
Chapter 8
Securing Management Traffic
CISCO CCNA SECURITY EXAM OBJECTIVES COVERED IN THIS CHAPTER:
 2.1 Secure management
- Compare in-band and out-of-band
- Configure secure network management
- Configure and verify secure access through SNMP v3 using an ACL
- Configure and verify security for NTP
- Use SCP for file transfer
 Controlling access to the management interface of a router or switch is critical to ensuring that there is no unauthorized access that can introduce malicious changes to the configuration of the device. Moreover, when network management and time synchronization protocols such as SMTP and NTP are in use, access to this information must be secured. Finally, as a technician, you should use secure protocols when performing file transfers. This chapter will cover all of these secure management topics.
In this chapter, you will learn the following:
- Comparing in-band and out-of-band
- Configuring secure network management
- Configuring and verifying secure access through SNMP v3 using an ACL
- Configuring and verifying security for NTP
- Using SCP for file transfer
In-Band and Out-of-Band Management
Many options are available to connect to a Cisco device for managing the device. Methods can be classified as either in-band or out-of-band. An in-band connection is one that uses the network as its transmission medium. In-band connection types include SNMP, virtual terminal (VTY), and HTTPS connections. Out-of-band connections include the console port and the AUX port, both physical connections that do not use the network as the transmission medium. It is good practice to have both in-band and out-of-band methods available for redundancy.
AUX Port
The AUX port comprises a direct serial connection to the device and is considered an out-of-band method of managing the device. One option is to connect a modem to the AUX port and dial into the modem when access to the CLI is required and when network access is not available. To set up the AUX port for this and to also set a password for the AUX port, you need to know the line number used by the AUX port. This can be determined with the show line command, as shown here:
R1#show lineTty Typ Tx/Rx A Modem Roty AccO AccI Uses Noise Overruns Int* 0 CTY - - - - - 0 0 0/0 -65 AUX 9600/9600 - - - - - 0 1 0/0 -66 VTY - - - - - 0 0 0/0 -67 VTY - - - - - 0 0 0/0 -
In the previous output, the AUX port is using line 65, which you will need to reference in the following set of commands, which set the AUX port to use a modem with a speed of 1115200. The commands also set the flow control to hardware and set the password to cisco. Don’t forget the login command, which is the command that specifies asking for a password at connection time!
R1# conf tR1(config)# line 65R1(config-line)#modem inoutR1(config-line)#speed 115200R1(config-line)#transport input allR1(config-line)#flowcontrol hardwareR1(config-line)#loginR1(config-line)#password ciscoR1(config-line)#end
VTY Ports
The virtual terminal (VTY) ports are considered an in-band method as these connections use the network as the transmission medium. These ports can use several protocols, among them Telnet and SSH. While you will learn later in the chapter to configure the secure alternative to clear-text Telnet, here I will cover securing the lines with passwords and adding physical redundancy to the connections by setting a loopback address. When a loopback address is configured and used as the management IP address, any physical interface on the device can accept the connection attempt if the loopback address is included in dynamic routing advertisements or advertised via a static route. When management access is tied to a physical IP address, the device will be unreachable when that physical interface is down.
To configure a loopback address for management, use the following command:
R1(config)# int loopback0R1(config-if)#ip address 192.168.5.5 255.255.255.0R1(config-if)#no shut
To include the IP address in EIGRP or OSPF routing advertisements, use the following commands. This will ensure that you can reach this address from a remote network.
R1(config)#router eigrp 10R1(config-rtr)#network 192.168.5.0 0.255.255.255R1(config)#router ospf 1R1(config-rtr)#network 192.168.5.0 0.255.255.255
Before setting a password on the VTY lines, you should determine how many of these lines exist on the device (which varies) so that you secure them all. Use this command to learn the number of VTY lines:
R1(config)#line vty ?R1(c0nfig)#line vty <0 15>
Now you know there are 16 lines on this device, so refer to 16 lines when you execute any command designed to apply to all VTY lines. To set a password on the VTY lines, use the following set of commands:
R1(config)#line vty 0 15R1(config-line)#password ciscoR1(config-line)#login
HTTPS Connection
Many Cisco devices offer the option of managing the device from a GUI interface. This would be considered an in-band connection as it uses the network. While the initial configuration must be completed at the CLI, once an interface has been assigned an IP address and is functional and the HTTP or HTTPS server has been enabled, these devices can be managed using this interface. While the HTTP server is certainly functional, when managing the device, you should always use a secure connection as provided with HTTPS.
Later in this chapter, you will learn how to configure HTTPS.
SNMP
Another option for configuration management is SNMP. As with other methods that use the network as a transmission medium, it is also considered an in-band method. SMTP stores the settings in a MIB. This is a repository with a hierarchical structure with standardized locations for each piece of configuration or status information. These locations and their associated data are called OIDs. The OID number describes the path through the tree-like structure where the specific piece of information is located. Figure 8.1 shows a portion of the MIB. An example of an OID would be 1.3.6.1.2.1.1.5 (system name), which would be one of the subsections of sysDescr (1.3.6.2.1.1).

FIGURE 8.1 Partial MIB
Notice also that there is a private branch in the tree where vendors can include settings and status information that might be unique to their products. Therefore, the path to Cisco-specific data is 1.3.6.1.4.1.9. Access to information stored by an individual device is done using get or set commands, while referencing the OID. get commands retrieve information, while set commands make configuration changes to IODs that can be changed. SNMP also allows for the creation of traps on devices, which can trigger a message to the management station when a threshold is met or an event occurs. In SMTP version 2, these trap messages are called informs.
SNMP has undergone three version changes over the years. Versions 1 and 2 used the knowledge of a community string as the access control mechanism to the MIBs of the devices. As this is quite a flimsy security system, version 3 adopted a user-based security model that provides for authentication, integrity hashing, and encryption of transmissions. These functions can be configured using three modes that represent various combinations of these capabilities.
- noAuthNoPriv: No hashing to secure authentication or encryption of data (referenced as noauth in the command)
- AuthNoPriv: Hashing to secure authentication but no encryption of data (referenced as auth in the command)
- AuthPriv: Hashing to secure authentication and encryption of data (referenced as priv in the command)
Later in this chapter, you will learn how to configure SNMPv3.
Console Port
The console port also comprises a serial connection that is considered an out-of-band connection. Access control can be applied to this interface by using the line console 0 command. For example, here I have applied a password in this single line and by using the login command have specified that the password is required:
R83(config)line console 0R83(config-line)#password ciscoR83(config-line)#login
Securing Network Management
Regardless of the interface with which you manage a Cisco device, you should ensure that the method used is secure. In this section, you’ll look at securing VTY ports and HTTP connections and using ACLs as a further line of defense in protecting these critical management interfaces. Finally, I’ll discuss banner messages and the role they can play in securing management interfaces.
SSH
When accessing a device using the VTY ports, you should always configure and use SSH rather than Telnet for the connection. For more information on configuring SSH, see Chapter 4.
HTTPS
To disable the HTTP server and enable the HTTPS server, execute the following commands:
R81(config)#no ip http serverR81(config)#ip https secure-serverR81(config)#copy run start
Once these commands are executed, the device will generate an RSA key and will use the key to encrypt all transmissions.
ACLs
An additional layer of security that can be applied to any management interface is the application of ACLs. After the ACL has been created, it can be applied to the VTY, HTTPS, and SNMPv3 processes. For example, consider the following access list that allows access only to and from hosts in the 192.168.5.0/24 network (presumably one that contains only management stations).
R84(config)#access-list 99 permit 192.168.5.0 0.0.0.255
This ACL can be applied to each of these management interfaces as follows:
- SSH
R84(config)#line vty 0 15R84(config-line)#access-class 99 in - HTTPS
R84(config)#ip http access-class 99
SNMPv3
To apply ACL 99 at the group level, use this command, which refers to the group test-group using the priv security policy with write access to a view called write-view:
R84(config)#snmp-server group test-group v3 priv write write-view access 99
To apply ACL 99 at the user level, use the following command, which refers to a user named nms-user who is a member of the group nms-group using the auth security policy. This policy uses SHA hashing for authentication with a shared secret of auth-pass. It uses 128-bit AES for encryption using a shared secret of priv-pass. The 99 at the end of the command is the reference to controlling access with ACL 99.
R84(config)#snmp-server user nms-user nms-group v3 auth sha auth-pass priv aes 128 priv-pass 99
Banner Messages
While banner messages will never prevent unauthorized access to a device, they should be implemented to provide legal notice to unauthorized individuals that they are breaking the law when attempting to achieve unauthorized access. While the specific wording required for this varies from jurisdiction to jurisdiction, there are some general guidelines regarding this wording.
- Use of words such as Welcome may be used later as a defense that access was encouraged.
- If you plan to use AAA accounting records in any subsequent legal proceeding, you must inform intruders they are being audited.
- You should always state the owner of the system so there will be no later defense that the intruder was unaware of the system owner.
- To prevent any future defense that permission was implied, always state “authorized access only.”
There are three types of banner message, and they differ in when they are displayed. Let’s look at configuring each type and discuss when they will appear. The messages used do not constitute any recommendations as to wording.
Message of the Day (MOTD)
A message of the day (MOTD) appears at connection time and before the login banner (if configured). They may be used to communicate scheduled maintenance windows or other general information. To create a message that says “We will be down for 2 hours at 12 p.m.,” use the following command. The message can be surrounded with any character (in this case ') as long as that character does not appear in the message.
R85(config)#banner motd 'Enter text message , End with character '''We will be down for 2 hours at 12 PM.'
EXEC Banner
This banner appears after successful authentication but before the first command prompt appears. To configure the EXEC banner to say “This is your last chance to leave if you are unauthorized,” use this command:
R85(config)#banner exec 'Enter text message, End with character '''This is your last chance to leave if you are unauthorized.'
Login Banner
This banner appears after the MOTD banner (if configured), before the login prompt, and before the EXEC banner (if configured). To configure the login banner to say “This is your first chance to leave if you are unauthorized,” use this command:
R85(config)#banner login 'Enter text message, End with character '''This is your first chance to leave if you are unauthorized.'
Verification
To check your work, let’s connect from R86 using Telnet and see what you get:
R86#telnet 10.10.10.10Trying 10.10.10.10 ... OpenWe will be down for 2 hours at 12 PMThis is your first chance to leave if you are unauthorizedUsername:AdminPassword: <hidden>This is your last chance to leave if you are unauthorized
As you can see, you received the messages as configured in the order you expected.
Securing Access through SNMP v3
Configuring SNMP requires you to set an engine ID for any device used to manage SNMP. This is an ID number composed of 24 hex characters. When inform messages are sent to stations, it is the engine ID that identifies the station. It is entered as a 12-character string. Setting the SNMPv3 engine ID for the management station on a router is done as follows:
R82(config)#snmp-server engineID local 000010000203
Once the engine ID has been defined, the high-level steps to control access to SNMP are as follows:
- Define an SNMP group and specify the cryptographic policy to be used by the group. In this same command, you can assign an MIB view.
- Define SNMP users and assign them a user group, a view, an authentication hashing algorithm and shared secret, and when used an encryption algorithm.
- Define SNMP views, each of which will control the information that can be accessed by users who have been assigned the view.
- Define the SNMP host that will be the recipient of traps. You will also specify in the same command the user account (and the algorithms and keys associated with that account) under whose security context the traps will be sent.
First let’s define an SMTP group named snmp-group, specify version 3, and set it to use the priv security policy and to have read-only access to the view named read-view (to be created in a later step).
R82(config)#snmp-server group snmp-group v3 priv read read-view
Next let’s define an SNMP user named read-user, assign the user to the group snmp-group, set the version as version 3, configure SHA as the authentication algorithm using a shared key of troy-key, and configure 128-bit AES as the encryption algorithm using mac-key as the shared key for AES.
R82(config)#snmp-server user read-user snmp-group v3 auth sha troy-key priv aes 128 mac-key
Now let’s define the view that you referenced in the command creating the group. The view will only allow read access to the OID 1.3.6.1.2.1 and below.
R82(config)#snmp-server view read-view 1.3.6.1.2.1 included
Finally, let’s set the IP address of the management station to which any traps should be sent along with the version number, a cryptographic policy of auth, and a user account named test-user under whose security context the traps will be sent. This is an account you did not create in this example.
R82(config)#snmp-server host 10.10.10.10 version 3 priv test-user
Securing NTP
Synchronization of time among infrastructure devices has become more and more critical to the proper operation of networks. Digital certificates have explicit validity periods, certain Windows operations require strict time synchronization, and analysis of integrated log files becomes a nightmare when the devices from which the log files come have not been synchronized. Moreover, some compliance standards call for strict time synchronization.
While the need to use NTP is without question, network attacks leveraging NTP have appeared that now require you to secure the operation of NTP to prevent such attacks. These attacks can be prevented by configuring NTP authentication. This involves setting a shared secret between the NTP clients and the NTP server that will be used to compute a hash value of the update sent to the client. The client will perform a hash calculation of the update using the same shared key and will compare the results. A match serves as assurance that the update came from the legitimate NTP server. It is important to note that this does not encrypt the update; it only verifies its origin and trustworthiness. Figure 8.2 shows the process.
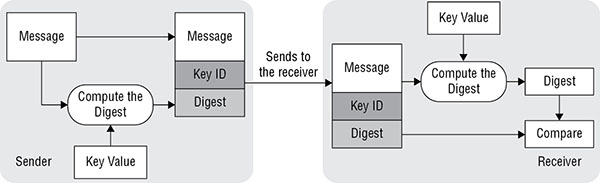
FIGURE 8.2 NTP authentication process
To configure NTP authentication, the high-level steps (to be performed on both server and client) are as follows:
- Configure an NTP authentication key number and MD5 string (shared secret).
- Specify at least one trusted key number referencing the key number in step 1.
- Enable NTP authentication.
For the first step, let’s configure an NTP key numbered 87 with an associated MD5 string (the shared secret) of mykey on two routers.
R88(config)#ntp authentication-key 87 md5 mykeyR89(config)#ntp authentication-key 87 md5 mykey
Now let’s specify the use of key number 87 and its associated MD5 string to be used for NTP authentication.
R88(config)#ntp trusted-key 87R89(config)#ntp trusted-key 87
Finally, all you need do is enable NTP authentication.
R88(config)#ntp authenticateR89(config)#ntp authenticate
Using SCP for File Transfer
While FTP and TFTP can be used to transfer configurations and IOS images across the network, these protocols lack the ability to encrypt the transmission. A better alternative is Secure Copy Protocol (SCP). This is an implementation of the Remote Copy Protocol (RCP) that operates over an SSH connection. The server that is used to store images and configurations must be configured as an SCP server with a key that can be validated by the Cisco devices. That setup is beyond the scope of this book; however, we will cover the commands to be used on the Cisco devices to perform an SCP transfer.
With the server setup in place, you simply reference the SCP server by URL in the copy command. For example, if the server were named scp-srv and you wanted to copy the running configuration to it under the security context of an account named Admin with a password of mypass, while naming the file R88-config.txt, you would use the following command:
R88#copy run scp://scp-srv/admin:mypass/r88-config.txt
To restore that file to the startup configuration, you would use the following command:
R88#copy scp://scp-srv/admin:mypass/r88-config.txt start
Summary
In this chapter, you learned about the security differences in managing devices from in-band and out-of-band interfaces. You also learned that in-band interfaces include HTTP, VTY, and the physical interfaces on the device and that out-of-band interfaces include the console and AUX ports. The chapter also discussed methods of securing management interfaces including enabling the HTTPS server, securing SNMP v3 with a security policy, applying passwords to all management interfaces, and using SSH for remote management. Among the other topics covered in this chapter were the types of banner message that can be configured and the securing of the NTP protocol.
Exam Essentials
Identify in-band and out-of-band interfaces. In-band interfaces include HTTP, VTY, and the physical interfaces on the device. Out-of-band interfaces include the console and AUX ports.
Describe methods to secure management interfaces. These include disabling the HTTP server and enabling the HTTPS server, securing SNMP v3 with a security policy, applying passwords to all management interfaces, and using SSH for remote management rather than Telnet. It also includes applying ACLs to all management interfaces.
Identify the types of banner messages and their use. These include the message of the day banner, which appears when a connection is made, and login banners, which appear after authentication, after the MOTD and EXEC banners that appear.
List the three security policies that can be applied to SNMPv3. These include AuthNoPriv, which is no hashing to secure authentication or encryption of data; AuthNoPriv, which is hashing to secure authentication but no encryption of data; and AuthPriv, which is hashing to secure authentication and encryption of data.
Describe the steps to configure NTP authentication. These steps are configuring an NTP authentication key number and MD5 string (shared secret), specifying at least one trusted key number referencing the key number in the first step, and enabling NTP authentication.
Review Questions
-
Which of the following is an out-of-band connection?
- HTTP
- Con0
- Gi0/1
- VTY
-
What information is required to set up a modem on the AUX port?
- Line number
- AUX password
- Transmission rate
- Modem model
-
Which of the following is a valid reason for configuring a loopback interface as the management interface?
- It is more secure.
- It provides better performance.
- It is always up.
- It is preconfigured.
-
What command enables you to identify the total number of VTY ports in the device?
- R1(config)#line ?
- R1(config)#line vty ?
- R1#line ?
- R1#line vty ?
-
How are the locations of information contained in SNMP identified?
- MIB
- OID
- Informs
- Traps
-
Which SNMP security policy provides hashing to secure authentication but no encryption of data?
- noAuthNoPriv
- AuthNoPriv
- AuthPriv
- Priv
-
Which interfaces should be protected by passwords?
- VTY
- Console
- HTPS
- All of the above
-
Which of the following commands enables encryption of HTTP transfers?
- R81(config)#ip https secure
- R81(config)#ip https server
- R81(config)#ip https secure-server
- R81(config-line)#ip https secure-server
-
Which command applies ACL 99 at the group level, while referring to the group test-group using the priv security policy with write access to a view called write-view?
- R84#snmp-server group test-group v3 priv write write-view access 99
- R84(config)#snmp-server test-group v3 priv write write-view access 99
- R84(config)#snmp-server group test-group v3 priv write-view access 99
- R84(config)#snmp-server group test-group v3 priv write write-view access 99
-
Which of the following is not a recommendation for banner message wording?
- Use of words such as Welcome should be encouraged.
- If you plan to use AAA accounting records in any subsequent legal proceeding, you must inform intruders they are being audited.
- You should always state the owner of the system so there will be no later defense that the intruder was unaware of the system owner.
- To prevent any future defense that permission was implied, always state “authorized access only.”
-
Which of the following is not a banner type?
- MOTD
- EXEC
- Login
- Maintenance
-
Which of the following banner messages appears at connection time?
- MOTD
- EXEC
- Login
- Maintenance
-
When SNMP inform messages are sent to stations, what value identifies the station?
- Process ID
- MAC address
- Engine ID
- Router ID
-
Which of the following steps in configuring SNMP v3 security is optional?
- Define an SNMP group
- Assign an MIB view
- Specify the cryptographic policy to be used by the group
- Define SNMP users and assign them a user group
-
What statement is false with regard to the following command?
R82(config)#snmp-server view read-view 1.3.6.1.2.1 included
- The view is name read-view.
- read-view is the group name.
- 1.3.6.1.2.1 is the OID.
- This command defines a view.
-
How is MD5 used in NTP authentication?
- Encrypts the data
- Hashes the update
- Hashes the password
- Encrypts the shared secret
-
Which step is not part of configuring NTP authentication?
- Configure an NTP authentication key number and MD5 string
- Specify at least one trusted key number referencing the key number
- Encrypt the key number
- Enable NTP authentication
-
Which of the following should be used as a secure alternative to TFTP or FTP?
- SCP
- RTP
- VTP
- STP
-
When using SCP to copy files to an SCP server, how do you reference the SCP server in the copy command?
- MAC address
- IP address
- URL
- Port number
-
In what repository is SNMP data contained?
- OID
- MIB
- Registry
- Hardware register