
Chapter 6. Meet your new project: The Blend
This chapter covers
- Previewing the functionality of The Blend
- Establishing a technical design based on business requirements
- Setting up your development environment
- Configuring the InMemory server with custom content types
- Adding login/logout to The Blend and connecting to the repository
This chapter introduces you to the project you’re going to tackle using CMIS and Apache Chemistry. The project is a collaborative music- and art-sharing application called The Blend. By the end of the chapter, you’ll understand the business requirements and the technical design of the application. You also will have set up your development environment and configured the OpenCMIS InMemory Repository to be ready to store the content for the application. Finally, you’ll take the first steps toward coding the application by creating a new web application project and writing the code necessary to log in, connect to the repository, and log out.
6.1. Understanding the business requirements and technical approach
Before we start knocking out code, let’s take a minute to talk about some of the application’s requirements and discuss a high-level approach to the project.
6.1.1. Business requirements
The Blend is a web application that artists can use to collaborate with others and to organize their work. The idea is for different types of artists—musicians, graphic designers, and sound engineers—to upload, share, and remix their work. Rather than doing this using email or simple cloud file-sharing applications, The Blend is a purpose-built, content-centric application aimed specifically at fulfilling the needs of these types of artists. Specifically, users of The Blend need to be able to do the following:
- Upload audio, lyrics, artwork (such as album covers), and videos.
- Group one or more songs into an album of orderable tracks.
- Tag songs, artwork, albums, and videos.
- Create new versions of audio or video files and keep track of version history. (This is particularly important for these artists, who create lots of derivative works as they riff on each other’s ideas.)
- Associate artwork (such as an album cover) with an album or an individual song.
- Search the entire repository for tags or keywords that appear within lyrics, song titles, album names, and so on.
- Organize any of these creative assets in a folder structure that makes sense to end users. This includes the ability not only to create an arbitrary folder structure, but also to move assets between folders and rename assets.
- Play audio and video files within the web page without requiring the intermediate step of downloading the file first.
In addition, it’d be nice if the system could take advantage of some existing libraries that know how to extract metadata from audio and video files as they’re uploaded so end users don’t have to rekey metadata that’s already contained in existing files.
It’s also important to get something done quickly and to implement a solution that’s as portable and open as possible.
That’s it for the requirements. Don’t you wish all of your projects were this straightforward? Now that you know what you’re about to build from a functional perspective, let’s talk about the technical approach.
6.1.2. Establishing the technical design
You don’t need to go overboard to design this application, but it does make sense to discuss an approach or an overall technical design. At a high level, the application architecture looks like figure 6.1.
Figure 6.1. High-level architecture of The Blend

To cover all the bases, we’ll need to talk about the repository, the web application framework, security, the organization of the data, and the data model.
The repository
To the surprise of no one reading this book, the technical team decides that the repository that will hold The Blend’s data needs to be CMIS-compliant for all of the reasons we discussed in part 1. Because you’ve already got it set up, you’ll use the OpenCMIS InMemory Repository as the CMIS repository for this project, but you could as easily use Alfresco, FileNet, SAP, or any other CMIS-compliant server as the backend for The Blend.
The web application framework
You can’t throw a stick without hitting a web application framework these days. They’re as ubiquitous as dry cleaning and frozen yogurt shops are in my little part of the world—there’s one on every corner. Even if you decide to narrow your scope to Java-based web application frameworks, you’ll still be faced with hundreds to choose from.
For this simple application, most any framework would be fine—Grails, Spring MVC, or anything. And as much as we’d like to pick something trendy and new, we decided that it would be best to keep things as simple as possible and go with an approach that won’t distract you from the task at hand—learning how to write CMIS applications. We chose to use no framework at all and to write the application using good old Java servlets and JSPs. If you’re old enough to remember writing apps with servlets, we’ll give you a second to reminisce. If you’re not, well, you’re about to kick it old school.
Using this approach, every page in the application will have a corresponding servlet that uses OpenCMIS to talk to the CMIS repository, and each servlet will have a corresponding JSP page that’s used to show the CMIS repository data to the end user. This one-to-one mapping between servlets and JSP pages is shown in figure 6.2.
Figure 6.2. Every page in the application will have one servlet and one JSP.
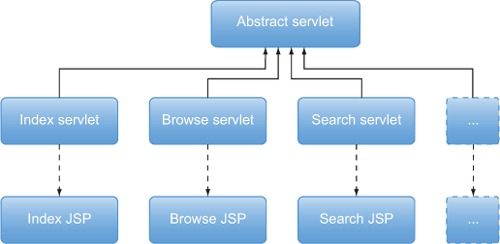
Bear in mind that you’re likely to have additional Java classes that aren’t servlets. And the application will include additional resources that aren’t JSPs, such as images, style sheets, and JavaScript files.
Security
It’s always a good idea to talk about security up front. You’ll notice that the business requirements were silent on this subject, and that’s primarily because this application is about sharing, remixing, and reusing these creative assets freely. This means the application doesn’t require much in the way of security.
Depending on the capabilities of your repository, you could have certain users or groups who could modify certain object types (like Graphic Designers can modify Album Covers but not Songs). But for our purposes, we’ll assume that users who can log in to the application have full rights to everything stored in the repository.
The Blend will have a login page, and it will use the CMIS repository to validate the user’s credentials. All pages except the login page will require a session to be established.
Data organization
In many content-centric applications, the physical organization of the data is critically important, either because the organization of the data helps the humans who have to work with it, or because the organization has semantic meaning to the system that’s working with it, or both. For example, if you were building a system to manage expense reports, you might choose to model the expense report as a folder and the receipts as images stored in that folder. Both the human using the application and the system get some efficiency in being able to assume that anything they find in that expense report folder will be an expense receipt image.
In some repositories, the security requirements may also drive folder structure. It may be optimal, for example, to store everything with similar security settings in a common root folder in cases where access control lists are inherited from parent to child. Grouping objects with similar security profiles makes it easy to manage security settings in fewer places.
In The Blend, the songs, videos, lyrics, and other assets will be typed. We’ll talk about the types in the next section, but for now that means that the system doesn’t need a specific folder structure to know what an object is—it can look at the object’s type.
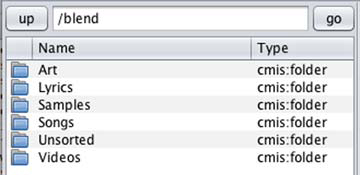
The Blend’s folder structure will be purely for the convenience of its human users. The exception to this is the application’s root folder. The Blend application will let users browse the folder structure, but it’s not safe to assume that the repository is used solely for The Blend. What’s more likely is that one folder in the repository will be designated as the application’s root folder. In our setup, we’ll use /blend as the application’s root folder.
The default folder structure is shown in figure 6.3.
Figure 6.3. Default folder structure for The Blend
Data model
As mentioned in the previous section, every object The Blend works with will be of a type specific to this application. The first step is to identify the types that are needed. Next, the types need to be organized in a type hierarchy. Then properties can be added to each type. The result is the data or content model.
Identifying types
One way to identify types is to look back at the requirements and look for words that describe the kind of content being managed. If you do that now, you’ll likely come up with a list that includes audio, video, lyrics, artwork, album covers, albums, and songs.
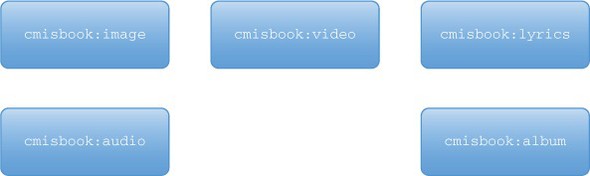
A song is a specific type of audio. But there’s nothing special you need to do to a song compared to a piece of audio, so there’s no need to have two different types. Let’s start with a type called audio, and later it can be specialized to song if needed.
Similarly, an album cover is a specific kind of artwork, and a more general form of artwork is an image. That gives us the types shown in figure 6.4.
Figure 6.4. Types of content users will work with in The Blend
Organizing the types into a hierarchy
The types we’ll work with have been identified, but they need to be organized into a hierarchy. That’s because some of these types may have characteristics in common, so it’s helpful to group them under a common ancestor. For example, audio, video, and album are all types of media. The application might want to display a media player that can deal with any of these types, so it makes sense to group those.
Now consider the tagging requirement. You have a lot of ways to implement this. The easiest way is to create a “taggable” type that has a multivalue property that keeps track of tags, and then have the types that need to support tags inherit from the taggable type.
All of these types ultimately have a file associated with them, so they all share cmis:document as a common ancestor.
When you prepend the type names with the cmisbook namespace and organize them as discussed, you get the content type hierarchy shown in figure 6.5.
Figure 6.5. The basic content type hierarchy for The Blend

Identifying each type’s properties
The content types are identified and are organized in a hierarchy. The last thing you need in order to create the complete content model is to know the properties defined for each type. The tables that follow (tables 6.1 through 6.8) show the properties that will be defined for each type.
Table 6.1. Properties of cmis:taggable
|
ID |
Type |
Multivalue? |
|---|---|---|
| cmisbook:tags | String | Yes |
The cmis:taggable type (table 6.1) needs a single property to keep track of the tags assigned to an object. Any other type that needs to have tags associated can inherit from this type.
The cmisbook:image type (table 6.2) contains properties typical of digital images, and many of these properties are part of a standard called EXIF. Most digital cameras will set some or all of these properties when they capture the images.
Table 6.2. Subset of properties of cmisbook:image
|
Type |
Multivalue? |
|
|---|---|---|
| cmisbook:imageWidth | Integer | No |
| cmisbook:imageHeight | Integer | No |
| cmisbook:bitsPerSample | Integer | No |
| cmisbook:compression | Integer | No |
| cmisbook:photometricInterpretation | Integer | No |
| cmisbook:imageDescription | String | No |
| cmisbook:make | String | No |
| cmisbook:model | String | No |
| cmisbook:orientation | Integer | No |
| cmisbook:xResolution | Decimal | No |
| cmisbook:yResolution | Decimal | No |
| cmisbook:resolutionUnit | Integer | No |
The cmisbook:media type (table 6.3) contains properties common to media such as audio, video, and albums.
Table 6.3. Properties of cmisbook:media
|
ID |
Type |
Multivalue? |
|---|---|---|
| cmisbook:sourceURL | URI | No |
| cmisbook:license | String | No |
| cmisbook:year | Integer | No |
| cmisbook:artwork | ID | No |
Table 6.4. Subset of properties of cmisbook:audio
|
ID |
Type |
Multivalue? |
|---|---|---|
| cmisbook:artist | String | No |
| cmisbook:album | String | No |
| cmisbook:title | String | No |
| cmisbook:comment | String | No |
| cmisbook:genre | String | No |
| cmisbook:length | Integer | No |
| cmisbook:track | Integer | No |
| cmisbook:composer | String | No |
| cmisbook:discNo | String | No |
| cmisbook:audioFormat | String | No |
| cmisbook:sampleRate | Integer | No |
Table 6.5. Properties of cmisbook:video
|
Type |
Multivalue? |
|
|---|---|---|
| cmisbook:videoHeight | Integer | No |
| cmisbook:videoWidth | Integer | No |
| cmisbook:hasVideo | Boolean | No |
| cmisbook:hasAudio | Boolean | No |
| cmisbook:datasize | Integer | No |
| cmisbook:audiosize | Integer | No |
| cmisbook:videoDuration | Decimal | No |
| cmisbook:videoFramerate | Decimal | No |
An album is a collection of songs ordered into tracks, so the cmisbook:album type (table 6.6) needs a single multivalued property that contains the IDs of songs that make up the album.
Table 6.6. Properties of cmisbook:album
|
ID |
Type |
Multivalue? |
|---|---|---|
| cmisbook:tracks | ID | Yes |
Table 6.7. Properties of cmisbook:text
|
ID |
Type |
Multivalue? |
|---|---|---|
| cmisbook:author | String | No |
Lyrics are blocks of text with a song title, so the cmisbook:lyrics type (table 6.8) needs only a song title property.
Table 6.8. Properties of cmisbook:lyrics
|
Type |
Multivalue? |
|
|---|---|---|
| cmisbook:songtitle | String | No |
Now you’ve got everything you need to define a content model. This wraps up the high-level approach. In the next section, you’ll see what the finished application looks like. In the real world, this would be a set of mockups or a prototype. After that you’ll have a better idea of what it is you’re building, and you’ll be ready to prepare your development environment so you can start to implement The Blend step by step with your own code.
6.2. Walking through the finished product
We hate to spoil the surprise, but we thought it might be helpful for you to see the finished product before you build it. So here, as they say, is the nickel tour.
Before starting the tour, you have a choice. You can either read through the tour of the finished product in this section and then move on to the next section, which shows you how to get the application running on your machine, or you can get the application running on your machine first, and then follow along click by click as we walk through the application. To get the application running first, jump ahead to section 6.3, and then come back.
When you first go to the application’s home page, you’ll see the page shown in figure 6.6.
Figure 6.6. Click the link to load sample data into the OpenCMIS InMemory Repository.

The application ships with some demo data that needs to be loaded into the repository before you use it. To load the demo data into the OpenCMIS InMemory Repository, follow these steps:
1. Click the Here link to load sample data into the OpenCMIS InMemory Repository.
2. Specify a username and password. Anything will do. How about admin and admin? Then, click Install. The application will load some sample data into the InMemory server and will tell you when it’s done.
Repeat the setup after every restart
Because the InMemory server stores everything in memory, any time you shut down the OpenCMIS InMemory Repository, you’ll have to repeat this process.
Now that the InMemory server has some sample data, you can click around the application and see what it can do. That will give you a good idea of the functionality you’ll be building in the rest of part 2 of this book.
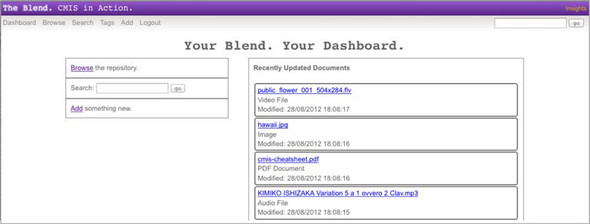
Navigate back to the application’s home page, http://localhost:8080/the-blend, to log in. Again, you can use admin and admin. After logging in, you’ll see The Blend’s dashboard, as shown in figure 6.7.
Figure 6.7. The Blend’s dashboard
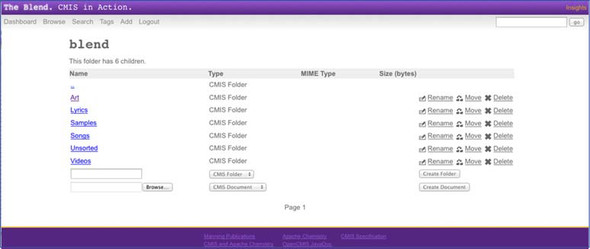
Clicking Browse shows the children of the Blend root directory (see figure 6.8).
Figure 6.8. Viewing the children of the Blend root directory
If you navigate to the Videos folder, you’ll see a list of sample videos. You’ll notice that the file named public_flower_001_504x284.flv has two tags associated with it: “video” and “flower” (see figure 6.9).
Figure 6.9. The Blend supports tags on certain content types.

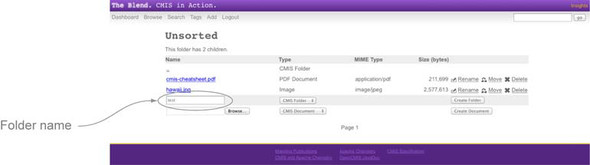
The Blend supports creating new objects. In figure 6.10, you’ve navigated to the Unsorted folder. You can create a new folder by specifying a folder name in the empty folder name field and then clicking Create Folder.
Figure 6.10. The Blend allows users to create new folders easily.
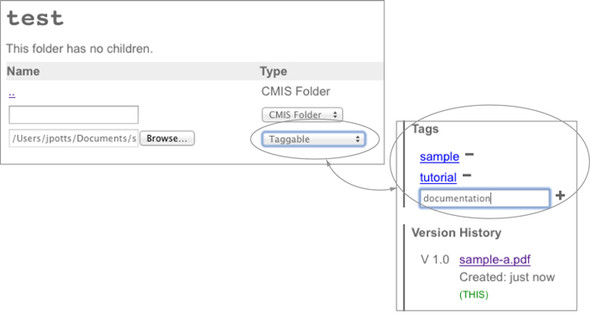
Suppose you want to create a new document in the test folder created in figure 6.10. You can navigate into the folder, browse for a test document to upload, select Taggable from the dropdown list, and then click Create Document (see figure 6.11). By specifying Taggable as the content type, you allow the document to have multiple tags associated with it.
Figure 6.11. It’s easy to upload files into The Blend. Once a document is created, you can add tags by specifying the tag and clicking the plus icon.
Searching is also easy. Just click the Search link. In figure 6.12, we typed the name of the sample document uploaded earlier, and it shows up in the search results list.
Figure 6.12. The Blend allows users to search the repository for content.

You can also search for documents by tag. If you click the Tags link, then type the name of one of the tags added to the test document, and then click Search (as figure 6.13 shows), the document shows up in the search results.
Figure 6.13. The Blend allows users to search the repository for documents with a particular tag.

An alternative to adding a document from within a folder is to add it by clicking Add in the main navigation, and then specifying the path where the document should be created and browsing for the file on your desktop to upload to that path.
The Blend features an embedded audio player. You can see this by navigating to the Songs folder and clicking on one of the songs in the list, as shown in figure 6.14.
Figure 6.14. The detail page features an embedded media player, which can play songs that reside in the repository.

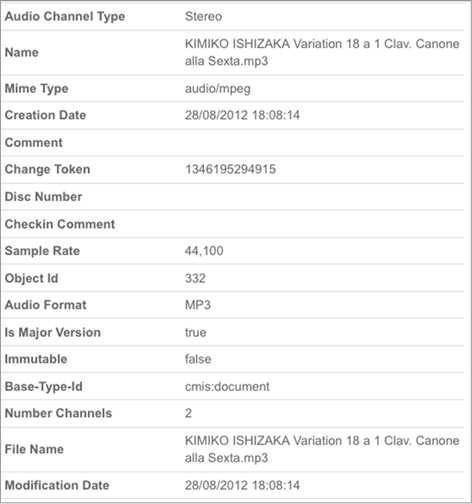
Notice that the song’s detail page includes an embedded player, as shown in figure 6.14. If you scroll down (figure 6.15), you’ll see that the song object’s properties have been populated with metadata taken from the song file. This happens automatically when a song is uploaded.
Figure 6.15. The Blend leverages an open source project called Apache Tika to extract metadata from certain file types and set that metadata as properties on the document.
Songs can have a piece of artwork associated with them, as figure 6.16 shows, but it’s a little clumsy in this demo app. You first have to navigate to the Art folder to pick out a nice piece of artwork, and then click on it to find its object ID. For example, the object ID for Sunset.jpg is 314 (yours may be different). Now you go back into the song’s detail page and click Change Artwork, paste the ID into the Artwork ID field, making sure Artwork Id is selected, and then click Update to save the change.
Figure 6.16. Songs can have artwork associated with them if you know the object ID for the image you want to set as the artwork.

You’ve now seen the finished product. It’s time to learn how it’s built. In the next section, you’ll set up your development environment so you can do that.
6.3. Setting up the development environment
If you’re going to follow along and build the application, which we definitely recommend, you’ll need to have a few things installed on your machine. First, review the prerequisites to make sure you have everything you need, and then go through the steps to build the project and run it from Eclipse. By the end of this section, you’ll have the finished product running so you can get a feel for what you’ll build in subsequent chapters.
Here’s what you’ll need to build The Blend on your own:
- Apache Maven 3.x or higher. If you need to install Apache Maven, go to http://maven.apache.org/.
- Eclipse IDE for Java EE Developers. You can use another IDE or no IDE at all, but these instructions and screenshots assume you’re running Eclipse. We used Eclipse Juno, but any fairly recent version should work fine.
- Apache Tomcat. Any servlet container will work, but our instructions will assume Apache Tomcat 6.x or 7.x. If you need to download and install Tomcat, go to http://tomcat.apache.org/.
- The code that accompanies this book. We’ll assume you’ve expanded it in a directory we’ll refer to as $CODE_HOME. The completed project resides in $CODE_HOME/the-blend.
- Optionally, you can bookmark the OpenCMIS Javadoc on the Apache Chemistry website, which resides at http://chemistry.apache.org/.
With those prerequisites in place, you’re ready to use Maven to build and “Eclipsify” the project. To do that, follow these steps:
1. On the command line, switch to $CODE_HOME/the-blend.
2. Tell Maven to clean, install, and Eclipsify the project. You can combine these three commands into a single command, like this:
mvn clean install eclipse:eclipse
The results will look something like figure 6.17.
Figure 6.17. Results of telling Maven to clean, install, and Eclipsify the project

3. Start Eclipse.
4. Specify a new workspace for this book. We’ll use workspace-cmis-book.
5. Close the Welcome page.
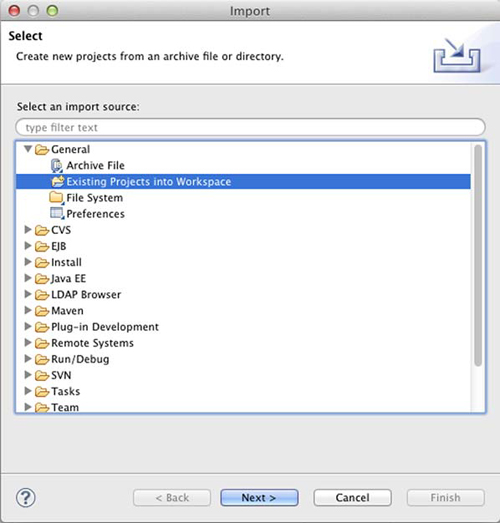
6. From the menu, select File > Import > General > Existing Projects into Workspace, and then click Next, as shown in figure 6.18.
Figure 6.18. Import the project into your Eclipse workspace.
8. Right-click on the project and select Run As > Run on Server, as shown in figure 6.19.
Figure 6.19. Run the project using Eclipse’s built-in Tomcat integration.

9. Manually configure a new server.
10. Specify Apache Tomcat and tell Eclipse where to find the Tomcat installation on your machine.
Don’t see Apache Tomcat?
Is Apache Tomcat missing from the list? One reason could be that you’re running Eclipse IDE for Java Developers instead of Eclipse for Java EE Developers. See the Eclipse site (www.eclipse.org) for more details.
Eclipse will start the web application and render the home page in the built-in browser, as shown in figure 6.20.
Figure 6.20. The Blend running in the browser built into Eclipse

At this point, you’ve got an Eclipse project set up with the finished product. You can make changes to the servlets and JSPs in the Eclipse project, and those changes will be reflected in the running application.
You may prefer to hit the web application with a “real” web browser instead of the one embedded in Eclipse. That’s not a problem. Open your preferred browser and navigate to http://localhost:8080/the-blend.
6.4. Configuring the InMemory server
The InMemory server that accompanies this book has already been configured with a content model for The Blend, but you might be curious how the content model is defined. If so, read on; otherwise, feel free to skip this section.
Type mutability in CMIS 1.1
In CMIS 1.0, the specification doesn’t provide for the creation of new type definitions. That’s left up to the underlying repository. This makes it a little tough on CMIS application developers and their customers, because it complicates the installation process. Developers have to provide repository-specific content models and installation instructions. In CMIS 1.1, this will change. The 1.1 version of the specification provides for type mutability, which means that the CMIS API can be used to create new types and modify existing types. With CMIS 1.1, applications ought to be able to inspect the repository and install the content model they require, regardless of the underlying repository.
When you run the InMemory server that accompanies this book, the server webapp gets expanded to $SERVER_HOME/cmis/webapps/inmemory. If you look in the WEBINF folder within that, you’ll see the webapp’s web.xml file. That file contains the following context parameter:
<context-param>
  <param-name>
    org.apache.chemistry.opencmis.REPOSITORY_CONFIG_FILE
  </param-name>
  <param-value>/inmemory-repository.properties</param-value>
</context-param>
This context parameter tells the InMemory server to use a file called inmemory-repository.properties for configuration. The InMemory server that accompanies this book is configured to run using several of its assets compressed into zip files. That inmemory-repository.properties file resides in $SERVER_HOME/inmemory-cmis-server-sources.zip. If you were to unzip the file and look inside, you’d see the following properties:
# InMemory Server Settings
InMemoryServer.RepositoryId=A1
InMemoryServer.TypeDefinitionsFile=inmemory-types.xml
InMemoryServer.MaxSize=20971520
The InMemoryServer.TypeDefinitionsFile setting tells the InMemory server that its type definitions reside in a file called inmemory-types.xml. That file also resides in the inmemory-cmis-server-sources.zip file, and if you were to browse it, you’d see that it contains several type definitions.
The type definitions should look familiar to you from the type definition discussion in chapter 4. Here’s one example of a type definition in inmemory-types.xml:
<cmisra:type xsi:type="cmisTypeDocumentDefinitionType">
  <id>cmisbook:taggable</id>
  <localName>Taggable</localName>
  <localNamespace>http://example.org/cmisbook</localNamespace>
  <parentId>cmis:document</parentId>
  <displayName>Taggable</displayName>
  <queryName>cmisbook:taggable</queryName>
  <description>Taggable document</description>
  <baseId>cmis:document</baseId>
  <creatable>true</creatable>
  <fileable>true</fileable>
  <queryable>true</queryable>
  <fulltextIndexed>true</fulltextIndexed>
  <includedInSupertypeQuery>true</includedInSupertypeQuery>
  <controllablePolicy>false</controllablePolicy>
  <controllableACL>true</controllableACL>
  <versionable>true</versionable>
  <contentStreamAllowed>allowed</contentStreamAllowed>
  <propertyStringDefinition>
    <id>cmisbook:tags</id>
    <localName>Tags</localName>
    <displayName>Tags</displayName>
    <queryName>cmisbook:tags</queryName>
    <description>Tags</description>
    <localNamespace>http://example.org/cmisbook</localNamespace>
    <propertyType>string</propertyType>
    <cardinality>multi</cardinality>
    <updatability>readwrite</updatability>
    <inherited>false</inherited>
    <required>false</required>
    <queryable>true</queryable>
    <orderable>false</orderable>
    <openChoice>false</openChoice>
  </propertyStringDefinition>
</cmisra:type>
The inmemory-types.xml file tells the InMemory server everything it needs to know about the types you need to support The Blend.
Every content repository defines its content model in a different way. If you want to run The Blend on top of a different CMIS repository, you should be able to translate this content model into one that your CMIS repository understands. A version of this content model that will work with Alfresco is provided with the code that accompanies this book.
6.5. Taking first steps with The Blend
Now that you understand the business requirements and the high-level technical approach, and you’ve seen the complete system in action, it’s time to begin your own development effort. By the end of this section, you’ll have your own start on The Blend, which you’ll build upon in subsequent chapters.
6.5.1. Setting up the Eclipse project
The first step is to create an Eclipse project. You’ll use Eclipse’s Dynamic Web Project wizard, and then you’ll configure Maven for the project. After this bit of yak shaving, the real work of coding can begin.
Create the project
The first step is to create a new project in Eclipse. To do that, follow these steps:
1. In Eclipse, select File > New > Other > Web > Dynamic Web Project, and then click Next.
2. Name the project something other than the-blend, such as my-blend, and then click Next.
3. Remove the src folder from the build path, click Add Folder to add src/main/java as the new source folder, and then click Next.
4. Leave the context root alone, but change the content directory to src/main/webapp, and then click Finish.
You should now have a project that looks roughly like figure 6.21.
Figure 6.21. The my-blend project structure after it’s first created

Configure Maven for the project
Configuring Maven for the project means you won’t have to go searching for the OpenCMIS JARs or any other dependencies. You’ll tell Maven what the project depends on, and Maven will take care of the rest. To do that, follow these steps:
1. Right-click the my-blend project and select Configure > Convert to Maven Project.
2. Specify com.manning for the Group Id, my-blend for the Artifact Id, and war for Packaging, and then click Finish.
3. Eclipse should automatically open the pom.xml file. If it doesn’t, edit it now. It should open in the Maven POM Editor.
4. Click the Dependencies tab, and then click Add. Specify org.apache.chemistry .opencmis for the Group Id, chemistry-opencmis-client-impl for the Artifact Id, and ${opencmis.version} for the Version. Then click OK.
5. Click Add again. This time specify javax.servlet as the Group Id, servletapi as the Artifact Id, 2.5 as the Version, and change the Scope to provided. Then click OK.
6. Two final dependencies need to be added. You won’t need them until chapter 8, but let’s add them now. Click Add. Specify commons-fileupload as the Group Id and as the Artifact Id. Specify 1.2.2 as the Version and compile as the Scope. Click OK. Click Add again. This time specify commons-io as the Group Id and as the Artifact Id, 2.2 as the Version, and compile as the Scope. Click OK again.
7. Go back to the Overview tab and expand the Properties section. Use the Create button to add the following properties and their values: project.build.sourceEncoding: UTF-8, maven.compile.source: 1.6, maven.compile.target: 1.6, opencmis.version: 0.9.0-beta-1.
8. Go to the pom.xml tab and add the following additional plugin:
<plugin>
<groupId>org.apache.maven.plugins</groupId>
<artifactId>maven-eclipse-plugin</artifactId>
<version>2.9</version>
<configuration>
<projectNameTemplate>the-blend-ch06</projectNameTemplate>
<wtpmanifest>true</wtpmanifest>
<wtpapplicationxml>true</wtpapplicationxml>
<wtpversion>2.0</wtpversion>
<manifest>
${basedir}/src/main/webapp/META-INF/MANIFEST.MF
</manifest>
<downloadSources>true</downloadSources>
<downloadJavadocs>true</downloadJavadocs>
<workspace>..</workspace>
</configuration>
</plugin>
9. Save the pom.xml file.
Now that you’ve configured Maven with the project’s dependencies, Eclipse shouldn’t have any problem finding the OpenCMIS JARs as you start to add code in the next section.
6.5.2. Creating a session factory
Nearly everything the application does is going to need an OpenCMIS session. Creating sessions is expensive—you should only do it once for each user and then store it on the user’s HTTP session for reuse. So let’s create a session factory that knows how to establish a session with the OpenCMIS repository. In the next section, you’ll see how to persist the OpenCMIS session to the HTTP session when you set up the servlets.
1. Right-click Java Resources and select New > Package. Specify com.manning .cmis.theblend.session, and click Finish.
2. Right-click the package you created and select New > Class. Specify OpenCMISSessionFactory as the class name.
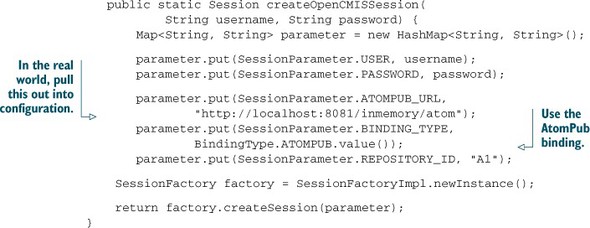
3. The class only needs a single static method called createOpenCmisSession that takes a username and a password and returns an instance of org.apache .chemistry.opencmis.client.api.Session, as you can see here:
You may have noticed that the ID of the repository is hardcoded with a value of "A1" and passed in via the SessionParameter.REPOSITORY_ID parameter. Servers have one or more repositories—here we’re making an assumption about the ID of the repository we want to use. This is also a good candidate for configuration.
4. Resolve the imports and save the class.
6.5.3. Creating the servlets
As discussed earlier in the chapter, each page of The Blend will be implemented with a servlet and a JSP. All of the servlets share some common functionality, and that functionality will be implemented in an abstract class that all servlets will extend. Let’s implement the abstract servlet and the servlet for the index page, as well as some utility classes on which those servlets will rely.
Implement the abstract servlet
The abstract servlet will make it easy for subsequent servlets to work with the CMIS repository by grabbing the OpenCMIS session from the HTTP session and handing it to the concrete servlet along with the request and response. To implement the abstract servlet, follow these steps:
1. Create a new package called com.manning.cmis.theblend.servlets.
2. In the package you created, create a new abstract class called AbstractTheBlendServlet that extends HttpServlet.
3. Add some constants:
public static final String JSP_DIRECTORY = "/WEB-INF/jsp/";
public static final String PAGE_INDEX = "";
public static final String ATTR_TITLE = "title";
private static final String HTTP_SESSION_SESSION = "session";
private static final long serialVersionUID = 1L;
4. Implement doGet, like this:

5. Set up an overloaded version of doGet that accepts an OpenCMIS session as an argument in addition to the request and response. Because the “normal” doGet calls this doGet, any servlets that need a session can implement this method:
protected void doGet(HttpServletRequest request,
HttpServletResponse response, Session session)
throws ServletException, IOException, TheBlendException {
}
6. As with doGet, you’ll need two doPost methods that follow this same pattern:
protected void doPost(HttpServletRequest request,
HttpServletResponse response)
throws ServletException, IOException {
// get OpenCMIS Session
Session session = getOpenCMISSession(request, response);
if (session == null) {
// no session -> forward to index (login) page
redirect("", request, response);
return;
}
try {
doPost(request, response, session);
} catch (TheBlendException tbe) {
error(tbe.getMessage(), tbe.getCause(), request, response);
} catch (Exception e) {
error(e.getMessage(), e, request, response);
}
}
protected void doPost(HttpServletRequest request,
HttpServletResponse response, Session session)
throws ServletException, IOException, TheBlendException {
}
7. The getOpenCMISSession method is going to look at the HTTP session and attempt to retrieve the OpenCMIS session from it. The setOpenCMISSession method sets the OpenCMIS session on the HTTP session. It will get called on a successful login, as follows:

8. Drop in a helper method for retrieving parameter values:
protected String getStringParameter(
HttpServletRequest request,
String name) {
return request.getParameter(name);
}
protected int getIntParameter(
HttpServletRequest request,
String name, int defValue) {
String value = getStringParameter(request, name);
if (value == null) {
return defValue;
}
try {
return Integer.parseInt(value);
} catch (NumberFormatException nfe) {
return defValue;
}
}
9. The final chunk of code is some helper methods for dispatching and redirecting to JSP pages and showing the error JSP page:
protected void dispatch(String jsp, String title,
HttpServletRequest request,
HttpServletResponse response)
throws ServletException, IOException {
request.setAttribute(ATTR_TITLE, title);
RequestDispatcher dispatcher = request
.getRequestDispatcher(JSP_DIRECTORY + jsp);
dispatcher.include(request, response);
}
protected void redirect(String url,
HttpServletRequest request,
HttpServletResponse response)
throws ServletException, IOException {
response.sendRedirect(url);
}
/**
* Forwards to an error message.
*
* @throws IOException
* @throws ServletException
*/
protected void error(String msg, Throwable t,
HttpServletRequest request,
HttpServletResponse response)
throws ServletException, IOException {
request.setAttribute("message", msg);
request.setAttribute("exception", t);
// show error page
dispatch("error.jsp", "Error.", request, response);
}
Now you have an abstract servlet that the rest of the servlets in the application can extend, reducing the code that has to be repeated in each servlet.
Implement the index servlet
Every page in The Blend will have a corresponding servlet, so let’s create one for the index page. It’ll display the login page. If the login is successful, we’ll display some information about the repository for now:
1. Create a new class named IndexServlet in the com.manning.cmis.theblend .servlets package that extends AbstractTheBlendServlet.
2. Set up parameters for the username, password, and logout:
private static final String PARAM_LOGOUT = "logout";
private static final String PARAM_USERNAME = "username";
private static final String PARAM_PASSWORD = "password";
3. Implement doGet. It needs to display the login page, unless the user is trying to log out, in which case the session needs to be invalidated:

4. Implement doPost, which is what will attempt to use the OpenCMISSessionFactory to try to log in:

5. Resolve the imports and save the class.
Create an application-specific exception class
Sometimes it’s nice to be able to throw an exception that’s more specific than java.lang.Exception. Let’s create one called TheBlendException. It can live in the same package as the servlet classes:
1. Create a new class named TheBlendException in the com.manning.cmis .theblend.servlets package that extends java.lang.Exception.
2. The contents of the new class are as follows:
public class TheBlendException extends Exception {
private static final long serialVersionUID = 1L;
public TheBlendException(String message) {
super(message);
}
public TheBlendException(String message, Throwable cause) {
super(message, cause);
}
}
3. Resolve the imports and save the class.
Configure the web.xml file
Like any other Java web application, the web.xml file is used to declare the servlets used within the application. For now, you have only one servlet to configure—the index servlet—but you’ll add to this file in subsequent chapters.
In the project structure, the web.xml file goes in src/main/webapp/WEB-INF, as shown in the following listing.
Listing 6.1. The Blend’s web.xml file
<display-name>The Blend</display-name>

<servlet>
 <servlet-name>IndexServlet</servlet-name>
 <servlet-class>
    com.manning.cmis.theblend.servlets.IndexServlet
 </servlet-class>
 </servlet>
<servlet-mapping>
 <servlet-name>IndexServlet</servlet-name>
 <url-pattern>/index</url-pattern>
</servlet-mapping>

<welcome-file-list>
 <welcome-file>index</welcome-file>
</welcome-file-list>
6.5.4. Creating the JSPs
The first JSP to create is an index JSP to show the login form and an echo JSP to display some information about the repository after successful login. Every page in the application will have a header and a footer, and you need a generic error-handling page, so now is a good time to set those up as well.
Create the index JSP
In the src/main/webapp/WEB-INF/jsp directory, create a file called index.jsp (create the directory if it doesn’t exist). This JSP doesn’t do much—it displays the login form.
Listing 6.2. Display the login form
<%@ page language="java" contentType="text/html; charset=UTF-8"
pageEncoding="UTF-8" trimDirectiveWhitespaces="true" %>
<%@ include file="header.jsp"  %>

<div class="monospace" style="text-align: center; margin: 30px;">
<div style="font-size: 15px;">
  Mix it. Mash it. Blend it. Rock it.
</div>
<div style="font-size: 60px;">The Blend.</div>
<div style="font-size: 23px;">Organize your Creativity.</div>
</div>

<div class="monospace" style="text-align: center;">

<form method="POST" action="">
 Your Username:<br>
 <input type="text" name="username"><br>
    Your Password:<br>
 <input type="password" name="password"><br>
 <input type="submit" value="Login">
</form>

</div>

<br><br><br><br><br>

<%@ include file="footer.jsp" %>
Create the echo JSP
The echo JSP is temporary—its purpose is only to test out the login logic and to ensure that the application can connect to the back-end CMIS repository without any problem. The contents of echo.jsp need to be as shown in the following listing.
Listing 6.3. A temporary JSP that echoes some basic information about the repository
<%@ page language="java" contentType="text/html; charset=UTF-8"
    pageEncoding="UTF-8" trimDirectiveWhitespaces="true" %>
<%@ page import="org.apache.chemistry.opencmis.client.api.*" %>
<%@ page import="org.apache.chemistry.opencmis.commons.enums.*" %>
<%@ page import="java.util.*" %>
<%@ include file="header.jsp"  %>

<div class="monospace" style="text-align: center;">

<%
Session cmisSession = (Session) request.
                                  getSession().
                                  getAttribute("session");
if (cmisSession != null) {%>
  <ul>
    <li><%=cmisSession.getRepositoryInfo().getVendorName() %></li>
    <li><%=cmisSession.getRepositoryInfo().getProductName() %></li>
    <li>
      <%=cmisSession.getRepositoryInfo().getProductVersion() %>
    </li>
  </ul>
<%
}
%>

</div>

<br><br><br><br><br>

<%@ include file="footer.jsp" %>
We realize it’s bad form to put Java code in the JSP, but we’re doing it anyway here and in later chapters to keep the examples manageable.
Create the header, footer, and error JSPs
The header, footer, and error JSPs are barely worth mentioning at this point. They provide some basic information that will be expanded on in later chapters. They don’t make any CMIS calls, so rather than include them here, we’ll let you copy them from the completed project into your project.
The header JSP relies on a CSS file. Copy the CSS file from the completed project into your project. It belongs under src/main/webapp/stylesheets/main.css.
6.5.5. Try it—testing The Blend
You’ve got your OpenCMIS session factory, the abstract servlet, a concrete servlet for the index page, and the index JSP page implemented. You’ve also set up a basic header, footer, error page, and style sheet. Now all that’s left is to run the code and see if the echo JSP properly connects to the InMemory server and responds with some basic repository information.
To test out what you have so far, follow these steps:
1. The web application’s manifest needs to be updated—if you don’t do this, when you run the application in the embedded Tomcat server, Tomcat won’t be able to find your dependent classes. The easiest way to do this is to open up a command line, cd to the project’s root directory (where the pom.xml lives), and run mvn eclipse:eclipse. Then you can go back into Eclipse, refresh the project, and the manifest file (MANIFEST.MF) will be up to date.
2. Run the application, as you did during the walk-through. Right-click on the project, and then select Run As > Run on Server. The index page should display in Eclipse’s embedded browser, as shown in figure 6.22.
Figure 6.22. The index page of the first iteration of The Blend
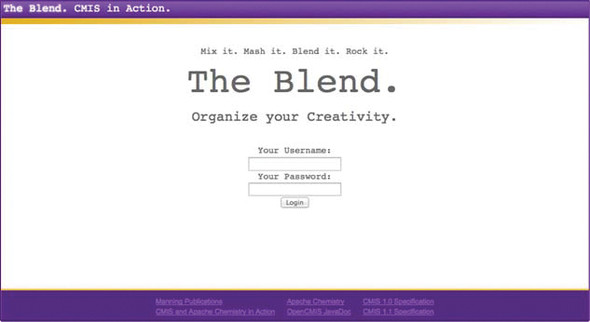
Provide a username and password. If the web application connects successfully to the repository, you should see the echo page, and it should look something like figure 6.23.
Figure 6.23. If all goes well, this iteration of The Blend should echo back some repository information.

Your own work-in-progress copy of The Blend is off to a good start. You’ve set up the abstract servlet and you’ve implemented one concrete servlet and its associated JSP, which is the pattern you’ll follow for the rest of the pages. As it stands, the application doesn’t do much with the CMIS repository, but the echo page proves you can connect and retrieve some basic repository information. Now you can start to work on pages that retrieve and display music and artwork from the back end.
6.6. Summary
This chapter introduced you to The Blend, a web application that artists can use to mix and mash-up music, sounds, and artwork. After reviewing the business requirements, the chapter took a look at the technical approach. Key aspects of the approach include
- The obvious choice of a CMIS server as the back-end data repository.
- Keeping the web application as simple as possible. The application will be built with servlets and JSPs so that you can focus on the details around using OpenCMIS to write web applications.
- Other than the ability to handle authentication and making sure all your pages can only be accessed when a session has been established, this application has no other security features.
- The application’s data will be stored in a single root folder called /blend. Below that, the folder structure is arbitrary, but when you import some test data, it’s likely to be organized into a default folder structure that’ll help end users find their content.
- All objects will be typed. The types are organized in a hierarchy, and each type has a set of properties specific to that type.
You also got a tour of the finished product. In the real world, this product likely would have been a screen mockup or a prototype of some sort. In this chapter, you saw the fully baked pie first, in the hope that you’d be motivated to start slicing some apples.
Then you started to do some work. The rest of the chapter showed you how to use XML to define the content model for the InMemory server. Then you implemented enough code to support login, a connection to the repository, and logout.
With this foundation in place, you can now move on to the next chapter, in which you’ll implement all of the browse functions of The Blend.