
Chapter 9
Picture Playback
IN THIS CHAPTER
Exploring picture playback functions
Magnifying your picture to check details
Deciphering the picture information displays
Understanding histograms
Without question, one of the best things about digital photography is being able to view pictures right after you shoot them. No more guessing whether you got the shot you want or need to try again; no more wasting money on developing and printing pictures that stink.
Seeing your pictures is just the start of the things you can do when you switch your camera to playback mode, though. You also can review settings you used to take the picture, display graphics that alert you to exposure problems, and magnify a photo to check details. This chapter introduces you to these playback features and more.
Note: Some information in this chapter applies only to still photographs; if a feature also works for movie files, I spell that out. For specifics on movie playback, see the end of Chapter 8.
Disabling and Adjusting Image Review
After you take a picture, it appears briefly on the monitor. By default, the instant-review period lasts 2 seconds. You can change the display time via the Image Review option on Shooting Menu 1, shown in Figure 9-1.

FIGURE 9-1: Control the timing of instant picture review through this option on Shooting Menu 1.
You can select from the following options:
- A specific review period: Pick 2, 4, or 8 seconds.
- Off: Disables automatic instant review. Turning off the monitor saves battery power, so keep this option in mind if the battery is running low. You can still view pictures by pressing the Playback button.
- Hold: Displays the current image indefinitely or until the camera automatically shuts off to save power. (The camera shutdown timing is controlled through the Auto Power Off option on Setup Menu 1.)
Viewing Pictures in Playback Mode
![]() To switch to Playback mode, press the Playback button, labeled in Figure 9-2. The last photo you took appears onscreen, and you also may see some shooting data. In the figure, for example, the shutter speed and f-stop settings appear in the upper-left corner of the monitor, and the folder number and file number appear in the upper-right corner.
To switch to Playback mode, press the Playback button, labeled in Figure 9-2. The last photo you took appears onscreen, and you also may see some shooting data. In the figure, for example, the shutter speed and f-stop settings appear in the upper-left corner of the monitor, and the folder number and file number appear in the upper-right corner.

FIGURE 9-2: The default Playback mode displays one picture at a time, with minimal picture data.
Several camera buttons come into play when you’re viewing images; I labeled these buttons in Figure 9-2. Note that with the exception of the DISP button, the labels on the buttons are either all blue or partially blue. Canon likes to color-code things, and blue is the color chosen for playback. In the camera menu system, Playback Menus 1 and 2 are decorated in blue as well. (The black-and-white portions of labels refer to shooting functions.)
Here’s a quick-start guide to playback features; later sections provide more details on some functions.
-
Scrolling from one image to the next: Press the right cross key to go forward one photo; press the left cross key to go back one.
 To skip more quickly through images, rotate the Main dial to enter Jump mode. By default, the camera leaps through photos ten at a time, but you can set up a different system if you prefer. I detail the options in the upcoming section “Jumping through images.”
 -
Display image thumbnails (Index view): Instead of viewing a single photo, you can switch to Index view, which displays four or nine thumbnails, as shown in Figure 9-3.
 To switch from single-image view to four-image view, press the Index/Reduce button, shown in the margin and labeled “Display thumbnails” in Figure 9-2. Press the button again to display nine thumbnails.
 In Index view, movie files are indicated by borders that look like the sprocket holes in old film reels (I labeled a movie file in Figure 9-3). To play a movie, you must exit Index view; just press Set to do so. Press Set again to open the movie-playback screen, which you can find out how to navigate in Chapter 8.
 - Select a file in Index view: When Index view is active, you can perform some file operations, such as erasing a photo or movie. But you first need to select the file by using the cross keys to place a selection box over the file’s thumbnail. In Figure 9-3, I labeled the selected thumbnails. (In single-image view, the image on the monitor is automatically selected.)
- Scroll from one page of thumbnails to the next: Either rotate the Main dial or press the up/down cross keys. (The Main dial doesn’t invoke Jump mode in Index view.)
-
 Reduce the number of thumbnails: Press the Magnify button, labeled “Display fewer thumbnails” in Figure 9-2. Press once to go from nine thumbnails to four; press again to shift from four thumbnails to single-image view.
You also can press the Set button to switch from Index view to single-image view. The image that was highlighted in Index view appears on the monitor after you press Set.
- Change the amount of shooting data that appears: Press the DISP button to cycle through the various playback display modes, each of which presents a different amount of shooting data. Read “Viewing Picture Data,” later in this chapter, to find out how to interpret the data in each mode.

FIGURE 9-3: You can view four or nine thumbnails at a time.
Jumping through images
If your memory card contains scads of images, here’s a trick you’ll love: By using the Jump feature, you can rotate the Main dial to leapfrog through images rather than press the right or left cross key a bazillion times to get to the picture you want to see. You also can search for the first image shot on a specific date, tell the camera to display only movies or only still shots, or display images with a specific star rating. (See Chapter 10 for details on rating photos.)
You can choose from the following Jump options:
-
Display Images One by One: This option, in effect, disables jumping, restricting you to browsing pictures one at a time. So what’s the point? If you select this setting, you can scroll pictures by rotating the Main dial as well as by pressing the right/left cross keys.
- Jump 10 Images: Advance 10 images at a time.
- Jump 100 Images: Advance 100 images at a time.
- Display by Date: If your card contains images shot on different dates, you can jump between dates with this option. For example, if you’re looking at the first of 30 pictures taken on June 1, you can jump past all others from that day to the first image taken on, say, June 5.
- Display by Folder: If you create custom folders on your memory card — an option outlined in Chapter 11 — this option jumps you from the current folder to the first photo in a different folder.
- Display Movies Only: Does your memory card contain both still photos and movies? If you want to view only the movie files, select this option. Then rotate the Main dial to jump from one movie to the next without seeing any still photos.
- Display Stills Only: This one is the opposite of the Movies option: Movie files are hidden when you use the Main dial to scroll photos. You scroll one picture at a time, just like when you use the Display Images One by One option.
- Display by Image Rating: With the Rating feature, you can assign each photo or movie a rating of one to five stars, which makes it easy to sort out your best work from your worst. If you take this step, you can set up the Jump feature so that only photos that have a specific rating are displayed.
You can establish your Jump preference by using the Quick Control screen or Playback Menu 2, as follows:
-
 Quick Control screen: Press the Q button to display the current image along with the Quick Control playback icons, as shown in Figure 9-4. (If you’re viewing images in Index mode, the camera temporarily shifts to single-image view and displays the image that was highlighted.)
Use the up/down cross keys to highlight the Jump icon, labeled on the left in the figure. Along the bottom of the screen, you see the icons representing the available Jump options, with a highlight box around the currently selected setting. (The text above the icon strip tells you what each symbol represents.) Use the left/right cross keys to highlight the icon representing the jump method you want to use.
If you select the Image Rating option, as shown in the figure, rotate the Main dial to set the number of stars that an image must have in order to be displayed. For example, in the figure, I set the option to five stars. Exit the Quick Control screen by pressing the Q button. - Playback Menu 2: Select Image Jump, as shown on the left in Figure 9-5, and then press Set to display the settings screen shown on the right. Use the cross keys to choose a Jump method. Again, if you select the Display by Image Rating option, rotate the Main dial to specify how many stars qualifies an image for jump viewing. Press Set to lock in your choice and return to the initial menu screen.

FIGURE 9-4: You can specify a Jump method by using the Quick Control screen.

FIGURE 9-5: Or select the Jump method from Playback Menu 2.
After selecting a Jump method, take the following steps to jump through your photos:
-
Set the camera to display a single photo.
You can use jumping only when viewing a single photo at a time. To leave Index (thumbnails) mode quickly, press the Set button. -
Rotate the Main dial.
The camera jumps to the next image. The number of images you advance, and whether you see movies as well as still photos, depends on the Jump method you select.
If you select any Jump setting but Display Images One by One, a jump bar appears for a few seconds at the bottom of the monitor, indicating the current Jump setting, as shown in Figure 9-6. For the Image Rating Jump method, you also see the number of stars you specified.
- To return to regular Playback mode, press the right or left cross key.

FIGURE 9-6: Rotate the Main dial to start jumping through pictures.
Rotating pictures
When you take a picture, the camera can tag the image file with the camera orientation: that is, whether you held the camera horizontally or vertically. When you view the picture, the camera can read the data and rotate the image so that it appears upright in the monitor, as shown on the left in Figure 9-7, instead of on its side, as shown on the right. The image is also rotated automatically when you view it in Canon Digital Photo Professional, the free photo software available for download from the Canon website. Some other photo viewing programs and apps also can read the rotation data.

FIGURE 9-7: You can display vertically oriented pictures upright (left) or sideways (right).
 Photographers use the term portrait orientation to refer to vertically oriented pictures and landscape orientation to refer to horizontally oriented pictures. The terms stem from the traditional way that people and places are photographed — portraits, vertically; landscapes, horizontally.
By default, the camera tags the photo with the orientation data and rotates the image automatically both on the camera and on your computer screen. But you have other choices, as follows:
- Disable or adjust automatic rotation. Select Auto Rotate on Setup Menu 1, as shown on the left in Figure 9-8. Then choose from these options:
- On (Camera and Computer): Labeled in the figure, this option is the default; rotation happens both on the computer and camera. (The camera and computer symbols shown to the right of the word On tell you that rotation will occur on both devices.)
- On (Computer Only): Also labeled in the figure, this setting rotates pictures only on a computer monitor. Notice the absence of the camera icon, reminding you that photos won’t be rotated when you view them on the camera monitor.
- Off: New pictures aren’t tagged with the orientation data, and existing photos aren’t rotated during playback on the camera, even if they’re tagged.
-
Rotate pictures during playback. If you stick with the default Auto Rotate setting, you can rotate pictures to a different orientation during playback via the Quick Control screen. Highlight the Rotate option, as shown in Figure 9-9, and then press the right or left cross keys to select one of the three orientation icons (labeled in the figure). Press the Q button a second time to exit the Quick Control screen.
The Quick Control method does not work if you set the Auto Rotate option on Setup Menu 1 to Off or computer-rotation only. However, you can still rotate pictures via the Rotate Image option on Playback Menu 1, shown on the left in Figure 9-10.
Choose the menu option and then press Set to display your photos. In Index display mode, use the cross keys to select the image that needs rotating. In full-frame display, just scroll to the photo. Either way, press Set once to rotate the image 90 degrees; press again to rotate 180 additional degrees; press once more to return to 0 degrees, or back where you started. Press Menu to return to the menu system or Playback to return to viewing pictures. The photo remains in its rotated orientation only if the Auto Rotate option is set to the default.

FIGURE 9-8: Go to Setup Menu 1 to disable or adjust automatic image rotation.

FIGURE 9-9: The fastest way to rotate individual images is to use the Quick Control screen (on left).

FIGURE 9-10: You also can rotate images via Playback Menu 1.
All these rotation features apply only to still photos; you can’t rotate movies.
Zooming in for a closer view
During playback, you can magnify a photo to inspect details, as shown in Figure 9-11. In the example photo, I had to zoom way in to reveal the colorful visitor hanging on my rain chain, apparently searching for a tailor. (Get it? He’s missing part of his tail, so he needs a tail … oh never mind. The good news is that his tail will grow back, so you needn’t fret for his safety. My sanity is another story.)

FIGURE 9-11: After displaying your photo in full-frame view (left), press the Magnify button to zoom in for a closer view (right).
At any rate, you can magnify only photos and only when you’re displaying photos one at a time. So if the camera is in Index display mode, press Set to return to full-frame view. Then use these techniques to adjust the image magnification:
-
Zoom in. Press and hold the Magnify button until you reach the magnification you want. You can enlarge the image up to ten times its normal display size. Note the plus sign in the middle of the magnifying glass part of the button icon. That’s your reminder to use this button to increase the display magnification.
- View another part of the picture. When the image is magnified, a little thumbnail representing the entire image appears in the lower-right corner of the monitor, as shown in the right image in Figure 9-11. The solid white box indicates the area of the image that is shown on the monitor. Press the cross keys to scroll the display to see another portion of the image.
-
View more images at the same magnification. While the display is zoomed, rotate the Main dial to display the same area of the next photo at the same magnification. (The Jump feature, normally triggered by rotating the dial, is disabled while a photo is magnified.) For example, if you shot a group portrait several times, you can easily check each one for shut-eye problems.
-
Zoom out. To zoom out to a reduced magnification, press the Index/Reduce button. Continue holding down the button until you reach the magnification you want.
Here again, the symbol inside the magnifying glass label offers a hint as to the button’s purpose: The minus sign indicates that pressing the button decreases the magnification. After you zoom all the way out, pressing the button another time shifts the display to Index (thumbnails) view.
 Return to full-frame view when zoomed in. To exit magnified view, don’t keep pressing the Index/Reduce button until you zoom out all the way. Instead, just press the Playback button, which quickly returns you to full-frame view.
Viewing Picture Data
When you’re viewing your photos in single-image view, you can press the DISP button to change the amount and type of shooting data that appears with the photo. You have a choice of the displays labeled in Figure 9-12, all of which I detail in the upcoming sections.

FIGURE 9-12: Press the DISP button to change the amount of picture data displayed with your photo.
For pictures taken using the Full Auto, Flash Off, Creative Auto, or scene exposure modes, you see less data than appears in Figure 9-12. You get the full complement of data only if you took the picture in P, Tv, Av, or M modes. Also, the screens in Figure 9-12 and throughout the remainder of this chapter show all possible bits of information that can be viewed in each display mode. If you didn’t use a particular feature when shooting the picture, the area of the screen devoted to that feature appears empty. For example, at the top of each screen in Figure 9-12, you see a plus/minus symbol with the number –1. That information reflects the Exposure Compensation setting. If you didn’t enable Exposure Compensation, that symbol and value don’t appear.
Basic Information display mode
In Basic Information mode, you see the following bits of information (labeled in Figure 9-13):
- Shutter speed, aperture, and Exposure Compensation setting: Chapter 4 explains these exposure settings. If the Exposure Compensation setting was 0 (no compensation), this value doesn’t appear.
- Protected status: The key icon appears if you used the Protect feature to prevent your photo from being erased when you use the normal picture-deleting feature. Find out how to protect photos in the next chapter.
- Rating: If you rated the photo, a topic also covered in Chapter 10, you can see how many stars you assigned it (five, in the figure).
- Folder number and last four digits of file number: See Chapter 1 for information about how the camera assigns folder and file numbers. And visit Chapter 11 for details on how you can create custom folders.

FIGURE 9-13: You can view basic exposure and file data in this display mode.
Basic Information plus Image Quality/Playback Number display mode
This display mode adds two pieces of information to the Basic display, as shown in Figure 9-14:
- Image quality: These values correspond to the Image Quality setting. In the figure, the symbols indicate that I used the Large/Fine setting (the smooth arc represents the JPEG Fine file type; the L, the Large resolution option). Chapter 2 provides more help with this setting.
- Frame number/total frames: These values show the current file number and the total number of files on the memory card. For example, the candle image is file number 32 out of 46 total files.

FIGURE 9-14: You can view the Image Quality setting in this display mode.
Shooting Information display mode
In Shooting Information display mode, the camera presents a thumbnail of your image along with scads of shooting data. You also see a brightness histogram — the chart-like thingy on the top-right side of the screen. You can get schooled in the art of reading histograms in the next section. (Remember, press the DISP button to cycle through the other display modes.)
How much data you see, though, depends on the exposure mode you used to take the picture, as illustrated in Figure 9-15. The screen on the left shows the data dump that occurs when you shoot in the advanced exposure modes, where you can control all the settings indicated on the playback screen. When you shoot in the other exposure modes, you get a far less detailed playback screen. For example, the right screen in Figure 9-15 shows the data that appears for a picture taken in Close-up mode. Here, you can view the Shoot by Ambience and Shoot by Lighting or Scene Type settings you used, but not all the individual exposure and color settings that appear for pictures shot in the advanced exposure modes.
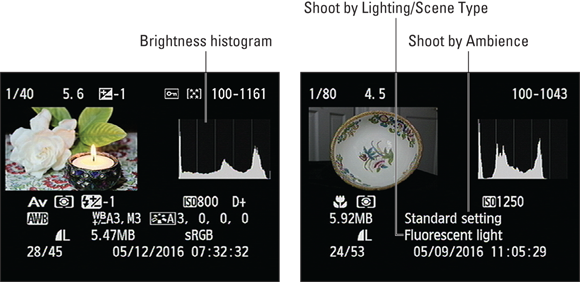
FIGURE 9-15: How much data appears depends on which exposure mode you used to shoot the picture.
Again, in Figures 9-15 through 9-18, I show all possible shooting data for the purpose of illustration. If a data item doesn’t appear on your monitor, it simply means that the feature wasn’t enabled when you captured the photo.

FIGURE 9-16: This row contains additional exposure information.

FIGURE 9-17: Look to this row for details about advanced color settings.

FIGURE 9-18: The bottom two rows of the display offer this data.
At this point, I’m going to assume that if you’re interested in the Shooting Information display mode, you’re shooting in the advanced exposure modes. So the rest of this section concentrates on that level of playback data. To that end, it helps to break the display shown on the left in Figure 9-15 into five rows of information: the row along the top of the screen and the four rows that appear under the image thumbnail and histogram. Here’s what appears in the five rows:
- Row 1: Shows the same data as Basic Information display mode, including the f-stop and shutter speed.
- Row 2: Contains the additional exposure settings labeled in Figure 9-16. Look for details about them in Chapter 4.
- Row 3: These values, labeled in Figure 9-17, relate to color settings that you can explore in Chapter 6.
-
Row 4 and 5: Wrapping up the smorgasbord of shooting data, the bottom two rows hold the information labeled in Figure 9-18. See Chapter 2 for information about the Image Quality setting and how it affects file size; Chapter 11 explains the Color Space option.
If the date/time information displayed isn’t accurate, head for Setup Menu 2 and adjust the camera’s clock via the Date/Time/Zone setting. (This change affects only any new pictures you shoot; your existing photos still bear the old date/time information.)
If you use Eye-Fi memory cards, you also see an icon depicting the card’s wireless connection status. (It appears to the left of the date and isn’t shown in the figure.) See the Chapter 1 section related to using memory cards for more information about Eye-Fi cards.
Understanding Histogram display mode
A variation of the Shooting Information display, the Histogram display offers the data you see in Figure 9-19. Again, you see an image thumbnail, but some of the information that you see in the Shooting Information display is left out, making room for an additional histogram, called an RGB histogram. Remember that this figure shows you the playback screen for pictures taken in the advanced exposure modes; in the other exposure modes, you see slightly different data, but you still get two histograms.

FIGURE 9-19: Histogram display mode replaces some shooting data with an RGB histogram.
The next two sections explain what information you can gain from both types of histograms.
Interpreting a brightness histogram
One of the most difficult problems to correct in a photo editing program is known as blown highlights or clipped highlights. Both terms mean that the brightest areas of the image are so overexposed that areas that should include a variety of light shades are instead totally white. For example, in a cloud image, pixels that should be light to very light gray are white, resulting in a loss of detail in those clouds.
In Shooting Information and Histogram display modes, areas that fall into this category blink in the image thumbnail. This warning is a helpful feature because simply viewing the image on the camera monitor isn’t always a reliable way to gauge exposure: The brightness of the monitor and the ambient light in which you view it affect the appearance of the image.
The Brightness histogram, found in both display modes, offers another analysis of image exposure. This graph, featured in Figure 9-20, indicates the distribution of shadows, highlights, and midtones (areas of medium brightness) in an image. Photographers use the term tonal range to describe this aspect of their pictures.
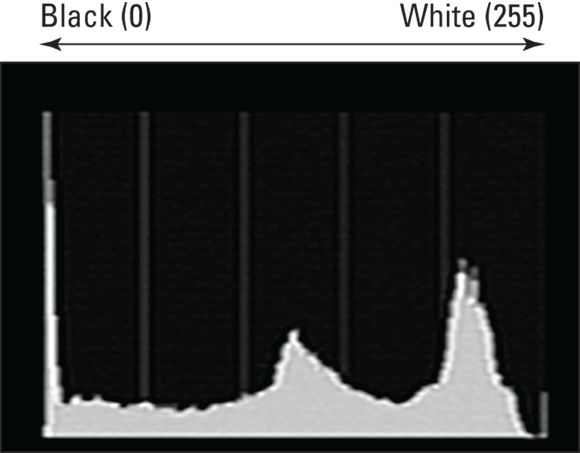
FIGURE 9-20: The Brightness histogram indicates the tonal range of an image.
The horizontal axis of the graph represents the possible picture brightness values, from black (a value of 0) to white (a value of 255). And the vertical axis shows you how many pixels fall at a particular brightness value. A spike indicates a heavy concentration of pixels. For example, in Figure 9-20, which shows the histogram for the image you see in Figure 9-19, the histogram indicates a broad range of brightness values but with very few at the far right end of the brightness spectrum.
Keep in mind that there is no “perfect” histogram that you should try to duplicate. Instead, interpret the histogram with respect to the amount of shadows, highlights, and midtones that make up your subject. For example, I wanted to create a slightly dark, moody look in the candle image in Figure 9-19. And I wanted to be certain not to blow out the details in the white gardenia bloom. So I set the Exposure Compensation value to EV –1.0, forcing the camera to deliver an exposure that was one stop darker than it normally would have produced. So my histogram reflects the exposure that I was after. The fact that the white end of the scale didn’t show a heavy cluster of pixels reassured me that I did not overexpose those important white flower details — something that’s often difficult to judge by simply looking at the image on the camera monitor. Although there were a few “blinkies” in the candle flame (indicating fully white pixels), there were none in the gardenia, which was further help in deciding the right exposure settings. See the nearby sidebar “What are these blinking spots?” for an explanation of interpreting the blinkies.
Reading an RGB histogram
In Histogram display mode, you see two histograms: the Brightness histogram (covered in the preceding section) and an RGB histogram, shown in Figure 9-21.

FIGURE 9-21: The RGB histogram can indicate problems with color saturation.
To make sense of an RGB histogram, you first need to know that digital images are known as RGB images because they’re created from three primary colors of light: red, green, and blue. In the image file, the brightness values for those colors are contained in three separate vats of color data, known as color channels. Whereas the Brightness histogram reflects the brightness of all three color channels rolled into one, RGB histograms let you view the values for each individual channel.
When you look at the brightness data for a single channel, though, you glean information about color saturation rather than image brightness. I don’t have space in this book to provide a full lesson in RGB color theory, but the short story is that when you mix red, green, and blue light, and each component is at maximum brightness, you create white. Zero brightness in all three channels creates black. If you have maximum red and no blue or green, though, you have fully saturated red. If you mix two channels at maximum brightness, you also create full saturation. For example, maximum red and blue produce fully saturated magenta. And, wherever colors are fully saturated, you can lose picture detail. For example, a rose petal that should have a range of tones from medium to dark red may instead be a flat blob of dark red.
The upshot is that if all the pixels for one or two channels are slammed to the right end of the histogram, you may be losing picture detail because of overly saturated colors. If all three channels show a heavy pixel population at the right end of the histograms, you may have blown highlights — again, because the maximum levels of red, green, and blue create white. Either way, you may want to adjust the exposure settings and try again.
A savvy RGB-histogram reader can also spot color balance issues by looking at the pixel values. But frankly, color balance problems are fairly easy to notice just by looking at the image on the camera monitor.
If you’re a fan of RGB histograms, however, you may be interested in another possibility: You can swap the standard Brightness histogram that appears in Shooting Information playback mode with the RGB histogram. Just set the Histogram Disp option on Playback Menu 2 to RGB instead of Brightness.
For information about manipulating color, see Chapter 6.