
Chapter 10
Working with Picture and Movie Files
IN THIS CHAPTER
Deleting unwanted files
Protecting files from accidental erasure
Rating photos and movies
Downloading files to your computer
Processing Raw files in Canon Digital Photo Professional
Shrinking files for online use
Every creative pursuit involves its share of cleanup and organizational tasks. Painters have to wash brushes, embroiderers have to separate strands of floss, and woodcrafters have to haul out the wet/dry vac to suck up sawdust. Digital photography is no different: At some point, you have to stop shooting so that you can download and process your files.
This chapter explains these after-the-shot tasks. First up is a review of several in-camera file-management operations: Delete unwanted files, protect your best work from accidental erasure, and rate files. Following that, you can get help with transferring files to your computer, processing files that you shot in the Raw (CR2) format, and preparing images for online sharing. Along the way, I introduce you to two free Canon photo programs, which offer easy ways to handle these jobs.
One feature I don’t cover in this chapter is the option to transfer photos wirelessly to a smartphone or tablet. See Chapter 12 for help with this and other Wi-Fi features.
Deleting Files
When you spot clunkers during your picture and movie review, you can use the following options to erase them from your memory card:
 Deleting single images: To delete photos or movies one at a time, display the photo or movie in Single Image view or select it in Index view. Then press the Erase button, labeled in Figure 10-1. The words Cancel and Erase appear at the bottom of the screen. Press the right cross key to highlight Erase and press the Set button.
-
Deleting all images: To erase all photos on the memory card — with the exception of those you locked by using the Protect feature discussed in the following section — display Playback Menu 1, shown on the left in Figure 10-2. Choose Erase Images to display the screen shown on the right in the figure. Choose All Images on Card and press Set. On the confirmation screen that appears, choose OK and press Set.
 If your card contains multiple folders, you can limit the image dump to a specific folder. Just choose All Images in Folder on the screen shown on the right in Figure 10-2. Press Set to see a list of folders; choose the folder you want to empty and press Set again.
 -
Deleting selected images: To erase more than a few but not all photos and movies, choose Erase Images from Playback Menu 1. On the next screen (right screen in Figure 10-2), choose Select and Erase Images.
You then see a photo or movie on the monitor, as shown on the left in Figure 10-3. At the top of the screen, a little check box appears. To the right of the box is a value showing you how many files are currently tagged for erasure.
To mark the displayed file as trash, press the up or down cross key to put a check mark in the box. (I labeled the check mark “Erase tag” in the figure.) If you change your mind, press up or down again to remove the check mark. To scroll through your images to find the next bad apple, press the right or left cross keys; press up or down to tag that file for erasure.
 If you don’t need to inspect each image closely, you can display up to three thumbnails per screen. (Refer to the image on the right in Figure 10-3.) Press the Index button to shift into this display. Use the same methods to tag images for erasure and to scroll through photos as you do when viewing them one at a time.
 After tagging all images in the three-frame view, press the Magnify button to exit to the regular single-image view. When you finish tagging images, press the Erase button. You see a confirmation screen asking whether you really want to get rid of the selected images. Highlight OK and press Set.

FIGURE 10-1: After pressing the Erase button, press the right cross key to highlight Erase and then press the Set button.

FIGURE 10-2: Use the Erase option on Playback Menu 1 to delete multiple images quickly.

FIGURE 10-3: Press the up/down cross keys to toggle the Erase check box on and off.
Protecting Photos and Movies
You can protect pictures and movies from accidental erasure by giving them protected status. After you take this step, the camera doesn’t allow you to delete the file from your memory card, whether you press the Erase button or use the Erase Images option on Playback Menu 1.
You can also save time by using the protection feature when you want to keep a handful of pictures but delete the rest. Instead of using the Select and Erase Images option, which requires that you tag each photo you want to delete, protect the handful that you want to preserve. Then use the Erase All Images option to dump the rest — the protected photos are left intact.
 Although the Erase functions don’t touch protected pictures or movies, formatting your memory card does erase them. For more about formatting, see the Chapter 1 section related to Setup Menu 1, which contains the Format Card tool.
To protect a photo, use these techniques:
-
 Protect/unprotect a single photo/movie: The Quick Control screen offers the fastest option. Display the photo in full-frame view. Or in Index view, select the photo by moving the highlight box over it. Then press the Q button and highlight the Protect Images symbol, labeled in Figure 10-4. Choose Enable at the bottom of the screen, and a little key symbol appears at the top of the frame, as shown in the figure. Press the Q button again to exit the Quick Control display.
To remove the protected status, follow the same steps but choose Disable on the Quick Control screen.
-
Protect/unprotect multiple photos/movies: To apply or remove protected status from more than a couple photos or movies, going through Playback Menu 1 is faster than using the Quick Control screen. From the menu, choose Protect Images, as shown on the left in Figure 10-5. You then can select from these options, shown on the right in Figure 10-5:
- Select Images: Choose this option to protect specific photos or movies. An image appears along with a key icon in the upper-left corner of the screen, as shown on the left in Figure 10-6. This symbol is there to remind you that you add/remove protection by pressing the Set button. So scroll to the picture you want to protect and press that button. Now a key icon appears at the top of the screen, as labeled in the figure. That key symbol means protection is in place. Press the right/left cross key to scroll through your images, pressing Set to add the key to each file you want to protect. To remove protection, press Set to make the key disappear.
- All Images in Folder: When you choose this option (refer to the right screen in Figure 10-5), you see a list of available folders. Select the one that contains the images you want to protect and press Set. (Unless you create custom folders, you probably only have one folder on your card.)
- Unprotect All Images in Folder: Use this option to unlock all protected images in the folder you select.
- All Images on Card: After you select this option, choose OK on the confirmation screen and press Set. All photos and movies on the memory card are now locked.
- Unprotect All Images on Card: Select this option to unlock all pictures and movies on the card.
When you finish protecting or unlocking photos, press the Menu button to exit the protection screens.

FIGURE 10-4: You can use the Quick Control screen to protect the current photo.

FIGURE 10-5: Go the menu route to protect multiple photos at a time.

FIGURE 10-6: The key icon indicates that the picture is protected.
Rating Photos and Movies
Many image browsers provide a tool that you can use to assign a rating to a picture: five stars for your best shots, one star for those you wish you could reshoot, and so on. But you don’t have to wait until you make it to your computer because your camera offers the same feature. If you later view your pictures in the Canon image software, you can see the ratings you assigned and sort pictures according to rating.
You assign a rating via the Quick Control screen or Playback Menu 2. For rating just a photo or two, either works fine, but for rating a batch of photos or movies, using the menu is fastest. Here’s how the two methods work:
- Quick Control screen: Display your photo in full-screen view; or, in Index view, select it by moving the highlight box over it. Then press the Q button and highlight the Rating icon, as shown in Figure 10-7. Press the right or left cross key to highlight the number of stars you want to give the photo (None or 1 to 5 stars) and then press the Q button to return to the normal playback screen. You must exit the Quick Control screen before rating a second photo; there’s no way to advance to another image while the Quick Control screen is active.
-
Playback Menu 2: Choose Rating from the menu, as shown on the left in Figure 10-8, and then press Set. You then see the screen shown on the right in Figure 10-8. Above the image, you get a control box for setting the rating of the current picture or movie; just press the up or down cross keys to give the photo anything from one to five stars (cycle back around to turn the rating off for the photo). The values next to the control box indicate how many other photos on the card have been assigned each rating. For example, in the figure, the numbers indicate two one-star images, one four-star image, and five that I thought deserving of five stars. (I grade on a curve.)
You can press the Index button to display three thumbnails at a time, just as you can when deleting files. (Refer to Figure 10-3.) Use the right/left cross keys to highlight a thumbnail; its rating appears in the box right above the thumbnails. To go back to the single-image display, press the Magnify button.After rating your photos, press Menu to return to the Playback menu.

FIGURE 10-7: You can rate photos via the Quick Control screen.

FIGURE 10-8: When rating pictures through Playback Menu 2, press the up or down cross key to change the photo rating.
Using Canon’s Computer Software
To download, view, and edit your photos on a computer, you can use whatever software you like. But even if you’re already perfectly happy with the programs you already use, you may want to also grab the following programs, which Canon makes available free to T6/T1300D owners:
-
Canon EOS Utility (Version 3.4.0.3): This program offers an easy-to-use tool for downloading pictures directly from your camera, which I show you how to do later in this chapter. Additionally, it enables tethered shooting, which means that you can connect the camera to the computer via the supplied cable and then operate the camera remotely from the computer.
Tethered shooting is great when you’re photographing products or portraits in a studio setting, with clients or colleagues on hand to supervise or collaborate. If you set the camera to Live View mode, you can see the live preview on the computer monitor, as shown in Figure 10-9, giving everyone a larger view of things than the camera monitor provides. You can adjust most camera settings using the control panel shown on the right side of the figure. After the shot, photos can be displayed immediately on the computer monitor and automatically downloaded to the computer.
I don’t have room to cover tethered shooting in this book, but you can get details in the program’s instruction manual, also available for download from the Canon website. (More about downloading programs and manuals momentarily.)
-
Canon Digital Photo Professional (Version 4.4.3.0): This product, featured in Figure 10-10, offers a nice assortment of photo-editing and organizing features. It also has a tool that you can use to process Raw files, which I show you how to do later in this chapter.
Two cool features worth special note: First, after you select an image, you can view its metadata, which is hidden data that contains all the camera settings you used to take the shot. To display the metadata panel, labeled in Figure 10-10, open the program’s View menu and select Info.
You also can display the focus point or points that the camera used to establish the focusing distance for the picture. In the figure, for example, notice the red focus box atop the subject — showing that it was the point used to set the focusing distance. You also can see two focus points on either side of the selected box; those appear black because they weren’t included in the camera’s focusing calculations. (The other six focus points aren’t visible in the figure because I magnified the display.) To enable the focus-point display, open the Preview menu and choose AF Points. To see the points on your image as shown in the figure, double-click the image thumbnail to open it in an editing window.

FIGURE 10-9: The EOS Utility program enables you to operate your camera remotely from your computer.

FIGURE 10-10: Digital Photo Professional 4 provides a good, free solution for viewing, organizing, and editing your photos.
To download these programs, head for the T6/1300D product page for your country. (The web address is www.USA.Canon.com if you live in the United States.) Then follow the Drivers and Downloads links to the programs. One caveat: You also have the option to download an entire bundle of Canon programs; in fact, this download link is provided under the label “Recommended Downloads.” The problem is that because the bundle was developed for several different camera models, it contains several programs that don’t support features of the T6/1300D. So I recommend just downloading the two aforementioned programs. You also can download the user manuals for each program, but you get to those via the Manuals link rather than the software link. (Don’t blame me; I just report the news.)
Keep in mind that every time Canon updates the software, the version number changes. So don’t be concerned if the links you find at the website have a later version number than listed above. You can’t, however, use older versions of these programs with your camera.
As for the Canon smartphone and tablet software — sorry, app (for application) — you need it only to take advantage of certain Wi-Fi features. I cover the app and Wi-Fi functions in Chapter 12.
Sending Pictures to the Computer
Your camera’s built-in Wi-Fi system enables you to send photos wirelessly to a smartphone or tablet — again, see Chapter 12 for help. Unfortunately, you can’t use Wi-Fi to download files to a computer, even if your computer is connected to a wireless network. Instead, you need to choose one of these options to download your files:
- Connect the camera to the computer via a USB cable. The cable is supplied in the camera box. (Canon refers to the cable as the interface cable.) If you’re unfamiliar with the basics of computer file management — tasks such as creating storage folders, organizing files, and so on — this option is easiest. The drawback is that your camera must be turned on during the process, which uses battery power.
-
Use a memory-card reader. With a card reader, you pop the memory card out of your camera and into the card reader instead of hooking the camera to the computer. Many computers and printers now have card readers, and you also can buy standalone readers for under $30. I recommend this option for computer-savvy photographers because it doesn’t require any camera-battery power.
Note: If you use SDHC (Secure Digital High-Capacity) or SDXC (Secure Digital Extended-Capacity) cards, the card reader must specifically support that type. Many older card readers — including some still on the market — do not.
The next two sections walk you through each process, using the aforementioned Canon programs to handle the transfer.
Downloading directly from the camera
The following steps show you how to move pictures directly from your camera to your computer using Canon EOS Utility. To use this method, you need the USB cable that shipped with your camera. Also install the EOS Utility program on your computer before you begin.
Don’t be put off by the length of the steps — it takes a lot of words to detail the process, but it’s actually easy after you work through the steps once or twice. So walk this way:
-
Make sure the camera battery is fully charged.
Running out of battery power during the transfer process can cause problems, including lost picture data. Alternatively, if you have an AC adapter, use it to power the camera during picture transfers. - Turn your computer on and give it time to finish its normal startup routine.
-
On the camera, open Setup Menu 3 and make sure that the Wi-Fi/NFC function is set to Disable.
When that feature is turned on, you can’t connect the camera to the computer.
-
Turn the camera off and insert the smaller of the two plugs on the interface cable into the port labeled Digital terminal (USB) in Figure 10-11.
This port is hidden behind the rubber door that’s just around the corner from the left side of the monitor.
- Plug the other end of the cable into a USB port on the computer.
-
Turn on the camera.
At this point, the initial Canon EOS Utility window, shown in Figure 10-12, may appear automatically, or your operating software may offer a link to launch the tool. If neither of those things happens, locate the EOS Utility program and start it yourself. And if some other program comes to life to try to wrestle the downloading job away from the Canon utility, shut down that other program.
 The figures in this chapter show how things look on a computer running Windows 7. If you use another version of Windows or a Mac computer, the various option boxes follow the design standards of that operating system. But the major program features work the same no matter what the operating system.
 - Click Download Images to Computer to display the window shown in Figure 10-13.
-
Click Select and Download, as shown in Figure 10-13.
This option is the second one in the list — it appears white in the figure. The other setting, Start Automatic Download, may work better for some downloads, so I explain it later. For now, choose Select and Download to display the screen shown in Figure 10-14. On the left side of the screen is a list of all the folders on your memory card (you may have only one folder); on the right, you see thumbnails of the images in the selected folder. To see the contents of all folders, select All, as in the figure.
-
Select the images you want to copy to the computer.
Each thumbnail contains a check box in its lower-left corner. I labeled a check box in the figure. To select an image for downloading, click the box to put a check mark in it.
A couple of tips about this window:
- If you used the Protect Images feature, explained earlier in this chapter, you see a key icon with each protected image. You can see the icon in the top-right thumbnail in the figure.
- Movie files are indicated by a movie-camera symbol, also labeled in the figure.
- Stars under a thumbnail indicate the rating that you assigned using the Rating feature, also covered earlier in this chapter. If you didn’t rate the photo, that area of the thumbnail shows no stars.
- Click the button labeled Selection Menu in the figure to display a list of batch selection options. You can tell the program to select all protected files, for example, all files that have a certain star rating, all new files, or all files.
- Click the Download button to display the dialog box shown in Figure 10-15.
-
Verify or change the storage location and file-naming settings for your pictures.
The top half of the dialog box indicates where the program wants to store your downloaded pictures. By default, pictures are stored in the Pictures or My Pictures folder in Windows (depending on the version of Windows you use) and in the Pictures folder on a Mac. A new folder is created for each batch of files you download, and the download date is used as the folder name. To change these details, click the Destination Folder button.Normally, the program retains the original filenames when downloading. But if you want to assign files different names, click the File Name button. (For example, if all the pictures are from Ted’s birthday party, you might tell the program to name the files Ted_001, Ted_002, and so on.) The file-naming options box isn’t the most intuitive to use, so check the EOS Utility software instruction manual for help. (Yes, you have to download the instruction manual separately from the program itself.)
-
Click OK to begin the download.
A progress window appears, showing you the status of the download. You also may see a preview window showing you a quick look at each picture as it’s downloaded.

FIGURE 10-11: Connect the smaller end of the USB cable here to download pictures.

FIGURE 10-12: Canon EOS Utility is the key to downloading pictures directly from your camera.

FIGURE 10-13: Choose this option to preview and select images for downloading.

FIGURE 10-14: Select the thumbnails of the images you want to transfer.

FIGURE 10-15: You can specify where you want to store the photos.
When the download is complete and the memory-card access light on the back of the camera turns off, turn off the camera. You can then disconnect the camera from the computer. The EOS Utility window should close automatically after the program notices the disappearance of the camera.
Now for the promised details about the automatic downloading setting and a couple of other fine points about direct camera-to-computer file transfer:
-
Using the automatic download option: If you don’t want to take the time to preview photos before downloading them, follow Steps 1–7 as just outlined. Then choose Start Automatic Download on the screen shown in Figure 10-13. (It’s the top option, appearing in yellow type in the figure.) By default, the program downloads only images you haven’t already transferred to the computer. But if you click the Settings button to the right of the Start Automatic Download option, you can specify that you instead want to download all images, all protected images that haven’t already been downloaded, or images to which you assigned a print order setting via the Print Order option on Playback Menu 1. (I cover the Print Order feature in Chapter 12.)
The program uses the default file destination and file-naming settings I described in the steps. To access those settings so that you can change them, click the Preferences button at the bottom of the EOS Utility dialog box (refer to Figure 10-13) and then click the Destination Folder tab.
- Auto-launching Digital Photo Professional: By default, Digital Photo Professional opens after the download is finished so that you can view, edit, and organize your files. To stop that program from launching automatically, connect the camera to the computer and click the Preferences button at the bottom of the first EOS Utility window that appears (refer to Figure 10-12). Click the Linked Software tab and select None from the drop-down list labeled Software to Link. Or click the Register button to choose another photo program that you want to open automatically after picture download completes.
- Setting other download preferences: You can adjust many other aspects of the download, including whether images are displayed one by one during the download, via the Preferences dialog box. Again, you must connect your camera to the computer to adjust these settings. (Turn off the Quick Preview option on the Basic Settings tab if you don’t want to see the image-by-image previews during downloading.)
Downloading from a card reader
Canon’s EOS Utility no longer offers an automated tool that works for downloads from card readers. But you can use Digital Photo Professional 4 to view and transfer your photos the “old-fashioned” way, which is to select the files you want to download and then drag and drop them to an existing folder on your computer.
When you launch the program, you should see the card reader as just another drive in the list of drives that appears on the left side of the program window. (If you don’t see the folder list, labeled in Figure 10-16, open the View menu, choose Open/Close Pane, and select left.) The card reader may display the name EOS_DIGITAL, as in the figure.

FIGURE 10-16: Image files are located inside the main DCIM folder.
After locating the card drive, you need to crack open its main folder, named DCIM. Inside that folder, you see subfolders containing your images; the subfolder names may be 100Canon, 101Canon, and so on. (Ignore the folder named EOSMISC.) Double-click the folder that contains the images you want to download. You then see thumbnails in the program window, as shown on the right in Figure 10-16. Select the images that you want to download as follows:
- Select a single file: Click its thumbnail to select it.
- Select multiple files: Click one thumbnail and then hold down the Ctrl key (Windows) or Command key (Mac) as you click additional files. You also can click the first file in a group and then Shift-click on the last file to select the first and last images and all the ones in between.
- Select all files: Click in the thumbnail pane and then press the Control key and the A key if you use a Windows-based computer. Press the Command key and the A key on a Mac. (You may see such keyboard shortcuts presented like so: Ctrl+A or Command+A.)
Next, just drag the selected files to the folder where you want to store them, as illustrated in the figure. I organize my images by subject, with subfolders to further segregate images in a subject folder. For example, the images in the figure, taken in Santa Fe, are headed to the Santa Fe folder, which I created inside a main Travel folder. (If you want the pictures to go into a new folder, create that folder first.)
Although it’s not visible in the figure, you should see a little plus sign next to your cursor when you drag. The plus sign indicates that you’re placing a copy of the picture files on the computer; your originals remain on the card.
Of course, if you already have a program you like to use for picture downloads, you’re free to stick with it. You can even use the Windows and Mac file-management programs — Windows Explorer and Mac Finder — to drag and drop files if you prefer. You can still use Digital Photo Professional to edit your files after you download them.
Processing Raw (CR2) Files
Chapter 2 introduces you to the Raw file format, which enables you to capture images as raw data. Before you can take Raw pictures to a retail lab for printing, share images online, or do much of anything else with them, you need to convert the Raw files to a standard file format. You can do Raw conversions in Digital Photo Professional 4; again, this program is available free for download from the Canon website.
If you have a previous version of this program, you cannot open Raw files from your T6/1300D. You must update to Version 4 to work with your Raw images. Be sure to also download the software instruction manual. As you can see in Figure 10-17, which shows the main program window, Digital Photo Professional 4 is loaded with features — too many for me to detail here.

FIGURE 10-17: You can convert Raw images using Digital Photo Professional.
That said, here’s a quick overview of the process of using the program to convert your Raw files:
-
After opening the program, track down the Raw file you want to convert.
Use the folder tree on the left side of the window to navigate to the folder where the file is stored. You can hide and display the folder pane by clicking the triangle labeled in the figure. Or open the View menu, click Open/Close Pane, and then click Left.
-
Click the thumbnail of the image you want to process, and then click the Edit Image button, labeled in Figure 10-17.
Your photo appears inside an editing window, as shown in Figure 10-18. The exact appearance of the window varies depending on your program settings. If you don’t see the Tool palette on the right side of the window, open the View menu and click Tool Palette or click the Tool Palette icon (at the bottom of the window, labeled in the figure). Other View menu options enable you to further customize the window display.
-
Open the Adjustment menu and choose the Work Color Space option. Then select your preferred color space.
The color space determines the spectrum of colors that can be used to generate the image. By default, the program uses the color space selected when you shot the picture (sRGB or Adobe RGB, Shooting Menu 2). But you can select from a couple of other options if you prefer. The color space determines the spectrum of colors your image can contain; sRGB is the best option if you’re not yet schooled in this subject, which I explain in Chapter 11.
-
Adjust the image using controls in the Tool palette.
The Tool palette offers multiple tabs, each offering its own assortment of adjustment tools. The tab shown in the figure is the Basic tab, which appears by default when you first open the window. To explore another tab, click its icon. The icons are near the top of the palette, in the area surrounded by the red box in the figure. You may need to drag the scroll bar, also labeled in the figure, to access all the options on a particular tab.
As you change the various settings, the large image preview updates to show you the results. You can magnify the display by using the controls underneath the preview, as shown in Figure 10-18. Place your cursor inside the preview and drag to scroll the display so that you can see another part of the image when the view is magnified.
At any time, you can revert the image to the original settings by opening the Adjustment window and selecting Revert to Shot Settings. -
Open the File menu and choose Convert and Save.
You see the standard file-saving dialog box with a few additional controls. Here’s the rundown of critical options:
-
Save as type: Choose Exif-TIFF (8bit). This option saves your image in the TIFF file format, which preserves all image data. Don’t choose the JPEG format; doing so is destructive to the photo because of the lossy compression that’s applied. (Chapter 2 explains JPEG compression.)
 A bit is a unit of computer data; the more bits you have, the more colors your image can contain. Some photo-editing programs can’t open 16-bit files, or else they limit you to a few editing tools, so stick with the standard, 8-bit image option unless you know that your software can handle the higher bit depth. If you prefer 16-bit files, you can select TIFF 16bit as the file type.
 - Output Resolution: This option does not adjust the pixel count of an image, as you might imagine. It only sets the default output resolution to be used if you send the photo to a printer. The final resolution will depend on the print size you choose, however. See the next section for more information about printing and resolution.
- Embed ICC Profile in Image: Select this check box to include the color-space data in the file. If you then open the photo in a program that supports color profiles, the colors are rendered more accurately. ICC refers to the International Color Consortium, the group that created color-space standards.
- Resize: Clear this check box so that your processed file contains all its original pixels.
-
-
Enter a filename, select the folder where you want to store the image, and then click Save.
A progress box appears, letting you know that the conversion and file saving is going forward. Close the progress box when the program announces that the process is complete.
-
Click the exit button (labeled in Figure 10-18) to close the editing window.
You’re returned to the main Digital Photo Professional 4 window.
-
Close Digital Photo Professional 4.
You see a dialog box that tells you that your Raw file was edited and asks whether you want to save the changes.
-
Click Yes to store your raw-processing “recipe” with the Raw file.
The Raw settings you used are then kept with the original image so that you can create additional copies of the Raw file easily without having to make all your adjustments again.

FIGURE 10-18: The Tool palette contains multiple tabs of options for manipulating exposure, color, sharpness, and more.
Again, these steps give you only a basic overview of the process. If you regularly shoot in the Raw format, take the time to explore the Digital Photo Professional instruction manual so that you fully understand all the program’s Raw conversion features.
Preparing Pictures for Online Sharing
Have you ever received an email message containing a photo so large that you can’t view the whole thing on your monitor without scrolling the email window? This annoyance occurs because monitors can display only a limited number of pixels. The exact number depends on the screen resolution setting, but suffice it to say that most of today’s digital cameras produce photos with pixel counts in excess of what the monitor can handle.
Thankfully, the newest email programs incorporate features that automatically shrink the photo display to a viewable size. But that doesn’t change the fact that a large photo file means longer downloading times and, if recipients hold onto the picture, a big storage hit on their hard drives.
Sending a high-resolution photo is the thing to do if you want the recipient to be able to generate a good print. But for simple onscreen viewing, I suggest limiting your photos to about 1,000 pixels on the longest side. That ensures that people who use an email program that doesn’t offer the latest photo-viewing tools can see the entire picture without scrolling the viewer window.
At the lowest Image Quality setting on your camera, S3, pictures contain 720 x 480 pixels. But recording your originals at that tiny size isn’t a good idea because if you want to print the photo, you won’t have enough pixels to produce a good result. Instead, shoot your originals at a resolution appropriate for print and then create a low-res copy of the picture for email sharing or for other online uses, such as posting to Facebook. (Posting only low-res photos to Facebook and online photo-sharing sites also helps dissuade would-be photo-thieves looking for free images for use in their company’s brochures and other print materials.)
In addition to resizing high-resolution images, also check their file types; if the photos are in the Raw or TIFF format, you need to create a JPEG copy for online use. Web browsers and email programs can’t display Raw or TIFF files.
You have a couple ways to tackle both bits of photo prep:
-
Use Canon Digital Photo Professional 4 to convert Raw and TIFF files to the JPEG format. You also can use the program to create small copies of your JPEG files for Internet sharing. After selecting the image thumbnail, open the File menu and choose Convert and Save. In the Convert and Save dialog box, choose JPEG as the file type for Raw and TIFF files. For Raw, TIFF, and JPEG files, select the Resize box and then enter your desired photo width and height. (Keep the Lock Aspect Ratio box checked to avoid distorting the image.)
For JPEG images, be sure to save the resized file under a new name so that the original remains intact at its full size. - For photos that you shot in the JPEG format, you can create a small-size copy right in the camera. The only exceptions are pictures captured using the S3 Quality setting. At 740 x 480 pixels, they’re already the smallest images the camera can create.
Use either of these approaches to use the in-camera shrink ray:
-
Quick Control screen: After putting the camera in Playback mode, display the photo you want to resize, press the Q button, and then highlight the Resize icon, as shown in Figure 10-19. Size options appear at the bottom of the screen. Which sizes appear depends on the size of the original photo; you’re offered only sizes that produce a smaller picture. The text label above the options indicates the file size (in megapixels, not megabytes) and pixel count of the selected setting.
Use the left/right cross keys to highlight a size and press the Set button. A confirmation screen appears, asking permission to save the resized copy as a new file. Highlight OK and press Set. The camera creates your low-res copy and displays a text message along with a seven-digit number. The first three numbers indicate the folder number where the copy is stored, and the last four numbers are the last four numbers of the image filename. Be sure to note the filename of the small copy so that you can tell it apart from its higher-resolution sibling later. Press Set one more time to wrap up.
-
Playback Menu 1: Choose Resize, as shown on the left in Figure 10-20. You see a photo along with a Resize icon in the upper-left corner, as shown on the right in the figure.
Scroll to the picture you want to resize and then press the Set button. You see display size options available for the photo. Choose the one you want to use and press Set again. On the confirmation screen, highlight OK and press Set.

FIGURE 10-19: You can resize photos from the Quick Control screen during playback.

FIGURE 10-20: Choose the Resize command to make a low-resolution copy of an existing image.
Transferring Files to a Smartphone or Tablet
Your camera’s Wi-Fi feature enables you to transfer files to a smartphone or tablet so that you can easily share them online when you’re away from your computer. After sending the files to your smart device, you use its Internet connection to post them on your Facebook page, attach them to an email or text message, or otherwise launch them into cyberspace.
To take advantage of this option, your device needs to be compatible with the Canon Camera Connect app. The app is available for Android and iOS (Apple) devices; visit Google Play Store for the Android version and the Apple App store for the iOS version. Be sure to check the app specs to make sure that it’s compatible with the version of the operating system on your device.
The next sections explain the steps for setting up your camera for Wi-Fi transfer and then actually shipping the files to your phone or tablet. A couple of notes before you start:
- Some steps, such as entering a nickname for the camera, need to be completed just the first time you connect the two devices. So don’t be too freaked out by the length of these instructions.
- You can’t transfer movie files over the Wi-Fi connection. Nor can you enable the camera’s Wi-Fi functions when the Mode dial is set to Movie mode. Additionally, the Wi-Fi features are inoperable while the camera is connected via cable to your computer or a TV set.
-
That last bit of information puts a bit of a crimp in my ability to show you the camera screens that you see during the transfer process. I can record the screens only while the camera is connected to my computer’s video-capture card, and as soon as I make that connection, the Wi-Fi is disabled.
I provide as many text cues as I can, but if you hit a snag, check the camera’s instruction manual. Toward the back of the manual, Canon provides a quick guide to the Wi-Fi features. For more complete instructions, visit the Canon support site and download the complete Wi-Fi manual, which is provided in electronic form.
Okay, with those preliminaries out of the way, the next section explains how to perform the initial setup steps, which involve assigning a name to your camera. After that, I explain how to actually transfer your image files.
Giving the camera a Wi-Fi name
Before you can use any of the wireless networking features, you need to assign a name to the camera. Take these steps:
- Open Setup Menu 3 and choose Wi-Fi/NFC, as shown in Figure 10-21.
- Press Set.
-
On the screen that appears, highlight Enable.
After you do so, the camera displays a check box related to NFC Connectivity.
NFC stands for Near Field Communication. If your smartphone or other smart device is NFC capable, you may be able to establish a connection between it and the camera simply by placing the two devices next to each other. I say may because some devices offer NFC only for limited functions, such as using Apple Pay on an iPhone. Anyway, if your device doesn’t offer NFC, press the DISP button to remove the check mark from the NFC box. Press again to enable the option.
-
Press the Set button.
You see a screen asking you to enter a nickname for the camera. Select OK to display a keyboard input screen. Figure 10-22 shows the critical portions of this screen. The screen is divided into two sections: the text box, which shows the current nickname, and the keyboard, which you use to enter new characters. In the text box, the yellow line indicates the text cursor.
-
Enter a camera nickname.
This name will identify your camera on your smart device. By default, the camera name is EOST6, as shown in Figure 10-22. If that’s okay with you, you don’t have to change the name; just skip to step 5.
If you do want to create a custom name, the keyboard screen works like so:
- Press the Q button to toggle between the text entry box and the keyboard. The blue outline indicates which part of the screen is active. In the figure, the keyboard is active, as it is when you first open the screen.
- To delete the default nickname: First, press the Q button to activate the text box. Press the right cross key to move the cursor to the end of the text, as shown in the figure. Then press the Erase button; each press deletes one character.
- To enter new text: Again, press Q to toggle to the keyboard if needed. Then use the cross keys or Main dial to highlight a character. To enter the character, press Set. If you make a mistake, press Q to switch back to the text box, move the cursor as needed, and press the Erase button to remove the offending character. To enter an empty space, choose the very first character on the keyboard, highlighted in the figure
Your camera nickname can be up to ten characters long.
-
Press the Menu button.
You see a confirmation screen; select OK to move forward and exit to Setup Menu 3. The camera is now ready for Wi-Fi connection.

FIGURE 10-21: Wi-Fi functions are controlled via the two top options on Setup Menu 3.

FIGURE 10-22: The name you enter will be used to identify the camera’s wireless network.
Transferring photos to your smart device
After you complete the steps in the preceding section, follow these instructions to connect your camera to your phone or tablet for file transfer. Note that these steps relate to transferring to a device that doesn’t offer NFC connectivity; I provide a few notes about that option after the steps.
-
On the camera, open Setup Menu 3 and choose Wi-Fi Function, located just below the Wi-Fi/NFC option (refer to Figure 10-21).
The next screen offers two icons: one that looks like a phone and one that looks like a globe.
-
Highlight the phone icon and press Set.
Now you see the Connection Method screen, which offers two options: Easy Connection and Select a Network.
-
Choose Easy Connection, press Set to highlight OK, and press Set again.
On the resulting screen, the camera displays the nickname that you assigned in the steps found in the preceding section. You also see an encryption key, a string of characters that serve as the password to your camera’s Wi-Fi network.
-
On your smartphone or tablet, enable Wi-Fi and then open the wireless settings screen.
Your camera’s nickname should appear on the list of available Wi-Fi connections.
- Select the camera from the list of networks and, when prompted for a password, enter the encryption key shown on the camera monitor.
-
On your phone or tablet, start the Canon Camera Connect app.
If all the planets are in alignment, a screen should appear on your device that asks you to select the camera to finalize the connection.
-
On the camera, press DISP to specify which images you want to access.
You can select All Images, images from just the past few days, images assigned a particular rating, or a specific file-number range. If you choose anything but All Images, you can then set parameters for the file selection.
-
After selecting the types of images you want to access, press the Set button as needed to exit the camera screens.
The monitor goes dark, and the app shows that the camera is connected. Figure 10-23 gives you a look at the Android version of the app; you get the same options on an Apple iOS device, although the window dressing is a little different. (In the name of fair play, I feature the Apple version of the app in Chapter 12.)
-
On your device, choose Images on Camera.
Thumbnails of your images appear, as shown on the right in Figure 10-23.
-
To transfer an image, tap its thumbnail and then tap the send to device icon, labeled in the figure.
A progress bar appears as the file is sent to the phone or tablet.

FIGURE 10-23: In the Canon Camera Connect app, tap Images on Camera (left) to view pictures stored on the camera memory card (right).
That’s the basic concept; here are a few more pieces of the puzzle that may help:
- After you get to the thumbnails screen, you can adjust a few aspects of the file transfer by tapping the icon labeled “Access settings” in Figure 10-23. For example, you can specify whether you want to send the file at its original size or create and send a lower-resolution copy. (The copy is stored only on your smart device, not on the camera.)
- Where the image files end up depends on how you have picture storage set up on your device. Look for the Camera Connect app in your device’s main settings panel to sort this out. You may need to give the app permission to access the photo-storage folder on the device.
- For NFC transfer, look for the camera’s NFC thing-a-ma-jingy on the left side of the camera, just forward of the door that covers the connection ports. I labeled the spot where the NFC connection lives in Figure 10-24. Bring the device’s NFC antenna into contact with that mark until a message on the camera monitor says that the connection is established. Then move the two devices apart. At that point, the Camera Connect icon should launch automatically on the device.
- While a Wi-Fi connection is active, the lamp labeled on the right side of Figure 10-24 lights. You can’t access any camera functions by using the camera’s own controls while the devices are connected. (See Chapter 12 to find out how to use the device as a remote-control for the camera.)
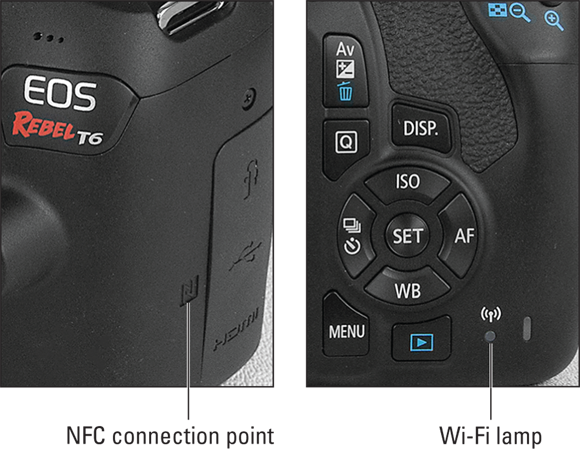
FIGURE 10-24: Here’s where to find the NFC connection point (left) and the Wi-Fi connection lamp (right).