
7The Lens Correction Tab
There is no such thing as the perfect lens. Many lenses are sure to suit your personal shooting style and deliver near-perfect results, but a lens is nevertheless an optical/mechanical system that has physical limits and is subject to the variations in quality that are part of every manufacturing process. More than cameras, lenses are also subject to the Pareto principle, which states that the final 20 percent increase in quality costs 80 percent of the resources involved in the process. It is not without good reason that ultra-high-end lenses often cost as much as a small car.
Put simply, lenses are imperfect systems and the results of using them sometimes have to be corrected using software. Dedicated software packages such as ePaperPress’s PTLens remain popular, but as so often in the context of digital image processing, it’s preferable to perform as many lens corrections as possible during the raw conversion process. This chapter looks at the tools in the Lens Correction panel and explains how to use them to produce optimum results.
7.1Lens Corrections and Profiles
In addition to its camera profiles (see section 1.3), Capture One uses lens profiles to describe the known limitations of a lens. Not all “errors” detract from the quality of the images a lens produces—for example, many people consider brightness falloff toward the edges of the frame to be an aesthetically pleasing effect and often add it artificially to finished images (see section 6.5). Distortion is more of an issue, and although some distortion effects produce photos with a unique look, they are usually a hindrance to the process of realistic image capture. This is where lens profiles come into play. ![]() 7.1
7.1
Lens profiles describe precisely measured lens errors such as distortion, chromatic aberrations, and brightness falloff.
Capture One Pro is supplied with a huge range of built-in lens profiles that also includes the latest Sony/Zeiss lenses, so there is a good chance that your lens is supported. If not, you can use one of the two built-in generic profiles that are based on the assumed errors produced by a nominal virtual lens. This approach is, of course, a compromise and is not suitable for correcting complex issues such as mustache distortion. ![]() 7.2
7.2

7.1 Within the rendering pipeline, lens corrections run parallel to basic develop settings such as the camera profile and Curve adjustments. However, because they use a lot of processing power, I recommend that you perform them at the end of your workflow.

7.2 Lens profiles are selected in the Profile drop-down list. Capture One makes recommendations based on the metadata stored with your images.
Unfortunately, because Capture One has no lens profile creator like the one Adobe provides for use with Lightroom, the generic profiles are the only option if your particular lens isn’t supported. Currently, only Phase One can generate lens profiles for Capture One and, as explained in section 7.4, LCC profiles are not a real alternative to “proper” lens profiles.
The people at Phase One will profile any lens they can get their hands on. If you have a “problem” lens that you often use, open a support query at the Phase One website—if possible, your lens will be included in a later release.
Corrections are simple to perform for supported lenses. The Distortion slider corrects distortion described by the lens profile, whereas Sharpness Falloff attempts to recover the lost sharpness (especially in the corners of the frame) that often plagues wide-angle lenses. However, be warned that the tool cannot perform miracles and can only approximate where no image data is available in the original file. The Light Falloff slider corrects the vignetting effects that often occur when you shoot at maximum aperture using a wide-angle lens.

7.3 The Lens Correction tool
Chromatic aberrations are errors that occur when a lens incorrectly focuses red and blue light waves and produces blue or purple fringing effects at high-contrast edges. As with the Purple Fringing tool (see section 7.3), this option doesn’t necessarily require an appropriate lens profile to work, and if no profile is available, Capture One analyzes each image individually and creates corresponding correction values. If you want to analyze multiple images simultaneously, select them in the Browser and choose the Analyze option in the action menu located next to the Chromatic Aberration check box.
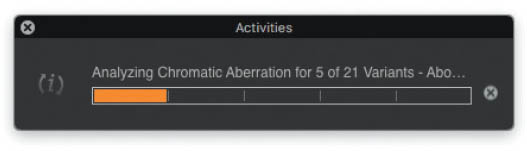
7.4 Analyzing multiple images can take some time, but the program opens a pop-up window to keep you informed of progress.
The Hide Distorted Areas option automatically crops the Browser view of your image to remove any unwanted edge detail that’s created when you adjust the Distortion slider.
With version 10, Capture One introduced a new option to the Lens Correction tool: Diffraction Correction. Diffraction may appear with closed-down apertures. The smaller the sensor, the earlier diffraction occurs. Images then look “soft” when zoomed in to 100%. For APS crop sensors and full-frame sensors, the rule of thumb is that diffraction can become a problem, image-quality wise, between f/8 and f/11. Go below that, and diffraction is almost guaranteed to muddle up your shots. This is where Capture One’s Diffraction Correction comes in. Based on EXIF information in your image files—which contains the camera model (and thus, sensor size), lens, and aperture used—Capture One can guesstimate the amount of diffraction that has likely occurred and try to counteract it. In effect, this results in an automated and not too harsh presharpening of your images, similar to what one might do with raw files to counter the effects of the demosaicing process (chapter 9).
As is often the case with correction settings in Capture One, Diffraction Correction cannot add information to your files that wasn’t there to begin with. But Capture One will try its best to reconstruct image detail. If you often need to work with small apertures—for example, for landscape photography with apertures between f/16 and f/22, or even smaller—give Diffraction Correction a shot.
QUICK TIP
Lens corrections use a lot of processing power and slow down even the most powerful CPUs and graphics cards. Only apply lens corrections when you’re done with most of the other steps you wish to perform. If you don’t want to perform any lens corrections, deactivate the tool using the Disable Default Lens Correction option in the tab’s action menu. This prevents the program from automatically loading recommended lens profiles and noticeably speeds up all other processing steps, especially if you’re using a notebook.
7.2The Movement Tab
Tilt/shift lenses are traditionally used to correct errors such as converging lines in architectural photos, but they have recently gained popularity for producing fake miniature-style effects.
Use the Tilt/Shift options to optimize the effect of your lens profile.

7.5 Although it isn’t what tilt/shift lenses were designed to do, the fake miniature effect has recently become so popular that even smartphone cameras have built-in fake miniature tools.
When you apply conventional tilt and/or shift movements, the data stored in the lens profile is no longer correct for the situation at hand, and this is where the Movement tab in the Lens Corrections tool comes in.

7.6 If the focal length and aperture values were recorded with the EXIF metadata in your image, Capture One will automatically enter those values into the appropriate boxes in the Movement tab.
All you have to do is enter the movements you make with your lens (“x” stands for horizontal and “y” for vertical movement). These then adjust the values stored in the lens profile to match the degree of shift. You don’t have to enter tilt data because tilting the lens has no effect on the lens profile.
The horizontal and vertical shift values optimize the effect of the current lens profile without altering or negating the shift effect you apply in your lens. The more distortion the lens produces, the stronger the effect of the shift values. In other words, the image itself isn’t altered, and instead of having their effects increased, the distortion and light falloff corrections simply function more precisely.
7.3Purple Fringing
Purple fringing occurs at high-contrast edges and in areas with fine texture such as the branches of a tree shot against a bright sky, the spokes of a bicycle wheel, or chainlink fencing. Reflections in metal surfaces also produce fringing effects when their wavelengths differ from those of the actual subject.
In earlier versions of Capture One, purple fringing correction took the form of an additional slider in the Lens tool tab in the Lens Correction tool and only worked if an appropriate lens profile was available. Since version 8, the function has been turned into a separate tool that works without a lens profile and is also available as a local adjustment.
The Defringe slider works independently of the active lens profile but works best if the profile matches the lens.

7.7 The Purple Fringing tool is clearly laid out and simple to use.
Like the Chromatic Aberration function (see section 7.1), the defringing algorithm incorporates the data from the lens profile (if available) but is capable of working on its own if necessary. The results of working without a profile vary in quality and also depend on the particular combination of camera, lens, and subject.

7.8 Purple fringing effects can often be effectively removed without the help of a lens profile.
As with many of the tools we have already described, the best way to get a feel for the tool is to experiment with low values rather than dialing in the maximum possible effect. It also helps to clone your image before you begin (right-click and choose Clone Variant) and compare your results with the original. Because it is often applied to highly detailed images, the Defringe tool produces side effects (such as destroying other purple textures) that are easy to overlook, so comparing your before and after versions will help you keep unwanted effects in check. But don’t worry—the effects the tool produces are usually quite subtle.
QUICK TIP
If the Defringe tool doesn’t help, you can always use the Color Editor to remove fringing effects. Most fringes are the same color, so all you have to do is use the Color Picker to select a fringed detail and desaturate it, and then correct for brightness differences. If further purple details are affected, use the tool as a local adjustment. See section 5.6 for more on the Color Editor and chapter 10 for a comprehensive look at local adjustments.
7.4LCC Profiles—For More than Just Lens Correction
In section 7.1 we explained why you need a proprietary Phase One lens profile to achieve the best possible lens correction results. However, even if your lens isn’t supported, you can still use Lens Cast Calibration (LCC) profiles to correct some lens errors.
LCC profiles are used to correct light falloff and color casts but not distortion. They can also be used to eliminate the effects of dust on the camera sensor.

7.9 The LCC tool uses a test shot to create a custom lens profile.
Because LCC profiles are designed to work with a single combination of camera, lens, aperture, and exposure time, you’ll usually need to shoot a test shot for each image to be sure of getting accurate results. In other words, an LCC profile corrects a specific image rather a specific lens—in theory, at least.
Many photographers save up to eight LCC profile presets per lens and use them to make general lens corrections. If you take this approach, you can simply select the appropriate profile—f/8 or wide open, for example—that matches the image you’re working on.
IMPORTANT
LCC profiles aren’t a replacement for “proper” lens profiles, which are more precise and correct a wider range of errors. LCC profiles can correct neither chromatic aberrations nor distortion, but can be used to perform additional dust and spot removal. Always use Phase One profiles if they’re available.
To create an LCC profile, you need the following:
- Time to capture test shots
- An appropriate test subject
The first item is self-explanatory. If, for example, you’re a reporter working in constantly changing surroundings, you may not have time or the opportunity to capture an LCC test shot.
The question of what makes an appropriate test subject is of more interest, and you have two basic options. The first is to capture an image of a spectrally flat, evenly lit neutral gray or white target that fills the entire image circle. Targets are available in a variety of shapes and sizes that fill all three channels with unvarying neutral light. If you’re using a wide-angle lens, and especially one with a relatively large close-focus distance, you’ll have trouble filling the image circle—unless, of course, you use an extremely large (and therefore expensive) target.
Using an opaque filter is often more practical than using a target to capture an LCC test shot.
The alternative is to use an opaque white balance or exposure correction filter to take a test shot of a bright subject such as the sky. ExpoImaging’s ExpoDisc is probably the best-known commercial white balance filter on the market. It is made of a material that allows precisely 18 percent of the (spectrally flat) incident light to pass, rather than reflecting light the way a target does. The ExpoDisc is a precision tool manufactured to extremely fine tolerances and is correspondingly priced. The ClearWhite system is cheaper but just as good.
Because the LCC tool doesn’t require the use of a high-end filter, you can use easily available materials to make your own—for example, try using the milky-white plastic lid from your next can of Pringles chips.

7.10 The lid from a Pringles can is not as exactingly manufactured as a dedicated filter but is good enough for creating custom LCC profiles.
Thanks to the industrial methods used to manufacture them, these lids are of even thickness and, because LCC profiles don’t correct distortion, the molding mark in the center doesn’t adversely affect the test shot. Scratches on the lid are too large to be mistaken for dust spots by the algorithm.
QUICK TIP
Don’t scrimp on your filter if you don’t have to. Let’s face it, a filter for $50–$100 doesn‘t make a huge difference to a camera kit that costs several thousand dollars. Is it more important to save time or money? Do you like dabbling with home-build projects, or do you consider them a waste of effort? It’s up to you to decide.
7.4.1LCC as a General Use Lens Profile
The following steps explain how to use LCC profiles to replace some of the functionality of proprietary lens profiles:
LCC profiles cannot completely replace lens profiles based on precise lens analysis but can still be used to effectively counteract color casts and edge falloff.
- 1.Use your lens with filter or target to capture test shots at all the aperture settings you use regularly. Be sure to include maximum aperture, because this is the setting at which light falloff is usually most marked.
- 2.Open a test image and switch to the Lens Correction tab.

- 3.Click the Create LCC button.
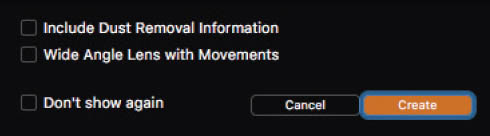
- 4.Uncheck the Include Dust Removal Information option and check the Wide Angle Lens with Movements option if you used tilt/shift movements that you need to compensate for (see section 7.2). Now click Create.
- 5.The test shot will now be marked with an LCC label in the Browser, and the LCC tool automatically activates the Color Cast and Enable Uniform Light options.

- 6.The Enable Uniform Light option corrects edge falloff, and also evens out the light levels across the frame. Depending on how well you were able to shoot your target or through your filter for the test images, the LCC profile will correct “too much”—perhaps, for example, the algorithm tried to correct for a shadow in the middle of the frame, which happened to be a cloud you overlooked when you took your test shot against the sky. If you are unsure whether Uniform Light works as intended, level it down with its slider or disable it completely, and use Light Falloff in the Lens Correction tool instead.
- 7.Go to the Manage Presets menu (the button with three horizontal lines in the tool’s title bar) and select Save User Preset.
- 8.Check the Profile option in the Save Preset dialog and click Save. Be sure you give your new profile an easily identifiable name that includes the name of the lens, its focal length, and the aperture setting you used to make the test shot.

7.11 For a generally usable LCC profile, be sure you leave Dust Removal disabled.
Now that you’ve saved your new profile to the Capture One presets library, you can delete the test shot. You can apply your new profile via the Manage Presets menu in the LCC tool or by using the Adjustments > Styles > User Presets > LCC command.

7.12 Selecting an LCC profile to correct selected images. If you need to apply multiple presets, activate the Stack Presets option.
If you decide to use LCC profiles this way, remember these tips:
- Always save new LCC profiles as presets. If you delete an LCC test shot without saving a preset, the new profile will be irretrievably deleted.
- Give your profile presets meaningful names. I use the lens name, the focal length, and aperture setting—for example, nikkor-28mm-f2, rather than just profile-1, which doesn’t tell me anything.
- Always uncheck the Dust Removal option for profiles that you’re likely to use regularly. If you clean the sensor regularly (as you should!), the dust data in the profile will quickly become outdated and produce unwanted errors in new images.
- LCC profiles are especially good for correcting light falloff, but only if you use the right aperture setting. The larger the aperture, the more falloff there will be. If you don’t want to take the effort to create separate LCC profiles for each aperture setting, use the LCC tool’s Uniform Light slider to adjust falloff by eye.
- The amount of light falloff and the presence of color casts in images shot with a zoom lens depend on the focal length you set. When using a zoom, you need to create at least three LCC profiles for short, medium, and long focal length settings.
- Color casts appear at different strengths according to the type of camera/sensor and the ISO setting you use. If your sensor tends to produce high-ISO color casts that you wish to correct, create an LCC profile for your camera’s normal ISO setting and the highest ISO setting that you use regularly.
- If you want to correct images immediately with a new LCC profile, select the test shot in the Browser and select the images you wish to adjust while keeping the Ctrl key pressed. Now right-click one of your selected images and select the Apply LCC command.

7.13 If you select images and the LCC test shot simultaneously, you can use the Apply LCC command in the context menu to apply the corresponding profile.
To accelerate the LCC profile creation process, go to the Creating LCC Options submenu in the tool’s action menu (indicated by the three dots), deactivate the Include Dust Removal Information and the Include Technical Lens Correction Data options, and activate the “Don’t show options when creating LCC” option. You can now create new LCC profiles by right-clicking an image in the Browser and selecting the Create LCC command. If you want to simultaneously create profiles for multiple test shots, select them and use the context menu command. And don’t forget to save your new profiles as presets!

7.14 The options located in the action menu determine which corrections a profile will be capable of performing and whether they’re automatically applied.
7.4.2Custom LCC Profiles for Individual Images
As I’ve already mentioned, some photographers take an LCC test shot for every image, even if Capture One provides its own profile for the lens in question. This approach is particularly useful in high-end product photography situations. Editing poster-sized images or double-page magazine spreads involves a lot of resources, and spending a couple of seconds making an LCC test shot during a shoot can save you hours of dust retouching or color correction work at the editing stage.
LCC profiles work best when they’re created for use with a specific image. This approach also enables you to apply automatic dust removal.
Landscape photographers, too, can benefit from creating an LCC test shot immediately before or after capturing an important image. This way, you can be sure to achieve excellent image quality—quality that can mean the difference between success and disappointment, especially in fine art photography situations. There is nothing more annoying than finding a previously undiscovered dust spot after you have had a large-format print made.

7.15 Automatic dust removal can save you a lot of work in critical situations.
To create a dust-removal profile, proceed as described in section 7.4.1. If a shoot involves large numbers of new profiles, Capture One’s batch functionality can save you a lot of work creating and assigning them names:
- 1.Copy all the images you wish to correct and the corresponding LCC test shots to a new Album or session and click the “Toggle primary/selected variants” button in the toolbar (see section 1.8.2).

- 2.Open the action menu and select the Include Dust Removal Information option. If you used a tilt/shift lens during your session, select the Wide Angle Lens with Movements option as well. Finish up by choosing “Don’t show options when creating LCC” in the LCC tool’s action menu.

- 3.Select all your LCC test shots in the Browser while keeping the Ctrl key pressed, right-click one of them, and select the Create LCC command. Depending on how many profiles you’re creating, now might be the right time to take a coffee break.

- 4.Once the progress pop-up has disappeared, your new profiles are ready for action. Because we’re not using the LCC tool as an alternative to “real” lens profiles, we don’t have to save each one separately as a preset.
- 5.To assign profiles automatically to the corresponding images, select all your images and test shots in the Browser, right-click to open the context menu, and select the Apply LCC command.
And that’s it. The new LCC profiles remain assigned to their corresponding images even if you delete the test shots. A profile is deleted only if you delete the test shot without assigning the profile to an image.
Capture One automatically recognizes which profile belongs to which image by comparing the EXIF data stored with your raw originals. Images that were captured using the same exposure parameters as the test shot are automatically assigned the corresponding LCC profile. This function works best if you’re shooting in a controlled (studio) environment or if you adjust your shooting parameters manually. Even the tiniest discrepancies can cause the automatic assignment of profiles to fail, but you can always assign profiles manually if necessary. To do this, copy your LCC settings to the Clipboard by clicking the double-arrow button in the tool’s title bar and click your selected image(s) to apply them.