
8The Composition Tool Tab
The Composition tool tab gathers all the tools you need to alter the geometry of your images—that is, if you enable the Composition tool tab. Most workspaces Capture One Pro 10 ships with leave this tool tab disabled by default, distributing the tools it usually contains to other tabs, such as the Lens Correction tab. This switch is recent and is aimed at providing a less cluttered user interface. Nevertheless, bundling all geometrical tools in the Composition tool tab makes sense, so we’ll stick to tradition with this book. As well as simple functions such as cropping and flipping, the tab includes the more complex Keystone and Overlay tools. This chapter introduces ways to use these tools creatively and also discusses their limitations and the potential pitfalls involved.
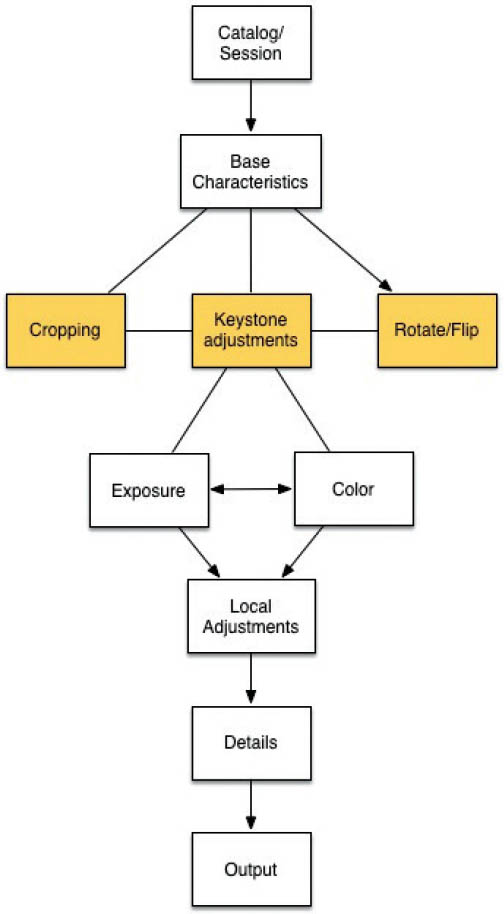
8.1 Because tools such as Vignetting (see section 6.5) and Levels and Curve (see section 6.3) also affect crops and rotations, it makes sense to perform any adjustments that alter the shape or alignment of an image at an early stage in the workflow.
8.1Crop, Aspect Ratio, Grids, and Guides
The purists can protest as much as they like—altering framing on a computer after a shoot is a legitimate and often necessary part of the raw processing workflow. There are plenty of good reasons to crop your images:
Don’t be scared of cropping! Cropping is more of a creative tool than a way of correcting poorly framed images, as shown in the work of Man Ray, photojournalist René Burri, and many other well-known photographers.
- If you use a rangefinder camera, parallax errors make it virtually impossible to frame your subject precisely, regardless of how experienced you are (especially if you’re using a wide-angle lens). A WYSIWYG (what you see is what you get) approach to shooting is only realistic if you use a DSLR with 100 percent frame coverage or live view, if available.
- If you use lenses that produce pronounced pin-cushion or barrel distortion, you’ll probably use the Lens Correction tools to process your images. These tools often crop the edges of an image, requiring additional cropping to balance the final composition.
- If you often shoot portraits with the camera in a vertical position and prefer a 5:4 aspect ratio to the 3:2 ratio that’s standard in most digital cameras, cropping is the answer.
- You prefer to shoot using prime lenses but occasionally miss having a zoom. Using the crop function as a “digital zoom” is a simple solution.
- A client requires multiple formats or enlarged details. Here, too, a crop is the best approach.
The Crop tool offers a cursor function (keyboard shortcut C) as well as grids and guides that you can show or hide using the Cmd/Ctrl+G command.
8.2 The Crop tool (highlighted in orange on the left) has additional grids and guides (highlighted on the right) that help you find precisely the right crop.
8.1.1All About Crops and Aspect Ratios
Cropping is simple—select your desired aspect ratio (unconstrained, original, or one of a range of other presets) and drag the frame to size in the Viewer.

8.3 The Crop tool is clear and simple to use.
As well as this standard functionality, Capture One offers a number of additional features:
- The program always fills the selected aspect ratio as far as possible with the selected Size setting, but you may have to manually enter new height or width values to completely fill the frame.

- If an active process recipe includes a fixed image size, the Viewer displays the fixed size, not the size of your original image file. If the output size cannot be retained—for example, because it doesn’t fit the aspect ratio—the side that doesn’t fit is labeled with red rather than orange digits.

- A process recipe also determines the units you can use in the Crop tool and which are displayed in the Viewer. You can only alter the units if you select the “Fixed” Scale option in the recipe.

- The Output option doesn’t constrain the ratio but labels the sides in red until the ratio fits.
QUICK TIP
If the Crop tool doesn’t work as you expect or the Viewer displays red digits, this is usually due to the settings in the active process recipe. See chapter 13 for more on process recipes.
To save a specific aspect ratio as a preset, select the Add Aspect Ratio item in the Ratio drop-down list.
Aspect ratios that you save as presets are automatically added to the drop-down list in the Crop tool.

8.4 Use the New Aspect Ratio dialog to save custom settings like the 16:9 ratio shown here. As ever, always use a meaningful name for your presets.
The Crop Outside Image option enables you to work with image areas that are automatically cropped when you make Keystone (see section 8.3) or other distortion-based corrections. Automatically cropped areas remain part of the original image but are not displayed in the Viewer.

8.5 The Crop Outside Image option enables you to include automatically cropped image areas in the frame.
If you crop outside the processed image area, the discarded image areas are retained as transparent areas in the outputted image. You can then use a program like Photoshop to fill the transparent areas and recover details that would otherwise be lost. ![]() 8.6
8.6

8.6 This image was corrected using the Keystone tool and the new crop lies outside the displayed image area. You can fill the discarded area (shown in gray) using the Photoshop Clone Stamp or Content-Aware Fill (or similar) tools.
Improving Crop Mask Visibility
Capture One’s default settings mask the cropped areas with a very dark color and the frame itself has neither an outline nor handles, making accurate cropping quite tricky, especially if you’re cropping photos of dark subjects.

8.7 Where the blazes are my handles?
To make life easier, navigate to the Preferences dialog and set a lighter color using the Brightness slider in the Mask section of the Crop tab. Switch the Show Frame option to Always. This makes it much easier to see the edges and corners of the mask.

8.8 A lighter mask and a visible frame make cropping much easier.
8.1.2Grids and Guides
Grids and guides are not always necessary and are not up everyone’s alley anyway, but for those who are used to using a grid in their camera monitor or viewfinder, the Capture One version of the feature will be a welcome bonus.
Grids and guides help you judge the effectiveness of your composition and make the right crops.

8.9 Live View and Capture One—you don’t have to do without your familiar helpers during processing.
You can show and hide grids and guides by using the Cmd/Ctrl+G shortcut or by clicking the button in the toolbar. The default settings only show the grid when you alter the shape of the frame or move it around during cropping, but you can, of course, alter these settings using the options in the Crop tab of the Preferences dialog.

8.10 The options for adjusting the look and feel of the grids and guides. Additional options are regularly added to Capture One point-releases to accommodate the preferences of various users.
The Show drop-down list determines if and when the grid is displayed using the options During Drag Only, When Grid and Guides On, or Never. You can also set the grid type—the default is a grid of two horizontal and two vertical lines arranged quite close to the center of the frame to form a three-by-three grid. The Type dropdown, though, gives you a slew of other options, from a simple center cross to the golden ratio to the famous Fibonacci spiral.

8.11 Have an art degree? Capture One loves to accommodate you.
QUICK TIP
If you prefer a classic grid view, then experiment with the number of lines in the grid. If you use it to adjust your composition, between two and five lines create a pattern that is similar to the golden section. If you need to check alignment or the straightness of lines within the frame, use 10–12 lines to give yourself plenty of reference points without obscuring the subject.
The grid type can be altered only in the Preferences dialog and not on the fly, but you can use adjustable guides to help you analyze different parts of an image while you work.

8.12 The options for creating new guides or locking and deleting existing guides are located in the View menu.
Create new guides using the View > Add Guide command. When the cursor touches a guide, it becomes a double-headed arrow that indicates that you can drag the guide within the Viewer frame. Use the Lock Guides command to lock in the current position. Clear Guides deletes all current guides, and you can remove individual guides by dragging them outside the Viewer window.
Creating Previews That Work on Facebook and Other Social Networks
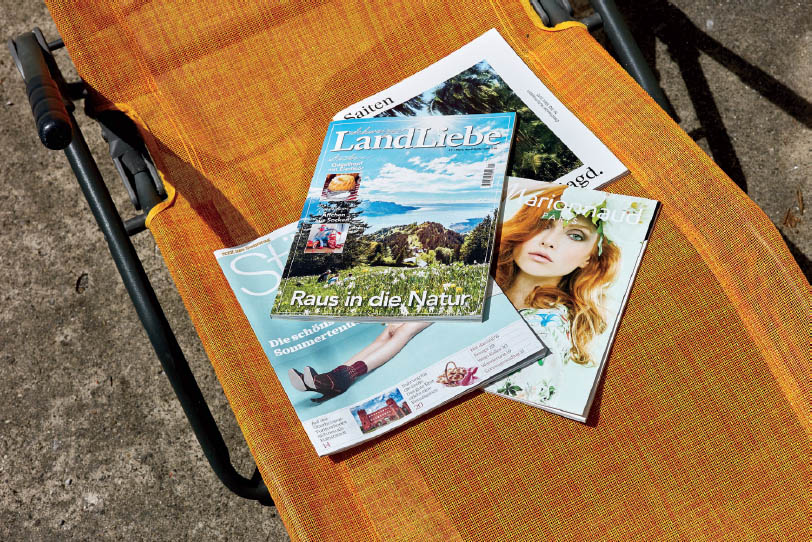
Facebook and other social and photo-sharing sites often show only a square detail as a preview, and it’s a matter of luck whether the selected detail is actually the subject of the photo.

8.13 These square previews look nice, but if the subject is outside of the automatically selected detail, the images don’t have their full impact.
To get people clicking your images in online albums, you can select your own preview details with the help of (locked) guides.

8.14 Square guides help you to select the right detail for publishing as an online preview.
You can show or hide the guides at any time using the Cmd/Ctrl+G shortcut and align or crop your image to fit within them.
Photo-sharing sites and social networks don’t dictate the actual image format, and it’s up to you to decide which you use. However, square guides will help you estimate in advance whether you’ll have to tweak your previews to maximize their effect. If you’re out and about, it is often simpler to tweak your images before you upload them than it is to use web-based tools later on.
8.2Rotate, Flip, and Straighten
Rotate and flip tools are part of the basic toolset in every raw converter or image-processing program.

8.15 The Rotation & Flip tool panel
The Angle slider determines the degree to which your image is rotated, and you can adjust the value either by typing values into the boxes or by dragging the slider with your mouse. You can then fine-tune the result by clicking in the text box and using the up/down arrow keys. One click up adjusts the value by 0.01 degrees (or 0.1 degrees with the Shift key pressed). Grids and guides (see section 8.1) help you align your image accurately.
The left/right arrow keys rotate the image by 90 degrees let and right, and the Flip drop-down list gives you horizontal or vertical flip options. This is all pretty basic stuff, but the most interesting feature of the Rotation & Flip tool panel is the button with the circular arrow and a plus sign at the right-hand end of the tool panel. This is the Straighten tool.
Grids and guides are a great aid to accurate image alignment.
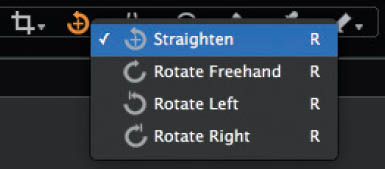
8.16 The Straighten tool is activated by using the button in the Rotation & Flip tool panel, the button in the Cursor Tools menu bar (see section 1.5.1), or the R shortcut.
This cursor tool has various options that are revealed by a click-and-hold on the button. The default option is Straighten. This enables you to use the cursor to draw a line in the Viewer that then becomes the new horizon or vertical reference line. The software automatically realigns the image to match the line you’ve drawn.

8.17 Two clicks, or a click-and-drag, are all it takes to correct a sloping horizon.
QUICK TIP
The Straighten tool also works when the Viewer image is zoomed, enabling you to realign it more precisely—after all, clicking just one pixel too far can equate to several degree-minutes of unwanted rotation.
The other Straighten options are Rotate Freehand, Rotate Left, and Rotate Right. The last two options have the same effect as using the arrow keys, whereas the Freehand option uses the mouse to drag the image to your desired angle just like you’d use a fingertip to straighten a print on your desk.
As usual, it’s up to you to decide which approach best suits the way you work. Rotate Freehand is easiest to use with a graphics tablet and pen (see section 2.4), whereas Straighten is easier to use with a mouse or trackball. Whichever you decide on, you’ll probably have to fine-tune the results using the angle boxes and guides anyway. A grid made up of 10 or more horizontal or vertical lines and a switch to the 66% view will help you judge the overall effect of your adjustments. If you straighten images regularly as part of your workflow, you can set up the default grid in the Crop section of the Preferences dialog (see section 8.1.2). But people have their own personal preferences—some people play first-person shooters using a trackpad, whereas others need a 12-button gaming mouse to feel comfortable.
8.3Keystone
The Keystone tool enables you to correct converging verticals and horizontal lines that are no longer parallel. Here, too, you can enter precise values, make adjustments with sliders, or experiment with the Viewer image using your mouse.
The Keystone tool is aimed primarily at architectural photographers but has its uses in other situations as well.
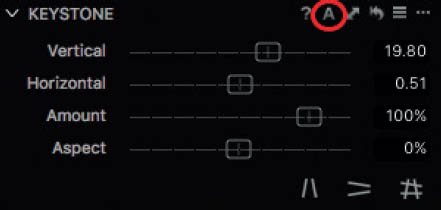
8.18 With the exception of the highlighted button, all of the options in the Keystone tool work the same with every type of camera.
The A button in the Keystone tool is different from the one in Capture One’s other tools. It doesn’t perform automatic perspective correction like the equivalent Lightroom tool and is only designed to work with data gathered by the gyroscope built into Phase One’s IQ-series medium-format digital backs.
Because most camera manufacturers write gyroscope data to raw files in a proprietary format, the program cannot interpret third-party data. If you use an IQ back, the Auto button will use the gyroscope data recorded with your images to automatically correct distortion caused by the camera tipping. If you use any other type of camera, you can ignore the A button.
If you don’t have an IQ back, you’ll have to perform your perspective corrections manually using the following options:
- Vertical: Corrects converging verticals.
- Horizontal: Corrects horizontal distortion (for example, lines that are no longer parallel).
- Amount: The degree to which the previous adjustments are applied.
- Aspect: This slider readjusts your image to compensate for vertical compression or stretching caused by the application of extreme adjustments.
You’ll usually need to use a grid or guides to help you adjust an image using the sliders or manually entered values (see section 8.1.2). As usual, you can alter values entered in the boxes using the arrow keys. The up/down arrow keys alter values in increments of 1 (or 10 with the Shift key pressed). Once you’ve made your basic adjustments, you can fine-tune the results.

8.19 You can activate grids and guides by clicking the button in the toolbar or by using the Cmd/Ctrl+G shortcut. They are a great aid to manual perspective correction.
Instead of entering values or playing with the sliders, you can perform perspective correction in the Viewer window using your mouse to draw horizontal or vertical lines the same way as you did with the Straighten tool (see section 8.2).

8.20 The three keystone buttons at the bottom right in the tool panel determine whether you correct horizontal or vertical distortion, or both, as shown here. But beware: Images of buildings from the Brutalist movement aren’t the only ones that might need manual corrections with the Keystone tool afterward.
Use the circular handles to move the reference lines to the position of the lines you wish to correct and click the Apply button that appears in the Viewer image.
Keystone corrections are made on top of any rotations you have applied (see section 8.2). If you readjust a rotation after performing a keystone correction, you’ll have to readjust that, too. In other words, it pays to perform keystone corrections before you straighten the horizon. You’ll still probably have to make minor adjustments to your keystone correction following straightening, but these will be much less hassle if you straighten first.
Straightening Wide-Angle Images
Distortion is particularly prevalent in wide-angle shots and can quickly spoil the effect of an image. If you’re using a wide-angle lens to capture as much detail as possible within the frame but strongly converging lines or an exaggerated vanishing point ruin the effect (or if you simply want to capture front-on images of buildings without any distortion), the Keystone tool is the one to use. The following steps explain how to get the best results:
- 1. We begin by selecting an image and cloning it using the Clone Variant command in the Browser context menu. Then we switch to the Composition tool tab.
- 2. We show the grid to gain an impression of the degree of distortion in our image.

- 3. At a first glance, the only issue in our sample image is the converging verticals. We correct these using the Keystone Vertical option in the Keystone tool.

- 4. Unfortunately, we overdo the angle, making the result look slightly strange. To compensate, we adjust the Vertical slider and slightly reduce the Amount setting.

- 5. That’s more like it. But the image is now on a slope and the camera no longer appears to be perpendicular to the front of the building. We select the Keystone tool (using the K shortcut) to set the horizontal lines in the building back to parallel.

- 6. We use reference lines to align the image before clicking Apply.
- 7. Nearly there, but there’s still a hint of a slope. We add a guide (View > Add Guide > Vertical) near the center of the frame.

- 8. We switch to the Rotation & Flip tool, click the Angle box, and adjust the value using the arrow keys.

- 9. To finish up, we reduce the Amount value as far as possible while retaining a natural look in our image. We can now compare our result with the clone we made in step 1 to see if we’ve achieved the result we were looking for or whether the original was better, in spite of its imperfections.
IMPORTANT
The Keystone tool can be used to correct extreme distortion but, like all complex manipulations, does so at the expense of image quality. The stronger the distortion you have to correct, the more image data will be lost, especially at the edges of the frame. Strongly manipulated images look fine on the web but are usually too tweaked for use in fine art or reproduction situations. Don’t rely on keystone corrections if you don’t have to and instead get your image as straight as possible during the shoot. Your camera’s built-in gyroscope will help you to keep things level, or failing that, you can use a shoe-mounted level instead. The bottom line is always the same: the less you have to correct your image in post-production, the higher-quality your results will be.
8.4Overlay
The layouts of most magazine covers follow the same formula, with the masthead, body copy, picture, and barcode in the same place every issue. The Overlay tool is designed to help the photographer visualize a cover during a tethered shoot. If Capture One supports your camera’s live view functionality, you can even preview cover effects without taking test shots (see chapter 14). The tool ensures that all of the important elements of the cover image remain visible even when the layout department has done its job.
The Overlay tool aids composition, especially during tethered shooting sessions.
8.21 The Overlay tool makes life easier for photographers who shoot magazine covers.
Aside from cover shoots, the tool has other uses—for example:
- If you’re shooting for a corporate client with a strong corporate identity that dictates precise positioning for its logos and letterhead
- If you’re working on a Photoshop collage and you want to do as much preprocessing as possible at the raw development stage
- If your online portfolio requires a watermark in a specific place within the frame and you want to check its position
- If you’re working on a long-term project (a time-lapse study, for example) for which the camera has to be located in exactly the same position for every shoot
This is just a selection of the situations beyond the realm of medium-format cover shoots in which the Overlay tool can aid your work.

8.22 To aid composition, you can insert a draft cover image—or, as in our example, a calendar mock layout—into the Overlay tool’s preview box.
To insert a draft into the Overlay tool preview window, proceed as follows:
- 1. Drag your draft from the Browser into the frame in the Overlay tool panel. If the draft file is not available in the Browser, click the button with the three dots to select it via your computer’s filesystem.
- 2. By default, Capture One displays draft files at full size (that is, the same size as your raw images). Click Show to overlay the current image with a 50 percent transparent view of the draft.

- 3. Click the hand icon below the draft preview to move the draft within the frame. This feature is great for checking alignment with a printer’s register marks, or a cutout for your photo calendar, as in our example.

- 4. Instead of dragging the draft in the Viewer, you can move it using the Horizontal and Vertical sliders or by entering values in the sliders’ boxes. The Scale slider alters the size of the draft and Opacity its degree of transparency.
Tips for Working with the Overlay Tool
Keep the following tips in mind when working with the Overlay tool:
- If you need to check how a layout that obscures some of the details in your image will look, use a PSD or TIFF file with a transparent background for your draft and set Opacity to 100—your image will then be displayed in the transparent areas, with the masthead and body copy superimposed on it.
- You can use any file format supported by Capture One (including raw) for your draft file. Raw draft files are displayed without any adjustments you have made.
- The draft you have selected applies to all of the images in the Browser. Once you are done with your session, delete the draft via the tool’s Action menu.
- The draft file cannot be output (see chapter 13), which means you cannot produce a photomontage within Capture One. The Overlay tool serves purely as a visual compositional tool, but it saves you from having to do a lot of subsequent compositing work by helping you deliver an image that’s already perfectly positioned, scaled, cropped, and straightened.
- On the subject of long-term sequences: If you use a previous image from your series as your draft, you can overlay your newer work and use the Composition tools to adjust it to match your earlier images.