
15 Using Capture One with Third-Party Software
Capture One was originally designed for use with other programs, and sessions (with their predefined session folders) still represent a simple way to share selected raw files and finished TIFF, JPEG, or PSD copies with other applications. Finished copies can be accessed using filesystem operations or automated using the sync functionality in a media database. An automated system ensures that every time a finished copy is sent to the Output folder, it is automatically imported into your DAM system, for example, or opened in Photoshop. Macros and scripts enable you to scale images for attaching to emails or upload to a photo-sharing website, and can also be used to perform more complex tasks such as transferring the contents of a specific folder to a designated server every time the folder’s contents change. Capture One started life as a “plain” raw converter that formed a single link in the raw processing chain, and today’s Session mode still mirrors those roots.
The introduction of catalogs in version 7 made things a little more complex and positioned Capture One as an image management package. The managed files are still stored in “real” folders, but not always together with their associated metadata and develop settings (see section 4.2). A default output folder like the one in a session folder doesn’t exist in Catalog mode, making it more difficult to use macros and scripts to automate processes. Additionally, you can’t open random files in a catalog, and images have to be imported before Capture One can do anything with them. Catalogs aren’t designed to work with third-party database or DAM software.
This chapter looks at ways of integrating Capture One into a multi-application workflow, either as the key element (see section 15.2) or as a link in the raw processing chain (see section 15.1).
15.1Image Databases and DAM Systems
Maybe you already use an image database or work within a sophisticated editorial/DAM system that manages all your images, videos, and other documents. Or perhaps you want to switch from Lightroom to Capture One for editing purposes but you still want to manage your files in Lightroom. Or perhaps you simply can’t stand Capture One’s Catalog mode and prefer to use a third-party solution such as Media Pro, Apple Photos, or Adobe Bridge to manage your images.
If your workflow includes a third-party database or DAM software, you’re better off using Capture One in Session mode.
There are plenty of reasons to use a third-party database instead of Catalog mode, and this is where Capture One sessions (see section 4.1) come into play. Sessions leave image management to the software of your choice and transform Capture One into a “pure” raw developer and image-editing suite. If you take this approach, you have to decide which role Capture One plays within your workflow:
- 1.It is your main raw converter. You develop and edit all of your images in Capture One but leave managing your originals and copies to a separate database.
- 2.It is a secondary raw developer that you use only when you require specific features that it provides.
And by the way, this is a good time to reread chapter 4.
If you want to use Capture One as the main entry point into your imaging workflow (scenario #1), proceed as follows:
- 1.Copy the images from your camera or memory card to the folders in one or more sessions. Feel free to use the built-in Import Images dialog, which saves all your metadata and develop settings within the session folder rather than in a catalog.
- 2.Develop and edit your images using Capture One and save your finished copies to the session’s default Output folder.
- 3.Import all your copies and original raw files to your database.
- 4.If you need to alter a copy or create a new one, select the corresponding original in your database and open it in Capture One.

15.1 Scenario #1: You develop and edit your images in a Capture One session and then export them to your database/DAM system. You can then reprocess your original raw files in Capture One as necessary.
If you take this approach, you need to consider the following:
- Your database won’t be able to display the adjustments you’ve made to your raw images, with the possible exception of the metadata. If you need to view your adjustments in your database, you’ll have to store processed copies of your images alongside the raw originals.
- Adjustments you make in Capture One aren’t embedded in the raw files and are instead stored in additional .cos sidecar files (see section 4.2). Make sure that you include these in your backups and, if you move your original files to a new location (for example, from a working disk to an archive disk), don’t forget to move the sidecar files, too. Lost develop settings mean lost work!
- Assign as little metadata as possible from within Capture One and use your database to assign keywords and other tags. This saves you from having to make painstaking compatibility checks and experiment with metadata and XMP settings in Capture One. Make sure that tags you’re likely to assign can be correctly interpreted by your database software.
- If you need to make fresh copies or you want to try out a new adjustment, synchronize the metadata in your database in XMP sidecar files (see sections 1.7.2 and 12.3). Open your images and check that the metadata from your database has safely made the transition to Capture One. If not, reload your metadata using the Load Metadata command in the context menu.

15.2 Using the Load Metadata option, either through the context menu in the Browser or through the application Menu > File, enables you to specifically load the most recent meta information for only those images that really need said meta information—for example, because you need keywords in your output copies.
If you only use Capture One occasionally, you can follow the same steps, but begin by creating a new dummy session (see section 4.1.2) and leave all file operations—from importing to saving your finished images—to your preferred main application. In this case the original image files are not part of the session (or dummy session) and instead remain where you saved them using your main application.

15.3 Scenario #2: Your images are stored in your database or another application. Selected images are opened in a dummy session, but the files themselves remain in their original location.
What About Media Pro?
In 2010, Phase One purchased the Microsoft Expression Media software previously known as iView Media Pro and started selling it under the Media Pro banner. All of the new functions that Phase One had introduced were aimed at tightening integration with Capture One, which was originally conceived without image management and catalog functionality.

15.4 Media Pro SE is the current—and perhaps last—version of Phase One’s in-house media management package.
Capture One supports Media Pro better than it supports other DAM systems. For example, you can add session albums and selected images to the Media Pro catalog via the context menu, and Capture One supports albums and collections created in Media Pro. Theoretically, Media Pro can display the current state of your Capture One edits and also knows where the adjustments you make in a session are stored. In other words, if you move or copy images within Media Pro, all subsidiary sidecar files, LCC profiles, and adjustments will be moved, too—theoretically.
In practice, Media Pro’s development has often lagged behind that of Capture One, and the first version of Media Pro that worked well with Capture One 8.0 was released months after version 8.1 hit the market. And, with the release of Capture One 8.2 just a few weeks later, Media Pro once again lagged behind and no longer supported the latest preview and adjustment functionality. In 2016, Media Pro SE appeared on the stage, working perfectly fine with the then-new version 9 of Capture One, which raised hopes for a return to a more tight integration between current versions of Capture One and Media Pro. Those hopes are likely misplaced. As of this writing, Media Pro SE hasn’t been updated in ages, and still feels like a legacy application. The difference to versions 1.x are minuscule and mostly skin-deep. Nowadays, Capture One’s database is more robust and offers more features for image management (such as support for networked collaboration) than Media Pro. It’s questionable whether Media Pro can keep up with Capture One’s fast-paced development cycle.
In spite of its many benefits, I strongly recommend that you use Media Pro (SE) in conjunction with Capture One as you would any other third-party image management package. Don’t expect tight integration, and don’t expect to see the results of your adjustments in Media Pro previews. Media Pro SE works with Capture One Pro 10.1 just fine, but what about 10.2, 10.3, or 11? If you move or copy files using the filesystem, make sure you move your develop settings too, and be sure to back up your sidecar files with your image files. Taking this conservative approach will save you a lot of hassle if future Capture One updates produce new incompatibility issues or if Phase One finally decides to pull the plug on Media Pro.
15.2Plug-ins, Photoshop, and Other Raw Developers
You can use Capture One to perform a lot of editing tasks that you previously had to perform in a separate image-processing application. However, you still have to leave the Capture One environment if you want to use plug-ins like the Google Nik Collection (such as Silver Efex Pro, Viveza, or HDR Efex Pro) or if you want to perform any kind of montage, panorama merge, or major retouching. Such tasks are still the preserve of programs like Photoshop.
Because none of these third-party programs can interpret develop settings made in Capture One, you have to hand over finished copies of your images for further processing. This is the only way to ensure that you produce accurately processed results.
If this is the case, you can probably still process most of your images and manage them in a Capture One catalog, even if you use a different raw converter to process selected files. As discussed in section 9.2.1, cameras with Foveon sensors are not yet supported by Capture One, and it always takes a few weeks (or even months) for Phase One to produce profiles for newly released cameras (see section 1.4). Until Capture One catches up, you have no alternative but to use a different raw converter.
If your particular camera isn’t yet supported by Capture One, you’ll have to use a raw converter from a different manufacturer.
Fortunately, Capture One includes Edit With and Open With functionality that sends images from the catalog to third-party programs.
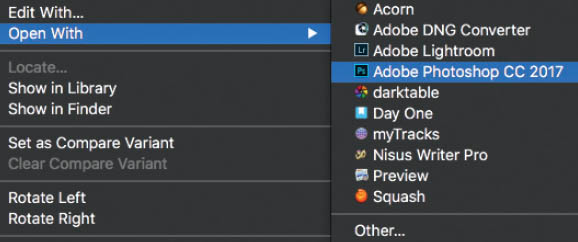
15.5 Whether you use the Edit With or the Open With command depends on the task at hand. The commands are located in the File menu and the Browser context menu.
Edit With creates copies of the selected image(s) and opens them directly in programs and plug-ins such as Acorn, Photoshop, Silver Efex Pro, or Hugin.

15.6 The Edit Recipe dialog is a condensed version of the standard export dialog.
The Edit Recipe dialog contains options for image format and bit depth, enabling you to hand over high-quality 16-bit TIFFs if necessary. You can, of course, adjust these settings to suit the target application. The available settings are largely the same as those found in the Output tool tab and the export dialog, and include the Disable Sharpening and Ignore Crop options (see chapter 13).
Handing Over Images to and from Silver Efex
Silver Efex Pro was already a popular choice among black-and-white photography enthusiasts before it was purchased by Google. As mentioned in section 5.5, the program’s Ansel Adams–style “zone” functionality and built-in curves for a range of analog film types make it ideal for use in a monochrome digital development environment. Many users still prefer Silver Efex to the raw-level black-and-white conversion functionality offered by Capture One. The following walkthrough is based on Silver Efex, but the same steps apply for any program or plug-in that you wish to use in conjunction with Capture One.
- 1.Select an image in the Browser and then click the Edit With option in the Context menu. This opens the Edit Recipe dialog.
- 2.Black-and-white conversions benefit from maximum bit depth in the source material, so leave the Format options set to 16-bit TIFF. Select Silver Efex Pro 2 in the Open With drop-down list. Although it is available as a Photoshop and Aperture plug-in, Silver Efex also works as a standalone application.
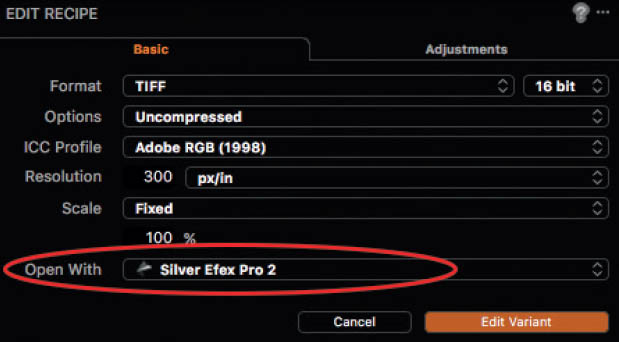
- 3.Click Edit Variant to create a copy of your image and open it in Silver Efex.


Capture One automatically imports the Silver Efex version of your image and displays it next to the raw original in the Browser. You don’t have to know where the new copy is stored and you don’t have to import it manually into the catalog. Also, note in the screenshot how your edited variant kept the original’s metadata, such as color tag and rating.
If Edit With is comparable to a round-trip, Open With is like emigrating to a foreign country.
Open With opens the raw original in your selected application. Because Capture One develop settings are proprietary, this means that none of your adjustments are handed over with the image file. ![]() 15.7
15.7
Additionally, because Capture One doesn’t know where your third-party application saves edited versions of the file, it cannot automatically reimport them into the catalog.
QUICK TIP
The Open With command is useful only if you want to hand over your original raw files to your third-party application and only occasionally process the results in Capture One afterwards. This may be the case if you sometimes use a camera that isn’t supported by Capture One but you still need to manage its raw and copy files in the catalog. Note that you can use Open With to send raw files to any application that’s installed on your computer, whether FTP, mail, a database, or any other image-processing program. Using Open With is a quick and easy way to share raw files without the need to search through your system or archive drives. Think of it like the Share button on your smartphone.

15.7 Open with . . . Photoshop CC sends the original raw file to Photoshop’s Camera RAW module without any settings made in Capture One, including any meta information you might have tagged the file with.
15.3Using AppleScript
Scripting is a popular tool in agencies and photo studios where automation helps to prevent the unnecessary user errors that always creep in when humans perform repetitive tasks. Capture One is fully compatible with Apple-Script, making it simple to script individual tasks or build its functionality into applets. For example, you can use a script to:
AppleScript is a powerful and practical tool, but it’s too broad a subject to address in a single chapter of a book like this.
- Start Capture One.
- Open a session.
- Display the aperture and exposure time of a tethered camera.
- Create an automatically cropped copy of each capture.
- Save a copy of each cropped image in the session’s Output folder.
- Close the session as soon as the camera is switched off.

15.8 Using the OS X AppleScript Editor to write a Capture One script

To embed Capture One in the OS X AppleScript environment:
- 1.Start the AppleScript Editor.
- 2.Use the Window > Library command to open the library.
- 3.Click the “+” button and add Capture One to your library.

15.9 Capture One’s function library is extremely comprehensive but is almost exclusively designed for use in Session mode.
Capture One’s classes and commands will now be recognized by the AppleScript Editor and are available to all other applications in your scripting environment.

You’ll notice that the available classes and commands are largely related to Capture One’s Session mode and tethered shooting (see chapter 14). It’s easy to script how the program should behave before and after a capture or define which recipes to apply, whereas exposure evaluation (see section 5.2) and creative editing steps are more difficult to automate.
It’s up to you to decide whether it’s worth learning AppleScript for the task you have in mind, but if you’re already familiar with the platform, a quick scroll through the available functions might just reveal a way to automate a task that you perform regularly.
If you do decide to use scripts, start small. Don’t attempt to automate your entire workflow from the get-go. Instead, build up a library of short scripts and combine them later as necessary.
Whatever you do, don’t experiment with scripts on important sessions or your “real” image archive. Create test collections and work carefully and methodically. It would be a shame if one mistyped scripting command wrecked the integrity of your entire vacation collection or a client’s images.
QUICK TIP
Because Capture One is historically based on AppleScript precepts, there is currently no scripting solution available for PC users. However, you can still use macros to automate processing tasks. Various freeware macro creation solutions are available (Nemex Studios’ Mouse Recorder, for instance) as well as commercial applications such as N.R.S.’s Ghost Control. Whichever program you choose, you can only automate program functions. Macros cannot access more complex data such as a tethered camera’s exposure parameters or the batch status of an image.