
Now that our application has some real data in it, it would be nice to show it only to the authorized users, not everyone on the Internet. In Catalyst, this is a two-step process. First, we use authentication plugins to determine who a user is. In the simplest case, we ask the user to enter a username and password. If the username is known and the password is correct, we assume that the person at the other end of the connection is the user whose username they specified. If we wanted to be more flexible, we could ask users to log in with OpenID, their Flickr username and password, or Bitcard. Either way, the end result is that we can authoritatively associate a username with the session and then act on that username to grant permission to restricted areas of our application. The granting of permission is the second stage—authorization.
As with sessions, Catalyst handles authentication via an array of plugins. The main plugin is Catalyst::Plugin::Authentication. This plugin calls upon sub-plugins that handle the various details, such as reading the OpenID credentials or looking up a username and password in the database. Regardless of the plugins you use, you'll get a standard program interface. Every logged-in user gets a user object, accessible through $c->user->obj. If you use DBIC to store your usernames and passwords, then this object is a full DBIC resultset for the user's row in the user table. This will allow you to store user preferences in the database right next to their username and password, as well as create relations to other tables. Other backends might not put anything in the object, but the username will always be available via $c->user.
The simplest way to try authentication in your application is via the "Minimal" backend, with a setup like the following in your application's main file:
use Catalyst qw/
-Debug
ConfigLoader
Static::Simple
Session
Session::State::Cookie
Session::Store::DBIC
Authentication
/; __
__PACKAGE__->config( 'Plugin::Authentication' =>
{
default => {
credential => {
class => 'Password',
password_field => 'password',
password_type => 'clear'
},
store => {
class => 'Minimal',
users => {
testuser1 => {
password => "RanDo99",
editor => 'yes',
roles => [qw/edit delete/],
},
}
}
}
);
This will store usernames and passwords directly in the configuration file. This makes testing very easy, as you can add any attributes to the user object by specifying keys and values alongside the password or roles, without having to change your database schema. Another easy way to get authentication going quickly is to generate an Apache htpasswd file and use Authentication::Store::Htpasswd:
__PACKAGE__->config( 'Plugin::Authentication' =>
{
default => {
credential => {
class => 'Password',
password_field => 'password',
password_type => 'clear'
},
store => {
class => 'Htpasswd',
file => '/path/to/passwd.file';
}
}
}
}
);
Once you have an authentication store and some users, you can create an action that reads the username and password from the user and calls $c->authenticate({ username => $username,password => $password }). If the username and password were correct, $c->authenticate will return true and store that fact in the session, so the user doesn't have to reauthenticate to every page. Once the user is logged in, your actions can test $c->user and act upon the information as they see it. When the user is done with his/her session, your application should call $c->logout, which will delete the session data. Later in the chapter, we will see how to use the DBIC to authenticate for the AddressBook application. More details on authentication can be found at http://search.cpan.org/~flora/Catalyst-Plugin-Authentication-0.10016/lib/Catalyst/Plugin/Authentication.pm.
Having just a username isn't particularly useful, unless your application only wants to differentiate between logged-in users and anonymous users. If you'd like to apply different rules to different classes of users for different URLs, you'll want to use some of the Catalyst's authorization plugins.
The simplest authorization plugin is Authorization::Roles. This plugin provides methods for testing if a user belongs to a certain role or class of users. You'll need a backend that supports roles, but fortunately both the Minimal backend and the DBIC backend do. Using roles is very simple. At the beginning of your action, you call $c->assert_user_roles(qw/role1 role2/). This method will throw an exception unless the user is a member of both role1 and role2. For example, an action called edit_management_reports might look like this:
sub edit_management_reports {
my ($self, $c) = @_;
$c->assert_user_roles(qw/manager editor/);
generate_reports();
}
Unless a user is both a manager and an editor, the generate_reports() command will never be called. The user will instead get an access denied error message.
$c->assert_user_role(qw/role1 role2/) works similarly, but only requires a user to possess one (not all) of the mentioned roles. If you want more control over what happens when a user is denied access, you can use $c->check_user_role(s) instead. These methods work like assert_user_role(s), but return true if the check succeeds and return false otherwise. You can check the result in an if statement, and act accordingly:
if($c->check_user_role(qw|administrator editor|)){
do_the_edit();
}
else {
$c->stash->{error} = "You are not authorized to edit this.";
$c->detach('/denied'),
}
This is the most basic way to use roles to control access. A more flexible option is the Authorization::ACL plugin. This plugin allows you to set up per path rules that are tested on each request. If all of the checks pass, the user is allowed to access the page. Otherwise, an /access_denied method is executed instead. This method can display an error to the user, or check some other credentials and allow access anyway.
For example, to use the ACL to disallow access to /admin for non-administrators, your MyApp.pm (or AddressBook.pm) file will look like the following:
use Catalyst qw/ConfigLoader Static::Simple
Session Session::State::Cookie Session::Store::DBIC Authentication
Authorization::Roles
Authorization::ACL/;
# setup sessions, authorization, and authentication
## ACL rules
__PACKAGE__->deny_access_unless('/admin', [qw/admin/]);
This code will check the user's role on every request to /admin. If the user isn't in all of the listed roles (only 'admin' in this case), then the request goes to /access_denied instead of /admin. This rule will also apply to /admin/list/user/123 and anything in a path below /admin.
If you prefer not to use roles, you can also use an arbitrary subroutine:
__PACKAGE__->allow_access_if(
'/bonus/area',
sub { my ($c, $action) = @_;
if($c->user->karma > 50){
return $ALLOWED;
}
else {
return $DENIED;
}
}
);
Here we allow access to /bonus/area only if the user has a karma (as defined by the user object) greater than 50. Otherwise, the /access_denied action is run instead. Note that in this example we have written a custom method that returns true or false based on some condition, which is then used as an input for allow_access_if.
Also, being able to define rules for ACL using __PACKAGE__ allows easy application of arbitrary rules to an entire portion of the application, without having to change any Controller code.
Now that we've had an overview of authentication and authorization, let's restrict access to our address book. To make the management of users and roles as easy as possible, we'll store the user data and role data in our DBIC Model. For now, we'll manually add users to the database and set their usernames and passwords. We'll also optionally associate an entry in the person table with each user, to allow non-editors to edit their own addresses. Finally, we'll create two roles, "viewer" and "editor" and restrict access to the site via an ACL. We'll let viewers view any data and allow editors to mutate that data (edit/create/delete). Also, we'll make an exception—if a user is a viewer but wants to add or delete his own addresses, we'll allow that.
The first step is to create the necessary tables in our database as follows:
$ sqlite3 database
CREATE TABLE user (id INTEGER PRIMARY KEY, username TEXT, password TEXT, person INTEGER);
INSERT INTO user VALUES(1, 'edit', 'editme', 1); INSERT INTO user VALUES(2, 'view', 'viewme', 2); CREATE TABLE role (
id INTEGER PRIMARY KEY,
role TEXT
);
INSERT INTO role VALUES(1, 'editor'), INSERT INTO role VALUES(2, 'viewer'), CREATE TABLE user_role (
user INTEGER REFERENCES user, role INTEGER REFERENCES role,
PRIMARY KEY (user, role)
);
INSERT INTO user_role VALUES(1, 1); INSERT INTO user_role VALUES(1, 2); INSERT INTO user_role VALUES(2, 2);
DELETE FROM people; -- Clear out the database INSERT INTO people VALUES(1, 'Editor', 'Person'), INSERT INTO people VALUES(2, 'Viewer', 'Person'),
Here, we created three tables, a user table to store username, passwords, and the link to the people table; a role table to store a list of roles; and a user_role table to apply roles to each user. Then we added two users, "edit" and "view" with passwords "editme" and "viewme" respectively.
Note
We're using cleartext passwords for testing. When we deploy the application, we'll encrypt the password so that the passwords are not revealed if the database is stolen.
We also added "editor" and "viewer" roles and made "edit" a member of the "editor" and "viewer" role, and "view" only a "viewer". Finally, we created the entries in the people table for each user.
Next, we'll use the Catalyst helper script to create the new schema as follows:
script/addressbook_create.pl model AddressDB DBIC::Schema AddressBook::Schema::AddressDB create=static dbi:SQLite:database
Notice that this should have created three new schema files, Role.pm, User.pm, and UserRole.pm. Note that the helper has already determined the relationship between role and user_role. We will edit User.pm to add the relationship with user_role and people.
Make sure the three schema look like the following:
User.pm
package AddressBook::Schema::AddressDB::Result::User;
use strict;
use warnings;
use base 'DBIx::Class';
__PACKAGE__->load_components("InflateColumn::DateTime", "Core");
__PACKAGE__->table("user");
__PACKAGE__->add_columns(
"id",
{
data_type => "INTEGER",
default_value => undef,
is_nullable => 1,
size => undef,
},
"username",
{
data_type => "TEXT",
default_value => undef,
is_nullable => 1,
size => undef,
},
"password",
{
data_type => "TEXT",
default_value => undef,
is_nullable => 1,
size => undef,
},
"person",
{
data_type => "INTEGER",
default_value => undef,
is_nullable => 1,
size => undef,
},
);
__PACKAGE__->set_primary_key("id");
# Created by DBIx::Class::Schema::Loader v0.04005 @ 2010-04-14 20:54:46
# DO NOT MODIFY THIS OR ANYTHING ABOVE! md5sum:0WYaHOZ/ZNIE1tU7qd3k3A
# You can replace this text with custom content, and it will be preserved on regeneration
__PACKAGE__->has_many(map_user_role => 'AddressBook::Schema::AddressDB::Result::UserRole', 'user'),
__PACKAGE__->belongs_to(person => 'AddressBook::Schema::AddressDB::Result::People'),
__PACKAGE__->many_to_many( roles => 'map_user_role', 'role' );
1;
Role.pm
package AddressBook::Schema::AddressDB::Result::Role;
use strict;
use warnings;
use base 'DBIx::Class';
__PACKAGE__->load_components("InflateColumn::DateTime", "Core");
__PACKAGE__->table("role");
__PACKAGE__->add_columns(
"id",
{
data_type => "INTEGER",
default_value => undef,
is_nullable => 1,
size => undef,
},
"role",
{
data_type => "TEXT",
default_value => undef,
is_nullable => 1,
size => undef,
},
);
__PACKAGE__->set_primary_key("id");
# Created by DBIx::Class::Schema::Loader v0.04005 @ 2010-04-14 20:54:46
# DO NOT MODIFY THIS OR ANYTHING ABOVE! md5sum:h20Spzb/nmESWeqFwzqJUg
# You can replace this text with custom content, and it will be preserved on regeneration
__PACKAGE__->has_many(map_user_role => 'AddressBook::Schema::AddressDB::Result::UserRole', 'role'),
1;
UserRole.pm
package AddressBook::Schema::AddressDB::Result::UserRole;
use strict;
use warnings;
use base 'DBIx::Class';
__PACKAGE__->load_components("InflateColumn::DateTime", "Core");
__PACKAGE__->table("user_role");
__PACKAGE__->add_columns(
"user",
{
data_type => "INTEGER",
default_value => undef,
is_nullable => 1,
size => undef,
},
"role",
{
data_type => "INTEGER",
default_value => undef,
is_nullable => 1,
size => undef,
},
);
__PACKAGE__->set_primary_key("user", "role");
# Created by DBIx::Class::Schema::Loader v0.04005 @ 2010-04-14 20:54:46
# DO NOT MODIFY THIS OR ANYTHING ABOVE! md5sum:fibVKCta/8LNK7VleF0OGQ
__PACKAGE__->belongs_to(user => 'AddressBook::Schema::AddressDB::Result::User', 'user'),
__PACKAGE__->belongs_to(role => 'AddressBook::Schema::AddressDB::Result::Role', 'role'),
# You can replace this text with custom content, and it will be preserved on regeneration
1;
You may notice that we have added custom relationships in the schema file. Following is the explanation of the syntax and usage of these relationships:
- Has_many: In this relationship, the package in which this is defined has a primary key that is accessed by the foreign class. In our example, we have a has_many relationship in
UserandRoleclass, as the ID of both these classes are primary keys inUserRole. The first argument to this relationship is the relationship name, the second is the related classes, and the third is the field in the foreign class that acts as foreign key. The third argument can also be a condition. - Belongs_to: This relationship is complimentary to has_many. It is defined in the class that is referring to another class's primary key. In this example, belongs_to is defined in the
UserRole. As in has_many, the first argument is the relationship name and the second is the name of the foreign class. The third argument can optionally be the field in class that will refer to the foreign class or a condition. - Many_to_Many: This relationship is simple and consists of two has_many relationships. The first argument is the name of the relationship. As many_to_many is just two has_many relationships, the second and third arguments are merely the names of the two has_many relationships.
For more information on relationships in DBIx::Class you may want to refer to http://search.cpan.org/~frew/DBIx-Class-0.08121/lib/DBIx/Class/Relationship.pm.
Now we just need to configure the application to use these schemata in AddressBook.pm as follows:
__PACKAGE__->config( name => 'AddressBook' );
__PACKAGE__->config( session => {
dbic_class => 'AddressDB::Sessions',
expires => 3600,
flash_to_stash => 1,
}
);
__PACKAGE__->config->{'Plugin::Authentication'} =
{
default => {
store => {
class => 'DBIx::Class',
user_class => 'AddressDB::User',
password_type => 'clear', # use salted_hash for real applications
role_relation => 'roles',
role_field => 'role'
},
credential => {
class => 'Password',
}
}
};
# Start the application
__PACKAGE__->setup();
Now our application is set to use authentication information from the database and we're ready to start implementing the guts of our authentication infrastructure. Note that we have used the name of the many_to_many relationship we just set up as the value for role_relation, and the belongs_to relationship name from UserRole for role_field.
Now, we need to create login, logout, and access_denied method. It is a good practice to place these in a separate Controller as follows:
Perl script/addressbook_create.pl controller Auth
Auth.pm (lib/AddressBook/Controller/Auth.pm)
package AddressBook::Controller::Auth;
use Moose;
use namespace::autoclean;
BEGIN {extends 'Catalyst::Controller'; }
extends 'Catalyst::Controller::FormBuilder';

=head1 NAME
AddressBook::Controller::Auth - Catalyst Controller
=head1 DESCRIPTION
Catalyst Controller.
=head1 METHODS
=cut
sub access_denied : Private {
my ($self, $c) = @_;
$c->stash->{template} = 'denied.tt2';
}
sub login : Global Form {
my ($self, $c) = @_;
my $form = $self->formbuilder;
return unless $form->submitted && $form->validate;
if ($c->authenticate( {username => $form->field('username') , password => $form->field('password')} ))
{
$c->flash->{message} = 'Logged in successfully.';
$c->res->redirect($c->uri_for('/'));
$c->detach();
}
else {
$c->stash->{error} = 'Login failed.';
}
}
sub logout : Global {
my ($self, $c) = @_;
$c->logout;
$c->flash->{message} = 'Logged out.';
$c->res->redirect($c->uri_for('/'));
}

=head1 AUTHOR
Antano Solar John
=head1 LICENSE
This library is free software. You can redistribute it and/or modify
it under the same terms as Perl itself.
=cut
#__PACKAGE__->meta->make_immutable;

1;
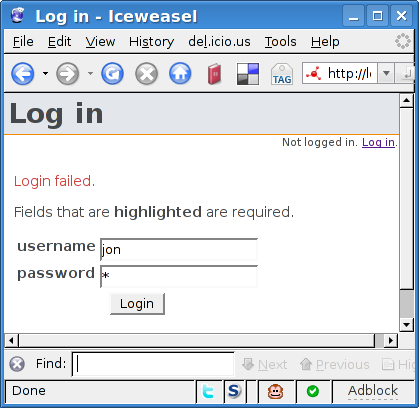
These three actions are very simple. access_denied just displays the access denied template when the user isn't authorized to access a certain page. logout calls $c->logout and redirects the user to the main page, with a message saying that the logout has succeeded. Finally, login reads in a FormBuilder form and checks the provided username and password. If it matches a user database, the login succeeds. If it doesn't match, we let the user try again, while displaying an error message on top of the login form, as shown in the following screenshot:
Notice the use of Global attribute. As mentioned in Chapter 3, Building a Real Application this allows us to call the login action with the /login URI instead of /auth/login.
The login form and login template go in the usual places, root/forms/auth/login.fb for the form definition and root/src/auth/login.tt2 for the template, and are very similar to the forms and templates we've already created:
Login.tt2:
[% META title="Log in" %] [% FormBuilder.render %]
login.fb
name: login
method: POST
header: 1
title: Login
fields:
username:
label: username
type: text
required: 1
password:
label: password
type: password
required: 1
submit: Login
We'll also modify our global header in root/lib/site/layout to show the logged-in user's name:
<div id="header">[% PROCESS site/header %]</div>
<div id="userinfo">
[% IF c.user %]
Logged in as [% c.user.username %] ([% c.user.person.name %])
<a href ="[% c.uri_for('/logout') %]">Log out</a>. [% ELSE %]
Not logged in. <a href ="[% c.uri_for('/login') %]">Log in</a>.
[% END %]
</div>

<div id="content">
[% IF error %]
<p><span class="error">[% error | html %]</span></p> [% END %]
[% IF message %]
<p><span class="message">[% message | html %]</span></p> [% END %]
[% content %]
</div>
<div id="footer">[% PROCESS site/footer %]</div>
Note that the first and last lines should already exist in the file. We'll also need to update the CSS (root/src/ttsite.css) a bit, so that the username displays in a small font on the right side of the screen:
#userinfo {
font-size: .8em;
text-align: right;
}
On restarting the server, you should be able to visit /login, type in a username and password and be logged in! Clicking the logout link should cause Catalyst to forget that you logged in (and allow you to log in again). With that working, we're ready to add the final feature—authorization.
We'll implement authorization in two stages. First, we'll add generic rules to only allow viewers to view pages that contain address data. To the end of AddressBook.pm, after __PACKAGE__->setup(), add the following:
## ACLs
PACKAGE ->deny_access_unless('/person', [qw/viewer/]);
PACKAGE ->deny_access_unless('/search', [qw/viewer/]);
PACKAGE ->deny_access_unless('/address', [qw/viewer/]);
# should always be allowed
PACKAGE ->allow_access('/index'),
PACKAGE ->allow_access('/login'),
We'll also need the template to display when the user is denied access, root/src/denied.tt2:
[% META title="Access denied" %]
[% IF !error %]You are not allowed to access this resource.[% END %] [% IF !c.user %]
<a href ="[% c.uri_for_action('/auth/login') %]">Logging in</a> might help. [% END %]
This template does a few different things. If the user is not logged in, then the page suggests that the user should authenticate and then try again. If an error message has been specified, then that's displayed. Otherwise, a default message is displayed: You are not allowed to access this resource.
The final step is to add a rule to all edit actions to see if a user is a member of the editor role or if she/he is editing his own entry. So, at the top of each editing action, add some code like the following:
# check ACL
$address = $c->model('AddressDB::Address')->...
if($c->user->person)
{
if($address->person->id != $c->user->person->id &&
!$c->check_any_user_role('editor')){
$c->stash->{error} =
'You are not authorized to edit or delete addresses for this person.';
$c->detach('/auth/access_denied'),
}
}
else
{
$c->stash->{error} = 'No Person attached to your login!';
$c->detach('/person/list'),
}
You'll want to add this to the edit and delete actions in AddressBook::Controller:: Person and AddressBook::Controller::Address, modifying the error message as appropriate. You also might want to disallow a user from deleting his/her name, as that will cause the foreign key in the user table to dangle into nowhere.
When you've made those changes, fire up the application and explore the robust access control system that you've created!
Note
When planning ACL for your application, it is neater to have private actions or Controller methods that get called with the roles and error message as arguments.
You may also want to read http://wiki.catalystframework.org/wiki/gettingstarted/howtos/interim_authorization_and_authentication_example.