
Chapter 2. Cluster Architecture, Installation, and Configuration
According to the name of the chapter, the first section of the curriculum refers to typical tasks you’d expect of a Kubernetes administrator. Those tasks include understanding the architecutural components of a Kubernetes cluster, setting up a cluster from scratch, and maintaining a cluster going forward.
Interestingly, this section also covers security aspects of a cluster, more specifically Role Based Access Control (RBAC). You are expected to understand how to map permissions for operations to API resources for a set of users or processes.
At the end of this chapter, you will understand the tools and procedures for installing and maintaining a Kubernetes cluster. Moreover, you’ll know how to configure RBAC for representative, real-world use cases.
At a high level, this chapter covers the following concepts:
-
Role Based Access Control (RBAC)
-
Installation of a cluster with
kubeadm -
Upgrading a version of a Kubernetes cluster with kubeadm
-
Backing up and restoring etcd with
etcdctl -
Understanding a highly-available Kubernetes cluster
Role Based Access Control (RBAC)
In Kubernetes you need to be authenticated before you are allowed to make a request to an API resource. A cluster administrator usually has access to all resources and operations. The easiest way to operate a cluster is to provide everyone with an admin account. While “admin access for everyone” sounds fantastic as you grow your business, it comes with a considerable amount of risks. Users may accidentally delete a Secret Kubernetes object which likely breaks one or many applications and therefore has a tremendous impact on end users. As you can imagine, this approach is not a good idea for production environments that run mission-critical applications.
As with other production systems, only certain users should have full access, whereas the majority of users has read-only access (and potentially access to mutate the system) depending on the role. For example, application developers do not need to manage cluster nodes. They only need to tend to the objects required to run and configure their application.
RBAC defines policies for users, groups, and processes by allowing or disallowing access to manage API resources. Enabling and configuring RBAC is mandatory for any organization with a strong emphasis on security. For the exam, you need to understand the involved RBAC API resource types and how to create and configure them in different scenarios.
RBAC High-Level Overview
RBAC helps with implementing a variety of use cases:
-
Establishing a system for users with different roles to access a set of Kubernetes resources.
-
Controlling processes running in a Pod and the operations they can perform via the Kubernetes API.
-
Limiting the visibility of certain resources per namespace.
RBAC consists of three key building blocks, as shown in Figure 2-1. Together, they connect API primitives and their allowed operations to the so-called subject which is a user, a group, or a ServiceAccount.

Figure 2-1. RBAC key building blocks
The following list breaks down the responsibilities by terminology.
-
Subject: The user or process that wants to access a resource.
-
Resource: The Kubernetes API resource type e.g. a Deployment or node.
-
Verb: The operation that can be executed on the resource e.g. creating a Pod, or deleting a Service.
Creating a Subject
In the context of RBAC, you can use an user account, service account, or a group as a subject. In this section, you’ll learn how to create them.
User Accounts and Groups
Kubernetes does not represent a user as with an API resource. They are meant to be managed by the adminstrator of a Kubernetes cluster which then distributes the credentials of the account to the real person. There are different ways to create an user, as shown in Table 2-1.
| Authentication strategy | Description |
|---|---|
X.509 client certificate |
Uses an OpenSSL client certificate to authenticate. |
Basic authentication |
Uses username and password to authenticate. |
Bearer tokens |
Uses OpenID (a flavor of OAuth2) or webhooks as a way to authenticate. |
To keep matters simple, the following steps demonstrate the creation of a user with OpenSSL. Those actions have to be performed with the cluster-admin Role.
-
Log into the Kubernetes master node and create a temporary directory that will hold the generated keys. Navigate into the directory.
$ mkdir cert && cd cert
-
Create a private key using the
opensslexecutable. Provide an expressive file name, e.g.<username>.key.$ openssl genrsa -out johndoe.key 2048 Generating RSA private key, 2048 bit long modulus ..............................+++ ..+++ e is 65537 (0x10001) $ ls johndoe.key
-
Create a certificate sign request (CSR) in a file with extension
.csr. You need to provide the private key from the previous step. The-subjoption provides the username (CN) and the group (O). The following command uses the usernamejohndoeand the group namedcka-study-guide. To avoid assigning the user to a group, leave off the /O component of the assignment.$ openssl req -new -key johndoe.key -out johndoe.csr -subj "/CN=johndoe/O=cka-study-guide" $ ls johndoe.csr johndoe.key
-
Lastly, sign the CSR with the Kubernetes cluster certificate authority (CA). The CA can usually be found in the directory
/etc/kubernetes/pkiand needs to contain the filesca.crtandca.key. We are going to use minikube here which stores those files in the directory~/.minikube. The following command signs the CSR and makes it valid for 364 days.$ openssl x509 -req -in johndoe.csr -CA ~/.minikube/ca.crt -CAkey ~/.minikube/ca.key -CAcreateserial -out johndoe.crt -days 364 Signature ok subject=/CN=johndoe/O=cka-study-guide Getting CA Private Key
-
Create the user in Kubernetes by setting a user entry in
kubeconfigforjohndoe. Point to the CRT and key file. Set a context entry inkubeconfigforjohndoe.$ kubectl config set-credentials johndoe --client-certificate=johndoe.crt --client-key=johndoe.key User "johndoe" set. $ kubectl config set-context johndoe-context --cluster=minikube --user=johndoe Context "johndoe-context" modified.
-
To switch to the user, use the context named
johndoe-context. You can check the current context using the commandconfig current-context.$ kubectl config use-context johndoe-context Switched to context "johndoe-context". $ kubectl config current-context johndoe-context
Service Account
A user represents a real person that commonly interacts with the Kubernetes cluster using the kubectl executable or the UI dashboard. Some service applications like Helm running inside of a Pod need to interact with the Kubernetes cluster by making requests to the API server via RESTful HTTP calls. For example, a Helm chart would define multiple Kubernetes objects required for a business application. Kubernetes uses a Service Account to authenticate the Helm service process with the API server through an authentication token. This Service Account can be assigned to a Pod and mapped to to RBAC rules.
A Kubernetes cluster already comes with a Service Account, the default Service Account that lives in the default namespace. Any Pod that doesn’t explicitly assign a Service Account uses the default Service Account.
To create a custom Service Account imperatively, run the create serviceaccount command.
$ kubectl create serviceaccount build-bot
serviceaccount/build-bot created
The declarative way to create a Service Account looks very straighforward. You simply provide the appropriate kind and a name, as shown in Example 2-1.
Example 2-1. A YAML manifest defining a ServiceAccount
apiVersion:v1kind:ServiceAccountmetadata:name:build-bot
Listing Service Accounts
Listing the Service Accounts can be achieved with the get serviceaccounts command. As you can see in the following output, the default namespace lists the default Service Account and the custom Service Account we just created.
$ kubectl get serviceaccounts
NAME        SECRETS   AGE
build-bot   1         78s
default     1         93d
Rendering Service Account Details
Upon object creation, the API server creates a Secret holding the API token and assigns it to the Service Account. The naming of the Secret and the token use the Service Account name as a prefix. You can discover the details of a Service Account using the describe serviceaccount command, as shown below.
$ kubectl describe serviceaccount build-bot
Name:                build-bot
Namespace:           default
Labels:              <none>
Annotations:         <none>
Image pull secrets:  <none>
Mountable secrets:   build-bot-token-rvjnz
Tokens:              build-bot-token-rvjnz
Events:              <none>
Consequently, you should be able to find a Secret object for the default and the build-bot Service Account.
$ kubectl get secrets
NAME                    TYPE                                  DATA   AGE
build-bot-token-rvjnz   kubernetes.io/service-account-token   3      20m
default-token-qgh5n     kubernetes.io/service-account-token   3      93d
Assigning a Service Account to a Pod
For a Service Account to take effect, it needs to be assigned to a Pod running the application intended to make API calls. Upon Pod creation, you can use the command line option --serviceaccount in conjunction with the run command.
$ kubectl run build-observer --image=alpine --restart=Never
--serviceaccount=build-bot
pod/build-observer created
Alternatively, you can directly assign the Service Account in the YAML manifest of a Pod, Deployment, Job, or CronJob using the field serviceAccountName. Example 2-2 shows the definition of a Service Account to a Pod.
Example 2-2. A YAML manifest assigning a ServiceAccount to a Pod
apiVersion:v1kind:Podmetadata:name:build-observerspec:serviceAccountName:build-bot...
Understanding RBAC API Primitives
With those key concepts in mind, let’s have a look at the Kubernetes API primitives that implement the RBAC functionality.
-
Role: The Role API primitive declares the API resources and their operations this rule should operate on. For example, you may want to say “allow listing and deleting of Pods”, or you may express “allow watching the logs of Pods”, or even both with the same Role. Any operation that is not spelled out explicitly is disallowed as soon as it is bound to the subject.
-
RoleBinding: The RoleBinding API primitive binds the Role to the subject(s). It is the glue for making the rules active. For example, you may want to say “bind the Role that permits updating Services to the user John Doe”.
Figure 2-2 shows the relationship between the involed API primitives. Keep in mind that the image only renders a selected list of API resource types and operations.
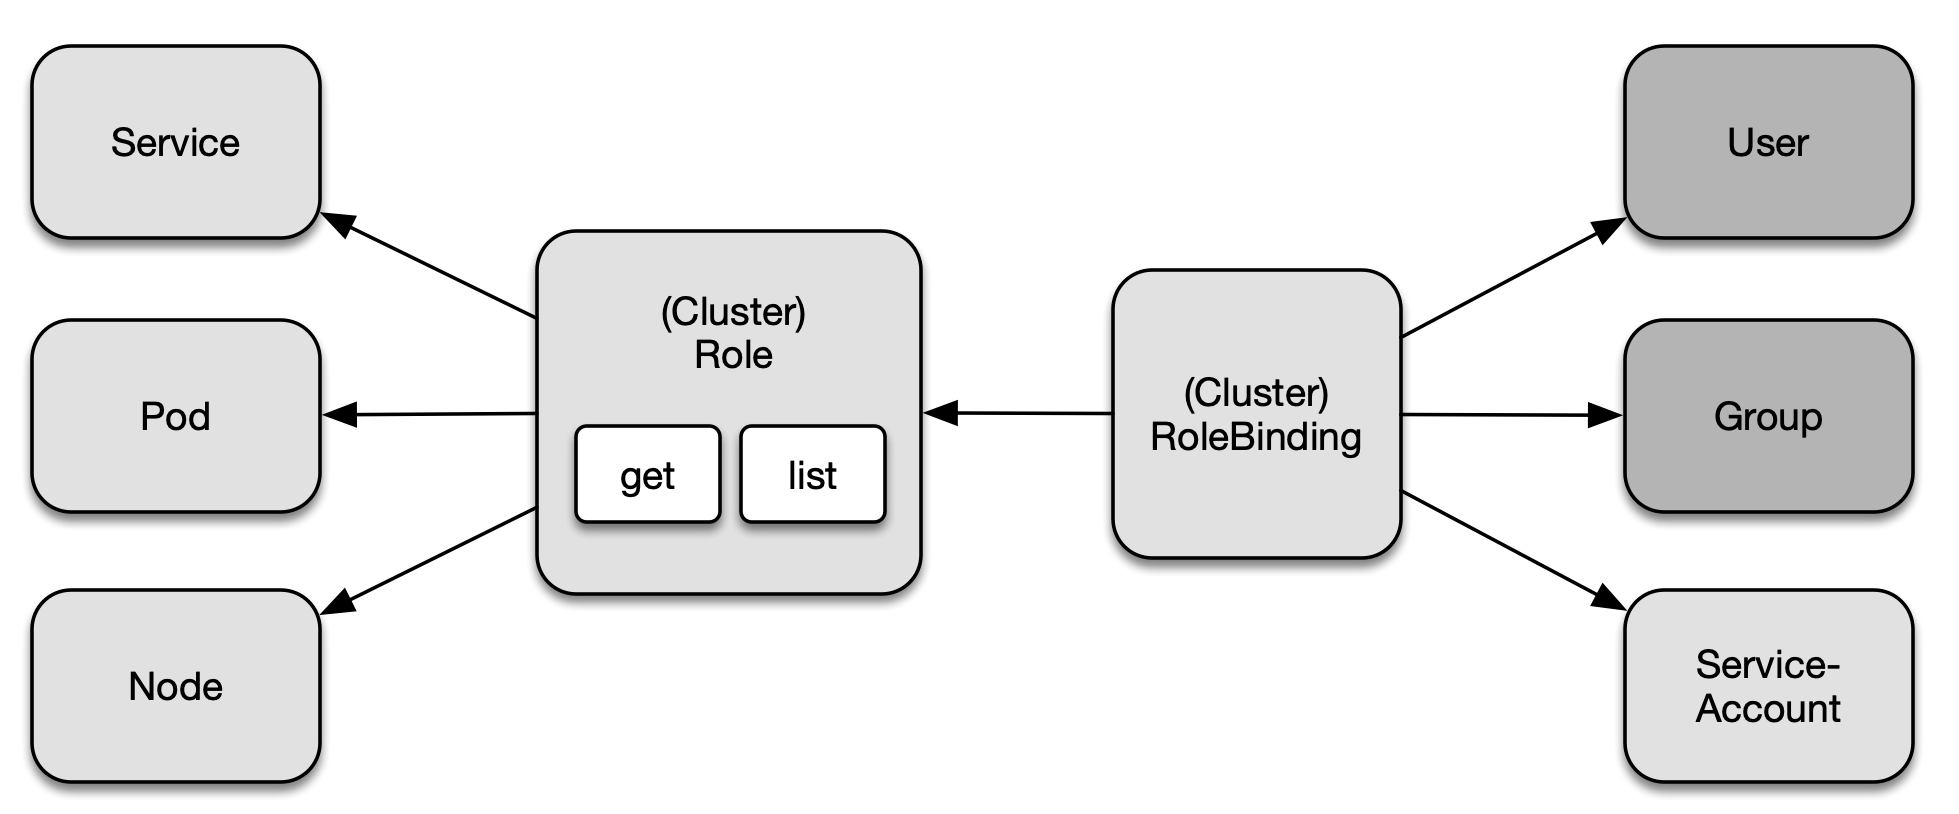
Figure 2-2. RBAC primitives
Namespace-Wide and Cluster-Wide RBAC
Roles and RoleBindings apply to a particular namespace. You will have to specify the namespace at the time of creating both objects. Sometimes, a set of Roles and Rolebindings needs to apply to multiple namespaces or even the whole cluster. For a cluster-wide definition, Kubernetes offers the API resource types ClusterRole and ClusterRoleBinding. The configuration elements are effectively the same. The only difference is the value of the kind attribute.
-
To define a cluster-wide Role, use the imperative subcommand
clusterroleand the kindClusterRolein the YAML manifest. -
To define a cluster-wide RoleBinding, use the imperative subcommand
clusterrolebindingand the kindClusterRoleBindingin the YAML manifest.
The following sections demonstrate the namespace-wide usage of Roles and RoleBindings but the same operations and attributes apply to cluster-wide Roles and RoleBindings.
Default User-Facing Roles
Kubernetes defines a set of default Roles. You can assign them to a subject via a RoleBinding or define your own, custom Roles depending on your needs. Table 2-2 describes the default user-facing Roles.
| Default ClusterRole | Description |
|---|---|
cluster-admin |
Allows read- and write-access to resources across all namespaces. |
admin |
Allows read- and write-access to resources in namespace including Roles and RoleBindings. |
edit |
Allows read- and write-access to resources in namespace except Roles, and RoleBindings. Provides access to Secrets. |
view |
Allows read-only access to resources in namespace except Roles, RoleBindings, and Secrets. |
To define new Roles and RoleBindings, you will have to use a context that allows for creating or modifying them, that is cluster-admin or admin.
Creating Roles
Roles can be created imperatively with the create role command. The most important options for the command are --verb for defining the verbs aka operations, and --resource for declaring a list of API resources. The following command creates a new Role for the resources Pod, Deployment, and Service with the verbs list, get, and watch:
$ kubectl create role read-only --verb=list,get,watch
  --resource=pods,deployments,services
role.rbac.authorization.k8s.io/read-only created
Declaring multiple verbs and resources for a single imperative create role command can be declared as comma-separated list for the corresponding command line option or as multiple arguments. For example, --verb=list,get,watch and --verb=list --verb=get --verb=watch carry the same instructions. You may also use the wildcard “*” to refer to all verbs or resources.
The command line option --resource-name spells out one or many object names that the policy rules should apply to. A name of a Pod could be nginx and listed here with its name. Providing a list of resource names is optional. If no names have been provided then the provided rules apply to all objects of a resource type.
The declarative approach can become a little lengthy. As you can see in Example 2-3, the section rules lists the resources and verbs. Resources with an API group, like Deployments that use the API version apps/v1, need to explictly declare it under the attribute apiGroups. All other resources e.g. Pods and Services simply use an empty string as their API version doesn’t contain a group. Be aware that the imperative command for creating a Role automatically determines the API group.
Example 2-3. A YAML manifest defining a Role
apiVersion:rbac.authorization.k8s.io/v1kind:Rolemetadata:name:read-onlyrules:-apiGroups:-""resources:-pods-servicesverbs:-list-get-watch-apiGroups:-appsresources:-deploymentsverbs:-list-get-watch
Listing Roles
Once the Role has been created, its object can be listed. The list of roles only renders the name and the creation timestamp. Each of the listed roles does not give away any of its details.
$ kubectl get roles
NAME        CREATED AT
read-only   2021-06-23T19:46:48Z
Rendering Role Details
You can inspect the details of a Role using the describe command. The output renders a table that maps a resource to its permitted verbs. As you can see in the following console output, the list of resource names is empty.
$ kubectl describe role read-only
Name:         read-only
Labels:       <none>
Annotations:  <none>
PolicyRule:
  Resources         Non-Resource URLs  Resource Names  Verbs
  ---------         -----------------  --------------  -----
  pods              []                 []              [list get watch]
  services          []                 []              [list get watch]
  deployments.apps  []                 []              [list get watch]
Creating RoleBindings
The imperative command creating a RoleBinding object is create rolebinding. To bind a Role to the RoleBinding, use the --role command line option. The subject type can be assigned by declaring the options --user, --group, or --serviceaccount. The following command creates the RoleBinding with the name read-only-binding to the user called johndoe.
$ kubectl create rolebinding read-only-binding --role=read-only --user=johndoe
rolebinding.rbac.authorization.k8s.io/read-only-binding created
Example 2-4 shows a YAML manifest representing the RoleBinding. You can see from the structure, a role can be mapped to one or many subjects. The data type is an array indicated by the dash character under the attribute subjects. At this time, only the user johndoe has been assigned.
Example 2-4. A YAML manifest defining a RoleBinding
apiVersion:rbac.authorization.k8s.io/v1kind:RoleBindingmetadata:name:read-only-bindingroleRef:apiGroup:rbac.authorization.k8s.iokind:Rolename:read-onlysubjects:-apiGroup:rbac.authorization.k8s.iokind:Username:johndoe
Listing RoleBindings
The most important information the list of RoleBindings gives away is the associated Role. The following command shows that the RoleBinding read-only-binding has been mapped to the Role read-only.
$ kubectl get rolebindings
NAME                ROLE             AGE
read-only-binding   Role/read-only   24h
The output does not provide an indication of the subjects. You will need to render the details of the object for more information, as described in the next section.
Rendering RoleBinding Details
RoleBindings can be inspected using the describe command. The output renders a table of subjects and the assigned role. The following example renders the descriptive representation of the RoleBinding named read-only-binding.
$ kubectl describe rolebinding read-only-binding
Name:         read-only-binding
Labels:       <none>
Annotations:  <none>
Role:
  Kind:  Role
  Name:  read-only
Subjects:
  Kind  Name     Namespace
  ----  ----     ---------
  User  johndoe
Seeing the RBAC Rules in Effect
Let’s see how Kubernetes enforces the RBAC rules for the scenario we set up so far. First, we’ll create a new Deployment with the cluster-admin credentials. In minikube, this user is assigned to the context minikube.
$ kubectl config current-context
minikube
$ kubectl create deployment myapp --image=nginx --port=80 --replicas=2
deployment.apps/myapp created
Now, we’ll switch the context for the user johndoe.
$ kubectl config use-context johndoe-context
Switched to context "johndoe-context".
Remember that the user johndoe is permitted to list deployments. We’ll verify that by using the get deployments command.
$ kubectl get deployments
NAME    READY   UP-TO-DATE   AVAILABLE   AGE
myapp   2/2     2            2           8s
The RBAC rules only allow listing Deployments, Pods, and Services. The following command tries to list the ReplicaSets which results in an error.
$ kubectl get replicasets
Error from server (Forbidden): replicasets.apps is forbidden: User "johndoe"
cannot list resource "replicasets" in API group "apps" in the namespace "default"
A similar behavior can be observed when trying to use other verbs than list, get, or watch. The command below tries to delete a Deployment.
$ kubectl delete deployment myapp
Error from server (Forbidden): deployments.apps "myapp" is forbidden: User
"johndoe" cannot delete resource "deployments" in API group "apps" in the
namespace "default"
At any given time, you can check a user’s permissions with the auth can-i command. The command gives you the option to list all permissions or check a specific permission.
$ kubectl auth can-i --list --as johndoe
Resources          Non-Resource URLs   Resource Names   Verbs
...
pods               []                  []               [list get watch]
services           []                  []               [list get watch]
deployments.apps   []                  []               [list get watch]
$ kubectl auth can-i list pods --as johndoe
yes
Aggregating RBAC Rules
Existing ClusterRoles can be aggregated to avoid having to redefine a new, composed set of rules that likely leads to duplication of instructions. For example, say you wanted to combine a user-facing role with a custom Role. An aggregated ClusterRule can merge rules via label selection without having to copy-paste the existing rules into one.
Say we defined two ClusterRoles shown in Example 2-5 and Example 2-6. The ClusterRole list-pods allows for listing Pods, the ClusterRole delete-services allows for deleting Services.
Example 2-5. A YAML manifest defining a ClusterRole for listing Pods
apiVersion:rbac.authorization.k8s.io/v1kind:ClusterRolemetadata:name:list-podsnamespace:rbac-examplelabels:rbac-pod-list:"true"rules:-apiGroups:-""resources:-podsverbs:-list
Example 2-6. A YAML manifest defining a ClusterRole for deleting Services
apiVersion:rbac.authorization.k8s.io/v1kind:ClusterRolemetadata:name:delete-servicesnamespace:rbac-examplelabels:rbac-service-delete:"true"rules:-apiGroups:-""resources:-servicesverbs:-delete
To aggregate those rules, ClusterRoles can specify an aggregationRule. This attribute describes the label selection rules. Example 2-7 shows an aggregated ClusterRole defined by an array of matchLabels criteria. The ClusterRole does not add its own rules as indicated by rules: [], however, there’s no limiting factor that would disallow it.
Example 2-7. A YAML manifest defining a ClusterRole with aggregated rules
apiVersion:rbac.authorization.k8s.io/v1kind:ClusterRolemetadata:name:pods-services-aggregation-rulesnamespace:rbac-exampleaggregationRule:clusterRoleSelectors:-matchLabels:rbac-pod-list:"true"-matchLabels:rbac-service-delete:"true"rules:[]
We can verify the proper aggregation behavior of the ClusterRole by describing the object. You can see in the output below that both ClusterRoles, list-pods and delete-services have been taken into account.
$ kubectl describe clusterroles pods-services-aggregation-rules -n rbac-example
Name:         pods-services-aggregation-rules
Labels:       <none>
Annotations:  <none>
PolicyRule:
  Resources  Non-Resource URLs  Resource Names  Verbs
  ---------  -----------------  --------------  -----
  services   []                 []              [delete]
  pods       []                 []              [list]
For more information on ClusterRole label selection rules, see the official documentation. The page also explains how to aggregate the default user-facing ClusterRoles.
Creating and Managing a Kubernetes Cluster
When thinking about the typical tasks of a Kubernetes administrator, I am sure that at least one of the following bread and butter activities comes to mind:
-
Bootstraping a control-plane node.
-
Bootstraping worker nodes and join them to the cluster.
-
Upgrading a cluster to a newer version.
The low-level command line tool for performing cluster bootstrapping operations is called kubeadm. It is not meant for provisioning the underlying infrastructure. That’s the purpose of infrastructure automation tools like Ansible and Terraform. To install kubeadm follow the installation instructions in the official Kubernetes documentation.
While not explicitly stated in the CKA frequently asked questions (FAQ) page, you can assume that the kubeadm executable has been preinstalled for you. The following sections describe the processes for creating and managing a Kubernetes cluster on a high-level and will use kubeadm heavily. For more detailed information, see the step by step Kubernetes reference documentation I will point out for each of the tasks.
Installing a Cluster
The most basic topology of a Kubernetes cluster consists of a single node that acts as the control plane and the worker node at the same time. By default, many developer-centric Kubernetes installations like minikube or Docker Desktop start with this configuration. While a single node cluster may be a good option for a Kubernetes playground, it is not a good foundation for scalability and high-availability reasons. At the very least, you will want to create a cluster with a single control plane and one or many nodes handling the workload.
This section explains how to install a cluster with a single control plane and one worker node. You can repeat the woker node installation process to add more worker nodes to the cluster. You can find a full description of the installation steps in the official Kubernetes documentation. Figure 2-3 illustrates the installation process.
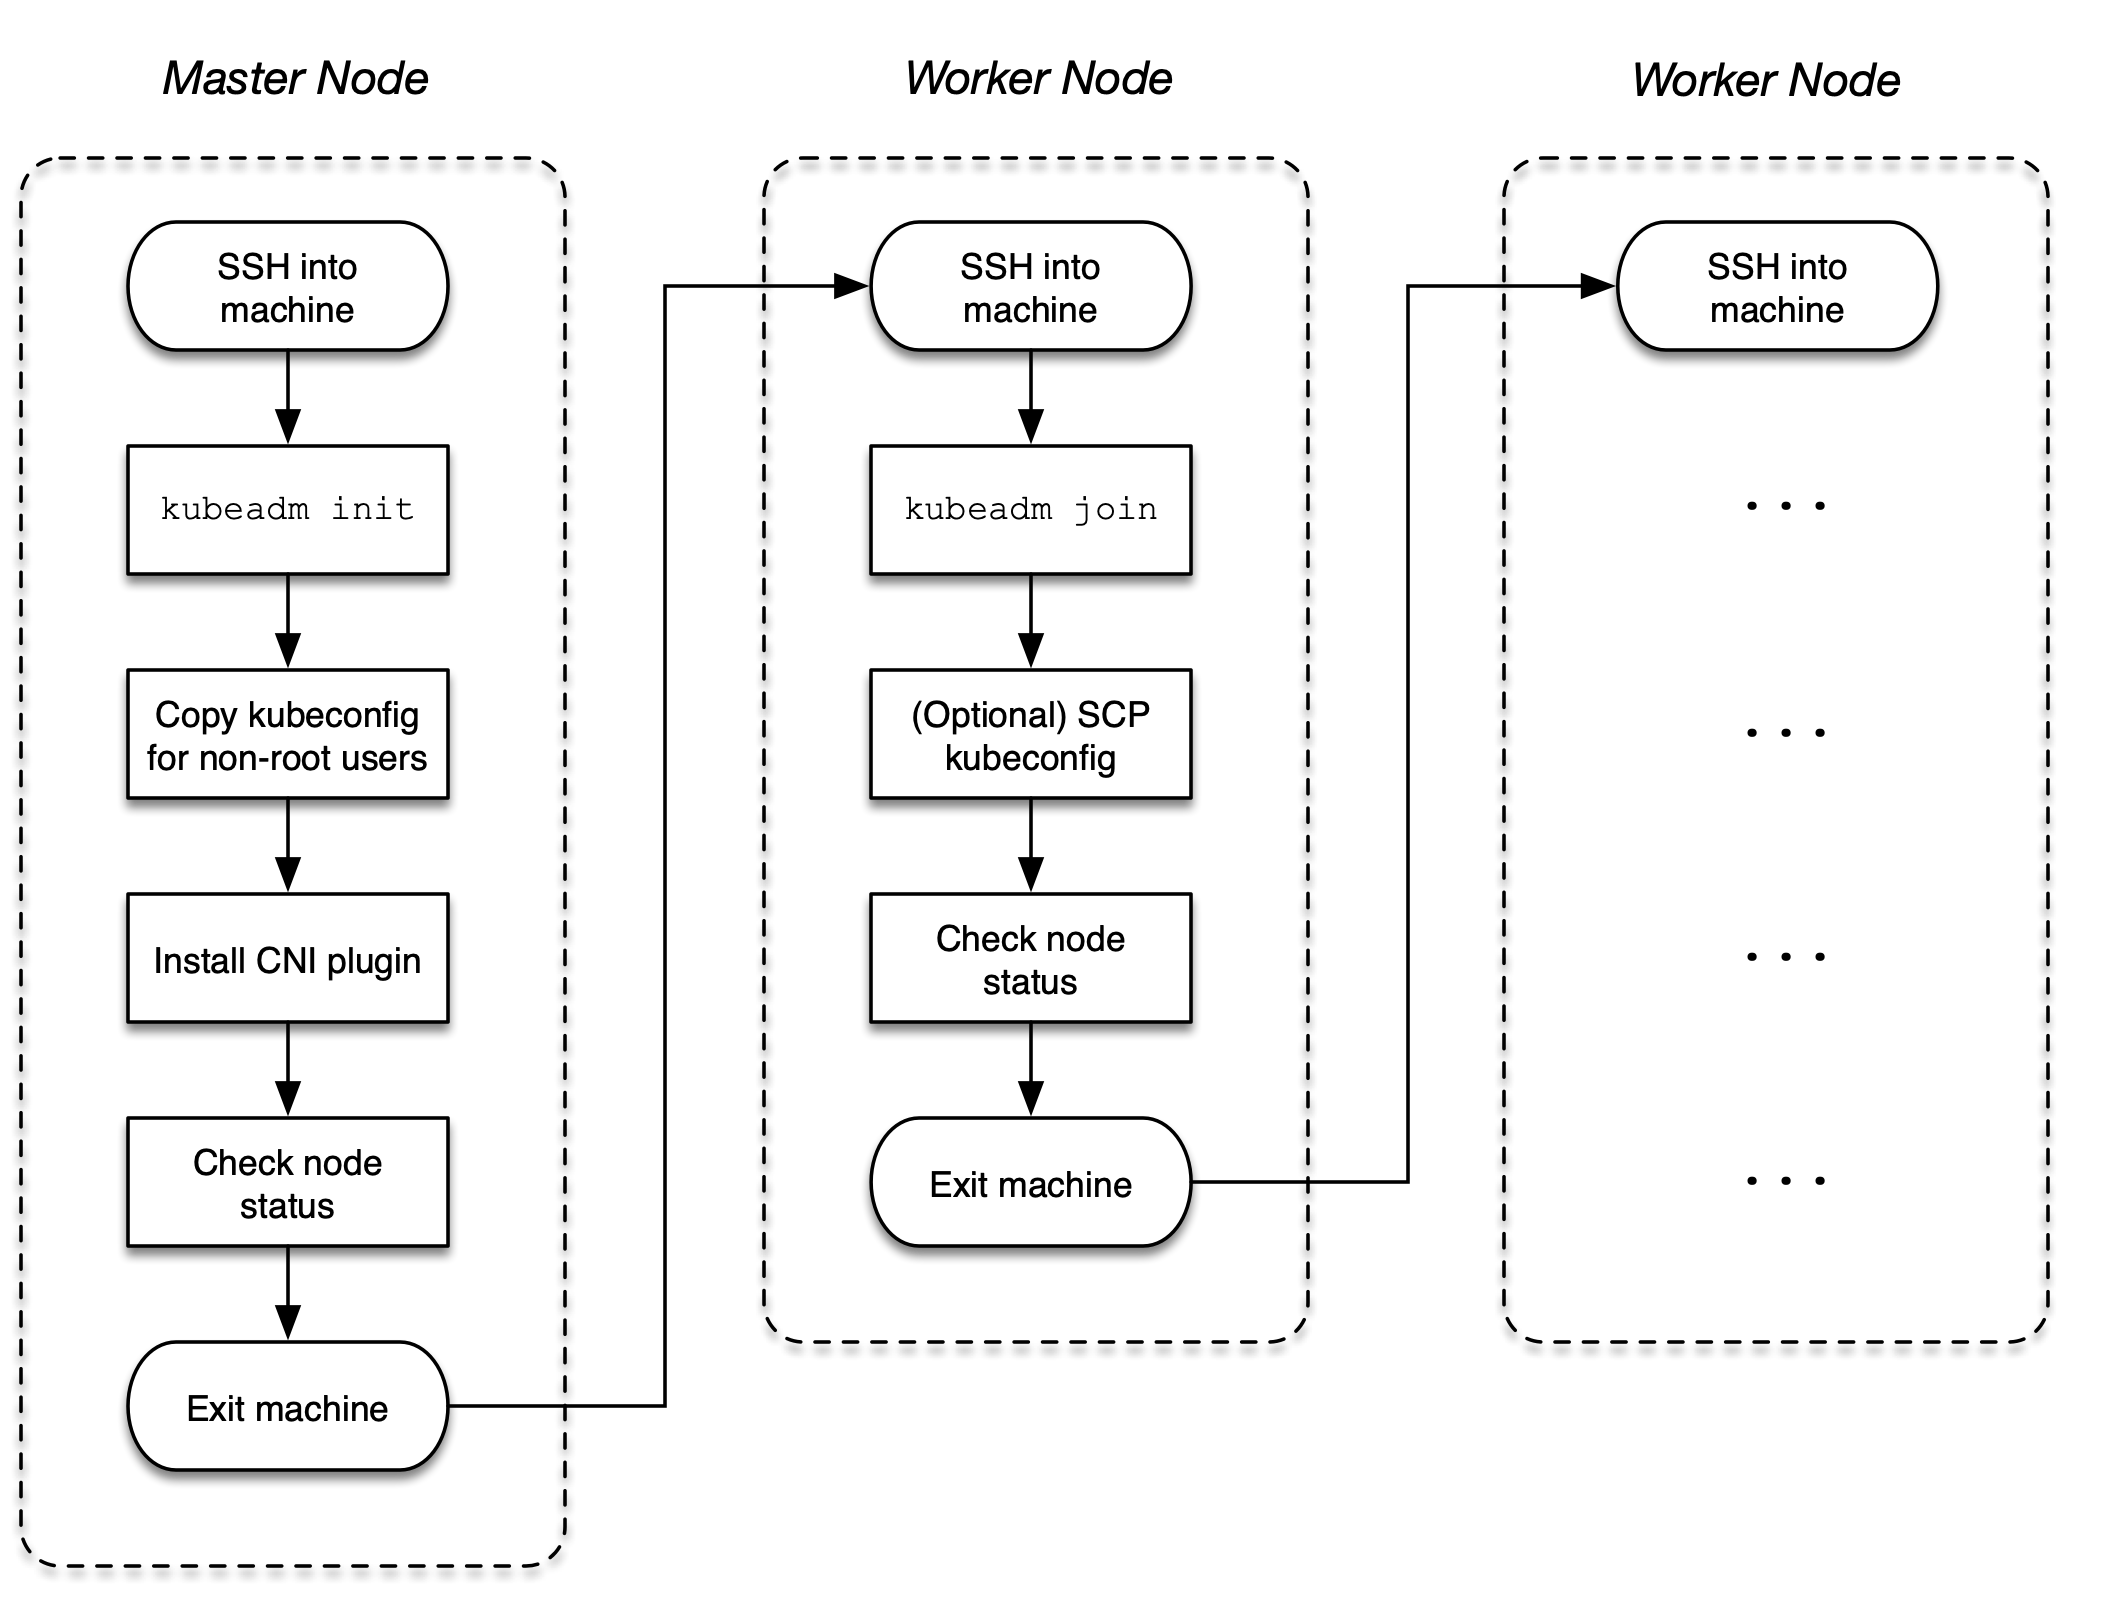
Figure 2-3. Process for a cluster installation process
Initializing the Control Plane on the Master Node
Start by initializing the control plane on the master node. The control plane is the machine responsible for hosting the API server, etcd, and other components important to managing the Kubernetes cluster.
Open an interactive shell to the master node using the ssh command. The following command targets the master node named kube-master running Ubuntu 18.04.5 LTS.
$ ssh kube-master
Welcome to Ubuntu 18.04.5 LTS (GNU/Linux 4.15.0-132-generic x86_64)
...
Initialize the control plane using the kubeadm init command. You will need to add the following two command line options: Provide the IP addresses for the Pod network with the option --pod-network-cidr. With the option --apiserver-advertise-address, you can declare the IP address the API Server will advertise to listening on.
The console output renders a kubeadm join command. Keep that command around for later. It is important for joining worker nodes to the cluster in a later step. The following command uses 172.18.0.0/16 for the Classless Inter-Domain Routing (CIDR) and IP address 10.8.8.10 for the API server.
$ sudo kubeadm init --pod-network-cidr 172.18.0.0/16
  --apiserver-advertise-address 10.8.8.10
...
To start using your cluster, you need to run the following as a regular user:

  mkdir -p $HOME/.kube
  sudo cp -i /etc/kubernetes/admin.conf $HOME/.kube/config
  sudo chown $(id -u):$(id -g) $HOME/.kube/config

You should now deploy a pod network to the cluster.
Run "kubectl apply -f [podnetwork].yaml" with one of the options listed at:
  https://kubernetes.io/docs/concepts/cluster-administration/addons/

Then you can join any number of worker nodes by running the following on
each as root:

kubeadm join 10.8.8.10:6443 --token fi8io0.dtkzsy9kws56dmsp
    --discovery-token-ca-cert-hash
    sha256:cc89ea1f82d5ec460e21b69476e0c052d691d0c52cce83fbd7e403559c1ebdac
After the init command has finished, run the necessary commands from the console output to start the cluster as non-root user.
$ mkdir -p $HOME/.kube
$ sudo cp -i /etc/kubernetes/admin.conf $HOME/.kube/config
$ sudo chown $(id -u):$(id -g) $HOME/.kube/config
You must deploy a Container Network Interface (CNI) plugin so that Pods can communicate with each other. You can pick from a wide range of add-ons listed in the Kubernetes documentation. Popular add-ons include Flannel, Calico, and Weave Net.
The CKA exam will most likely ask you to install a specific add-on. Most of the installation instructions live on external webpages, not permitted to be used during the exam. Make sure that you search for the relevant instructions in the official Kubernetes documentation. For example, you can find the installation instructions for Weave Net here. The following command installs the Weave Net objects.
$ kubectl apply -f "https://cloud.weave.works/k8s/net?k8s-version=
  $(kubectl version | base64 | tr -d '
')"
serviceaccount/weave-net created
clusterrole.rbac.authorization.k8s.io/weave-net created
clusterrolebinding.rbac.authorization.k8s.io/weave-net created
role.rbac.authorization.k8s.io/weave-net created
rolebinding.rbac.authorization.k8s.io/weave-net created
daemonset.apps/weave-net created
Verify that the master node indicates the “Ready” status using the command kubectl get nodes. It might take a couple of seconds before the node transitions from the “NotReady” status to the “Ready” status. You have an issue with your node installation in case the status transition does not occur. Refer to the chapter “Troubleshooting” for debugging strategies.
$ kubectl get nodes
NAME          STATUS   ROLES                  AGE   VERSION
kube-master   Ready    control-plane,master   24m   v1.21.2
Exit out of the master node using the exit command.
$ exit
logout
...
Joining the Worker Nodes
Worker nodes are responsible for handling the workload scheduled by the control plane. Examples of workloads are Pods, Deployments, Jobs, and CronJobs. To add a worker node to the cluster so that it can be used, you will have to run a couple of commands, as described below.
Open an interactive shell to the worker node using the ssh command. The following command targets the worker node named kube-worker-1 running Ubuntu 18.04.5 LTS.
$ ssh kube-worker-1
Welcome to Ubuntu 18.04.5 LTS (GNU/Linux 4.15.0-132-generic x86_64)
...
Run the kubeadm join command provided by the kubeadm init console out on the master node. The following command shows an example. Remember that the token and SHA256 hash will be different for you.
$ sudo kubeadm join 10.8.8.10:6443 --token fi8io0.dtkzsy9kws56dmsp
  --discovery-token-ca-cert-hash
  sha256:cc89ea1f82d5ec460e21b69476e0c052d691d0c52cce83fbd7e403559c1ebdac
[preflight] Running pre-flight checks
[preflight] Reading configuration from the cluster...
[preflight] FYI: You can look at this config file with
'kubectl -n kube-system get cm kubeadm-config -o yaml'
[kubelet-start] Writing kubelet configuration to file
"/var/lib/kubelet/config.yaml"
[kubelet-start] Writing kubelet environment file with
flags to file "/var/lib/kubelet/kubeadm-flags.env"
[kubelet-start] Starting the kubelet
[kubelet-start] Waiting for the kubelet to perform the TLS Bootstrap...

This node has joined the cluster:
* Certificate signing request was sent to apiserver and a response was received.
* The Kubelet was informed of the new secure connection details.

Run 'kubectl get nodes' on the control-plane to see this node join the cluster.
You won’t be able to run the kubectl get nodes command from the worker node without copying the administrator kubeconfig file from the master node. Follow the instructions in the Kubernetes documentation to do so or log back into the master node. Here, we are just going to log back into the master node. You should see that the worker node has joined the cluster and is in a “Ready” status.
$ exit
logout
...
$ ssh kube-master
Welcome to Ubuntu 18.04.5 LTS (GNU/Linux 4.15.0-132-generic x86_64)
...
$ kubectl get nodes
NAME            STATUS   ROLES                  AGE     VERSION
kube-master     Ready    control-plane,master   5h49m   v1.21.2
kube-worker-1   Ready    <none>                 15m     v1.21.2
You can repeat the process for any other worker node you want to add to the cluster.
Managing a Highly-Available Cluster
Single control plane clusters are easy to install, however, they present an issue when the node is lost. Once the control plane node becomes unavailable, any ReplicaSet running on a worker node cannot recreate a Pod due to the inability to talk back to the scheduler running on a master node. Moreover, clusters cannot be accessed externally anymore e.g. via kubectl as the API server cannot be reached.
High-availability (HA) cluster help with scalability and redundancy. For the exam, you will need to have a basic understanding about configuring them and their implications. Given the complexity of standing up a HA cluster, it’s unlikely that you’ll be asked to perform the steps during the exam. For a full discussion on setting up HA clusters, see the relevant page in the Kubernetes documentation.
The stacked etcd topology involves creating two or more control plane nodes where etcd is colocated on the node. Figure 2-4 shows a representation of the topology with three control plane nodes.
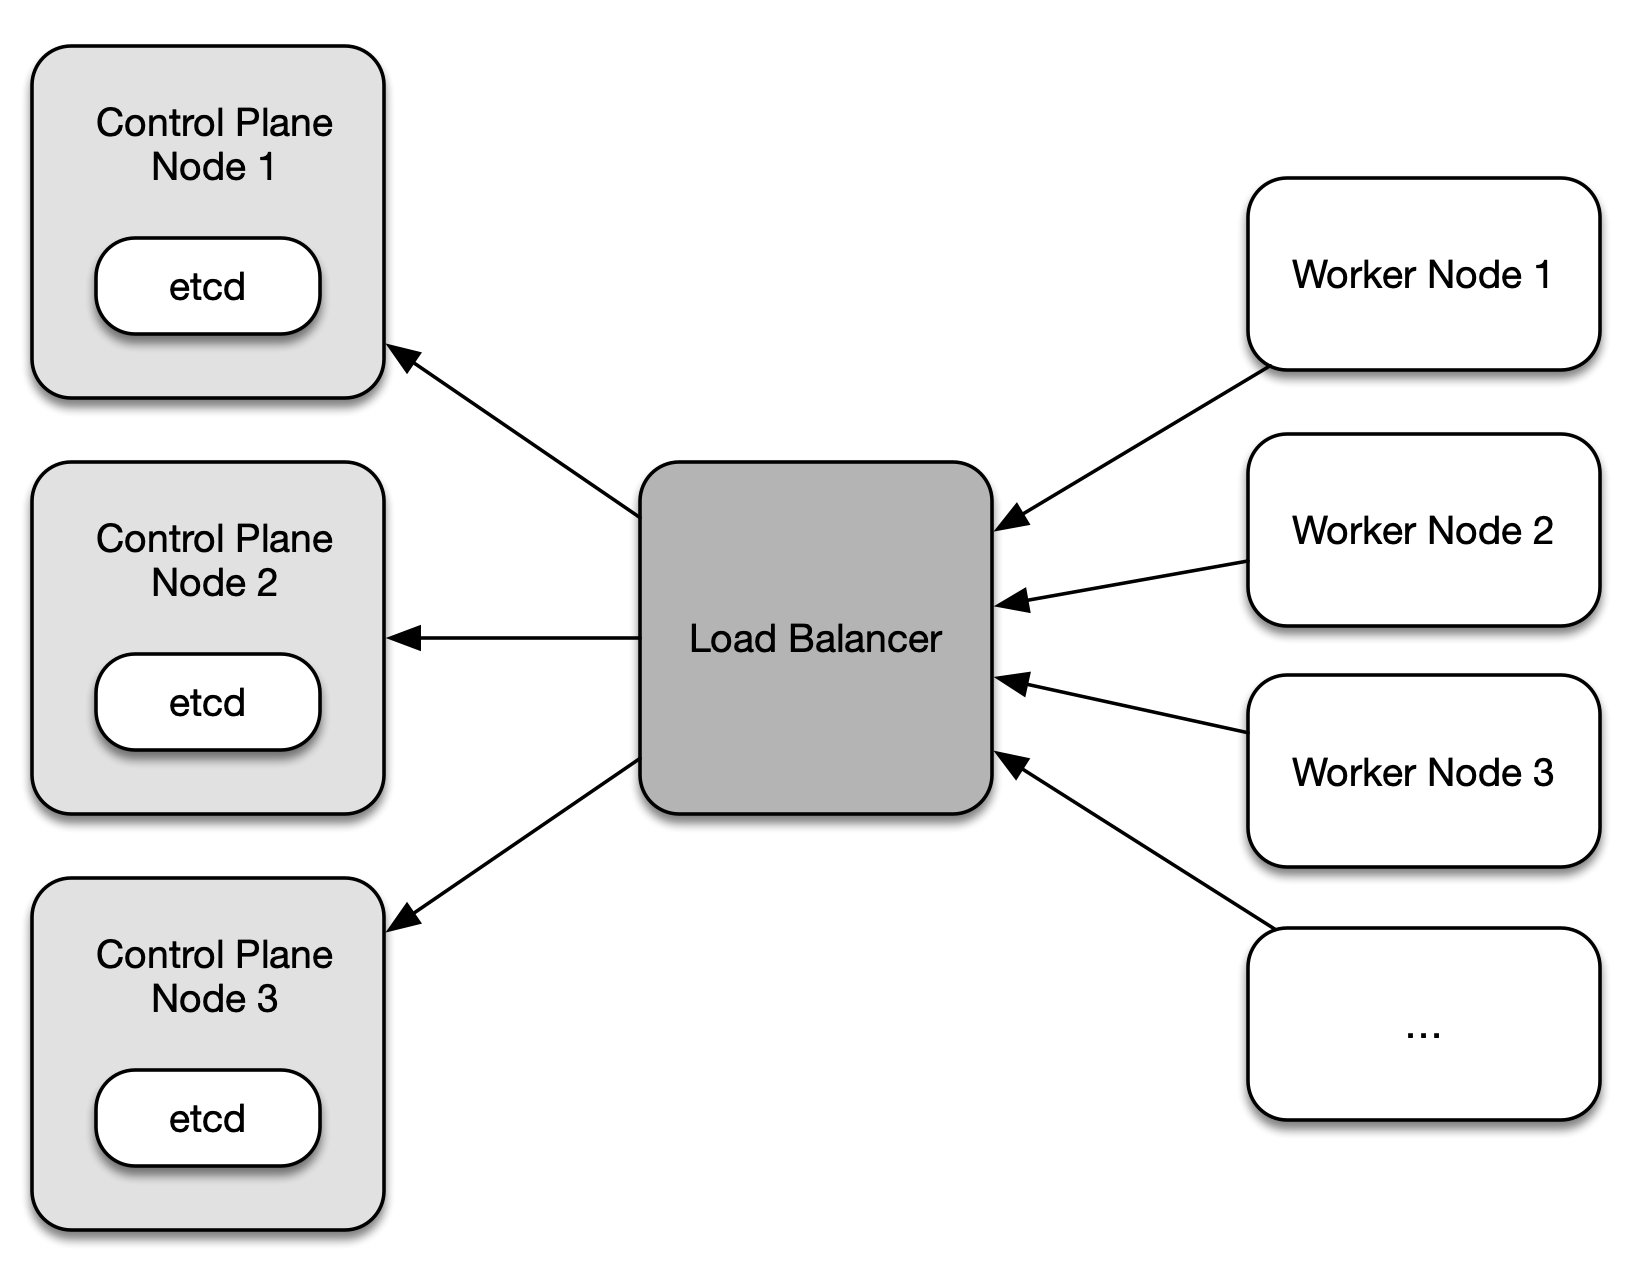
Figure 2-4. Stacked etcd topology with three control plane nodes
Each control plane node hosts the API server, the scheduler, and the controller manager. Worker nodes communicate with the API server through a load balancer. It is recommended to operate this cluster topology with a minimum of three control plane nodes for redundancy reasons due to the tight coupling of etcd to the control plane node. By default, kubeadm will create a etcd instance when joining a control plane node to the cluster.
The external etcd node topology separates etcd from the control plane node by running it on dedicated machine. Figure 2-5 shows a setup with three control plane nodes, each of which run etcd on a different machine.
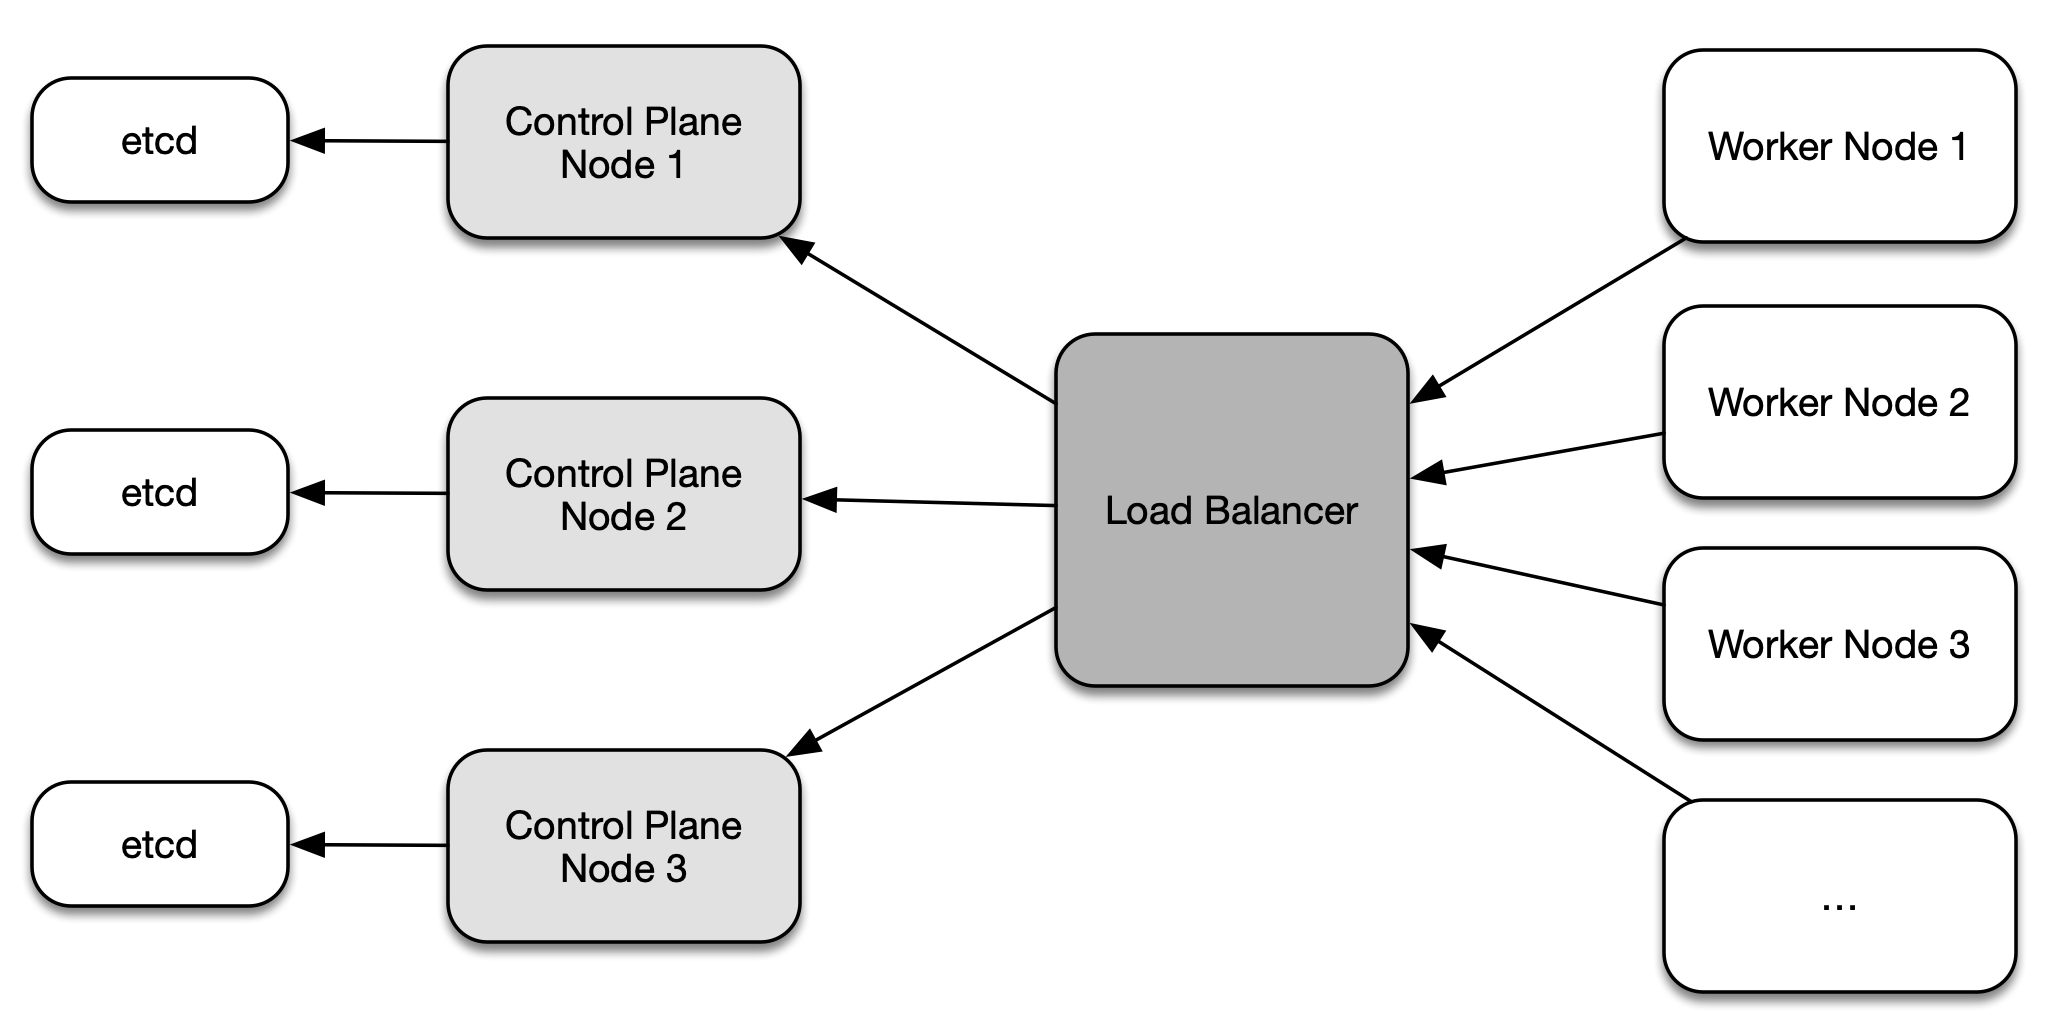
Figure 2-5. External etcd node topology
Similiar to the stacked etcd topology, each control plane node hosts the API server, the scheduler, and the controller manager. The worker nodes communicate with them through a load balancer. The main difference here is that the etcd instances run on a separate host. This topology decouples etcd from other control plane functionality and therefore has less of an impact on redundancy when a control plane node is lost. As you can see in the illustration, this topology requires twice as many hosts as the stacked etcd topology.
Upgrading a Cluster Version
Over time, you will want to upgrade the Kubernetes version of an existing cluster to pick up bug fixes and new features. The upgrade process has to be performed in a controlled manner to avoid the disruption of workload currently in execution, and to prevent the corruption of cluster nodes.
It is recommended to upgrade a from minor version to next higher one e.g. from 1.18.0 to 1.19.0, or from a patch version to a higher one, e.g. from 1.18.0 to 1.18.3. Abstain from jumping up multiple minor versions avoid unexpected side effects. You can find a full description of the upgrade steps in the official Kubernetes documentation. Figure 2-6 illustrates the upgrade process.
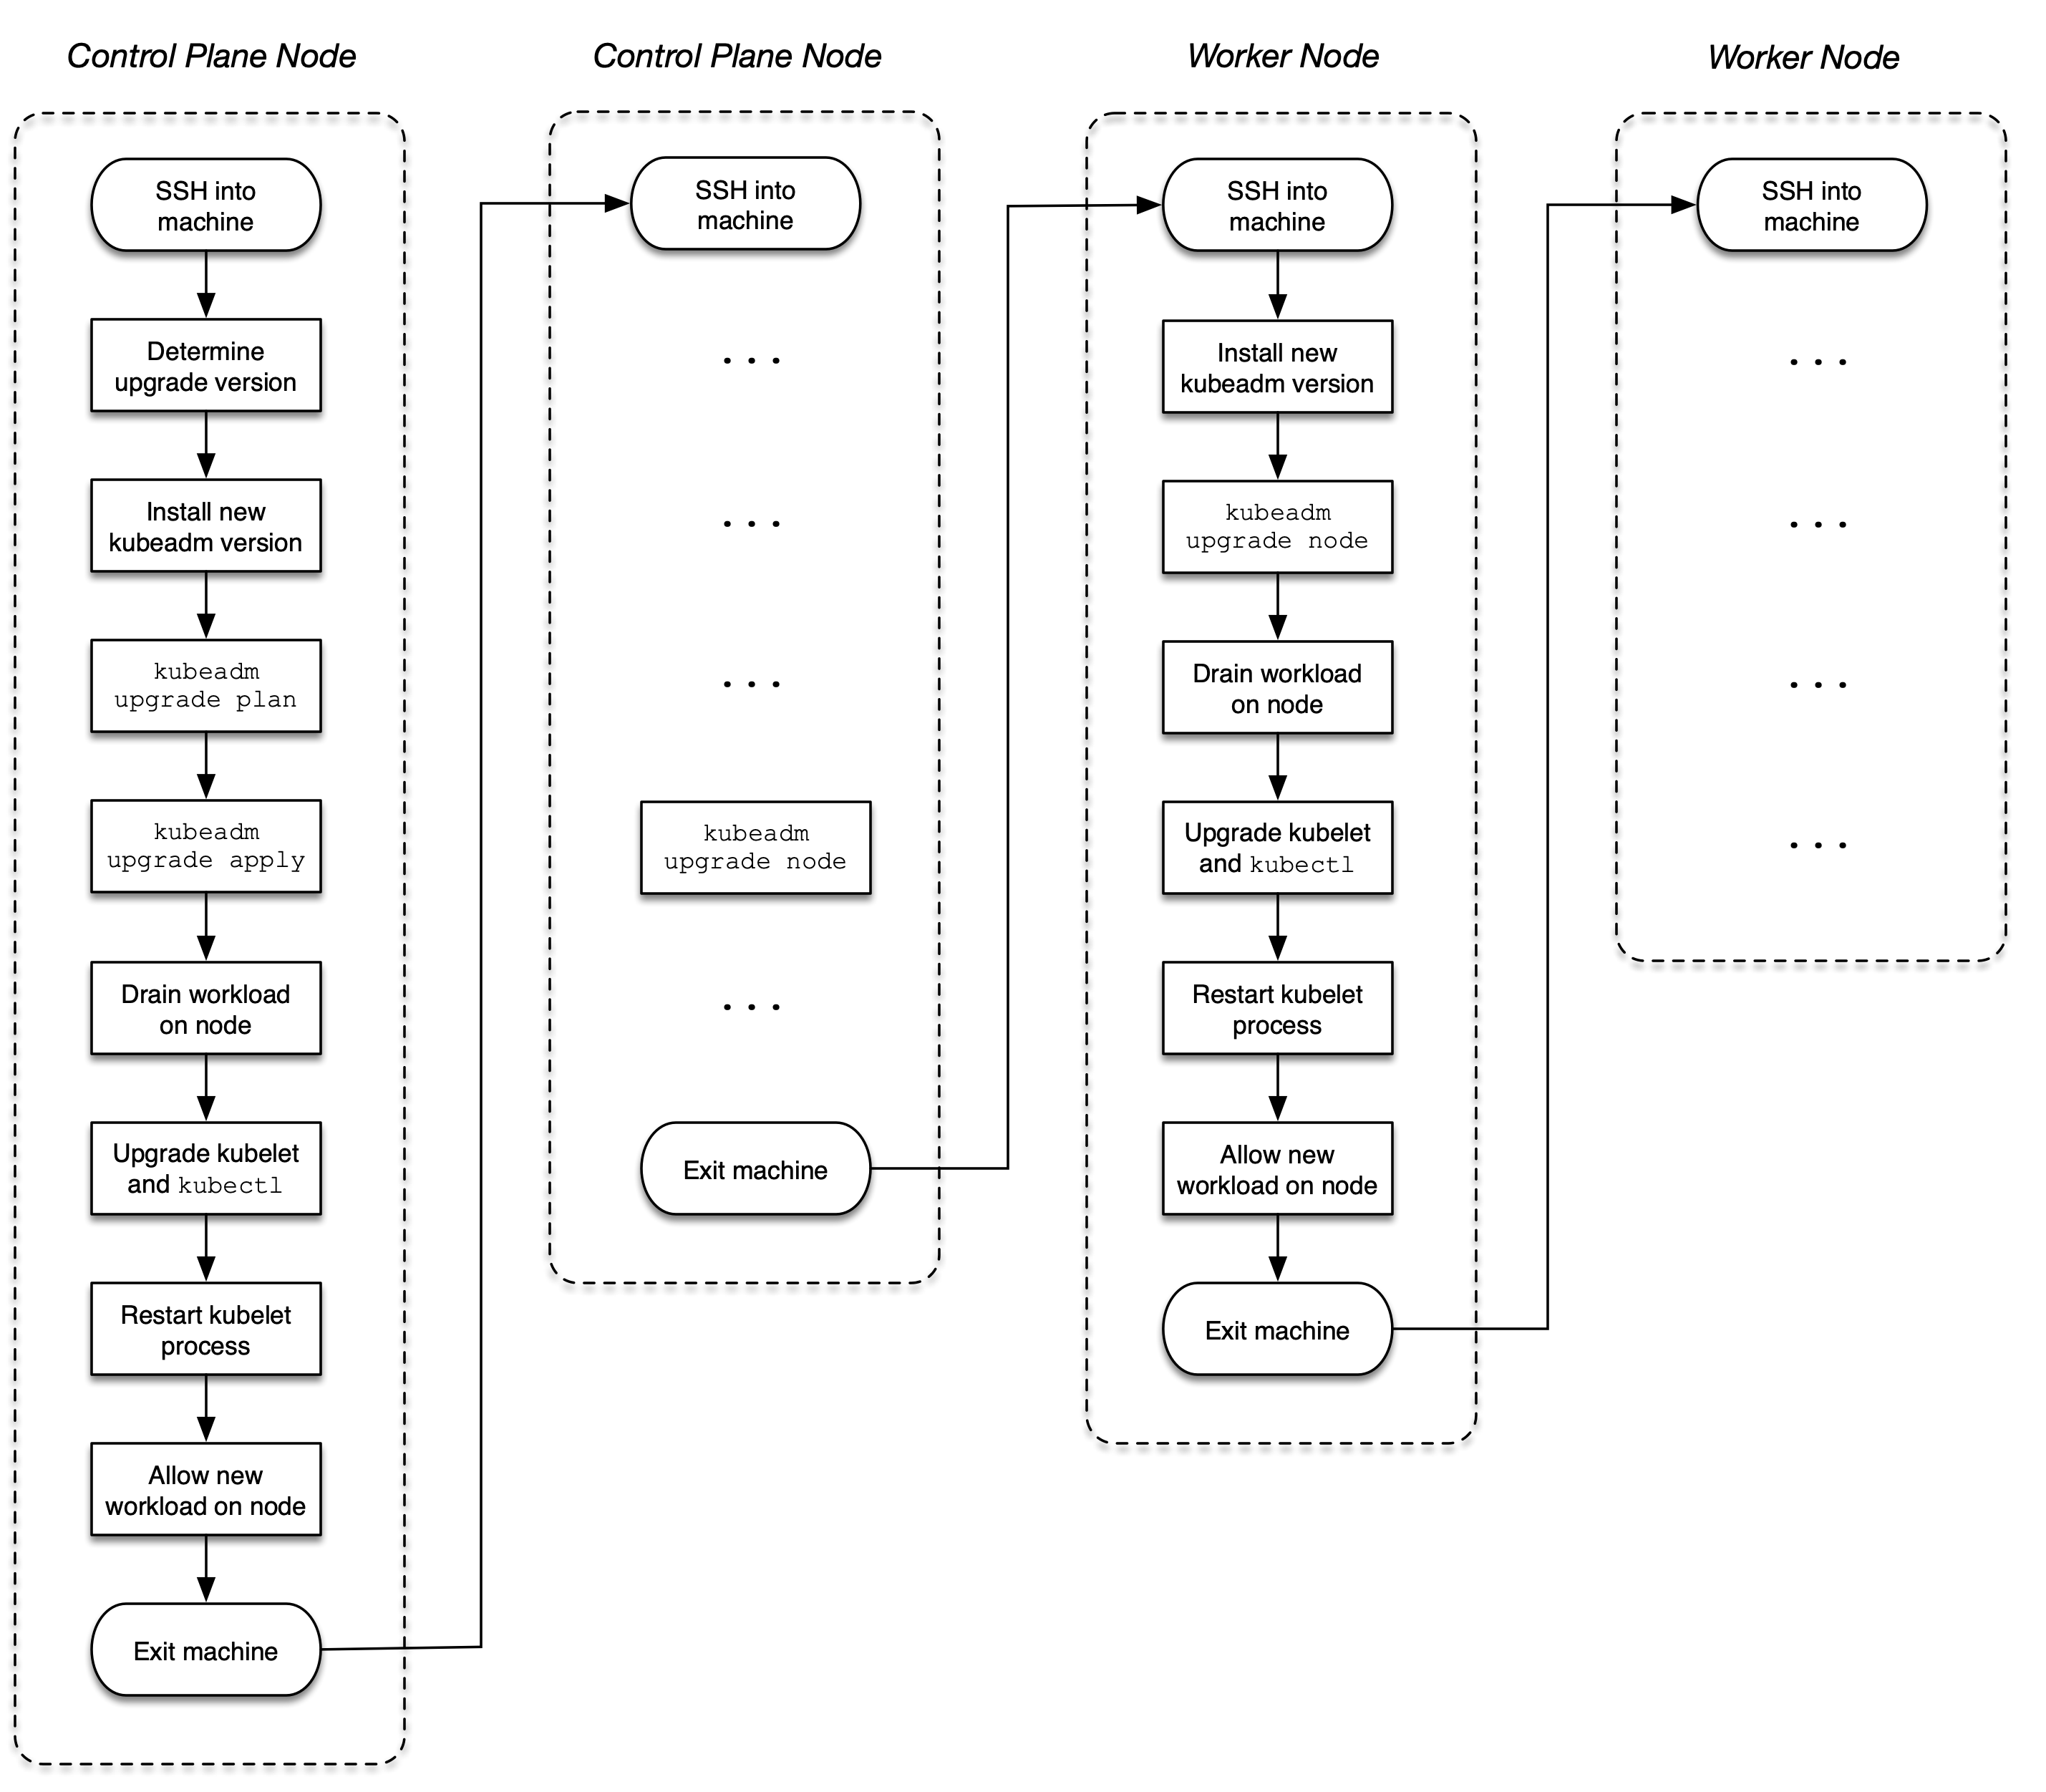
Figure 2-6. Process for a cluster version upgrade
Upgrading Control Plane Nodes
As explained earlier, a Kubernetes cluster may employ one or many control plane nodes to better support high-availability and scalability concerns. When upgrading a cluster version, this change needs to happen for control plane nodes one at a time.
Pick one of the control plane nodes that contains the kubeconfig file (located at /etc/kubernetes/admin.conf), open an interactive shell to the master node using the ssh command. The following command targets the master node named kube-master running Ubuntu 18.04.5 LTS.
$ ssh kube-master
Welcome to Ubuntu 18.04.5 LTS (GNU/Linux 4.15.0-132-generic x86_64)
...
First, check the nodes and their Kubernetes versions. In this setup, all nodes run on version 1.18.0. We are only dealing with a single control plane node, and a single worker node.
$ kubectl get nodes
NAME            STATUS   ROLES    AGE     VERSION
kube-master     Ready    master   4m54s   v1.18.0
kube-worker-1   Ready    <none>   3m18s   v1.18.0
Start by upgrading the kubeadm version. Identify the version you’d like to upgrade to. On Ubuntu machines, you can use the following apt-get command. The version format usually includes a patch version e.g. 1.20.7-00. Check the Kubernetes documentation if your machine is running a different operating system.
$ sudo apt update
...
$ sudo apt-cache madison kubeadm
   kubeadm |  1.21.2-00 | http://apt.kubernetes.io kubernetes-xenial/main
   amd64 Packages
   kubeadm |  1.21.1-00 | http://apt.kubernetes.io kubernetes-xenial/main
   amd64 Packages
   kubeadm |  1.21.0-00 | http://apt.kubernetes.io kubernetes-xenial/main
   amd64 Packages
   kubeadm |  1.20.8-00 | http://apt.kubernetes.io kubernetes-xenial/main
   amd64 Packages
   kubeadm |  1.20.7-00 | http://apt.kubernetes.io kubernetes-xenial/main
   amd64 Packages
   kubeadm |  1.20.6-00 | http://apt.kubernetes.io kubernetes-xenial/main
   amd64 Packages
   kubeadm |  1.20.5-00 | http://apt.kubernetes.io kubernetes-xenial/main
   amd64 Packages
   kubeadm |  1.20.4-00 | http://apt.kubernetes.io kubernetes-xenial/main
   amd64 Packages
   kubeadm |  1.20.2-00 | http://apt.kubernetes.io kubernetes-xenial/main
   amd64 Packages
   kubeadm |  1.20.1-00 | http://apt.kubernetes.io kubernetes-xenial/main
   amd64 Packages
   kubeadm |  1.20.0-00 | http://apt.kubernetes.io kubernetes-xenial/main
   amd64 Packages
...
Upgrade kubeadm to a target version. Say you’d want to upgrade to version 1.19.0-00. The following series of commands installs kubeadm with that specific version, and checks the currently installed version to verify.
$ sudo apt-mark unhold kubeadm && sudo apt-get update && sudo apt-get install
  -y kubeadm=1.19.0-00 && sudo apt-mark hold kubeadm
Canceled hold on kubeadm.
...
Unpacking kubeadm (1.19.0-00) over (1.18.0-00) ...
Setting up kubeadm (1.19.0-00) ...
kubeadm set on hold.
$ sudo apt-get update && sudo apt-get install -y --allow-change-held-packages
  kubeadm=1.19.0-00
...
kubeadm is already the newest version (1.19.0-00).
0 upgraded, 0 newly installed, 0 to remove and 7 not upgraded.
$ kubeadm version
kubeadm version: &version.Info{Major:"1", Minor:"19", GitVersion:"v1.19.0",
GitCommit:"e19964183377d0ec2052d1f1fa930c4d7575bd50", GitTreeState:"clean",
BuildDate:"2020-08-26T14:28:32Z", GoVersion:"go1.15", Compiler:"gc",
Platform:"linux/amd64"}
Check which versions are available to upgrade to and validate whether your current cluster is upgradeable. You can see in the output of the following command that we could upgrade to version 1.19.12. For now, we’ll stick with 1.19.0.
$ sudo kubeadm upgrade plan
...
[upgrade] Fetching available versions to upgrade to
[upgrade/versions] Cluster version: v1.18.20
[upgrade/versions] kubeadm version: v1.19.0
I0708 17:32:53.037895   17430 version.go:252] remote version is much newer:
v1.21.2; falling back to: stable-1.19
[upgrade/versions] Latest stable version: v1.19.12
[upgrade/versions] Latest version in the v1.18 series: v1.18.20
...
You can now apply the upgrade by executing the following command:

	kubeadm upgrade apply v1.19.12

Note: Before you can perform this upgrade, you have to update kubeadm to v1.19.12.
...
As described in the console output, we’ll start the upgrade for the control plane. The process may take a couple of minutes. You may have to upgrade the CNI plugin as well. Follow the provider instructions for more information.
$ sudo kubeadm upgrade apply v1.19.0
...
[upgrade/version] You have chosen to change the cluster version to "v1.19.0"
[upgrade/versions] Cluster version: v1.18.20
[upgrade/versions] kubeadm version: v1.19.0
...
[upgrade/successful] SUCCESS! Your cluster was upgraded to "v1.19.0". Enjoy!

[upgrade/kubelet] Now that your control plane is upgraded, please proceed
with upgrading your kubelets if you haven't already done so.
Drain the master node by evicting workload. New workload won’t be schedulable on the node until uncordoned.
$ kubectl drain kube-master --ignore-daemonsets
node/kube-master cordoned
WARNING: ignoring DaemonSet-managed Pods: kube-system/calico-node-qndb9,
kube-system/kube-proxy-vpvms
evicting pod kube-system/calico-kube-controllers-65f8bc95db-krp72
evicting pod kube-system/coredns-f9fd979d6-2brkq
pod/calico-kube-controllers-65f8bc95db-krp72 evicted
pod/coredns-f9fd979d6-2brkq evicted
node/kube-master evicted
Upgrade the kubelet and the kubectl tool to the same version.
$ sudo apt-mark unhold kubelet kubectl && sudo apt-get update && sudo
  apt-get install -y kubelet=1.19.0-00 kubectl=1.19.0-00 && sudo apt-mark
  hold kubelet kubectl
...
Setting up kubelet (1.19.0-00) ...
Setting up kubectl (1.19.0-00) ...
kubelet set on hold.
kubectl set on hold.
Restart the kubelet process.
$ sudo systemctl daemon-reload
$ sudo systemctl restart kubelet
Reenable the control plane node back so that new workload can become schedulable.
$ kubectl uncordon kube-master
node/kube-master uncordoned
The master nodes should now show the usage of Kubernetes 1.19.0.
$ kubectl get nodes
NAME            STATUS   ROLES    AGE   VERSION
kube-master     Ready    master   21h   v1.19.0
kube-worker-1   Ready    <none>   21h   v1.18.0
Exit out of the master node using the exit command.
$ exit
logout
...
Upgrading Worker Nodes
Pick one of the worker nodes, and open an interactive shell to the node using the ssh command. The following command targets the worker node named kube-worker-1 running Ubuntu 18.04.5 LTS.
$ ssh kube-worker-1
Welcome to Ubuntu 18.04.5 LTS (GNU/Linux 4.15.0-132-generic x86_64)
...
Upgrade kubeadm to a target version. This is the same command, you used for the control plane node, as explained above.
$ sudo apt-mark unhold kubeadm && sudo apt-get update && sudo apt-get install
  -y kubeadm=1.19.0-00 && sudo apt-mark hold kubeadm
Canceled hold on kubeadm.
...
Unpacking kubeadm (1.19.0-00) over (1.18.0-00) ...
Setting up kubeadm (1.19.0-00) ...
kubeadm set on hold.
$ kubeadm version
kubeadm version: &version.Info{Major:"1", Minor:"19", GitVersion:"v1.19.0",
GitCommit:"e19964183377d0ec2052d1f1fa930c4d7575bd50", GitTreeState:"clean",
BuildDate:"2020-08-26T14:28:32Z", GoVersion:"go1.15", Compiler:"gc",
Platform:"linux/amd64"}
Upgrade the kubelet configuration.
$ sudo kubeadm upgrade node
[upgrade] Reading configuration from the cluster...
[upgrade] FYI: You can look at this config file with 'kubectl -n kube-system
get cm kubeadm-config -oyaml'
[preflight] Running pre-flight checks
[preflight] Skipping prepull. Not a control plane node.
[upgrade] Skipping phase. Not a control plane node.
[kubelet-start] Writing kubelet configuration to file
"/var/lib/kubelet/config.yaml"
[upgrade] The configuration for this node was successfully updated!
[upgrade] Now you should go ahead and upgrade the kubelet package using your
package manager.
Drain the worker node by evicting workload. New workload won’t be schedulable on the node until uncordoned.
$ kubectl drain kube-worker-1 --ignore-daemonsets
node/kube-worker-1 cordoned
WARNING: ignoring DaemonSet-managed Pods: kube-system/calico-node-2hrxg,
kube-system/kube-proxy-qf6nl
evicting pod kube-system/calico-kube-controllers-65f8bc95db-kggbr
evicting pod kube-system/coredns-f9fd979d6-7zm4q
evicting pod kube-system/coredns-f9fd979d6-tlmhq
pod/calico-kube-controllers-65f8bc95db-kggbr evicted
pod/coredns-f9fd979d6-7zm4q evicted
pod/coredns-f9fd979d6-tlmhq evicted
node/kube-worker-1 evicted
Upgrade the kubelet and the kubectl tool with the same command used for the control plane node.
$ sudo apt-mark unhold kubelet kubectl && sudo apt-get update && sudo apt-get
install -y kubelet=1.19.0-00 kubectl=1.19.0-00 && sudo apt-mark hold kubelet
kubectl
...
Setting up kubelet (1.19.0-00) ...
Setting up kubectl (1.19.0-00) ...
kubelet set on hold.
kubectl set on hold.
Restart the kubelet process.
$ sudo systemctl daemon-reload
$ sudo systemctl restart kubelet
Reenable the worker node so that new workload can become schedulable.
$ kubectl uncordon kube-worker-1
node/kube-worker-1 uncordoned
Listing the nodes should now show version 1.19.0 for the worker node. You won’t be able to run the kubectl get nodes from the worker node without copying the administrator kubeconfig file from the master node. Follow the instructions in the Kubernetes documentation to do so or log back into the master node.
$ kubectl get nodes
NAME            STATUS   ROLES    AGE   VERSION
kube-master     Ready    master   24h   v1.19.0
kube-worker-1   Ready    <none>   24h   v1.19.0
Exit out of the worker node using the exit command.
$ exit
logout
...
Backing up and Restoring etcd
Kubernetes stores critical cluster data and states in the etcd database. It’s important to have a backup plan in place that can help you with restoring the data in case of data corruption. Backing up the data should happen periodically in short time frames to avoid losing as little historical data as possible.
The backup process stores the ectd data in a so-called snapshot file. This snapshot file can be used to restore the etcd data at any given time. You can encrypt the snapshot file to protect sensitive information. The tool etcdctl is central to the backup and restore procedure.
As an administrator, you will need to understand how to use the tool for both operations. You may need to install etcdctl if it is not available on the control plane node yet. You can find installation instructions in the etcd GitHub repository. Figure 2-7 visualizes the etcd backup and restoration process.

Figure 2-7. Process for a backing up and restoring etcd
Depending on your cluster topology, your cluster may consists of one or many etcd instances. Refer to the section “High-Availability Cluster Setup” for more information on how to set it up. The following sections explain a single-node etcd cluster setup. You can find additional instructions on the backup and restoration process for multi-node etcd clusters in the official Kubernetes documentation.
Backing Up etcd
Open an interactive shell to the machine hosting etcd using the ssh command. The following command targets the master node named kube-master running Ubuntu 18.04.5 LTS.
$ ssh kube-master
Welcome to Ubuntu 18.04.5 LTS (GNU/Linux 4.15.0-132-generic x86_64)
...
Check the installed version of etcdctl to verify that the tool has been installed. On this node, the version is 3.4.14.
$ etcdctl version
etcdctl version: 3.4.14
API version: 3.4
Etcd is deployed as a Pod in the kube-system namespace. Inspect the version by describing the Pod. In the output below, you will find that the version is 3.4.13-0.
$ kubectl get pods -n kube-system
NAME                                       READY   STATUS    RESTARTS   AGE
...
etcd-kube-master                           1/1     Running   0          33m
...
$ kubectl describe pod etcd-kube-master -n kube-system
...
Containers:
  etcd:
    Container ID:  docker://28325c63233edaa94e16691e8082e8d86f5e7da58c0fb54
    d95d68dec6e80cf54
    Image:         k8s.gcr.io/etcd:3.4.3-0
    Image ID:      docker-pullable://k8s.gcr.io/etcd@sha256:4afb99b4690b418
    ffc2ceb67e1a17376457e441c1f09ab55447f0aaf992fa646
...
The same describe command reveals the configuration of the etcd service. Look for the value of the option --listen-client-urls for the endpoint URL. In the output below, the host is localhost and the port is 2379. The server certificate is located at /etc/kubernetes/pki/etcd/server.crt defined by the option --cert-file. The CA certificate can be found at /etc/kubernetes/pki/etcd/ca.crt specified by the option --trusted-ca-file.
$ kubectl describe pod etcd-kube-master -n kube-system
...
Containers:
  etcd:
    ...
    Command:
      etcd
      ...
      --cert-file=/etc/kubernetes/pki/etcd/server.crt
      --listen-client-urls=https://127.0.0.1:2379,https://10.8.8.10:2379
      --trusted-ca-file=/etc/kubernetes/pki/etcd/ca.crt
...
Use the etcdctl command to create the backup with version 3 of the tool. For a good starting point, copy the command from the official Kubernetes documentation. Provide the mandatory command line options --cacert, --cert, and --key. The option --endpoints is not needed as we are running the command on the same server as etcd. After running the command, the file /tmp/etcd-backup.db has been created.
$ sudo ETCDCTL_API=3 etcdctl --cacert=/etc/kubernetes/pki/etcd/ca.crt
--cert=/etc/kubernetes/pki/etcd/server.crt
--key=/etc/kubernetes/pki/etcd/server.key
snapshot save /opt/etcd-backup.db
{"level":"info","ts":1625860312.3468597,
"caller":"snapshot/v3_snapshot.go:119",
"msg":"created temporary db file","path":"/opt/etcd-backup.db.part"}
{"level":"info","ts":"2021-07-09T19:51:52.356Z",
"caller":"clientv3/maintenance.go:200",
"msg":"opened snapshot stream; downloading"}
{"level":"info","ts":1625860312.358686,
"caller":"snapshot/v3_snapshot.go:127",
"msg":"fetching snapshot","endpoint":"127.0.0.1:2379"}
{"level":"info","ts":"2021-07-09T19:51:52.389Z",
"caller":"clientv3/maintenance.go:208",
"msg":"completed snapshot read; closing"}
{"level":"info","ts":1625860312.392891,
"caller":"snapshot/v3_snapshot.go:142",
"msg":"fetched snapshot","endpoint":"127.0.0.1:2379",
"size":"2.3 MB","took":0.045987318}
{"level":"info","ts":1625860312.3930364,
"caller":"snapshot/v3_snapshot.go:152",
"msg":"saved","path":"/opt/etcd-backup.db"}
Snapshot saved at /opt/etcd-backup.db
Exit out of the node using the exit command.
$ exit
logout
...
Restoring etcd
You created a backup of etcd and stored it in a safe space. There’s nothing else to do at this time. Effectively, it’s your insurance policy that becomes relevant when disaster strikes. In the case of a disaster scenario, the data in etcd gets corrupted or the machine managing etcd experiences a physical storage failure. That’s the time when you want to pull out the etcd backup for restoration.
To restore etcd from the backup, use the etcdctl snapshot restore command. At a minimum, provide the --data-dir command line option. Here, we are using the data directory /tmp/from-backup. After running the command, you should be able to find the restored backup in the directory /var/lib/from-backup.
$ sudo ETCDCTL_API=3 etcdctl --data-dir=/var/lib/from-backup snapshot restore
  /opt/etcd-backup.db
{"level":"info","ts":1625861500.5752304,
"caller":"snapshot/v3_snapshot.go:296",
"msg":"restoring snapshot","path":"/opt/etcd-backup.db",
"wal-dir":"/var/lib/from-backup/member/wal",
"data-dir":"/var/lib/from-backup",
"snap-dir":"/var/lib/from-backup/member/snap"}
{"level":"info","ts":1625861500.6146874,
"caller":"membership/cluster.go:392",
"msg":"added member","cluster-id":"cdf818194e3a8c32",
"local-member-id":"0",
"added-peer-id":"8e9e05c52164694d",
"added-peer-peer-urls":["http://localhost:2380"]}
{"level":"info","ts":1625861500.6350253,
"caller":"snapshot/v3_snapshot.go:309",
"msg":"restored snapshot","path":"/opt/etcd-backup.db",
"wal-dir":"/var/lib/from-backup/member/wal",
"data-dir":"/var/lib/from-backup",
"snap-dir":"/var/lib/from-backup/member/snap"}
$ sudo ls /var/lib/from-backup
member
Edit the YAML manifest of the etcd Pod which can be found at /etc/kubernetes/manifests/etcd.yaml. Change the value of the attribute spec.volumes.hostPath with the name etcd-data from the original value /var/lib/etcd to /var/lib/from-backup.
$ cd /etc/kubernetes/manifests/
$ sudo vim etcd.yaml
...
spec:
  volumes:
  ...
  - hostPath:
      path: /var/lib/from-backup
      type: DirectoryOrCreate
    name: etcd-data
...
The etcd-kube-master Pod will be recreated and points to the restored backup directory.
$ kubectl get pod etcd-kube-master -n kube-system
NAME               READY   STATUS    RESTARTS   AGE
etcd-kube-master   1/1     Running   0          5m1s
In case the Pod doesn’t transition into the “Running” status, try to delete it manually with the command kubectl delete pod etcd-kube-master -n kube-system.
Exit out of the node using the exit command.
$ exit
logout
...
Summary
Production-ready Kubernetes clusters should employ security policies to control which users and what processes can manage objects. Role Based Access Control (RBAC) defines those rules. RBAC introduces specific API resources that map subjects to the operations allowed for particular objects. Rules can be defined on a namespace- or cluster-level using the API resource types Role, ClusterRole, as well as RoleBinding and ClusterRoleBinding. To avoid duplication of rules, ClusterRoles can be aggregated with the help of label selection.
As a Kubernetes administrator, you need to be familiar with typical tasks involving the management of the cluster nodes.
The primary tool for installing new nodes, and upgrading a node version is kubeadm. The cluster topology of such a cluster can vary. For optimal result on redundancy and scalability, consider configuring the cluster with a high-availability setup that uses three or more control plane nodes and dedicated etcd hosts.
Backing up the etcd database should be performed as a periodic process to prevent the loss of crucial data in the event of a node or storage corruption. You can use the tool etcdctl to back up and restore etcd from the control control plane node or via an API endpoint.
Exam Essentials
- Know how to define RBAC rules
-
Defining RBAC rules involves a couple of moving parts: The subject defined by users, groups, and ServiceAccounts. The RBAC-specific API resources on the namespace- and cluster-level. And finally, the verbs that allow the corresponding operations on the Kubernetes objects. Practice the creation of subjects, and how to tie them together to form the desired access rules. Ensure that you verify the correct behavior with different constellations.
- Creating and Managing a Kubernetes Cluster
-
Installing new cluster nodes and upgrading the version of an existing cluster node are typical tasks performed by a Kubernetes administrator. You do not need to memorize all the steps involved. The documentation provides a step by step, easy-to-follow manual for those operations. For upgrading a cluster version, it is recommended to jump up by a single minor version or multiple patch versions before tackling the next higher version. High-availability clusters help with redundancy and scalability. For the exam, you will need to understand the different HA topologies though it’s unlikely that you’ll have to configure one of them as the process would involve a suite of different hosts.
- Practice backing up and restoring etcd
-
The process for etcd disaster recovery is not as well documented as you’d expect. Practice the backup and a restoration process hands-on a couple of times to get the hang of it. Remember to point the control plane node(s) to the restored snapshot file to recover the data.
Sample Exercises
Solutions to these exercises are available in the Appendix A.
-
Create the ServiceAccount named
api-accessin a new namespace calledapps. -
Create a ClusterRole with the name
api-clusterrole, and the ClusterRoleBinding namedapi-clusterrolebinding. Map the ServiceAccount from the previous step to the API resourcesPodswith the operationswatch,list,get. -
Create a Pod named
operatorwith the imagenginx:1.21.1in the namespaceapps. Expose the container port 80. Assign the ServiceAccountapi-accessto the Pod. Create another Pod nameddisposablewith the imagenginx:1.21.1in the namespacerm. Do not assign the ServiceAccount to the Pod. -
Open an interactive shell to the Pod named
operator. Use the command line toolcurlto make an API call to list the Pods in the namespacerm. What response do you expect? Use the command line toolcurlto make an API call to delete the Poddisposablein the namespacerm. Does the response differ from the first call? You can find information about how to interact with Pods using the API via HTTP in the reference guide. -
Navigate to the directory
app-a/ch02/upgrade-versionof the checked-out GitHub repositorybmuschko/cka-study-guide. Start up the VMs running the cluster using the commandvagrant up. Upgrade all nodes of the cluster from Kubernetes 1.20.4 to 1.21.2. The cluster consists of a single control plane node namedk8s-master, and three worker nodes namedworker-1,worker-2, andworker-3. Once done, shut down the cluster usingvagrant destroy -f.Prerequisite: This exercise requires the installation of the tools Vagrant and VirtualBox.
-
Navigate to the directory
app-a/ch02/backup-restore-etcdof the checked-out GitHub repositorybmuschko/cka-study-guide. Start up the VMs running the cluster using the commandvagrant up. The cluster consists of a single control plane node namedk8s-master, and two worker nodes namedworker-1, andworker-2. Theetcdctltool has been preinstalled on the nodek8s-master. Back up etcd to the snapshot file/opt/etcd.bak. Restore etcd from the snapshot file. Use the data directory/var/bak. Once done, shut down the cluster usingvagrant destroy -f.Prerequisite: This exercise requires the installation of the tools Vagrant and VirtualBox.