
Finally we get to the meat of the chapter. Here we roll up our sleeves and get to the business of coding Tinyclone. The overall web application is around 200 lines of code, so we will put everything into a single file called tinyclone.rb. With a bit of Sinatra magic this becomes our entire web application.
We will be looking at Tinyclone from two simple perspectives. The first is the data model. The data model is an abstract view of the objects that are used to represent the application problem space. The second is the application flow, which describes how the application uses the data model to provide the functions needed. As the application isn't very large, we can inspect its code in detail, something we will not be able to do in later chapters when we deal with larger applications.
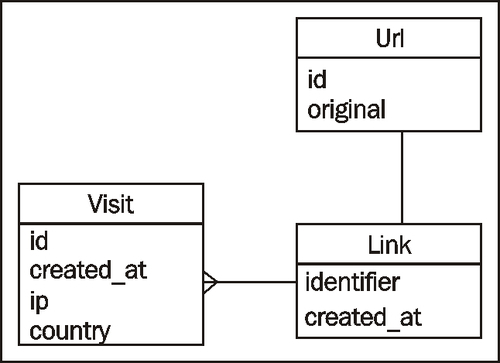
Let's look at the data model first. The model we use has three classes. The Link is the main class for the application, one that has an identifier (short URL) that represents an actual URL. A Link object (that is, an instance of the Link class) has a Url object. Url represents the original URL that has been shortened. The reason why we separate the short URL and the original URL is to allow custom short URLs, as described above when we discussed the design.
A Link object has many Visit objects. Each Visit object represents a visit to the short URL and contains information about the visit, namely the date of the visit and where the visitor came from. The diagram below describes the three classes we will be using in Tinyclone:
Now that we have the properties of the objects, let's look at the logic that is required for each object.
The Url class has no additional built-in logic as it's just a container to store the original URL. Here's the code for the Url class:
class Url
include DataMapper::Resource
property :id, Serial
property :original, String, :length => 255
belongs_to :link
end
The main logic in the Link class is based on shortening URLs, that is, turning a given URL into a short URL. Naturally, we create a class method called shorten for this, shown as follows:
def self.shorten(original, custom=nil)
url = Url.first(:original => original)
return url.link if url
link = nil
if custom
raise 'Someone has already taken this custom URL, sorry' unless Link.first(:identifier => custom).nil?
raise 'This custom URL is not allowed because of profanity' if DIRTY_WORDS.include? custom
transaction do |txn|
link = Link.new(:identifier => custom)
link.url = Url.create(:original => original)
link.save
end
else
transaction do |txn|
link = create_link(original)
end
end
return link
end
We pass in an original URL and optionally a custom label we want for the short URL. First, we check if the original URL is already shortened. If it is, we just return the link. Otherwise, we have split choices, where we will react differently to each situation. If a custom label is provided, we check if the label is already in use. If it is, we throw an exception and ask the user to use another label. We also check the custom label with a list of banned words that we don't want as custom labels. If these two checks are cleared, we proceed to create the Link object and the Url object then save them.
If a custom label is not provided, we will use a recursive method to create the link. We use a recursive method because without a custom label, we will use the record ID as the identifier for the Link object. If coincidentally the custom label is in the list of banned words or if the record ID created is the same as an existing custom label, we want to create another Url object to represent the new Link object. Of course, if even more coincidentally the new Url object ID is also in the banned words list or is a custom label that already exists, we want to create yet another Url object and so on, hence the recursion. The danger that it becomes a never-ending recursion is quite low as it is highly unlikely recursion will happen more than twice.
The list of banned words is loaded up in a separate Ruby file named dirty_words.rb. For obvious reasons, this file is not re-printed here.
def self.create_link(original)
url = Url.create(:original => original)
if Link.first(:identifier => url.id.to_s(36)).nil? or !DIRTY_WORDS.include? url.id.to_s(36)
link = Link.new(:identifier => url.id.to_s(36))
link.url = url
link.save
return link
else
create_link(original)
end
end
Note that we convert from the Url's ID to a base 36 numbering system before storing it, as explained above.
The Visit object has the most built-in logic. While storing the data for the visits to the short URL is trivial, we want to also use the Visit object for retrieving the usage charts and statistics.
Remember one of the things we want to do is find and store the country where each visitor comes from. Whenever a visitor visits a short URL in the application, we will create a Visit object and associate it with the correct Link object. Using information from the environment variables, we get the IP address where the visitor comes from. However, getting the IP address is not good enough, as we also want to find out which country the visitor came from. To do this, we use the HostIP IP geocoding API. By sending it the IP address, we will get an XML document that contains information on the country where the client comes from. We parse this XML document and store the country into the Visit object.
To implement this, we use the after callback mechanism in the Visit object, where we call a method after the object is created.
after :create, :set_country
This results in the set_country method being called after an object is created. The set_country method in turn calls HostIP with the IP and is returned geocoded information in an XML document. Using XmlSimple, we parse that document and set the country code. The country information is in the form of ISO 3166-1 country codes, which are two letter abbreviations of the country name. For example, Singapore would be SG, France would be FR, and the United States would be US.
def set_country
xml = RestClient.get "http://api.hostip.info/get_xml.php?ip=#{ip}"
self.country = XmlSimple.xml_in(xml.to_s, { 'ForceArray' => false })['featureMember']['Hostip']['countryAbbrev']
self.save
end
Next, we want to get the visit statistics after storing the visit information. We use two methods to do this one that get the statistics by date, and another by country of origin.
def self.count_by_date_with(identifier,num_of_days)
visits = repository(:default).adapter.query("SELECT date(created_at) as date, count(*) as count FROM visits where link_identifier = '#{identifier}' and created_at between CURRENT_DATE-#{num_of_days} and CURRENT_DATE+1 group by date(created_at)")
dates = (Date.today-num_of_days..Date.today)
results = {}
dates.each { |date|
visits.each { |visit| results[date] = visit.count if visit.date == date }
results[date] = 0 unless results[date]
}
results.sort.reverse
end
In the count_by_date_with method, we use SQL directly on the table to get the data for the range of dates that we want. This results in an array of Ruby Struct objects that contains the information we want. However, we can't use this directly, because there would be some dates without visits, and the SQL doesn't return empty dates. To do this, we create a contiguous list of dates and for each date, we put in the visit count if it is not 0, and 0 if there are no visits. The result we return from this method is a hash table of data with the date as the key and the count as the value.
def self.count_by_country_with(identifier)
repository(:default).adapter.query("SELECT country, count(*) as count FROM visits where link_identifier = '#{identifier}' group by country")
end
The count_by_country_with method is simpler—we just get the count per country.
Getting the numbers is useful but visualizing it in charts and maps is probably more appealing to most users. Tinyclone uses only charts and maps to visualize the statistics and uses the statistics methods described above to get the numbers. Again, we use two methods to return the charts we need.
def self.count_days_bar(identifier,num_of_days)
visits = count_by_date_with(identifier,num_of_days)
data, labels = [], []
visits.each {|visit| data << visit[1]; labels << "#{visit[0].day}/#{visit[0].month}" }
"http://chart.apis.google.com/chart?chs=820x180&cht=bvs&chxt=x&chco=a4b3f4&chm=N,000000,0,-1,11&chxl=0:|#{labels.join('|')}&chds=0,#{data.sort.last+10}&chd=t:#{data.join(',')}"
end
The count_days_bar method takes in the identifier and the number of days we want to display the information on and returns a Google Chart API URL that shows image chart that we want. In this case, it is a vertical bar chart that shows the visit count by date.
def self.count_country_chart(identifier,map)
countries, count = [], []
count_by_country_with(identifier).each {|visit| countries << visit.country; count << visit.count }
chart = {}
chart[:map] = "http://chart.apis.google.com/chart?chs=440x220&cht=t&chtm=#{map}&chco=FFFFFF,a4b3f4,0000FF&chld=#{countries.join('')}&chd=t:#{count.join(',')}"
chart[:bar] = "http://chart.apis.google.com/chart?chs=320x240&cht=bhs&chco=a4b3f4&chm=N,000000,0,-1,11&chbh=a&chd=t:#{count.join(',')}&chxt=x,y&chxl=1:|#{countries.reverse.join('|')}"
return chart
end
The count_country_chart method takes in the identifier and the geographical zoom-in of the map we want and returns two charts. The first chart is a horizontal chart showing the number of visits by country and the second chart is a map visualizing the countries where the visits come from. The countries with the larger number of visits are in a darker shade of blue, compared to the countries with the smaller number of visits.
Next, we look at the application flow.
Like many web applications, most of the logic for the application lies in the model. The logic in the application flow (as the name suggests) mainly deals with routing or display formatting, besides actually calling the various classes and objects to do their jobs. As a result, this part of Tinyclone is relatively simple. As the routing flow becomes more complex in later chapters, this might not be necessarily true.
The application has six different routes, but only three of them do any significant work. The main route (/) does nothing except to display the main page.
get '/' do haml :index end
The create shortened URL route is a HTTP POST request to (/). It is used to create the short URL. First, it makes sure that the input is a valid HTTP or HTTPS URL. If it is, it will use the shorten method in the Link class to create a Link object, which is then passed on to the view.
post '/' do
uri = URI::parse(params[:original])
custom = params[:custom].empty? ? nil : params[:custom]
raise "Invalid URL" unless uri.kind_of? URI::HTTP or uri.kind_of? URI::HTTPS
@link = Link.shorten(params[:original], custom)
haml :index
end
The short URL route is the one that is most frequently used. Given the short URL, it redirects the user to the original URL. At the same time it records the call as a visit.
get '/:short_url' do
link = Link.first(:identifier => params[:short_url])
link.visits << Visit.create(:ip => get_remote_ip(env))
link.save
redirect link.url.original, 301
end
The redirect command in Sinatra normally issues a HTTP 302 response code. However, we need to send a 301, as mentioned in the design section. Fortunately, Sinatra is flexible enough to let us send a 301 instead.
To get the IP address of the calling client, we use a method called get_remote_ip and pass it the current environment.
def get_remote_ip(env)
if addr = env['HTTP_X_FORWARDED_FOR']
addr.split(',').first.strip
else
env['REMOTE_ADDR']
end
end
Astute readers who already know Sinatra or Rack would know that the Request object inherent in the block has an ip method that returns the IP address already and looking at the source it seems to be the same. However, there is a small difference and this has to do with how web applications get the client's IP address.
Most web servers send a set of information when it interacts with the web applications. These environment variables (which are specified in the CGI specification) contain information about the resource that was requested from the web server, and the information in turn can be used by the web application. An example of the information is SERVER_NAME, which gives the web application the host name of the server. Amongst the other information is the REMOTE_ADDR, which tells the web application the IP address of the calling client.
This is all well and good in an ideal world where the clients and servers are connected to and interact directly with the Internet. However, in many production situations, clients and servers are often proxied (by one or more layers) for caching or other reasons. As a result the REMOTE_ADDR variable only gives you the IP address of the last proxy.
Many proxies try to be helpful and add HTTP headers to let the web applications know the real IP address of the calling client. The most popular of these HTTP headers, pioneered by the Squid proxy, is known as X-Forwarded-For. X-Forwarded-For provides a list of IP addresses, from the calling client to the last proxy:
X-Forwarded-For: client1, proxy1, proxy2
Sinatra gets both the REMOTE_ADDR HTTP environment variable and X-Forwarded-For HTTP header through its env variable in the Request object provided by Rack. However, the current implementation of Rack (1.0.0) has the ip method in the Request class taking the last IP address while what we need is really the first IP address. Therefore we need to modify the implementation slightly in order to get the IP address.
X-Forwarded-For is not very secure though, and any machines along the way can always change the HTTP header to something else altogether. However, as the information is statistical anyway, this is not a big concern for us.
Next is a group of routes that show the information on the short URL:
['/info/:short_url', '/info/:short_url/:num_of_days', '/info/:short_url/:num_of_days/:map'].each do |path|
get path do
@link = Link.first(:identifier => params[:short_url])
raise 'This link is not defined yet' unless @link
@num_of_days = (params[:num_of_days] || 15).to_i
@count_days_bar = Visit.count_days_bar(params[:short_url], @num_of_days)
chart = Visit.count_country_chart(params[:short_url], params[:map] || 'world')
@count_country_map = chart[:map]
@count_country_bar = chart[:bar]
haml :info
end
end
You might notice that we are grouping three different routes under a single block. This is possible under Sinatra because each route is a method that is being called and not being defined in the code. We grouped the routes by placing them in an array and iterating them with a get call.
To show the information in the short URL, firstly we need to establish that the short URL is an existing link in the system. The rest of the code just calls the logic in the models and retrieves the necessary data and charts from the models.
Note
In this chapter we are discussing the views separately from the routes because the application is very small. In subsequent chapters the routes are discussed alongside the views.
The view in the application is implemented using Haml. The Haml templates are also in the same file. To do this takes a little Sinatra magic. Ruby has a __END__ directive that indicates that anything that comes after it will not be parsed. Instead, we can use the DATA constant to get the rest of the data after the __END__ directive.
Using the command use_in_file_templates! we can tell Sinatra to use whatever after the __END__ directive as the template files. As a result, the Haml templates at the end of the file are the templates for the Sinatra application. This is not the norm for the rest of the chapters though, and is not suitable if there are a large number of views.
Just as in the routes, the view pages are relatively simple. We have a layout page, an index page and an info page. Each inline template page starts with @@ followed by the name of the page. In the Sinatra route, we use this to call a page:
haml :index
In Sinatra, if we define a template called layout, Sinatra will use it as the layout for all pages, unless we tell it specifically not to.
@@ layout
!!! 1.1
%html
%head
%title Tinyclone
%link{:rel => 'stylesheet', :href => 'http://www.blueprintcss.org/blueprint/screen.css', :type => 'text/css'}
%body
.container
= yield
We use Blueprint, a CSS framework that provides us with a ready made set of CSS for various styling and layout purposes. Blueprint goes well with Haml.
Let's look at the index page, which is the front page of the application. The index page also acts as a catchall that includes error handling and providing feedback to the user.
@@ index
%h1.title Tinyclone
- unless @link.nil?
.success
%code= @link.url.original
has been shortened to
%a{:href => "/#{@link.identifier}"}
= "http://tinyclone.saush.com/#{@link.identifier}"
%br
Go to
%a{:href => "/info/#{@link.identifier}"}
= "http://tinyclone.saush.com/info/#{@link.identifier}"
to get more information about this link.
- if env['sinatra.error']
.error= env['sinatra.error']
%form{:method => 'post', :action => '/'}
Shorten this:
%input{:type => 'text', :name => 'original', :size => '70'}
%input{:type => 'submit', :value => 'now!'}
%br
to http://tinyclone.saush.com/
%input{:type => 'text', :name => 'custom', :size => '20'}
(optional)
%p
%small copyright ©
%a{:href => 'http://blog.saush.com'}
Chang Sau Sheong
%p
%a{:href => 'http://github.com/sausheong/tinyclone'}
Full source code
Reading Haml code takes some getting used to but after a while it becomes a breeze. If you feel confused at this point in time please refresh your Haml knowledge in Chapter 1!
The other page is the information page, which provides information of the short URL to the user. To access the information page, the visitor needs to add info to the URL path, just before the short URL key, as shown in the following code:
@@info
%h1.title Information
.span-3 Original
.span-21.last= @link.url.original
.span-3 Shortened
.span-21.last
%a{:href => "/#{@link.identifier}"}
= "http://tinyclone.saush.com/#{@link.identifier}"
.span-3 Date created
.span-21.last= @link.created_at
.span-3 Number of visits
.span-21.last= "#{@link.visits.size.to_s} visits"
%h2= "Number of visits in the past #{@num_of_days} days"
- %w(7 14 21 30).each do |num_days|
%a{:href => "/info/#{@link.identifier}/#{num_days}"}
="#{num_days} days "
|
%p
.span-24.last
%img{:src => @count_days_bar}
%h2 Number of visits by country
- %w(world usa asia europe africa middle_east south_america).each do |loc|
%a{:href => "/info/#{@link.identifier}/#{@num_of_days.to_s}/#{loc}"}
=loc
|
%p
.span-12
%img{:src => @count_country_map}
.span-12.last
%img{:src => @count_country_bar}
%p
The information template is mostly laid out using Blueprint CSS. The rules for using Blueprint grid layout are rather simple. Blueprint defines a grid on a page to be 950px, with 24 columns of width 30px, and a 10px margin between columns. By adding a CSS class selector that starts with span to a tag, we indicate the width of that tag. For example, span-2 means the tag is set a width of two columns. The last tag in the list needs another tag that is last to complete the row.
Now that we have gone through the application in detail, let's look at how we can deploy it.