
In the previous chapter we went through what social networking services are all about. We also designed a Facebook clone with a small list of essential features that a typical social networking service would have and talked through the design. We also started describing its implementation with a description of the data model used by Colony, our Facebook clone.
In this chapter we will continue with the clone we started previously. We will discuss the application flow of each chapter and finish up with our usual deployment to Heroku to a standalone server.
Let's start!
While much of the application logic resides in the data model, the flow of the application determines how the user uses Colony. Let's begin with the overall structure of the application and then we'll inspect each feature for its flow.
Unlike the previous clones where we stored the entire flow in a single file, Colony is too big to fit into a single file, so we split the application along the lines of its features and use one file per feature. The main file is called colony.rb. It contains the main processing necessary to log in as well as the landing page.
require 'rubygems'
gem 'rest-client', '=1.0.3'
%w(config haml sinatra digest/md5 rack-flash json restclient models).each { |lib| require lib}
set :sessions, true
set :show_exceptions, false
use Rack::Flash
get "/" do
if session[:userid].nil? then
@token = "http://#{env["HTTP_HOST"]}/after_login"
haml :login
else
@all = @user.feed
haml :landing
end
end
get "/logout" do
session[:userid] = nil
redirect "/"
end
# called by RPX after the login completes
post "/after_login" do
profile = get_user_profile_with params[:token]
user = User.find(profile["identifier"])
if user.new_record?
photo = profile["photo"].nil? ? "http://www.gravatar.com/avatar/#{Digest::MD5.hexdigest(profile["email"])}" : profile["photo"]
unless user.update_attributes({:nickname => profile["identifier"].hash.to_s(36), :email => profile["email"], :photo_url => photo, :provider => profile["provider"]})
flash[:error] = user.errors.values.join(",")
redirect "/"
end
session[:userid] = user.id
redirect "/user/profile/change"
else
session[:userid] = user.id
redirect "/"
end
end
%w(pages friends photos messages events groups comments user helpers).each {|feature| load "#{feature}.rb"}
error NoMethodError do
session[:userid] = nil
redirect "/"
end
before do
@token = "http://#{env["HTTP_HOST"]}/after_login"
@user = User.get(session[:userid]) if session[:userid]
end
Let's jump into the code details of the main file. Note that we're using a specific gem version for RestClient. This is because as of writing the RightAWS gem we use for accessing S3 doesn't work with the latest version of RestClient.
gem 'rest-client', '=1.0.3'
As mentioned earlier, each feature is contained in a file and we load each feature by file.
%w(pages friends photos messages events groups comments user helpers).each {|feature| load "#{feature}.rb"}
The one piece of data that we will always get for each route is the currently logged in user's ID, which we store in the session.
before do
@user = User.get(session[:userid]) if session[:userid]
end
The before filter is run before each request to Colony and returns User object, which is used in most of the routes. It also becomes a means of securing pages because if the user has not logged in, we will not be able to retrieve the User object. This will result in an error which clears the session and sends the user back to the login page.
error NoMethodError do
session[:userid] = nil
redirect "/"
end
As with the other clones in this book we use RPX for Colony to reduce the amount of work needed to build an authentication system. Let's describe what will happen. The first and the most basic route is the index route. If the user is already logged in and has a session, we will redirect him to the landing page described previously.
get "/" do
if session[:userid].nil? then
haml :login
else
@all = @user.feed
haml :landing
end
end
We use Haml for the view pages. As we did earlier, we define a separate layout Haml page that will be used in all the subsequent pages.
!!! 1.1
%html{:xmlns => "http://www.w3.org/1999/xhtml", :'xmlns:fb' => "http://www.facebook.com/2008/fbml"}
%head
%title Colony
%link{:rel => 'stylesheet', :href => '/css/blueprint/screen.css', :type => 'text/css'}
%link{:rel => 'stylesheet', :href => '/css/blueprint/plugins/fancy-type/screen.css', :type => 'text/css'}
%link{:rel => 'stylesheet', :href => '/css/additional.css', :type => 'text/css'}
%link{:href => '/css/datepicker.css', :rel => 'stylesheet', :type => 'text/css'}
%script{:src => '/js/jquery.min.js', :type => 'text/javascript'}
%script{:src => '/js/select.js', :type => 'text/javascript'}
%script{:src => '/js/notes.js', :type => 'text/javascript'}
%script{:src => '/js/datepicker.js', :type => 'text/javascript'}
%script{:src => '/js/timepicker.js', :type => 'text/javascript'}
%body
%script{:type => "text/javascript", :src => "http://static.ak.connect.facebook.com/js/api_lib/v0.4/FeatureLoader.js.php"}
.container
= yield
%hr.space
.span-24.last
.small.span-5.prepend-19
copyright ©
%a{:href => 'http://www.saush.com'} Chang Sau Sheong
2010
Like Tweetclone, but unlike Photoclone, we only place the RPX code in the login page. Sinatra looks for all view templates in a folder called views by default. Our login page, called login.haml, is found at the same place.
.span-24
.span-11
%img.span-12.prepend-6{:src => '/images/colony_login.png'}
.span-10.prepend-7
%h2{:style => 'font-size:2em;margin-bottom:0.75em;margin-top:0; padding-top: 0;'} Connect with friends, share your life
.subtitle You don't need to register any accounts, just use an existing account from your favorite Internet provider!
.span-3.prepend-9
%a.rpxnow{:onclick => "return false;", :href => "https://colony.rpxnow.com/openid/v2/signin?token_url=#{@token}" }
%h2{:style => "font-size:2em;margin-bottom:0.75em;"} Sign In
%script{:type => 'text/javascript'}
var rpxJsHost = (("https:" == document.location.protocol) ? "https://" : "http://static."); document.write(unescape("%3Cscript src='" + rpxJsHost + "rpxnow.com/js/lib/rpx.js' type='text/javascript'%3E%3C/script%3E"));
%script{:type => "text/javascript"}
RPXNOW.overlay = true;
RPXNOW.language_preference = 'en';
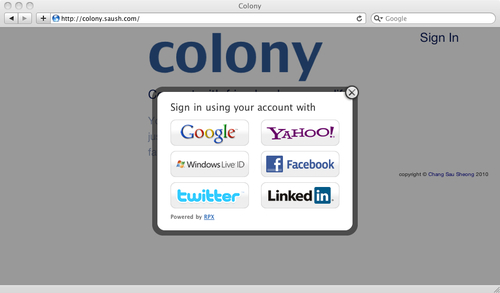
To allow login, we add an HTML anchor link that redirects us to RPX, passing in the token.
%a.rpxnow{:onclick => "return false;", :href => "https://colony.rpxnow.com/openid/v2/signin?token_url=#{@token}" }
%h2{:style => "font-size:2em;margin-bottom:0.75em;"} Sign In
This will redirect the user to the RPX site, which in turn redirects the user to the appropriate provider. On completion of the authentication, RPX will call on Colony at the URL (after_login) which was provided earlier. RPX passes a token parameter to us in this call, which we will use to retrieve the user's profile.
We will define a separate helper method to do the work of retrieving the user's profile. All such methods are placed in the helpers.rb file:
def get_user_profile_with(token)
response = RestClient.post 'https://rpxnow.com/api/v2/auth_info', 'token' => token, 'apiKey' => '<RPX API key>', 'format' => 'json', 'extended' => 'true'
json = JSON.parse(response)
return json['profile'] if json['stat'] == 'ok'
raise LoginFailedError, 'Cannot log in. Try another account!'
end
We use the Rest-Client library again to send the POST request to RPX, passing in the token and requesting the information back in JSON format. If successful, RPX will return some information on the users, which we will use the Ruby JSON library to parse and return. Let's look at the after_login route next.
post '/after_login' do
profile = get_user_profile_with params[:token]
user = User.find(profile['identifier'])
if user.new_record?
photo = profile ['email'] ? "http://www.gravatar.com/avatar/#{Digest::MD5.hexdigest(profile['email'])}" : profile['photo']
unless user.update_attributes({:nickname => profile['identifier'].hash.to_s(36), :email => profile['email'], :photo_url => photo, :provider => profile['provider']})
flash[:error] = user.errors.values.join(',')
redirect "/"
end
session[:userid] = user.id
redirect '/user/profile/change'
else
session[:userid] = user.id
redirect "/"
end
end
After getting the user's profile from the authentication provider through RPX, we try to retrieve the user's record from our database, using the unique identifier. If the user's record does not exist, we'll create a new record. If it's a new record, we will update the rest of the attributes from his/her profile. This includes a photo link from Gravatar.
Gravatar uses e-mail addresses that are hashed using MD5 to uniquely identify a user's avatar. Since a user can have multiple e-mail addresses, he can have multiple avatars:
photo = profile ['email'] ? "http://www.gravatar.com/avatar/#{Digest::MD5.hexdigest(profile['email'])}" : profile['photo']
We can optionally take the URL to an avatar photo from the photo link, if it is provided in the profile, though Gmail doesn't provide that as of date. As done before, if the user is not a Gravatar user, Gravatar returns a default avatar.
As in Photoclone we set the nickname here as well. We hash the identifier returned by the authentication provider and convert it into an alphanumeric string, which we use as the nickname. This means if a user doesn't change his nickname later, this will become his nickname. Finally we set session[:userid] with the user ID and redirect the user to change his profile.
The user profile and change profile routes do very little, other than redirecting to their respective views.
get "/user/profile" do
haml :profile
end
get "/user/profile/change" do
haml :change_profile
end
The change profile route does the actual work of saving any changes on the user profile. There is more to store here than there was with Photoclone.
post "/user/profile" do
unless @user.update_attributes(:nickname => params[:nickname],
:formatted_name => params[:formatted_name],
:location => params[:location],
:description => params[:description],
:sex => params[:sex],
:relationship_status => params[:relationship_status],
:interests => params[:interests],
:education => params[:education])
flash[:error] = @user.errors.values.join(",")
redirect "/user/profile/change"
end
redirect "/"
end
Finally, the logout route simply resets session[:userid] and redirects the user back to the index route. Without the user ID, the index route shows the login page.
get '/logout' do
session[:userid] = nil
redirect '/'
end
This wraps up authentication and user management.
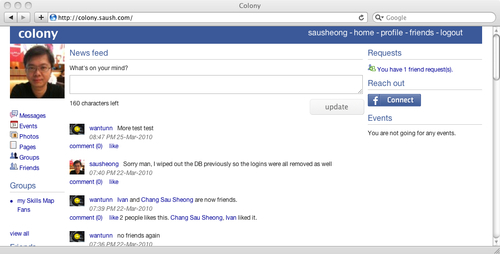
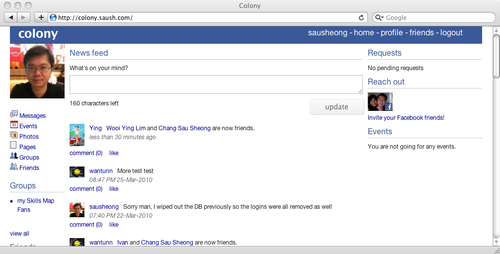
The landing page is the first page that the user sees when he logs in. It contains summary information for the user and is probably the most frequently used page. The centerpiece of the landing page is the user's news feed.
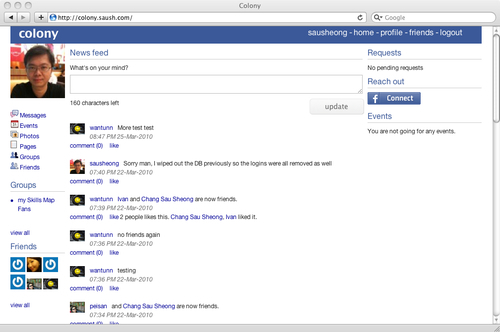
The main route will redirect the user to the login page, if he hasn't logged in yet, and to the landing page, if he has.
get "/" do
if session[:userid].nil? then
haml :login
else
@all = @user.feed
haml :landing
end
end
The news feed is processed in the landing page, which is nothing more than a collection of snippets. As explained in the previous chapters, a snippet is a small piece of template code that we re-use in various view templates. We use snippets extensively in Colony.
=snippet :'/snippets/top'
.span-24.last
.span-3
%img.span-3{:src => "#{@user.photo_url}"}
=snippet :'/snippets/links'
%h3 Groups
=snippet :'/snippets/mini_groups'
%h3 Friends
=snippet :'/snippets/mini_friends', :locals => {:user => @user}
.span-15
%h3 News feed
=snippet :'/snippets/update_box'
%hr.space
=snippet :'/snippets/feeds'
.span-6.last
%h3 Requests
=snippet :'/snippets/mini_requests'
%h3 Reach out
=snippet :'/snippets/mini_invite'
%h3 Events
=snippet :'/snippets/mini_events'
%hr.space
In particular, the news feed is used in the feeds snippet, in the feeds.haml file. The feeds snippet shows a list of feed items, given that we use the @all instance variable.
.feeds
[email protected] do |item|
.span-1
%img.span-1{:src => "#{item.user.photo_url}"}
.span-13.last
%a{:href => "/user/#{item.user.nickname}"}
=item.user.nickname

=item.text
.span-8.last
%em.quiet
=time_ago_in_words(item.created_at.to_time)
=snippet :'/snippets/comment_and_like', {:locals => {:item => item}}
We iterate through the news feed and display each one of the news feed items. Remember news feeds are basically activities, but a user's activity feed includes his activities and posts. We pass each item into the comment and like snippet as a variable to be used to display the comments and list of likes.
.span-15.last
.span-2
%a{:href =>"#", :onclick => "$('#comment_box_#{item.class.to_s}_#{item.id}').toggle();$('#comment_box_#{item.class.to_s}_#{item.id}').focus();"} comment (#{item.comments.size})
.span-13.last
%form{:method => 'post', :action => "/like/#{item.class.to_s.downcase}/#{item.id}", :id => "form_like_#{item.class.to_s.downcase}_#{item.id}"}
%input{:type => 'hidden', :name => 'return_url', :value => request.url.to_s}
%input{:type => 'hidden', :name => '_method', :value => 'put'}
%a{:href =>"#", :onclick => "$('#form_like_#{item.class.to_s.downcase}_#{item.id}').submit();"} like
- unless item.likes.empty?
#{item.likes.size} people likes this. #{item.people_who_likes.join(', ')} liked it.
.span-13.hide.last{:id => "comment_box_#{item.class.to_s}_#{item.id}"}
%form{:method => 'post', :action => "/comment/#{item.class.to_s.downcase}/#{item.id}"}
%textarea.span-10{:name => 'text', :style => 'height: 30px;'}
%input{:type => 'hidden', :name => 'return_url', :value => request.url.to_s}
%input{:type => 'hidden', :name => '_method', :value => 'put'}
%br
%input{:type => 'submit', :value => 'comment'}
%hr.space
- unless item.comments.empty?
.span-14.push-1.last
- item.comments.each do |comment|
.span-1
%a{:href => "/user/#{comment.user.nickname}"}
%img.span-1{:src => "#{comment.user.photo_url}"}
.span-12.last.comment_box
#{comment.text}
%br
%em.quiet
=time_ago_in_words(comment.created_at.to_time)
The comment and like snippet is split into three sections. The first section deals with the likes, allowing the user to like the item as well as listing the people who like this item.
%form{:method => 'post', :action => "/like/#{item.class.to_s.downcase}/#{item.id}", :id => "form_like_#{item.class.to_s.downcase}_#{item.id}"}
%input{:type => 'hidden', :name => 'return_url', :value => request.url.to_s}
%input{:type => 'hidden', :name => '_method', :value => 'put'}
%a{:href =>"#", :onclick => "$('#form_like_#{item.class.to_s.downcase}_#{item.id}').submit();"} like
- unless item.likes.empty?
#{item.likes.size} people likes this. #{item.people_who_likes.join(', ')} liked it.
The second section allows users to add comments to the item using a form.
.span-13.hide.last{:id => "comment_box_#{item.class.to_s}_#{item.id}"}
%form{:method => 'post', :action => "/comment/#{item.class.to_s.downcase}/#{item.id}"}
%textarea.span-10{:name => 'text', :style => 'height: 30px;'}
%input{:type => 'hidden', :name => 'return_url', :value => request.url.to_s}
%input{:type => 'hidden', :name => '_method', :value => 'put'}
%br
%input{:type => 'submit', :value => 'comment'}
The final section displays all the comments on the item.
- unless item.comments.empty?
.span-14.push-1.last
- item.comments.each do |comment|
.span-1
%a{:href => "/user/#{comment.user.nickname}"}
%img.span-1{:src => "#{comment.user.photo_url}"}
.span-12.last.comment_box
#{comment.text}
%br
%em.quiet
=time_ago_in_words(comment.created_at.to_time)
With that we have our news feed. Let's go back a little bit and discuss the common snippets. The top snippet provides us with the top bar.
.span-24
.span-2
%a{:href => '/'}
%img{:src => '/images/colony_header.png'}
- if @user
.span-9.prepend-13.last
%a.topbar{:href =>"/user/#{@user.nickname}"} #{@user.nickname} -
%a.topbar{:href => '/'} home -
%a.topbar{:href => '/user/profile'} profile -
%a.topbar{:href => '/friends'} friends -
%a.topbar{:href => '/logout'} logout
- else
.span-2.prepend-20.last
%a.topbar.rpxnow{:onclick => "return false;", :href => "https://colony.rpxnow.com/openid/v2/signin?token_url=#{@token}" } sign in
The links snippet provides us with a simple left navigation sidebar.
%hr.space
.span-3
.icons.icons_messages
- num_unread_msgs = @user.received_messages.all(:read => false).size
%a{:href => '/messages/inbox'} Messages
- if num_unread_msgs > 0
(#{num_unread_msgs})
.span-3
.icons.icons_event
%a{:href => '/events'} Events
.span-3
.icons.icons_photo
%a{:href => '/albums'} Photos
.span-3
.icons.icons_pages
%a{:href => '/user/pages'} Pages
.span-3
.icons.icons_group
%a{:href => '/groups'} Groups
.span-3
.icons.icons_friends
%a{:href => '/friends'} Friends
%hr.space
The other snippets in the landing page will be described in their respective features. A user updates his status (as in Tweetclone) through the update box snippet in a file named update_box.haml. This snippet is like the one in Tweetclone, using a text limiter Javascript and posting the status content to the user status route.
post '/user/status' do
Status.create(:text => params[:status], :user => @user)
redirect "/"
end
The user status route simply creates the status update and redirects the user back to the landing page. The update box snippet is only used in the landing page.
The invite friends and friends list features are implemented with a file named friends.rb. Let's look at the friends list first.
get '/friends' do
if params[:query]
results = User.all(:nickname.like => params[:query] + '%') + User.all(:formatted_name.like => '%' + params[:query] + '%')
@search_results = results.uniq[0..24]
end
haml :'/friends/friends', :locals => {:show_search => true, :user => @user}
end
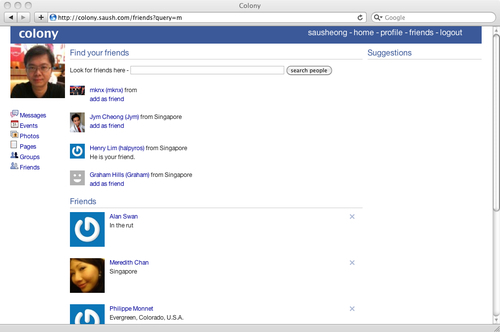
The friends route performs two tasks. Firstly, it performs a simple search on all users in the application, based on either the user's nickname or formatted name, and returns the first 25 results found. Secondly, it tells the view page to show the search for friends form and passes the user to the page. We do this to reuse the same page to show the friends of a specific user and not your own friends.
All the views are in a folder named friends. The first page we will be looking at is the friends.haml page.
=snippet :'/snippets/top'
.span-24.last
.span-3
%img.span-3{:src => "#{user.photo_url}"}
=snippet :'/snippets/links'
.span-15
- if show_search
%h3 Find your friends
%form{:method => 'get'}
Look for friends here -
%input.span-8{:type => 'text', :name => 'query'}
%input{:type => 'submit', :value => 'search people'}
- if @search_results
%hr.space
- @search_results.each do |res|
.span-1
%img.span-1{:src => "#{res.photo_url}"}
.span-12
- unless res == @user
%a{:href => "/user/#{res.nickname}"} #{res.formatted_name} (#{res.nickname})
from #{res.location}
%br
- if @user.friends.include? res
#{res.pronoun.capitalize} is your friend.
- else
%a{:href => "/request/#{res.id}"} add as friend
- else
This is me!
%hr.space
%h3 Friends
- user.friends.each do |friend|
.span-2
%img.span-2{:src => "#{friend.photo_url}"}
.span-12
%a{:href => "/user/#{friend.nickname}"} #{friend.formatted_name}
%br
#{friend.location}
.span-1.last
%form{:id => "form_friend_#{friend.id}", :method => 'post', :action => "/friend/#{friend.id}"}
%input{:type => 'hidden', :name => '_method', :value => 'delete'}
%a{:href => '#', :onclick => '$("#form_friend_' + "#{friend.id}" + '").submit();', :class => 'remove_link'}
Notice the simple use of pronouns to make the experience friendlier. We also allow the user to add people he has found as friends using a link to the create request route.
- if @user.friends.include? res
#{res.pronoun.capitalize} is your friend.
- else
%a{:href => "/request/#{res.id}"} add as friend
Below the search form and the search results we show a list of friends the user has. For each friend displayed, we allow the friend to be viewed using a link to the view user route, and also to be removed from the Friends list.
%h3 Friends
- user.friends.each do |friend|
.span-2
%img.span-2{:src => "#{friend.photo_url}"}
.span-12
%a{:href => "/user/#{friend.nickname}"} #{friend.formatted_name}
%br
#{friend.location}
.span-1.last
%form{:id => "form_friend_#{friend.id}", :method => 'post', :action => "/friend/#{friend.id}"}
%input{:type => 'hidden', :name => '_method', :value => 'delete'}
%a{:href => '#', :onclick => '$("#form_friend_' + "#{friend.id}" + '").submit();', :class => 'remove_link'}
To add a friend, we need to create a request object, and attach it to the user that we want as a friend. This is initiated with the create request route.
get '/request/:userid' do
@friend = User.get(params[:userid])
haml :'/friends/request'
end
This retrieves the user we want to befriend, and shows us the request creation page.
=snippet :'/snippets/top'
.span-3
%img.span-3{:src => "#{@user.photo_url}"}
=snippet :'/snippets/links'
.span-20.last
%h3 Add #{@friend.formatted_name} as a friend?
%h4 #{@friend.formatted_name} will have to confirm that you are friends.
%form{:action => '/request', :method => 'post'}
.span-20 Add a personalized message (optional)
.span-20
%textarea.span-10{:name => 'text'}
%input{:type => 'hidden', :name => '_method', :value => 'put'}
%input{:type => 'hidden', :name => 'receiverid', :value => "#{@friend.id}"}
%input{:type => 'submit', :value => 'send request'}
The request creation page allows us to add an optional personalized message which is sent along the request.
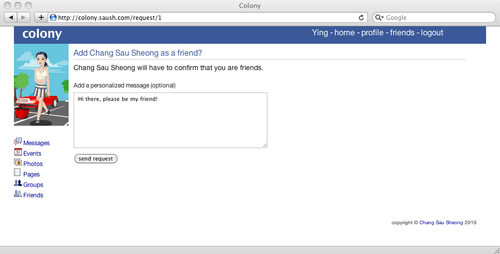
The form submits to the put request route, which creates a request that sets from to the requesting user and the user to the person he wishes to befriend.
put '/request' do
Request.create(:text => params[:text], :from => @user, :user => User.get(params[:receiverid]))
redirect '/friends'
end
Once the user receives the request, he or she will see a new request on the landing page, displayed using the mini request snippet.
- unless @user.requests.empty?
.icons.icons_add_friend
%a{:href => '/requests/pending'}
You have #{@user.requests.size} friend request(s).
- else
No pending requests
Clicking on the request link will allow the user to see a list of pending requests, which he may approve or ignore. This is done in the request pending route.
get '/requests/pending' do
haml :'/friends/pending_requests'
end
This goes to the request pending page.
=snippet :'/snippets/top'
.span-3
%img.span-3{:src => "#{@user.photo_url}"}
=snippet :'/snippets/links'
.span-21.last
%h3 Pending requests
- if @user.requests.empty?
You have no pending requests.
- @user.requests.each do |req|
.span-13
.span-2
%img.span-2{:src => "#{req.from.photo_url}"}
.span-10
#{req.text}
%br
%form{:id => "form_approve_#{req.id}", :method => 'post', :action => "/friend/#{req.id}"}
%input{:type => 'hidden', :name => '_method', :value => 'put'}
%a{:href => '#', :onclick => '$("#form_approve_' + "#{req.id}" + '").submit();'} approve
.
%a{:href => "/friend/ignore/#{req.id}"} ignore
%hr.space
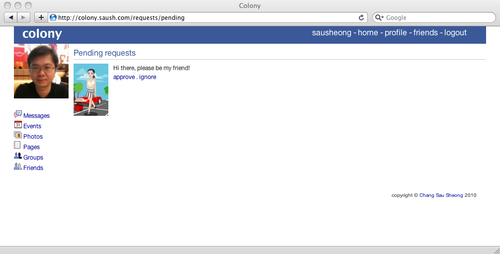
To approve the friendship, the user clicks on the approve link which goes to the approve request route. This retrieves the request and approves it if it really belongs to the current logged in user (we don't want just anyone to come in to approve the request).
put '/friend/:requestid' do
req = Request.get(params[:requestid])
if @user.requests.include? req
req.approve
req.destroy
end
redirect '/requests/pending'
end
Approving the request simply means that the user is added as a friend to the current user.
def approve
self.user.add_friend(self.from)
end
Similarly to ignore the request the user clicks on the ignore link which goes to the ignore request route. This will destroy the request if the user is the correct one.
get '/friend/ignore/:requestid' do
req = Request.get(params[:requestid])
req.destroy if @user.requests.include? req
redirect '/requests/pending'
end
In the landing page, there is a mini friends snippet from a file named mini_friends.haml that displays a minified image of the friends the user has (up to 12 friends at once).
- if user.friends.empty?
You don't have any friends in Colony! Start adding friends today!
- else
- user.friends[0..11].each do |f|
%a{:href => "/user/#{f.nickname}"}
%img.span-1{:src => "#{f.photo_url}"}
%hr.space
- if user == @user
%a{:href => "/friends"} view all
- else
%a{:href => "/friends/#{user.id}"} view all
If this snippet is used in the user page instead of the landing page, this will show the viewed user's friends, via the user friends route.
get '/friends/:id' do
viewed_user = User.get params[:id]
haml :'/friends/friends', :locals => {:show_search => false, :user => viewed_user}
end
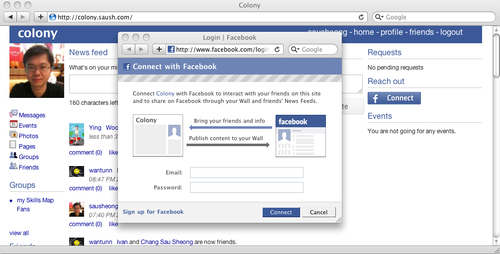
That's all for the friends list. Let's take a look at how we can invite friends to join us in Colony. The design of the feature of inviting friends is based on Facebook Connect. We use Facebook Connect to allow a user to log in to his Facebook account, and then using this account, send invitations to his friends through Facebook.
When a user logs in, there is a button to the right of the landing page that invites the user to log in to Facebook Connect, if he wasn't logged in to Facebook. Clicking on that will request the user to log in to his Facebook account. Note that if you have used the Facebook account to log in to Colony in the first place (through RPX) you would have automatically logged in to Facebook Connect already.
Let's look at how we use Facebook Connect in Colony. There are three basic steps to enable Facebook Connect for a web application.
- Register the application with Facebook by creating a Facebook application. This will also give you the application key.
- Create a cross-domain communication channel file called
xd_receiver.htmand place it in a directory relative to the Connect URL specified in the first step. - Write the necessary Javascript and FBML.
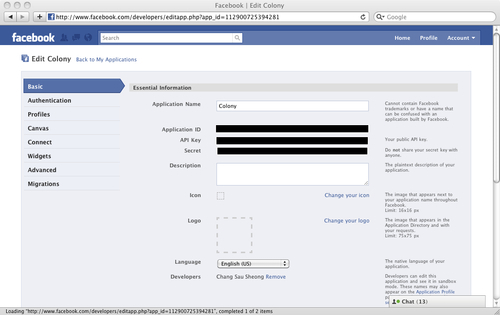
Without going through every detail, here are the essential steps to create a Facebook application for Colony's Facebook Connect integration:
- Go to http://www.facebook.com/developers/createapp.php to create a new application.
- Go to http://www.facebook.com/developers/createapp.php to create a new application.
- Enter 'Colony' in the Application Name field and save to proceed.
- Take note of the API Key, as we'll need this shortly.
- Click on the Connect tab. Set Connect URL to http://colony.saush.com.
The Facebook JavaScript Client Library uses a cross-domain communications library to establish communication between external web pages and Facebook pages, and services inside a browser. To reference the library, we need to create a cross-domain communications channel file named xd_receiver.htm with the following information:
<!DOCTYPE html PUBLIC "-//W3C//DTD XHTML 1.0 Strict//EN" "http://www.w3.org/TR/xhtml1/DTD/xhtml1-strict.dtd">
<html xmlns="http://www.w3.org/1999/xhtml">
<head>
<title>xd</title>
</head>
<body>
<script src="http://static.ak.facebook.com/js/api_lib/v0.4/XdCommReceiver.js" type="text/javascript"></script>
</body>
</html>
We then place this file in the public folder.
Our Facebook Connect code is in a snippet called mini invite in the file mini_invite.haml.
=snippet :'/snippets/fbinit'
%div#fblogin
%fb:login-button{:onlogin => "$('#fblogin').hide();$('#fbuser').show();"}
%fb:intl
Connect with Facebook
%div#fbuser.hide
%fb:profile-pic{:uid => "loggedinuser", :'facebook-logo' =>"true", :linked => "true"}
%br
%a{:href => '/invite'}
Invite your Facebook friends!
:javascript
FB.ensureInit(function() {
FB.Connect.get_status().waitUntilReady( function( status ) {
switch ( status ) {
case FB.ConnectState.connected:
loggedIn = true;
break;
case FB.ConnectState.appNotAuthorized:
case FB.ConnectState.userNotLoggedIn:
loggedIn = false;
}
});
});
if (loggedIn) {
$("#fblogin").hide();
$("#fbuser").show();
}
else {
$("#fblogin").show();
$("#fbuser").hide();
}
Notice that the code here is all JavaScript from the Facebook JavaScript libraries and FBML. The first line inserts a snippet named fbinit.haml that initializes Facebook with the application key and xd_receiver.htm.
:javascript
FB.init("<FB APP KEY>", "xd_receiver.htm");
Why not just insert this line into the code? It's because there is another location where we are using the Facebook JavaScript libraries and we will need to reuse fbinit.haml.
Creating FBML with Haml is easy; remember that Haml can create any XML-like markup language.
%fb:login-button{:onlogin => "$('#fblogin').hide();$('#fbuser').show();"}
%fb:intl
Connect with Facebook
%div#fbuser.hide
%fb:profile-pic{:uid => "loggedinuser", :'facebook-logo' =>"true", :linked => "true"}
We tell the FBML login button that whenever the login button is clicked, we need to hide that button and show the fbuser element. This element contains the profile picture FBML, which forms the necessary HTML tags for us to display the image.
As for the Javascript, the first thing we need to do is to initialize the library with the application key and tell it where to look for the xd_receiver.htm file we created earlier in step 2.
After logging in, the Facebook Connect button is replaced by the user's Facebook profile photo as well as a link to get the user invite his Facebook friends. The rest of the JavaScript simply detects if the user has logged in, and toggles the display of the button or the profile picture and link accordingly.
When the user clicks on the link, he will be directed to a new page, with a list of his Facebook friends who he can send the invitation to join. This link goes to the invite route.
get '/invite' do
haml :'/friends/invite'
end
The route just redirects to the invite page.
=snippet :'/snippets/top'
%script{:src => "http://static.ak.connect.facebook.com/js/api_lib/v0.4/FeatureLoader.js.php", :type=>"text/javascript"}
%fb:serverfbml
%script{:type=>"text/fbml"}
%fb:fbml
%fb:request-form{:action => "http://colony.saush.com/", :method => "GET", :invite => "true", :type => "Colony", :content => "I am a member of Colony and would like to invite you share the experience. To visit the Colony, simply click on the Visit button below.<fb:req-choice url='http://colony.saush.com/' label='Visit' />"}
%fb:multi-friend-selector{:showborder => "false", :actiontext => "Invite your Facebook Friends to use Colony"}
=snippet :'/snippets/fbinit'
This is a whole bunch of FBML. We start off by adding the Facebook Javascript libraries, followed by the FBML tag<fb:serverfbml>. This tag enables us to place FBML tags inside a Facebook iframe, which means everything else nested in this tag is actually inside a Facebook iframe. Why is this?
This is because Facebook Connect applications use XFBML whereas usual Facebook applications use FBML. If we want to use any FBML tag inside a Facebook Connect, we need to wrap it around a ServerFBML tag.
Next, we have the usual<fb:fbml> tag, which indicates that we're using FBML now, followed by the<fb:request-form> tag, which creates a form to send invitations to users. Finally, nested within the request form, we use the<fb:multi-friend-selector> tag. This tag provides us with a list of the user's friends which he can select to send invitations with, using the request form. Right at the end of the template we re-use the fbinit snippet to initialize the libraries.
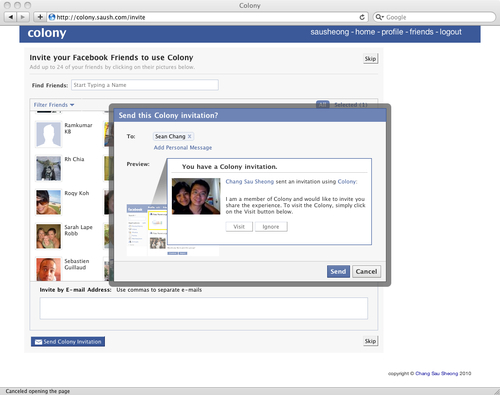
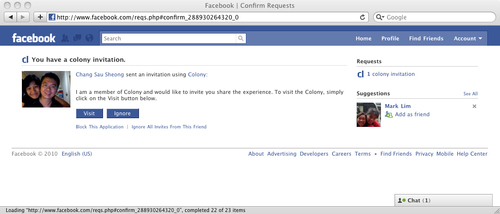
Clicking on the Send button will send an invitation to the user(s), and it will appear in Facebook's list of requests.
Next, we look at user pages and the activity feeds in the user pages. The user route is found in the user.rb file.
get "/user/:nickname" do
@myself = @user
@viewed_user = User.first(:nickname => params[:nickname])
@viewing_self = (@viewed_user == @myself)
all = [] + @viewed_user.activities + @viewed_user.wall.posts + @viewed_user.statuses
@all = all.sort {|x,y| y.created_at <=> x.created_at}
haml :user
end
If you are observant, you might notice that this route (like all other routes with variables in its definition) is placed at the last in the file. This is to prevent confusion by Sinatra when it is called. For example, in the same user.rb file we have the user profile (user/profile) and user status (user/status) routes. If we placed the user route (user/:nickname) definition before these two route definitions, when the user profile route is called Sinatra will be misinformed that it is called with a user named 'profile'!
The user route has two user objects, the currently logged in user and the user that is being viewed. These two users can be the same (if the logged in user is viewing his own page), and if this is the case then we set the @viewing_self variable to be true. We also extract all the viewed user's activities, wall posts, and statuses and sort them by reverse chronological order.
The route goes to the user page, called user.haml. This page, like the landing page, contains a number of snippets.
=snippet :'/snippets/top'
.span-24.last
.span-3
%img.span-3{:src => "#{@viewed_user.photo_url}"}
=snippet :'/snippets/links'
%h3 Friends
=snippet :'/snippets/mini_friends', :locals => {:user => @viewed_user}
.span-15
%h3 Wall
=snippet :'/snippets/wall_box'
%hr.space
=snippet :'/snippets/feeds'
.span-6.last
%h3 Information
.span-5 Name : #{@viewed_user.formatted_name}
.span-5 Location : #{@viewed_user.location}
.span-5 #{@viewed_user.description}
%hr.space
%h3 Photos
=snippet :'/snippets/mini_album'
%h3 Pages
=snippet :'/snippets/mini_pages', {:locals => {:owner => @viewed_user, :owner_name => 'user'}}
Notice that we have re-used a number of snippets (this is the reason why we started using snippets). The activity feed is used by the feeds snippet.
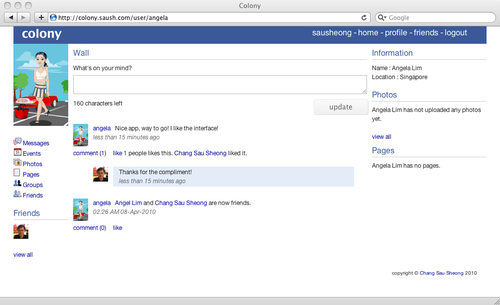
A wall is the place where users can post their views on. Walls belong to users, events, and groups, and each one of these can only have one wall. A post is content generated by the user placed on a wall.
The implementation of the wall is done at the various owning object's route files. Let's look at the user wall first. The wall posting form is in the wall box snippet, in a file named wall_box.haml. This snippet is found in the user page.
=snippet :'/snippets/text_limiter_js'
What's on your mind?
%form{:method => 'post', :action => '/user/wall'}
%textarea.update.span-15#update{:name => 'status', :rows => 2, :onKeyDown => "text_limiter($('#update'), $('#counter'))"}
.span-6
%span#counter
160
characters left
.prepend-12
%input{:type => 'hidden', :name => 'wallid', :value => "#{@viewed_user.wall.id}"}
%input{:type => 'hidden', :name => 'nickname', :value => "#{@viewed_user.nickname}"}
%input#button{:type => 'submit', :value => 'update'}
This snippet is very similar to the status update snippet, except we need to pass in the wall ID as well as the nickname of the user whom the wall belongs to. The form posts to the user wall route, which is found in the user.rb file.
post '/user/wall' do
Post.create(:text => params[:status], :user => @user, :wall_id => params[:wallid])
redirect "/user/#{params[:nickname]}"
end
This creates a post from a user to a wall. To view the posts, we re-use the feeds snippet we described earlier, which is also in the user page. We used this snippet to view the user's news feed, but we can also use it to view the activity for the viewed user.
.feeds
[email protected] do |item|
.span-1
%img.span-1{:src => "#{item.user.photo_url}"}
.span-13.last
%a{:href => "/user/#{item.user.nickname}"}
=item.user.nickname

=item.text
.span-8.last
%em.quiet
=time_ago_in_words(item.created_at.to_time)
=snippet :'/snippets/comment_and_like', {:locals => {:item => item}}
Next we look at a wall belonging to a group. The form is in the group wall snippet in a file named group_wall_box.haml.
=snippet :'/snippets/text_limiter_js'
What's on your mind?
%form{:method => 'post', :action => '/group/wall'}
%textarea.update.span-15#update{:name => 'status', :rows => 2, :onKeyDown => "text_limiter($('#update'), $('#counter'))"}
.span-6
%span#counter
160
characters left
.prepend-12
%input{:type => 'hidden', :name => 'wallid', :value => "#{@group.wall.id}"}
%input{:type => 'hidden', :name => 'group', :value => "#{@group.id}"}
%input#button{:type => 'submit', :value => 'update'}
This snippet allows the user to post to the group wall and it is found in the group page (discussed in a later section).
%h3 Wall
=snippet :'/snippets/group_wall_box'
%hr.space
[email protected] do |post|
.span-2
%img.span-2{:src => "#{post.user.photo_url}"}
.span-4
#{post.user.formatted_name}
%br
#{post.created_at.strftime "%d %b %Y"}
%br
#{post.created_at.strftime "%I:%M %P"}
.span-8
#{post.text}
%hr
For this wall, instead of using a snippet to view all the wall posts for this group, we add it in directly on the page. The route to create the group wall posts is also very similar to the one used for creating user wall posts.
post '/group/wall' do
Post.create(:text => params[:status], :user => @user, :wall_id => params[:wallid])
redirect "/group/#{params[:group]}"
end
Similarly for the event wall, we have an event wall snippet in a file named event_wall_box.haml.
=snippet :'/snippets/text_limiter_js'
What's on your mind?
%form{:method => 'post', :action => '/event/wall'}
%textarea.update.span-15#update{:name => 'status', :rows => 2, :onKeyDown => "text_limiter($('#update'), $('#counter'))"}
.span-6
%span#counter
160
characters left
.prepend-12
%input{:type => 'hidden', :name => 'wallid', :value => "#{@event.wall.id}"}
%input{:type => 'hidden', :name => 'event', :value => "#{@event.id}"}
%input#button{:type => 'submit', :value => 'update'}
Correspondingly, we also have the event wall on the event page, which we will look at later.
%h3 Wall
=snippet :'/snippets/event_wall_box'
%hr.space
[email protected] do |post|
.span-2
%img.span-2{:src => "#{post.user.photo_url}"}
.span-4
#{post.user.formatted_name}
%br
#{post.created_at.strftime "%d %b %Y"}
%br
#{post.created_at.strftime "%I:%M %P"}
.span-8
#{post.text}
%hr
The route to create the wall posts for an event is also quite similar.
post '/event/wall' do
Post.create(:text => params[:status], :user => @user, :wall_id => params[:wallid])
redirect "/event/#{params[:event]}"
end
Let's continue with more user-generated content, this time with photos. The photo-sharing feature in Colony is transplanted from Photoclone and share many similarities in design and code. The basic model for the photo-sharing feature is that of albums as containers to photos. Each user can have one or more albums, and each album has one or more photos in them. For the implementation we will look into the albums first, then move on to uploading photos then annotating them.
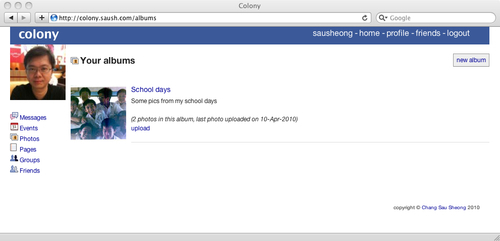
Albums are relatively simple to implement. The albums route shows a list of albums belonging to the currently logged in user.
get "/albums" do
@myself = @user = User.get(session[:userid])
haml :"albums/manage"
end
For the viewed user, we use the user albums route, which retrieves the albums belonging to that user we are viewing.
get "/albums/:user_id" do
@myself = User.get(session[:userid])
@user = User.get(params[:user_id])
haml :"albums/manage"
end
Both routes go to the manage album page.
=snippet :'/snippets/top'
.span-24
.span-3
%img.span-3{:src => "#{@user.photo_url}"}
=snippet :'/snippets/links'
.span-21.last
%hr.space
.span-17
%div.icons.icons_photo
%strong{:style => 'vertical-align:bottom;font-size:18px;'}
#{@user == @myself ? 'Your' : "#{@user.formatted_name}'s"} albums
- if @user == @myself
.span-4.last.right
%a.button{:href => '/album/add'} new album
- if @user != @myself
- if @myself.friends.include? @user
.span-17.last You and #{@user.formatted_name} are friends.
- else
.span-17.last
#{@user.formatted_name} and you are not connected in Colony.
%hr.space
[email protected] do |album|
%hr.space
.span-3
- if album.cover_photo
%img.span-3{:src => "#{album.cover_photo.url_thumbnail}"}
- elsif !album.photos.empty?
%img.span-3{:src => "#{album.photos.first.url_thumbnail}"}
- else
%img.span-2{:src => "/images/album_icon.png"}
.span-18.last
%h4{:style => 'margin-bottom:5px;'}
%a{:href => "/album/#{album.id}"} #{album.name}
#{album.description}
%hr.space
- unless album.photos.empty?
%div{:style => 'font-style: italic;'} (#{album.photos.size} photos in this album, last photo uploaded on #{album.photos.last.created_at.strftime('%d-%b-%Y')})
- if @user == @myself
- if album.photos.empty?
%div{:style => "width: 50px;float: left;"}
%form{:id => "form_#{album.id}", :method => 'post', :action => "/album/#{album.id}"}
%input{:type => 'hidden', :name => '_method', :value => 'delete'}
%a{:href => '#', :onclick => '$("#form_' + "#{album.id}" + '").submit();'} remove
.span-2
%a{:href => "/album/#{album.id}/upload"} upload
The manage album page uses two instance variables for this—@myself indicates the logged in user and @user indicates the user whose list of albums are being viewed. We use these two instance variables to format the view accordingly and display the appropriate messages.
We also display a cover photo. If there is a given cover photo (the user has explicitly set one of the photos as the cover photo) we will show that, otherwise we'll show the first photo in the list or a default album icon, if the album is empty.
- if album.cover_photo
%img.span-3{:src => "#{album.cover_photo.url_display}"}
- elsif !album.photos.empty?
%img.span-3{:src => "#{album.photos.first.url_display}"}
- else
%img.span-3{:src => "/images/album_icon.png"}
Lastly, we'll only allow some actions if the current user is managing his own albums, and only allow the album to be deleted if the album is empty.
- if @user == @myself
- if album.photos.empty?
%div{:style => "width: 50px;float: left;"}
%form{:id => "form_#{album.id}", :method => 'post', :action => "/album/#{album.id}"}
%input{:type => 'hidden', :name => '_method', :value => 'delete'}
%a{:href => '#', :onclick => '$("#form_' + "#{album.id}" + '").submit();'} remove
.span-2
%a{:href => "/album/#{album.id}/upload"} upload
Note that delete uses the DELETE method and we are using the form submit hack to get around the problem of browsers not supporting any other HTTP methods other than GET and POST. Here is the delete album route.
delete "/album/:id" do
album = Album.get(params[:id])
user = User.get(session[:userid])
if album.user == user
if album.destroy
redirect "/albums"
else
throw "Cannot delete this album!"
end
else
throw "This is not your album, you cannot delete it!"
end
end
Viewing someone else's albums uses the same view. The only difference is that the @myself variable points to the logged in user and the @user variable points to the viewed user. The view user album route is as follows:
get "/albums/:user_id" do
@myself = User.get(session[:userid])
@user = User.get(params[:user_id])
haml :"albums/manage"
end
Creating an album is easy as well.
get "/album/add" do
haml :"/albums/add"
end
The add album page provides the user a form to add the album, which submits to a create album route as below. After creating the album, the user is redirected to the main albums page.
post "/album/create" do
album = Album.new
album.attributes = {:name => params[:name], :description => params[:description]}
album.user = @user
album.save
redirect "/albums"
end
Next, we display the album with the view album route.
get "/album/:id" do
@album = Album.get params[:id]
haml :"/albums/view"
end
Displaying the album is done with the view album page in a file named view.haml.
=snippet :'/snippets/top'
=snippet :'/snippets/album_inline_js'
.span-24.last
.span-3
%img.span-3{:src => "#{@album.user.photo_url}"}
=snippet :'/snippets/links'
.span-15.last
- if @user == @album.user
%h3.edit_name{:style => 'margin-bottom: 0;'} #{@album.name}
%h4.edit_area #{@album.description}
- else
%h3{:style => 'margin-bottom: 0;'} #{@album.name}
%h4 #{@album.description}
- if @user == @album.user
%a{:href => "/album/#{@album.id}/upload"} Upload photos
- if @user
-
%a{:href => "/albums/#{@album.user.id}"} Back to albums
- else
-
%a{:href => "/user/#{@album.user.nickname}"} Back to albums
%hr.space
- if @user
- if @album.photos.empty?
%h4
There are no photos in this album.
%a{:href => "/album/#{@album.id}/upload"} Upload some photos?
- @album.photos.each do |photo|
%a{:href => "/photo/#{photo.id}"}
%img.span-2{:src => "#{photo.url_thumbnail}"}
The view album page allows you to edit the name and the description of the album inline through Javascript. The inline album snippet in the file name album_inline_js.haml provides the code for us to do this. You would have seen this in Photoclone.
As in Chapter 4, modifying the name or description properties will use AJAX to call the edit album properties route.
post "/album/:property/:photo_id" do
album = Album.get params[:photo_id]
if %w(name description).include? params[:property]
album.send(params[:property] + '=', params[:value])
album.save
end
album.send(params[:property])
end
This allows us to change the necessary album properties, in our case the name and a description of the album. Notice that we don't allow changing other properties besides name and description. The details of this mechanism are described in full in Chapter 4.
Next, if the owner of the album is the currently logged in user, we will allow uploading new photos. Otherwise we will only allow returning back to the albums list.
- if @user == @album.user
%h3.edit_name{:style => 'margin-bottom: 0;'} #{@album.name}
%h4.edit_area #{@album.description}
- else
%h3{:style => 'margin-bottom: 0;'} #{@album.name}
%h4 #{@album.description}
- if @user == @album.user
%a{:href => "/album/#{@album.id}/upload"} Upload photos
- if @user
-
%a{:href => "/albums/#{@album.user.id}"} Back to albums
- else
-
%a{:href => "/user/#{@album.user.nickname}"} Back to albums
Finally, we show a list of photos in this album.
- if @user
- if @album.photos.empty?
%h4
There are no photos in this album.
%a{:href => "/album/#{@album.id}/upload"} Upload some photos?
- @album.photos.each do |photo|
%a{:href => "/photo/#{photo.id}"}
%img.span-2{:src => "#{photo.url_thumbnail}"}
Let's turn to uploading photos next. The upload photo route is in the same photos.rb file.
get "/upload" do
@albums = @user.albums
haml :upload
end
This allows us to show all albums that belong to the logged in user and allow him to choose which album he wants to upload in. However, when we want to choose the album we must upload to we use this route instead:
get "/album/:id/upload" do
@albums = [@user.albums.get(params[:id])]
haml :upload
end
Either route provides the albums for the upload photos page.
=snippet :'/snippets/top'
.span-3
%img.span-3{:src => "#{@user.photo_url}"}
=snippet :'/snippets/links'
.span-21.last
%h3 Upload photos to an album
- unless @albums.empty?
.span-24.last
%form{:method => 'post', :action => '/upload', :enctype=>"multipart/form-data"}
Upload photos to this album -
%select.span-8{:name => 'album_id'}
- @albums.each do |album|
%option{:value => "#{album.id}"} #{album.name}
%hr.space
.span-23.push-1
%ol
%li
%input{:type => 'file', :name => 'file1', :size => 60}
%li
%input{:type => 'file', :name => 'file2', :size => 60}
%li
%input{:type => 'file', :name => 'file3', :size => 60}
%li
%input{:type => 'file', :name => 'file4', :size => 60}
%li
%input{:type => 'file', :name => 'file5', :size => 60}
%li
%input{:type => 'file', :name => 'file6', :size => 60}
%input{:type => 'submit', :value => 'upload'}
- else
%h3
Looks like you don't have any albums yet.
%a{:href => "/album/add"} Create one
before uploading photos!
Most of the work is done by the model, but the upload photo route for uploading does some basic manipulation to get the pieces of data in place.
post "/upload" do
album = Album.get params[:album_id]
(1..6).each do |i|
if params["file#{i}"] && (tmpfile = params["file#{i}"][:tempfile]) && (name = params["file#{i}"][:filename])
Photo.new(:title => name, :album => album, :tmpfile => tmpfile).save
end
end
redirect "/album/#{album.id}"
end
The parameters provided by most browsers are nested such that a parameter nested in the parameter (in this case it is file1, file2, and so on) named tempfile will contain the binary data and one named filename will contain the name of the file that is uploaded. Extracting the data and passing it to the Photo object will persist the data, as described in the Photo class used earlier.
To explain how Colony displays photos properly we will break up the description into several parts.
- Displaying the photo including the title and caption, both of which can be edited inline
- Displaying photo metadata
- Navigation in the album to the next and previous photos
- Annotating the photo
Let's start with the view photo route.
get "/photo/:id" do
@photo = Photo.get params[:id]
notes = @photo.annotations.collect do |n|
'{"x1": "' + n.x.to_s + '", "y1": "' + n.y.to_s +
'", "height": "' + n.height.to_s + '", "width": "' + n.width.to_s +
'","note": "' + n.description + '"}'
end
@notes = notes.join(',')
@prev_in_album = @photo.previous_in_album
@next_in_album = @photo.next_in_album
haml :'/photos/photo'
end
We retrieve the annotations from the photo as well as find the next and previous photos in the same album then show the view photo page. This page is one of the longest in Colony and is stuffed with features. Let's look at them one at a time.
=snippet :'/snippets/top'
=snippet :'/snippets/annotations_js'
=snippet :'/snippets/photo_inline_js'
.span-24
.span-3
%img.span-3{:src => "#{@user.photo_url}"}
=snippet :'/snippets/links'
.span-15
- if @user === @photo.album.user
%h2.edit_title #{@photo.title}
- else
%h2 #{@photo.title}
%img{:id => 'photo', :src => "#{@photo.url_display}"}
- if @user === @photo.album.user
%h4.edit_area #{@photo.caption}
- else
%h4 #{@photo.caption}
.span-3
%a{:href => "/album/#{@photo.album.id}"} Back to album
- if @user == @photo.album.user
.span-3
%a{:href => '#', :id => 'add_annotation' } annotate photo
.span-3
%form{:id => "form_cover_photo", :method => 'post', :action => "/album/cover/#{@photo.id}"}
%a{:href => '#', :onclick => '$("#form_cover_photo").submit();'} set album cover
.span-3.last
%form{:id => "form_photo_#{@photo.id}", :method => 'post', :action => "/photo/#{@photo.id}"}
%input{:type => 'hidden', :name => '_method', :value => 'delete'}
%a{:href => '#', :onclick => '$("#form_photo_' + "#{@photo.id}" + '").submit();'} delete photo
=snippet :'/snippets/comment_and_like', {:locals => {:item => @photo}}
.span-6.last
%img.span-1{:src => "#{@photo.album.user.photo_url}"}
Uploaded on #{@photo.created_at.strftime("%d %b %Y")} by
- if @user
%form{:id => "form_create_#{@photo.album.user.id}", :method => 'post', :action => "/follow/#{@photo.album.user.id}"}
%input{:type => 'hidden', :name => '_method', :value => 'put'}
%a{:href => '#', :onclick => '$("#form_create_' + "#{@photo.album.user.id}" + '").submit();'}
[email protected]_name
- else
[email protected]_name
%h4
This photo is
- if @user === @photo.album.user
%b.edit_privacy #{@photo.privacy}
- else
%b #{@photo.privacy}
- if @user === @photo.album.user
%h3 Annotations
- if @photo.annotations.empty?
%h4 No annotations on this photo.
- else
- @photo.annotations.each do |note|
.span-6
=note.description
.span-3
%form{:id => "form_#{note.id}", :method => 'post', :action => "/annotation/#{note.id}"}
%input{:type => 'hidden', :name => '_method', :value => 'delete'}
%a{:href => '#', :onclick => '$("#form_' + "#{note.id}" + '").submit();'} [remove]
%hr.space
%h3 #{@photo.album.name}
- if @prev_in_album
%a{:href => "/photo/#{@prev_in_album.id}"}
%img.span-2{:src => "#{@prev_in_album.url_thumbnail}"}
- else
%img.span-2{:src => '/images/spacer.gif'}
- if @next_in_album
%a{:href => "/photo/#{@next_in_album.id}"}
%img.span-2{:src => "#{@next_in_album.url_thumbnail}"}
- else
%img.span-2{:src => '/images/spacer.gif'}
%br
- if @prev_in_album
%a{:href => "/photo/#{@prev_in_album.id}"}
%img.span-2{:src => "/images/left_arrow.gif"}
%a{:href => "/album/#{@photo.album.id}"}
%img.span-2{:src => "/images/browse.gif"}
- if @next_in_album
%a{:href => "/photo/#{@next_in_album.id}"}
%img.span-2{:src => "/images/right_arrow.gif"}
%hr.space
photo-sharing, Colonyphotos, displaying.span-24
#annotation_form
%form{:id => 'annotation_add_form', :method => 'post', :action => "/annotation/#{@photo.id}"}
%fieldset
%legend
%input{:name => 'annotation[x1]', :type => 'hidden', :id => 'annotation_x1'}
%input{:name => 'annotation[y1]', :type => 'hidden', :id => 'annotation_y1'}
%input{:name => 'annotation[height]', :type => 'hidden', :id => 'annotation_height'}
%input{:name => 'annotation[width]', :type => 'hidden', :id => 'annotation_width'}
%textarea{:name => 'annotation[text]', :id => 'annotation_text'}
.submit
%input{:type => 'submit', :value => 'add'}
%input{:type => 'button', :value => 'cancel', :id => 'cancel_note'}
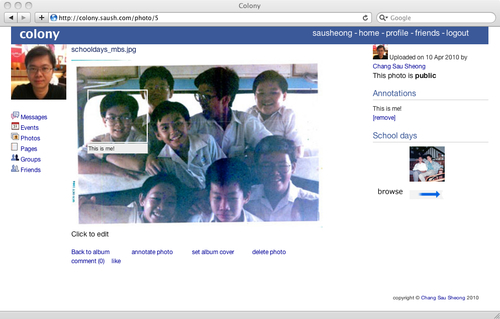
First let's look at the action menubar, which is placed right below the displayed photo. This menubar contains all the actions that can be done on the photo. Most of the actions are only available to the owner of the photo. Notice that unlike in Photoclone, we don't allow the photos to be edited.
.span-3
%a{:href => "/album/#{@photo.album.id}"} Back to album
- if @user == @photo.album.user
.span-3
%a{:href => '#', :id => 'add_annotation' } annotate photo
.span-3
%form{:id => "form_cover_photo", :method => 'post', :action => "/album/cover/#{@photo.id}"}
%a{:href => '#', :onclick => '$("#form_cover_photo").submit();'} set album cover
.span-3.last
%form{:id => "form_photo_#{@photo.id}", :method => 'post', :action => "/photo/#{@photo.id}"}
%input{:type => 'hidden', :name => '_method', :value => 'delete'}
%a{:href => '#', :onclick => '$("#form_photo_' + "#{@photo.id}" + '").submit();'} delete photo
Next, we look at displaying the photo and doing inline editing of the title and caption.
- if @user === @photo.album.user
%h2.edit_title #{@photo.title}
- else
%h2 #{@photo.title}
%img{:id => 'photo', :src => "#{@photo.url_display}"}
- if @user === @photo.album.user
%h4.edit_area #{@photo.caption}
- else
%h4 #{@photo.caption}
As with editing the album title and description earlier, we use a similar snippet called photo_inline_js.rb to add in the necessary JavaScript, and an edit photo properties route to do the actual modification of the properties. The edit photo properties route is as below:
post "/photo/:property/:photo_id" do
photo = Photo.get params[:photo_id]
if %w(title caption).include? params[:property]
photo.send(params[:property] + '=', params[:value])
photo.save
end
photo.send(params[:property])
end
Just as in Photoclone, we show a list of annotations on the photo and below that is the navigation amongst photos in the same album. Remember we got these two variables in the route:
@prev_in_album = @photo.previous_in_album(@user)
@next_in_album = @photo.next_in_album(@user)
These two variables are used to determine the next and previous photos to view. The logic to retrieve the correct photo is in the Photo class but the layout is determined here.
%h3 #{@photo.album.name}
- if @prev_in_album
%a{:href => "/photo/#{@prev_in_album.id}"}
%img.span-2{:src => "#{@prev_in_album.url_thumbnail}"}
- else
%img.span-2{:src => '/images/spacer.gif'}
- if @next_in_album
%a{:href => "/photo/#{@next_in_album.id}"}
%img.span-2{:src => "#{@next_in_album.url_thumbnail}"}
- else
%img.span-2{:src => '/images/spacer.gif'}
%br
- if @prev_in_album
%a{:href => "/photo/#{@prev_in_album.id}"}
%img.span-2{:src => "/images/left_arrow.gif"}
%a{:href => "/album/#{@photo.album.id}"}
%img.span-2{:src => "/images/browse.gif"}
- if @next_in_album
%a{:href => "/photo/#{@next_in_album.id}"}
%img.span-2{:src => "/images/right_arrow.gif"}
Note that the previous and next photos in the list shows a last-in-first-out (LIFO) structure. The last uploaded photo is considered the first photo to view while the next photo goes to the second to last.
Annotating a photo involves placing a bounding box around an area and attaching some text to this area. To annotate on a photo in Colony, we place a JavaScript layer on top of the photo and draw a white box around the item that the user marked. This is the same technique we used in Photoclone.
First, we use two JavaScript libraries, both of which are initalized in the layout.rb file.
%script{:src => '/js/select.js', :type => 'text/javascript'}
%script{:src => '/js/notes.js', :type => 'text/javascript'}
The two important functions in the two files of note are img_annotations in the notes.js file and imgAreaSelect in the select.js file. To add the annotation feature, we include an annotations snippet in a file called annotations_js.haml in the view photo page.
=snippet :'/snippets/annotations_js'
This snippet allows us to provide annotations to photo.
:javascript
notes = [ #{@notes} ];
$(window).load(function () {
$('#photo').img_annotations();
$('#cancel_note').click(function(){
$('#photo').imgAreaSelect({ hide: true });
$('#annotation_form').hide();
});
$('#add_annotation').click(function(){
$('#photo').imgAreaSelect({ onSelectChange: show_add_annotation, x1: 120, y1: 90, x2: 280, y2: 210 });
return false;
});
});
function show_add_annotation (img, area) {
imgOffset = $(img).offset();
form_left = parseInt(imgOffset.left) + parseInt(area.x1);
form_top = parseInt(imgOffset.top) + parseInt(area.y1) + parseInt(area.height)+5;
$('#annotation_form').css({ left: form_left + 'px', top: form_top + 'px'});
$('#annotation_form').show();
$('#annotation_form').css("z-index", 10000);
$('#annotation_x1').val(area.x1);
$('#annotation_y1').val(area.y1);
$('#annotation_height').val(area.height);
$('#annotation_width').val(area.width);
}
notes is a JavaScript variable used to store a list of notes added to the photo.
notes = [ #{@notes} ];
The data is something like this:
notes = [ {"x1": "63", "y1": "39", "height": "239", "width": "384","note": "School trip to the zoo!!"},{"x1": "325", "y1": "8", "height": "74", "width": "146","note": "This is me!"} ];
x1 and y1 are the coordinates of the upper left corner of the white box while height and width defines the height and width of the box. The note field is the actual text to be displayed. We indicate the image to be annotated to be the element that has a class ID photo.
$('#photo').img_annotations();
Remember the function img_annotations, which we are using here. When we click on an element that has the class ID add_annotation, we use the imgAreaSelect function to draw the white select box and at the same time, call the show_add_annotation function.
$('#add_annotation').click(function(){
$('#photo').imgAreaSelect({ onSelectChange: show_add_annotation, x1: 120, y1: 90, x2: 280, y2: 210 });
return false;
});
});
The show_add_annotation function in turn shows a form just below the white box, and pre-populates certain dimensions data into that form.
function show_add_annotation (img, area) {
imgOffset = $(img).offset();
form_left = parseInt(imgOffset.left) + parseInt(area.x1);
form_top = parseInt(imgOffset.top) + parseInt(area.y1) + parseInt(area.height)+5;
$('#annotation_form').css({ left: form_left + 'px', top: form_top + 'px'});
$('#annotation_form').show();
$('#annotation_form').css("z-index", 10000);
$('#annotation_x1').val(area.x1);
$('#annotation_y1').val(area.y1);
$('#annotation_height').val(area.height);
$('#annotation_width').val(area.width);
}
The annotation form is a simple HTML form that allows the user to create the annotation.
#annotation_form
%form{:id => 'annotation_add_form', :method => 'post', :action => "/annotation/#{@photo.id}"}
%fieldset
%legend
%input{:name => 'annotation[x1]', :type => 'hidden', :id => 'annotation_x1'}
%input{:name => 'annotation[y1]', :type => 'hidden', :id => 'annotation_y1'}
%input{:name => 'annotation[height]', :type => 'hidden', :id => 'annotation_height'}
%input{:name => 'annotation[width]', :type => 'hidden', :id => 'annotation_width'}
%textarea{:name => 'annotation[text]', :id => 'annotation_text'}
.submit
%input{:type => 'submit', :value => 'add'}
%input{:type => 'button', :value => 'cancel', :id => 'cancel_note'}
The cancel button calls the cancel_note function to hide the form once more.
$('#cancel_note').click(function(){
$('#photo').imgAreaSelect({ hide: true });
$('#annotation_form').hide();
});
The add anotation route creates a note whenever the form posts to it, given the photo ID.
post "/annotation/:photo_id" do
photo = Photo.get params[:photo_id]
note = Annotation.create(:x => params["annotation"]["x1"],
:y => params["annotation"]["y1"],
:height => params["annotation"]["height"],
:width => params["annotation"]["width"],
:description => params["annotation"]["text"])
photo.annotations << note
photo.save
redirect "/photo/#{params[:photo_id]}"
end
The annotation is created and added to the photo and the user is redirected back to the view photo route. To remove the annotation, the user can click on the remove link at the list of annotations to the right.
%h3 Annotations
- if @photo.annotations.empty?
%h4 No annotations on this photo.
- else
- @photo.annotations.each do |note|
.span-6
=note.description
.span-3
%form{:id => "form_#{note.id}", :method => 'post', :action => "/annotation/#{note.id}"}
%input{:type => 'hidden', :name => '_method', :value => 'delete'}
%a{:href => '#', :onclick => '$("#form_' + "#{note.id}" + '").submit();'} [remove]
This will simply remove the annotation and reload the same page.
delete "/annotation/:id" do
note = Annotation.get(params[:id])
photo = note.photo
if note.destroy
redirect "/photo/#{photo.id}"
else
throw "Cannot delete this annotation!"
end
end
While viewing a friend's albums and photos is implemented the same way as viewing the users's albums and photos, there are few ways of attracting other users to view your photos. First, viewing a user's page will also show a list of photos the viewed user has. This is done with the the mini album snippet, which shows the most recent 16 photos belonging to that user.
- if @viewed_user.photos.empty?
#{@viewed_user.formatted_name} has not uploaded any photos yet.
- @viewed_user.photos[0..15].each do |photo|
%a{:href => "/photo/#{photo.id}"}
%img.span-1{:src => photo.url_thumbnail }
%hr.space
%a{:href => "/albums/#{@viewed_user.id}"} view all
Clicking on an individual photo will show that photo while clicking on view all will show all photos in that album.
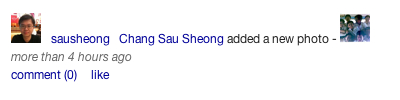
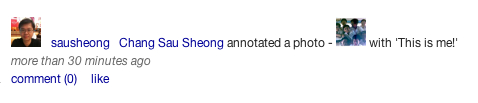
Also, each time a photo is uploaded, the activity of uploading that photo is logged and shown in the user's news and activity feeds. Also when the photo is annotated, the action is also logged as an activity and appears in the news and activity feeds.
Sending messages is yet another feature transplanted from Tweetclone. However, the implementation of sending messages in Colony is different. Importantly, the main class used in this feature in Colony is the Message class, while in Tweetclone we use the Status class for both public statuses and private messages.
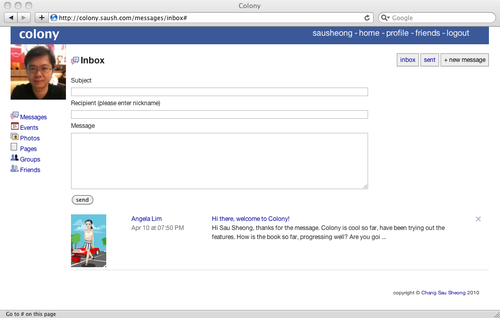
The routing logic for this feature is in the messages.rb file. Let's look at viewing all messages first. The same route is used to view both sent and received messages.
get '/messages/:type' do
@friends = @user.friends
case params[:type]
when 'inbox' then @messages = Message.all(:recipient_id => @user.id, :order => [ :created_at.desc ]); @label = 'Inbox'
when 'sent_box' then @messages = Message.all(:user_id => @user.id, :order => [ :created_at.desc ]); @label = 'Sent'
end
haml :'/messages/messages'
end
The type parameter in this route is used to differentiate between sent (sent box)/received (inbox) messages, and the retrieved messages are passed to the messages page.
=snippet :'/snippets/top'
.span-24
.span-3
%img.span-3{:src => "#{@user.photo_url}"}
=snippet :'/snippets/links'
.span-21.last
%hr.space
.span-4
%div.icons.icons_messages
%strong{:style => 'vertical-align:bottom;font-size:18px;'} #{@label}
.span-12
.span-5.last.right
%a.button{:href =>'/messages/inbox'} inbox
%a.button{:href =>'/messages/sent_box'} sent
%a.button{:href =>'#', :onclick => "$('#compose_box').toggle();"} + new message
%hr.space
#compose_box.span-21.last.hide
%form{:action => "/message/send", :method => 'post'}
Subject
%br
%input.span-15{:type => 'text', :name => 'subject'}
%br
Recipient (please enter nickname)
%br
%input.span-15{:type => 'text', :name => 'recipient'}
%br
Message
%br
%textarea.span-15{:name => 'text'}
%br
%input{:type => 'submit', :value => 'send'}
%hr.space
#messages_list
- @messages.each do |msg|
- usr = params[:type] == 'inbox' ? msg.sender : msg.recipient
.span-3
%img.span-2{:src => "#{usr.photo_url}"}
.span-4
%a{:href => "/user/#{usr.nickname}"} #{usr.formatted_name}
.quiet #{msg.created_at.strftime '%b %d at %I:%M %p'}
.span-13
.loud
%a{:href => "/message/#{msg.id}"}
- if msg.read?
#{msg.subject}
-else
%strong #{msg.subject}
#{msg.text[0,150]} ...
.span-1.last
%form{:id => "form_msg_#{msg.id}", :method => 'post', :action => "/message/#{msg.id}"}
%input{:type => 'hidden', :name => '_method', :value => 'delete'}
%a{:href => '#', :onclick => '$("#form_msg_' + "#{msg.id}" + '").submit();', :class => 'remove_link'}
%hr
We toggle a compose message form to allow the user to click to write messages.
#compose_box.span-21.last.hide
%form{:action => "/message/send", :method => 'post'}
Subject
%br
%input.span-15{:type => 'text', :name => 'subject'}
%br
Recipient (please enter nickname)
%br
%input.span-15{:type => 'text', :name => 'recipient'}
%br
Message
%br
%textarea.span-15{:name => 'text'}
%br
%input{:type => 'submit', :value => 'send'}
This submits a request to the send message route, which saves the message.
post '/message/send' do
recipient = User.first(:nickname => params[:recipient])
m = Message.create(:subject => params[:subject], :text => params[:text], :sender => @user, :recipient => recipient)
if params[:thread].nil?
m.thread = m.id
else
m.thread = params[:thread].to_i
end
m.save
redirect '/messages/sent_box'
end
Notice the thread property of a message. We will be using this later to filter messages of the same thread. At this point, we only capture the thread number if the message has a thread; if not it will use the message ID as the starting thread number.
We also list the messages provided, and truncate each message to 150 characters only.
@messages.each do |msg|
- usr = params[:type] == 'inbox' ? msg.sender : msg.recipient
.span-3
%img.span-2{:src => "#{usr.photo_url}"}
.span-4
%a{:href => "/user/#{usr.nickname}"} #{usr.formatted_name}
.quiet #{msg.created_at.strftime '%b %d at %I:%M %p'}
.span-13
.loud
%a{:href => "/message/#{msg.id}"}
- if msg.read?
#{msg.subject}
-else
%strong #{msg.subject}
#{msg.text[0,150]} ...
Finally, we let the users delete messages in their inbox as well as from their sent box.
%form{:id => "form_msg_#{msg.id}", :method => 'post', :action => "/message/#{msg.id}"}
%input{:type => 'hidden', :name => '_method', :value => 'delete'}
%a{:href => '#', :onclick => '$("#form_msg_' + "#{msg.id}" + '").submit();', :class => 'remove_link'}
Let's look at viewing the messages next, starting with the view message route.
get '/message/:id' do
@message = Message.get(params[:id])
@message.read = true
@message.save
@messages = Message.all(:thread => @message.thread).sort{|m1, m2| m1.created_at <=> m2.created_at}
haml :'/messages/message'
end
This is simply getting the message and then all messages with the same thread number, but sorted according to their reverse chronological date of creation. The messages are then displayed in the view message page in a file named message.haml. Note that we also set the read property to true, to indicate that the message has been read.
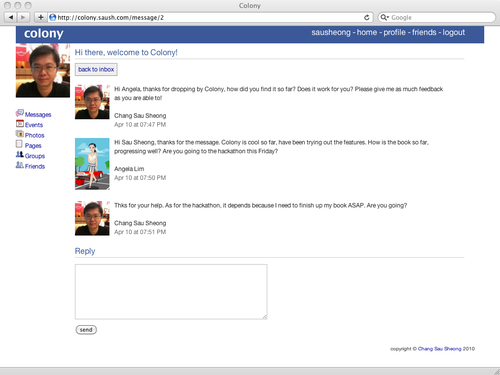
=snippet :'/snippets/top'
.span-24
.span-3
%img.span-3{:src => "#{@user.photo_url}"}
=snippet :'/snippets/links'
.span-20
%h3 #{@message.subject}
%a.button{:href =>'/messages/inbox'} back to inbox
%hr.space
- @messages.each do |msg|
.span-2
%img.span-2{:src => "#{msg.sender.photo_url}"}
.span-17
#{msg.text}
%hr.space
#{msg.sender.formatted_name}
.quiet #{msg.created_at.strftime '%b %d at %I:%M %p'}
%hr.space
%h3 Reply
%form{:action => "/message/send", :method => 'post'}
%input{:type => 'hidden', :name => 'subject', :value => "#{@message.subject}"}
%input{:type => 'hidden', :name => 'recipient', :value => "#{@message.sender.nickname}"}
%input{:type => 'hidden', :name => 'thread', :value => "#{@message.thread}"}
%textarea.span-10{:name => 'text'}
%br
%input{:type => 'submit', :value => 'send'}
We display the main message, followed by each message in the same message thread, then provide a reply form to reply this message.
Finally, let's see how we delete a message with the delete message route.
delete '/message/:id' do
message = Message.get(params[:id])
if message.sender == @user
message.sender = nil
elsif message.recipient == @user
message.recipient = nil
end
message.save
redirect '/messages/inbox'
end
Notice we don't actually delete the message, only de-link it from the various users. This is useful to keep track of messages for auditing purposes.
Now that we are able to send, view, and delete messages put in the finishing touch to let the user know about these messages. We place a number after the messages link at the left navigation bar to indicate the number of unread messages a user has. In the links snippet, we have the following code:
.icons.icons_messages
- num_unread_msgs = @user.received_messages.all(:read => false).size
%a{:href => '/messages/inbox'} Messages
- if num_unread_msgs > 0
(#{num_unread_msgs})
Events can be thought of as locations in time where people can come together for an activity. To recap, in Colony's implementation of events, an event can have a wall, pages, and three types of users according to their attendance status. The first type is the confirmed user (those who have confirmed their attendance to the event). The second type is the declined user (users who have explicitly declined attendance to the event). The last type is the pending user (users who are still undecided, if they should attend or not).
Let's look at managing the events first. Managing events here refers to a user managing his own list of events that he has confirmed, is pending, or has declined to attend. The manage events route simply points the user to the manage events page.
get '/events' do
haml :'/events/manage'
end
The manage events page shows the user a list of events that he has either created, is attending, or pending a confirmation.
=snippet :'/snippets/top'
.span-24
.span-3
%img.span-3{:src => "#{@user.photo_url}"}
=snippet :'/snippets/links'
.span-15
%hr.space
.span-3
%div.icons.icons_event
%strong{:style => 'vertical-align:bottom;font-size:18px;'} Events
.span-8
.span-4.last.right
%a.button{:href =>"/event/add"} new event
.span-15
%hr.space
- @user.all_events.each do |event|
.span-11
%strong #{event.name}
.quiet #{event.description}
.quiet Venue : #{event.venue}
.quiet Date/time : #{event.time.strftime "%I:%M %p"}, #{event.date.strftime "%d %b %Y"}
.span-4.last.right
%form{:id => "form_event_#{event.id}", :method => 'post', :action => "/event/#{event.id}"}
%input{:type => 'hidden', :name => '_method', :value => 'delete'}
- if event.user == @user
%a.button{:href => '#', :onclick => '$("#form_event_' + "#{event.id}" + '").submit();'} delete
%a.button{:href => "/event/#{event.id}"}
- if @user.pending_events.include? event
pending
- else
view
%hr.space
%hr
.span-6.last
%h3 Suggestions
- if @user.friend_events.empty?
No suggested events
- else
Your friends are attending these events:
%ul
- @user.friend_events[0..9].each do |event|
%li
%a{:href => "/event/#{event.id}"} #{event.name}
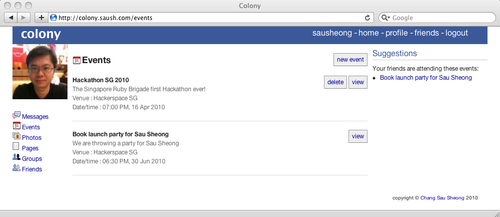
From the User class you might remember that the all_events method returns all confirmed and pending events only, and these events should be later than or equal to today's date.
has n, :confirms
has n, :confirmed_events, :through => :confirms, :class_name => 'Event', :child_key => [:user_id], :date.gte => Date.today
has n, :pendings
has n, :pending_events, :through => :pendings, :class_name => 'Event', :child_key => [:user_id], :date.gte => Date.today
def all_events
confirmed_events + pending_events
end
For each event that is displayed, if the user is the creator of the event, we also allow him to delete it.
- @user.all_events.each do |event|
.span-11
%strong #{event.name}
.quiet #{event.description}
.quiet Venue : #{event.venue}
.quiet Date/time : #{event.time.strftime "%I:%M %p"}, #{event.date.strftime "%d %b %Y"}
.span-4.last.right
%form{:id => "form_event_#{event.id}", :method => 'post', :action => "/event/#{event.id}"}
%input{:type => 'hidden', :name => '_method', :value => 'delete'}
- if event.user == @user
%a.button{:href => '#', :onclick => '$("#form_event_' + "#{event.id}" + '").submit();'} delete
%a.button{:href => "/event/#{event.id}"}
- if @user.pending_events.include? event
pending
- else
view
Note if the user has not decided to attend the event yet, we indicate that he is pending in this list. To cater for that connection, we also display a list of suggested events, which are events that the user's friends are also attending.
%h3 Suggestions
- if @user.friend_events.empty?
No suggested events
- else
Your friends are attending these events:
%ul
- @user.friend_events[0..9].each do |event|
%li
%a{:href => "/event/#{event.id}"} #{event.name}
These friend's events goes through the user's friends list and retrieve all their confirmed events, then sort them out by chronological order.
def friend_events
events = []
friends.each do |friend|
events += friend.confirmed_events
end
return events.sort {|x,y| y.time <=> x.time}
end
We will now move on to create an event. As mentioned previously, the add event route is very simple.
get '/event/add' do
haml :'/events/add'
end
The add event page provides a form that sends the event creation data to the create event route.
=snippet :'/snippets/top'
.span-24
.span-3
%img.span-3{:src => "#{@user.photo_url}"}
=snippet :'/snippets/links'
.span-20
%h3 Create a new event
Create a new event here. Add people you would like to invite.
%form{:method => 'post', :action => '/event'}
%input{:type => 'hidden', :name => '_method', :value => 'put'}
%p Name
%p
%input.span-10{:type => 'text', :name => 'name'}
%p Description
%p
%textarea.span-10{:name => 'description'}
%p Venue
%p
%input.span-10{:type => 'text', :name => 'venue'}
%p Date
%p
%input.span-4#date{:type => 'text', :name => 'date'}
:javascript
var opts = { formElements:{"date":"d-ds-m-ds-Y"} };
datePickerController.createDatePicker(opts);
%p Time
%p
%input.span-2#time{:type => 'text', :name => 'time'}
:javascript
$("#time").timePicker({
startTime: "08:00",
show24Hours: false,
separator: ':',
step: 15});
%p People you want to invite
%p
%input.span-10{:type => 'text', :name => 'invites'}
%p
%input{:type => 'submit', :value => 'create this event'}
In the add event page, we allow users to set a list of users that they want to invite. This will effectively add the newly created event into each of the user's pending events list. In the mini requests snippet, this will be shown as a pending event.
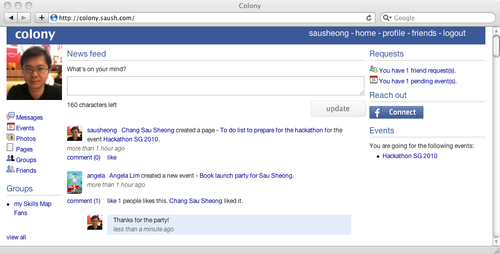
Next, we look at viewing the event. As before, the view event route is simple.
get '/event/:id' do
@event = Event.get params[:id]
haml :'/events/event'
end
Viewing the event however is much more demanding.
=snippet :'/snippets/top'
.span-24
.span-3
%img.span-3{:src => "#{@user.photo_url}"}
=snippet :'/snippets/links'
.span-15
%h3 #{@event.name}
.span-14
.span-3 Date
.span-10 #{@event.date.strftime "%d %b %Y"}
.span-14
.span-3 Time
.span-10 #{@event.time.strftime "%I:%M %p"}
.span-14
.span-3 Venue
.span-10 #{@event.venue}
%hr.space
%h3 Description
[email protected]
%h3 Confirmed attendees
- @event.confirmed_users.each do |user|
.span-2
%a{:href => "/user/#{user.nickname}"}
%img.span-1{:src => "#{user.photo_url}", :alt => "#{user.formatted_name}"}
%hr.space
%h3 Pages
.span-3.push-12.right
- if @event.user == @user
%a.button{:href =>"/event/#{@event.id}/page/add"} new page
- @event.pages.each do |page|
.span-12
%a{:href => "/event/page/#{page.id}" } #{page.title}
.quiet Date created : #{page.created_at.strftime "%I:%M %p, %d %b %Y"}
.span-3.right.last
%form{:id => "form_page_#{page.id}", :method => 'post', :action => "/event/page/#{page.id}"}
%input{:type => 'hidden', :name => '_method', :value => 'delete'}
- if @event.user == @user
%a.button{:href => '#', :onclick => '$("#form_page_' + "#{page.id}" + '").submit();'} del
%a.button{:href => "/event/page/edit/#{page.id}"} edit
%hr.space
%hr
%hr.space
%h3 Wall
=snippet :'/snippets/event_wall_box'
%hr.space
[email protected] do |post|
.span-2
%img.span-2{:src => "#{post.user.photo_url}"}
.span-4
#{post.user.formatted_name}
%br
#{post.created_at.strftime "%d %b %Y"}
%br
#{post.created_at.strftime "%I:%M %P"}
.span-8
#{post.text}
%hr
%hr.space
.span-6.last
%h3 Your RSVP
=snippet :'/snippets/rsvp'
%h3 Awaiting reply
- @event.pending_users.each do |user|
.span-2
%a{:href => "/user/#{user.nickname}"}
%img.span-1{:src => "#{user.photo_url}", :alt => "#{user.formatted_name}"}
We will split the description of this page into several parts:
- Displaying information about the event
- Showing the list of confirmed attendees and the list of pending attendees
- Listing the pages created for this event
- Showing the event wall
- Showing the RSVP form
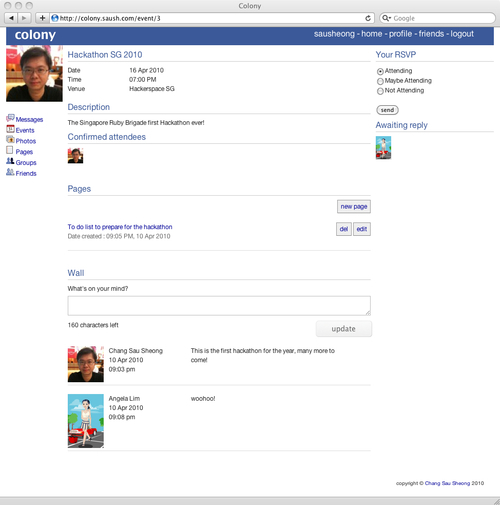
The uppermost part shows the event information. This is quite straightforward and the page just dumps whatever has been created.
%h3 #{@event.name}
.span-14
.span-3 Date
.span-10 #{@event.date.strftime "%d %b %Y"}
.span-14
.span-3 Time
.span-10 #{@event.time.strftime "%I:%M %p"}
.span-14
.span-3 Venue
.span-10 #{@event.venue}
%hr.space
%h3 Description
[email protected]
Showing the list of confirmed attendees is also relatively straightforward, as with showing the list of pending attendees. We show the list of confirmed attendees on the middle column, while the list of pending attendees is on the right column.
%h3 Confirmed attendees
- @event.confirmed_users.each do |user|
.span-2
%a{:href => "/user/#{user.nickname}"}
%img.span-1{:src => "#{user.photo_url}", :alt => "#{user.formatted_name}"}
%h3 Awaiting reply
- @event.pending_users.each do |user|
.span-2
%a{:href => "/user/#{user.nickname}"}
%img.span-1{:src => "#{user.photo_url}", :alt => "#{user.formatted_name}"}
In both cases we show the profile picture of the user. Showing event pages is similarly straightforward. We only allow the event administrator to create or delete event pages. We will be looking at pages later in this chapter.
%h3 Pages
.span-3.push-12.right
- if @event.user == @user
%a.button{:href =>"/event/#{@event.id}/page/add"} new page
- @event.pages.each do |page|
.span-12
%a{:href => "/event/page/#{page.id}" } #{page.title}
.quiet Date created : #{page.created_at.strftime "%I:%M %p, %d %b %Y"}
.span-3.right.last
%form{:id => "form_page_#{page.id}", :method => 'post', :action => "/event/page/#{page.id}"}
%input{:type => 'hidden', :name => '_method', :value => 'delete'}
- if @event.user == @user
%a.button{:href => '#', :onclick => '$("#form_page_' + "#{page.id}" + '").submit();'} del
%a.button{:href => "/event/page/edit/#{page.id}"} edit
As for the event wall, we include the event wall box snippet and show the list of posts just below the snippet.
%h3 Wall
=snippet :'/snippets/event_wall_box'
%hr.space
[email protected] do |post|
.span-2
%img.span-2{:src => "#{post.user.photo_url}"}
.span-4
#{post.user.formatted_name}
%br
#{post.created_at.strftime "%d %b %Y"}
%br
#{post.created_at.strftime "%I:%M %P"}
.span-8
#{post.text}
The event wall box snippet was described earlier. Finally let's look at the RSVP form.
%form{:action => "/event/#{@event.id}", :method => 'post'}
%p
%input{:type => :radio, :name => 'attendance', :value => 'yes', :checked => @event.confirmed_users.include?(@user) } Attending
%p
%input{:type => :radio, :name => 'attendance', :value => 'maybe', :checked => @event.pending_users.include?(@user) } Maybe Attending
%p
%input{:type => :radio, :name => 'attendance', :value => 'no', :checked => @event.declined_users.include?(@user) } Not Attending
%input{:type => 'submit', :value => 'send'}
The input is a radio button, which allows the user to indicate if he is attending, maybe attending, or not attending. Submitting this form goes to the event rsvp route.
post '/event/:id' do
event = Event.get params[:id]
case params[:attendance]
when 'yes'
Pending.first(:user_id => @user.id, :event_id => event.id).destroy if event.pending_users.include? @user
Decline.first(:user_id => @user.id, :event_id => event.id).destroy if event.declined_users.include? @user
Confirm.create(:confirmed_event => event, :confirmed_user => @user)
when 'no'
Confirm.first(:user_id => @user.id, :event_id => event.id).destroy if event.confirmed_users.include? @user
Pending.first(:user_id => @user.id, :event_id => event.id).destroy if event.pending_users.include? @user
Decline.create(:declined_user => @user, :declined_event => event)
when 'maybe'
Confirm.first(:user_id => @user.id, :event_id => event.id).destroy if event.confirmed_users.include? @user
Decline.first(:user_id => @user.id, :event_id => event.id).destroy if event.declined_users.include? @user
Pending.create(:pending_user => @user, :pending_event => event)
end
redirect "/event/#{event.id}"
end
We need to switch between each type of attendance and add the event to the respective queues under the user.
Groups in Colony place groups of one or more users together and provide services for the group. Groups and events are very similar to each other, except that groups are not time-based (unlike events), and do no have a concept of attendance. Groups however have users who are called members of a group.
The implementation of groups is quite similar to that of events. Let's look at managing a group first. Managing groups in Colony as with managing events means providing a page for users to look and control groups that he is either an admin or a member of. The manage groups route is simple, similar to the manage events route.
get '/groups' do
haml :'/groups/manage'
end
The manage groups page lists the groups a user belongs to.
=snippet :'/snippets/top'
.span-24
.span-3
%img.span-3{:src => "#{@user.photo_url}"}
=snippet :'/snippets/links'
.span-15
%hr.space
.span-3
%div.icons.icons_group
%strong{:style => 'vertical-align:bottom;font-size:18px;'} Groups
.span-8
.span-4.last.right
%a.button{:href =>"/group/add"} new group
.span-15
%hr.space
- @user.groups.each do |group|
.span-11
%strong #{group.name}
.quiet #{group.description}
.span-4.last{:style => 'text-align:right;'}
%form{:id => "form_group_#{group.id}", :method => 'post', :action => "/group/#{group.id}"}
%input{:type => 'hidden', :name => '_method', :value => 'delete'}
- if group.user == @user
%a.button{:href => '#', :onclick => '$("#form_group_' + "#{group.id}" + '").submit();'} delete
%a.button{:href => "/group/#{group.id}"} view
%hr.space
%hr
.span-6.last
%h3 Suggestions
- if @user.friend_groups.empty?
No suggested groups
- else
Your friends have joined the following groups:
%ul
- @user.friend_groups[0..9].each do |group|
%li
%a{:href => "/group/#{group.id}"} #{group.name}
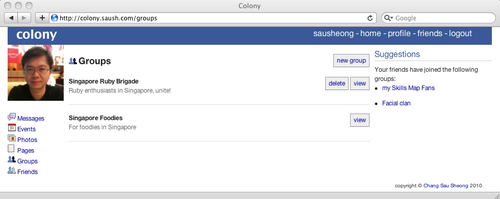
Furthermore, the user can delete the group(s) in which the user is the administrator. Also as with events, there is a list of suggested groups. These are the groups that the user's friends belong to. The code to retrieve this list is in the User class. Note the last line where we remove the groups that the users already belong to.
def friend_groups
groups = []
friends.each do |friend|
groups += friend.groups
end
groups - self.groups
end
The add group route redirects us to the add group page.
get '/group/add' do
haml :'/groups/add'
end
The add group page is a simple one.
=snippet :'/snippets/top'
.span-24
.span-3
%img.span-3{:src => "#{@user.photo_url}"}
=snippet :'/snippets/links'
.span-20
%h3 Create a new group
Create a new group here, use it to share information!
%form{:method => 'post', :action => '/group'}
%input{:type => 'hidden', :name => '_method', :value => 'put'}
%p Name
%p
%input.span-10{:type => 'text', :name => 'name'}
%p Description
%p
%textarea.span-10{:name => 'description'}
The add group form is submitted to the create group route.
put '/group' do
g = Group.create(:name => params[:name], :description => params[:description], :user => @user)
g.members << @user
g.save
redirect "/group/#{g.id}"
end
This route creates a group and adds the user as both the administrator as well as a member of the group that redirects the user to the view group route.
Viewing a group is simpler than viewing events. The view group route again points us to the view group page.
get '/group/:id' do
@group = Group.get params[:id]
haml :'/groups/group'
end
The view group page is quite like the view event page. The only differences are that instead of an RSVP form, we display the group admin, and instead of displaying users who are undecided on attending the event, we have a form to allow the users to join or leave the group. We will skip most of the description of this page, and concentrate on the membership forms.
=snippet :'/snippets/top'
.span-24
.span-3
%img.span-3{:src => "#{@user.photo_url}"}
=snippet :'/snippets/links'
.span-15
%h3 #{@group.name}
[email protected]
%h3 Members
- @group.members.each do |user|
.span-1
%a{:href => "/user/#{user.nickname}"}
%img.span-1{:src => "#{user.photo_url}", :alt => "#{user.formatted_name}"}
%hr.space
%h3 Pages
.span-3.push-12.right
- if @group.user == @user
%a.button{:href =>"/group/#{@group.id}/page/add"} new page
- @group.pages.each do |page|
.span-11
%strong
%a{:href => "/group/page/#{page.id}" } #{page.title}
.quiet Date created : #{page.created_at.strftime "%I:%M %p, %d %b %Y"}
.span-4.last.right
%form{:id => "form_page_#{page.id}", :method => 'post', :action => "/group/page/#{page.id}"}
%input{:type => 'hidden', :name => '_method', :value => 'delete'}
- if @group.user == @user
%a.button{:href => '#', :onclick => '$("#form_page_' + "#{page.id}" + '").submit();'} delete
%a.button{:href => "/group/page/edit/#{page.id}"} edit
%hr.space
%hr
%hr.space
%h3 Wall
=snippet :'/snippets/group_wall_box'
%hr.space
[email protected] do |post|
.span-2
%img.span-2{:src => "#{post.user.photo_url}"}
.span-4
#{post.user.formatted_name}
%br
#{post.created_at.strftime "%d %b %Y"}
%br
#{post.created_at.strftime "%I:%M %P"}
.span-8
#{post.text}
%hr
%hr.space
.span-6.last
%h3 Group admin
.span-3
%img.span-3{:src => "#{@group.user.photo_url}"}
%a{:href => "/user/#{@group.user.nickname}"} #{@group.user.formatted_name}
%hr.space
%h3 Your membership
- if @group.members.include? @user
You are a member of this group.
- unless @group.user == @user
%form{:method => 'post', :action => "/group/leave/#{@group.id}"}
%input{:type => 'submit', :value => 'leave this group'}
- else
You are not a member of this group yet.
%form{:method => 'post', :action => "/group/join/#{@group.id}"}
%input{:type => 'submit', :value => 'join this group'}
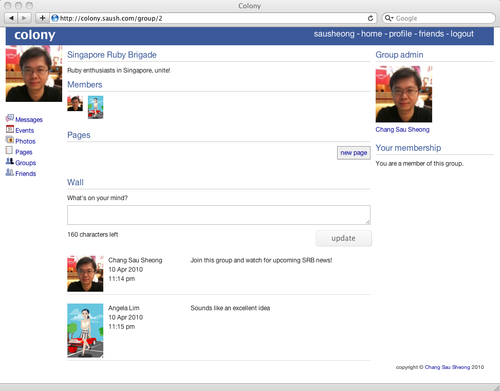
If the user is already a member in this group we display the leave group form, which is just a single button that posts to the leave group route. The group admin however is not allowed to leave the group.
%h3 Your membership
- if @group.members.include? @user
You are a member of this group.
- unless @group.user == @user
%form{:method => 'post', :action => "/group/leave/#{@group.id}"}
%input{:type => 'submit', :value => 'leave this group'}
- else
You are not a member of this group yet.
%form{:method => 'post', :action => "/group/join/#{@group.id}"}
%input{:type => 'submit', :value => 'join this group'}
The route removes the user from the list and redirects the user back to viewing the group.
post '/group/leave/:id' do
group = Group.get params[:id]
if group.members.include?(@user)
group.members.delete(@user)
group.save
end
redirect "/group/#{params[:id]}"
end
Similarly if the user is not yet a member, the page shows a join group form that submits to the join group route.
post '/group/join/:id' do
group = Group.get params[:id]
unless group.members.include? @user
group.members << @user
group.save
end
redirect "/group/#{params[:id]}"
end
This will add the user to the list of group members and redirect the user back to viewing the group.
Colony's pages are a means of allowing users to create their own full-page content, attaching it to themselves, a page, or a group. The implementation of Colony's pages is distributed in the various objects that contain pages. Let's look at the user pages first.
Each user can have one or more pages. The implementation of user pages is in a file called pages.rb. We start off with managing pages. The manage pages route simply redirects to the manage pages page; pass in a local variable named owner, with the value of a string user.
get '/user/pages' do
haml :'/pages/manage', {:locals => {:owner => 'user'}}
end
The manage pages page is quite small. It is essentially a list of pages belonging to the user, with the options to edit and delete the pages. Where is the local variable owner used? It is at the new page link. We share the manage pages page among the other owners of the page, such as group and event, so we need to tell this page who the owner is, in order to call the correct route. While it's possible to create a single route to manage different owners, it is deliberately separated into different routes. This is because we want each feature to be more modular and each page implementation to be customizable.
=snippet :'/snippets/top'
.span-24
.span-3
%img.span-3{:src => "#{@user.photo_url}"}
=snippet :'/snippets/links'
.span-21.last
%hr.space
.span-11
%div.icons.icons_pages
%strong{:style => 'vertical-align:bottom;font-size:18px;'} Pages
.span-10.last.right
%a.button{:href =>"/#{owner}/page/add"} new page
.span-21.last
%hr.space
- if @user.pages.empty?
You don't have any pages yet.
- @user.pages.each do |page|
.span-11
%strong
%a{:href => "/user/page/#{page.id}" } #{page.title}
.quiet Date created : #{page.created_at.strftime "%I:%M %p, %d %b %Y"}
.span-10.last.right
%form{:id => "form_page_#{page.id}", :method => 'post', :action => "/user/page/#{page.id}"}
%input{:type => 'hidden', :name => '_method', :value => 'delete'}
%a.button{:href => '#', :onclick => '$("#form_page_' + "#{page.id}" + '").submit();'} delete
%a.button{:href => "/user/page/edit/#{page.id}"} edit
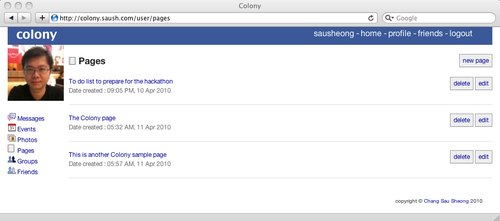
Note that this list of pages can also be found on the user page, where the pages are listed at the right column. To create a page, the user will click on the new page link to the top right of the manage user pages page. This will go to the add page route.
get '/user/page/add' do
@page = Page.new
haml :'/pages/add', {:locals => {:owner => 'user'}}
end
The route sends the user to the add page page, with the local variable owner with a value of a string user. This again is used to tell the form to post to the correct route; in this case it is the create user page route.
=snippet :'/snippets/top'
.span-24
.span-3
%img.span-3{:src => "#{@user.photo_url}"}
=snippet :'/snippets/links'
.span-21.last
%h3 Create a new page
Create a new page here. Use
%a{:href => 'http://daringfireball.net/projects/markdown/basics'} markdown
for the body text and copy this link to be used elsewhere!
%hr.space
%form{:method => 'post', :action => "/#{owner}/page"}
- if @page.title.nil?
%input{:type => 'hidden', :name => '_method', :value => 'put'}
- else
%input{:type => 'hidden', :name => 'id', :value => "#{@page.id}"}
- if owner == 'event'
%input{:type => 'hidden', :name => 'eventid', :value => "#{@event.id}"}
- if owner == 'group'
%input{:type => 'hidden', :name => 'groupid', :value => "#{@group.id}"}
%strong Title
%p
%input.span-10{:type => 'text', :name => 'title', :value => "#{@page.title}"}
%strong Body
%p
%textarea.span-18{:name => 'body', :style => 'height: 350px;'} #{@page.body}
%p
- if @page.title.nil?
%input{:type => 'submit', :value => 'create this page'}
- else
%input{:type => 'submit', :value => 'modify this page'}
We use Markdown for markup text input for pages. Conveniently, Haml supports Markdown and as you would see later, it is displayed rather nicely. Why use Markdown instead of using a rich text editor, which can be more intuitive and user friendly to end-users? After some consideration, I took this design path because we want a consistent look and feel to the pages while retaining flexibility of content creation by the users. If we have used a rich text editor, it is inevitable that the look and feel of the pages would be radically different and this would have a downstream bad effect on the user experience with the application. With Markdown, the look and feel can be consistent with the rest of the site, and at the same time, the user doesn't need to worry about making it look good, they just need to enter the text content and link accordingly.
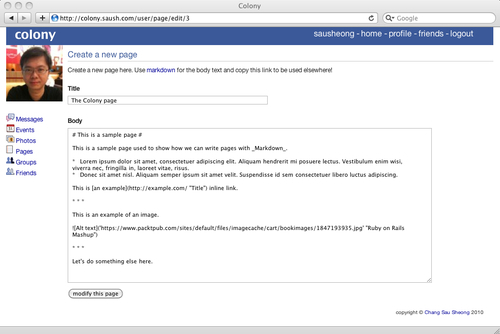
The create page form submits to the create user page route which redirects the user to the view page page after the Page object is created.
put '/user/page' do
p = Page.create(:title => params[:title], :body => params[:body], :user => @user)
redirect "/user/page/#{p.id}"
end
Displaying the page is quite simple.
=snippet :'/snippets/top'
.span-24
.span-3
%img.span-3{:src => "#{@user.photo_url}"}
=snippet :'/snippets/links'
.span-15
%h3 #{@page.title}
:markdown
#{@page.body}
%hr.space
=snippet :'/snippets/comment_and_like', {:locals => {:item => @page}}
.span-6.last
%h3 Other pages
=snippet :'/snippets/mini_pages', {:locals => {:owner => @user, :owner_name => 'user'}}
As mentioned earlier, Haml conveniently provides Markdown support, so all the Markdown content the user created earlier will be parsed and converted into HTML for displaying in the page. Just under the page, we place the comment and like snippet, passing in the page as a local variable. We'll come back to this snippet in a later section.
We also place the mini pages snippet at the right column in order to display the list of pages that the user also owns.
- if owner.pages.empty?
#{owner.formatted_name} has no pages.
%ul
- owner.pages.each do |page|
%li
%a{:href => "/#{owner_name}/page/#{page.id}"}#{page.title}
- if page.event
%a{:href => "/event/#{page.event.id}"} (#{page.event.name})
This just lists all the user's pages. The final resulting page looks like this:
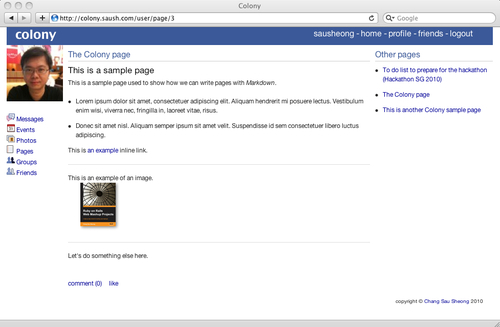
As mentioned earlier, pages belong to events, groups, and users. The implementation of the event pages and group pages are very similar to that of the user pages. The implementations are placed together with the features that own them, for example, the event page routes are all in the pages.rb file, but the views are shared amongst all owning features.
Let's look at some examples of these implementations. Take the create event page route—the only difference is that we set the event association in the Page object to the owning event.
put '/event/page' do
event = Event.get params[:eventid]
p = Page.create(:title => params[:title], :body => params[:body], :user => @user, :event => event)
redirect "/event/page/#{p.id}"
end
Notice that the page still has a user. This is because each page must have an owner, regardless of it being owned by a user, an event, or a group. The differences in the other routes as well as in the groups are similar to this.
The commenting and liking features are implemented together. Firstly all objects that can be liked or commented on, such as Status, Post, Photo, and Page include the Commentable module.
module Commentable
def people_who_likes
self.likes.collect { |l| "<a href='http:///user/#{l.user.nickname}'>#{l.user.formatted_name}</a>" }
end
end
This allows us to retrieve all users who have liked this object. Also, all these classes have a one-to-many relationship with Like and Comment classes.
has n, :comments
has n, :likes
Commenting and liking, unlike other features, are not implemented through full standalone pages. The views are through a comment and like snippet in a file named comment_and_like.haml that is attached to the various places where commenting and liking are needed.
There are a few sections to this snippet:
- Links to commenting and liking
- The comment form
- A list of comments
The following is the comment_and_like.haml file:
.span-15.last
.span-2
%a{:href =>"#", :onclick => "$('#comment_box_#{item.class.to_s}_#{item.id}').toggle();$('#comment_box_#{item.class.to_s}_#{item.id}').focus();"} comment (#{item.comments.size})
.span-13.last
%form{:method => 'post', :action => "/like/#{item.class.to_s.downcase}/#{item.id}", :id => "form_like_#{item.class.to_s.downcase}_#{item.id}"}
%input{:type => 'hidden', :name => 'return_url', :value => request.url.to_s}
%input{:type => 'hidden', :name => '_method', :value => 'put'}
%a{:href =>"#", :onclick => "$('#form_like_#{item.class.to_s.downcase}_#{item.id}').submit();"} like
- unless item.likes.empty?
#{item.likes.size} people likes this.
#{item.people_who_likes.join(', ')} liked it.
.span-13.hide.last{:id => "comment_box_#{item.class.to_s}_#{item.id}"}
%form{:method => 'post', :action => "/comment/#{item.class.to_s.downcase}/#{item.id}"}
%textarea.span-10{:name => 'text', :style => 'height: 30px;'}
%input{:type => 'hidden', :name => 'return_url', :value => request.url.to_s}
%input{:type => 'hidden', :name => '_method', :value => 'put'}
%br
%input{:type => 'submit', :value => 'comment'}
- unless item.comments.empty?
.span-14.push-1.last
- item.comments.each do |comment|
.span-1
%a{:href => "/user/#{comment.user.nickname}"}
%img.span-1{:src => "#{comment.user.photo_url}"}
.span-12.last.comment_box
#{comment.text}
%br
%em.quiet
=time_ago_in_words(comment.created_at.to_time)
The first few lines of code provide a link to toggle the comment field, allowing the user to enter his comments. It also provides some statistical information on the comments, such as the number of comments there are for the item.
%a{:href =>"#", :onclick => "$('#comment_box_#{item.class.to_s}_#{item.id}').toggle();$('#comment_box_#{item.class.to_s}_#{item.id}').focus();"} comment (#{item.comments.size})
Next, we have a form masquerading as a link that allows users to like the item.
%form{:method => 'post', :action => "/like/#{item.class.to_s.downcase}/#{item.id}", :id => "form_like_#{item.class.to_s.downcase}_#{item.id}"}
%input{:type => 'hidden', :name => 'return_url', :value => request.url.to_s}
%input{:type => 'hidden', :name => '_method', :value => 'put'}
%a{:href =>"#", :onclick => "$('#form_like_#{item.class.to_s.downcase}_#{item.id}').submit();"} like
- unless item.likes.empty?
#{item.likes.size} people likes this.
#{item.people_who_likes.join(', ')} liked it.
This also shows the number of people who liked the item, as well as showing the people who liked it (this is where we use the method from the Commentable module). The form submits to the create like route.
put "/like/:class/:id" do
return unless %w(status activity post photo page).include? params[:class]
clazz = Kernel.const_get(params[:class].capitalize)
item = clazz.get params[:id]
if Like.first(:user_id => @user.id, "#{params[:class]}_id".to_sym => item.id).nil?
Like.create(params[:class].to_sym => item, :user => @user)
end
redirect params[:return_url]
end
This route is more interesting to describe than the others as it uses some metaprogramming. Let's look at it in details. The URL route has two parameters—class and ID. The class is the class of the object that is likable while the ID is the ID of that object. The first line of the code rejects any other types of objects other than Status, Activity, Post, Photo, or Page.
Next, we get the Class object through Kernel.const_get, which returns an object's class (which is also an object, since everything in Ruby is an object!). We call the get method of this Class object, given the ID and this returns the actual object that we want. Once we have the object, we check if the user has already liked this object. If not, we create add a like to this object and go back to the calling URL.
The implementation of the commenting feature is in the create comment route in the comments.rb file, and is almost the same as the create like route.
put "/comment/:class/:id" do
return unless %w(status activity post photo page).include? params[:class]
clazz = Kernel.const_get(params[:class].capitalize)
item = clazz.get params[:id]
Comment.create(:text => params[:text], params[:class].to_sym => item, :user => @user)
redirect params[:return_url]
end
That's all for the application flow. It has been a lengthy discussion and we've covered a lot of ground. If there are any parts that are less understood you should go through the chapter again or read the code in full and run it carefully. However, most of the codes are straightforward enough.