
Chapter 3. Getting Started
CockroachDB has a sophisticated and modern architecture and is designed for a global scale. However, that complexity and scalability don’t imply a steep learning curve or barrier to entry. In this chapter we’ll help you get started with a CockroachDB installation and introduce you to the basics of working with a CockroachDB system.
Installation
CockroachDB can be installed on virtually any flavor of desktop operating system within a few minutes. Alternatively, you can create a free CockroachCloud database or run CockroachDB within a Docker container or Kubernetes cluster.
Installing CockroachDB software
In most scenarios, you’ll want to have the CockroachDB software installed on your desktop computer, so let’s start with that. You’ll find a full list of CockroachDB binaries at https://www.cockroachlabs.com/docs/releases/. From there, you can pick your operating system and download the most recent version or pick a previous version.
Installation on MacOS
If you have the brew package manager installed, then that is probably
the easiest way to get started installing CRDB on Mac. In fact, even if
you don’t have brew installed, its probably easier to install it and
then install CRDB than to install CRDB manually.
To install brew, issue the following command from a terminal window:
/bin/bash -c"$(curl -fsSLhttps://raw.githubusercontent.com/Homebrew/install/HEAD/install.sh)"
Once brew is installed, you can install CRDB with the following command:
guyharrison@macos ~ % brew install cockroachdb/tap/cockroach==> Tapping cockroachdb/tap Cloning into'/usr/local/Homebrew/Library/Taps/cockroachdb/homebrew-tap'... …==> Installing cockroach from cockroachdb/tap …. To have launchd start cockroachdb/tap/cockroach now and restart at login: brew services start cockroachdb/tap/cockroach Or,ifyou don't want/need a background service you can just run: cockroach start-single-node --insecure==> Summary ߍꠠ/usr/local/Cellar/cockroach/21.1.1:134files, 184.8MB, built in8seconds
One of the great things about brew is that it sets up CRDB as a service,
so you can issue brew services start cockroach to start a background
instance of CRDB.
However, If you don’t want to use brew, then you can download the
CockroachDB binary directly and copy the binary into your path. Visit
https://www.cockroachlabs.com/docs/releases/?filters=mac to determine
the path for the release you want, then use curl or wget to copy and
decompress that binary:
$curl https://binaries.cockroachdb.com/cockroach-v21.1.1.darwin-10.9-amd64.tgz|tar -xJ
You can then copy the binary into your PATH so you can execute cockroach commands from any shell:
$ sudo cp -i cockroach-v21.1.1.darwin-10.9-amd64/cockroach /usr/local/bin/Note that copying the binary directly into your path may not install some of the ancillary libraries which support geospatial functionality. Consult the CockroachDB web site for further details.
Once you’ve installed CRDB either manually, or via brew, run the
cockroach demo command to start a demo instance and confirm that it is
running:
guyharrison@macos ~ % cockroach demo## Welcome to the CockroachDB demo database!## You are connected to a temporary, in-memory CockroachDB cluster of 1 node.## Enter ? for a brief introduction.#[email protected]:49418/movr> show databases;database_name|owner ----------------+-------- defaultdb|root movr|root postgres|root system|node(4rows)Time: 1ms total(execution 1ms / network 0ms)[email protected]:49418/movr>
Installation on Linux
To perform a basic installation on Linux, visit
https://www.cockroachlabs.com/docs/releases/. To obtain the latest
release (or a specific version you are interested in), download and
unpack it. Of course, you can use curl or wget to obtain the tarball
once you have determined its path:
$wget https://binaries.cockroachdb.com/cockroach-v21.1.1.linux-amd64.tgz 2021-04-17 16:10:35 -'cockroach-v21.1.1.linux-amd64.tgz’ saved$sudo cp -i cockroach-v21.1.1.linux-amd64/cockroach
Once installed, run the cockroach demo command to start a temporary
local instance of CRDB and verify the installation.
$cockroach demo## Welcome to the CockroachDB demo database!## You are connected to a temporary, in-memory CockroachDB cluster of 1 node.#…## Enter ? for a brief introduction.#[email protected]:44913/movr> show databases;database_name|owner ----------------+-------- defaultdb|root movr|root postgres|root system|node(4rows)Time: 1ms total(execution 1ms / network 0ms)[email protected]:44913/movr>
Installation on Microsoft Windows
Microsoft Windows is not a fully supported platform for running a CockroachDB server; certain features - such as spatial - is not available. However, Windows is completely supported for CockroachDB clients and the server runs well enough for experimentation and most developent.
From https://www.cockroachlabs.com/docs/releases/?filters=windows, click
on the link for the release you’d like to download. Once downloaded,
unzip the archive into a directory and add the subdirectory containing
the cockroach.exe to your PATH.
Alternatively, you can download the file directly from a PowerShell
prompt. Here, we download the zip fie for version 21.1.0, unzip it to a
directory c: oolscockroachdb:
PS>wgetwgethttps://binaries.cockroachdb.com/cockroach-v21.1.0.windows-6.2-amd64.zip-OutFilecrdb.zipPS>mkdirc:toolscockroachdbPS>Expand-Archive-Pathcrdb.zip-DestinationPathC:toolscockroachdb
Now you can test your installation by issuing the
cockroach demo command:
PS>cockroachdemo## Welcome to the CockroachDB demo database!## You are connected to a temporary, in-memory CockroachDB cluster of 1 node.### Enter ? for a brief introduction.#root@127.0.0.1:57574/movr>showdatabases;database_name|owner----------------+--------defaultdb|rootmovr|rootpostgres|rootsystem|node(4rows)Time:2mstotal(execution1ms/network0ms)
Creating a CockroachCloud cluster
The cockroach demo command is a handy way for playing with the
CockroachDB server, but the easiest way to get a fully functional
CockroachDB server with persistent storage is to take advantage of the
CockroachCloud free cloud database service. This service grants you
access to a fully functional multi-tenant cloud service with 5GB of
storage.
The CockroachCloud has a number of advantages compared with a desktop
deployment:
-
It’s automatically configured for high availability and backup. You don’t have to worry about losing your data in the event of a hard drive failure on your desktop.
-
It’s fully secured using encryption at rest and in transit
-
It’s available from anywhere, so it can be used for team development purposes.
To create a CockroachCloud server, navigate to https://www.cockroachlabs.com/get-started-cockroachdb/ and select the CockroachCloud option. Enter your email as shown in Figure 3-1.

Figure 3-1. Signing up for CockroachCloud
After entering your details and validating your email address, you’ll be given the option to create your free cluster as shown in Figure 3-2.
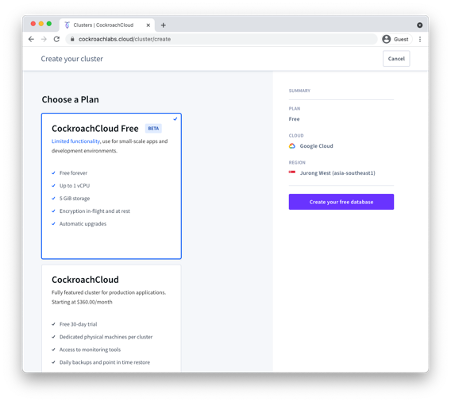
Figure 3-2. Creating a free CockroachCloud Database
Once created, the Connection info dialogue should appear, with
information on how to connect to your new cluster – see Figure 3-3.
Download the CA certificate cc-ca.crt+ by clicking on the first link
in the dialogue and store it on your desktop.
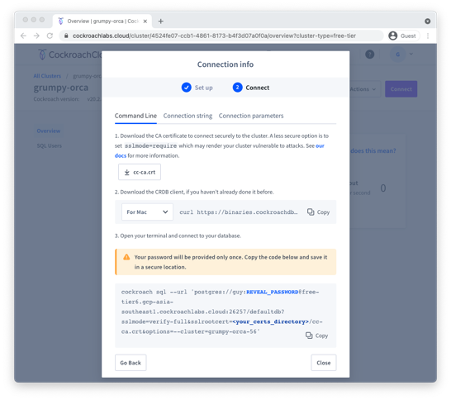
Figure 3-3. Connecting to CockroachCloud
Once the certificate is stored on the desktop, you can use the connection string provided to establish a connection. Below we copy the cc-ca.crt file into a +`~/.cockroach-certs/ca.crt + folder, and then connect to the newly created cloud database.
$mkdir$HOME/.cockroach-certs$cp$HOME/Downloads/cc-ca.crt$HOME/.cockroach-certs$cockroach sql --url'postgres://guy:myPassword@free-tier6.gcp-asia-southeast1.cockroachlabs.cloud:26257/defaultdb?sslmode=verify-full&sslrootcert=/Users/guyharrison/.cockroach-certs/cc-ca.crt&options=--cluster=grumpy-orca-56'## Welcome to the CockroachDB SQL shell.# All statements must be terminated by a semicolon.# To exit, type: q.## Client version: CockroachDB CCL v21.1.0# Server version: CockroachDB CCL v20.2.8# Cluster ID: 45851b67-5277-4795-aab9-390c70a78786## Enter ? for a brief introduction.#[email protected]:26257/defaultdb> show databases;database_name|owner ----------------+-------- defaultdb|root postgres|root system|node(3rows)Time: 106ms total(execution 7ms / network 100ms)
Starting a local single-node server
As we’ve seen above, you can use the cockroach demo command to start a
temporary demo cluster, and we can quickly create a free CockroachCloud
server. But if you want to start a single-node CockroachDB with
persistent storage on your own hardware, you can use the
start=single-node option:
$cockroach start-single-node --insecure * * WARNING: ALL SECURITY CONTROLS HAVE BEEN DISABLED! * * This mode is intendedfornon-production testing only. * * In this mode: * - Your cluster is open to any client that can access any of your IP addresses. * - Intruders with access to your machine or network can observe client-server traffic. * - Intruders can log in without password andreador write any data in the cluster. * - Intruders can consume all your server's resources and cause unavailability. * * * INFO: To start a secure server without mandating TLSforclients, * consider --accept-sql-without-tls instead. For other options, see: * * - https://go.crdb.dev/issue-v/53404/v20.2 * - https://www.cockroachlabs.com/docs/v20.2/secure-a-cluster.html * * * WARNING: neither --listen-addr nor --advertise-addr was specified. * The server will advertise"mubuntu"to other nodes, is this routable? * * Consider using: * -forlocal-only servers: --listen-addr=localhost * -formulti-node clusters: --advertise-addr=<host/IP addr>
This will start a single node CockroachDB cluster with no security
controls. To connect to this server
we can use the cockroach sql command with the default connection
string:
$cockroach sql --insecure## Welcome to the CockroachDB SQL shell.# All statements must be terminated by a semicolon.# To exit, type: q.## Server version: CockroachDB CCL v21.1.1# Cluster ID: 848d8b85-4000-484a-b4ad-8f2c76c68221## Enter ? for a brief introduction.#root@:26257/defaultdb> show databases;database_name|owner ----------------+-------- defaultdb|root postgres|root system|node(3rows)Time: 3ms total(execution 2ms / network 0ms)root@:26257/defaultdb>
Starting up CockroachDB in a docker container
If you have docker, you can quickly start a CockroachDB single node instance inside a docker container.
You’ll need a persistent volume for data, so let’s create that first:
$ docker volume create crdb1Then, we invoke docker run to pull and start the latest CockroachDB
docker image and start the server in single-node, insecure mode:
$docker run -d> --name=crdb1> --hostname=crdb1> -p 26257:26257 -p 8080:8080> -v"crdb1:/cockroach/cockroach-data"> cockroachdb/cockroach:latest start-single-node> --insecure> Unable to find image'cockroachdb/cockroach:latest'locally latest: Pulling from cockroachdb/cockroach a591faa84ab0: Pullcomplete… 6913e7a5719b8cb705c32540523885f6592270cf091ac1013cca66914b1aafe8
The output of the docker run command is the container identifier for the
CockroachDB container. Using that containerId, we can connect to that
container using the cockroach sql command.
$dockerexec-it 6913e7a5719b8cb705c32540523885f6592270cf091ac1013cca66914b1aafe8cockroach sql --insecure## Welcome to the CockroachDB SQL shell.# All statements must be terminated by a semicolon.# To exit, type: q.## Server version: CockroachDB CCL v21.1.1# Cluster ID: 8fcbb9bb-ec7c-40dc-afe0-90306c87f5d7## Enter ? for a brief introduction.#root@:26257/defaultdb> show databases;database_name|owner ----------------+-------- defaultdb|root postgres|root system|node(3rows)Time: 3ms total(execution 3ms / network 0ms)
We don’t need to have the CockroachDB software installed on our local host to connect using the above method, since we are using the cockroachdb client installed within the docker container. However, since we’ve forwarded port 26257 from the docker container, we can attach from the desktop using the default connection:
$~ cockroach sql --insecure## Welcome to the CockroachDB SQL shell.# All statements must be terminated by a semicolon.# To exit, type: q.## Client version: CockroachDB CCL v21.1.0# Server version: CockroachDB CCL v21.1.1# Cluster ID: d070609f-58a7-4aea-aa27-92bc4a1e5406## Enter ? for a brief introduction.#root@:26257/defaultdb>
Note that this port forwarding can only work if there’s not already a CockroachDB server listening on that port.
Starting up a secure server
In the previous examples, we’ve used the --insecure mode to start the
server without needing to configure secure communications. This is a
quick way to set up a test server but is catastrophically dangerous for
anything that contains valuable data.
We’ll cover CockroachDB security in-depth within Chapter 12, but for now, to set up a secure server, we need to create security certificates to encrypt the communications channel and authenticate the client and server.
The following commands create the certificates. The Certificate
Authority key will be held in my-safe-directory; the certificates
themselves will be held in the certs directory:
$mkdir certs my-safe-directory$# CA certificate and keypair$cockroach cert create-ca> --certs-dir=certs> --ca-key=my-safe-directory/ca.key$# certificate and keypair for localhost$cockroach cert create-node localhost`hostname`--certs-dir=certs> --ca-key=my-safe-directory/ca.key$# certificate for the root user$cockroach cert create-client root> --certs-dir=certs> --ca-key=my-safe-directory/ca.key
We can now start the server and specify the directory containing the certificates:
$cockroach start-single-node --certs-dir=certs --background * * WARNING: neither --listen-addr nor --advertise-addr was specified. * The server will advertise"mubuntu"to other nodes, is this routable? * * Consider using: * -forlocal-only servers: --listen-addr=localhost * -formulti-node clusters: --advertise-addr=<host/IP addr> * *$* * INFO: Replication was disabledforthis cluster. * When/if adding nodes in the future, update zone configurations to increase the replication factor.
Now when connecting, we must specify the certificates directory. If we are connecting from a remote host then we would need to copy the certificates to that host.
$cockroach sql --certs-dir=certs --certs-dir=certs## Welcome to the CockroachDB SQL shell.# All statements must be terminated by a semicolon.# To exit, type: q.## Server version: CockroachDB CCL v21.1.0# Cluster ID: f908d29e-1fb6-40b8-9e1f-a2a0a3763603## Enter ? for a brief introduction.#root@:26257/defaultdb>
Remote connection
In the previous examples, we’ve connected to a server running on the
same host as our client. This is pretty unusual in the real world, where
we would normally be connecting to a server on another machine.
Typically, we’d specify the URL parameter to identify the server
concerned. For instance, to connect to a server on the mubuntu server
on the default port, we could issue the following command:
$cockroach sql --certs-dir=certs --url postgresql://root@mubuntu:26257/defaultdb## Welcome to the CockroachDB SQL shell.# All statements must be terminated by a semicolon.# To exit, type: q.## Server version: CockroachDB CCL v21.1.0# Cluster ID: f908d29e-1fb6-40b8-9e1f-a2a0a3763603## Enter ? for a brief introduction.#root@mubuntu:26257/defaultdb>
Creating a Kubernetes cluster
In the above examples, we’ve created single-node clusters and connected to a free CockroachCloud database which is a shared region of a multi-tenant cluster. If you want to start with a dedicated multi-node cluster, then the easiest way is to install a CockroachDB cluster in a Kubernetes environment using the CockroachDB Kubernetes operator.
Kubernetes is an increasingly ubiquitous framework that coordinates – orchestrates – the management of the components of a distributed system. The CockroachDB Kubernetes operator contains the configuration and utilities that allow CockroachDB to be deployed in Kubernetes.
We’ll come back to production deployment options for Kubernetes later in the book. For now, we will deploy CockroachDB in a Kubernetes Minikube cluster, which implements a local Kubernetes cluster on a desktop system.
For this example, we are using a minikube cluster running on macOS with 6 CPUs and 12GB of memory.
The first step is to deploy the operator, and it’s manifest:
$kubectl apply -fhttps://raw.githubusercontent.com/cockroachdb/cockroach-operator/master /config/crd/bases/crdb.cockroachlabs.com_crdbclusters.yaml customresourcedefinition.apiextensions.k8s.io/crdbclusters.crdb.cockroachlabs.com created$kubectl apply-f https://raw.githubusercontent.com/cockroachdb/cockroach-operator/ master/manifests/operator.yaml clusterrole.rbac.authorization.k8s.io/cockroach-database-role created serviceaccount/cockroach-database-sa created clusterrolebinding.rbac.authorization.k8s.io/cockroach-database-rolebinding created role.rbac.authorization.k8s.io/cockroach-operator-role created clusterrolebinding.rbac.authorization.k8s.io/cockroach-operator-rolebinding created clusterrole.rbac.authorization.k8s.io/cockroach-operator-role created serviceaccount/cockroach-operator-sa created rolebinding.rbac.authorization.k8s.io/cockroach-operator-default created deployment.apps/cockroach-operator created
Once this is done, a kubectl get pods command should show the
CockroachDB Kubernetes operator running inside the cluster:
$kubectl get pods NAME READY STATUS RESTARTS AGE cockroach-operator-84bf588dbb-65m8k 0/1 ContainerCreating09s
We then retrieve the example configuration file that is included in the operators repository.
$curl -Ohttps://raw.githubusercontent.com/cockroachdb/cockroach-operator/master/ examples/example.yaml % Total % Received % Xferd Average Speed Time Time Time Current Dload Upload Total Spent Left Speed100109810010980033990--:--:-- --:--:-- --:--:-- 3399
This file contains definitions for the cluster to be configured, such as the number of nodes to be created and the memory and CPU required by each node. The configuration is tilted towards a production deployment, so you might want to trim down the requirements. For instance, below we see that the default configuration file specifies a 60GB storage requirement. We might want to change this to a lower value for a simple test system (or increase it for a bigger deployment):
apiVersion:crdb.cockroachlabs.com/v1alpha1kind:CrdbClustermetadata:name:cockroachdbspec:dataStore:pvc:spec:accessModes:-ReadWriteOnceresources:requests:storage:"60Gi"volumeMode:Filesystem
You could edit other elements of the configuration file, such as the number of nodes to be created or the version of CockroachDB to be used.
We now apply the configuration file to the operator, which will perform the necessary tasks to create the cluster:
$ kubectl apply -f myconfig.yaml

crdbcluster.crdb.cockroachlabs.com/cockroachdb created
The cluster creation process can take some time. We’ll know it’s
complete when a kubectl get pods command shows all nodes in Running
state:
$kubectl get pods NAME READY STATUS RESTARTS AGE cockroach-operator-84bf588dbb-65m8k 1/1 Running06m59s cockroachdb-0 1/1 Running087s cockroachdb-1 1/1 Running071s cockroachdb-2
We can connect to the cluster by invoking the cockroach sql + command
from within any of the CockroachDB nodes. For instance, here we connect
to +cockroachdb-2 and connect to the cluster:
$kubectlexec-it cockroachdb-2 -- ./cockroach sql --certs-dir cockroach-certs## Welcome to the CockroachDB SQL shell.# All statements must be terminated by a semicolon.# To exit, type: q.## Server version: CockroachDB CCL v21.1.1# Cluster ID: cb78255b-befa-4447-9fa8-c06b7a353564## Enter ? for a brief introduction.#root@:26257/defaultdb> show databases;database_name|owner ----------------+-------- defaultdb|root postgres|root system|node(3rows)Time: 7ms total(execution 6ms / network 1ms)
Connecting to the cluster using the method above requires a very high level of access to the cluster. In a production environment, we would probably setup a load balancer in to securely handle incoming requests to the cluster. We’ll look at these sorts of configurations in Chapter 10.
Meanwhile, to connect to the simple cluster we just created from outside the cluster, we need to first retrieve the client certificates that the operator created when the cluster was established:
mkdir certs kubectlexeccockroachdb-0 -it-- cat cockroach-certs/ca.crt >certs/ca.crt kubectlexeccockroachdb-0 -it-- cat cockroach-certs/client.root.key >certs/client.root.key kubectlexeccockroachdb-0 -it-- cat cockroach-certs/client.root.crt >certs/client.root.crt chmod600certs/*
Now we can forward one of the CockroachDB nodes ports to our local machine and connect using the cockroach sql command:
$kubectl port-forward services/cockroachdb-public 26257:26257 -n default&[1]22643$Forwarding from[::1]:26257 -> 26257$cockroach sql --port26257--certs-dir certs## Welcome to the CockroachDB SQL shell.# All statements must be terminated by a semicolon.# To exit, type: q.#Handling connectionfor26257# Client version: CockroachDB CCL v21.1.0# Server version: CockroachDB CCL v21.1.1# Cluster ID: cb78255b-befa-4447-9fa8-c06b7a353564## Enter ? for a brief introduction.#root@:26257/defaultdb>
Using a GUI client
While some are more than happy to use only a command-line client to interact with a database, some of us prefer a Graphical User Interface (GUI). Many GUI applications for PostgreSQL exist and most of these will work with CockroachDB. However, DBeaver Community edition is a free database GUI that has dedicated support for CockroachDB.
You can get DBeaver from https://DBeaver.io. Figure 3-4 shows the DBeaver GUI client.

Figure 3-4. The DBeaver GUI
Exploring CockroachDB
Now that we’ve got access to a CockroachDB cluster and have the client ready to connect let’s take CockroachDB for a drive!
Adding some data
As we say in Australia, “A database without data is like a Pub with no Beer!” So let’s get some data into the database so that we have something to look at.
The CockroachDB software includes a number of demonstration databases that you can quickly add to your CockroachDB installation. In some cases, these databases are pre-populated with data; in other cases, you create the schemas then add data afterward.
To initialize the schemas, we use the cockroach workload init [schema]
command. To run a workload against the schema, we use the cockroach
workload run [schema] command.
The schemas include:
- Bank
-
This models a set of accounts with currency balances. After the initializing the schema, use
workload runto generate a workload against the database. - Intro
-
A simple single-table database.
- kv
-
A simple key-value schema. After the initializing the schema, use run to generate a workload that will be evenly distributed across the cluster.
- Movr
-
A schema for the MovR example application. This schema can be used with the
workload runcommand to generate load against the databases. - Startrek
-
A startrek database, with two tables,
episodesandquotes. - Tpcc
-
A transaction processing schema for the TPCC standard benchmark. This schema can be used with the
workload runcommand to generate load against the databases. - Ycsb
-
The Yahoo Cloud Serving Benchmark schema. This schema can be used with the
workload runcommand to generate load against the databases.
For the intro and startrek databases, we create the tables and data
using the workload init command. For instance, in the following
example, we create the startrek schema and look at some data:
root@crdb1cockroach]#cockroachworkloadinitstartrekpostgres://localhost:26257?sslmode=disableI21050104:29:29.6943401workload/workloadsql/dataload.go:140importedepisodes(0s,79rows)I21050104:29:29.8989451workload/workloadsql/dataload.go:140importedquotes(0s,200rows)[root@crdb1cockroach]#cockroachsql--insecure##WelcometotheCockroachDBSQLshell.#Allstatementsmustbeterminatedbyasemicolon.#Toexit,type:q.##Serverversion:CockroachDBCCLv21.1.1(sameversionasclient)#ClusterID:d070609f-58a7-4aea-aa27-92bc4a1e5406##Enter?forabriefintroduction.#root@:26257/defaultdb>showdatabases;database_name|owner----------------+--------defaultdb|rootpostgres|rootstartrek|rootsystem|node(4rows)Time:2mstotal(execution2ms/network0ms)root@:26257/defaultdb>usestartrek;SETTime:1mstotal(execution0ms/network0ms)root@:26257/startrek>showtables;schema_name|table_name|type|owner|estimated_row_count--------------+------------+-------+-------+----------------------public|episodes|table|root|0public|quotes|table|root|0(2rows)Time:56mstotal(execution56ms/network0ms)root@:26257/startrek>select*fromepisodeslimit1;id|season|num|title|stardate-----+--------+-----+--------------+-----------1|1|1|TheManTrap|1531.1(1row)Time:1mstotal(execution1ms/network0ms)
In this example, we create the bank schema:
$cockroach workload init bank postgres://localhost:26257?sslmode=disable I210501 04:31:41.2140081imported bank(0s,1000rows)I210501 04:31:41.2214781starting9splits
And then run a workload simulation for 60 seconds:
$cockroach workload run bank postgres://localhost:26257?sslmode=disable --duration 60s I210501 04:33:52.3408521creating load generator... I210501 04:33:52.3440741reating load generator...done(took 3.220303ms)_elapsed___errors__ops/sec(inst)___ops/sec(cum)__p50(ms)__p99(ms)_pMax(ms)1.0s0187.3 187.9 16.8 65.0 121.6 transfer 2.0s0295.0 241.5 11.0 52.4 79.7 transfer 3.0s0260.9 248.0 13.1 54.5 83.9 transfer 4.0s0203.1 236.7 17.8 54.5 79.7 <snip> _elapsed___errors_____ops(total)___ops/sec(cum)__p50(ms)__p99(ms)_pMax(ms)__result 60.0s014230237.2 13.6 65.0 192.9
The run command is primarily meant to generated data for load testing purposes but is useful to generate data for query purposes as well.
Databases and tables
As we’ve seen already, data in a CockroachDB deployment is organized into specific namespaces called databases. Database is a fairly loosely used and overloaded term – it’s quite common for a CockroachDB cluster to be referred to as a database or for a database within a cluster to be referred to as a schema. However, in CockroachDB, as in most other SQL databases, a database cluster contains one or more databases. Within a database, one or more schemas may be defined, though it’s common for each database to contain only one schema.
We can list the databases in the cluster using the SHOW DATABASES
command:
root@:26257/defaultdb>showdatabases;database_name|owner----------------+--------bank|rootdefaultdb|rootpostgres|rootstartrek|rootsystem|node(5rows)
We can set our current database with the use command:
root@:26257/defaultdb>usestartrek;SETTime:1mstotal(execution0ms/network0ms)
We list tables within a database with the show tables command:
root@:26257/startrek>showtables;schema_name|table_name|type|owner|estimated_row_count--------------+------------+-------+-------+----------------------public|episodes|table|root|79public|quotes|table|root|200(2rows)Time:16mstotal(execution16ms/network0ms)
We can describe a table using the d command:
root@:26257/startrek>dquotes;column_name|data_type|is_nullable|column_default|g|indices|--------------+-----------+-------------+----------------+--+------------------------------+-quote|STRING|true|NULL||{}|characters|STRING|true|NULL||{}|stardate|DECIMAL|true|NULL||{}|episode|INT8|true|NULL||{quotes_episode_idx}|rowid|INT8|false|unique_rowid()||{primary,quotes_episode_idx}|(5rows)Time:13mstotal(execution12ms/network1ms)
Issuing SQL
From the CockroachDB client, we can issue any SQL commands for which we are authorized.
Here we create a table within the startrek database, load it with some derived data and issue a query:
root@localhost:26257/startrek>CREATETABLEepisode_quote_count(idintegerPRIMARYKEY,titleTEXT,quote_countinteger);CREATETABLETime:135mstotal(execution135ms/network0ms)root@localhost:26257/startrek>INSERTINTOepisode_quote_countSELECTid,title,count(*)ASquote_countFROMepisodesASeLEFTOUTERJOINquotesASqON(e.id=q.episode)GROUPBYid,title;INSERT79Time:90mstotal(execution90ms/network0ms)root@localhost:26257/startrek>SELECTtitle,quote_countFROMstartrek.episode_quote_countORDERBY2DESCLIMIT5;title|quote_count------------------------+--------------TheUltimateComputer|11TheSavageCurtain|9Metamorphosis|7TheMenagerie,PartI|7TheGalileoSeven|7(5rows)Time:3mstotal(execution2ms/network0ms)
The console
The CockroachDB server exposes a web-based client that shows the status
of the cluster and useful performance metrics. The webserver is usually
exposed on port 8080, though this can be changed using the --http-addr
setting when starting the server. Figure 3-5 shows an example of
the console, in this case from the Kubernetes cluster that we started
earlier in this chapter (we forwarded port 8080 from one of the pods in
the cluster).
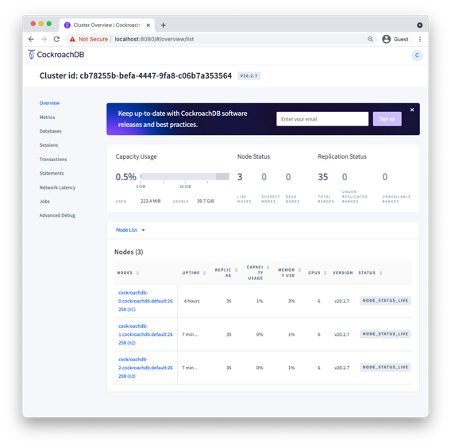
Figure 3-5. The CockroachDB console
Working with programming languages
Working with the CockroachDB shell is useful for experimentation, but eventually, most databases interact with application code written in languages such as Javascript, Java, Go, or Python.
Because CockroachDB is wire compatible with Postgres, most Postgres compatible drivers will work with CockroachDB. Indeed, there are no CockroachDB-specific drivers on the market because the Postgres drivers work so well. In this section, we’ll get you up to speed with “hello world” programs in Java, GoLang, Python, and JavaScript that connect to and queries a CockroachDB cluster.
Connecting to CockroachDB from NodeJS
Server-side Javascript using the NodeJS platform is an increasingly popular choice for application development because it allows the same Javascript language to be used for both front-end web presentation code and server-side application logic.
Assuming that you have nodeJS and the Node Package Manager (npm)
installed, we’ll use the node-postgres driver to connect to
CockroachDB. We can install this driver with the following command:
npm install pg
Once pg is installed, then the following example should connect to any CockroachDB database using a connection URI:
/// Example of connecting to CockroachDB using NodeJSconstCrClient=require('pg').Client;//load pg clientasyncfunctionmain(){try{// Check parametersif(process.argv.length!=3){console.log('Usage: node helloWorld.js CONNECTION_URI');process.exit(1);}// Establish a connection using the command line URIconstconnectionString=process.argv[2];constcrClient=newCrClient(connectionString);awaitcrClient.connect();// Issue a SELECTconstdata=awaitcrClient.query(`SELECT CONCAT('Hello from CockroachDB at ',CAST (NOW() as STRING)) as hello`);// Print out the error messageconsole.log(data.rows[0].hello);}catch(error){console.log(error.stack);}// Exitprocess.exit(0);}main();
This program expects the connection string to be provided as the first argument to the program. The process.argv array contains the full command line including “node” and “helloWorld.js”, so the URI actually shows up as the third element in the array.
We then attempt to establish a connection using that connection string, then issue a SELECT statement that retrieves the time as known to the server.
Here we connect to the cockroachCloud server that we setup earlier in this chapter:
$node helloWorld.js"postgres://guy:guysPassword@free-tier6.gcp-asia-southeast1.cockroachlabs.cloud:26257/defaultdb?sslmode=verify-full&sslrootcert=$HOME/CRDBKeys/cc-ca.crt&options=--cluster=grumpy-orca-56"Hello from CockroachDB at 2021-05-02 00:17:40.835834+00:00
And here we connect to a local CockroachDB running in insecure mode
$node helloWorld.js'postgres://root@localhost:26257?sslmode=disable'Hello from CockroachDB at 2021-05-02 00:32:39.125419+00:00
Connecting to CockroachDB from Java
Java is the workhorse of millions of applications across all industries and contexts.
In this example, we will use the official PostgresSQL JDBC driver to connect to a CockroachDB server.
Download the JDBC driver from here: https://jdbc.postgresql.org/download.html and place it in your CLASSPATH or configure it as a dependency in your IDE.
The following program accepts a URL, username and password as arguments on the command line and connects to the CockroachDB cluster concerned, and issues a SELECT statement:
packagehelloCRDB;importjava.sql.Connection;importjava.sql.DriverManager;importjava.sql.ResultSet;importjava.sql.Statement;publicclassHelloCRDB{publicstaticvoidmain(String[]args){Connectioncdb=null;try{Class.forName("org.postgresql.Driver");StringconnectionURL="jdbc:"+args[0];StringuserName=args[1];StringpassWord=args[2];cdb=DriverManager.getConnection(connectionURL,userName,passWord);Statementstmt=cdb.createStatement();ResultSetrs=stmt.executeQuery("SELECT CONCAT('Hello from CockroachDB at ',"+"CAST (NOW() as STRING)) AS hello");rs.next();System.out.println(rs.getString("hello"));}catch(Exceptione){e.printStackTrace();System.err.println(e.getClass().getName()+": "+e.getMessage());System.exit(0);}}}
If we wanted to connect to the CockroachCloud server we created earlier, we’d issue the following command:
$node helloWorld.js"postgres://guy:myPassword@free-tier6.gcp-asia-southeast1.cockroachlabs.cloud:26257/defaultdb?sslmode=verify-full&sslrootcert=$HOME/CRDBKeys/cc-ca.crt&options=--cluster=grumpy-orca-56"Hello from CockroachDB at 2021-05-05 15:38:56.691009+10:00
And here we connect to a local CockroachDB cluster in insecure mode:
$java -m helloCRDB/helloCRDB.HelloCRDB postgresql://localhost:26257/?sslmode=disable root ‘’
Connecting to CockroachDB from Python
Python is a widely used scripting language as well as the tool of choice
for many data scientists and data wranglers. In this example We’ll use
the psycopg python-postgresql package to connect to CockroachDB.
To install the psycopg package, issue the following command:
$pip3 install psycopg2Collecting psycopg2 Using cached psycopg2-2.8.6.tar.gz(383kB)Building wheelsforcollected packages: psycopg2 Building wheelforpsycopg2(setup.py)...doneCreated wheelforpsycopg2:sha256=0c386372a9a001b321... Stored in directory: /User... Successfully built psycopg2 Installing collected packages: psycopg2 Successfully installed psycopg2-2.8.6
Now the following short program will connect to CockroachDB using a URL provided on the command line and issue a SELECT statement:
#!/usr/bin/env python3importpsycopg2importsysdefmain():if((len(sys.argv))!=2):sys.exit("Error:No URL provided on command line")uri=sys.argv[1]conn=psycopg2.connect(uri)withconn.cursor()ascur:cur.execute("""SELECT CONCAT('Hello from CockroachDB at ',CAST (NOW() as STRING))""")data=cur.fetchone()("%s"%data[0])main()
Here we connect to a local CockroachDB cluster running in insecure mode:
$python helloCRDB.py'postgres://root@localhost:26257?sslmode=disable'Hello from CockroachDB at 2021-05-02 02:33:00.755359+00:00
And here we connect to the CockroachCloud database we established earlier in the chapter1:
$python helloCRDB.py'postgres://guy:guysPassword@free-tier6.gcp-asia-southeast1.cockroachlabs.cloud:26257/defaultdb?sslmode=verify-full&sslrootcert=/Users/guyharrison/CRDBKeys/cc-ca.crt&options=--cluster%3dgrumpy-orca-56'Hello from CockroachDB at 2021-05-02 02:39:55.859734+00:00
Connecting to CockroachDB from Go
The GO language is one of the fastest-growing programming languages, which offers high performance, modern programming paradigms and a low footprint. Much of the CockroachDB database platform is written in Go, so Go is a great choice for CockroachDB development.
In this example, we are going to use the pgx PostgreSQL driver for Go to connect to a CockroachDB cluster. First, we need to install the driver:
$go env -wGO111MODULE=auto$go get github.com/jackc/pgx go: downloading github.com/jackc/pgx v3.6.2+incompatible go: downloading golang.org/x/text v0.3.6 go: downloading golang.org/x/crypto v0.0.0-20210421170649-83a5a9bb288b
This short program connects to CockroachDB using the URL provided on the command line, and issues a SELECT statement:
packagemainimport("context""fmt""os""github.com/jackc/pgx")funcmain(){iflen(os.Args)<2{fmt.Fprintln(os.Stderr,"Missing URL argument")os.Exit(1)}uri:=os.Args[1]conn,err:=pgx.Connect(context.Background(),uri)iferr!=nil{fmt.Fprintf(os.Stderr,"Unable to connect to database: %v ",err)os.Exit(1)}vartextstringerr=conn.QueryRow(context.Background(),"SELECT CONCAT('Hello from CockroachDB at ',CAST (NOW() as STRING))").Scan(&text)iferr!=nil{fmt.Fprintf(os.Stderr,"QueryRow failed: %v ",err)os.Exit(1)}fmt.Println(text)}
Here, we connect to the CockroachCloud cluster we created earlier in the chapter:
✗ go run helloCRDB.go"postgres://guy:guysPassword@free-tier6.gcp-asia-southeast1.cockroachlabs.cloud:26257/defaultdb?sslmode=verify-full&sslrootcert=$HOME/CRDBKeys/cc-ca.crt&options=--cluster=grumpy-orca-56"Hello from CockroachDB at 2021-05-02 02:24:13.930662+00:00
And here we run the program to connect to a local CockroachDB cluster in insecure mode:
✗ go run helloCRDB.go 'postgres://root@localhost:26257?sslmode=disable'

Hello from CockroachDB at 2021-05-02 02:21:59.179171+00:00
Summary
In this chapter, we’ve shown you how to install CockroachDB software on a local computer, how to create a CockroachDB cluster in a variety of configurations and how to work with CockroachDB from the command line or a programming language.
It’s easy to install CockroachDB software on a desktop and, in most cases, necessary if you want to work with a CockroachDB server from the command line. You can also install CockroachDB software using Docker or Kubernetes.
While a single-node test server can be a useful tool for learning CockroachDB, the CockroachCloud offers a free 5GB server that provides backup and security. You can also install CockroachDB in a Kubernetes cluster to experiment with a full cluster in a local environment.
Because CockroachDB is PostgreSQL compatible, you can use any Postgres compatible driver to connect to CockroachDB. We also provided simple examples of connecting to CockroachDB using the PostgreSQL drivers for Java, Python, GoLang and NodeJS.
1 Note that because of limitations in the psycopg2 driver, we need to replace the final “=” in the URL with “%3d. Instead of + cluster=grumpy-orca-56+ we use + cluster%3dgrumpy-orca-56+