Chapter 2. Deploying Consul
In this chapter, you will learn how to deploy Consul onto Kubernetes or VMs (virtual machines). For the Kubernetes installation, this chapter covers provisioning a Kubernetes cluster locally or on the cloud, and installing Consul using its Helm chart. For the VM installation, you’ll use a local VM with Vagrant or a VM on the cloud. Once Consul is installed, you’ll learn how to interact with it through its UI, CLI, and API.
If you’re deploying Consul on VMs, skip ahead to “Deploying Consul on VMs”. Otherwise, continue reading to deploy Consul on Kubernetes.
Deploying Consul on Kubernetes
Deploying Consul onto Kubernetes is the easiest way to get started with Consul. First, you must have a running Kubernetes cluster. Then you’ll use Consul’s Helm chart to install Consul with a single command.
Provisioning a Kubernetes Cluster
Before you provision a Kubernetes cluster, you’ll need the Kubernetes CLI kubectl tool installed. On a Mac, you can install it with Homebrew:
$ brew install kubernetes-cliNext, it’s time to provision a Kubernetes cluster. If you’ve already got a Kubernetes cluster ready to go, then you can skip this section–the only requirement is that your cluster is running a version of Kubernetes greater than 1.16.
If you don’t have a Kubernetes cluster available, there are many ways to provision one. The quickest way to get started is to run Kubernetes on your local workstation using kind ( Kubernetes In Docker).
If you don’t want to run Kubernetes locally, many cloud providers offer managed Kubernetes clusters. These clusters cost money, although both Azure and Google Cloud offer credits for new users.
Note
You can also run Kubernetes on your own VMs. This is more complicated than using kind or a cloud provider managed Kubernetes offering and is out of the scope of this book.
Installing kind
To install kind, you must first install Docker. Docker’s install instructions depend on your operating system:
-
Windows: Install Docker Desktop. Running Docker on Windows requires you enable the WSL2 Backend1. If you have installation issues on Windows, I recommend you use a cloud provider managed cluster.
-
Linux: Install Docker Engine
Once you’ve installed Docker, install kind. On Mac you can use Homebrew:
$ brew install kindNow you can finally bring up your Kubernetes cluster!
$ kind create cluster --wait 3mThis command will bring up a one-node Kubernetes. It will wait for up to three minutes for the cluster to be ready.
To see the status of your cluster, run kubectl cluster-info:
$kubectl cluster-infoKubernetes master is running at https://127.0.0.1:57709KubeDNS is running at https://127.0.0.1:57709/api/v1...
To see the Kubernetes node, use kubectl get nodes:
$kubectl get nodesNAME STATUS ROLES AGE VERSIONkind-control-plane Ready master 1m v1.19.1
Now you’re ready to install Consul with Helm. Skip ahead to “Installing with the Helm Chart” or read on to provision a cloud-managed cluster.
Tip
If you need to re-create your kind cluster for some reason, you can delete it by running kind delete cluster and then recreate it with kind create cluster.
Cloud-managed clusters
Running Kubernetes in a cloud provider managed cluster costs money (unless you’re using a free credit), but you won’t have to worry about installing Docker on your workstation and experiencing excess resource consumption.
See the following links for how to spin up a managed Kubernetes cluster in your favourite cloud provider:
Once you’ve provisioned your Kubernetes cluster, ensure your kubectl context is set up correctly and your cluster is healthy by running kubectl cluster-info:
$kubectl cluster-infoKubernetes master is running at ...KubeDNS is running at ...Metrics-server is running at ...
Installing with the Helm Chart
Now that you’ve got a Kubernetes cluster ready to go, it’s time to install Consul. Consul on Kubernetes is installed via a Helm chart. Helm is a package manager for Kubernetes, and a chart is a specific package.
Installing Helm
To install Helm, follow the installation guide for your platform. On Mac, you can use Homebrew:
$ brew install helmHashiCorp Helm repository
Next, you’ll need to add HashiCorp’s Helm repository to your list of local repositories:
$helm repo add hashicorp https://helm.releases.hashicorp.com"hashicorp" has been added to your repositories
A repository is a source of Helm charts. To check that the repository was added properly, search for the hashicorp/consul chart:
$helm search repo hashicorp/consulNAME CHART VERSION APP VERSION DESCRIPTIONhashicorp/consul x.x.x x.x.x Official HashiCorp Consul Chart
Helm values file
Most Helm charts need to be configured before installation. This configuration can be done via a values.yaml file. First, choose a directory in which to work, for example ~/code/consul:
$mkdir -p ~/code/consul$cd~/code/consul
Next, create a values.yaml file with the following contents:
# Settings under "global" pertain to all components# of the Consul installation.global:# name ensures resources are prefixed with consul-.# If not set, resources get prefixed with consul-consul-# which looks messy.name:consul# Settings under "metrics" configure how Consul outputs# metrics. We want to enable metrics so we can# observe what's happening in our installation.metrics:enabled:true# Settings under "server" configure Consul servers.server:# replicas sets the number of servers.# In production, this should be 3 or 5, however# for testing, or when running on single-node# clusters, this can be set to 1.replicas:1# Settings under "connectInject" configure service mesh# features.connectInject:enabled:true# Settings under "controller" configure Consul's controller# that manages CRDs (Custom Resource Definitions).# We'll cover these in later chapters.controller:enabled:true# This setting will install an example Prometheus# server that will be used to gather metrics.prometheus:enabled:true
Helm install
To install Consul, use the helm install command. Be sure to pass your values.yaml file to the --values flag:
$helm install consul hashicorp/consul--version 0.32.1--values values.yaml--wait--timeout 3mNAME: consulLAST DEPLOYED: ...NAMESPACE: defaultSTATUS: deployed
This command will install Consul onto your Kubernetes cluster. It will wait for up to three minutes for the installation to complete.
Tip
Helm chart configuration can also be done via Helm’s --set flag, for example, helm install --set global.name=consul. If you are only configuring a few settings, this is faster than using a values.yaml file. However, when configuring multiple settings, a values.yaml file is more maintainable.
Verifying your installation
To verify your installation, run kubectl get pods:
$kubectl get podsNAME READY STATUS RESTARTS AGEconsul-connect-... 1/1 Running 0 1sconsul-controller-... 1/1 Running 0 1sconsul-lhwtz 1/1 Running 0 1sconsul-server-0 1/1 Running 0 1sconsul-webhook-... 1/1 Running 0 1s
You should see five types of Pods:
-
consul-<id>:These Pods are Consul clients. There will be one per Kubernetes node. If you’re running onkind, there will only be one Pod becausekindclusters only have one node. -
consul-server-0:This Pod is the Consul server. There should only be one because you setserver.replicasto1. Additional servers would have the Pod namesconsul-server-1,consul-server-2, etc. -
consul-connect-injector-...:There will be two of these Pods. These Pods provide Kubernetes-specific service mesh functionality. -
consul-controller-...:This Pod manages CRDs (Custom Resource Definitions). CRDs are covered in Chapter 5. -
consul-webhook-cert-manager-...:This Pod handles creating TLS certificates needed by Consul to communicate with Kubernetes securely.
Each Pod should have 1/1 under its READY column and its STATUS should be Running. This means that all the containers are passing their readiness checks and that the Pod is running.
Now you’re ready to start interacting with Consul via its UI, CLI, and API. Skip ahead to “Interacting with Consul” or read on to learn how to deploy Consul onto VMs.
Deploying Consul on VMs
One of Consul’s strengths is that it runs equally as well on VMs as it does on Kubernetes. Consul can scale to run on thousands of VMs, but for simplicity, this chapter covers installing Consul on a single VM. First, you need to provision a VM, and then you will install the Consul binary and create Consul’s configuration files. Finally, you will create a systemd service to handle actually starting Consul.
Provisioning a VM
We’re going to run a VM locally using a program called Vagrant that makes it easy to manage VMs on a local workstation.
Note
This book uses Vagrant for provisioning a VM locally, but you may instead want to provision a VM via a cloud provider. If you’re using a cloud provider hosted VM, ensure that it’s running Ubuntu 18.04 and that you can ssh into it. Then skip ahead to “Installing Consul”.
To use Vagrant, install the vagrant CLI tool and Virtualbox, a tool for running VMs.
Next, choose a directory in which to work, for example ~/code/consul, and navigate into it:
$mkdir -p ~/code/consul$cd~/code/consul
Create a file called Vagrantfile that describes how to configure the VM:
# VagrantfileVagrant.configure("2")do|config|# Use Ubuntu 18.04.config.vm.box="hashicorp/bionic64"# Forward port 8500 into the VM for access to the Consul UI.config.vm.network"forwarded_port",guest:8500,host:8500,host_ip:"127.0.0.1"end
Confirm that Vagrant is installed and sees the Vagrantfile by running vagrant status:
$vagrant statusCurrent machine states:default not created (virtualbox)
Because you haven’t started the VM yet, it should show the state as not created.
To start the VM, run the following:
$ vagrant upOnce the command completes, run vagrant status again to check that now the VM has started:
$vagrant statusCurrent machine states:default running (virtualbox)...
You can now ssh into the VM with:
$ vagrant sshInstalling Consul
Consul can be installed via apt. First, add HashiCorp’s GPG key:
$curl -fsSL https://apt.releases.hashicorp.com/gpg|sudo apt-key add -OK
Next, add the apt repository:
$sudo apt-add-repository"deb [arch=amd64] https://apt.releases.hashicorp.com $(lsb_release -cs) main"...Reading package lists... Done
Finally, update the package list:
$sudo apt-get update...Reading package lists... Done
Now the consul package should be available to install. You can list the available versions with the apt-cache policy command:
$sudo apt-cache policy consul|head -n 8consul:Installed: (none)Candidate: x.x.xVersion table:x.x.x 500500 https://apt.releases.hashicorp.com focal/main amd64 Packagesx.x.x 500500 https://apt.releases.hashicorp.com focal/main amd64 Packages
This book uses Consul version 1.10.0. You’re welcome to install a newer version, but bear in mind that some configuration settings used in this book may no longer be supported in newer versions.
To install Consul 1.10.0, use apt-get install:
$sudo apt-get installconsul=1.10.0...Setting up consul (1.10.0) ...
Note
This book will assume your VM is running Ubuntu, but Consul can be installed on any Linux distribution. See the Consul documentation for instructions on how to install Consul onto CentOS/RHEL, Fedora, Amazon Linux, FreeBSD, or Solaris2.
To verify that Consul was installed, run consul version:
$consul versionConsul v1.10.0Revision 27de64da7Protocol 2 spoken by default...
Configuring Consul
Now that you’ve got the Consul binary installed, you need to create Consul configuration files. You’re going to place your configuration in /etc/consul.d/consul.hcl. This directory and file should have been created when you installed the consul package:
$ls -la /etc/consul.d/total 16drwxr-xr-x 2 consul consul 4096 Jul 11 19:01 .drwxr-xr-x 96 root root 4096 Jul 11 19:01 ..-rw-r--r-- 1 consul consul 0 Jun 22 18:46 consul.env-rw-r--r-- 1 consul consul 5158 Jun 22 18:46 consul.hcl
If the file or directory doesn’t exist, create it:
$sudo mkdir /etc/consul.d$sudo touch /etc/consul.d/consul.hcl$sudo chown --recursive consul:consul /etc/consul.d$sudo chmod644/etc/consul.d/consul.hcl
Note
Consul can be configured using JSON or HCL. HCL stands for HashiCorp Configuration Language. It is similar to JSON but is meant to be more human readable. In this book, I will use HCL for that reason.
If you open up /etc/consul.d/consul.hcl, you will see that it already has some configuration set. All of the configuration values are commented out except for data_dir:
# data_dir# This flag provides a data directory for the agent to store state. This is required# for all agents. The directory should be durable across reboots. This is especially# critical for agents that are running in server mode as they must be able to persist# cluster state. Additionally, the directory must support the use of filesystem# locking, meaning some types of mounted folders (e.g. VirtualBox shared folders) may# not be suitable.data_dir="/opt/consul"
You need to add some configuration to this file to enable the service mesh features of Consul. Open up /etc/consul.d/consul.hcl with your favorite editor and add the following lines to the top:
# connect# This stanza configures connect, the name# for the service mesh feature of Consul.connect{enabled=true}# ports# Configures which ports Consul listens on.# You need to configure its gRPC port to listen on 8502# because this is required for the service mesh functionality.ports{grpc=8502}
Tip
The Consul configuration files are only writable by the consul user or root so you’ll need to use sudo to edit them, for example:
$ sudo vim /etc/consul.d/consul.hclBecause you’re going to run a Consul server on this node, you need some additional configuration. Create a separate server.hcl file to keep the server-specific configuration:
$sudo touch /etc/consul.d/server.hcl$sudo chown consul:consul /etc/consul.d/server.hcl$sudo chmod644/etc/consul.d/server.hcl
Edit /etc/consul.d/server.hcl and add the following:
# server# Configures this agent to run as a server (as opposed to a client).server=true# bootstrap_expect# Sets the number of servers expected to be in this cluster.# Since you only have one server, this is set to 1.# The servers will wait until this many servers# have joined the cluster before they start up.bootstrap_expect=1# ui_config# Configures Consul's UI.# Set enabled to true to enable the UI.ui_config{enabled=true}# client_addr# The address Consul binds to for its HTTP API and other functions.# The UI is exposed over the HTTP API so to access# the UI from outside the VM, set this to 0.0.0.0 so it# binds to all interfaces.client_addr="0.0.0.0"
All of your configuration is now complete. You could start Consul now, but when your terminal session ended, Consul would exit. Instead, you want Consul to continue running as a service in the background, and so you must use the operating system’s service manager. On Ubuntu, this manager is called systemd.
systemd
In order for Consul to run as a service in the background you must register it as a service in systemd. You do this by creating a consul.service file in /usr/lib/systemd/system/. This directory and file should have been created when you installed the Consul package:
$cat /usr/lib/systemd/system/consul.service[Unit]Description="HashiCorp Consul - A service mesh solution"Documentation=https://www.consul.io/Requires=network-online.targetAfter=network-online.targetConditionFileNotEmpty=/etc/consul.d/consul.hcl[Service]User=consulGroup=consulExecStart=/usr/bin/consul agent -config-dir=/etc/consul.d/ExecReload=/bin/kill --signal HUP $MAINPIDKillMode=processKillSignal=SIGTERMRestart=on-failureLimitNOFILE=65536[Install]WantedBy=multi-user.target
Note
systemd is an init system that manages processes and services that run when the virtual machine starts and throughout its lifecycle.
Before you can start the consul service, you need to enable it:
$sudo systemctlenableconsulCreated symlink /etc/systemd/system/...
Now you can start the consul service:
$ sudo systemctl start consulCheck its status:
$sudo systemctl status consulconsul.service - "HashiCorp Consul - A service mesh solution"Loaded: loaded (/lib/systemd/...Active: active (running) since ......
If its status is active (running) then Consul is running!
You can view Consul’s logs with journalctl:
$journalctl -u consulsystemd[1]: Started "HashiCorp Consul - A service mesh solution".consul[31615]: ==> Starting Consul agent...consul[31615]: Version: '1.10.0'consul[31615]: Node ID: '01ec3a1e-11c5-9a04-0a62-65afaf4447b2'consul[31615]: Node name: 'vagrant'consul[31615]: Datacenter: 'dc1' (Segment: '<all>')consul[31615]: Server: true (Bootstrap: true)consul[31615]: Client Addr: [0.0.0.0] (HTTP: 8500, HTTPS: -1, ......
Tip
-
To scroll through the logs with
journalctl, use thejandkkeys for up and down respectively. -
To exit, type
q. -
To tail the logs, use the
-fflag:journalctl -u consul -f, and then useCtrl-Cto exit.
Congratulations! You’ve got Consul up and running on your VM! Next I’ll cover how to interact with Consul.
Interacting with Consul
Now that Consul’s running, it’s time to actually interact with it. There are three ways to interact with Consul: via its UI, CLI, or API. If running on Kubernetes, you will also use Kubernetes resources known as CRDs (Custom Resource Definitions). CRDs are covered in Chapter 3.
Consul UI
First, let’s look at the UI. The UI is hosted by the Consul servers.
Note
Consul clients and servers can both host the Consul UI, but usually administrators will only configure the servers to host the UI because their locations are more stable–you’ll have a set number of servers–and so it’s easier to maintain routing and load balancing to them.
On Kubernetes, use kubectl port-forward to access the UI:
$ kubectl port-forward service/consul-ui 8500:80On VMs, port 8500 is already forwarded from your local computer to the VM by the Vagrantfile.
Tip
If your VM is running on the cloud, you can use an SSH tunnel to forward your local port 8500 to the VM’s port 8500:
#Replace 12.34.56.78 with your VM's IP.$ssh -L 8500:localhost:8500 -N 12.34.56.78
To view the UI, navigate to http://localhost:8500. You should see the UI, as shown in Figure 2-1.

Figure 2-1. The Consul UI.
The view that is loaded by default is the Services view. This view lists all the services Consul has registered. There’s only one service listed right now called consul because Consul registers itself as a service on all Consul server nodes. When you register new services in Chapter 3, you’ll see more services listed here.
The links on the sidebar are Services, Nodes, Key/Value, and Intentions. They navigate to the following pages:
-
Services: This links to the Services view that lists all the services in this datacenter. By default, the Consul UI loads the Services view.
-
Nodes: This links to the Nodes view that lists all the nodes in this datacenter. On Kubernetes, this will show all your Kubernetes nodes. On VMs, this will show all the VMs that Consul clients and servers are deployed onto.
-
Key/Value: This links to Consul’s key/value database. A key/value database is a simple database that stores a value that can be looked up by a specific key, for example
my-key: my-value. Consul’s key/value database is a very powerful tool but it is not used for its service mesh functionality and so is out of the scope of this book. If you want to learn more, start with Consul’s Key/Value Tutorial. -
Intentions: This links to Consul’s Intention management view. Intentions are rules about which services can talk to which other services. Intentions will be covered in detail in Chapter 5. Below these links there’s a section called Access Controls with greyed out links to Tokens, Policies, Roles, and Auth Methods. These pages are for configuring Consul’s ACL (Access Control List) system. ACLs are used to set rules about who can perform certain tasks and are a critical part of a secure, production-ready Consul installation. Your current installation does not enable ACLs because ACLs can make it more complicated to try out Consul’s features at first. ACLs are covered in Chapter 12.
Across the top, there are the following links:
-
dc1: This drop-down displays the name of the current Consul datacenter. When deploying multiple Consul datacenters in Chapter 11, the drop-down lets you switch between datacenters.
-
Help: This drop-down links out to Consul’s documentation, HashiCorp’s Learn site that contains tutorials, and GitHub’s issue creation page.
-
Settings: This links to the Settings view that is used to configure settings for the UI. These settings only apply to your specific browser–not to other Consul users.
If you navigate back to the Services page and click the consul service, you’ll be brought into the Service Instances view (Figure 2-2).
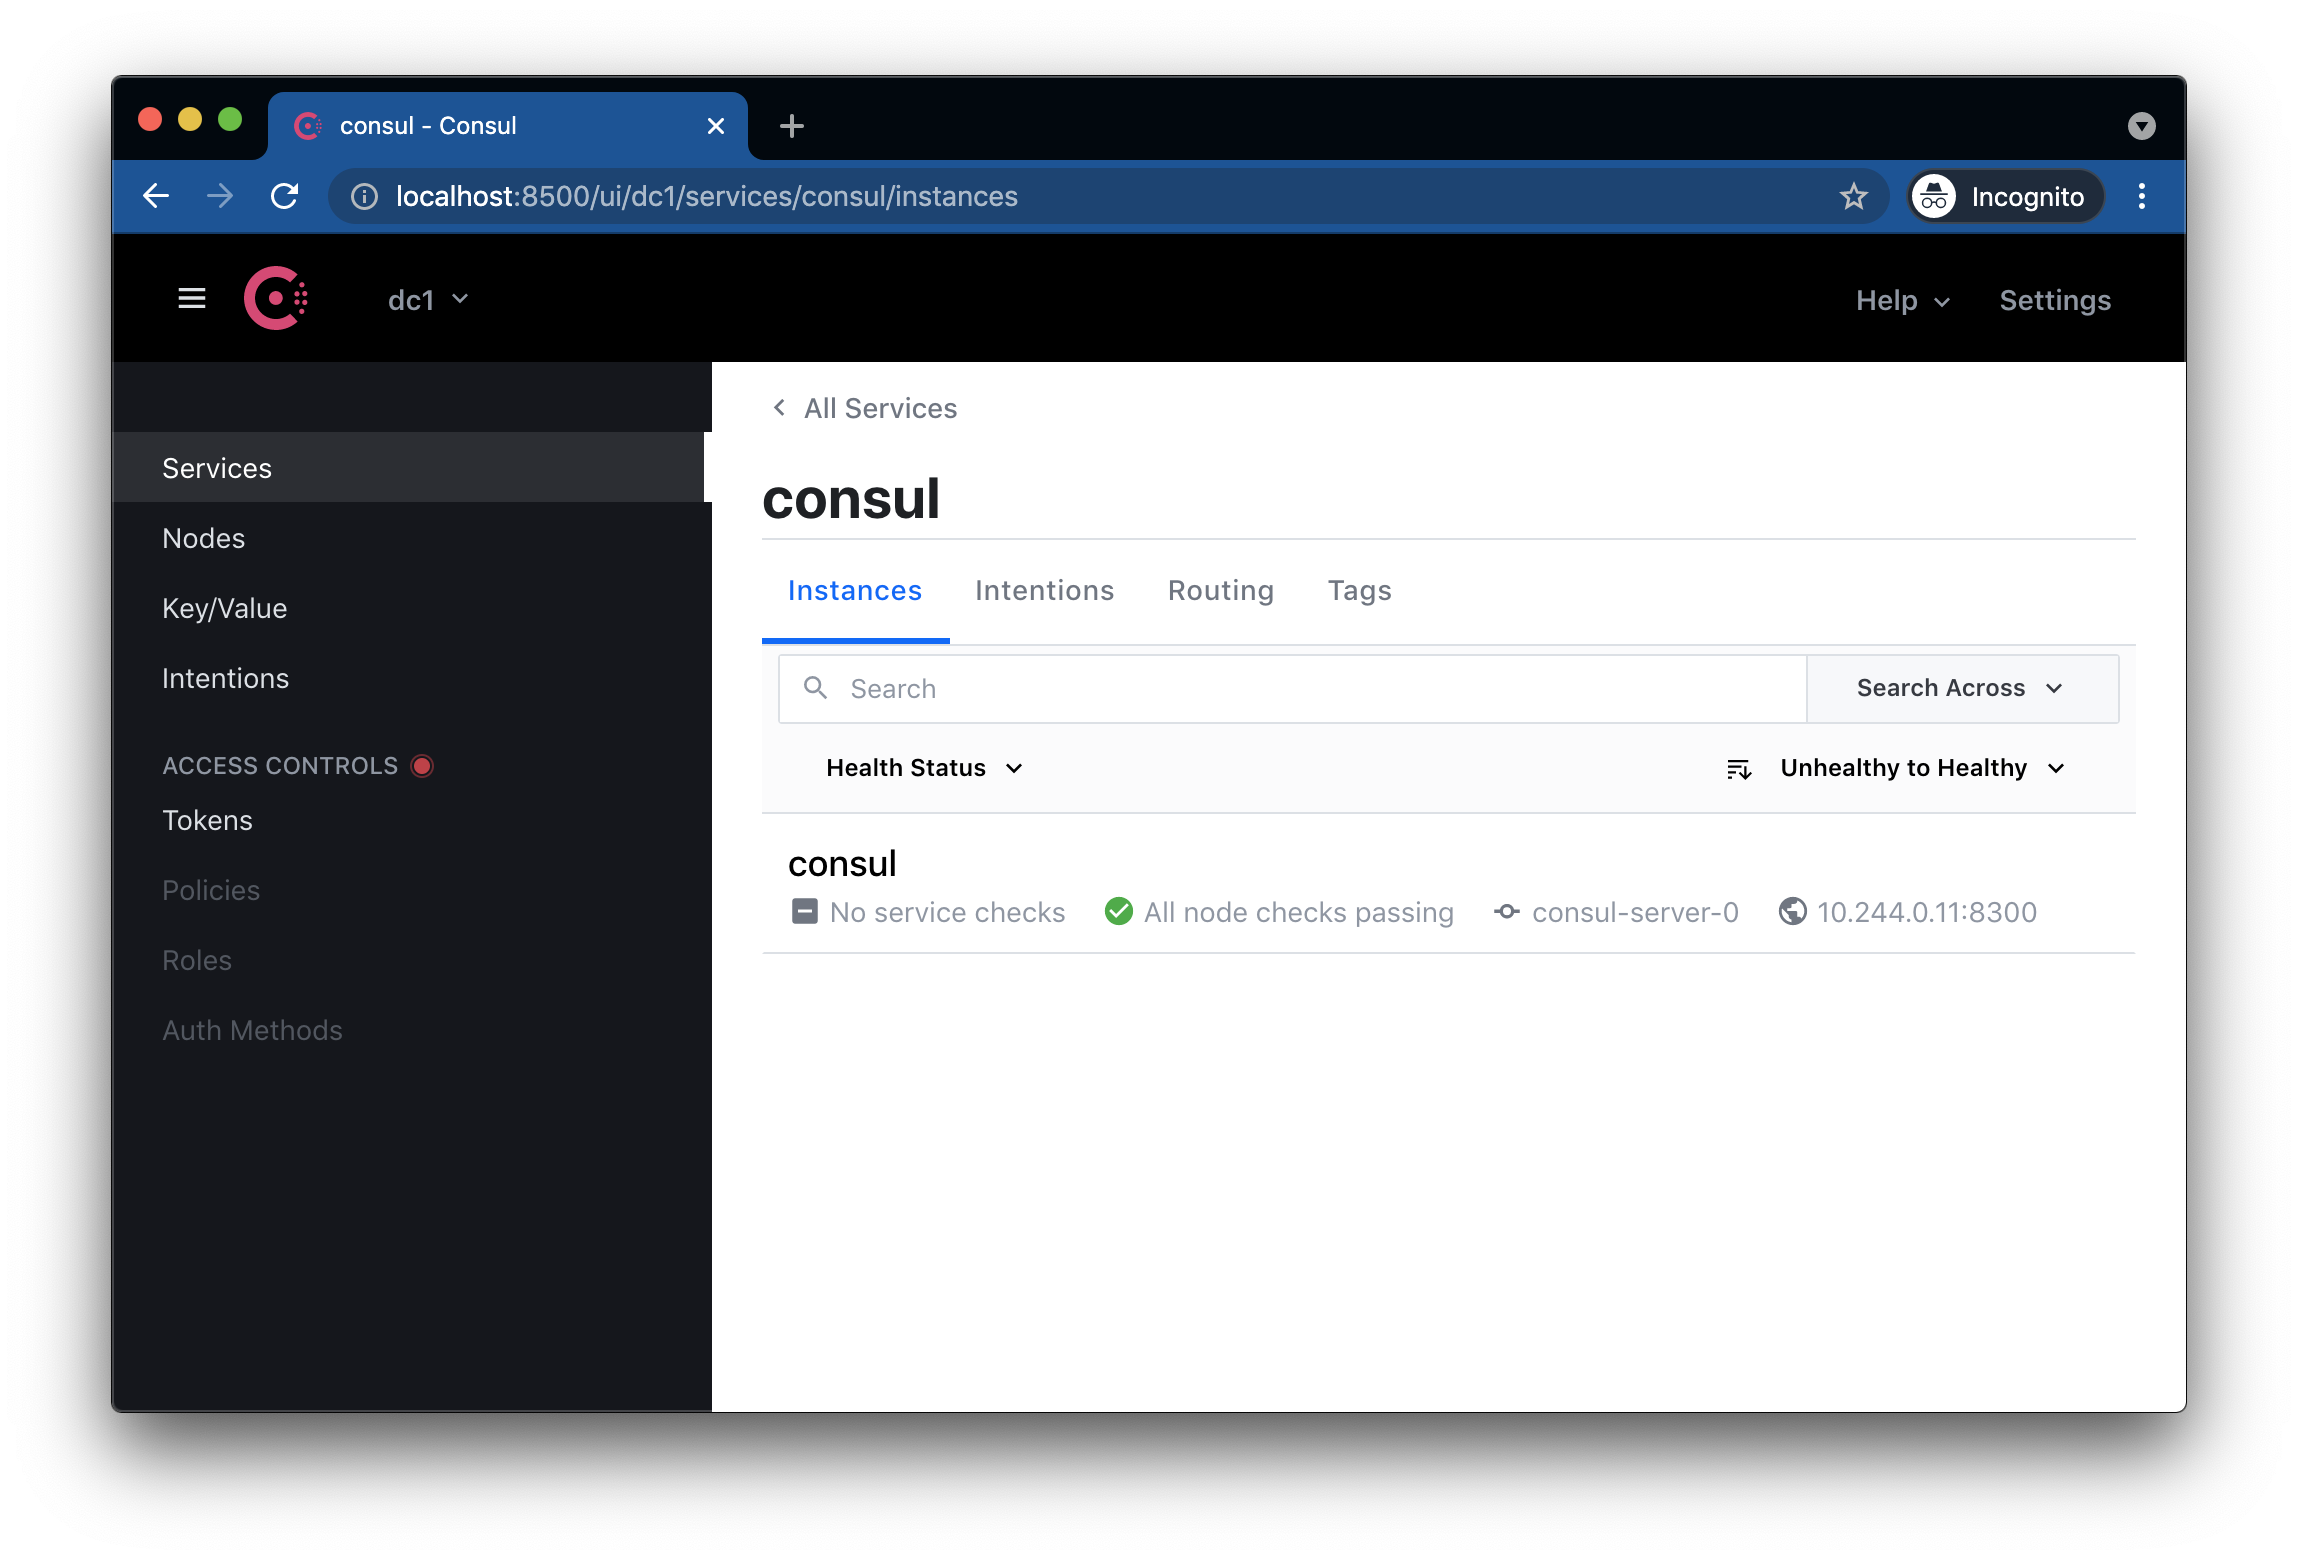
Figure 2-2. The Service Instances view shows all the instances of a specific service–in this case the consul service.
This view shows all the running instances of a particular service. An instance is an actual version of the service running somewhere. It is the same as a Kubernetes replica. Currently there is only one instance listed because Consul registers the consul service on each server node and there’s currently only one server node running. In the Instances list you can see more details about the one instance of the consul service:
-
No service checks: Service checks are health checks for that specific service instance. For example, if you had a web server, you might register a service check that ensures its HTTP port is open. Consul actually runs the service checks itself and so the
consulservice has no service checks because it can’t health check itself. -
All node checks passing: Node checks are checks registered to a node instead of a specific service instance. For example, you could register a check on a node that would fail when its disk was full. Node checks affect the health of all service instances on that node. If the node check fails, all services on that node are considered unhealthy.
-
consul-server-0/vagrant: This is the name of the node that the instance is running on. By default, the node name is the hostname of the machine where the instance is running. In Kubernetes, the node name is
consul-server-0because Kubernetes sets the hostname of Pods to the Pod name. In the Vagrant VM, Vagrant sets the hostname tovagrant. -
<some-ip-address>:8300: This is the IP and port of the service instance. The IP will be set to the pod IP in Kubernetes and the VM IP in Vagrant. The port will be set to 8300 because that’s the port for Consul’s server RPC (remote procedure call) traffic.
The Consul UI is a powerful tool for quickly understanding the state of your cluster. You’ll be using the UI for many tasks later on in the book, but for now let’s move on to the CLI.
CLI
Consul’s CLI is invoked by running the consul binary. On Kubernetes, you can use kubectl exec to gain a command-line shell inside a Consul Pod that has the consul binary already installed:
$kubectlexec-it consul-server-0 -- sh
On VMs, you can simply run consul after SSH’ing into the VM with vagrant ssh.
You can view the available commands by running consul --help:
$ consul --help
Usage: consul [--version] [--help] <command> [<args>]

Available commands are:
    acl            Interact with Consul's ACLs
    agent          Runs a Consul agent
    catalog        Interact with the catalog
    config         Interact with Consul's Centralized Configurations
    connect        Interact with Consul Connect
    debug          Records a debugging archive for operators
    event          Fire a new event
...
As with the UI, there’s not a lot you can do right now with the CLI since your cluster has nothing running, but you can at least list out the current services:
$consul catalog servicesconsul
And view the current nodes:
$consul catalog nodesNode ID Address DCconsul-server-0 666dbe4b 10.244.0.9 dc1kind-control-plane 5b0d2ccf 10.244.0.7 dc1
Note
On Vagrant, you’ll only see one node because there’s only one VM running. On Kubernetes, you’ll see one node for the Consul server and then one node for each Kubernetes node in your cluster because a Consul client runs on each node.
Under the hood, the CLI is actually just making API calls to the local Consul server and displaying the results in a human readable format. If you want, you can make the same API calls ourselves without using the CLI.
API
Almost every resource and action in Consul can be controlled via its HTTP API. By default, the API is hosted on port 8500. Let’s make the same API call used by the consul catalog services CLI command ourselves using curl:
$curl localhost:8500/v1/catalog/services?pretty{"consul": []}
Tip
The path to every API endpoint is prefixed with /v1/. Consul did this to reserve the possibility for adding v2 endpoints, however currently there are no v2 endpoints.
Typically, you’ll use the UI and CLI to interact with Consul on a day to day basis, and use the API for more complicated tasks or to get detailed information. The full reference for Consul’s API is documented on its API docs website.
Summary
In this chapter you deployed Consul onto Kubernetes via its Helm chart or onto a VM via a package manager. On Kubernetes, you learned how to configure Consul with a values.yaml file and on VMs, you learned how to configure Consul with HCL config files. On VMs, you also learned how to run Consul as a long-lived service with systemd. Once Consul was running, you learned how to interact with it through its UI, CLI and API.
In the next chapter, you’ll deploy real services into the service mesh.