
This chapter introduces three techniques for processing code. The scripting API lets you invoke code in a scripting language such as JavaScript or Groovy. You use the compiler API when you want to compile Java code inside your application. Annotation processors operate on Java source or class files that contain annotations. As you will see, there are many applications for annotation processing, ranging from simple diagnostics to “bytecode engineering,” the insertion of byte codes into class files or even running programs.
A scripting language is a language that avoids the usual edit/compile/link/run cycle by interpreting program text at runtime. Scripting languages have a number of advantages:
Rapid turnaround, encouraging experimentation.
Changing the behavior of a running program.
Enabling customization by program users.
On the other hand, most scripting languages lack features that are beneficial for programming complex applications, such as strong typing, encapsulation, and modularity.
It is therefore tempting to combine the advantages of scripting and traditional languages. The scripting API lets you do just that for the Java platform. It enables you to invoke scripts written in JavaScript, Groovy, Ruby, and even exotic languages such as Scheme and Haskell, from a Java program. (The other direction, accessing Java from the scripting language, is the responsibility of the scripting language provider. Most scripting languages that run on the Java virtual machine have this capability.)
In the following sections, we show you how to select an engine for a particular language, how to execute scripts, and how to take advantage of advanced features that some scripting engines offer.
A scripting engine is a library that can execute scripts in a particular language. When the virtual machine starts, it discovers the available scripting engines. To enumerate them, construct a ScriptEngineManager and invoke the getEngineFactories method. You can ask each engine factory for the supported engine names, MIME types, and file extensions. Table 11-1 shows typical values.
Table 11-1. Properties of Scripting Engine Factories
Engine | Names | MIME types | Extensions |
|---|---|---|---|
Rhino (included in Java SE 6) | js, rhino, JavaScript, javascript, ECMAScript, ecmascript | application/javascript, application/ecmascript, text/javascript, text/ecmascript] | js |
Groovy | groovy | None | groovy |
SISC Scheme | scheme, sisc | None | scc, sce, scm, shp |
Usually, you know which engine you need, and you can simply request it by name, MIME type, or extension. For example,
ScriptEngine engine = manager.getEngineByName("JavaScript");Java SE 6 includes a version of Rhino, a JavaScript interpreter developed by the Mozilla foundation. You can add additional languages by providing the necessary JAR files on the class path. You will generally need two sets of JAR files. The scripting language itself is implemented by a single JAR file or a set of JARs. The engine that adapts the language to the scripting API usually requires an additional JAR. The site http://scripting.dev.java.net provides engines for a wide range of scripting languages. For example, to add support for Groovy, the class path should contain groovy/lib/* (from http://groovy.codehaus.org) and groovy-engine.jar (from http://scripting.dev.java.net).
javax.script.ScriptEngineManager 6
List<ScriptEngineFactory> getEngineFactories()gets a list of all discovered engine factories.
ScriptEngine getEngineByName(String name)ScriptEngine getEngineByExtension(String extension)ScriptEngine getEngineByMimeType(String mimeType)gets the script engine with the given name, script file extension, or MIME type.
Once you have an engine, you can call a script simply by invoking
Object result = engine.eval(scriptString);
If the script is stored in a file, then open a Reader and call
Object result = engine.eval(reader);
You can invoke multiple scripts on the same engine. If one script defines variables, functions, or classes, most scripting engines retain the definitions for later use. For example,
engine.eval("n = 1728");
Object result = engine.eval("n + 1");
will return 1729.
Note
To find out whether it is safe to concurrently execute scripts in multiple threads, call
Object param = factory.getParameter("THREADING");The returned value is one of the following:
null: Concurrent execution is not safe"MULTITHREADED": Concurrent execution is safe. Effects from one thread might be visible from another thread."THREAD-ISOLATED": In addition to"MULTITHREADED", different variable bindings are maintained for each thread."STATELESS": In addition to"THREAD-ISOLATED", scripts do not alter variable bindings.
You often want to add variable bindings to the engine. A binding consists of a name and an associated Java object. For example, consider these statements:
engine.put(k, 1728);
Object result = engine.eval("k + 1");
The script code reads the definition of k from the bindings in the “engine scope.” This is particularly important because most scripting languages can access Java objects, often with a syntax that is simpler than the Java syntax. For example,
engine.put(b, new JButton());
engine.eval("f.text = 'Ok'");
Conversely, you can retrieve variables that were bound by scripting statements:
engine.eval("n = 1728");
Object result = engine.get("n");
In addition to the engine scope, there is also a global scope. Any bindings that you add to the ScriptEngineManager are visible to all engines.
Instead of adding bindings to the engine or global scope, you can collect them in an object of type Bindings and pass them to the eval method:
Bindings scope = engine.createBindings();
scope.put(b, new JButton());
engine.eval(scriptString, scope);
This is useful if a set of bindings should not persist for future calls to the eval method.
Note
You might want to have scopes other than the engine and global scopes. For example, a web container might need request and session scopes. However, then you are on your own. You need to implement a class that implements the ScriptContext interface, managing a collection of scopes. Each scope is identified by an integer number, and scopes with lower numbers should be searched first. (The standard library provides a SimpleScriptContext class, but it only holds global and engine scopes.)
javax.script.ScriptEngine 6
Object eval(Reader reader)Object eval(String script, Bindings bindings)Object eval(Reader reader, Bindings bindings)evaluates the script given by the string or reader, subject to the given bindings.
Object get(String key)void put(String key, Object value)gets or puts a binding in the engine scope.
Bindings createBindings()creates an empty
Bindingsobject suitable for this engine.
You can redirect the standard input and output of a script by calling the setReader and setWriter method of the script context. For example,
StringWriter writer = new StringWriter();
engine.getContext().setWriter(new PrintWriter(writer, true));
Any output written with the JavaScript print or println functions is sent to writer.
Caution
You can pass any Writer to the setWriter method, but the Rhino engine throws an exception if it is not a PrintWriter.
The setReader and setWriter methods only affect the scripting engine’s standard input and output sources. For example, if you execute the JavaScript code
println("Hello");
java.lang.System.out.println("World");
only the first output is redirected.
The Rhino engine does not have the notion of a standard input source. Calling setReader has no effect.
With many script engines, you can invoke a function in the scripting language without having to evaluate the actual script code. This is useful if you allow users to implement a service in a scripting language of their choice.
The script engines that offer this functionality implement the Invocable interface. In particular, the Rhino engine implements Invocable.
To call a function, call the invokeFunction method with the function name, followed by the function parameters:
if (engine implements Invocable)
   ((Invocable) engine).invokeFunction("aFunction", param1, param2);
If the scripting language is object oriented, you call can a method like this:
((Invocable) engine).invokeMethod(implicitParam, "aMethod", explicitParam1, explicitParam2);
Here, the implicitParam object is a proxy to an object in the scripting language. It must be the result of a prior call to the scripting engine.
Note
If the script engine does not implement the Invocable interface, you might still be able to call a method in a language-independent way. The getMethodCallSyntax method of the ScriptEngineFactory class produces a string that you can pass to the eval method. However, all method parameters must be bound to names, whereas invokeMethod can be called with arbitrary values.
You can go a step further and ask the scripting engine to implement a Java interface. Then you can call scripting functions and methods with the Java method call syntax.
The details depend on the scripting engine, but typically you need to supply a function for each method of the interface. For example, consider a Java interface
public interface Greeter
{
   String greet(String whom);
}
In Rhino, you provide a function
function greet(x) { return "Hello, " + x + "!"; }This code must be evaluated first. Then you can call
Greeter g = ((Invocable) engine).getInterface(Greeter.class);
Now you can make a plain Java method call
String result = g.greet("World");Behind the scenes, the JavaScript greet method is invoked. This approach is similar to making a remote method call, as discussed in Chapter 10.
In an object-oriented scripting language, you can access a script class through a matching Java interface. For example, consider this JavaScript code, which defines a SimpleGreeter class.
function SimpleGreeter(salutation) { this.salutation = salutation; }
SimpleGreeter.prototype.greet = function(whom) { return this.salutation + ", " + whom + "!"; }
You can use this class to construct greeters with different salutations (such as Hello, Goodbye, and so on).
Note
For more information on how to define classes in JavaScript, see JavaScript—The Definitive Guide, 5th ed., by David Flanagan (O’Reilly 2006).
After evaluating the JavaScript class definition, call
Object goodbyeGreeter = engine.eval("new SimpleGreeter('Goodbye')");
Greeter g = ((Invocable) engine).getInterface(goodbyeGreeter, Greeter.class);
When you call g.greet("World"), the greet method is invoked on the JavaScript object goodbyeGreeter. The result is a string "Goodbye, World!".
In summary, the Invocable interface is useful if you want to call scripting code from Java without worrying about the scripting language syntax.
javax.script.Invocable 6
Object invokeFunction(String name, Object... parameters)Object invokeMethod(Object implicitParameter, String name, Object... explicitParameters)invokes the function or method with the given name, passing the given parameters.
<T> T getInterface(Class<T> iface)returns an implementation of the given interface, implementing the methods with functions in the scripting engine.
<T> T getInterface(Object implicitParameter, Class<T> iface)returns an implementation of the given interface, implementing the methods with methods of the given object.
Some scripting engines can compile scripting code into an intermediate form for efficient execution. Those engines implement the Compilable interface. The following example shows how to compile and evaluate code that is contained in a script file:
Reader reader = new FileReader("myscript.js");
CompiledScript script = null;
if (engine implements Compilable)
   CompiledScript script = ((Compilable) engine).compile(reader);
Once the script is compiled, you can execute it. The following code executes the compiled script if compilation was successful, or the original script if the engine didn’t support compilation.
if (script != null)
   script.eval();
else
   engine.eval(reader);
Of course, you only want to compile a script if you need to execute it repeatedly.
To illustrate the scripting API, we will develop a sample program that allows users to specify event handlers in a scripting language of their choice.
Have a look at the program in Listing 11-1. The ButtonFrame class is similar to the event handling demo in Volume I, with two differences:
Each component has its
nameproperty set.There are no event handlers.
The event handlers are defined in a properties file. Each property definition has the form
componentName.eventName = scriptCode
For example, if you choose to use JavaScript, you supply the event handlers in a file js.properties, like this:
yellowButton.action=panel.background = java.awt.Color.YELLOW
blueButton.action=panel.background = java.awt.Color.BLUE
redButton.action=panel.background = java.awt.Color.RED
The companion code also has files for Groovy and SISC Scheme.
The program starts by loading an engine for the language that is specified on the command line. If no language is specified, we use JavaScript.
We then process a script init.language if it is present. This seems like a good idea in general. Moreover, the Scheme interpreter needs some cumbersome initializations that we did not want to include in every event handler script.
Next, we recursively traverse all child components and add the bindings (name, object) into the engine scope.
Then we read the file language.properties. For each property, we synthesize an event handler proxy that causes the script code to be executed. The details are a bit technical. You might want to read the section on proxies in Volume I, Chapter 6, together with the section on JavaBeans events in Chapter 8 of this volume, if you want follow the implementation in detail. The essential part, however, is that each event handler calls
engine.eval(scriptCode);
Let us look at the yellowButton in more detail. When the line
yellowButton.action=panel.background = java.awt.Color.YELLOW
is processed, we find the JButton component with the name "yellowButton". We then attach an ActionListener with an actionPerformed method that executes the script
panel.background = java.awt.Color.YELLOW
The engine contains a binding that binds the name "panel" to the JPanel object. When the event occurs, the setBackground method of the panel is executed, and the color changes.
You can run this program with the JavaScript event handlers, simply by executing
java ScriptTest
For the Groovy handlers, use
java -classpath .:groovy/lib/*:jsr223-engines/groovy/build/groovy-engine.jar ScriptTest groovy
Here, groovy is the directory into which you installed Groovy, and jsr223-engines is the directory that contains the engine adapters from http://scripting.dev.java.net.
To try out Scheme, download SISC Scheme from http://sisc-scheme.org/ and run
java -classpath .:sisc/*:jsr223-engines/scheme/build/scheme-engine.jar ScriptTest scheme
This application demonstrates how to use scripting for Java GUI programming. One could go one step further and describe the GUI with an XML file, as you have seen in Chapter 2. Then our program would become an interpreter for GUIs that have visual presentation defined by XML and behavior defined by a scripting language. Note the similarity to a dynamic HTML page or a dynamic server-side scripting environment.
Example 11-1. ScriptTest.java
  1. import java.awt.*;
  2. import java.beans.*;
  3. import java.io.*;
  4. import java.lang.reflect.*;
  5. import java.util.*;
  6. import javax.script.*;
  7. import javax.swing.*;
  8.
  9. /**
 10.  * @version 1.00 2007-10-28
 11.  * @author Cay Horstmann
 12.  */
 13. public class ScriptTest
 14. {
 15.    public static void main(final String[] args)
 16.    {
 17.       EventQueue.invokeLater(new Runnable()
 18.          {
 19.             public void run()
 20.             {
 21.                String language;
 22.                if (args.length == 0) language = "js";
 23.                else language = args[0];
 24.
 25.                ScriptEngineManager manager = new ScriptEngineManager();
 26.                System.out.println("Available factories: ");
 27.                for (ScriptEngineFactory factory : manager.getEngineFactories())
 28.                   System.out.println(factory.getEngineName());
 29.                final ScriptEngine engine = manager.getEngineByName(language);
 30.
 31.                if (engine == null)
 32.                {
 33.                   System.err.println("No engine for " + language);
 34.                   System.exit(1);
 35.                }
 36.
 37.                ButtonFrame frame = new ButtonFrame();
 38.
 39.                try
 40.                {
 41.                   File initFile = new File("init." + language);
 42.                   if (initFile.exists())
 43.                   {
 44.                      engine.eval(new FileReader(initFile));
 45.                   }
 46.
 47.                   getComponentBindings(frame, engine);
 48.
 49.                   final Properties events = new Properties();
 50.                   events.load(new FileReader(language + ".properties"));
 51.                   for (final Object e : events.keySet())
 52.                   {
 53.                      String[] s = ((String) e).split("\.");
 54.                      addListener(s[0], s[1], (String) events.get(e), engine);
 55.                   }
 56.                }
 57.                catch (Exception e)
 58.                {
 59.                   e.printStackTrace();
 60.                }
 61.
 62.                frame.setDefaultCloseOperation(JFrame.EXIT_ON_CLOSE);
 63.                frame.setTitle("ScriptTest");
 64.                frame.setVisible(true);
 65.             }
 66.          });
 67.    }
 68.
 69.    /**
 70.     * Gathers all named components in a container.
 71.     * @param c the component
 72.     * @param namedComponents
 73.     */
 74.    private static void getComponentBindings(Component c, ScriptEngine engine)
 75.    {
 76.       String name = c.getName();
 77.       if (name != null) engine.put(name, c);
 78.       if (c instanceof Container)
 79.       {
 80.          for (Component child : ((Container) c).getComponents())
 81.             getComponentBindings(child, engine);
 82.       }
 83.    }
 84.
 85.    /**
 86.     * Adds a listener to an object whose listener method executes a script.
 87.     * @param beanName the name of the bean to which the listener should be added
 88.     * @param eventName the name of the listener type, such as "action" or "change"
 89.     * @param scriptCode the script code to be executed
 90.     * @param engine the engine that executes the code
 91.     * @param bindings the bindings for the execution
 92.     */
 93.    private static void addListener(String beanName, String eventName, final String scriptCode,
 94.          final ScriptEngine engine) throws IllegalArgumentException, IntrospectionException,
 95.          IllegalAccessException, InvocationTargetException
 96.    {
 97.       Object bean = engine.get(beanName);
 98.       EventSetDescriptor descriptor = getEventSetDescriptor(bean, eventName);
 99.       if (descriptor == null) return;
100.       descriptor.getAddListenerMethod().invoke(
101.             bean,
102.             Proxy.newProxyInstance(null, new Class[] { descriptor.getListenerType() },
103.                   new InvocationHandler()
104.                      {
105.                         public Object invoke(Object proxy, Method method, Object[] args)
106.                               throws Throwable
107.                         {
108.                            engine.eval(scriptCode);
109.                            return null;
110.                         }
111.                      }));
112.
113.    }
114.
115.    private static EventSetDescriptor getEventSetDescriptor(Object bean, String eventName)
116.          throws IntrospectionException
117.    {
118.       for (EventSetDescriptor descriptor : Introspector.getBeanInfo(bean.getClass())
119.             .getEventSetDescriptors())
120.          if (descriptor.getName().equals(eventName)) return descriptor;
121.       return null;
122.    }
123. }
124.
125. class ButtonFrame extends JFrame
126. {
127.    public ButtonFrame()
128.    {
129.       setSize(DEFAULT_WIDTH, DEFAULT_HEIGHT);
130.
131.       panel = new JPanel();
132.       panel.setName("panel");
133.       add(panel);
134.
135.       yellowButton = new JButton("Yellow");
136.       yellowButton.setName("yellowButton");
137.       blueButton = new JButton("Blue");
138.       blueButton.setName("blueButton");
139.       redButton = new JButton("Red");
140.       redButton.setName("redButton");
141.
142.       panel.add(yellowButton);
143.       panel.add(blueButton);
144.       panel.add(redButton);
145.    }
146.
147.    public static final int DEFAULT_WIDTH = 300;
148.    public static final int DEFAULT_HEIGHT = 200;
149.
150.    private JPanel panel;
151.    private JButton yellowButton;
152.    private JButton blueButton;
153.    private JButton redButton;
154. }
In the preceding sections, you saw how to interact with code in a scripting language. Now we turn to a different scenario: Java programs that compile Java code. There are quite a few tools that need to invoke the Java compiler, such as:
Development environments.
Java teaching and tutoring programs.
Build and test automation tools.
Templating tools that process snippets of Java code, such as JavaServer Pages (JSP).
In the past, applications invoked the Java compiler by calling undocumented classes in the jdk/lib/tools.jar library. As of Java SE 6, a public API for compilation is a part of the Java platform, and it is no longer necessary to use tools.jar. This section explains the compiler API.
It is very easy to invoke the compiler. Here is a sample call:
JavaCompiler compiler = ToolProvider.getSystemJavaCompiler();
OutputStream outStream = ..., errStream = ...;
int result = compiler.run(null, outStream, errStream, "-sourcepath", "src", "Test.java");
A result value of 0 indicates successful compilation.
The compiler sends output and error messages to the provided streams. You can set these parameters to null, in which case System.out and System.err are used. The first parameter of the run method is an input stream. Because the compiler takes no console input, you always leave it as null. (The run method is inherited from a generic Tool interface, which allows for tools that read input.)
The remaining parameters of the run method are simply the arguments that you would pass to javac if you invoked it on the command line. These can be options or file names.
You can have even more control over the compilation process with a CompilationTask object. In particular, you can
Control the source of program code, for example, by providing code in a string builder instead of a file.
Control the placement of class files, for example, by storing them in a database.
Listen to error and warning messages as they occur during compilation.
Run the compiler in the background.
The location of source and class files is controlled by a JavaFileManager. It is responsible for determining JavaFileObject instances for source and class files. A JavaFileObject can correspond to a disk file, or it can provide another mechanism for reading and writing its contents.
To listen to error messages, you install a DiagnosticListener. The listener receives a Diagnostic object whenever the compiler reports a warning or error message. The DiagnosticCollector class implements this interface. It simply collects all diagnostics so that you can iterate through them after the compilation is complete.
A Diagnostic object contains information about the problem location (including the file name, line number, and column number) as well as a human-readable description.
You obtain a CompilationTask object by calling the getTask method of the JavaCompiler class. You need to specify:
A
Writerfor any compiler output that is not reported as aDiagnostic, ornullto useSystem.err.A
JavaFileManager, ornullto use the compiler’s standard file manager.A
DiagnosticListener.Option strings, or
nullfor no options.Class names for annotation processing, or
nullif none are specified. (We discuss annotation processing later in this chapter.)JavaFileObjectinstances for source files.
You need to provide the last three arguments as Iterable objects. For example, a sequence of options might be specified as
Iterable<String> options = Arrays.asList("-g", "-d", "classes");Alternatively, you can use any collection class.
If you want the compiler to read source files from disk, then you can ask the StandardJavaFileManager to translate file name strings or File objects to JavaFileObject instances. For example,
StandardJavaFileManager fileManager = compiler.getStandardFileManager(null, null, null);
Iterable<JavaFileObject> fileObjects = fileManager.getJavaFileObjectsFromStrings(fileNames);
However, if you want the compiler to read source code from somewhere other than a disk file, then you supply your own JavaFileObject subclass. Listing 11-2 shows the code for a source file object with data that are contained in a StringBuilder. The class extends the SimpleJava FileObject convenience class and overrides the getCharContent method to return the content of the string builder. We use this class in our example program in which we dynamically produce the code for a Java class and then compile it.
The CompilationTask class implements the Callable<Boolean> interface. You can pass it to an Executor for execution in another thread, or you can simply invoke the call method. A return value of Boolean.FALSE indicates failure.
Callable<Boolean> task = new JavaCompiler.CompilationTask(null, fileManager, diagnostics,
   options, null, fileObjects);
if (!task.call())
   System.out.println("Compilation failed");
If you simply want the compiler to produce class files on disk, you need not customize the JavaFileManager. However, our sample application will generate class files in byte arrays and later read them from memory, using a special class loader. Listing 11-3 defines a class that implements the JavaFileObject interface. Its openOutputStream method returns the ByteArrayOutputStream into which the compiler will deposit the byte codes.
It turns out a bit tricky to tell the compiler’s file manager to uses these file objects. The library doesn’t supply a class that implements the StandardJavaFileManager interface. Instead, you subclass the ForwardingJavaFileManager class that delegates all calls to a given file manager. In our situation, we only want to change the getJavaFileForOutput method. We achieve this with the following outline:
JavaFileManager fileManager = compiler.getStandardFileManager(diagnostics, null, null);
fileManager = new ForwardingJavaFileManager<JavaFileManager>(fileManager)
   {
      public JavaFileObject getJavaFileForOutput(Location location, final String className,
            Kind kind, FileObject sibling) throws IOException
      {
         return custom file object
      }
   };
In summary, you call the run method of the JavaCompiler task if you simply want to invoke the compiler in the usual way, reading and writing disk files. You can capture the output and error messages, but you need to parse them yourself.
If you want more control over file handling or error reporting, you use the CompilationTask class instead. Its API is quite complex, but you can control every aspect of the compilation process.
Example 11-2. StringBuilderJavaSource.java
 1. import java.net.*;
 2. import javax.tools.*;
 3.
 4. /**
 5.  * A Java source that holds the code in a string builder.
 6.  * @version 1.00 2007-11-02
 7.  * @author Cay Horstmann
 8.  */
 9. public class StringBuilderJavaSource extends SimpleJavaFileObject
10. {
11.    /**
12.     * Constructs a new StringBuilderJavaSource
13.     * @param name the name of the source file represented by this file object
14.     */
15.    public StringBuilderJavaSource(String name)
16.    {
17.       super(URI.create("string:///" + name.replace('.', '/') + Kind.SOURCE.extension),
18.                Kind.SOURCE);
19.       code = new StringBuilder();
20.    }
21.
22.    public CharSequence getCharContent(boolean ignoreEncodingErrors)
23.    {
24.       return code;
25.    }
26.
27.    public void append(String str)
28.    {
29.       code.append(str);
30.       code.append('
'),
31.    }
32.
33.    private StringBuilder code;
34. }
Example 11-3. ByteArrayJavaClass.java
 1. import java.io.*;
 2. import java.net.*;
 3. import javax.tools.*;
 4.
 5. /**
 6.  * A Java class that holds the bytecodes in a byte array.
 7.  * @version 1.00 2007-11-02
 8.  * @author Cay Horstmann
 9.  */
10. public class ByteArrayJavaClass extends SimpleJavaFileObject
11. {
12.    /**
13.     * Constructs a new ByteArrayJavaClass
14.     * @param name the name of the class file represented by this file object
15.     */
16.    public ByteArrayJavaClass(String name)
17.    {
18.       super(URI.create("bytes:///" + name), Kind.CLASS);
19.       stream = new ByteArrayOutputStream();
20.    }
21.
22.    public OutputStream openOutputStream() throws IOException
23.    {
24.       return stream;
25.    }
26.
27.    public byte[] getBytes()
28.    {
29.       return stream.toByteArray();
30.    }
31.
32.    private ByteArrayOutputStream stream;
33. }
javax.tools.JavaCompiler 6
StandardJavaFileManager getStandardFileManager(DiagnosticListener<? super JavaFileObject> diagnosticListener, Locale locale, Charset charset)gets the standard file manager for this compiler. You can supply
nullfor default error reporting, locale, and character set.JavaCompiler.CompilationTask getTask(Writer out, JavaFileManager fileManager, DiagnosticListener<? super JavaFileObject> diagnosticListener, Iterable<String> options, Iterable<String> classesForAnnotationProcessing, Iterable<? extends JavaFileObject> sourceFiles)gets a compilation task that, when called, will compile the given source files. See the discussion in the preceding section for details.
javax.tools.StandardJavaFileManager 6
Iterable<? extends JavaFileObject> getJavaFileObjectsFromStrings(Iterable<String> fileNames)Iterable<? extends JavaFileObject> getJavaFileObjectsFromFiles(Iterable<? extends File> files)translates a sequence of file names or files into a sequence of
JavaFileObjectinstances.
javax.tools.DiagnosticCollector<S> 6
DiagnosticCollector()constructs an empty collector.
List<Diagnostic<? extends S>> getDiagnostics()gets the collected diagnostics.
javax.tools.Diagnostic<S> 6
S getSource()gets the source object associated with this diagnostic.
Diagnostic.Kind getKind()gets the type of this diagnostic, one of
ERROR,WARNING,MANDATORY_WARNING,NOTE, orOTHER.String getMessage(Locale locale)gets the message describing the issue raised in this diagnostic. Pass
nullfor the default locale.long getColumnNumber()gets the position of the issue raised in this diagnostic.
javax.tools.SimpleJavaFileObject 6
CharSequence getCharContent(boolean ignoreEncodingErrors)override this method for a file object that represents a source file, and produce the source code.
OutputStream openOutputStream()override this method for a file object that represents a class file, and produce a stream to which the byte codes can be written.
javax.tools.ForwardingJavaFileManager<M extends JavaFileManager> 6
protected ForwardingJavaFileManager(M fileManager)constructs a
JavaFileManagerthat delegates all calls to the given file manager.FileObject getFileForOutput(JavaFileManager.Location location, String className, JavaFileObject.Kind kind, FileObject sibling)intercept this call if you want to substitute a file object for writing class files.
kindis one ofSOURCE,CLASS,HTML, orOTHER.
In JSP technology for dynamic web pages, you can mix HTML with snippets of Java code, such as
<p>The current date and time is <b><%= new java.util.Date() %></b>.</p>
The JSP engine dynamically compiles the Java code into a servlet. In our sample application, we use a simpler example and generate dynamic Swing code instead. The idea is that you use a GUI builder to lay out the components in a frame and specify the behavior of the components in an external file. Listing 11-4 shows a very simple example of a frame class, and Listing 11-5 shows the code for the button actions. Note that the constructor of the frame class calls an abstract method addEventHandlers. Our code generator will produce a subclass that implements the addEventHandlers method, adding an action listener for each line in the action.properties class. (We leave it as the proverbial exercise to the reader to extend the code generation to other event types.)
We place the subclass into a package with the name x, which we hope is not used anywhere else in the program. The generated code has the form
package x;
public class Frame extends SuperclassName {
   protected void addEventHandlers() {
      componentName1.addActionListener(new java.awt.event.ActionListener() {
         public void actionPerformed(java.awt.event.ActionEvent) {
            code for event handler1
         } } );
      // repeat for the other event handlers ...
   } }
The buildSource method in the program of Listing 11-6 builds up this code and places it into a StringBuilderJavaSource object. That object is passed to the Java compiler.
We use a ForwardingJavaFileManager with a getJavaFileForOutput method that constructs a ByteArrayJavaClass object for every class in the x package. These objects capture the class files that are generated when the x.Frame class is compiled. The method adds each file object to a list before returning it so that we can locate the byte codes later. Note that compiling the x.Frame class produces a class file for the main class and one class file per listener class.
After compilation, we build a map that associates class names with bytecode arrays. A simple class loader (shown in Listing 11-7) loads the classes stored in this map.
We ask the class loader to load the class that we just compiled, and then we construct and display the application’s frame class.
ClassLoader loader = new MapClassLoader(byteCodeMap);
Class<?> cl = loader.loadClass("x.Frame");
Frame frame = (JFrame) cl.newInstance();
frame.setVisible(true);
When you click the buttons, the background color changes in the usual way. To see that the actions are dynamically compiled, change one of the lines in action.properties, for example like this:
yellowButton=panel.setBackground(java.awt.Color.YELLOW); yellowButton.setEnabled(false);
Run the program again. Now the Yellow button is disabled after you click it. Also have a look at the code directories. You will not find any source or class files for the classes in the x package. This example demonstrates how you can use dynamic compilation with in-memory source and class files.
Example 11-4. ButtonFrame.java
 1. package com.horstmann.corejava;
 2. import javax.swing.*;
 3.
 4. /**
 5.  * @version 1.00 2007-11-02
 6.  * @author Cay Horstmann
 7.  */
 8. public abstract class ButtonFrame extends JFrame
 9. {
10.    public ButtonFrame()
11.    {
12.       setSize(DEFAULT_WIDTH, DEFAULT_HEIGHT);
13.
14.       panel = new JPanel();
15.       add(panel);
16.
17.       yellowButton = new JButton("Yellow");
18.       blueButton = new JButton("Blue");
19.       redButton = new JButton("Red");
20.
21.       panel.add(yellowButton);
22.       panel.add(blueButton);
23.       panel.add(redButton);
24.
25.       addEventHandlers();
26.    }
27.
28.    protected abstract void addEventHandlers();
29.
30.    public static final int DEFAULT_WIDTH = 300;
31.    public static final int DEFAULT_HEIGHT = 200;
32.
33.    protected JPanel panel;
34.    protected JButton yellowButton;
35.    protected JButton blueButton;
36.    protected JButton redButton;
37. }
Example 11-6. CompilerTest.java
  1. import java.awt.*;
  2. import java.io.*;
  3. import java.util.*;
  4. import java.util.List;
  5. import javax.swing.*;
  6. import javax.tools.*;
  7. import javax.tools.JavaFileObject.*;
  8.
  9. /**
 10.  * @version 1.00 2007-11-02
 11.  * @author Cay Horstmann
 12.  */
 13. public class CompilerTest
 14. {
 15.    public static void main(final String[] args) throws IOException
 16.    {
 17.       JavaCompiler compiler = ToolProvider.getSystemJavaCompiler();
 18.
 19.       final List<ByteArrayJavaClass> classFileObjects = new ArrayList<ByteArrayJavaClass>();
 20.
 21.       DiagnosticCollector<JavaFileObject> diagnostics = new DiagnosticCollector<JavaFileObject>()
 22.
 23.       JavaFileManager fileManager = compiler.getStandardFileManager(diagnostics, null, null);
 24.       fileManager = new ForwardingJavaFileManager<JavaFileManager>(fileManager)
 25.          {
 26.             public JavaFileObject getJavaFileForOutput(Location location,
 27.                   final String className, Kind kind, FileObject sibling) throws IOException
 28.             {
 29.                if (className.startsWith("x."))
 30.                {
 31.                   ByteArrayJavaClass fileObject = new ByteArrayJavaClass(className);
 32.                   classFileObjects.add(fileObject);
 33.                   return fileObject;
 34.                }
 35.                else return super.getJavaFileForOutput(location, className, kind, sibling);
 36.             }
 37.          };
 38.
 39.       JavaFileObject source = buildSource("com.horstmann.corejava.ButtonFrame");
 40.       JavaCompiler.CompilationTask task = compiler.getTask(null, fileManager, diagnostics,
 41.             null, null, Arrays.asList(source));
 42.       Boolean result = task.call();
 43.
 44.       for (Diagnostic<? extends JavaFileObject> d : diagnostics.getDiagnostics())
 45.          System.out.println(d.getKind() + ": " + d.getMessage(null));
 46.       fileManager.close();
 47.       if (!result)
 48.       {
 49.          System.out.println("Compilation failed.");
 50.          System.exit(1);
 51.       }
 52.
 53.       EventQueue.invokeLater(new Runnable()
 54.          {
 55.             public void run()
 56.             {
 57.                try
 58.                {
 59.                   Map<String, byte[]> byteCodeMap = new HashMap<String, byte[]>();
 60.                   for (ByteArrayJavaClass cl : classFileObjects)
 61.                      byteCodeMap.put(cl.getName().substring(1), cl.getBytes());
 62.                   ClassLoader loader = new MapClassLoader(byteCodeMap);
 63.                   Class<?> cl = loader.loadClass("x.Frame");
 64.                   JFrame frame = (JFrame) cl.newInstance();
 65.                   frame.setDefaultCloseOperation(JFrame.EXIT_ON_CLOSE);
 66.                   frame.setTitle("CompilerTest");
 67.                   frame.setVisible(true);
 68.                }
 69.                catch (Exception ex)
 70.                {
 71.                   ex.printStackTrace();
 72.                }
 73.             }
 74.          });
 75.    }
 76.
 77.    /*
 78.     * Builds the source for the subclass that implements the addEventHandlers method.
 79.     * @return a file object containing the source in a string builder
 80.     */
 81.    static JavaFileObject buildSource(String superclassName) throws IOException
 82.    {
 83.       StringBuilderJavaSource source = new StringBuilderJavaSource("x.Frame");
 84.       source.append("package x;
");
 85.       source.append("public class Frame extends " + superclassName + " {");
 86.       source.append("protected void addEventHandlers() {");
 87.       Properties props = new Properties();
 88.       props.load(new FileReader("action.properties"));
 89.       for (Map.Entry<Object, Object> e : props.entrySet())
 90.       {
 91.          String beanName = (String) e.getKey();
 92.          String eventCode = (String) e.getValue();
 93.          source.append(beanName + ".addActionListener(new java.awt.event.ActionListener() {");
 94.          source.append("public void actionPerformed(java.awt.event.ActionEvent event) {");
 95.          source.append(eventCode);
 96.          source.append("} } );");
 97.       }
 98.       source.append("} }");
 99.       return source;
100.    }
101. }
Example 11-7. MapClassLoader.java
 1. import java.util.*;
 2.
 3. /**
 4.  * A class loader that loads classes from a map whose keys are class names and whose
 5.  * values are byte code arrays.
 6.  * @version 1.00 2007-11-02
 7.  * @author Cay Horstmann
 8.  */
 9. public class MapClassLoader extends ClassLoader
10. {
11.    public MapClassLoader(Map<String, byte[]> classes)
12.    {
13.       this.classes = classes;
14.    }
15.
16.    protected Class<?> findClass(String name) throws ClassNotFoundException
17.    {
18.       byte[] classBytes = classes.get(name);
19.       if (classBytes == null) throw new ClassNotFoundException(name);
20.       Class<?> cl = defineClass(name, classBytes, 0, classBytes.length);
21.       if (cl == null) throw new ClassNotFoundException(name);
22.       return cl;
23.    }
24.
25.    private Map<String, byte[]> classes;
26. }
Annotations are tags that you insert into your source code so that some tool can process them. The tools can operate on the source level, or they can process class files into which the compiler has placed annotations.
Annotations do not change the way in which your programs are compiled. The Java compiler generates the same virtual machine instructions with or without the annotations.
To benefit from annotations, you need to select a processing tool. You insert annotations into your code that your processing tool understands, and then apply the processing tool.
There is a wide range of uses for annotations, and that generality can be initially confusing. Here are some uses for annotations:
Automatic generation of auxiliary files, such as deployment descriptors or bean information classes.
Automatic generation of code for testing, logging, transaction semantics, and so on.
We start our discussion of annotations with the basic concepts and put them to use in a concrete example: We mark methods as event listeners for AWT components, and show you an annotation processor that analyzes the annotations and hooks up the listeners. We then discuss the syntax rules in detail. We finish the chapter with two advanced examples for annotation processing. One of them processes source-level annotations. The other uses the Apache Bytecode Engineering Library to process class files, injecting additional bytecodes into annotated methods.
Here is an example of a simple annotation:
public class MyClass
{
   . . .
   @Test public void checkRandomInsertions()
}
The annotation @Test annotates the checkRandomInsertions method.
In Java, an annotation is used like a modifier, and it is placed before the annotated item, without a semicolon. (A modifier is a keyword such as public or static.) The name of each annotation is preceded by an @ symbol, similar to Javadoc comments. However, Javadoc comments occur inside /** . . . */ delimiters, whereas annotations are part of the code.
By itself, the @Test annotation does not do anything. It needs a tool to be useful. For example, the JUnit 4 testing tool (available at http://junit.org) calls all methods that are labeled as @Test when testing a class. Another tool might remove all test methods from a class file so that they are not shipped with the program after it has been tested.
Annotations can be defined to have elements, such as
@Test(timeout="10000")
These elements can be processed by the tools that read the annotations. Other forms of elements are possible; we discuss them later in this chapter.
Besides methods, you can annotate classes, fields, and local variables—an annotation can be anywhere you could put a modifier such as public or static.
Each annotation must be defined by an annotation interface. The methods of the interface correspond to the elements of the annotation. For example, the JUnit Test annotation is defined by the following interface:
@Target(ElementType.METHOD)
@Retention(RetentionPolicy.RUNTIME)
public @interface Test
{
   long timeout() default 0L;
   . . .
}
The @interface declaration creates an actual Java interface. Tools that process annotations receive objects that implement the annotation interface. A tool would call the timeout method to retrieve the timeout element of a particular Test annotation.
The Target and Retention annotations are meta-annotations. They annotate the Test annotation, marking it as an annotation that can be applied to methods only and that is retained when the class file is loaded into the virtual machine. We discuss them in detail in the section “Meta-Annotations” on page 917.
You have now seen the basic concepts of program metadata and annotations. In the next section, we walk through a concrete example of annotation processing.
One of the more boring tasks in user interface programming is the wiring of listeners to event sources. Many listeners are of the form
myButton.addActionListener(new
   ActionListener()
   {
      public void actionPerformed(ActionEvent event)
      {
         doSomething();
      }
   });
In this section, we design an annotation to avoid this drudgery. The annotation has the form
@ActionListenerFor(source="myButton") void doSomething() { . . . }The programmer no longer has to make calls to addActionListener. Instead, each method is simply tagged with an annotation. Listing 11-8 shows the ButtonFrame class from Volume I, Chapter 8, reimplemented with these annotations.
We also need to define an annotation interface. The code is in Listing 11-9.
Example 11-8. ButtonFrame.java
 1. import java.awt.*;
 2. import javax.swing.*;
 3.
 4. /**
 5.  * A frame with a button panel
 6.  * @version 1.00 2004-08-17
 7.  * @author Cay Horstmann
 8.  */
 9. public class ButtonFrame extends JFrame
10. {
11.    public ButtonFrame()
12.    {
13.       setTitle("ButtonTest");
14.       setSize(DEFAULT_WIDTH, DEFAULT_HEIGHT);
15.
16.       panel = new JPanel();
17.       add(panel);
18.
19.       yellowButton = new JButton("Yellow");
20.       blueButton = new JButton("Blue");
21.       redButton = new JButton("Red");
22.
23.       panel.add(yellowButton);
24.       panel.add(blueButton);
25.       panel.add(redButton);
26.
27.       ActionListenerInstaller.processAnnotations(this);
28.    }
29.
30.    @ActionListenerFor(source = "yellowButton")
31.    public void yellowBackground()
32.    {
33.       panel.setBackground(Color.YELLOW);
34.    }
35.
36.    @ActionListenerFor(source = "blueButton")
37.    public void blueBackground()
38.    {
39.       panel.setBackground(Color.BLUE);
40.    }
41.
42.    @ActionListenerFor(source = "redButton")
43.    public void redBackground()
44.    {
45.       panel.setBackground(Color.RED);
46.    }
47.
48.    public static final int DEFAULT_WIDTH = 300;
49.    public static final int DEFAULT_HEIGHT = 200;
50.
51.    private JPanel panel;
52.    private JButton yellowButton;
53.    private JButton blueButton;
54.    private JButton redButton;
55. }
Of course, the annotations don’t do anything by themselves. They sit in the source file. The compiler places them in the class file, and the virtual machine loads them. We now need a mechanism to analyze them and install action listeners. That is the job of the ActionListenerInstaller class. The ButtonFrame constructor calls
ActionListenerInstaller.processAnnotations(this);
The static processAnnotations method enumerates all methods of the object that it received. For each method, it gets the ActionListenerFor annotation object and processes it.
Class<?> cl = obj.getClass();
for (Method m : cl.getDeclaredMethods())
{
   ActionListenerFor a = m.getAnnotation(ActionListenerFor.class);
   if (a != null) . . .
}
Here, we use the getAnnotation method that is defined in the AnnotatedElement interface. The classes Method, Constructor, Field, Class, and Package implement this interface.
The name of the source field is stored in the annotation object. We retrieve it by calling the source method, and then look up the matching field.
String fieldName = a.source();
Field f = cl.getDeclaredField(fieldName);
This shows a limitation of our annotation. The source element must be the name of a field. It cannot be a local variable.
The remainder of the code is rather technical. For each annotated method, we construct a proxy object that implements the ActionListener interface and with an actionPerformed method that calls the annotated method. (For more information about proxies, see Volume I, Chapter 6.) The details are not important. The key observation is that the functionality of the annotations was established by the processAnnotations method.
Figure 11-1 shows how annotations are handled in this example.
In this example, the annotations were processed at runtime. It would also have been possible to process them at the source level. A source code generator might have produced the code for adding the listeners. Alternatively, the annotations might have been processed at the bytecode level. A bytecode editor might have injected the calls to addActionListener into the frame constructor. This sounds complex, but libraries are available to make this task relatively straightforward. You can see an example in the section “Bytecode Engineering” on page 926.
Our example was not intended as a serious tool for user interface programmers. A utility method for adding a listener could be just as convenient for the programmer as the annotation. (In fact, the java.beans.EventHandler class tries to do just that. You could easily refine the class to be truly useful by supplying a method that adds the event handler instead of just constructing it.)
However, this example shows the mechanics of annotating a program and of analyzing the annotations. Having seen a concrete example, you are now more prepared (we hope) for the following sections that describe the annotation syntax in complete detail.
Example 11-10. ActionListenerInstaller.java
 1. import java.awt.event.*;
 2. import java.lang.reflect.*;
 3.
 4. /**
 5.  * @version 1.00 2004-08-17
 6.  * @author Cay Horstmann
 7.  */
 8. public class ActionListenerInstaller
 9. {
10.    /**
11.     * Processes all ActionListenerFor annotations in the given object.
12.     * @param obj an object whose methods may have ActionListenerFor annotations
13.     */
14.    public static void processAnnotations(Object obj)
15.    {
16.       try
17.       {
18.          Class<?> cl = obj.getClass();
19.          for (Method m : cl.getDeclaredMethods())
20.          {
21.             ActionListenerFor a = m.getAnnotation(ActionListenerFor.class);
22.             if (a != null)
23.             {
24.                Field f = cl.getDeclaredField(a.source());
25.                f.setAccessible(true);
26.                addListener(f.get(obj), obj, m);
27.             }
28.          }
29.       }
30.       catch (Exception e)
31.       {
32.          e.printStackTrace();
33.       }
34.    }
35.
36.    /**
37.     * Adds an action listener that calls a given method.
38.     * @param source the event source to which an action listener is added
39.     * @param param the implicit parameter of the method that the listener calls
40.     * @param m the method that the listener calls
41.     */
42.    public static void addListener(Object source, final Object param, final Method m)
43.          throws NoSuchMethodException, IllegalAccessException, InvocationTargetException
44.    {
45.       InvocationHandler handler = new InvocationHandler()
46.          {
47.             public Object invoke(Object proxy, Method mm, Object[] args) throws Throwable
48.             {
49.                return m.invoke(param);
50.             }
51.          };
52.
53.       Object listener = Proxy.newProxyInstance(null,
54.             new Class[] { java.awt.event.ActionListener.class }, handler);
55.       Method adder = source.getClass().getMethod("addActionListener", ActionListener.class);
56.       adder.invoke(source, listener);
57.    }
58. }
java.lang.AnnotatedElement 5.0
boolean isAnnotationPresent(Class<? extends Annotation> annotationType)returns
trueif this item has an annotation of the given type.<T extends Annotation> T getAnnotation(Class<T> annotationType)gets the annotation of the given type, or
nullif this item has no such annotation.Annotation[] getAnnotations()gets all annotations that are present for this item, including inherited annotations. If no annotations are present, an array of length 0 is returned.
Annotation[] getDeclaredAnnotations()gets all annotations that are declared for this item, excluding inherited annotations. If no annotations are present, an array of length 0 is returned.
In this section, we cover everything you need to know about the annotation syntax.
An annotation is defined by an annotation interface:
modifiers @interface AnnotationName
{
   element declaration1
   element declaration2
   . . .
}
Each element declaration has the form
type elementName();or
type elementName() default value;
For example, the following annotation has two elements, assignedTo and severity.
public @interface BugReport
{
   String assignedTo() default "[none]";
   int severity() = 0;
}
Each annotation has the format
@AnnotationName(elementName1=value1, elementName2=value2, . . .)
For example,
@BugReport(assignedTo="Harry", severity=10)
The order of the elements does not matter. The annotation
@BugReport(severity=10, assignedTo="Harry")
is identical to the preceding one.
The default value of the declaration is used if an element value is not specified. For example, consider the annotation
@BugReport(severity=10)
The value of the assignedTo element is the string "[none]".
Caution
Defaults are not stored with the annotation; instead, they are dynamically computed. For example, if you change the default for the assignedTo element to "[]" and recompile the BugReport interface, then the annotation @BugReport(severity=10) uses the new default, even in class files that have been compiled before the default changed.
Two special shortcuts can simplify annotations.
If no elements are specified, either because the annotation doesn’t have any or because all of them use the default value, then you don’t need to use parentheses. For example,
@BugReport
is the same as
@BugReport(assignedTo="[none]", severity=0)
Such an annotation is called a marker annotation.
The other shortcut is the single value annotation. If an element has the special name value, and no other element is specified, then you can omit the element name and the = symbol. For example, had we defined the ActionListenerFor annotation interface of the preceding section as
public @interface ActionListenerFor
{
   String value();
}
then we could have written the annotations as
@ActionListenerFor("yellowButton")instead of
@ActionListenerFor(value="yellowButton")
All annotation interfaces implicitly extend the interface java.lang.annotation.Annotation. That interface is a regular interface, not an annotation interface. See the API notes at the end of this section for the methods provided by this interface.
You cannot extend annotation interfaces. In other words, all annotation interfaces directly extend java.lang.annotation.Annotation.
You never supply classes that implement annotation interfaces. Instead, the virtual machine generates proxy classes and objects when needed. For example, when requesting an ActionListenerFor annotation, the virtual machine carries out an operation similar to the following:
return Proxy.newProxyInstance(classLoader, ActionListenerFor.class,
   new
      InvocationHandler()
      {
         public Object invoke(Object proxy, Method m, Object[] args) throws Throwable
         {
            if (m.getName().equals("source")) return value of source annotation;
             . . .
         }
      });
The element declarations in the annotation interface are actually method declarations. The methods of an annotation interface can have no parameters and no throws clauses, and they cannot be generic.
The type of an annotation element is one of the following:
A primitive type (
int,short,long,byte,char,double,float, orboolean)StringClass(with an optional type parameter such asClass<? extends MyClass>)An
enumtypeAn annotation type
An array of the preceding types (an array of arrays is not a legal element type)
Here are examples for valid element declarations:
public @interface BugReport
{
   enum Status { UNCONFIRMED, CONFIRMED, FIXED, NOTABUG };
   boolean showStopper() default false;
   String assignedTo() default "[none]";
   Class<?> testCase() default Void.class;
   Status status() default Status.UNCONFIRMED;
   Reference ref() default @Reference(); // an annotation type
   String[] reportedBy();
}
Because annotations are evaluated by the compiler, all element values must be compile-time constants. For example,
@BugReport(showStopper=true, assignedTo="Harry", testCase=MyTestCase.class,
   status=BugReport.Status.CONFIRMED, . . .)
Caution
An annotation element can never be set to null. Not even a default of null is permissible. This can be rather inconvenient in practice. You will need to find other defaults, such as "" or Void.class.
If an element value is an array, you enclose its values in braces, like this:
@BugReport(. . ., reportedBy={"Harry", "Carl"})You can omit the braces if the element has a single value:
@BugReport(. . ., reportedBy="Joe") // OK, same as {"Joe"}Because an annotation element can be another annotation, you can build arbitrarily complex annotations. For example,
@BugReport(ref=@Reference(id="3352627"), . . .)
Note
It is an error to introduce circular dependencies in annotations. For example, because BugReport has an element of the annotation type Reference, then Reference can’t have an element of type BugReport.
You can add annotations to the following items:
Packages
Classes (including
enum)Interfaces (including annotation interfaces)
Methods
Constructors
Instance fields (including
enumconstants)Local variables
Parameter variables
However, annotations for local variables can only be processed at the source level. Class files do not describe local variables. Therefore, all local variable annotations are discarded when a class is compiled. Similarly, annotations for packages are not retained beyond the source level.
Note
You annotate a package in a file package-info.java that contains only the package statement, preceded by annotations.
An item can have multiple annotations, provided they belong to different types. You cannot use the same annotation type more than once when annotating a particular item. For example,
@BugReport(showStopper=true, reportedBy="Joe")
@BugReport(reportedBy={"Harry", "Carl"})
void myMethod()
is a compile-time error. If this is a problem, you can design an annotation that has a value of an array of simpler annotations:
@BugReports({
   @BugReport(showStopper=true, reportedBy="Joe"),
   @BugReport(reportedBy={"Harry", "Carl"}))
void myMethod()
java.lang.annotation.Annotation 5.0
Class<? extends Annotation> annotationType()returns the
Classobject that represents the annotation interface of this annotation object. Note that callinggetClasson an annotation object would return the actual class, not the interface.boolean equals(Object other)returns
trueifotheris an object that implements the same annotation interface as this annotation object and if all elements of this object andotherare equal to another.int hashCode()returns a hash code that is compatible with the
equalsmethod, derived from the name of the annotation interface and the element values.String toString()returns a string representation that contains the annotation interface name and the element values, for example,
@BugReport(assignedTo=[none], severity=0)
Java SE defines a number of annotation interfaces in the java.lang, java.lang.annotation, and javax.annotation packages. Four of them are meta-annotations that describe the behavior of annotation interfaces. The others are regular annotations that you can use to annotate items in your source code. Table 11-2 shows these annotations. We discuss them in detail in the following two sections.
Table 11-2. The Standard Annotations
Annotation Interface | Applicable To | Purpose |
|---|---|---|
| All | Marks item as deprecated |
| All but packages and annotations | Suppresses warnings of the given type |
| Methods | Checks that this method overrides a superclass method |
PostConstruct PreDestroy | Methods | The marked method should be invoked immediately after construction or before removal |
| Classes, interfaces, methods, fields | On a class or interface: marks it as a resource to be used elsewhere. On a method or field: marks it for “injection” |
| Classes, interfaces | An array of resources |
| All | Marks item as source code that has been generated by a tool |
| Annotations | Specifies the items to which this annotation can be applied |
| Annotations | Specifies how long this annotation is retained |
| Annotations | Specifies that this annotation should be included in the documentation of annotated items |
| Annotations | Specifies that this annotation, when applied to a class, is automatically inherited by its subclasses |
The @Deprecated annotation can be attached to any items for which use is no longer encouraged. The compiler will warn when you use a deprecated item. This annotation has the same role as the @deprecated Javadoc tag.
The @SuppressWarnings annotation tells the compiler to suppress warnings of a particular type, for example,
@SuppressWarnings("unchecked")The @Override annotation applies only to methods. The compiler checks that a method with this annotation really overrides a method from the superclass. For example, if you declare
public MyClass
{
   @Override public boolean equals(MyClass other);
   . . .
}
then the compiler will report an error. After all, the equals method does not override the equals method of the Object class. That method has a parameter of type Object, not MyClass.
The @Generated annotation is intended for use by code generator tools. Any generated source code can be annotated to differentiate it from programmer-provided code. For example, a code editor can hide the generated code, or a code generator can remove older versions of generated code. Each annotation must contain a unique identifier for the code generator. A date string (in ISO8601 format) and a comment string are optional. For example,
@Generated("com.horstmann.beanproperty", "2008-01-04T12:08:56.235-0700");The @PostConstruct and @PreDestroy annotations are used in environments that control the lifecycle of objects, such as web containers and application servers. Methods tagged with these annotations should be invoked immediately after an object has been constructed or immediately before it is being removed.
The @Resource annotation is intended for resource injection. For example, consider a web application that accesses a database. Of course, the database access information should not be hardwired into the web application. Instead, the web container has some user interface for setting connection parameters and a JNDI name for a data source. In the web application, you can reference the data source like this:
@Resource(name="jdbc/mydb")
private DataSource source;
When an object containing this field is constructed, the container “injects” a reference to the data source.
The @Target meta-annotation is applied to an annotation, restricting the items to which the annotation applies. For example,
@Target({ElementType.TYPE, ElementType.METHOD})
public @interface BugReport
Table 11-3 shows all possible values. They belong to the enumerated type ElementType. You can specify any number of element types, enclosed in braces.
Table 11-3. Element Types for the @Target Annotation
Element Type | Annotation Applies To |
|---|---|
| Annotation type declarations |
| Packages |
| Classes (including |
| Methods |
| Constructors |
| Fields (including |
| Method or constructor parameters |
| Local variables |
An annotation without an @Target restriction can be applied to any item. The compiler checks that you apply an annotation only to a permitted item. For example, if you apply @BugReport to a field, a compile-time error results.
The @Retention meta-annotation specifies how long an annotation is retained. You specify at most one of the values in Table 11-4. The default is RetentionPolicy.CLASS.
In Listing 11-9, the @ActionListenerFor annotation was declared with RetentionPolicy.RUNTIME because we used reflection to process annotations. In the following two sections, you will see examples of processing annotations at the source and class file levels.
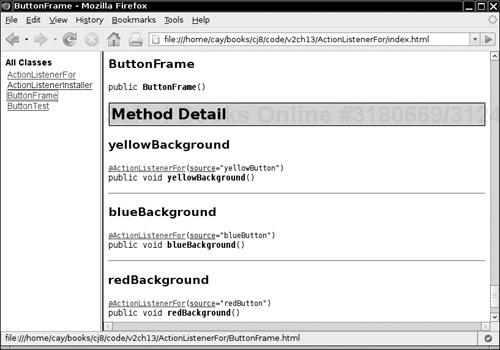
The @Documented meta-annotation gives a hint to documentation tools such as Javadoc. Documented annotations should be treated just like other modifiers such as protected or static for documentation purposes. The use of other annotations is not included in the documentation. For example, suppose we declare @ActionListenerFor as a documented annotation:
@Documented
@Target(ElementType.METHOD)
@Retention(RetentionPolicy.RUNTIME)
public @interface ActionListenerFor
Now the documentation of each annotated method contains the annotation, as shown in Figure 11-2.
If an annotation is transient (such as @BugReport), you should probably not document its use.
Note
It is legal to apply an annotation to itself. For example, the @Documented annotation is itself annotated as @Documented. Therefore, the Javadoc documentation for annotations shows whether they are documented.
The @Inherited meta-annotation applies only to annotations for classes. When a class has an inherited annotation, then all of its subclasses automatically have the same annotation. This makes it easy to create annotations that work in the same way as marker interfaces such as Serializable.
In fact, an annotation @Serializable would be more appropriate than the Serializable marker interfaces with no methods. A class is serializable because there is runtime support for reading and writing its fields, not because of any principles of object-oriented design. An annotation describes this fact better than does interface inheritance. Of course, the Serializable interface was created in JDK 1.1, long before annotations existed.
Suppose you define an inherited annotation @Persistent to indicate that objects of a class can be saved in a database. Then the subclasses of persistent classes are automatically annotated as persistent.
@Inherited @Persistent { }
@Persistent class Employee { . . . }
class Manager extends Employee { . . . } // also @Persistent
When the persistence mechanism searches for objects to store in the database, it will detect both Employee and Manager objects.
One use for annotation is the automatic generation of “side files” that contain additional information about programs. In the past, the Enterprise Edition of Java was notorious for making programmers fuss with lots of boilerplate code. Java EE 5 uses annotations to greatly simplify the programming model.
In this section, we demonstrate this technique with a simpler example. We write a program that automatically produces bean info classes. You tag bean properties with an annotation and then run a tool that parses the source file, analyzes the annotations, and writes out the source file of the bean info class.
Recall from Chapter 8 that a bean info class describes a bean more precisely than the automatic introspection process can. The bean info class lists all of the properties of the bean. Properties can have optional property editors. The ChartBeanBeanInfo class in Chapter 8 is a typical example.
To eliminate the drudgery of writing bean info classes, we supply an @Property annotation. You can tag either the property getter or setter, like this:
@Property String getTitle() { return title; }or
@Property(editor="TitlePositionEditor")
public void setTitlePosition(int p) { titlePosition = p; }
Listing 11-11 contains the definition of the @Property annotation. Note that the annotation has a retention policy of SOURCE. We analyze the annotation at the source level only. It is not included in class files and not available during reflection.
Note
It would have made sense to declare the editor element to have type Class. However, the annotation processor cannot retrieve annotations of type Class because the meaning of a class can depend on external factors (such as the class path or class loaders). Therefore, we use a string to specify the editor class name.
To automatically generate the bean info class of a class with name BeanClass, we carry out the following tasks:
Write a source file BeanClass
BeanInfo.java. Declare the BeanClassBeanInfoclass to extendSimpleBeanInfo, and override thegetPropertyDescriptorsmethod.For each annotated method, recover the property name by stripping off the
getorsetprefix and “decapitalizing” the remainder.For each property, write a statement for constructing a
PropertyDescriptor.If the property has an editor, write a method call to
setPropertyEditorClass.Write code for returning an array of all property descriptors.
For example, the annotation
@Property(editor="TitlePositionEditor")
public void setTitlePosition(int p) { titlePosition = p; }
in the ChartBean class is translated into
public class ChartBeanBeanInfo extends java.beans.SimpleBeanInfo
{
   public java.beans.PropertyDescriptor[] getProperties()
   {
      java.beans.PropertyDescriptor titlePositionDescriptor
         = new java.beans.PropertyDescriptor("titlePosition", ChartBean.class);
      titlePositionDescriptor.setPropertyEditorClass(TitlePositionEditor.class)
      . . .
      return new java.beans.PropertyDescriptor[]
      {
         titlePositionDescriptor,
         . . .
      }
   }
}
(The boilerplate code is printed in the lighter gray.)
All this is easy enough to do, provided we can locate all methods that have been tagged with the @Property annotation.
As of Java SE 6, you can add annotation processors to the Java compiler. (In Java SE 5, a stand-alone tool, called apt, was used for the same purpose.) To invoke annotation processing, run
javac -processor ProcessorClassName1,ProcessorClassName2,... sourceFiles
The compiler locates the annotations of the source files. It then selects the annotation processors that should be applied. Each annotation processor is executed in turn. If an annotation processor creates a new source file, then the process is repeated. If a processing round yields no further source files, then all source files are compiled. Figure 11-3 shows how the @Property annotations are processed.
We do not discuss the annotation processing API in detail, but the program in Listing 11-12 will give you a flavor of its capabilities.
An annotation processor implements the Processor interface, generally by extending the AbstractProcessor class. You need to specify which annotations your processor supports. Because the designers of the API love annotations, they use an annotation for this purpose:
@SupportedAnnotationTypes("com.horstmann.annotations.Property")
public class BeanInfoAnnotationProcessor extends AbstractProcessor
A processor can claim specific annotation types, wildcards such as "com.horstmann.*" (all annotations in the com.horstmann package or any subpackage), or even "*" (all annotations).
The BeanInfoAnnotationProcessor has a single public method, process, that is called for each file. The process method has two parameters, the set of annotations that is being processed in this round, and a RoundEnv reference that contains information about the current processing round.
In the process method, we iterate through all annotated methods. For each method, we get the property name by stripping off the get, set, or is prefix and changing the next letter to lower case. Here is the outline of the code:
public boolean process(Set<? extends TypeElement> annotations, RoundEnvironment roundEnv)
  {
     for (TypeElement t : annotations)
     {
        Map<String, Property> props = new LinkedHashMap<String, Property>();
        for (Element e : roundEnv.getElementsAnnotatedWith(t))
        {
           props.put(property name, e.getAnnotation(Property.class));
        }
     }
     write bean info source file
  }
  return true;
}
The process method should return true if it claims all the annotations presented to it; that is, if those annotations should not be passed on to other processors.
The code for writing the source file is straightforward, just a sequence of out.print statements. Note that we create the output writer as follows:
JavaFileObject sourceFile = processingEnv.getFiler().createSourceFile(beanClassName + "BeanInfo");
PrintWriter out = new PrintWriter(sourceFile.openWriter());
The AbstractProcessor class has a protected field processingEnv for accessing various processing services. The Filer interface is responsible for creating new files and tracking them so that they can be processed in subsequent processing rounds.
When an annotation processor detects an error, it uses the Messager to communicate with the user. For example, we issue an error message if a method has been annotated with @Property but its name doesn’t start with get, set, or is:
if (!found) processingEnv.getMessager().printMessage(Kind.ERROR,
   "@Property must be applied to getXxx, setXxx, or isXxx method", e);
In the companion code for this book, we supply you with an annotated file, ChartBean.java. Compile the annotation processor:
javac BeanInfoAnnotationProcessor.java
Then run
javac -processor BeanInfoAnnotationProcessor com/horstmann/corejava/ChartBean.java
and have a look at the automatically generated file ChartBeanBeanInfo.java.
To see the annotation processing in action, add the command-line option XprintRounds to the javac command. You will get this output:
Round 1:
        input files: {com.horstmann.corejava.ChartBean}
        annotations: [com.horstmann.annotations.Property]
        last round: false
Round 2:
        input files: {com.horstmann.corejava.ChartBeanBeanInfo}
        annotations: []
        last round: false
Round 3:
        input files: {}
        annotations: []
        last round: true
This example demonstrates how tools can harvest source file annotations to produce other files. The generated files don’t have to be source files. Annotation processors may choose to generate XML descriptors, property files, shell scripts, HTML documentation, and so on.
Note
Some people have suggested using annotations to remove an even bigger drudgery. Wouldn’t it be nice if trivial getters and setters were generated automatically? For example, the annotation
@Property private String title;
could produce the methods
public String getTitle() { return title; }
public void setTitle(String title) { this.title = title; }
However, those methods need to be added to the same class. This requires editing a source file, not just generating another file, and is beyond the capabilities of annotation processors. It would be possible to build another tool for this purpose, but such a tool would go beyond the mission of annotations. An annotation is intended as a description about a code item, not a directive for adding or changing code.
Example 11-12. BeanInfoAnnotationFactory.java
  1. import java.beans.*;
  2. import java.io.*;
  3. import java.util.*;
  4. import javax.annotation.processing.*;
  5. import javax.lang.model.*;
  6. import javax.lang.model.element.*;
  7. import javax.tools.*;
  8. import javax.tools.Diagnostic.*;
  9. import com.horstmann.annotations.*;
 10.
 11. /**
 12.  * This class is the processor that analyzes Property annotations.
 13.  * @version 1.10 2007-10-27
 14.  * @author Cay Horstmann
 15.  */
 16.
 17. @SupportedAnnotationTypes("com.horstmann.annotations.Property")
 18. @SupportedSourceVersion(SourceVersion.RELEASE_6)
 19. public class BeanInfoAnnotationProcessor extends AbstractProcessor
 20. {
 21.    @Override
 22.    public boolean process(Set<? extends TypeElement> annotations, RoundEnvironment roundEnv)
 23.    {
 24.       for (TypeElement t : annotations)
 25.       {
 26.          Map<String, Property> props = new LinkedHashMap<String, Property>();
 27.          String beanClassName = null;
 28.          for (Element e : roundEnv.getElementsAnnotatedWith(t))
 29.          {
 30.             String mname = e.getSimpleName().toString();
 31.             String[] prefixes = { "get", "set", "is" };
 32.             boolean found = false;
 33.             for (int i = 0; !found && i < prefixes.length; i++)
 34.                if (mname.startsWith(prefixes[i]))
 35.                {
 36.                   found = true;
 37.                   int start = prefixes[i].length();
 38.                   String name = Introspector.decapitalize(mname.substring(start));
 39.                   props.put(name, e.getAnnotation(Property.class));
 40.                }
 41.
 42.             if (!found) processingEnv.getMessager().printMessage(Kind.ERROR,
 43.                   "@Property must be applied to getXxx, setXxx, or isXxx method", e);
 44.             else if (beanClassName == null)
 45.                beanClassName = ((TypeElement) e.getEnclosingElement()).getQualifiedName()
 46.                      .toString();
 47.          }
 48.          try
 49.          {
 50.             if (beanClassName != null) writeBeanInfoFile(beanClassName, props);
 51.          }
 52.          catch (IOException e)
 53.          {
 54.             e.printStackTrace();
 55.          }
 56.       }
 57.       return true;
 58.    }
 59.
 60.    /**
 61.     * Writes the source file for the BeanInfo class.
 62.     * @param beanClassName the name of the bean class
 63.     * @param props a map of property names and their annotations
 64.     */
 65.    private void writeBeanInfoFile(String beanClassName, Map<String, Property> props)
 66.          throws IOException
 67.    {
 68.       JavaFileObject sourceFile = processingEnv.getFiler().createSourceFile(
 69.             beanClassName + "BeanInfo");
 70.       PrintWriter out = new PrintWriter(sourceFile.openWriter());
 71.       int i = beanClassName.lastIndexOf(".");
 72.       if (i > 0)
 73.       {
 74.          out.print("package ");
 75.          out.print(beanClassName.substring(0, i));
 76.          out.println(";");
 77.       }
 78.       out.print("public class ");
 79.       out.print(beanClassName.substring(i + 1));
 80.       out.println("BeanInfo extends java.beans.SimpleBeanInfo");
 81.       out.println("{");
 82.       out.println("   public java.beans.PropertyDescriptor[] getPropertyDescriptors()");
 83.       out.println("   {");
 84.       out.println("      try");
 85.       out.println("      {");
 86.       for (Map.Entry<String, Property> e : props.entrySet())
 87.       {
 88.          out.print("         java.beans.PropertyDescriptor ");
 89.          out.print(e.getKey());
 90.          out.println("Descriptor");
 91.          out.print("            = new java.beans.PropertyDescriptor("");
 92.          out.print(e.getKey());
 93.          out.print("", ");
 94.          out.print(beanClassName);
 95.          out.println(".class);");
 96.          String ed = e.getValue().editor().toString();
 97.          if (!ed.equals(""))
 98.          {
 99.             out.print("         ");
100.             out.print(e.getKey());
101.             out.print("Descriptor.setPropertyEditorClass(");
102.             out.print(ed);
103.             out.println(".class);");
104.          }
105.       }
106.       out.println("         return new java.beans.PropertyDescriptor[]");
107.       out.print("         {");
108.       boolean first = true;
109.       for (String p : props.keySet())
110.       {
111.          if (first) first = false;
112.          else out.print(",");
113.          out.println();
114.          out.print("            ");
115.          out.print(p);
116.          out.print("Descriptor");
117.       }
118.       out.println();
119.       out.println("         };");
120.       out.println("      }");
121.       out.println("      catch (java.beans.IntrospectionException e)");
122.       out.println("      {");
123.       out.println("         e.printStackTrace();");
124.       out.println("         return null;");
125.       out.println("      }");
126.       out.println("   }");
127.       out.println("}");
128.       out.close();
129.    }
130. }
You have seen how annotations can be processed at runtime or at the source code level. There is a third possibility: processing at the bytecode level. Unless annotations are removed at the source level, they are present in the class files. The class file format is documented (see http://java.sun.com/docs/books/vmspec). The format is rather complex, and it would be challenging to process class files without special libraries. One such library is the Bytecode Engineering Library (BCEL), available at http://jakarta.apache.org/bcel.
In this section, we use BCEL to add logging messages to annotated methods. If a method is annotated with
@LogEntry(logger=loggerName)then we add the bytecodes for the following statement at the beginning of the method:
Logger.getLogger(loggerName).entering(className, methodName);
For example, if you annotate the hashCode method of the Item class as
@LogEntry(logger="global") public int hashCode()
then a message similar to the following is printed whenever the method is called:
Aug 17, 2004 9:32:59 PM Item hashCode
FINER: ENTRY
To achieve this task, we do the following:
Load the bytecodes in the class file.
Locate all methods.
For each method, check whether it has a
LogEntryannotation.If it does, add the bytecodes for the following instructions at the beginning of the method:
ldc loggerName
invokestatic java/util/logging/Logger.getLogger:(Ljava/lang/String;)Ljava/util/logging/Logger;
ldc className
ldc methodName
invokevirtual java/util/logging/Logger.entering:(Ljava/lang/String;Ljava/lang/String;)V
Inserting these bytecodes sounds tricky, but BCEL makes it fairly straightforward. We don’t describe the process of analyzing and inserting bytecodes in detail. The important point is that the program in Listing 11-13 edits a class file and inserts a logging call at the beginning of the methods that are annotated with the LogEntry annotation.
Note
If you are interested in the details of bytecode engineering, we suggest that you read through the BCEL manual at http://jakarta.apache.org/bcel/manual.html.
You need version 5.3 or later of the BCEL library to compile and run the EntryLogger program. (As this chapter was written, version 5.3 was still a work in progress. If it isn’t finished when you read this, check out the trunk from the Subversion repository.)
For example, here is how you add the logging instructions to Item.java in Listing 11-14:
javac Item.java
javac -classpath .:bcel-version.jar EntryLogger.java
java -classpath .:bcel-version.jar EntryLogger Item
Try running
javap -c Item
before and after modifying the Item class file. You can see the inserted instructions at the beginning of the hashCode, equals, and compareTo methods.
public int hashCode();
  Code:
   0:   ldc     #85; //String global
   2:   invokestatic    #80; //Method java/util/logging/Logger.getLogger:(Ljava/lang/String;)Ljava/util/logging/Logger;
   5:   ldc     #86; //String Item
   7:   ldc     #88; //String hashCode
   9:   invokevirtual   #84; //Method java/util/logging/Logger.entering:(Ljava/lang/String;Ljava/lang/String;)V
   12:  bipush  13
   14:  aload_0
   15:  getfield        #2; //Field description:Ljava/lang/String;
   18:  invokevirtual   #15; //Method java/lang/String.hashCode:()I
   21:  imul
   22:  bipush  17
   24:  aload_0
   25:  getfield        #3; //Field partNumber:I
   28:  imul
   29:  iadd
   30:  ireturn
The SetTest program in Listing 11-15 inserts Item objects into a hash set. When you run it with the modified class file, you will see the logging messages.
Aug 18, 2004 10:57:59 AM Item hashCode
FINER: ENTRY
Aug 18, 2004 10:57:59 AM Item hashCode
FINER: ENTRY
Aug 18, 2004 10:57:59 AM Item hashCode
FINER: ENTRY
Aug 18, 2004 10:57:59 AM Item equals
FINER: ENTRY
[[descripion=Toaster, partNumber=1729], [descripion=Microwave, partNumber=4104]]
Note the call to equals when we insert the same item twice.
This example shows the power of bytecode engineering. Annotations are used to add directives to a program. A bytecode editing tool picks up the directives and modifies the virtual machine instructions.
Example 11-13. EntryLogger.java
  1. import java.io.*;
  2. import org.apache.bcel.*;
  3. import org.apache.bcel.classfile.*;
  4. import org.apache.bcel.generic.*;
  5.
  6. /**
  7.  * Adds "entering" logs to all methods of a class that have the LogEntry annotation.
  8.  * @version 1.10 2007-10-27
  9.  * @author Cay Horstmann
 10.  */
 11. public class EntryLogger
 12. {
 13.    /**
 14.     * Adds entry logging code to the given class
 15.     * @param args the name of the class file to patch
 16.     */
 17.    public static void main(String[] args)
 18.    {
 19.       try
 20.       {
 21.          if (args.length == 0) System.out.println("USAGE: java EntryLogger classname");
 22.          else
 23.          {
 24.             JavaClass jc = Repository.lookupClass(args[0]);
 25.             ClassGen cg = new ClassGen(jc);
 26.             EntryLogger el = new EntryLogger(cg);
 27.             el.convert();
 28.             File f = new File(Repository.lookupClassFile(cg.getClassName()).getPath());
 29.             cg.getJavaClass().dump(f.getPath());
 30.          }
 31.       }
 32.       catch (Exception e)
 33.       {
 34.          e.printStackTrace();
 35.       }
 36.    }
 37.
 38.    /**
 39.     * Constructs an EntryLogger that inserts logging into annotated methods of a given class
 40.     * @param cg the class
 41.     */
 42.    public EntryLogger(ClassGen cg)
 43.    {
 44.       this.cg = cg;
 45.       cpg = cg.getConstantPool();
 46.    }
 47.
 48.    /**
 49.     * converts the class by inserting the logging calls.
 50.     */
 51.    public void convert() throws IOException
 52.    {
 53.       for (Method m : cg.getMethods())
 54.       {
 55.          AnnotationEntry[] annotations = m.getAnnotationEntries();
 56.          for (AnnotationEntry a : annotations)
 57.          {
 58.             if (a.getAnnotationType().equals("LLogEntry;"))
 59.             {
 60.                for (ElementValuePair p : a.getElementValuePairs())
 61.                {
 62.                   if (p.getNameString().equals("logger"))
 63.                   {
 64.                      String loggerName = p.getValue().stringifyValue();
 65.                      cg.replaceMethod(m, insertLogEntry(m, loggerName));
 66.                   }
 67.                }
 68.             }
 69.          }
 70.       }
 71.    }
 72.
 73.    /**
 74.     * Adds an "entering" call to the beginning of a method.
 75.     * @param m the method
 76.     * @param loggerName the name of the logger to call
 77.     */
 78.    private Method insertLogEntry(Method m, String loggerName)
 79.    {
 80.       MethodGen mg = new MethodGen(m, cg.getClassName(), cpg);
 81.       String className = cg.getClassName();
 82.       String methodName = mg.getMethod().getName();
 83.       System.out.printf("Adding logging instructions to %s.%s%n", className, methodName);
 84.
 85.       int getLoggerIndex = cpg.addMethodref("java.util.logging.Logger", "getLogger",
 86.             "(Ljava/lang/String;)Ljava/util/logging/Logger;");
 87.       int enteringIndex = cpg.addMethodref("java.util.logging.Logger", "entering",
 88.             "(Ljava/lang/String;Ljava/lang/String;)V");
 89.
 90.       InstructionList il = mg.getInstructionList();
 91.       InstructionList patch = new InstructionList();
 92.       patch.append(new PUSH(cpg, loggerName));
 93.       patch.append(new INVOKESTATIC(getLoggerIndex));
 94.       patch.append(new PUSH(cpg, className));
 95.       patch.append(new PUSH(cpg, methodName));
 96.       patch.append(new INVOKEVIRTUAL(enteringIndex));
 97.       InstructionHandle[] ihs = il.getInstructionHandles();
 98.       il.insert(ihs[0], patch);
 99.
100.       mg.setMaxStack();
101.       return mg.getMethod();
102.     }
103.
104.     private ClassGen cg;
105.     private ConstantPoolGen cpg;
106. }
Example 11-14. Item.java
 1. /**
 2.  * An item with a description and a part number.
 3.  * @version 1.00 2004-08-17
 4.  * @author Cay Horstmann
 5.  */
 6. public class Item
 7. {
 8.    /**
 9.     * Constructs an item.
10.     * @param aDescription the item's description
11.     * @param aPartNumber the item's part number
12.     */
13.    public Item(String aDescription, int aPartNumber)
14.    {
15.       description = aDescription;
16.       partNumber = aPartNumber;
17.    }
18.
19.    /**
20.     * Gets the description of this item.
21.     * @return the description
22.     */
23.    public String getDescription()
24.    {
25.       return description;
26.    }
27.
28.    public String toString()
29.    {
30.       return "[description=" + description + ", partNumber=" + partNumber + "]";
31.    }
32.
33.    @LogEntry(logger = "global")
34.    public boolean equals(Object otherObject)
35.    {
36.       if (this == otherObject) return true;
37.       if (otherObject == null) return false;
38.       if (getClass() != otherObject.getClass()) return false;
39.       Item other = (Item) otherObject;
40.       return description.equals(other.description) && partNumber == other.partNumber;
41.    }
42.
43.    @LogEntry(logger = "global")
44.    public int hashCode()
45.    {
46.       return 13 * description.hashCode() + 17 * partNumber;
47.    }
48.
49.    private String description;
50.    private int partNumber;
51. }
Example 11-15. SetTest.java
 1. import java.util.*;
 2. import java.util.logging.*;
 3.
 4. /**
 5.  * @version 1.01 2007-10-27
 6.  * @author Cay Horstmann
 7.  */
 8. public class SetTest
 9. {
10.    public static void main(String[] args)
11.    {
12.       Logger.getLogger(Logger.GLOBAL_LOGGER_NAME).setLevel(Level.FINEST);
13.       Handler handler = new ConsoleHandler();
14.       handler.setLevel(Level.FINEST);
15.       Logger.getLogger(Logger.GLOBAL_LOGGER_NAME).addHandler(handler);
16.
17.       Set<Item> parts = new HashSet<Item>();
18.       parts.add(new Item("Toaster", 1279));
19.       parts.add(new Item("Microwave", 4104));
20.       parts.add(new Item("Toaster", 1279));
21.       System.out.println(parts);
22.    }
23. }
In the preceding section, you saw a tool that edits class files. However, it can be cumbersome to add yet another tool into the build process. An attractive alternative is to defer the bytecode engineering until load time, when the class loader loads the class.
Before Java SE 5.0, you had to write a custom classloader to achieve this task. Now, the instrumentation API has a hook for installing a bytecode transformer. The transformer must be installed before the main method of the program is called. You handle this requirement by defining an agent, a library that is loaded to monitor a program in some way. The agent code can carry out initializations in a premain method.
Here are the steps required to build an agent:
Implement a class with a method
public static void premain(String arg, Instrumentation instr)
This method is called when the agent is loaded. The agent can get a single command-line argument, which is passed in the
argparameter. Theinstrparameter can be used to install various hooks.Make a manifest file that sets the
Premain-Classattribute, for example:Premain-Class: EntryLoggingAgent
Package the agent code and the manifest into a JAR file, for example:
javac -classpath .:bcel-version.jar EntryLoggingAgent
jar cvfm EntryLoggingAgent.jar EntryLoggingAgent.mf Entry*.class
To launch a Java program together with the agent, use the following command-line options:
java -javaagent:AgentJARFile=agentArgument . . .
For example, to run the SetTest program with the entry logging agent, call
javac SetTest.java
java -javaagent:EntryLoggingAgent.jar=Item -classpath .:bcel-version.jar SetTest
The Item argument is the name of the class that the agent should modify.
Listing 11-16 shows the agent code. The agent installs a class file transformer. The transformer first checks whether the class name matches the agent argument. If so, it uses the EntryLogger class from the preceding section to modify the bytecodes. However, the modified bytecodes are not saved to a file. Instead, the transformer returns them for loading into the virtual machine (see Figure 11-4). In other words, this technique carries out “just in time” modification of the bytecodes.
Example 11-16. EntryLoggingAgent.java
 1. import java.lang.instrument.*;
 2. import java.io.*;
 3. import java.security.*;
 4. import org.apache.bcel.classfile.*;
 5. import org.apache.bcel.generic.*;
 6.
 7. /**
 8.  * @version 1.00 2004-08-17
 9.  * @author Cay Horstmann
10.  */
11. public class EntryLoggingAgent
12. {
13.    public static void premain(final String arg, Instrumentation instr)
14.    {
15.       instr.addTransformer(new ClassFileTransformer()
16.          {
17.             public byte[] transform(ClassLoader loader, String className, Class<?> cl,
18.                   ProtectionDomain pd, byte[] data)
19.             {
20.                if (!className.equals(arg)) return null;
21.                try
22.                {
23.                   ClassParser parser = new ClassParser(new ByteArrayInputStream(data),
24.                         className + ".java");
25.                   JavaClass jc = parser.parse();
26.                   ClassGen cg = new ClassGen(jc);
27.                   EntryLogger el = new EntryLogger(cg);
28.                   el.convert();
29.                   return cg.getJavaClass().getBytes();
30.                }
31.                catch (Exception e)
32.                {
33.                   e.printStackTrace();
34.                   return null;
35.                }
36.             }
37.          });
38.    }
39. }
In this chapter, you have learned how to
Add annotations to Java programs.
Design your own annotation interfaces.
Implement tools that make use of the annotations.
You have seen three technologies for processing code: scripting, compiling Java programs, and processing annotations. The first two were quite straightforward. On the other hand, building annotation tools is undeniably complex and not something that most developers will need to tackle. This chapter gave you the background knowledge for understanding the inner workings of the annotation tools that you will encounter, and perhaps piqued your interest in developing your own tools.
In the final chapter of this book, we tackle the API for native methods. That API allows you to mix Java and C/C++ code.