
In 1996, Sun released the first version of the JDBC API. This API lets programmers connect to a database and then query or update it, using the Structured Query Language (SQL). (SQL, usually pronounced “sequel,” is an industry standard for relational database access.) JDBC has since become one of the most commonly used APIs in the Java library.
JDBC has been updated several times. As part of the release of Java SE 1.2 in 1998, a second version of JDBC was issued. JDBC 3 is included with Java SE 1.4 and 5.0. As this book is published, JDBC 4, the version included with Java SE 6, is the most current version.
In this chapter, we explain the key ideas behind JDBC. We introduce you to (or refresh your memory of) SQL, the industry-standard Structured Query Language for relational databases. We then provide enough details and examples to let you start using JDBC for common programming situations. The chapter close with a brief introduction to hierarchical databases, the Lightweight Directory Access Protocol (LDAP), and the Java Naming and Directory Interface (JNDI).
Note
According to Sun, JDBC is a trademarked term and not an acronym for Java Database Connectivity. It was named to be reminiscent of ODBC, a standard database API pioneered by Microsoft and since incorporated into the SQL standard.
From the start, the developers of the Java technology at Sun were aware of the potential that Java showed for working with databases. In 1995, they began working on extending the standard Java library to deal with SQL access to databases. What they first hoped to do was to extend Java so that it could talk to any random database, using only “pure” Java. It didn’t take them long to realize that this is an impossible task: There are simply too many databases out there, using too many protocols. Moreover, although database vendors were all in favor of Sun providing a standard network protocol for database access, they were only in favor of it if Sun decided to use their network protocol.
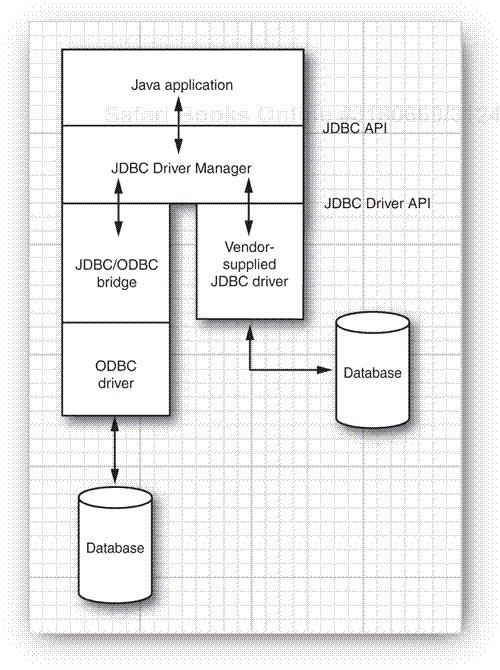
What all the database vendors and tool vendors did agree on was that it would be useful if Sun provided a pure Java API for SQL access along with a driver manager to allow third-party drivers to connect to specific databases. Database vendors could provide their own drivers to plug in to the driver manager. There would then be a simple mechanism for registering third-party drivers with the driver manager. As a result, two APIs were created. Application programmers use the JDBC API, and database vendors and tool providers use the JDBC Driver API.
This organization follows the very successful model of Microsoft’s ODBC, which provided a C programming language interface for database access. Both JDBC and ODBC are based on the same idea: Programs written according to the API talk to the driver manager, which, in turn, uses a driver to talk to the actual database.
All this means the JDBC API is all that most programmers will ever have to deal with—see Figure 4-1.
Note
A list of currently available JDBC drivers can be found at the web site http://developers.sun.com/product/jdbc/drivers.
The JDBC specification classifies drivers into the following types:
A type 1 driver translates JDBC to ODBC and relies on an ODBC driver to communicate with the database. Sun included one such driver, the JDBC/ODBC bridge, with earlier versions of the JDK. However, the bridge requires deployment and proper configuration of an ODBC driver. When JDBC was first released, the bridge was handy for testing, but it was never intended for production use. At this point, many better drivers are available, and we advise against using the JDBC/ODBC bridge.
A type 2 driver is written partly in Java and partly in native code; it communicates with the client API of a database. When you use such a driver, you must install some platform-specific code onto the client in addition to a Java library.
A type 3 driver is a pure Java client library that uses a database-independent protocol to communicate database requests to a server component, which then translates the requests into a database-specific protocol. This can simplify deployment because the platform-specific code is located only on the server.
A type 4 driver is a pure Java library that translates JDBC requests directly to a database-specific protocol.
Most database vendors supply either a type 3 or type 4 driver with their database. Furthermore, a number of third-party companies specialize in producing drivers with better standards conformance, support for more platforms, better performance, or, in some cases, simply better reliability than the drivers that are provided by the database vendors.
In summary, the ultimate goal of JDBC is to make possible the following:
Programmers can write applications in the Java programming language to access any database, using standard SQL statements—or even specialized extensions of SQL—while still following Java language conventions.
Database vendors and database tool vendors can supply the low-level drivers. Thus, they can optimize their drivers for their specific products.
Note
If you are curious as to why Sun just didn’t adopt the ODBC model, their response, as given at the JavaOne conference in May 1996, was this:
ODBC is hard to learn.
ODBC has a few commands with lots of complex options. The preferred style in the Java programming language is to have simple and intuitive methods, but to have lots of them.
ODBC relies on the use of
void*pointers and other C features that are not natural in the Java programming language.An ODBC-based solution is inherently less safe and harder to deploy than a pure Java solution.
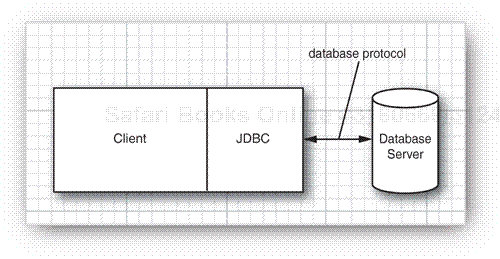
The traditional client/server model has a rich GUI on the client and a database on the server (see Figure 4-2). In this model, a JDBC driver is deployed on the client.
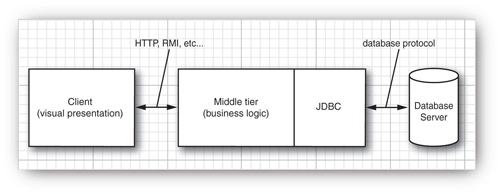
However, the world is moving away from client/server and toward a three-tier model or even more advanced n-tier models. In the three-tier model, the client does not make database calls. Instead, it calls on a middleware layer on the server that in turn makes the database queries. The three-tier model has a couple of advantages. It separates visual presentation (on the client) from the business logic (in the middle tier) and the raw data (in the database). Therefore, it becomes possible to access the same data and the same business rules from multiple clients, such as a Java application or applet or a web form.
Communication between the client and middle tier can occur through HTTP (when you use a web browser as the client) or another mechanism such as remote method invocation (RMI)—see Chapter 10. JDBC manages the communication between the middle tier and the back-end database. Figure 4-3 shows the basic architecture. There are, of course, many variations of this model. In particular, the Java Enterprise Edition defines a structure for application servers that manage code modules called Enterprise JavaBeans, and provides valuable services such as load balancing, request caching, security, and object-relational mapping. In that architecture, JDBC still plays an important role for issuing complex database queries. (For more information on the Enterprise Edition, see http://java.sun.com/javaee.)
Note
You can use JDBC in applets and Web Start applications, but you probably don’t want to. By default, the security manager permits a network connection only to the server from which the applet is downloaded. That means the web server and the database server (or the relay component of a type 3 driver) must be on the same machine, which is not a typical setup. You would need to use code signing to overcome this problem.
JDBC lets you communicate with databases using SQL, which is the command language for essentially all modern relational databases. Desktop databases usually have a GUI that lets users manipulate the data directly, but server-based databases are accessed purely through SQL.
The JDBC package can be thought of as nothing more than an API for communicating SQL statements to databases. We briefly introduce SQL in this section. If you have never seen SQL before, you might not find this material sufficient. If so, you should turn to one of the many books on the topic. We recommend Learning SQL by Alan Beaulieu (O’Reilly 2005) or the opinionated classic, A Guide to the SQL Standard by C. J. Date and Hugh Darwen (Addison-Wesley 1997).
You can think of a database as a bunch of named tables with rows and columns. Each column has a column name. Each row contains a set of related data.
As the example database for this book, we use a set of database tables that describe a collection of classic computer science books (see Table 4-1 through Table 4-4).
Figure 4-4 shows a view of the Books table. Figure 4-5 shows the result of joining this table with the Publishers table. The Books and the Publishers table each contain an identifier for the publisher. When we join both tables on the publisher code, we obtain a query result made up of values from the joined tables. Each row in the result contains the information about a book, together with the publisher name and web page URL. Note that the publisher names and URLs are duplicated across several rows because we have several rows with the same publisher.
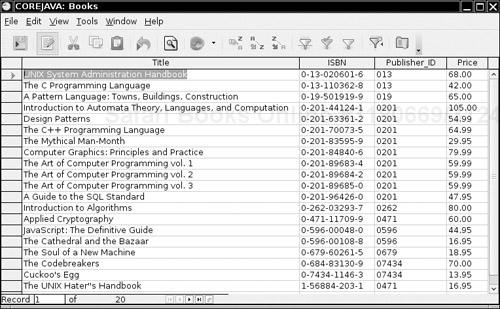
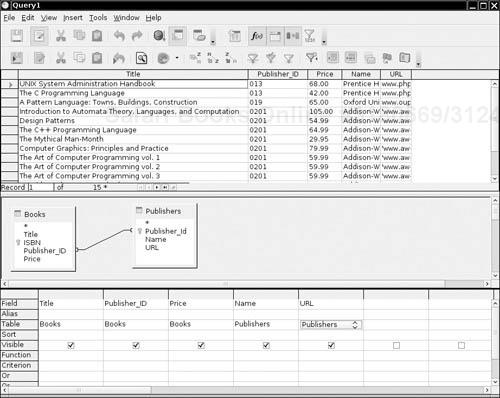
The benefit of joining tables is to avoid unnecessary duplication of data in the database tables. For example, a naive database design might have had columns for the publisher name and URL right in the Books table. But then the database itself, and not just the query result, would have many duplicates of these entries. If a publisher’s web address changed, all entries would need to be updated. Clearly, this is somewhat error prone. In the relational model, we distribute data into multiple tables such that no information is ever unnecessarily duplicated. For example, each publisher URL is contained only once in the publisher table. If the information needs to be combined, then the tables are joined.
In the figures, you can see a graphical tool to inspect and link the tables. Many vendors have tools to express queries in a simple form by connecting column names and filling information into forms. Such tools are often called query by example (QBE) tools. In contrast, a query that uses SQL is written out in text, with SQL syntax. For example,
SELECT Books.Title, Books.Publisher_Id, Books.Price, Publishers.Name, Publishers.URL
FROM Books, Publishers
WHERE Books.Publisher_Id = Publishers.Publisher_Id
In the remainder of this section, you will learn how to write such queries. If you are already familiar with SQL, just skip this section.
By convention, SQL keywords are written in capital letters, although this is not necessary.
The SELECT statement is quite flexible. You can simply select all rows in the Books table with the following query:
SELECT * FROM Books
The FROM clause is required in every SQL SELECT statement. The FROM clause tells the database which tables to examine to find the data.
You can choose the columns that you want.
SELECT ISBN, Price, Title
FROM Books
You can restrict the rows in the answer with the WHERE clause.
SELECT ISBN, Price, Title
FROM Books
WHERE Price <= 29.95
Be careful with the “equals” comparison. SQL uses = and <> rather than == or != as in the Java programming language, for equality testing.
Note
Some database vendors support the use of != for inequality testing. This is not standard SQL, so we recommend against such use.
The WHERE clause can also use pattern matching by means of the LIKE operator. The wildcard characters are not the usual * and ?, however. Use a % for zero or more characters and an underscore for a single character. For example,
SELECT ISBN, Price, Title
FROM Books
WHERE Title NOT LIKE '%n_x%'
excludes books with titles that contain words such as UNIX or Linux.
Note that strings are enclosed in single quotes, not double quotes. A single quote inside a string is denoted as a pair of single quotes. For example,
SELECT Title
FROM Books
WHERE Title LIKE '%''%'
reports all titles that contain a single quote.
You can select data from multiple tables.
SELECT * FROM Books, Publishers
Without a WHERE clause, this query is not very interesting. It lists all combinations of rows from both tables. In our case, where Books has 20 rows and Publishers has 8 rows, the result is a set of rows with 20 × 8 entries and lots of duplications. We really want to constrain the query to say that we are only interested in matching books with their publishers.
SELECT * FROM Books, Publishers
WHERE Books.Publisher_Id = Publishers.Publisher_Id
This query result has 20 rows, one for each book, because each book has one publisher in the Publisher table.
Whenever you have multiple tables in a query, the same column name can occur in two different places. That happened in our example. There is a column called Publisher_Id in both the Books and the Publishers table. When an ambiguity would otherwise result, you must prefix each column name with the name of the table to which it belongs, such as Books.Publisher_Id.
You can use SQL to change the data inside a database as well. For example, suppose you want to reduce by $5.00 the current price of all books that have “C++” in their title.
UPDATE Books
SET Price = Price - 5.00
WHERE Title LIKE '%C++%'
Similarly, to delete all C++ books, you use a DELETE query.
DELETE FROM Books
WHERE Title LIKE '%C++%'
Moreover, SQL comes with built-in functions for taking averages, finding maximums and minimums in a column, and much more. A good source for this information is http://sqlzoo.net. (That site also contains a nifty interactive SQL tutorial.)
Typically, to insert values into a table, you use the INSERT statement:
INSERT INTO Books
VALUES ('A Guide to the SQL Standard', '0-201-96426-0', '0201', 47.95)
You need a separate INSERT statement for every row being inserted in the table.
Of course, before you can query, modify, and insert data, you must have a place to store data. Use the CREATE TABLE statement to make a new table. You specify the name and data type for each column. For example,
CREATE TABLE Books
(
   Title CHAR(60),
   ISBN CHAR(13),
   Publisher_Id CHAR(6),
   Price DECIMAL(10,2)
)
Table 4-5 shows the most common SQL data types.
Table 4-5. Common SQL Data Types
Data Types | Description |
|---|---|
| Typically, a 32-bit integer |
| Typically, a 16-bit integer |
| Fixed-point decimal number with |
| A floating-point number with |
| Typically, a 32-bit floating-point number |
| Typically, a 64-bit floating-point number |
| Fixed-length string of length |
| Variable-length strings of maximum length |
| A Boolean value |
| Calendar date, implementation dependent |
| Time of day, implementation dependent |
| Date and time of day, implementation dependent |
| A binary large object |
| A character large object |
In this book, we do not discuss the additional clauses, such as keys and constraints, that you can use with the CREATE TABLE statement.
Of course, you need a database program for which a JDBC driver is available. There are many excellent choices, such as IBM DB2, Microsoft SQL Server, MySQL, Oracle, and PostgreSQL.
You must also create a database for your experimental use. We assume you name it COREJAVA. Create a new database, or have your database administrator create one with the appropriate permissions. You need to be able to create, update, and drop tables in the database.
If you have never installed a client/server database before, you might find that setting up the database is somewhat complex and that diagnosing the cause for failure can be difficult. It might be best to seek expert help if your setup is not working correctly.
If this is your first experience with databases, we recommend that you use the Apache Derby database that is a part of some versions of JDK 6. (If you use a JDK that doesn’t include it, download Apache Derby from http://db.apache.org/derby.)
Note
Sun refers to the version of Apache Derby that is included in the JDK as JavaDB. To avoid confusion, we call it Derby in this chapter.
You need to gather a number of items before you can write your first database program. The following sections cover these items.
When connecting to a database, you must use various database-specific parameters such as host names, port numbers, and database names.
JDBC uses a syntax similar to that of ordinary URLs to describe data sources. Here are examples of the syntax:
jdbc:derby://localhost:1527/COREJAVA;create=true
jdbc:postgresql:COREJAVA
These JDBC URLs specify a Derby database and a PostgreSQL database named COREJAVA.
jdbc:subprotocol:other stuff
where a subprotocol selects the specific driver for connecting to the database.
The format for the other stuff parameter depends on the subprotocol used. You will need to look up your vendor’s documentation for the specific format.
You need to obtain the JAR file in which the driver for your database is located. If you use Derby, you need the file derbyclient.jar. With another database, you need to locate the appropriate driver. For example, the PostgreSQL drivers are available at http://jdbc.postgresql.org.
Include the driver JAR file on the class path when running a program that accesses the database. (You don’t need the JAR file for compiling.)
When you launch programs from the command line, simply use the command
java -classpath .:driverJar ProgramNameOn Windows, use a semicolon to separate the current directory (denoted by the . character) from the driver JAR location.
The database server needs to be started before you can connect to it. The details depend on your database.
With the Derby database, follow these steps:
Open a command shell and change to a directory that will hold the database files.
Locate the file
derbyrun.jar. With some versions of the JDK, it is contained in the jdk/db/libdirectory, with others in a separate JavaDB installation directory. We denote the directory containinglib/derbyrun.jarwith derby.Run the command
java -jar derby/lib/derbyrun.jar server startDouble-check that the database is working correctly. Create a file
ij.propertiesthat contains these lines:ij.driver=org.apache.derby.jdbc.ClientDriver ij.protocol=jdbc:derby://localhost:1527/ ij.database=COREJAVA;create=true
From another command shell, run Derby’s interactive scripting tool (called
ij) by executingjava -jar derby/lib/derbyrun.jar ij -p ij.propertiesNow you can issue SQL commands such as
CREATE TABLE Greetings (Message CHAR(20));
INSERT INTO Greetings VALUES ('Hello, World!'),
SELECT * FROM Greetings;
DROP TABLE Greetings;
Note that each command must be terminated by a semicolon. To exit, type
EXIT;
When you are done using the database, stop the server with the command
java -jar derby/lib/derbyrun.jar server shutdown
If you use another database, you need to consult the documentation to find out how to start and stop your database server, and how to connect to it and issue SQL commands.
Some JDBC JAR files (such as the Derby driver that is included with Java SE 6) automatically register the driver class. In that case, you can skip the manual registration step that we describe in this section. A JAR file can automatically register the driver class if it contains a file META-INF/services/java.sql.Driver. You can simply unzip your driver JAR file to check.
Note
This registration mechanism uses a little-known part of the JAR specification; see http://java.sun.com/javase/6/docs/technotes/guides/jar/jar.html#Service%20Provider. Automatic registration is a requirement for a JDBC4-compliant driver.
If your driver JAR doesn’t support automatic registration, you need to find out the name of the JDBC driver classes used by your vendor. Typical driver names are
org.apache.derby.jdbc.ClientDriver
org.postgresql.Driver
There are two ways to register the driver with the DriverManager. One way is to load the driver class in your Java program. For example,
Class.forName("org.postgresql.Driver"); // force loading of driver classThis statement causes the driver class to be loaded, thereby executing a static initializer that registers the driver.
Alternatively, you can set the jdbc.drivers property. You can specify the property with a command-line argument, such as
java -Djdbc.drivers=org.postgresql.Driver ProgramNameOr your application can set the system property with a call such as
System.setProperty("jdbc.drivers", "org.postgresql.Driver");You can also supply multiple drivers; separate them with colons, such as
org.postgresql.Driver:org.apache.derby.jdbc.ClientDriver
In your Java program, you open a database connection with code that is similar to the following example:
String url = "jdbc:postgresql:COREJAVA";
String username = "dbuser";
String password = "secret";
Connection conn = DriverManager.getConnection(url, username, password);
The driver manager iterates through the registered drivers to find a driver that can use the subprotocol specified in the database URL.
The getConnection method returns a Connection object. In the following sections, you will see how to use the Connection object to execute SQL statements.
To connect to the database, you will need to know your database user name and password.
Note
By default, Derby lets you connect with any user name, and it does not check passwords. A separate schema is generated for each user. The default user name is app.
The test program in Listing 4-1 puts these steps to work. It loads connection parameters from a file named database.properties and connects to the database. The database.properties file supplied with the sample code contains connection information for the Derby database. If you use a different database, you need to put your database-specific connection information into that file. Here is an example for connecting to a PostgreSQL database:
jdbc.drivers=org.postgresql.Driver
jdbc.url=jdbc:postgresql:COREJAVA
jdbc.username=dbuser
jdbc.password=secret
After connecting to the database, the test program executes the following SQL statements:
CREATE TABLE Greetings (Message CHAR(20))
INSERT INTO Greetings VALUES ('Hello, World!')
SELECT * FROM Greetings
The result of the SELECT statement is printed, and you should see an output of
Hello, World!
Then the table is removed by executing the statement
DROP TABLE Greetings
To run this test, start your database and launch the program as
java -classpath .:driverJAR TestDBTip
One way to debug JDBC-related problems is to enable JDBC tracing. Call the DriverManager.setLogWriter method to send trace messages to a PrintWriter. The trace output contains a detailed listing of the JDBC activity. Most JDBC driver implementations provide additional mechanisms for tracing. For example, with Derby, add a traceFile option to the JDBC URL, such as jdbc:derby://localhost:1527/COREJAVA;create=true;traceFile=trace.out.
Example 4-1. TestDB.java
 1. import java.sql.*;
 2. import java.io.*;
 3. import java.util.*;
 4.
 5. /**
 6.  * This program tests that the database and the JDBC driver are correctly configured.
 7.  * @version 1.01 2004-09-24
 8.  * @author Cay Horstmann
 9.  */
10. class TestDB
11. {
12.   public static void main(String args[])
13.   {
14.      try
15.      {
16.         runTest();
17.      }
18.      catch (SQLException ex)
19.      {
20.         for (Throwable t : ex)
21.            t.printStackTrace();
22.      }
23.      catch (IOException ex)
24.      {
25.         ex.printStackTrace();
26.      }
27.   }
28.
29.   /**
30.    * Runs a test by creating a table, adding a value, showing the table contents, and
31.    * removing the table.
32.    */
33.   public static void runTest() throws SQLException, IOException
34.   {
35.      Connection conn = getConnection();
36.      try
37.      {
38.         Statement stat = conn.createStatement();
39.
40.         stat.executeUpdate("CREATE TABLE Greetings (Message CHAR(20))");
41.         stat.executeUpdate("INSERT INTO Greetings VALUES ('Hello, World!')");
42.
43.         ResultSet result = stat.executeQuery("SELECT * FROM Greetings");
44.         if (result.next())
45.            System.out.println(result.getString(1));
46.         result.close();
47.         stat.executeUpdate("DROP TABLE Greetings");
48.      }
49.      finally
50.      {
51.         conn.close();
52.      }
53.   }
54.
55.   /**
56.    * Gets a connection from the properties specified in the file database.properties
57.    * @return the database connection
58.    */
59.   public static Connection getConnection() throws SQLException, IOException
60.   {
61.      Properties props = new Properties();
62.      FileInputStream in = new FileInputStream("database.properties");
63.      props.load(in);
64.      in.close();
65.
66.      String drivers = props.getProperty("jdbc.drivers");
67.      if (drivers != null) System.setProperty("jdbc.drivers", drivers);
68.      String url = props.getProperty("jdbc.url");
69.      String username = props.getProperty("jdbc.username");
70.      String password = props.getProperty("jdbc.password");
71.
72.      return DriverManager.getConnection(url, username, password);
73.   }
74. }
To execute a SQL statement, you first create a Statement object. To create statement objects, use the Connection object that you obtained from the call to DriverManager.getConnection.
Statement stat = conn.createStatement();
Next, place the statement that you want to execute into a string, for example,
String command = "UPDATE Books"
   + " SET Price = Price - 5.00"
   + " WHERE Title NOT LIKE '%Introduction%'";
Then call the executeUpdate method of the Statement class:
stat.executeUpdate(command);
The executeUpdate method returns a count of the rows that were affected by the SQL statement, or zero for statements that do not return a row count. For example, the call to executeUpdate in the preceding example returns the number of rows whose price was lowered by $5.00.
The executeUpdate method can execute actions such as INSERT, UPDATE, and DELETE as well as data definition statements such as CREATE TABLE and DROP TABLE. However, you need to use the executeQuery method to execute SELECT queries. There is also a catch-all execute statement to execute arbitrary SQL statements. It’s commonly used only for queries that a user supplies interactively.
When you execute a query, you are interested in the result. The executeQuery object returns an object of type ResultSet that you use to walk through the result one row at a time.
ResultSet rs = stat.executeQuery("SELECT * FROM Books")The basic loop for analyzing a result set looks like this:
while (rs.next())
{
   look at a row of the result set
}
Caution
The iteration protocol of the ResultSet class is subtly different from the protocol of the java.util.Iterator interface. Here, the iterator is initialized to a position before the first row. You must call the next method once to move the iterator to the first row. Also, there is no hasNext method. You keep calling next until it returns false.
The order of the rows in a result set is completely arbitrary. Unless you specifically ordered the result with an ORDER BY clause, you should not attach any significance to the row order.
When inspecting an individual row, you will want to know the contents of the fields. A large number of accessor methods give you this information.
String isbn = rs.getString(1);
double price = rs.getDouble("Price");
There are accessors for various types, such as getString and getDouble. Each accessor has two forms, one that takes a numeric argument and one that takes a string argument. When you supply a numeric argument, you refer to the column with that number. For example, rs.getString(1) returns the value of the first column in the current row.
When you supply a string argument, you refer to the column in the result set with that name. For example, rs.getDouble("Price") returns the value of the column with name Price. Using the numeric argument is a bit more efficient, but the string arguments make the code easier to read and maintain.
Each get method makes reasonable type conversions when the type of the method doesn’t match the type of the column. For example, the call rs.getString("Price") converts the floating-point value of the Price column to a string.
java.sql.Connection 1.1
Statement createStatement()creates a
Statementobject that can be used to execute SQL queries and updates without parameters.void close()immediately closes the current connection and the JDBC resources that it created.
java.sql.Statement 1.1
ResultSet executeQuery(String sqlQuery)executes the SQL statement given in the string and returns a
ResultSetobject to view the query result.int executeUpdate(String sqlStatement)executes the SQL
INSERT,UPDATE, orDELETEstatement specified by the string. Also executes Data Definition Language (DDL) statements such asCREATE TABLE. Returns the number of rows affected, or −1 for a statement without an update count.boolean execute(String sqlStatement)executes the SQL statement specified by the string. Multiple result sets and update counts may be produced. Returns
trueif the first result is a result set,falseotherwise. CallgetResultSetorgetUpdateCountto retrieve the first result. See the section “Multiple Results” on page 253 for details on processing multiple results.ResultSet getResultSet()returns the result set of the preceding query statement, or
nullif the preceding statement did not have a result set. Call this method only once per executed statement.int getUpdateCount()returns the number of rows affected by the preceding update statement, or −1 if the preceding statement was a statement without an update count. Call this method only once per executed statement.
void close()closes this statement object and its associated result set.
boolean isClosed()6returns
trueif this statement is closed.
java.sql.ResultSet 1.1
boolean next()makes the current row in the result set move forward by one. Returns
falseafter the last row. Note that you must call this method to advance to the first row.Xxx
getXxx(int columnNumber)Xxx
getXxx(String columnLabel)(Xxx is a type such as
int,double,String,Date, etc.)returns the value of the column with the given column number or label, converted to the specified type. The column label is the label specified in the SQL
ASclause or the column name ifASis not used.int findColumn(String columnName)gives the column index associated with a column name.
void close()immediately closes the current result set.
boolean isClosed()6returns
trueif this statement is closed.
Every Connection object can create one or more Statement objects. You can use the same Statement object for multiple, unrelated commands and queries. However, a statement has at most one open result set. If you issue multiple queries whose results you analyze concurrently, then you need multiple Statement objects.
Be forewarned, though, that at least one commonly used database (Microsoft SQL Server) has a JDBC driver that allows only one active statement at a time. Use the getMaxStatements method of the DatabaseMetaData class to find out the number of concurrently open statements that your JDBC driver supports.
This sounds restrictive, but in practice, you should probably not fuss with multiple concurrent result sets. If the result sets are related, then you should be able to issue a combined query and analyze a single result. It is much more efficient to let the database combine queries than it is for a Java program to iterate through multiple result sets.
When you are done using a ResultSet, Statement, or Connection, you should call the close method immediately. These objects use large data structures, and you don’t want to wait for the garbage collector to deal with them.
The close method of a Statement object automatically closes the associated result set if the statement has an open result set. Similarly, the close method of the Connection class closes all statements of the connection.
If your connections are short-lived, you don’t have to worry about closing statements and result sets. Just make absolutely sure that a connection object cannot possibly remain open by placing the close statement in a finally block:
try
{
   Connection conn = . . .;
   try
   {
      Statement stat = conn.createStatement();
      ResultSet result = stat.executeQuery(queryString);
      process query result
   }
   finally
   {
      conn.close();
   }
}
catch (SQLException ex)
{
   handle exception
}Each SQLException has a chain of SQLException objects that is retrieved with the getNextException method. This exception chain is in addition to the “cause” chain of Throwable objects that every exception has. (See Volume I, Chapter 11 for details about Java exceptions.) One would need two nested loops to fully enumerate all these exceptions. Fortunately, Java SE 6 enhanced the SQLException class to implement the Iterable<Throwable> interface. The iterator() method yields an Iterator<Throwable> that iterates through both chains, first moving through the cause chain of the first SQLException, then moving on to the next SQLException, and so on. You can simply use an enhanced for loop:
for (Throwable t : sqlException)
{
   do something with t
}
You can call getSQLState and getErrorCode on an SQLException to analyze it further. The first method yields a string that is standardized by either X/Open or SQL:2003. (Call the DatabaseMetaData method getSQLStateType to find out which standard is used by your driver.) The error code is vendor specific.
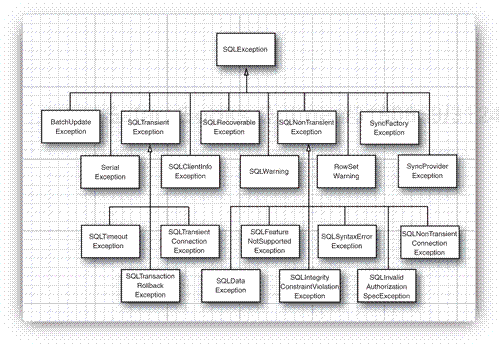
As of Java SE 6, the SQL exceptions have been organized into an inheritance tree (shown in Figure 4-6). This allows you to catch specific error types in a vendor-independent way.
In addition, the database driver can report nonfatal conditions as warnings. You can retrieve warnings from connections, statements, and result sets. The SQLWarning class is a subclass of SQLException (even though a SQLWarning is not thrown as an exception). You call getSQLState and getErrorCode to get further information about the warnings. Similar to SQL exceptions, warnings are chained. To retrieve all warnings, use this loop:
SQLWarning w = stat.getWarning();
while (w != null)
{
   do something with w
   w = w.nextWarning();
}
The DataTruncation subclass of SQLWarning is used when data are read from the database and unexpectedly truncated. If data truncation happens in an update statement, a DataTruncation is thrown as an exception.
java.sql.SQLException 1.1
SQLException getNextException()gets the next SQL exception chained to this one, or
nullat the end of the chain.Iterator<Throwable> iterator()6gets an iterator that yields the chained SQL exceptions and their causes.
String getSQLState()gets the “SQL state,” a standardized error code.
int getErrorCode()gets the vendor-specific error code.
java.sql.Warning 1.1
SQLWarning getNextWarning()returns the next warning chained to this one, or
nullat the end of the chain.
java.sql.Connection 1.1 java.sql.Statement 1.1 java.sql.ResultSet 1.1
QLWarning getWarnings()SQLWarning getWarnings()returns the first of the pending warnings, or
nullif no warnings are pending.
java.sql.DataTruncation 1.1
boolean getParameter()returns
trueif the data truncation applies to a parameter,falseif it applies to a column.int getIndex()returns the index of the truncated parameter or column.
returns the number of bytes that should have been transferred, or −1 if the value is unknown.
int getTransferSize()returns the number of bytes that were actually transferred, or −1 if the value is unknown.
We now want to write our first real JDBC program. Of course, it would be nice if we could execute some of the fancy queries that we discussed earlier. Unfortunately, we have a problem: Right now, there are no data in the database. We need to populate the database, and there is a simple way of doing that: with a set of SQL instructions to create tables and insert data into them. Most database programs can process a set of SQL instructions from a text file, but there are pesky differences about statement terminators and other syntactical issues.
For that reason, we used JDBC to create a simple program that reads a file with SQL instructions, one instruction per line, and executes them.
Specifically, the program reads data from a text file in a format such as
CREATE TABLE Publisher (Publisher_Id CHAR(6), Name CHAR(30), URL CHAR(80));
INSERT INTO Publishers VALUES ('0201', 'Addison-Wesley', 'www.aw-bc.com'),
INSERT INTO Publishers VALUES ('0471', 'John Wiley & Sons', 'www.wiley.com'),
. . .
Listing 4-2 contains the code for the program that reads the SQL statement file and executes the statements. It is not important that you read through the code; we merely provde the program so that you can populate your database and run the examples in the remainder of this chapter.
Make sure that your database server is running, and run the program as follows:
java -classpath .:driverPath ExecSQL Books.sql
java -classpath .:driverPath ExecSQL Authors.sql
java -classpath .:driverPath ExecSQL Publishers.sql
java -classpath .:driverPath ExecSQL BooksAuthors.sql
Before running the program, check that the file database.properties is set up properly for your environment—see “Connecting to the Database” on page 229.
Note
Your database may also have a utility to read the SQL files directly. For example, with Derby, you can run
java -jar derby/lib/derbyrun.jar ij -p ij.properties Books.sql(The ij.properties file is described in the section “Starting the Database” on page 228.)
Alternatively, if you are familiar with Ant, you can use the Ant sql task.
In the data format for the ExecSQL command, we allow an optional semicolon at the end of each line because most database utilities, as well as Ant, expect this format.
The following steps briefly describe the ExecSQL program:
Connect to the database. The
getConnectionmethod reads the properties in the filedatabase.propertiesand adds thejdbc.driversproperty to the system properties. The driver manager uses thejdbc.driversproperty to load the appropriate database driver. ThegetConnectionmethod uses thejdbc.url, jdbc.username, andjdbc.passwordproperties to open the database connection.Open the file with the SQL statements. If no file name was supplied, then prompt the user to enter the statements on the console.
Execute each statement with the generic
executemethod. If it returnstrue, the statement had a result set. The four SQL files that we provide for the book database all end in aSELECT *statement so that you can see that the data were successfully inserted.If there was a result set, print out the result. Because this is a generic result set, we need to use metadata to find out how many columns the result has. For more information, see the section “Metadata” on page 263.
If there is any SQL exception, print the exception and any chained exceptions that may be contained in it.
Close the connection to the database.
Listing 4-2 shows the code for the program.
Example 4-2. ExecSQL.java
  1. import java.io.*;
  2. import java.util.*;
  3. import java.sql.*;
  4.
  5. /**
  6.  * Executes all SQL statements in a file. Call this program as <br>
  7.  * java -classpath driverPath:. ExecSQL commandFile
  8.  * @version 1.30 2004-08-05
  9.  * @author Cay Horstmann
 10.  */
 11. class ExecSQL
 12. {
 13.    public static void main(String args[])
 14.    {
 15.       try
 16.       {
 17.          Scanner in;
 18.          if (args.length == 0) in = new Scanner(System.in);
 19.          else in = new Scanner(new File(args[0]));
 20.
 21.          Connection conn = getConnection();
 22.          try
 23.          {
 24.             Statement stat = conn.createStatement();
 25.
 26.             while (true)
 27.             {
 28.                if (args.length == 0) System.out.println("Enter command or EXIT to exit:");
 29.
 30.                if (!in.hasNextLine()) return;
 31.
 32.                String line = in.nextLine();
 33.                if (line.equalsIgnoreCase("EXIT")) return;
 34.                if (line.trim().endsWith(";")) // remove trailing semicolon
 35.                {
 36.                   line = line.trim();
 37.                   line = line.substring(0, line.length() - 1);
 38.                }
 39.                try
 40.                {
 41.                   boolean hasResultSet = stat.execute(line);
 42.                   if (hasResultSet) showResultSet(stat);
 43.                }
 44.                catch (SQLException ex)
 45.                {
 46.                   for (Throwable e : ex)
 47.                      e.printStackTrace();
 48.                }
 49.             }
 50.          }
 51.          finally
 52.          {
 53.             conn.close();
 54.          }
 55.       }
 56.       catch (SQLException e)
 57.       {
 58.          for (Throwable t : e)
 59.             t.printStackTrace();
 60.       }
 61.       catch (IOException e)
 62.       {
 63.          e.printStackTrace();
 64.       }
 65.    }
 66.
 67.    /**
 68.     * Gets a connection from the properties specified in the file database.properties
 69.     * @return the database connection
 70.     */
 71.    public static Connection getConnection() throws SQLException, IOException
 72.    {
 73.       Properties props = new Properties();
 74.       FileInputStream in = new FileInputStream("database.properties");
 75.       props.load(in);
 76.       in.close();
 77.
 78.       String drivers = props.getProperty("jdbc.drivers");
 79.       if (drivers != null) System.setProperty("jdbc.drivers", drivers);
 80.
 81.       String url = props.getProperty("jdbc.url");
 82.       String username = props.getProperty("jdbc.username");
 83.       String password = props.getProperty("jdbc.password");
 84.
 85.       return DriverManager.getConnection(url, username, password);
 86.    }
 87.
 88.    /**
 89.     * Prints a result set.
 90.     * @param stat the statement whose result set should be printed
 91.     */
 92.    public static void showResultSet(Statement stat) throws SQLException
 93.    {
 94.       ResultSet result = stat.getResultSet();
 95.       ResultSetMetaData metaData = result.getMetaData();
 96.       int columnCount = metaData.getColumnCount();
 97.
 98.       for (int i = 1; i <= columnCount; i++)
 99.       {
100.          if (i > 1) System.out.print(", ");
101.          System.out.print(metaData.getColumnLabel(i));
102.       }
103.       System.out.println();
104.
105.       while (result.next())
106.       {
107.          for (int i = 1; i <= columnCount; i++)
108.          {
109.             if (i > 1) System.out.print(", ");
110.             System.out.print(result.getString(i));
111.          }
112.          System.out.println();
113.       }
114.       result.close();
115.    }
116. }
In this section, we write a program that executes queries against the COREJAVA database. For this program to work, you must have populated the COREJAVA database with tables, as described in the preceding section. Figure 4-7 shows the QueryDB application in action.
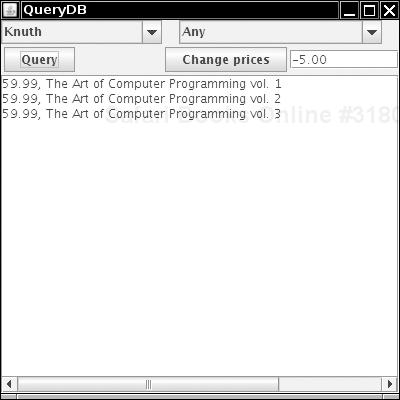
You can select the author and the publisher or leave either of them as “Any.” Click the Query button; all books matching your selection will be displayed in the text area.
You can also change the data in the database. Select a publisher and type an amount into the text box next to the Change prices button. When you click the button, all prices of that publisher are adjusted by the amount you entered, and the text area contains a message indicating how many rows were changed. However, to minimize unintended changes to the database, you can’t change all prices at once. The author field is ignored when you change prices. After a price change, you might want to run a query to verify the new prices.
In this program, we use one new feature, prepared statements. Consider the query for all books by a particular publisher, independent of the author. The SQL query is
SELECT Books.Price, Books.Title
FROM Books, Publishers
WHERE Books.Publisher_Id = Publishers.Publisher_Id
AND Publishers.Name = the name from the list box
Rather than build a separate query statement every time the user launches such a query, we can prepare a query with a host variable and use it many times, each time filling in a different string for the variable. That technique benefits performance. Whenever the database executes a query, it first computes a strategy of how to efficiently execute the query. By preparing the query and reusing it, you ensure that the planning step is done only once.
Each host variable in a prepared query is indicated with a ?. If there is more than one variable, then you must keep track of the positions of the ? when setting the values. For example, our prepared query becomes
String publisherQuery =
   "SELECT Books.Price, Books.Title" +
   " FROM Books, Publishers" +
   " WHERE Books.Publisher_Id = Publishers.Publisher_Id AND Publishers.Name = ?";
PreparedStatement publisherQueryStat = conn.prepareStatement(publisherQuery);
Before executing the prepared statement, you must bind the host variables to actual values with a set method. As with the ResultSet get methods, there are different set methods for the various types. Here, we want to set a string to a publisher name.
publisherQueryStat.setString(1, publisher);
The first argument is the position number of the host variable that we want to set. The position 1 denotes the first ?. The second argument is the value that we want to assign to the host variable.
If you reuse a prepared query that you have already executed, all host variables stay bound unless you change them with a set method or call the clearParameters method. That means you only need to call a setXxx method on those host variables that change from one query to the next.
Once all variables have been bound to values, you can execute the query
ResultSet rs = publisherQueryStat.executeQuery();
Tip
Building a query manually, by concatenating strings, is tedious and potentially dangerous. You have to worry about special characters such as quotes and, if your query involves user input, you have to guard against injection attacks. Therefore, you should use prepared statements whenever your query involves variables.
The price update feature is implemented as an UPDATE statement. Note that we call executeUpdate, not executeQuery, because the UPDATE statement does not return a result set. The return value of executeUpdate is the count of changed rows. We display the count in the text area.
int r = priceUpdateStmt.executeUpdate();
result.setText(r + " rows updated");
Note
A PreparedStatement object becomes invalid after the associated Connection object is closed. However, many database drivers automatically cache prepared statements. If the same query is prepared twice, the database simply reuses the query strategy. Therefore, don’t worry about the overhead of calling prepareStatement.
The following list briefly describes the structure of the example program.
The author and publisher text boxes are populated by running two queries that return all author and publisher names in the database.
The listener for the Query button checks which query type is requested. If this is the first time this query type is executed, then the prepared statement variable is
null, and the prepared statement is constructed. Then, the values are bound to the query and the query is executed.The queries involving authors are complex. Because a book can have multiple authors, the
BooksAuthorstable gives the correspondence between authors and books. For example, the book with ISBN 0-201-96426-0 has two authors with codesDATEandDARW. TheBooksAuthorstable has the rows0-201-96426-0, DATE, 1 0-201-96426-0, DARW, 2
to indicate this fact. The third column lists the order of the authors. (We can’t just use the position of the rows in the table. There is no fixed row ordering in a relational table.) Thus, the query has to join the
Books,BooksAuthors, andAuthorstables to compare the author name with the one selected by the user.SELECT Books.Price, Books.Title FROM Books, BooksAuthors, Authors, Publishers WHERE Authors.Author_Id = BooksAuthors.Author_Id AND BooksAuthors.ISBN = Books.ISBN AND Books.Publisher_Id = Publishers.Publisher_Id AND Authors.Name = ? AND Publishers.Name = ?
Tip
Some Java programmers avoid complex SQL statements such as this one. A surprisingly common, but very inefficient, workaround is to write lots of Java code that iterates through multiple result sets. But the database is a lot better at executing query code than a Java program can be—that’s the core competency of a database. A rule of thumb: If you can do it in SQL, don’t do it in Java.
The listener of the Change prices button executes an
UPDATEstatement. Note that theWHEREclause of theUPDATEstatement needs the publisher code and we know only the publisher name. This problem is solved with a nested subquery.UPDATE Books SET Price = Price + ? WHERE Books.Publisher_Id = (SELECT Publisher_Id FROM Publishers WHERE Name = ?)We initialize the connection and statement objects in the constructor. We hang on to them for the life of the program. Just before the program exits, we trap the “window closing” event, and these objects are closed.
Listing 4-3 is the complete program code.
Example 4-3. QueryDB.java
  1. import java.sql.*;
  2. import java.awt.*;
  3. import java.awt.event.*;
  4. import java.io.*;
  5. import java.util.*;
  6. import javax.swing.*;
  7.
  8. /**
  9.  * This program demonstrates several complex database queries.
 10.  * @version 1.23 2007-06-28
 11.  * @author Cay Horstmann
 12.  */
 13. public class QueryDB
 14. {
 15.    public static void main(String[] args)
 16.    {
 17.       EventQueue.invokeLater(new Runnable()
 18.          {
 19.             public void run()
 20.             {
 21.                JFrame frame = new QueryDBFrame();
 22.                frame.setDefaultCloseOperation(JFrame.EXIT_ON_CLOSE);
 23.                frame.setVisible(true);
 24.             }
 25.          });
 26.    }
 27. }
 28.
 29. /**
 30.  * This frame displays combo boxes for query parameters, a text area for command results,
 31.  * and buttons to launch a query and an update.
 32.  */
 33. class QueryDBFrame extends JFrame
 34. {
 35.    public QueryDBFrame()
 36.    {
 37.       setTitle("QueryDB");
 38.       setSize(DEFAULT_WIDTH, DEFAULT_HEIGHT);
 39.       setLayout(new GridBagLayout());
 40.
 41.       authors = new JComboBox();
 42.       authors.setEditable(false);
 43.       authors.addItem("Any");
 44.
 45.       publishers = new JComboBox();
 46.       publishers.setEditable(false);
 47.       publishers.addItem("Any");
 48.
 49.       result = new JTextArea(4, 50);
 50.       result.setEditable(false);
 51.
 52.       priceChange = new JTextField(8);
 53.       priceChange.setText("-5.00");
 54.
 55.       try
 56.       {
 57.          conn = getConnection();
 58.          Statement stat = conn.createStatement();
 59.          String query = "SELECT Name FROM Authors";
 60.          ResultSet rs = stat.executeQuery(query);
 61.          while (rs.next())
 62.             authors.addItem(rs.getString(1));
 63.          rs.close();
 64.
 65.          query = "SELECT Name FROM Publishers";
 66.          rs = stat.executeQuery(query);
 67.          while (rs.next())
 68.             publishers.addItem(rs.getString(1));
 69.          rs.close();
 70.          stat.close();
 71.       }
 72.       catch (SQLException e)
 73.       {
 74.          for (Throwable t : e)
 75.             result.append(t.getMessage());
 76.       }
 77.       catch (IOException e)
 78.       {
 79.          result.setText("" + e);
 80.       }
 81.
 82.       // we use the GBC convenience class of Core Java Volume I, Chapter 9
 83.       add(authors, new GBC(0, 0, 2, 1));
 84.
 85.       add(publishers, new GBC(2, 0, 2, 1));
 86.
 87.       JButton queryButton = new JButton("Query");
 88.       queryButton.addActionListener(new ActionListener()
 89.          {
 90.             public void actionPerformed(ActionEvent event)
 91.             {
 92.                executeQuery();
 93.             }
 94.          });
 95.       add(queryButton, new GBC(0, 1, 1, 1).setInsets(3));
 96.
 97.       JButton changeButton = new JButton("Change prices");
 98.       changeButton.addActionListener(new ActionListener()
 99.          {
100.             public void actionPerformed(ActionEvent event)
101.             {
102.                changePrices();
103.             }
104.          });
105.       add(changeButton, new GBC(2, 1, 1, 1).setInsets(3));
106.
107.       add(priceChange, new GBC(3, 1, 1, 1).setFill(GBC.HORIZONTAL));
108.
109.       add(new JScrollPane(result), new GBC(0, 2, 4, 1).setFill(GBC.BOTH).setWeight(100, 100));
110.
111.       addWindowListener(new WindowAdapter()
112.          {
113.             public void windowClosing(WindowEvent event)
114.             {
115.                try
116.                {
117.                   if (conn != null) conn.close();
118.                }
119.                catch (SQLException e)
120.                {
121.                   for (Throwable t : e)
122.                      t.printStackTrace();
123.                }
124.             }
125.          });
126.    }
127.
128.    /**
129.     * Executes the selected query.
130.     */
131.    private void executeQuery()
132.    {
133.       ResultSet rs = null;
134.       try
135.       {
136.          String author = (String) authors.getSelectedItem();
137.          String publisher = (String) publishers.getSelectedItem();
138.          if (!author.equals("Any") && !publisher.equals("Any"))
139.          {
140.             if (authorPublisherQueryStmt == null) authorPublisherQueryStmt = conn
141.                   .prepareStatement(authorPublisherQuery);
142.             authorPublisherQueryStmt.setString(1, author);
143.             authorPublisherQueryStmt.setString(2, publisher);
144.             rs = authorPublisherQueryStmt.executeQuery();
145.          }
146.          else if (!author.equals("Any") && publisher.equals("Any"))
147.          {
148.             if (authorQueryStmt == null) authorQueryStmt = conn.prepareStatement(authorQuery);
149.             authorQueryStmt.setString(1, author);
150.             rs = authorQueryStmt.executeQuery();
151.          }
152.          else if (author.equals("Any") && !publisher.equals("Any"))
153.          {
154.             if (publisherQueryStmt == null) publisherQueryStmt = conn
155.                   .prepareStatement(publisherQuery);
156.             publisherQueryStmt.setString(1, publisher);
157.             rs = publisherQueryStmt.executeQuery();
158.          }
159.          else
160.          {
161.             if (allQueryStmt == null) allQueryStmt = conn.prepareStatement(allQuery);
162.             rs = allQueryStmt.executeQuery();
163.          }
164.
165.          result.setText("");
166.          while (rs.next())
167.          {
168.             result.append(rs.getString(1));
169.             result.append(", ");
170.             result.append(rs.getString(2));
171.             result.append("
");
172.          }
173.          rs.close();
174.       }
175.       catch (SQLException e)
176.       {
177.          for (Throwable t : e)
178.             result.append(t.getMessage());
179.       }
180.    }
181.
182.    /**
183.     * Executes an update statement to change prices.
184.     */
185.    public void changePrices()
186.    {
187.       String publisher = (String) publishers.getSelectedItem();
188.       if (publisher.equals("Any"))
189.       {
190.          result.setText("I am sorry, but I cannot do that.");
191.          return;
192.       }
193.       try
194.       {
195.          if (priceUpdateStmt == null) priceUpdateStmt = conn.prepareStatement(priceUpdate);
196.          priceUpdateStmt.setString(1, priceChange.getText());
197.          priceUpdateStmt.setString(2, publisher);
198.          int r = priceUpdateStmt.executeUpdate();
199.          result.setText(r + " records updated.");
200.       }
201.       catch (SQLException e)
202.       {
203.          for (Throwable t : e)
204.             result.append(t.getMessage());
205.       }
206.    }
207.
208.    /**
209.     * Gets a connection from the properties specified in the file database.properties
210.     * @return the database connection
211.     */
212.    public static Connection getConnection() throws SQLException, IOException
213.    {
214.       Properties props = new Properties();
215.       FileInputStream in = new FileInputStream("database.properties");
216.       props.load(in);
217.       in.close();
218.
219.       String drivers = props.getProperty("jdbc.drivers");
220.       if (drivers != null) System.setProperty("jdbc.drivers", drivers);
221.       String url = props.getProperty("jdbc.url");
222.       String username = props.getProperty("jdbc.username");
223.       String password = props.getProperty("jdbc.password");
224.
225.       return DriverManager.getConnection(url, username, password);
226.    }
227.
228.    public static final int DEFAULT_WIDTH = 400;
229.    public static final int DEFAULT_HEIGHT = 400;
230.
231.    private JComboBox authors;
232.    private JComboBox publishers;
233.    private JTextField priceChange;
234.    private JTextArea result;
235.    private Connection conn;
236.    private PreparedStatement authorQueryStmt;
237.    private PreparedStatement authorPublisherQueryStmt;
238.    private PreparedStatement publisherQueryStmt;
239.    private PreparedStatement allQueryStmt;
240.    private PreparedStatement priceUpdateStmt;
241.
242.    private static final String authorPublisherQuery = "SELECT Books.Price,
243.          Books.Title FROM Books, BooksAuthors, Authors, Publishers"
244.          + " WHERE Authors.Author_Id = BooksAuthors.Author_Id AND
245.          BooksAuthors.ISBN = Books.ISBN" + " AND Books.Publisher_Id =
246.          Publishers.Publisher_Id AND Authors.Name = ?" + " AND Publishers.Name = ?";
247.
248.    private static final String authorQuery = "SELECT Books.Price, Books.Title FROM Books,
249.          BooksAuthors, Authors" + " WHERE Authors.Author_Id =
250.          BooksAuthors.Author_Id AND BooksAuthors.ISBN = Books.ISBN"
251.          + " AND Authors.Name = ?";
252.
253.    private static final String publisherQuery = "SELECT Books.Price, Books.Title FROM Books,
254.          Publishers" + " WHERE Books.Publisher_Id = Publishers.Publisher_Id
255.          AND Publishers.Name = ?";
256.
257.    private static final String allQuery = "SELECT Books.Price, Books.Title FROM Books";
258.
259.    private static final String priceUpdate = "UPDATE Books " + "SET Price = Price + ? "
260.          + " WHERE Books.Publisher_Id = (SELECT Publisher_Id FROM Publishers WHERE Name = ?)";
261. }
java.sql.PreparedStatement 1.1
void setXxx(int n,Xxxx)(Xxx is a type such as
int,double,String,Date, etc.)sets the value of the
nth parameter tox.void clearParameters()clears all current parameters in the prepared statement.
ResultSet executeQuery()executes a prepared SQL query and returns a
ResultSetobject.int executeUpdate()executes the prepared SQL
INSERT,UPDATE, orDELETEstatement represented by thePreparedStatementobject. Returns the number of rows affected, or 0 for DDL statements such asCREATE TABLE.
In addition to numbers, strings, and dates, many databases can store large objects (LOBs) such as images or other data. In SQL, binary large objects are called BLOBs, and character large objects are called CLOBs.
To read a LOB, execute a SELECT statement and then call the getBlob or getClob method on the ResultSet. You get an object of type Blob or Clob. To get the binary data from a Blob, call the getBytes or getInputStream. For example, if you have a table with book cover images, you can retrieve an image like this:
PreparedStatement stat = conn.prepareStatement("SELECT Cover FROM BookCovers WHERE ISBN=?");
stat.set(1, isbn);
ResultSet result = stat.executeQuery();
if (result.next())
{
   Blob coverBlob = result.getBlob(1);
   Image coverImage = ImageIO.read(coverBlob.getInputStream());
}
Similarly, if you retrieve a Clob object, you can get character data by calling the getSubString or getCharacterStream method.
To place a LOB into a database, you call createBlob or createClob on your Connection object, get an output stream or writer to the LOB, write the data, and store the object in the database. For example, here is how you store an image:
Blob coverBlob = connection.createBlob();
int offset = 0;
OutputStream out = coverBlob.setBinaryStream(offset);
ImageIO.write(coverImage, "PNG", out);
PreparedStatement stat = conn.prepareStatement("INSERT INTO Cover VALUES (?, ?)");
stat.set(1, isbn);
stat.set(2, coverBlob);
stat.executeUpdate();
java.sql.ResultSet 1.1
Blob getBlob(int columnIndex)1.2Blob getBlob(String columnLabel)1.2Clob getClob(int columnIndex)1.2Clob getClob(String columnLabel)1.2gets the BLOB or CLOB at the given column.
java.sql.Blob 1.2
long length()gets the length of this BLOB.
byte[] getBytes(long startPosition, long length)gets the data in the given range from this BLOB.
InputStream getBinaryStream()InputStream getBinaryStream(long startPosition, long length)returns a stream to read the data in this BLOB or the given range.
OutputStream setBinaryStream(long startPosition)1.4returns an output stream for writing into this BLOB, starting at the given position.
java.sql.Clob 1.4
long length()gets the number of characters of this CLOB.
String getSubString(long startPosition, long length)gets the characters in the given range from this BLOB.
Reader getCharacterStream(long startPosition, long length)returns a reader (not a stream) to read the characters in this CLOB or the given range.
Writer setCharacterStream(long startPosition)1.4returns a writer (not a stream) for writing into this CLOB, starting at the given position.
The “escape” syntax supports features that are commonly supported by databases, but with database-specific syntax variations. It is the job of the JDBC driver to translate the escape syntax to the syntax of a particular database.
Escapes are provided for the following features:
Date and time literals
Calling scalar functions
Calling stored procedures
Outer joins
The escape character in
LIKEclauses
Date and time literals vary widely among databases. To embed a date or time literal, specify the value in ISO 8601 format (http://www.cl.cam.ac.uk/~mgk25/iso-time.html). The driver will then translate it into the native format. Use d, t, ts for DATE, TIME, or TIMESTAMP values:
{d '2008-01-24'}
{t '23:59:59'}
{ts '2008-01-24 23:59:59.999'}
A scalar function is a function that returns a single value. Many functions are widely available in databases, but with varying names. The JDBC specification provides standard names and translates them into the database-specific names. To call a function, embed the standard function name and arguments like this:
{fn left(?, 20)}
{fn user()}
You can find a complete list of supported function names in the JDBC specification.
A stored procedure is a procedure that executes in the database, written in a database-specific language. To call a stored procedure, use the call escape. You need not supply parentheses if the procedure has no parameters. Use = to capture a return value:
{call PROC1(?, ?)}
{call PROC2}
{call ? = PROC3(?)}
An outer join of two tables does not require that the rows of each table match according to the join condition. For example, the query
SELECT * FROM {oj Books LEFT OUTER JOIN Publishers ON Books.Publisher_Id = Publisher.Publisher_Id}contains books for which Publisher_Id has no match in the Publishers table, with NULL values to indicate that no match exists. You would need a RIGHT OUTER JOIN to include publishers without matching books, or a FULL OUTER JOIN to return both. The escape syntax is needed because not all databases use a standard notation for these joins.
Finally, the _ and % characters have special meanings in a LIKE clause, to match a single character or a sequence of characters. There is no standard way to use them literally. If you want to match all strings containing a _, use this construct:
... WHERE ? LIKE %!_% {escape '!'}Here we define ! as the escape character. The combination !_ denotes a literal underscore.
It is possible for a query to return multiple results. This can happen when executing a stored procedure, or with databases that also allow submission of multiple SELECT statements in a single query. Here is how you retrieve all result sets.
Use the
executemethod to execute the SQL statement.Retrieve the first result or update count.
Repeatedly call the
getMoreResultsmethod to move on to the next result set. (This call automatically closes the previous result set.)Finish when there are no more result sets or update counts.
The execute and getMoreResults methods return true if the next item in the chain is a result set. The getUpdateCount method returns −1 if the next item in the chain is not an update count.
The following loop traverses all results:
boolean done = false;
boolean isResult = stmt.execute(command);
while (!done)
{
   if (isResult)
   {
      ResultSet result = stmt.getResultSet();
      do something with result
   }
   else
   {
      int updateCount = stmt.getUpdateCount();
      if (updateCount >= 0)
         do something with updateCount
      else
         done = true;
   }
   isResult = stmt.getMoreResults();
}Most databases support some mechanism for auto-numbering rows in a database. Unfortunately, the mechanisms differ widely among vendors. These automatic numbers are often used as primary keys. Although JDBC doesn’t offer a vendor-independent solution for generating these keys, it does provide an efficient way of retrieving them. When you insert a new row into a table and a key is automatically generated, you can retrieve it with the following code:
stmt.executeUpdate(insertStatement, Statement.RETURN_GENERATED_KEYS);
ResultSet rs = stmt.getGeneratedKeys();
if (rs.next())
{
   int key = rs.getInt(1);
   . . .
}
java.sql.Statement 1.1
boolean execute(String statement, int autogenerated)1.4int executeUpdate(String statement, int autogenerated)1.4executes the given SQL statement, as previously described. If
autogeneratedis set toStatement.RETURN_GENERATED_KEYSand the statement is anINSERTstatement, the first column contains the autogenerated key.
As you have seen, the next method of the ResultSet class iterates over the rows in a result set. That is certainly adequate for a program that needs to analyze the data. However, consider a visual data display that shows a table or query result (such as Figure 4-5 on page 224). You usually want the user to be able to move both forward and backward in the result set. In a scrollable result, you can move forward and backward through a result set and even jump to any position.
Furthermore, once users see the contents of a result set displayed, they may be tempted to edit it. In an updatable result set, you can programmatically update entries so that the database is automatically updated. We discuss these capabilities in the following sections.
By default, result sets are not scrollable or updatable. To obtain scrollable result sets from your queries, you must obtain a different Statement object with the method
Statement stat = conn.createStatement(type, concurrency);
For a prepared statement, use the call
PreparedStatement stat = conn.prepareStatement(command, type, concurrency);
The possible values of type and concurrency are listed in Table 4-6 and Table 4-7. You have the following choices:
Do you want the result set to be scrollable or not? If not, use
ResultSet.TYPE_FORWARD_ONLY.If the result set is scrollable, do you want it to be able to reflect changes in the database that occurred after the query that yielded it? (In our discussion, we assume the
ResultSet.TYPE_SCROLL_INSENSITIVEsetting for scrollable result sets. This assumes that the result set does not “sense” database changes that occurred after execution of the query.)Do you want to be able to update the database by editing the result set? (See the next section for details.)
For example, if you simply want to be able to scroll through a result set but you don’t want to edit its data, you use:
Statement stat = conn.createStatement(
   ResultSet.TYPE_SCROLL_INSENSITIVE, ResultSet.CONCUR_READ_ONLY);
All result sets that are returned by method calls
ResultSet rs = stat.executeQuery(query)
are now scrollable. A scrollable result set has a cursor that indicates the current position.
Note
Not all database drivers support scrollable or updatable result sets. (The supportsResultSetType and supportsResultSetConcurrency methods of the DatabaseMetaData class tell you which types and concurrency modes are supported by a particular database, using a particular driver.) Even if a database supports all result set modes, a particular query might not be able to yield a result set with all the properties that you requested. (For example, the result set of a complex query might not be updatable.) In that case, the executeQuery method returns a ResultSet of lesser capabilities and adds an SQLWarning to the connection object. (The section “Analyzing SQL Exceptions” on page 236 shows how to retrieve the warning.) Alternatively, you can use the getType and getConcurrency methods of the ResultSet class to find out what mode a result set actually has. If you do not check the result set capabilities and issue an unsupported operation, such as previous on a result set that is not scrollable, then the operation throws a SQLException.
Scrolling is very simple. You use
if (rs.previous()) . . .
to scroll backward. The method returns true if the cursor is positioned on an actual row; false if it now is positioned before the first row.
You can move the cursor backward or forward by a number of rows with the call
rs.relative(n);If n is positive, the cursor moves forward. If n is negative, it moves backward. If n is zero, the call has no effect. If you attempt to move the cursor outside the current set of rows, it is set to point either after the last row or before the first row, depending on the sign of n. Then, the method returns false and the cursor does not move. The method returns true if the cursor is positioned on an actual row.
Alternatively, you can set the cursor to a particular row number:
rs.absolute(n);You get the current row number with the call
int currentRow = rs.getRow();
The first row in the result set has number 1. If the return value is 0, the cursor is not currently on a row—it is either before the first row or after the last row.
The convenience methods first, last, beforeFirst, and afterLast move the cursor to the first, to the last, before the first, or after the last position.
Finally, the methods isFirst, isLast, isBeforeFirst, and isAfterLast test whether the cursor is at one of these special positions.
Using a scrollable result set is very simple. The hard work of caching the query data is carried out behind the scenes by the database driver.
If you want to edit result set data and have the changes automatically reflected in the database, you create an updatable result set. Updatable result sets don’t have to be scrollable, but if you present data to a user for editing, you usually want to allow scrolling as well.
To obtain updatable result sets, you create a statement as follows:
Statement stat = conn.createStatement(
   ResultSet.TYPE_SCROLL_INSENSITIVE, ResultSet.CONCUR_UPDATABLE);
The result sets returned by a call to executeQuery are then updatable.
Note
Not all queries return updatable result sets. If your query is a join that involves multiple tables, the result might not be updatable. If your query involves only a single table or if it joins multiple tables by their primary keys, you should expect the result set to be updatable. Call the getConcurrency method of the ResultSet class to find out for sure.
For example, suppose you want to raise the prices of some books, but you don’t have a simple criterion for issuing an UPDATE statement. Then, you can iterate through all books and update prices, based on arbitrary conditions.
String query = "SELECT * FROM Books";
ResultSet rs = stat.executeQuery(query);
while (rs.next())
{
   if (. . .)
   {
      double increase = . . .
      double price = rs.getDouble("Price");
      rs.updateDouble("Price", price + increase);
      rs.updateRow(); // make sure to call updateRow after updating fields
   }
}
There are updateXxx methods for all data types that correspond to SQL types, such as updateDouble, updateString, and so on. As with the getXxx methods, you specify the name or the number of the column. You then specify the new value for the field.
Note
If you use the updateXxx method whose first parameter is the column number, be aware that this is the column number in the result set. It could well be different from the column number in the database.
The updateXxx method changes only the row values, not the database. When you are done with the field updates in a row, you must call the updateRow method. That method sends all updates in the current row to the database. If you move the cursor to another row without calling updateRow, all updates are discarded from the row set and they are never communicated to the database. You can also call the cancelRowUpdates method to cancel the updates to the current row.
The preceding example shows how you modify an existing row. If you want to add a new row to the database, you first use the moveToInsertRow method to move the cursor to a special position, called the insert row. You build up a new row in the insert row position by issuing updateXxx instructions. Finally, when you are done, call the insertRow method to deliver the new row to the database. When you are done inserting, call moveToCurrentRow to move the cursor back to the position before the call to moveToInsertRow. Here is an example:
rs.moveToInsertRow();
rs.updateString("Title", title);
rs.updateString("ISBN", isbn);
rs.updateString("Publisher_Id", pubid);
rs.updateDouble("Price", price);
rs.insertRow();
rs.moveToCurrentRow();
Note that you cannot influence where the new data is added in the result set or the database.
If you don’t specify a column value in the insert row, it is set to a SQL NULL. However, if the column has a NOT NULL constraint, an exception is thrown and the row is not inserted.
Finally, you can delete the row under the cursor.
rs.deleteRow();
The deleteRow method immediately removes the row from both the result set and the database.
The updateRow, insertRow, and deleteRow methods of the ResultSet class give you the same power as executing UPDATE, INSERT, and DELETE SQL statements. However, programmers who are accustomed to the Java programming language might find it more natural to manipulate the database contents through result sets than by constructing SQL statements.???
Caution
If you are not careful, you can write staggeringly inefficient code with updatable result sets. It is much more efficient to execute an UPDATE statement than it is to make a query and iterate through the result, changing data along the way. Updatable result sets make sense for interactive programs in which a user can make arbitrary changes, but for most programmatic changes, a SQL UPDATE is more appropriate.
Note
JDBC 2 delivered further enhancements to result sets, such as the capability of updating a result set with the most recent data if the data have been modified by another concurrent database connection. JDBC 3 added yet another refinement, specifying the behavior of result sets when a transaction is committed. However, these advanced features are outside the scope of this introductory chapter. We refer you to the JDBC API Tutorial and Reference by Maydene Fisher, Jon Ellis, and Jonathan Bruce (Addison-Wesley 2003) and the JDBC specification documents at http://java.sun.com/javase/technologies/database for more information.
java.sql.Connection 1.1
Statement createStatement(int type, int concurrency)1.2PreparedStatement prepareStatement(String command, int type, int concurrency)1.2creates a statement or prepared statement that yields result sets with the given type and concurrency.
Parameters:
commandThe command to prepare
typeOne of the constants
TYPE_FORWARD_ONLY,TYPE_SCROLL_INSENSITIVE, orTYPE_SCROLL_SENSITIVEof theResultSetinterfaceconcurrencyOne of the constants
CONCUR_READ_ONLYorCONCUR_UPDATABLEof theResultSetinterface
java.sql.ResultSet 1.1
int getType()1.2returns the type of this result set, one of
TYPE_FORWARD_ONLY,TYPE_SCROLL_INSENSITIVE, orTYPE_SCROLL_SENSITIVE.returns the concurrency setting of this result set, one of
CONCUR_READ_ONLYorCONCUR_UPDATABLE.boolean previous()1.2moves the cursor to the preceding row. Returns
trueif the cursor is positioned on a row orfalseif the cursor is positioned before the first row.int getRow()1.2gets the number of the current row. Rows are numbered starting with 1.
boolean absolute(int r)1.2moves the cursor to row
r. Returnstrueif the cursor is positioned on a row.boolean relative(int d)1.2moves the cursor by
drows. Ifdis negative, the cursor is moved backward. Returnstrueif the cursor is positioned on a row.boolean first()1.2boolean last()1.2moves the cursor to the first or last row. Returns
trueif the cursor is positioned on a row.void beforeFirst()1.2void afterLast()1.2moves the cursor before the first or after the last row.
boolean isFirst()1.2boolean isLast()1.2tests whether the cursor is at the first or last row.
boolean isBeforeFirst()1.2boolean isAfterLast()1.2tests whether the cursor is before the first or after the last row.
void moveToInsertRow()1.2moves the cursor to the insert row. The insert row is a special row for inserting new data with the
updateXxx andinsertRowmethods.void moveToCurrentRow()1.2moves the cursor back from the insert row to the row that it occupied when the
moveToInsertRowmethod was called.void insertRow()1.2inserts the contents of the insert row into the database and the result set.
void deleteRow()1.2deletes the current row from the database and the result set.
void updateXxx(int column,Xxxdata)1.2void updateXxx(String columnName,Xxxdata)1.2(Xxx is a type such as
int,double,String,Date, etc.)updates a field in the current row of the result set.
void updateRow()1.2sends the current row updates to the database.
void cancelRowUpdates()1.2cancels the current row updates.
java.sql.DatabaseMetaData 1.1
boolean supportsResultSetType(int type)1.2returns
trueif the database can support result sets of the given type.typeis one of the constantsTYPE_FORWARD_ONLY,TYPE_SCROLL_INSENSITIVE, orTYPE_SCROLL_SENSITIVEof theResultSetinterface.boolean supportsResultSetConcurrency(int type, int concurrency)1.2returns
trueif the database can support result sets of the given combination of type and concurrency.Parameters:
typeOne of the constants
TYPE_FORWARD_ONLY,TYPE_SCROLL_INSENSITIVE, orTYPE_SCROLL_SENSITIVEof theResultSetinterfaceconcurrencyOne of the constants
CONCUR_READ_ONLYorCONCUR_UPDATABLEof theResultSetinterface
Scrollable result sets are powerful, but they have a major drawback. You need to keep the database connection open during the entire user interaction. However, users can walk away from their computer for a long time, leaving the connection occupied. That is not good—database connections are scarce resources. In such a situation, use a row set. The RowSet interface extends the ResultSet interface, but row sets don’t have to be tied to a database connection.
Row sets are also suitable if you need to move a query result to a different tier of a complex application, or to another device such as a cell phone. You would never want to move a result set—its data structures can be huge, and it is tethered to the database connection.
The javax.sql.rowset package provides the following interfaces that extend the RowSet interface:
A
CachedRowSetallows disconnected operation. We discuss cached row sets in the following section.A
WebRowSetis a cached row set that can be saved to an XML file. The XML file can be moved to another tier of a web application, where it is opened by anotherWebRowSetobject.The
FilteredRowSetandJoinRowSetinterfaces support lightweight operations on row sets that are equivalent to SQLSELECTandJOINoperations. These operations are carried out on the data stored in row sets, without having to make a database connection.A
JdbcRowSetis a thin wrapper around aResultSet. It adds useful getters and setters from theRowSetinterface, turning a result set into a “bean.” (See Chapter 8 for more information on beans.)
Sun Microsystems expects database vendors to produce efficient implementations of these interfaces. Fortunately, they also supply reference implementations so that you can use row sets even if your database vendor doesn’t support them. The reference implementations are in the package com.sun.rowset. The class names end in Impl, for example, CachedRowSetImpl.
A cached row set contains all data from a result set. Because CachedRowSet is a subinterface of the ResultSet interface, you can use a cached row set exactly as you would use a result set. Cached row sets confer an important benefit: You can close the connection and still use the row set. As you will see in our sample program in Listing 4-4, this greatly simplifies the implementation of interactive applications. Each user command simply opens the database connection, issues a query, puts the result in a cached row set, and then closes the database connection.
It is even possible to modify the data in a cached row set. Of course, the modifications are not immediately reflected in the database. Instead, you need to make an explicit request to accept the accumulated changes. The CachedRowSet then reconnects to the database and issues SQL statements to write the accumulated changes.
You can populate a CachedRowSet from a result set:
ResultSet result = . . .;
CachedRowSet crs = new com.sun.rowset.CachedRowSetImpl();
   // or use an implementation from your database vendor
crs.populate(result);
conn.close(); // now ok to close the database connection
Alternatively, you can let the CachedRowSet object establish a connection automatically. Set up the database parameters:
crs.setURL("jdbc:derby://localhost:1527/COREJAVA");
crs.setUsername("dbuser");
crs.setPassword("secret");
Then set the query statement and any parameters.
crs.setCommand("SELECT * FROM Books WHERE PUBLISHER = ?");
crs.setString(1, publisherName);
Finally, populate the row set with the query result:
crs.execute();
This call establishes a database connection, issues the query, populates the row set, and disconnects.
If your query result is very large, you would not want to put it into the row set in its entirety. After all, your users will probably only look at a few of the rows. In that case, specify a page size:
CachedRowSet crs = . . .;
crs.setCommand(command);
crs.setPageSize(20);
. . .
crs.execute();
Now you will only get 20 rows. To get the next batch of rows, call
crs.nextPage();
You can inspect and modify the row set with the same methods you use for result sets. If you modified the row set contents, you must write it back to the database by calling
crs.acceptChanges(conn);
crs.acceptChanges();
The second call works only if you configured the row set with the information (such as URL, user name, and password) that is required to connect to a database.
In the section “Updatable Result Sets” on page 256, you saw that not all result sets are updatable. Similarly, a row set that contains the result of a complex query will not be able to write back changes to the database. You should be safe if your row set contains data from a single table.
Caution
If you populated the row set from a result set, the row set does not know the name of the table to update. You need to call setTable to set the table name.
Another complexity arises if data in the database have changed after you populated the row set. This is clearly a sign of trouble that could lead to inconsistent data. The reference implementation checks whether the original row set values (that is, the values before editing) are identical to the current values in the database. If so, they are replaced with the edited values. Otherwise, a SyncProviderException is thrown, and none of the changes are written. Other implementations may use other strategies for synchronization.
javax.sql.RowSet 1.4
String getURL()void setURL(String url)gets or sets the database URL.
String getUsername()void setUsername(String username)gets or sets the user name for connecting to the database.
String getPassword()void setPassword(String password)gets or sets the password for connecting to the database.
String getCommand()void setCommand(String command)gets or sets the command that is executed to populate this row set.
void execute()populates this row set by issuing the statement set with
setCommand. For the driver manager to obtain a connection, the URL, user name, and password must be set.
javax.sql.rowset.CachedRowSet 5.0
void execute(Connection conn)populates this row set by issuing the statement set with
setCommand. This method uses the given connection and closes it.void populate(ResultSet result)populates this cached row set with the data from the given result set.
void setTableName(String tableName)gets or sets the name of the table from which this cached row set was populated.
int getPageSize()void setPageSize(int size)gets or sets the page size.
boolean nextPage()boolean previousPage()loads the next or previous page of rows. Returns
trueif there is a next or previous page.void acceptChanges()void acceptChanges(Connection conn)reconnects to the database and writes the changes that are the result of editing the row set. May throw a
SyncProviderExceptionif the data cannot be written back because the database data have changed.
In the preceding sections, you saw how to populate, query, and update database tables. However, JDBC can give you additional information about the structure of a database and its tables. For example, you can get a list of the tables in a particular database or the column names and types of a table. This information is not useful when you are implementing a business application with a predefined database. After all, if you design the tables, you know their structure. Structural information is, however, extremely useful for programmers who write tools that work with any database.
In SQL, data that describe the database or one of its parts are called metadata (to distinguish them from the actual data stored in the database). You can get three kinds of metadata: about a database, about a result set, and about parameters of prepared statements.
To find out more about the database, you request an object of type DatabaseMetaData from the database connection.
DatabaseMetaData meta = conn.getMetaData();
Now you are ready to get some metadata. For example, the call
ResultSet mrs = meta.getTables(null, null, null, new String[] { "TABLE" });returns a result set that contains information about all tables in the database. (See the API note at the end of this section for other parameters to this method.)
Each row in the result set contains information about a table in the database. The third column is the name of the table. (Again, see the API note for the other columns.) The following loop gathers all table names:
while (mrs.next())
   tableNames.addItem(mrs.getString(3));
There is a second important use for database metadata. Databases are complex, and the SQL standard leaves plenty of room for variability. Well over 100 methods in the DatabaseMetaData class can inquire about the database, including calls with exotic names such as
meta.supportsCatalogsInPrivilegeDefinitions()
meta.nullPlusNonNullIsNull()
Clearly, these are geared toward advanced users with special needs, in particular, those who need to write highly portable code that works with multiple databases.
The DatabaseMetaData class gives data about the database. A second metadata class, ResultSetMetaData, reports information about a result set. Whenever you have a result set from a query, you can inquire about the number of columns and each column’s name, type, and field width. Here is a typical loop:
ResultSet mrs = stat.executeQuery("SELECT * FROM " + tableName);
ResultSetMetaData meta = mrs.getMetaData();
for (int i = 1; i <= meta.getColumnCount(); i++)
{
   String columnName = meta.getColumnLabel(i);
   int columnWidth = meta.getColumnDisplaySize(i);
   . . .
}
In this section, we show you how to write such a simple tool. The program in Listing 4-4 uses metadata to let you browse all tables in a database. The program also illustrates the use of a cached row set.
The combo box on top displays all tables in the database. Select one of them, and the center of the frame is filled with the field names of that table and the values of the first row, as shown in Figure 4-8. Click Next and Previous to scroll through the rows in the table. You can also delete a row and edit the row values. Click the Save button to save the changes to the database.
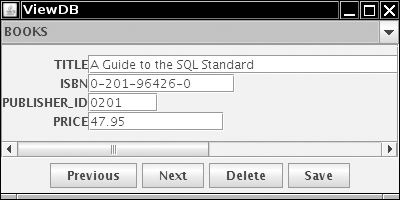
Note
Many databases come with much more sophisticated tools for viewing and editing tables. If your database doesn’t, check out iSQL-Viewer (http://isql.sourceforge.net) or SQuirreL (http://squirrel-sql.sourceforge.net). These programs can view the tables in any JDBC database. Our example program is not intended as a replacement for these tools, but it shows you how to implement a tool for working with arbitrary tables.
Example 4-4. ViewDB.java
  1. import com.sun.rowset.*;
  2. import java.sql.*;
  3. import java.awt.*;
  4. import java.awt.event.*;
  5. import java.io.*;
  6. import java.util.*;
  7. import javax.swing.*;
  8. import javax.sql.*;
  9. import javax.sql.rowset.*;
 10.
 11. /**
 12.  * This program uses metadata to display arbitrary tables in a database.
 13.  * @version 1.31 2007-06-28
 14.  * @author Cay Horstmann
 15.  */
 16. public class ViewDB
 17. {
 18.    public static void main(String[] args)
 19.    {
 20.       EventQueue.invokeLater(new Runnable()
 21.          {
 22.             public void run()
 23.             {
 24.                JFrame frame = new ViewDBFrame();
 25.                frame.setDefaultCloseOperation(JFrame.EXIT_ON_CLOSE);
 26.                frame.setVisible(true);
 27.             }
 28.          });
 29.    }
 30. }
 31.
 32. /**
 33.  * The frame that holds the data panel and the navigation buttons.
 34.  */
 35. class ViewDBFrame extends JFrame
 36. {
 37.    public ViewDBFrame()
 38.    {
 39.       setTitle("ViewDB");
 40.       setSize(DEFAULT_WIDTH, DEFAULT_HEIGHT);
 41.
 42.       tableNames = new JComboBox();
 43.       tableNames.addActionListener(new ActionListener()
 44.          {
 45.             public void actionPerformed(ActionEvent event)
 46.             {
 47.                showTable((String) tableNames.getSelectedItem());
 48.             }
 49.          });
 50.       add(tableNames, BorderLayout.NORTH);
 51.
 52.       try
 53.       {
 54.          readDatabaseProperties();
 55.          Connection conn = getConnection();
 56.          try
 57.          {
 58.             DatabaseMetaData meta = conn.getMetaData();
 59.             ResultSet mrs = meta.getTables(null, null, null, new String[] { "TABLE" });
 60.             while (mrs.next())
 61.                tableNames.addItem(mrs.getString(3));
 62.          }
 63.          finally
 64.          {
 65.             conn.close();
 66.          }
 67.       }
 68.       catch (SQLException e)
 69.       {
 70.          JOptionPane.showMessageDialog(this, e);
 71.       }
 72.       catch (IOException e)
 73.       {
 74.          JOptionPane.showMessageDialog(this, e);
 75.       }
 76.
 77.       JPanel buttonPanel = new JPanel();
 78.       add(buttonPanel, BorderLayout.SOUTH);
 79.
 80.       previousButton = new JButton("Previous");
 81.       previousButton.addActionListener(new ActionListener()
 82.          {
 83.             public void actionPerformed(ActionEvent event)
 84.             {
 85.                showPreviousRow();
 86.             }
 87.          });
 88.       buttonPanel.add(previousButton);
 89.
 90.       nextButton = new JButton("Next");
 91.       nextButton.addActionListener(new ActionListener()
 92.          {
 93.             public void actionPerformed(ActionEvent event)
 94.             {
 95.                showNextRow();
 96.             }
 97.          });
 98.       buttonPanel.add(nextButton);
 99.
100.       deleteButton = new JButton("Delete");
101.       deleteButton.addActionListener(new ActionListener()
102.          {
103.             public void actionPerformed(ActionEvent event)
104.             {
105.                deleteRow();
106.             }
107.          });
108.       buttonPanel.add(deleteButton);
109.
110.       saveButton = new JButton("Save");
111.       saveButton.addActionListener(new ActionListener()
112.          {
113.             public void actionPerformed(ActionEvent event)
114.             {
115.                saveChanges();
116.             }
117.          });
118.       buttonPanel.add(saveButton);
119.    }
120.
121.    /**
122.     * Prepares the text fields for showing a new table, and shows the first row.
123.     * @param tableName the name of the table to display
124.     */
125.    public void showTable(String tableName)
126.    {
127.       try
128.       {
129.          // open connection
130.          Connection conn = getConnection();
131.          try
132.          {
133.             // get result set
134.             Statement stat = conn.createStatement();
135.             ResultSet result = stat.executeQuery("SELECT * FROM " + tableName);
136.             // copy into cached row set
137.             crs = new CachedRowSetImpl();
138.             crs.setTableName(tableName);
139.             crs.populate(result);
140.          }
141.          finally
142.          {
143.             conn.close();
144.          }
145.
146.          if (scrollPane != null) remove(scrollPane);
147.          dataPanel = new DataPanel(crs);
148.          scrollPane = new JScrollPane(dataPanel);
149.          add(scrollPane, BorderLayout.CENTER);
150.          validate();
151.          showNextRow();
152.       }
153.       catch (SQLException e)
154.       {
155.          JOptionPane.showMessageDialog(this, e);
156.       }
157.    }
158.
159.    /**
160.     * Moves to the previous table row.
161.     */
162.    public void showPreviousRow()
163.    {
164.       try
165.       {
166.          if (crs == null || crs.isFirst()) return;
167.          crs.previous();
168.          dataPanel.showRow(crs);
169.       }
170.       catch (SQLException e)
171.       {
172.          for (Throwable t : e)
173.             t.printStackTrace();
174.       }
175.    }
176.
177.    /**
178.     * Moves to the next table row.
179.     */
180.    public void showNextRow()
181.    {
182.       try
183.       {
184.          if (crs == null || crs.isLast()) return;
185.          crs.next();
186.          dataPanel.showRow(crs);
187.       }
188.       catch (SQLException e)
189.       {
190.          JOptionPane.showMessageDialog(this, e);
191.       }
192.    }
193.
194.    /**
195.     * Deletes current table row.
196.     */
197.    public void deleteRow()
198.    {
199.       try
200.       {
201.          Connection conn = getConnection();
202.          try
203.          {
204.             crs.deleteRow();
205.             crs.acceptChanges(conn);
206.             if (!crs.isLast()) crs.next();
207.             else if (!crs.isFirst()) crs.previous();
208.             else crs = null;
209.             dataPanel.showRow(crs);
210.          }
211.          finally
212.          {
213.             conn.close();
214.          }
215.       }
216.       catch (SQLException e)
217.       {
218.          JOptionPane.showMessageDialog(this, e);
219.       }
220.    }
221.
222.    /**
223.     * Saves all changes.
224.     */
225.    public void saveChanges()
226.    {
227.       try
228.       {
229.          Connection conn = getConnection();
230.          try
231.          {
232.             dataPanel.setRow(crs);
233.             crs.acceptChanges(conn);
234.          }
235.          finally
236.          {
237.             conn.close();
238.          }
239.       }
240.       catch (SQLException e)
241.       {
242.          JOptionPane.showMessageDialog(this, e);
243.       }
244.    }
245.
246.    private void readDatabaseProperties() throws IOException
247.    {
248.       props = new Properties();
249.       FileInputStream in = new FileInputStream("database.properties");
250.       props.load(in);
251.       in.close();
252.       String drivers = props.getProperty("jdbc.drivers");
253.       if (drivers != null) System.setProperty("jdbc.drivers", drivers);
254.    }
255.
256.    /**
257.     * Gets a connection from the properties specified in the file database.properties
258.     * @return the database connection
259.     */
260.    private Connection getConnection() throws SQLException
261.    {
262.       String url = props.getProperty("jdbc.url");
263.       String username = props.getProperty("jdbc.username");
264.       String password = props.getProperty("jdbc.password");
265.
266.       return DriverManager.getConnection(url, username, password);
267.    }
268.
269.    public static final int DEFAULT_WIDTH = 400;
270.    public static final int DEFAULT_HEIGHT = 200;
271.
272.    private JButton previousButton;
273.    private JButton nextButton;
274.    private JButton deleteButton;
275.    private JButton saveButton;
276.    private DataPanel dataPanel;
277.    private Component scrollPane;
278.    private JComboBox tableNames;
279.    private Properties props;
280.    private CachedRowSet crs;
281. }
282.
283. /**
284.  * This panel displays the contents of a result set.
285.  */
286. class DataPanel extends JPanel
287. {
288.    /**
289.     * Constructs the data panel.
290.     * @param rs the result set whose contents this panel displays
291.     */
292.    public DataPanel(RowSet rs) throws SQLException
293.    {
294.       fields = new ArrayList<JTextField>();
295.       setLayout(new GridBagLayout());
296.       GridBagConstraints gbc = new GridBagConstraints();
297.       gbc.gridwidth = 1;
298.       gbc.gridheight = 1;
299.
300.       ResultSetMetaData rsmd = rs.getMetaData();
301.       for (int i = 1; i <= rsmd.getColumnCount(); i++)
302.       {
303.          gbc.gridy = i - 1;
304.
305.          String columnName = rsmd.getColumnLabel(i);
306.          gbc.gridx = 0;
307.          gbc.anchor = GridBagConstraints.EAST;
308.          add(new JLabel(columnName), gbc);
309.
310.          int columnWidth = rsmd.getColumnDisplaySize(i);
311.          JTextField tb = new JTextField(columnWidth);
312.          if (!rsmd.getColumnClassName(i).equals("java.lang.String"))
313.             tb.setEditable(false);
314.
315.          fields.add(tb);
316.
317.          gbc.gridx = 1;
318.          gbc.anchor = GridBagConstraints.WEST;
319.          add(tb, gbc);
320.       }
321.    }
322.
323.    /**
324.     * Shows a database row by populating all text fields with the column values.
325.     */
326.    public void showRow(ResultSet rs) throws SQLException
327.    {
328.       for (int i = 1; i <= fields.size(); i++)
329.       {
330.          String field = rs.getString(i);
331.          JTextField tb = (JTextField) fields.get(i - 1);
332.          tb.setText(field);
333.       }
334.    }
335.
336.    /**
337.     * Updates changed data into the current row of the row set
338.     */
339.    public void setRow(RowSet rs) throws SQLException
340.    {
341.       for (int i = 1; i <= fields.size(); i++)
342.       {
343.          String field = rs.getString(i);
344.          JTextField tb = (JTextField) fields.get(i - 1);
345.          if (!field.equals(tb.getText()))
346.             rs.updateString(i, tb.getText());
347.       }
348.       rs.updateRow();
349.    }
350.
351.    private ArrayList<JTextField> fields;
352. }
java.sql.DatabaseMetaData 1.1
ResultSet getTables(String catalog, String schemaPattern, String tableNamePattern, String types[])returns a description of all tables in a catalog that match the schema and table name patterns and the type criteria. (A schema describes a group of related tables and access permissions. A catalog describes a related group of schemas. These concepts are important for structuring large databases.)
The
catalogandschemaPatternparameters can be""to retrieve those tables without a catalog or schema, ornullto return tables regardless of catalog or schema.The
typesarray contains the names of the table types to include. Typical types areTABLE,VIEW,SYSTEM TABLE,GLOBAL TEMPORARY,LOCAL TEMPORARY,ALIAS, andSYNONYM. Iftypesisnull, then tables of all types are returned.The result set has five columns, all of which are of type
String, as shown in Table 4-8.int getJDBCMinorVersion()1.4returns the major or minor JDBC version numbers of the driver that established the database connection. For example, a JDBC 3.0 driver has major version number 3 and minor version number 0.
int getMaxConnections()returns the maximum number of concurrent connections allowed to this database.
int getMaxStatements()returns the maximum number of concurrently open statements allowed per database connection, or 0 if the number is unlimited or unknown.
java.sql.ResultSet 1.1
ResultSetMetaData getMetaData()returns the metadata associated with the current
ResultSetcolumns.
java.sql.ResultSetMetaData 1.1
int getColumnCount()returns the number of columns in the current
ResultSetobject.int getColumnDisplaySize(int column)returns the maximum width of the column specified by the index parameter.
Parameters:
columnThe column number
String getColumnLabel(int column)returns the suggested title for the column.
Parameters:
columnThe column number
String getColumnName(int column)returns the column name associated with the column index specified.
Parameters:
columnThe column number
You can group a set of statements to form a transaction. The transaction can be committed when all has gone well. Or, if an error has occurred in one of them, it can be rolled back as if none of the statements had been issued.
The major reason for grouping statements into transactions is database integrity. For example, suppose we want to transfer money from one bank account to another. Then, it is important that we simultaneously debit one account and credit another. If the system fails after debiting the first account but before crediting the other account, the debit needs to be undone.
If you group update statements to a transaction, then the transaction either succeeds in its entirety and it can be committed, or it fails somewhere in the middle. In that case, you can carry out a rollback and the database automatically undoes the effect of all updates that occurred since the last committed transaction.
By default, a database connection is in autocommit mode, and each SQL statement is committed to the database as soon as it is executed. Once a statement is committed, you cannot roll it back. Turn off this default when you use transactions:
conn.setAutoCommit(false);
Create a statement object in the normal way:
Statement stat = conn.createStatement();
Call executeUpdate any number of times:
stat.executeUpdate(command1);
stat.executeUpdate(command2);
stat.executeUpdate(command3);
. . .
If all statements have been executed without error, call the commit method:
conn.commit();
However, if an error occurred, call
conn.rollback();
Then, all statements until the last commit are automatically reversed. You typically issue a rollback when your transaction was interrupted by a SQLException.
With some drivers, you can gain finer-grained control over the rollback process by using save points. Creating a save point marks a point to which you can later return without having to abandon the entire transaction. For example,
Statement stat = conn.createStatement(); // start transaction; rollback() goes here
stat.executeUpdate(command1);
Savepoint svpt = conn.setSavepoint(); // set savepoint; rollback(svpt) goes here
stat.executeUpdate(command2);
if (. . .) conn.rollback(svpt); // undo effect of command2
. . .
conn.commit();
When you no longer need a save point, you should release it:
conn.releaseSavepoint(svpt);
Suppose a program needs to execute many INSERT statements to populate a database table. You can improve the performance of the program by using a batch update. In a batch update, a sequence of statements is collected and submitted as a batch.
Note
Use the supportsBatchUpdates method of the DatabaseMetaData class to find out if your database supports this feature.
The statements in a batch can be actions such as INSERT, UPDATE, and DELETE as well as data definition statements such as CREATE TABLE and DROP TABLE. An exception is thrown if you add a SELECT statement to a batch. (Conceptually, a SELECT statement makes no sense in a batch because it returns a result set without updating the database.)
To execute a batch, you first create a Statement object in the usual way:
Statement stat = conn.createStatement();
Now, instead of calling executeUpdate, you call the addBatch method:
String command = "CREATE TABLE . . ."
stat.addBatch(command);

while (. . .)
{
   command = "INSERT INTO . . . VALUES (" + . . . + ")";
   stat.addBatch(command);
}
Finally, you submit the entire batch:
int[] counts = stat.executeBatch();The call to executeBatch returns an array of the row counts for all submitted statements.
For proper error handling in batch mode, you want to treat the batch execution as a single transaction. If a batch fails in the middle, you want to roll back to the state before the beginning of the batch.
First, turn autocommit mode off, then collect the batch, execute it, commit it, and finally restore the original autocommit mode:???
boolean autoCommit = conn.getAutoCommit();
conn.setAutoCommit(false);
Statement stat = conn.getStatement();
. . .
// keep calling stat.addBatch(. . .);
. . .
stat.executeBatch();
conn.commit();
conn.setAutoCommit(autoCommit);
java.sql.Connection 1.1
boolean getAutoCommit()void setAutoCommit(boolean b)gets or sets the autocommit mode of this connection to
b. If autocommit istrue, all statements are committed as soon as their execution is completed.void commit()commits all statements that were issued since the last commit.
undoes the effect of all statements that were issued since the last commit.
Savepoint setSavepoint()1.4Savepoint setSavepoint(String name)1.4sets an unnamed or named save point.
void rollback(Savepoint svpt)1.4rolls back until the given save point.
void releaseSavepoint(Savepoint svpt)1.4releases the given save point.
java.sql.Savepoint 1.4
int getSavepointId()gets the ID of this unnamed save point, or throws a
SQLExceptionif this is a named save point.String getSavepointName()gets the name of this save point, or throws a
SQLExceptionif this is an unnamed save point.
java.sql.Statement 1.1
void addBatch(String command)1.2adds the command to the current batch of commands for this statement.
int[] executeBatch()1.2executes all commands in the current batch. Each value in the returned array corresponds to one of the batch statements. If it is nonnegative, it is a row count. If it is the value
SUCCESS_NO_INFO, the statement succeeded, but no row count is available. If it isEXECUTE_FAILED, then the statement failed.
Table 4-9 lists the SQL data types supported by JDBC and their equivalents in the Java programming language.
Table 4-9. SQL Data Types and Their Corresponding Java Types
SQL Data Type | Java Data Type |
|---|---|
|
|
|
|
|
|
|
|
|
|
|
|
|
|
|
|
|
|
|
|
|
|
|
|
|
|
|
|
|
|
|
|
|
|
|
|
|
|
A SQL ARRAY is a sequence of values. For example, in a Student table, you can have a Scores column that is an ARRAY OF INTEGER. The getArray method returns an object of the interface type java.sql.Array. That interface has methods to fetch the array values.
When you get a LOB or an array from a database, the actual contents are fetched from the database only when you request individual values. This is a useful performance enhancement, as the data can be quite voluminous.
Some databases support ROWID values that describe the location of a row such that it can be retrieved very rapidly. JDBC 4 introduced an interface java.sql.RowId and supplied methods to supply the row ID in queries and retrieve it from results.
A national character string (NCHAR and its variants) stores strings in a local character encoding and sorts them using a local sorting convention. JDBC 4 provided methods for converting between Java String objects and national character strings in queries and results.
Some databases can store user-defined structured types. JDBC 3 provided a mechanism for automatically mapping structured SQL types to Java objects.
Some databases provide native storage for XML data. JDBC 4 introduced a SQLXML interface that can mediate between the internal XML representation and the DOM Source/Result intefaces, as well as binary streams. See the API documentation for the SQLXML class for details.
We do not discuss these advanced SQL types any further. You can find more information on these topics in the JDBC API Tutorial and Reference and the JDBC 4 specifications.
The simplistic database connection setup with a database.properties file, as described in the preceding sections, is suitable for small test programs, but it won’t scale for larger applications.
When a JDBC application is deployed in a web or enterprise environment, the management of database connections is integrated with the JNDI. The properties of data sources across the enterprise can be stored in a directory. Using a directory allows for centralized management of user names, passwords, database names, and JDBC URLs.
In such an environment, you use the following code to establish a database connection:
Context jndiContext = new InitialContext();
DataSource source = (DataSource) jndiContext.lookup("java:comp/env/jdbc/corejava");
Connection conn = source.getConnection();
Note that the DriverManager is no longer involved. Instead, the JNDI service locates a data source. A data source is an interface that allows for simple JDBC connections as well as more advanced services, such as executing distributed transactions that involve multiple databases. The DataSource interface is defined in the javax.sql standard extension package.
Note
In a Java EE 5 container, you don’t even have to program the JNDI lookup. Simply use the Resource annotation on a DataSource field, and the data source reference will be set when your application is loaded:
@Resource("jdbc/corejava")
private DataSource source;
Of course, the data source needs to be configured somewhere. If you write database programs that execute in a servlet container such as Apache Tomcat or in an application server such as GlassFish, then you place the database configuration (including the JNDI name, JDBC URL, user name, and password) in a configuration file, or you set it in an admin GUI.
Management of user names and logins is just one of the issues that require special attention. A second issue involves the cost of establishing database connections. Our sample database programs used two strategies for obtaining a database connection. The QueryDB program in Listing 4-3 established a single database connection at the start of the program and closed it at the end of the program. The ViewDB program in Listing 4-4 opened a new connection whenever one was needed.
However, neither of these approaches is satisfactory. Database connections are a finite resource. If a user walks away from an application for some time, the connection should not be left open. Conversely, obtaining a connection for each query and closing it afterward is very costly.
The solution is to pool the connections. This means that database connections are not physically closed but are kept in a queue and reused. Connection pooling is an important service, and the JDBC specification provides hooks for implementors to supply it. However, the JDK itself does not provide any implementation, and database vendors don’t usually include one with their JDBC driver either. Instead, vendors of web containers and application servers supply connection pool implementations.
Using a connection pool is completely transparent to the programmer. You acquire a connection from a source of pooled connections by obtaining a data source and calling getConnection. When you are done using the connection, call close. That doesn’t close the physical connection but tells the pool that you are done using it. The connection pool typically makes an effort to pool prepared statements as well.
You have now learned about the JDBC fundamentals and know enough to implement simple database applications. However, as we mentioned at the beginning of this chapter, databases are complex and quite a few advanced topics are beyond the scope of this introductory chapter. For an overview of advanced JDBC capabilities, refer to the JDBC API Tutorial and Reference or the JDBC specifications.
In the preceding sections, you have seen how to interact with a relational database. In this section, we briefly look at hierarchical databases that use LDAP, the Lightweight Directory Access Protocol. This section is adapted from Core JavaServer Faces, 2nd ed., by Geary and Horstmann (Prentice Hall PTR 2007).
A hierarchical database is preferred over a relational database when the application data naturally follows a tree structure and when read operations greatly outnumber write operations. LDAP is most commonly used for the storage of directories that contain data such as user names, passwords, and permissions.
Note
For an in-depth discussion of LDAP, we recommend the “LDAP bible”: Understanding and Deploying LDAP Directory Services, 2nd ed., by Timothy Howes et al. (AddisonWesley Professional 2003).
An LDAP directory keeps all data in a tree structure, not in a set of tables as a relational database would. Each entry in the tree has the following:
Zero or more attributes. An attribute has an ID and a value. An example attribute is
cn=John Q. Public. (The IDcnstores the “common name.” See Table 4-10 for the meaning of commonly used LDAP attributes.)One or more object classes. An object class defines the set of required and optional attributes for this element. For example, the object class
persondefines a required attributecnand an optional attributetelephoneNumber. Of course, the object classes are different from Java classes, but they also support a notion of inheritance. For example,organizationalPersonis a subclass ofpersonwith additional attributes.A distinguished name (for example,
uid=jqpublic,ou=people,dc=mycompany,dc=com). A distinguished name is a sequence of attributes that trace a path joining the entry with the root of the tree. There might be alternate paths, but one of them must be specified as distinguished.
Figure 4-9 on the following page shows an example of a directory tree.
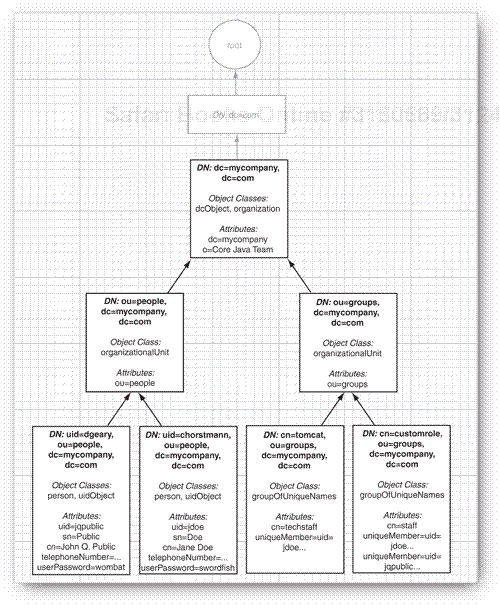
How to organize a directory tree, and what information to put in it, can be a matter of intense debate. We do not discuss the issues here. Instead, we simply assume that an organizational scheme has been established and that the directory has been populated with the relevant user data.
You have several options for running an LDAP server to try out the programs in this section. Here are the most common choices:
IBM Tivoli Directory Server
Microsoft Active Directory
Novell eDirectory
OpenLDAP
Sun Java System Directory Server for Solaris
We give you brief instructions for configuring OpenLDAP (http://openldap.org), a free server available for Linux and Windows and built into Mac OS X. If you use another directory server, the basic steps are similar.
If you use OpenLDAP, you need to edit the slapd.conf file before starting the LDAP server. (On Linux, the default location for the slapd.conf file is /etc/ldap, /etc/openldap, or /usr/local/etc/openldap.) Edit the suffix entry in slapd.conf to match the sample data set. This entry specifies the distinguished name suffix for this server. It should read
suffix "dc=mycompany,dc=com"
You also need to configure an LDAP user with administrative rights to edit the directory data. In OpenLDAP, add these lines to slapd.conf:
rootdn  "cn=Manager,dc=mycompany,dc=com"
rootpw  secret
We recommend that you specify authorization settings, although they are not strictly necessary for running the examples in this section. The following settings in slapd.conf permit the Manager user to read and write passwords, and everyone else to read all other attributes.
access to attr=userPassword
   by dn.base="cn=Manager,dc=mycompany,dc=com" write
   by self write
   by * none
access to *
   by dn.base="cn=Manager,dc=mycompany,dc=com" write
   by self write
   by * read
You can now start the LDAP server. On Linux, run the slapd service (typically in the /usr/sbin or /usr/local/libexec directory).
Next, populate the server with the sample data. Most LDAP servers allow the import of Lightweight Directory Interchange Format (LDIF) data. LDIF is a human-readable format that simply lists all directory entries, including their distinguished names, object classes, and attributes. Listing 4-5 shows an LDIF file that describes our sample data.
For example, with OpenLDAP, you use the ldapadd tool to add the data to the directory:
ldapadd -f sample.ldif -x -D "cn=Manager,dc=mycompany,dc=com" -w secret
Example 4-5. sample.ldif
 1. # Define top-level entry
 2. dn: dc=mycompany,dc=com
 3. objectClass: dcObject
 4. objectClass: organization
 5. dc: mycompany
 6. o: Core Java Team
 7.
 8. # Define an entry to contain people
 9. # searches for users are based on this entry
10. dn: ou=people,dc=mycompany,dc=com
11. objectClass: organizationalUnit
12. ou: people
13.
14. # Define a user entry for John Q. Public
15. dn: uid=jqpublic,ou=people,dc=mycompany,dc=com
16. objectClass: person
17. objectClass: uidObject
18. uid: jqpublic
19. sn: Public
20. cn: John Q. Public
21. telephoneNumber: +1 408 555 0017
22. userPassword: wombat
23.
24. # Define a user entry for Jane Doe
25. dn: uid=jdoe,ou=people,dc=mycompany,dc=com
26. objectClass: person
27. objectClass: uidObject
28. uid: jdoe
29. sn: Doe
30. cn: Jane Doe
31. telephoneNumber: +1 408 555 0029
32. userPassword: heffalump
33.
34. # Define an entry to contain LDAP groups
35. # searches for roles are based on this entry
36. dn: ou=groups,dc=mycompany,dc=com
37. objectClass: organizationalUnit
38. ou: groups
39.
40. # Define an entry for the "techstaff" group
41. dn: cn=techstaff,ou=groups,dc=mycompany,dc=com
42. objectClass: groupOfUniqueNames
43. cn: techstaff
44. uniqueMember: uid=jdoe,ou=people,dc=mycompany,dc=com
45.
46. # Define an entry for the "staff" group
47. dn: cn=staff,ou=groups,dc=mycompany,dc=com
48. objectClass: groupOfUniqueNames
49. cn: staff
50. uniqueMember: uid=jqpublic,ou=people,dc=mycompany,dc=com
51. uniqueMember: uid=jdoe,ou=people,dc=mycompany,dc=com
Before proceeding, it is a good idea to double-check that the directory contains the data that you need. We suggest that you download JXplorer (http://www.jxplorer.org) or Jarek Gawor’s LDAP Browser/Editor (http://www-unix.mcs.anl.gov/~gawor/ldap). These convenient Java programs let you browse the contents of any LDAP server. Supply the following options:
Host:
localhostPort: 389
Base DN:
dc=mycompany,dc=comUser DN:
cn=Manager,dc=mycompany,dc=comPassword:
secret
Make sure the LDAP server has started, then connect. If everything is in order, you should see a directory tree similar to that shown in Figure 4-10.
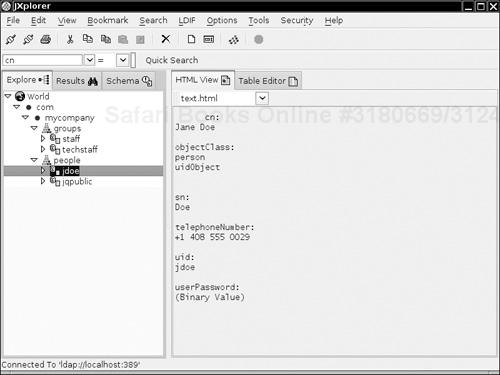
Once your LDAP database is populated, connect to it with a Java program. Start by getting a directory context to the LDAP directory, with the following incantation:
Hashtable env = new Hashtable();
env.put(Context.SECURITY_PRINCIPAL, username);
env.put(Context.SECURITY_CREDENTIALS, password);
DirContext initial = new InitialDirContext(env);
DirContext context = (DirContext) initial.lookup("ldap://localhost:389");
Here, we connect to the LDAP server at the local host. The port number 389 is the default LDAP port.
If you connect to the LDAP database with an invalid user/password combination, an AuthenticationException is thrown.
Note
Sun’s JNDI tutorial suggests an alternative way to connect to the server:
Hashtable env = new Hashtable();
env.put(Context.INITIAL_CONTEXT_FACTORY, "com.sun.jndi.ldap.LdapCtxFactory");
env.put(Context.PROVIDER_URL, "ldap://localhost:389");
env.put(Context.SECURITY_PRINCIPAL, userDN);
env.put(Context.SECURITY_CREDENTIALS, password);
DirContext context = new InitialDirContext(env);
However, it seems undesirable to hardwire the Sun LDAP provider into your code. JNDI has an elaborate mechanism for configuring providers, and you should not lightly bypass it.
To list the attributes of a given entry, specify its distinguished name and then use the getAttributes method:
Attributes attrs = context.getAttributes("uid=jqpublic,ou=people,dc=mycompany,dc=com");You can get a specific attribute with the get method, for example,
Attribute commonNameAttribute = attrs.get("cn");To enumerate all attributes, you use the NamingEnumeration class. The designers of this class felt that they too could improve on the standard Java iteration protocol, and they gave us this usage pattern:
NamingEnumeration<? extends Attribute> attrEnum = attrs.getAll();
while (attrEnum.hasMore())
{
    Attribute attr = attrEnum.next();
    String id = attr.getID();
    . . .
}
Note the use of hasMore instead of hasNext.
If you know that an attribute has a single value, you can call the get method to retrieve it:
String commonName = (String) commonNameAttribute.get();
If an attribute can have multiple values, you need to use another NamingEnumeration to list them all:
NamingEnumeration<?> valueEnum = attr.getAll();
while (valueEnum.hasMore())
{
    Object value = valueEnum.next();
    . . .
}
Note
As of Java SE 5.0, NamingEnumeration is a generic type. The type bound <? extends Attribute> means that the enumeration yields objects of some subtype of Attribute. Therefore, you don’t need to cast the value that next returns—it has type Attribute. However, a NamingEnumeration<?> has no idea what it enumerates. Its next method returns an Object.
You now know how to query the directory for user data. Next, let us take up operations for modifying the directory contents.
To add a new entry, gather the set of attributes in a BasicAttributes object. (The BasicAttributes class implements the Attributes interface.)
Attributes attrs = new BasicAttributes();
attrs.put("uid", "alee");
attrs.put("sn", "Lee");
attrs.put("cn", "Amy Lee");
attrs.put("telephoneNumber", "+1 408 555 0033");
String password = "woozle";
attrs.put("userPassword", password.getBytes());
// the following attribute has two values
Attribute objclass = new BasicAttribute("objectClass");
objclass.add("uidObject");
objclass.add("person");
attrs.put(objclass);
Then call the createSubcontext method. Provide the distinguished name of the new entry and the attribute set.
context.createSubcontext("uid=alee,ou=people,dc=mycompany,dc=com", attrs);Caution
When assembling the attributes, remember that the attributes are checked against the schema. Don’t supply unknown attributes, and be sure to supply all attributes that are required by the object class. For example, if you omit the sn of person, the createSubcontext method will fail.
To remove an entry, call the destroySubcontext method:
context.destroySubcontext("uid=alee,ou=people,dc=mycompany,dc=com");Finally, you might want to edit the attributes of an existing entry with this call:
context.modifyAttributes(distinguishedName, flag, attrs);
The flag parameter is one of the three constants ADD_ATTRIBUTE, REMOVE_ATTRIBUTE, or REPLACE_ATTRIBUTE defined in the DirContext class. The attrs parameter contains a set of the attributes to be added, removed, or replaced.
Conveniently, the BasicAttributes(String, Object) constructor constructs an attribute set with a single attribute. For example,
context.modifyAttributes("uid=alee,ou=people,dc=mycompany,dc=com",
   DirContext.ADD_ATTRIBUTE,
   new BasicAttributes("title", "CTO"));

context.modifyAttributes("uid=alee,ou=people,dc=mycompany,dc=com",
   DirContext.REMOVE_ATTRIBUTE,
   new BasicAttributes("telephoneNumber", "+1 408 555 0033"));

context.modifyAttributes("uid=alee,ou=people,dc=mycompany,dc=com",
   DirContext.REPLACE_ATTRIBUTE,
   new BasicAttributes("userPassword", password.getBytes()));
Finally, when you are done with a context, you should close it:
context.close();
The program in Listing 4-6 demonstrates how to access a hierarchical database through LDAP. The program lets you view, modify, and delete information in a database with the sample data in Listing 4-5.
Enter a uid into the text field and click the Find button to find an entry. If you edit the entry and click Save, your changes are saved. If you edited the uid field, a new entry is created. Otherwise, the existing entry is updated. You can also delete the entry by clicking the Delete button (see Figure 4-11).
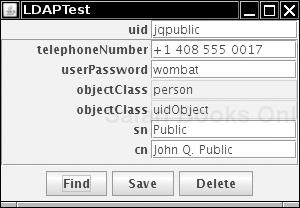
Here is a brief description of the program:
The configuration for the LDAP server is contained in the file
ldapserver.properties. The file defines the URL, user name, and password of the server, like this:ldap.username=cn=Manager,dc=mycompany,dc=com ldap.password=secret ldap.url=ldap://localhost:389
The
getContextmethod reads the file and obtains the directory context.When the user clicks the Find button, the
findEntrymethod fetches the attribute set for the entry with the givenuid. The attribute set is used to construct a newDataPanel.The
DataPanelconstructor iterates over the attribute set and adds a label and text field for each ID/value pair.When the user clicks the Delete button, the
deleteEntrymethod deletes the entry with the givenuidand discards the data panel.When the user clicks the Save button, the
DataPanelconstructs aBasicAttributesobject with the current contents of the text fields. ThesaveEntrymethod checks whether theuidhas changed. If the user edited theuid, a new entry is created. Otherwise, the modified attributes are updated. The modification code is simple because we have only one attribute with multiple values, namely,objectClass. In general, you would need to work harder to handle multiple values for each attribute.Similar to the program in Listing 4-4, we close the directory context when the frame window is closing.
You now know enough about directory operations to carry out the tasks that you will commonly need when working with LDAP directories. A good source for more advanced information is the JNDI tutorial at http://java.sun.com/products/jndi/tutorial.
Example 4-6. LDAPTest.java
  1. import java.awt.*;
  2. import java.awt.event.*;
  3. import java.io.*;
  4. import java.util.*;
  5. import javax.naming.*;
  6. import javax.naming.directory.*;
  7. import javax.swing.*;
  8.
  9. /**
 10.  * This program demonstrates access to a hierarchical database through LDAP
 11.  * @version 1.01 2007-06-28
 12.  * @author Cay Horstmann
 13.  */
 14. public class LDAPTest
 15. {
 16.    public static void main(String[] args)
 17.    {
 18.       EventQueue.invokeLater(new Runnable()
 19.          {
 20.             public void run()
 21.             {
 22.                JFrame frame = new LDAPFrame();
 23.                frame.setDefaultCloseOperation(JFrame.EXIT_ON_CLOSE);
 24.                frame.setVisible(true);
 25.             }
 26.          });
 27.    }
 28. }
 29.
 30. /**
 31.  * The frame that holds the data panel and the navigation buttons.
 32.  */
 33. class LDAPFrame extends JFrame
 34. {
 35.    public LDAPFrame()
 36.    {
 37.       setTitle("LDAPTest");
 38.       setSize(DEFAULT_WIDTH, DEFAULT_HEIGHT);
 39.
 40.       JPanel northPanel = new JPanel();
 41.       northPanel.setLayout(new java.awt.GridLayout(1, 2, 3, 1));
 42.       northPanel.add(new JLabel("uid", SwingConstants.RIGHT));
 43.       uidField = new JTextField();
 44.       northPanel.add(uidField);
 45.       add(northPanel, BorderLayout.NORTH);
 46.
 47.       JPanel buttonPanel = new JPanel();
 48.       add(buttonPanel, BorderLayout.SOUTH);
 49.
 50.       findButton = new JButton("Find");
 51.       findButton.addActionListener(new ActionListener()
 52.          {
 53.             public void actionPerformed(ActionEvent event)
 54.             {
 55.                findEntry();
 56.             }
 57.          });
 58.       buttonPanel.add(findButton);
 59.
 60.       saveButton = new JButton("Save");
 61.       saveButton.addActionListener(new ActionListener()
 62.          {
 63.             public void actionPerformed(ActionEvent event)
 64.             {
 65.                saveEntry();
 66.             }
 67.          });
 68.       buttonPanel.add(saveButton);
 69.
 70.       deleteButton = new JButton("Delete");
 71.       deleteButton.addActionListener(new ActionListener()
 72.          {
 73.             public void actionPerformed(ActionEvent event)
 74.             {
 75.                deleteEntry();
 76.             }
 77.          });
 78.       buttonPanel.add(deleteButton);
 79.
 80.       addWindowListener(new WindowAdapter()
 81.          {
 82.             public void windowClosing(WindowEvent event)
 83.             {
 84.                try
 85.                {
 86.                   if (context != null) context.close();
 87.                }
 88.                catch (NamingException e)
 89.                {
 90.                   e.printStackTrace();
 91.                }
 92.             }
 93.          });
 94.    }
 95.
 96.    /**
 97.     * Finds the entry for the uid in the text field.
 98.     */
 99.    public void findEntry()
100.    {
101.       try
102.       {
103.          if (scrollPane != null) remove(scrollPane);
104.          String dn = "uid=" + uidField.getText() + ",ou=people,dc=mycompany,dc=com";
105.          if (context == null) context = getContext();
106.          attrs = context.getAttributes(dn);
107.          dataPanel = new DataPanel(attrs);
108.          scrollPane = new JScrollPane(dataPanel);
109.          add(scrollPane, BorderLayout.CENTER);
110.          validate();
111.          uid = uidField.getText();
112.       }
113.       catch (NamingException e)
114.       {
115.          JOptionPane.showMessageDialog(this, e);
116.       }
117.       catch (IOException e)
118.       {
119.          JOptionPane.showMessageDialog(this, e);
120.       }
121.    }
122.
123.    /**
124.     * Saves the changes that the user made.
125.     */
126.    public void saveEntry()
127.    {
128.       try
129.       {
130.          if (dataPanel == null) return;
131.          if (context == null) context = getContext();
132.          if (uidField.getText().equals(uid)) // update existing entry
133.          {
134.             String dn = "uid=" + uidField.getText() + ",ou=people,dc=mycompany,dc=com";
135.             Attributes editedAttrs = dataPanel.getEditedAttributes();
136.             NamingEnumeration<? extends Attribute> attrEnum = attrs.getAll();
137.             while (attrEnum.hasMore())
138.             {
139.                Attribute attr = attrEnum.next();
140.                String id = attr.getID();
141.                Attribute editedAttr = editedAttrs.get(id);
142.                if (editedAttr != null && !attr.get().equals(editedAttr.get())) context
143.                      .modifyAttributes(dn, DirContext.REPLACE_ATTRIBUTE,
144.                            new BasicAttributes(id, editedAttr.get()));
145.             }
146.          }
147.          else
148.          // create new entry
149.          {
150.             String dn = "uid=" + uidField.getText() + ",ou=people,dc=mycompany,dc=com";
151.             attrs = dataPanel.getEditedAttributes();
152.             Attribute objclass = new BasicAttribute("objectClass");
153.             objclass.add("uidObject");
154.             objclass.add("person");
155.             attrs.put(objclass);
156.             attrs.put("uid", uidField.getText());
157.             context.createSubcontext(dn, attrs);
158.          }
159.
160.          findEntry();
161.       }
162.       catch (NamingException e)
163.       {
164.          JOptionPane.showMessageDialog(LDAPFrame.this, e);
165.          e.printStackTrace();
166.       }
167.       catch (IOException e)
168.       {
169.          JOptionPane.showMessageDialog(LDAPFrame.this, e);
170.          e.printStackTrace();
171.       }
172.    }
173.
174.    /**
175.     * Deletes the entry for the uid in the text field.
176.     */
177.    public void deleteEntry()
178.    {
179.       try
180.       {
181.          String dn = "uid=" + uidField.getText() + ",ou=people,dc=mycompany,dc=com";
182.          if (context == null) context = getContext();
183.          context.destroySubcontext(dn);
184.          uidField.setText("");
185.          remove(scrollPane);
186.          scrollPane = null;
187.          repaint();
188.       }
189.       catch (NamingException e)
190.       {
191.          JOptionPane.showMessageDialog(LDAPFrame.this, e);
192.          e.printStackTrace();
193.       }
194.       catch (IOException e)
195.       {
196.          JOptionPane.showMessageDialog(LDAPFrame.this, e);
197.          e.printStackTrace();
198.       }
199.    }
200.
201.    /**
202.     * Gets a context from the properties specified in the file ldapserver.properties
203.     * @return the directory context
204.     */
205.    public static DirContext getContext() throws NamingException, IOException
206.    {
207.       Properties props = new Properties();
208.       FileInputStream in = new FileInputStream("ldapserver.properties");
209.       props.load(in);
210.       in.close();
211.
212.       String url = props.getProperty("ldap.url");
213.       String username = props.getProperty("ldap.username");
214.       String password = props.getProperty("ldap.password");
215.
216.       Hashtable<String, String> env = new Hashtable<String, String>();
217.       env.put(Context.SECURITY_PRINCIPAL, username);
218.       env.put(Context.SECURITY_CREDENTIALS, password);
219.       DirContext initial = new InitialDirContext(env);
220.       DirContext context = (DirContext) initial.lookup(url);
221.
222.       return context;
223.    }
224.
225.    public static final int DEFAULT_WIDTH = 300;
226.    public static final int DEFAULT_HEIGHT = 200;
227.
228.    private JButton findButton;
229.    private JButton saveButton;
230.    private JButton deleteButton;
231.
232.    private JTextField uidField;
233.    private DataPanel dataPanel;
234.    private Component scrollPane;
235.
236.    private DirContext context;
237.    private String uid;
238.    private Attributes attrs;
239. }
240.
241. /**
242.  * This panel displays the contents of a result set.
243.  */
244. class DataPanel extends JPanel
245. {
246.    /**
247.     * Constructs the data panel.
248.     * @param attributes the attributes of the given entry
249.     */
250.    public DataPanel(Attributes attrs) throws NamingException
251.    {
252.       setLayout(new java.awt.GridLayout(0, 2, 3, 1));
253.
254.       NamingEnumeration<? extends Attribute> attrEnum = attrs.getAll();
255.       while (attrEnum.hasMore())
256.       {
257.          Attribute attr = attrEnum.next();
258.          String id = attr.getID();
259.
260.          NamingEnumeration<?> valueEnum = attr.getAll();
261.          while (valueEnum.hasMore())
262.          {
263.             Object value = valueEnum.next();
264.             if (id.equals("userPassword")) value = new String((byte[]) value);
265.
266.             JLabel idLabel = new JLabel(id, SwingConstants.RIGHT);
267.             JTextField valueField = new JTextField("" + value);
268.             if (id.equals("objectClass")) valueField.setEditable(false);
269.             if (!id.equals("uid"))
270.             {
271.                add(idLabel);
272.                add(valueField);
273.             }
274.          }
275.       }
276.    }
277.
278.    public Attributes getEditedAttributes()
279.    {
280.       Attributes attrs = new BasicAttributes();
281.       for (int i = 0; i < getComponentCount(); i += 2)
282.       {
283.          JLabel idLabel = (JLabel) getComponent(i);
284.          JTextField valueField = (JTextField) getComponent(i + 1);
285.          String id = idLabel.getText();
286.          String value = valueField.getText();
287.          if (id.equals("userPassword")) attrs.put("userPassword", value.getBytes());
288.          else if (!id.equals("") && !id.equals("objectClass")) attrs.put(id, value);
289.       }
290.       return attrs;
291.    }
292. }
javax.naming.Context 1.3
Object lookup(String name)looks up the object with the given name. The return value depends on the nature of this context. It commonly is a subtree context or a leaf object.
Context createSubcontext(String name)creates a subcontext with the given name. The subcontext becomes a child of this context. All path components of the name, except for the last one, must exist.
void destroySubcontext(String name)destroys the subcontext with the given name. All path components of the name, except for the last one, must exist.
void close()closes this context.
javax.naming.directory.DirContext 1.3
Attributes getAttributes(String name)gets the attributes of the entry with the given name.
void modifyAttributes(String name, int flag, Attributes modes)modifies the attributes of the entry with the given name. The value
flagis one ofDirContext.ADD_ATTRIBUTE,DirContext.REMOVE_ATTRIBUTE, orDirContext.REPLACE_ATTRIBUTE.
javax.naming.directory.Attributes 1.3
Attribute get(String id)gets the attribute with the given ID.
NamingEnumeration<? extends Attribute> getAll()yields an enumeration that iterates through all attributes in this attribute set.
Attribute put(Attribute attr)Attribute put(String id, Object value)adds an attribute to this attribute set.
javax.naming.directory.BasicAttributes 1.3
BasicAttributes(String id, Object value)constructs an attribute set that contains a single attribute with the given ID and value.
javax.naming.NamingEnumeration<T> 1.3
boolean hasMore()returns
trueif this enumeration object has more elements.T next()returns the next element of this enumeration.
In this chapter, you have learned how to work with relational databases in Java, and you were introduced to hierarchical databases. The next chapter covers the important topic of internationalization, showing you how to make your software usable for customers around the world.