6. Shooting in Daylight

When it comes to shooting outdoors, it can be quite challenging. You can’t overpower the sun, so you need to learn to work with it. You’ll need to position your camera and your subjects so the light is attractive and enhances the scene (instead of ruining it).
Of course, nothing is ever easy: The sun will move across the sky; objects like trees and buildings or even a passing cloud will obstruct the sun; the sun’s color temperature will vary depending on the time of day you’re shooting; and the position of the sun will change based on geography and the date. Therefore, you must learn to respect and work with the sun when shooting in daylight.
Poring Over the Footage
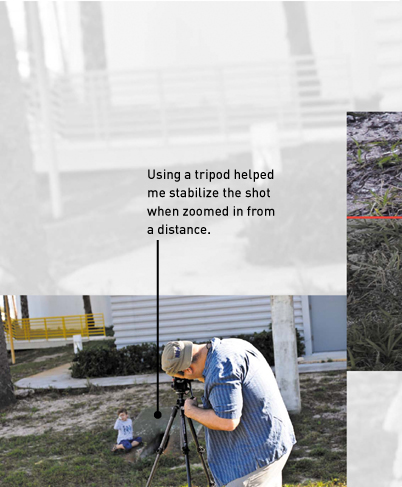
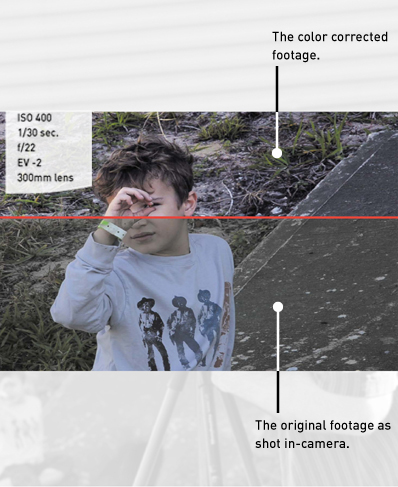
The top image of my son in some pretty intense shadow shows a split screen before and after I applied color correction to the image. I used a Levels adjustment to lift the exposure a bit and a Saturation adjustment to boost the color. Both adjustments are standard in nearly every video editing application. The area above the red line shows the image with the filters applied; the area below shows the original image. Remember to get the image “close” in-camera; then you can “finish” it when you edit.
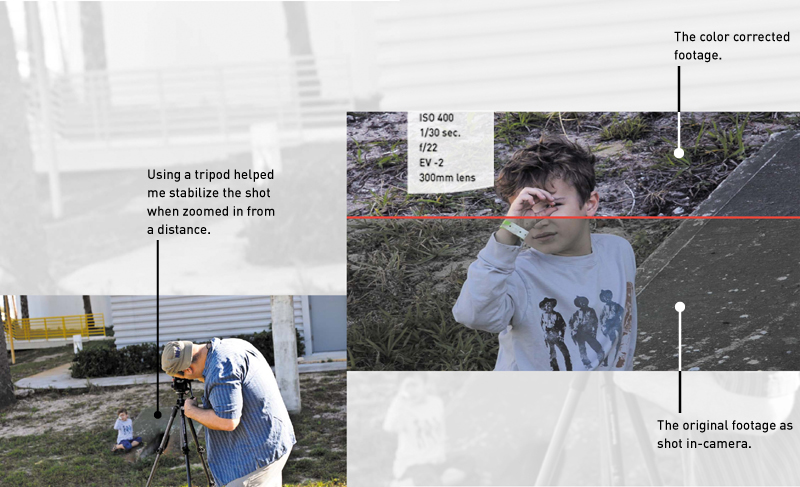
Photo by Vanelli.
Understanding Sunlight
No matter how good a photographer you are, you can’t completely control the way the sun affects your footage. It moves in your scene (more quickly the closer you are to sunrise or sunset). It also can vary greatly in quality and quantity. The longer you’re shooting in one location, the more aware of the sun you’ll need to be (Figure 6.1). Changes from shot to shot can become jarring when you edit the footage together because visual continuity can be broken.
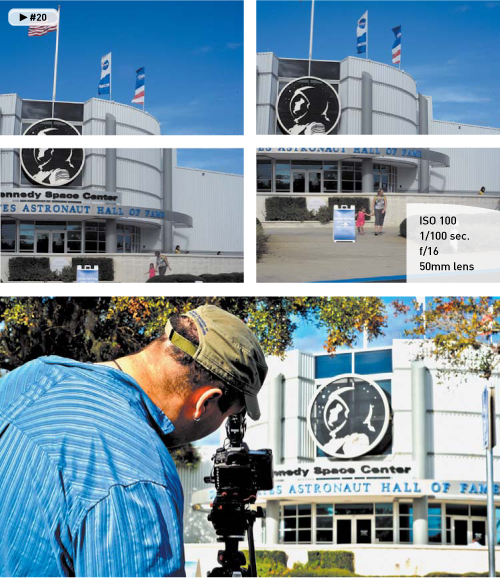
Figure 6.1. Finding a consistent exposure of the bright sky and shadowy sidewalks required a balancing act. Keeping my exposure in the middle to avoid clipping highlights or shadows was especially important because this was a tilted shot. Bottom: Positioning myself so the tree blocked the sun reduced the chance of lens flares on my camera. Photo by Vanelli.
What Is Sunlight?
Without revisiting too much material from your grade-school, earth science class, let’s review what sunlight is. Essentially, sunlight is a range of electromagnetic radiation given off by the sun. This radiation is filtered through the earth’s atmosphere and is obvious to the eye as daylight. Depending on the season as well as time of day, the amount of light visible will vary greatly.
The light can be directly visible as a source (although framing the actual sun directly in your camera for too long can potentially damage your camera’s sensor). The sunlight can also be diffused by clouds or reflected off natural and human-made surfaces. And of course, sunlight creates shadows that you must be aware of (Figure 6.2).
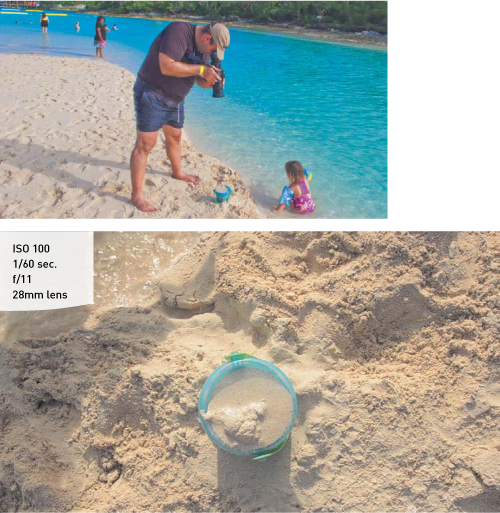
Figure 6.2. When shooting in sunlight, be mindful of your shadow. You don’t want to cast a shadow across your subject with your body or gear. Top photo by Meghan Ryan-Harrington.
What Is Color Temperature?
Light can actually be measured in terms of temperature; the common unit is degrees Kelvin (Figure 6.3). The scale ranges from the color of a candle (around 1900K) to that of a deep blue sky (around 10,000K). Typically, the average color temperature for outdoors at noon is approximately 5600K.
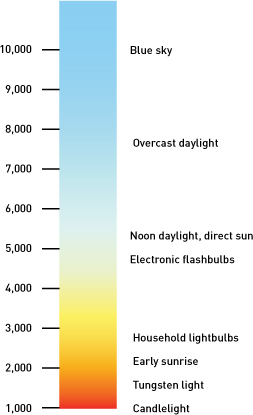
Figure 6.3. The Kelvin scale is a useful way to describe the temperature of light.
When you move from indoor light to outdoor light, your eyes automatically compensate for the color shift. All you’ll perceive is an overall change in light levels. Your DSLR camera, however, cannot compensate for the change. Whether you’re recording stills or video, you’ll see potentially dramatic color shifts if your camera isn’t calibrated correctly.
Recall that you learned about custom white balancing in Chapter 3, “Setting Up Your Camera.” You may need to take precise control while shooting video in daylight to adjust your color temperature slightly while shooting to account for changes like clouds and shade. Also, keep in mind that white balancing a shot during the video postproduction stages is very easy.
Choose Locations Wisely
When choosing where to shoot your video, you’ll want to give some thought to where you put your subjects (Figure 6.4). Try to find a place that is slightly out of direct sunlight, for example, under an overhang or under the shade of a tree or tall building. This will potentially diffuse the light. Don’t put your subjects in the shadows; instead, look for a place that is out of harsh light. Shooting under an overhang can provide an exposure approximately four stops less than direct sunlight. This will keep your subjects comfortable and make them look better.
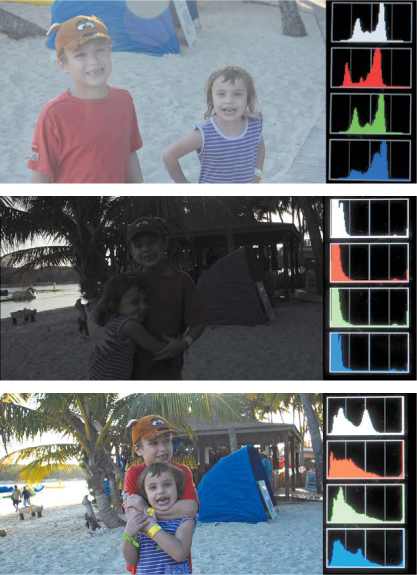
Figure 6.4. The first location is overexposed due to too much light. The lens flare has washed out the image as well. The middle image is a better location, but I’ve exposed for the sky, causing the subjects to fall into shadow. The final image is closer to a correct exposure for the subject and can be finessed during editing.
Tracking the Light
If the sun keeps moving, how do you track it for your shots? Well, unfortunately, you can’t just memorize a bunch of times or general angles. Your geographic location as well as the time of year will impact how close the earth is to the sun (and hence change times like sunrise and sunset). But these times and angles can be calculated (and in fact already have been).
I highly recommend that you add a SunPath style calculator to your smart phone or iPod/iPad. With this software you’ll always know where the sun is in relation to your scene, which will help you choose the best shots.
My favorite app is called Sun Seeker: 3D Augmented Reality Viewer by ozPDA (Figure 6.5). This application uses the GPS on my phone to pinpoint my location and determine sun data based on my position. Alternatively, I can enter any location and date to virtually “scout” a location in advance to plan for the likely lighting conditions. The app also offers visual ways to tell where the sun will be throughout a shooting day. A compass view shows solar position, angle, and elevation for both day and night. My favorite feature is the augmented reality view, which takes a live video feed from the phone’s camera and overlays detailed information about the sun. It’s great to be able to tell where and when the sun will rise or set, or for that matter pass behind a large building. The augmented reality view makes it much easier to frame shots.
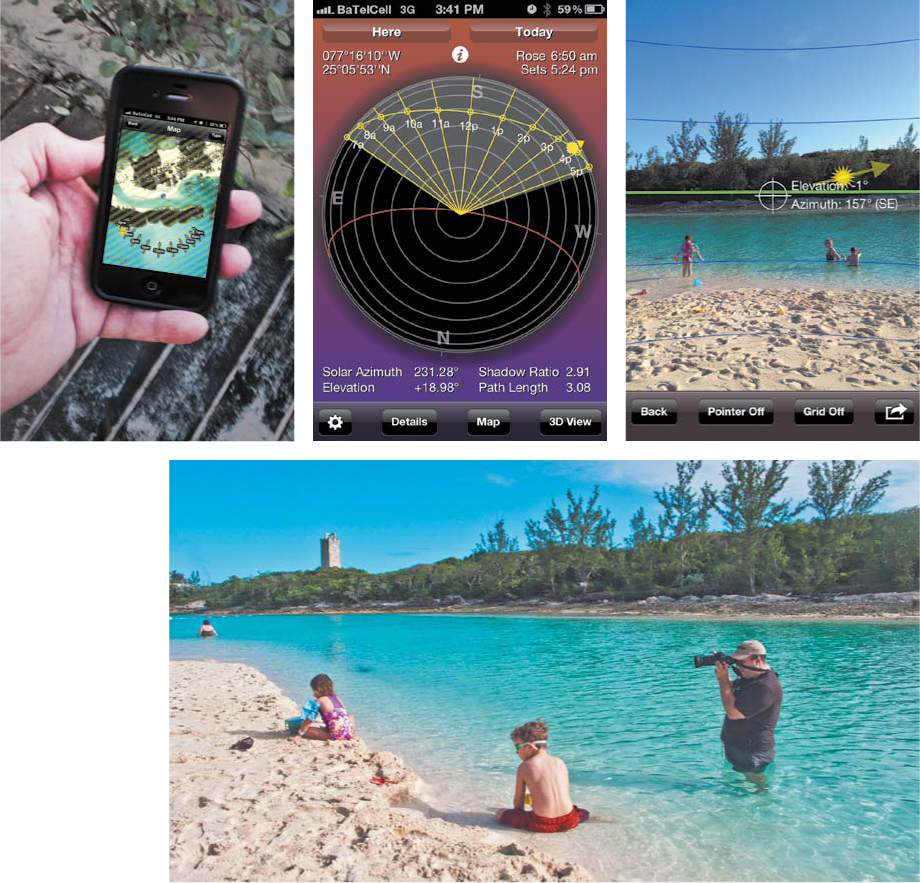
Figure 6.5. Knowing where the sun would be coming from allowed me to position myself so the sun was mostly behind me. This greatly reduced lens flares. Photo by Meghan Ryan-Harrington.
Bouncing Light
If you have the benefit of a second set of hands, you might try bouncing the light in your scene by using a reflector—a common photography tool. This highly reflective, flexible disc can be folded into a small size and easily carried. Keeping a small reflector (Figure 6.6) in your camera bag can be the perfect solution for many lighting problems. Simply bounce the light back onto your subject to help fill in shadows on a face. In a pinch you can also use a piece of white poster board or foam core.
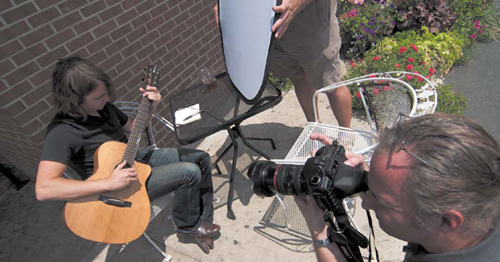
Figure 6.6. Using a simple reflector, the light is bounced back on the subject to help fill in facial details.
Why a Partly Cloudy Day Is a Good Thing
Although shooting on a nice sunny day can be a pleasant work experience, your camera might find it more difficult to process information. Without clouds, the sun’s movement is much more visible. The sun is also likely to produce hard shadows that can make your subjects look less attractive (Figure 6.7).
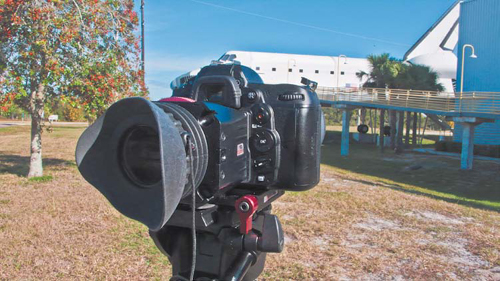
Figure 6.7. Without a cloud in the sky, the light is very harsh as are the shadows.
On the other hand, a slightly overcast day is pretty ideal. The light tends to be very even because the cloud cover diffuses it. Video pros love to hear the term “partly cloudy” because it practically guarantees uniform lighting. Of course, if there are too many clouds, your beautiful light can go flat, resulting in a boring, shadowless scene.
Tracking the weather is important when choosing times to shoot. By using a weather tracking application on my smart phone, I can see what the cloud coverage will be, get rain warnings, and more. Knowing the weather lets you make smart decisions about shooting. The goal is to shoot in the best light without your gear getting unnecessarily soaked.
Avoiding Lens Flares
The sun is generally incredibly useful to photographers, but it can occasionally be annoying. If the sun hits your lens at an undesirable angle, you can end up with spots or flares that ruin a shot. Flares generally take on a geometric shape and may be easy to miss while recording (Figure 6.8). Additionally, a flare can significantly reduce the amount of contrast and saturation in your image.
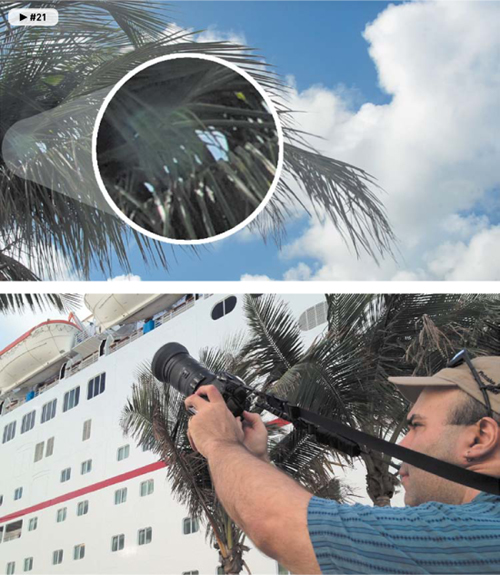
Figure 6.8. Pointing the camera into the sun almost guarantees you’ll get lens flares, as in this image of a washed-out area with a geometric flare in the trees. Lower photo by Meghan Ryan-Harrington.
The flare is typically caused by a very bright light source (in most cases the sun). Flares are far more common in zoom lenses because they have multiple surfaces that are prone to light scatter. With a little practice you’ll learn to spot flares quickly. Eliminating flares just requires a few strategies and modifications to your shooting style.
Use a Hood
Most lenses include a hood attached at the end of the lens. Typically, the hood is reversed for shipping (to make the lens shorter and easier to pack). Unfortunately, most people never bother to turn the hood around (Figure 6.9).
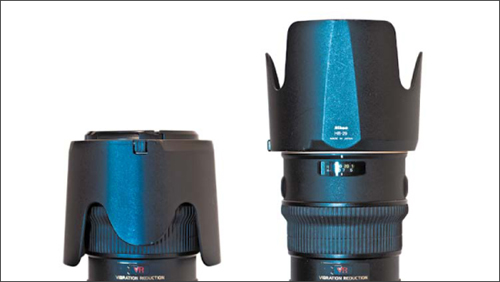
Figure 6.9. When shooting, reverse the lens hood to protect your lens from flares and other issues. You can reverse it again for packing or shipping.
Once a lens is mounted to your camera, you should properly set the hood. With a quick turn (and perhaps a push of a release button) the hood can be removed. Reverse its direction and reattach it to your lens to protect the lens from flare.
Hoods are usually specific to each lens. Some will have notches (called petals) to better accommodate the aspect ratio of your camera’s digital sensor. These hood types have an angle of view that is greater in one direction than the other. Others will vary in length to avoid casting a vignette (darkening of the edges) in your final image.
If you lose your hood, I recommend purchasing a replacement. Using a hood is the best way to reduce flares (Figure 6.10). It can also help protect the front of the lens from accidental impact as well as contact smudges.
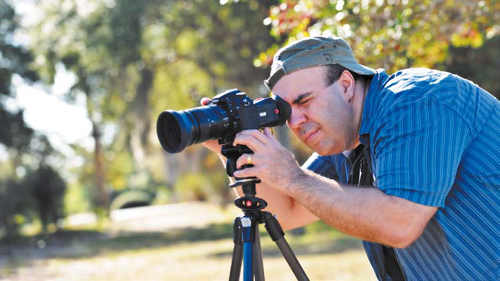
Figure 6.10. Sometimes a slight tilt to your camera can remove a flare. Photo by Vanelli.
Keep the Lens Clean and Clear
Most lenses have an anti-reflective coating to cut down on lens flare. Of course, greasy fingerprints and other smudges can also cause problems. When you clean the lens, be sure to use a proper lens cleaning cloth to remove smudges without damaging this coating.
If you’ll be using additional filters on your lenses (such as a protective UV filter or a neutral density filter), make sure you don’t skimp on quality. Cheap filters often lack good anti-reflective coatings. These filters can often cause flare through the introduction of additional reflective surfaces (Figure 6.11). If you’re using filters, make sure you choose a quality that matches your lens.
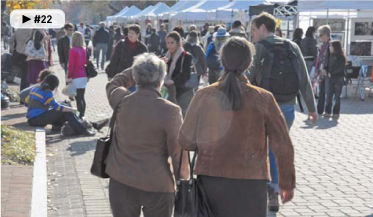
Figure 6.11. The use of a cheap UV filter accentuated the tendency of my lens to flare when shooting on a bright sunny day.
Flag the Lens
One way to prevent lens flare is to block the light. Typically, the flare is caused by light entering from the side of the frame. This light is rarely needed for a proper exposure and can be blocked. If you’re using a tripod, you can place your body to the side of the lens to serve as a wall. You can also reach out and hold a hat off to the side to block the light.
You can, of course, use other devices to block unwanted light. I’ll often attach a Rogue FlashBender directly to my lens (www.expoimaging.com). These flexible cards are normally used to shape an off-camera flash, but I find the flexible support rods and bendable surface works well to flag a troubling flare (Figure 6.12).
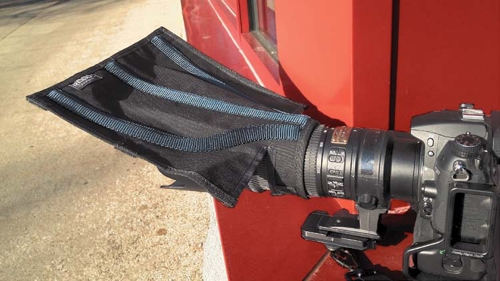
Figure 6.12. I used a Rogue FlashBender to protect the lens from additional flare while shooting on a bright day.
Change Your Position
If you can’t minimize a flare, you have one simple recourse. Move your camera until the flare is gone. Remember that flare is caused by light hitting the lens at an unwanted angle (Figure 6.13). Often, a small adjustment can be very effective at removing the flare. You can frame the shot so objects are blocking the sun or light source (or even reposition your subject to block the light for you). You may also find that tilting or panning the camera just a few degrees can remove the flare.

Figure 6.13. The top shot has the light coming from behind the subject. Not only does the backlighting make exposure difficult, but it creates a nasty flare. The bottom shot shows the same location, but the photographer and subject’s positions have been swapped.
Controlling the Camera in Daylight
When it comes to video, you really want to get the shot as close to right as possible in the camera. The reasons for this are twofold: First, rendering color correction filters during editing is relatively time-consuming with video because there are so many frames to process. Second, what you can accomplish in the field and at the computer is relatively limited compared to a raw photo workflow. Always do your best to shoot your footage right from the very start.
Better Underexposed than Overexposed
Although you can do a lot in postproduction to fix exposure, video files are a lot like working with JPEG images (as opposed to raw photos). Push an adjustment too far and you’ll get a posterized image where details are clipped (a reduction in the subtle details, which makes an image look artificial; gradients get flattened and colors become oversaturated). Shoot in conditions that are too dark or too bright and you’ll have no information to work with, and possibly quite a bit of noise.
The key is to always protect your highlights. Don’t let the bright areas of your image (like skies or faces) get clipped. On your camera, you’ll likely have a histogram view. You can typically see this histogram after taking a photo or cycling through your view options (in most cameras you can push the Info button or press your navigation dial from side to side to cycle views). If the histogram is pushed against the right edge, it means you have no information to work with. Blown-out highlights will be pure white, and there is just no way to recover the details.
In Figure 6.14 you can see the same scene shot two different ways. In the image on the left, I shot the scene a little hot (too bright). By color correcting in postproduction, I was able to recover many details. But you’ll notice that a lot of the details in the shadows are clipped.
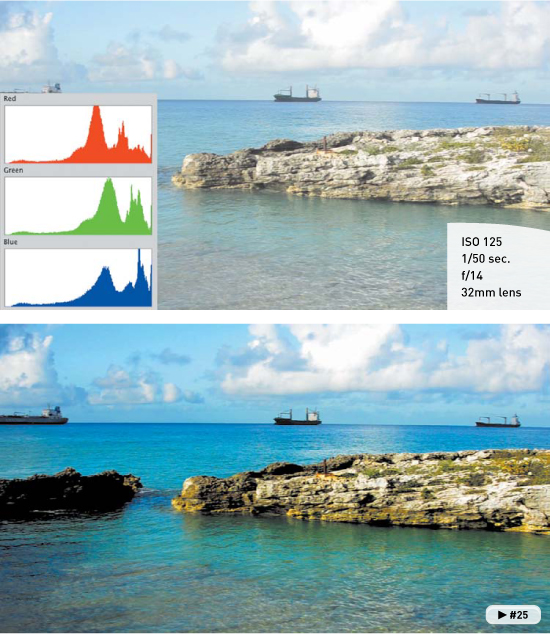
Figure 6.14. Be careful and avoid slamming your histograms to the right.
In addition, I shot the scene and exposed for the “boring middle”—not too much contrast (Figure 6.15). In this case the histograms were more balanced, and I had a lot more information to work with. After color correction (a Levels and Saturation adjustment), the shot looks a lot better.
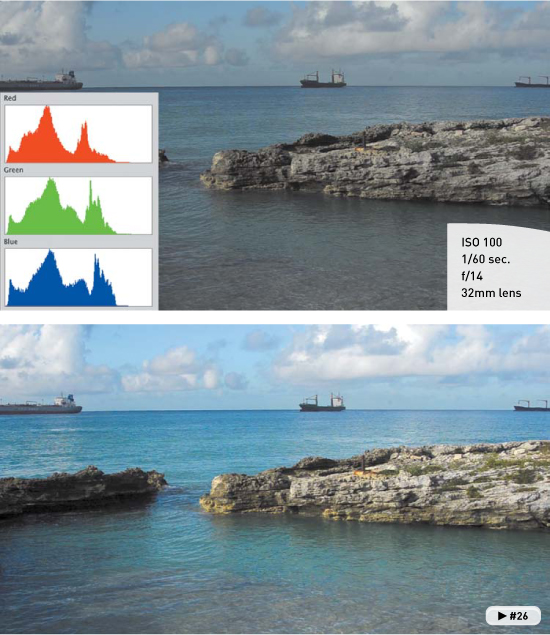
Figure 6.15. It’s better to slightly underexpose than overexpose when shooting video. Notice how the shadowy details in the rocks are preserved better in this version.
I’ve mentioned the use of a loupe or viewfinder a few times in this book. With outdoor shooting, the addition of this equipment is essential. Bright light on your LCD just makes the shot darn near impossible to judge. If a loupe is out of your price range, wear a hat and use it as a shield from time to time to judge exposure. I can’t emphasize enough that a loupe should be one of your first investments if you become serious about shooting video on your DSLR camera (Figure 6.16). By removing all light pollution, you can make accurate decisions.
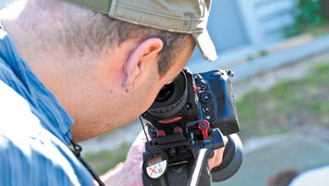
Figure 6.16. If you haven’t taken the hint yet, you need one of these. It doesn’t matter which brand you buy, just get a loupe. Photo by Vanelli.
Why Do My Photos Look Better in the Same Light than My Videos?
Recall that in Chapter 3 I discussed some of the differences between raw photos and unprocessed video. Video is a pretty weak medium as far as color fidelity goes, so don’t panic. The compression formats used by your DSLR camera throw away a lot of information. Unlike raw photos, which offer great controls to recover highlights and lift shadows, video tends to be lacking in these areas.
When shooting, I tend to aim for the “boring middle.” In other words, I don’t push my contrast too far when shooting video. Rather, I try to get as much information into the image’s histogram. Instead of applying picture or image styles to my footage in-camera, I strongly prefer to add all of my color grading and exposure manipulation during the editing stage. Figures 6.17 through 6.19 show examples of this method.
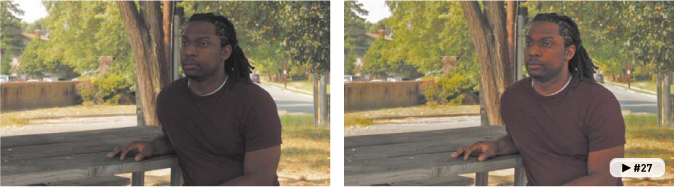
Figure 6.17. A Shadow/Highlight adjustment lifts the skin tones for better contrast.

Figure 6.18. A Curves adjustment lifts the shadow areas and knocks down the highlights. A small saturation boost restores the colors that are washed out.

Figure 6.19. A simple Auto adjustment using Curves restored proper contrast per channel.
Using Camera Controls to Control Exposure
In Chapter 4, “Exposure and Focus,” I examined exposure in depth (if you skipped that chapter, I suggest reading it now). Here I’ll review my approach to handle exposure when shooting in bright outdoor light. The following steps show the order in which I tackle the problem of getting a proper exposure.
1. Make sure the camera is in Manual shooting mode.
2. Set the shutter speed to a 1/50 of a second for 24 or 25 fps material or 1/60 of a second for 30 fps sources.
3. Set the ISO to 100 to start. This is the base ISO for outdoor lighting.
4. Adjust the f-stop to taste until the correct depth of field is set for the aesthetic look you want to capture.
5. Refine the exposure by either increasing the ISO if the image is too dark or by decreasing the shutter speed to let in less light.
6. Take a still photo for reference, and then examine the image using the built-in histograms to see the relevant details (Figure 6.20).
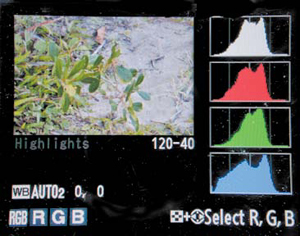
Figure 6.20. You can use the built-in scopes of your camera to check exposure. Just shoot a reference still before rolling video.
7. Adjust and remeasure the scene until you’re happy with the exposure.
When to Use Filters
Sometimes when shooting outdoors, you’ll just have too much light (this is particularly true if you’re using a full-frame sensor like the Canon 5D Mark II). Even after setting the ISO to a low rating (around 100), you may have issues and still need to lose some additional stops.
What’s the answer? Filters. You can add an additional layer of glass over the lens to get the exposure down to where you need it (Figure 6.21). Try using neutral density (ND) filters or polarizers to pull down the overall exposure. You can also use graduated filters to help control exposure in select areas of the frame (like the sky or a bright sandy beach).
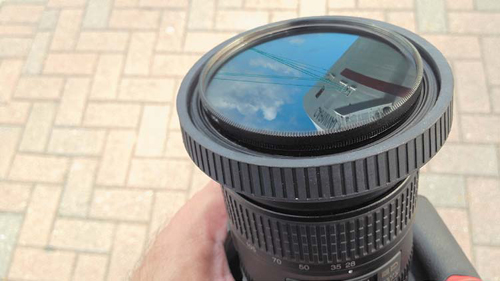
Figure 6.21. The use of a neutral density (ND) filter can really cut down on exposure problems when shooting outdoors.
A slightly more expensive option that offers the most flexibility is to use a variable ND filter, which screws on to the end of your lens. You can then further rotate it to adjust its density. These types of filters can knock down your exposure an additional 2–8 stops.
Chapter 6 Assignments
Now that you have a better understanding of where to target your exposure, it’s time to practice. Remember that your shots may need a little work after the fact, but that’s OK.
Download a SunPath Calculator Application
Download a SunPath calculator app to your phone, iPod, or computer. Experiment with its controls and determine where the sun will be a week from today at 3 p.m. for your current location.
Change Your Position
Try shooting a subject from multiple angles in the afternoon sun on a day that is fairly cloudless. Can you find some angles that work better than others? Note where the sun is in relation to your lens.
Fix Your Hood
If your lens has a hood, go outside and shoot in the sunlight. Experiment with the hood facing the right and wrong ways. Determine what impact it had on lens flares.
Share your results with the book’s Vimeo group!
Join the group here: vimeo.com/groups/DSLRVideoFSTGS