Appendix A Installing wxWidgets
The process of installing wxWidgets has been made as simple as possible by using tools and techniques native to each platform. This appendix introduces the different methods for installing wxWidgets on various platforms with different compilers and discusses some of the main configuration options available. Only the most popular compilers and environments are covered in this appendix; Digital Mars C++, OpenWatcom C++, and Cygwin are all supported by wxWidgets but are not described here. However, you can find instructions for these compilers in the wxWidgets documentation under docs/msw.
If you want, you can download and unpack wxWidgets and then go straight to Appendix C, “Creating Applications with DialogBlocks,” and use DialogBlocks to compile both wxWidgets and your application.
Before we discuss wxWidgets installation, let’s briefly look at choices in compiler tools to use with wxWidgets. Note that although cross-compilation is possible (compiling on one platform to run on another), you will generally need to compile, debug, and test on each platform that you support. However, you probably have a favorite platform you prefer to develop on, just compiling and testing on the others. If you only have one machine for Windows and Linux development, consider using a tool such as the excellent VMware virtual machine software to run several operating systems simultaneously.
Microsoft’s Visual Studio (see the section “Windows—Microsoft Visual Studio”) has a very good IDE, which makes debugging productive, and the compiler is good at optimizing executables for space and speed. It’s also reasonably fast to run (though slower than Borland C++). This compiler is highly recommended for wxWidgets work, and it is the tool of choice for most wxWidgets developers on Windows.
Borland C++ (BC++) is a fast compiler, but the linker has trouble with wxWidgets executable sizes, and the compiler is not actively supported by Borland. In addition, there is no good free debugger for BC++. You can download Borland C++ from http://www.borland.com/products/downloads/download_cbuilder.html.
GCC is available in two forms on Windows: MinGW and Cygwin. MinGW makes use of the Windows run-time libraries and so is a better choice for “native” Windows applications. MinGW has an accompanying Unix-like shell, MSYS, which you will need if you want to use the configure method of compiling. MinGW can also compile wxWidgets and applications from the Windows command prompt using its own make tool and makefile.gcc makefiles. MinGW can be used on its own or with an IDE such as Dev-C++ or DialogBlocks. Download it from http://www.mingw.org or install it from the CD-ROM. Unfortunately, GCC is a slow compiler that creates huge libraries and executables, and its GDB debugger (or IDE equivalents) cannot compare with the convenience of VC++’s debugger.
Digital Mars C++ also works with wxWidgets and is quite fast; the IDE and debugger need to be purchased. Download Digital Mars C++ from http://www.digitalmars.com or copy it from the CD-ROM.
OpenWatcom C++ does not implement all C++ standards, but it works with wxWidgets and can be downloaded from http://www.openwatcom.org or copied from the CD-ROM.
CodeWarrior will also work with wxWidgets and provide a consistent environment for those using CodeWarrior on MacOS.
See also Appendix E, “Third-Party Tools for wxWidgets,” for other IDEs and tools.
All the compilers mentioned here can be “driven” by DialogBlocks (on the accompanying CD-ROM), so you can design your dialogs and other user interface elements in addition to building and running your application. See Appendix C for more on DialogBlocks.
On Linux, GCC is usually installed by default. However, you can use it in a number of different ways. You can use command-line tools (configure, make, and GDB for debugging), or you can use an IDE such as KDevelop, as described in this chapter (though you’ll still compile the wxWidgets libraries from the command line). You also can use the command line to compile and then use GDB within Emacs to step through your application, or you can use the graphical debugger DDD.
On Mac OS X, you can download the GCC-based development tools from Apple’s web site after registering as an Apple Developer Connection (ADC) member. You can use configure and make in exactly the same way as on Linux, but you can also use Apple’s Xcode IDE to compile applications, again described later in this chapter. If you prefer, you can use CodeWarrior; however, you may find it harder to automate wxWidgets and application builds with CodeWarrior.
On both Linux and Mac OS X, you can also use DialogBlocks (on the CD-ROM), enabling you to create dialogs and other user interface elements easily in addition to generating makefiles and building your application with GCC. See Appendix C for more on DialogBlocks.
You may want to start off compiling wxWidgets and its samples with the command-line tools and then graduate to an IDE for new applications when you understand the basics.
The latest version of wxWidgets can be downloaded from the wxWidgets web site, or you can use the version included on the CD-ROM. After you have downloaded the library source or copied it from the CD-ROM, you will need to extract the files to a location of your choice. Windows users also have the option of a self-extracting installer.
After you have unpacked wxWidgets, you may want to familiarize yourself with the organization of the files. The structure is similar to other open source projects, with separate directories for include files (include), source files (src), compiled library objects (lib), documentation (docs), sample programs (samples), and build information (build). Within some directories, there are further classifications of files based on which operating system(s) they are for:
![]()
common: Used by all platforms, such as strings, streams, and database connectivity.
![]()
expat: An XML parser library.
![]()
generic: Widgets and dialogs implemented by wxWidgets for use where native versions are not available.
![]()
gtk: For GTK+.
![]()
html: For the HTML controls designed for wxWidgets.
![]()
iodbc: The iODBClibrary for platforms without native ODBC support.
![]()
jpeg: The JPEG library for platforms without native JPEG support.
![]()
mac: For the Mac, further subdivided into classic (OS 9), carbon (OS 9 and OS X), and corefoundation (OS X).
![]()
msw: For Microsoft Windows.
![]()
png: The PNG image library for platforms without native PNG support.
![]()
regex: A regular expression processor for platforms without native regular expression processing (or when Unicode is enabled).
![]()
tiff: The TIFF image library for platforms without native TIFF support.
![]()
unix: Used by all Unix-based platforms, including Linux and Mac OS X.
![]()
xrc: wxWidgets’ XML resource library.
![]()
xml: A C++ wrapper around the XML parser Expat.
![]()
zlib: The zlib compression library for platforms without native zlib support.
wxWidgets can be built using almost countless permutations of configuration options. However, four main options are available on all platforms:
![]() Release versus Debug: Debug builds include debug information and extra checking code, whereas release builds omit debug information and enable some level of optimization. It is strongly recommended that you develop your application using a debug version of the library to benefit from the debug assertions that can help locate bugs and other problems.
Release versus Debug: Debug builds include debug information and extra checking code, whereas release builds omit debug information and enable some level of optimization. It is strongly recommended that you develop your application using a debug version of the library to benefit from the debug assertions that can help locate bugs and other problems.
![]() Unicode versus non-Unicode: As discussed in Chapter 16, “Writing International Applications,” Unicode facilitates the display of non-ASCII characters such as Cyrillic, Greek, Korean, Japanese, and so on. wxWidgets natively supports Unicode; there is no penalty for using Unicode in terms of available features (with the exception of wxODBC on Unix), nor is any additional coding required. Windows 95, 98, and ME do not have built-in Unicode support, but wxWidgets can be configured to use the add-on MSLU library for these operating systems.
Unicode versus non-Unicode: As discussed in Chapter 16, “Writing International Applications,” Unicode facilitates the display of non-ASCII characters such as Cyrillic, Greek, Korean, Japanese, and so on. wxWidgets natively supports Unicode; there is no penalty for using Unicode in terms of available features (with the exception of wxODBC on Unix), nor is any additional coding required. Windows 95, 98, and ME do not have built-in Unicode support, but wxWidgets can be configured to use the add-on MSLU library for these operating systems.
![]() Static versus Shared: A static version of the library is linked with the application at compile time, whereas a shared version is linked at runtime. Using a static library results in a larger application but also relieves the end user of the need for installing shared libraries on his or her computer. On Linux and Mac OS X, static libraries end in
Static versus Shared: A static version of the library is linked with the application at compile time, whereas a shared version is linked at runtime. Using a static library results in a larger application but also relieves the end user of the need for installing shared libraries on his or her computer. On Linux and Mac OS X, static libraries end in .a, and on Windows, they end in .lib. On Linux and Mac OS X, shared libraries end in .so, and on Windows, they end in .dll. Note that there are certain memory and performance implications of static and shared libraries that are not specific to wxWidgets; they are beyond the scope of this book.
![]() Multi-lib versus Monolithic: The entire wxWidgets library is made up of modules that separate the GUI functionality from the non-GUI functionality as well as separate advanced features that are not frequently needed. This separation enables you to use wxWidgets modules selectively depending on your specific needs. Alternatively, you can build wxWidgets into one “monolithic” library that contains all of the wxWidgets modules in one library file.
Multi-lib versus Monolithic: The entire wxWidgets library is made up of modules that separate the GUI functionality from the non-GUI functionality as well as separate advanced features that are not frequently needed. This separation enables you to use wxWidgets modules selectively depending on your specific needs. Alternatively, you can build wxWidgets into one “monolithic” library that contains all of the wxWidgets modules in one library file.
You can build and simultaneously use more than one version and/or configuration of wxWidgets. The way you access the different builds depends on your platform, but all library files are created using a standard naming convention: wx<library><version><u><d> where u and d indicate Unicode and debug, respectively. For example, the file wxbase26ud.lib is the Unicode debug base library for wxWidgets 2.6, and wxmsw26u_core contains the core GUI elements for a Unicode release build on Windows.
After building wxWidgets, you can confirm that the library is built correctly by compiling and running one of the samples. The samples are located in the samples folder of the main wxWidgets directory, with each sample in its own subfolder. You might try samples/minimal first because it’s the simplest. For each compiler, directions for building one of the samples are included in docs/<platform>/install.txt. There are also more complete applications in the demos directory, and though they are not discussed here, they are built almost identically to the samples in most cases.
It is important to note that you can build wxWidgets with makefiles on any platform but still use an IDE to develop your projects. For example, you can use the Microsoft Visual C++ command-line compiler to build wxWidgets but still use Microsoft Visual Studio to create your applications.
Many IDEs and compilers are available for Windows. The dominant IDE on Windows is Microsoft Visual Studio; wxWidgets requires at least Visual Studio 5. Microsoft has released Visual Studio 2005 Express for home enthusiasts and students, and it features all of the common Visual Studio tools, omitting only the high-powered tools typically used in large projects or a corporate environment. Although it is a free beta download at the time of writing, it will cost around $50 once it is officially released. See http://lab.msdn.microsoft.com/vs2005/.
You must have the Windows Platform SDK installed in order to build wxWidgets, which is a free download from http://www.microsoft.com/msdowload/platformsdk/sdkupdate.
When using the Platform SDK and the free compiler, install both the Core and Internet modules, and build wxWidgets with the run-time library linked statically (pass RUNTIME_LIBS=static to make or set Runtime Linking to Static in your DialogBlocks configurations). If using a project file, you will need to modify this setting manually, both in the wxWidgets and application project files. You may also need to remove the library odbc32.lib from the linker settings because the Platform SDK does not contain this library.
The SDK is already included with any of the professional versions of Visual Studio.
Regardless of which version of Visual Studio you are using, the process for building wxWidgets is the same. From your wxWidgets installation, open the wx.dsw workspace from the buildmsw directory. If you are using a version later than 6.0, you may be prompted that the sub-projects must be converted to the current Visual C++ project format. Allow Visual Studio to proceed with the conversion; if you need the files in their original format, you can always extract the originals again. After all the projects in the workspace have been opened, you can browse the sources and classes.
If you are using Visual C++ version 7 or 8 (.NET or 2005), build wxWidgets by selecting Build Solution from the Build menu. Different solutions are used to build different library configurations, selectable from the Configuration Manager from the Build menu. Simply select which configuration you want to use, such as Debug, Unicode Release, or DLL Unicode Debug.
If you are using Visual Studio 5 or 6, build wxWidgets by selecting Batch Build from the Build menu and checking the desired library configurations. The wxWidgets project is set up to allow building release and debug versions of both Unicode and non-Unicode libraries, both static and shared (DLL). Ensure that you are building all of the sub-projects for the configurations that you want to use.
Most developers only need to build the release and debug libraries, or if you have a need for Unicode, the Unicode release and Unicode debug libraries. As a rule, using the static (non-DLL) libraries makes it easy to distribute a single-file application rather than needing to also distribute (or otherwise require) the correct wxWidgets DLL. Using the DLL builds can also result in quirks relating to application startup, so they should be used only when needed and only if you have a thorough understanding of how DLLs are utilized by both wxWidgets and Windows.
The compiled library files are placed into the lib directory under your wxWidgets directory. Two directories are created: vc_dll and vc_lib, for the shared and static builds, respectively.
If the process of building via project files seems fiddly (the number of configurations in the project file can be confusing!), consider using the command-line alternative as described in the section “Windows—Microsoft Visual C++ Command Line,” or build wxWidgets via DialogBlocks.
Workspace and project files are included for every wxWidgets sample. Use Visual Studio to open a workspace for one of the samples (in the samples directory within your wxWidgets installation), and then select a configuration matching any of the wxWidgets library builds that you compiled. For example, if you have built the Unicode debug library, compile the sample using the Unicode debug build. The samples are created to look within the wxWidgets tree for the include and library files in their default locations. As long as the library built successfully and the structure of the source tree hasn’t been altered, the samples will build successfully as well.
Microsoft’s C++ compiler is part of any Visual C++ installation (or can be downloaded free from Microsoft) and can be used from the command line. The Microsoft compiler makefile is in the buildmsw directory. From there, invoke the Microsoft compiler using a command such as the following ones, which demonstrate how to toggle all of the major configuration options:
nmake -f makefile.vc UNICODE=0 SHARED=0 BUILD=release MONOLITHIC=0
nmake -f makefile.vc UNICODE=0 SHARED=0 BUILD=debug MONOLITHIC=0
The compiled library files are placed into the lib directory under your wxWidgets directory. Two directories are created: vc_dll and vc_lib, for the shared and static builds, respectively.
If you need ODBC or OpenGL functionality, set wxUSE_ODBC or wxUSE_GLCANVAS to 1 in includewxmswsetup.h before compiling, and also pass USE_ODBC=1 or USE_OPENGL=1 on the nmake command line.
To remove the object files and libraries, append the target clean to the same command line. However, be aware that this won’t clean up the copy of setup.h that is placed under the vc_lib and vc_dll directories, so if you make any edits to includewxmswsetup.h, delete the vc_lib or vc_dll directories yourself before recompiling.
If you change into one of the sample program directories, you will see a makefile for Microsoft’s compiler called makefile.vc. The sample programs are built using the same command and switches as the library itself, and they are designed to look within the wxWidgets tree for the include and library files in their default locations. Be sure that you specify flags for a configuration of the library that has been built, or the sample will fail to link. That is, if you have only built a Unicode static release version of wxWidgets, use the same build options for the sample. For example:
cd sampleswidgets
nmake -f makefile.vc UNICODE=1 SHARED=0 BUILD=release MONOLITHIC=0
vc_mswdwidgets.exe
As with the library makefile, you can clean a sample by appending the clean target, for example:
nmake -f makefile.vc UNICODE=0 SHARED=0 BUILD=debug clean
Borland’s command-line C++ compiler (BC++) is a free download, but it is also part of Borland’s professional C++Builder IDE. Building wxWidgets with BC++ is done from the command line, using flags to the compiler to specify the library build configuration. The BC++ makefile is in the buildmsw directory. From there, invoke the BC++ compiler using a command such as the following, which demonstrates how to toggle all of the major build options:
make -f makefile.bcc UNICODE=0 SHARED=0 BUILD=release MONOLITHIC=0
The compiled library files are placed into the lib directory under your wxWidgets directory. Two directories are created: bcc_dll and bcc_lib, for the shared and static builds, respectively.
To remove the object files and libraries, append the target clean to the same command line. However, be aware that this won’t clean up the copy of setup.h that is placed under the bcc_lib and bcc_dll directories, so if you make any edits to includewxmswsetup.h, delete the bcc_lib or bcc_dll directories yourself before recompiling.
If you change into one of the sample program directories, you will see a makefile for BC++ called makefile.bcc. The sample programs are built using the same command and switches as the library itself and are designed to look within the wxWidgets tree for the include and library files in their default locations. Be sure that you specify flags for a configuration of the library that has been built, or the sample will fail to link. That is, if you have only built a Unicode static release version of wxWidgets, use the same build options for the sample. For example:
cd sampleswidgets
make -f makefile.bcc UNICODE=1 SHARED=0 BUILD=release MONOLITHIC=0
bcc_mswdwidgets.exe
As with the library makefile, you can clean a sample by appending the clean target, for example:
make -f makefile.bcc UNICODE=0 SHARED=0 BUILD=debug clean
MinGW is a GNU toolset that includes Windows headers and import libraries for building Windows applications. MSYS provides an environment closely resembling a Linux or Unix shell in which to use MinGW. The process for using MinGW is very similar to the process described later for GCC.
It is recommended that you create a subdirectory within the wxWidgets directory for each configuration that you want to build. Most developers create directories using the same naming conventions as wxWidgets; if you want to compile the library in Unicode debug mode, you might create a directory named buildud or build26ud depending on how many different configurations you want to have.
After you have created your build directory, change into the build directory. The configure script, now located one directory up, takes many different parameters, the most important ones being those that control the main build options. For example, you could run
../configure --enable-unicode --disable-debug --disable-shared --disable-monolithic
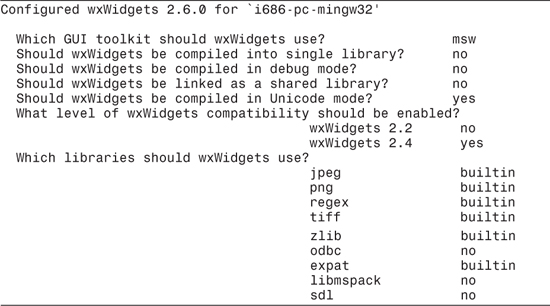
The configure script will analyze the build environment and then generate the makefiles for use with MinGW. When configure has finished, it will display a summary of the library build configuration.
Many other individual features can be enabled or disabled using the configure script, a list of which can be found in the wxWidgets documentation or by passing --help to the configure script. After configure has generated the makefiles, build the library by running make in the same directory as the one in which you ran configure. The compiled library files are placed in the lib subdirectory of the directory used for the build, not the lib directory at the root of the wxWidgets tree. You may optionally use make install as root after the build has completed, to copy the library and the necessary headers into /usr/local so that all users may have access to compile, build, and run wxWidgets programs.
The configure script creates a samples directory in your build directory, with further subdirectories for each sample. If you change into one of the sample program directories, you will see a makefile, which has been generated for your build directory and build configuration. Run make to build the sample. For example:
cd /c/wx/build26ud/samples/minimal
make
./minimal
MinGW can also be used from Microsoft’s command line (cmd.exe or command.com). You can control your build style by using flags to the compiler. The MinGW makefile is in the buildmsw directory. From there, invoke MinGW using a command such as the following, which demonstrates how to toggle all of the major build options:
mingw32-make -f makefile.gcc UNICODE=1 SHARED=0 BUILD=release
MONOLITHIC=0
(The backslash is only there to denote that the command should be typed all on one line.)
The compiled library files are placed into the lib directory under your wxWidgets directory. Two directories are created: gcc_dll and gcc_lib, for the shared and static builds, respectively.
To remove the object files and libraries, append the target clean to the same command line. However, be aware that this won’t clean up the copy of setup.h that is placed under the gcc_lib and gcc_dll directories, so if you make any edits to includewxmswsetup.h, delete the gcc_lib or gcc_dll directories yourself before recompiling.
If you change into one of these sample program directories, you will see a makefile for MinGW called makefile.gcc. The sample programs are built using the same command and switches as the library itself and are designed to look within the wxWidgets tree for the include and library files in their default locations. Be sure that you specify flags for a configuration of the library that has been built, or the sample will fail to link. That is, if you have only built a Unicode static release version of wxWidgets, use the same build options for the sample. For example:
cd c:wxsamplesminimal
mingw32-make -f makefile.gcc UNICODE=1 SHARED=0 BUILD=release
MONOLITHIC=0
minimal.exe
(The backslash is only there to denote that the command should be typed all on one line.)
To clean the sample, append clean to the make command.
GCC is the de facto standard compiler on Linux and many Unix platforms, including Darwin, the BSD foundation for Mac OS X. Building wxWidgets with GCC simply requires following the typical configure and make routine common on Unix and Unix-like environments.
It is recommended that you create a subdirectory within the wxWidgets directory for each different configuration that you want to build. Most developers create directories using the same naming conventions as wxWidgets; if you want to compile the library in Unicode debug mode, you might create a directory named buildud, build26ud, or even buildGTK26ud depending on how many different configurations you want to have.
After you have created your build directory, change into the build directory. The configure script, now located one directory up, takes many different parameters, the most important ones being those that control the main build options. For example, you could run
../configure --enable-unicode --disable-debug --disable-shared
--disable-monolithic
(The backslash is only there to denote that the command should be typed all on one line.)
The configure script will analyze the build environment and then generate the makefiles for use with GCC. When configure has finished, it will display a summary of the library build configuration. The previous configure options would produce the following summary on Linux:
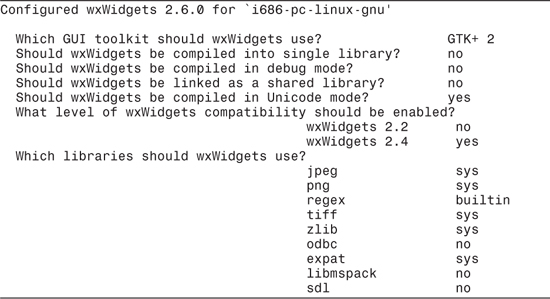
Many other individual features can be enabled or disabled using the configure script, a list of which can be found in the wxWidgets documentation or by passing --help to the configure script. Most significantly, you can also choose to override the default GUI toolkit (GTK+ 2) with GTK+, Motif, or X11.
After configure has generated the makefiles, build the library by running make in the same directory as you ran configure. The compiled library files are placed in the lib subdirectory of the directory used for the build, not the lib directory at the root of the wxWidgets tree. You may optionally use make install as root after the make has completed to copy the library and the necessary headers into /usr/local so that all users may have access to compile, build, and run wxWidgets programs.
The configure script creates a samples directory in your build directory, with further subdirectories for each sample. If you change into one of the sample program directories, you will see a makefile, which has been generated for your build directory and build configuration. Run make to build the sample. For example:
cd ~/wx/buildGTK26ud/samples/minimal
make
./minimal
If you want to further customize your wxWidgets library by enabling or disabling certain features, all of the configuration options are centralized into a file called setup.h. A separate setup.h file is automatically created from the default setup.h file for each library build and is placed in the lib directory of that build. The exact subdirectory depends on the compiler. For compilers using configure and make, setup.h is in lib/wx/include/<configname>/wx from the build directory. For other compilers, setup.h is in lib/<compiler>_lib/ <configname>/wx.
setup.h mostly contains a long list of wxUSE_... defines. For example, #define wxUSE_THREADS 1 indicates to build the library with support for threads using the wxThread class. If you change the 1 to a 0, wxThread will no longer be compiled into the library, and you will be unable to build programs that use wxThread. By enabling only the features that you need, you can build your own smaller, customized library. Most features are enabled by default, but some specialized features, such as ODBC, must be enabled if you want to use them. The setup.h file is heavily commented, pointing out possible side effects of enabling or disabling certain key features. Note that a change to setup.h requires recompiling the entire library because setup.h is at the very top of the wxWidgets include chain. On Windows, you may also need to pass extra options to the command line, such as USE_OPENGL=1 or USE_ODBC=1.
On Windows, there is a common setup.h in include/wx/msw that is copied, the first time the library is built, to the library configuration’s build directory. Changing the setup.h in include/wx/msw will result in changes for all configurations, whereas changing the setup.h in the lib/XX_lib directory will only change that one configuration. This does not apply if you are using configure and make under MinGW/MSYS, which creates the setup.h file as part of the configure process.
There may be times that you change the wxWidgets sources, perhaps to apply some code that fixes a bug or adds a new feature that you need. If you change only source files, you can simply rebuild the library using the same commands used to build it originally. However, if you are rebuilding after changing header files, you may need to do some additional cleaning in order for wxWidgets to build correctly due to precompiled headers that may not be automatically updated to reflect the latest changes to the header files.
![]() Microsoft Visual Studio: After changing header files, you will want to rebuild the library rather than just build it, forcing any precompiled headers to be discarded and re-created.
Microsoft Visual Studio: After changing header files, you will want to rebuild the library rather than just build it, forcing any precompiled headers to be discarded and re-created.
![]() GCC or MinGW using configure: Remove the
GCC or MinGW using configure: Remove the .deps directory before rebuilding. This one is easy to miss because the ls command does not list the directory by default.
If you continue to receive errors that indicate that an old header file is being used (for example, the compiler can’t find a function that was just added and that did not exist the first time you built wxWidgets), you may need to completely remove the build directory and rebuild the library. The build directories should not contain anything besides object files and compiled library files, so you won’t lose any data related to your projects.
Whenever you change the common setup.h (in include/wx/msw), it is very important that it be properly copied to its installed location in the lib subdirectory. If the setup.h being used to build your applications is out of sync with the setup.h used to compile the library, you will almost certainly receive link errors due to missing symbols. Although not hard to do, it is an easy step to overlook. If you are using configure and make under MSYS or MinGW, you can re-run configure. Otherwise, you will need to delete all of the setup.h files for each library build configuration in the lib subdirectory. Because the whole library needs to be rebuilt anyway, it is just as easy to delete the entire XX_lib or XX_dll directory.
Included with wxWidgets is a variety of contributed libraries, found in the contrib subdirectory of your wxWidgets distribution. These are libraries that are distributed with wxWidgets but are not part of the core toolkit. Although they are not officially supported and may not be actively maintained by the core wxWidgets developers, they can still be very useful. It’s easy to build the contrib libraries and use them in your projects.
You can build one or all of the contrib libraries using the same process as building the samples, discussed briefly with each compiler earlier. For Windows compilers, the libraries are compiled from within the contrib/build/<name> subdirectories. Compiled libraries are automatically placed alongside the main wxWidgets library files, eliminating the need to add any additional directories to the link path. You do, however, need to add contrib/include to your include path.
For descriptions of the more important contrib libraries, such as wxStyledTextCtrl, see Appendix D, “Other Features in wxWidgets.”