
For this reason, Web Components have Custom Elements. We're going to define a custom tag called <my-greeting> that the browser will automatically replace with our template—just like any other tag in HTML.
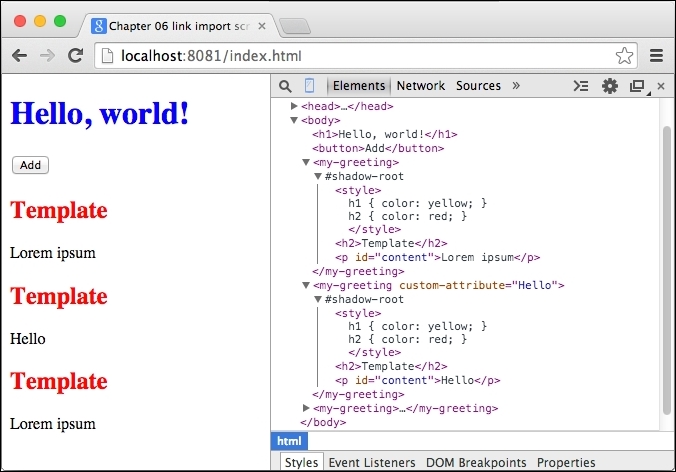
Our greeting.html file will include one extra element, selectable by ID, that will be customizable by one of the element's attribute. The same ID will be used in every instance of <my-greeting> that is correct and doesn't collide because each element instance has it's own Shadow DOM:
<!-- web/greeting.html -->
<template>
  <style>
  h1 { color: yellow; }
  h2 { color: red; }
  </style>

  <h2>Template</h2>
  <p id="content">Lorem ipsum</p>
</template>
The body for index.html is going to be even simpler than before:
  <body>
    <h2>Hello, world!</h2>
    <button>Add</button>
    <my-greeting></my-greeting>
    <my-greeting custom-attribute="Hello"></my-greeting>
  </body>
The Dart code will be mostly the same as the previous example. We'll just wrap the elements' configuration into a class that extends Dart's HtmlElement class. Note that you can extend any existing class that already extends HtmlElement or SvgElement:
// web/main.dart
import 'dart:html';

class MyGreetingElement extends HtmlElement {
  // The created() constructor is called every time
  // the tag is instantiated and calls parent's constructor first.
  MyGreetingElement.created() : super.created() {
    LinkElement cont = document.querySelector('#myElementLink'),
    TemplateElement template =
        cont.import.querySelector('template'),

    // Get DOM subtree from the external document,
    // clone it and make it available in the current document.
    Node clone = document.importNode(template.content, true);

    // Create a Shadow DOM in the target element and insert
    // cloned elements inside the shadow-root.
    ShadowRoot root = this.createShadowRoot();
    root.append(clone);

    // Check if this element has this attribute set.
    if (this.attributes.containsKey('custom-attribute')) {
      // Root is an encapsulated document created
      // for this instance.
      root.querySelector('#content').text =
          this.attributes['custom-attribute'];
    }
  }

  // Redefine the default constructor
  // This lets us use just "new MyGreetingElement()" to
  // create new instances.
  factory MyGreetingElement() => new Element.tag('my-greeting'),
}

void main() {
  // Let the browser know that we have our own element under
  // this tag name.
  document.registerElement('my-greeting', MyGreetingElement);

  // Allow user to dynamically add more elements.
  document.querySelector('button').onClick.listen((e) {
    document.querySelector('body')
        .children.add(new MyGreetingElement());
  });
}
We're using Factory design pattern and the factory keyword because we want this constructor to return an instance of a different class than MyGreetingElement. Subclasses of HtmlElement can't use the default constructor because new instances have to be created using the named constructor HtmlElement.created().
The most interesting part here is the document.registerElement() method, which tells the browser that the <my-greeting> tag is going to be an instance of MyGreetingElement and will instantiate it using the MyGreetingElement.created() constructor.
This is already quite useful. We have a custom tag that we can easily, dynamically instantiate. It's nice, but it's not an independent component that you can just include on your page with a single <link> tag and start using custom tags right away. We still have to call document.registerElement() manually.
In vanilla JavaScript, we can register a custom element right from the imported document:
<!-- greeting.html with JavaScript -->
<template>
  <style>
  h1 { color: yellow; }
  h2 { color: red; }
  </style>

  <h2>Template</h2>
  <p id="content">Lorem ipsum</p>
</template>
<script type="text/javascript">
(function() {
  // var importDoc = document.currentScript.ownerDocument;
  // Listen to the createdCallback event and
  // register this tag in the root document automatically.
  // document.registerElement(...);
})();
</script>
The JavaScript inside <script> tags gets executed right after the browser loads it because it's outside the <template> tag.
Unfortunately, we can't do this in Dart due to Dart's embedding policies:
- Only one Dart script is allowed per document
- Dart doesn't support inline scripts (you can't write scripts inside HTML)
- For more information about these restrictions, refer to https://www.dartlang.org/articles/embedding-in-html
Also, changes to custom attributes of our <my-greeting> tag aren't projected to the Shadow DOM automatically. This means that if you modified custom-attribute dynamically, it wouldn't change the text inside the #content paragraph because we set the text just once in its constructor.
One option is to listen to change events with MutationObserver:
void onMutation(List<MutationRecord> mut, MutationObserver ob) {
  // Handle changes.
};
MutationObserver observer = new MutationObserver(onMutation);
observer.observe(root.querySelector('#content').parent);
But we're not going to go into it here.
If you really wanted to do this by yourself, or had some very specific needs, check out the Observe library (https://pub.dartlang.org/packages/observe). This is used internally by polymer.dart and we'll use it in a moment.
Remember that you can make use of each part of Web Components separately even without diving into Polymer or Angular. For example, when you include a new JavaScript library into your existing project that overrides your styles, or that unnecessarily manipulates elements with its JavaScript code and you don't like it, you can use the Shadow DOM and Templates to isolate it from the rest of the page.