
Getting the right exposure is one of the foundations of a great photograph, but a lot more goes into a compelling shot than good tonal values. A sharp image, proper white balance, good color, and other factors all can help elevate your image from good to exceptional. So, now that you’ve got a good understanding of exposure tucked away, you’ll want to learn how to work with some additional exposure options, use the automatic and manual focusing controls available with the Nikon D3400, and master some of the many ways you can fine-tune your images.
In this chapter I’m including some specific advanced shooting techniques you can apply to your Nikon D3400. If you master these concepts, you can be confident that you’re well on your way toward mastering your Nikon D3400. In fact, you’ll be ready for the discussions of advanced techniques in the rest of this book.
How Focus Works
Although Nikon added autofocus capabilities to its cameras in the 1980s, back in the day of film, prior to that focusing was always done manually. Honest. Even though viewfinders were bigger and brighter than they are today, special focusing screens, magnifiers, and other gadgets were often used to help the photographer achieve correct focus. Imagine what it must have been like to focus manually under demanding, fast-moving conditions such as sports photography.
Focusing was problematic because our eyes and brains have poor memory for correct focus, which is why your eye doctor must shift back and forth between sets of lenses and ask, “Does that look sharper—or was it sharper before?” in determining your correct prescription. Similarly, manual focusing involves jogging the focus ring back and forth as you go from almost in focus, to sharp focus, to almost focused again. The little clockwise and counterclockwise arcs decrease in size until you’ve zeroed in on the point of correct focus. What you’re looking for is the image with the most contrast between the edges of elements in the image.
The camera also looks for these contrast differences among pixels to determine relative sharpness. There are two primary ways that sharp focus is determined: phase detection and contrast detection. As you’ll see, these can be applied in several different ways, with options changing dramatically when you switch from composing through the optical viewfinder, and when you’re using live view to shoot stills or movies. First, let’s get the primary focus methods out of the way. I’ll cover the focus variations available in Live View/Movie modes in Chapter 8.
Phase Detection
This mode is used by the autofocus system when you’re looking through the optical viewfinder. The autofocus sampling area is divided into two halves by a lens in the sensor. The two halves are compared, much like (actually, exactly like) a two-window rangefinder used in surveying weaponry—and non-SLR cameras like the venerable Leica M film models. The contrast between the two images changes as focus is moved in or out, until sharp focus is achieved when the images are “in phase,” or lined up.
The eleven autofocus sensors of Nikon’s Multi-CAM 1000 auto-focus module are located in the “floor” of the mirror box, just under the flip-up mirror, which is partially silvered so that most of the light reaching it from the lens is bounced upward to the viewfinder, while some light is directed downward toward the focus sensors. If you lock up the mirror of your camera (using the Lock Mirror Up for Cleaning option in the Setup menu), you can see where these sensors are located.
You can visualize how phase detection autofocus works if you look at Figures 7.1 and 7.2. (However, your camera’s actual auto-focus sensors don’t look anything like this; I’m providing a greatly simplified view just for illustration.) In Figure 7.1, a typical horizontally oriented focus sensor is looking at a series of parallel vertical lines in a weathered piece of wood. The lines are broken into two halves by the sensor’s rangefinder prism, and you can see that they don’t line up exactly; the image is slightly out of focus.

Figure 7.1 When an image is out of focus, the split lines don’t align precisely.

Figure 7.2 Using phase detection, the D3400 is able to align the features of the image and achieve sharp focus quickly.
Fortunately, the rangefinder approach of phase detection tells the D3400 exactly how out of focus the image is, and in which direction (focus is too near, or too far) thanks to the amount and direction of the displacement of the split image. The camera can quickly and precisely snap the image into sharp focus and line up the vertical lines, as shown in Figure 7.2. Of course, this scenario—vertical lines being interpreted by a horizontally oriented sensor—is ideal. When the same sensor is asked to measure focus for, say, horizontal lines that don’t split up quite so conveniently, or, in the worst case, subjects such as the sky (which may have neither vertical nor horizontal lines), focus can slow down drastically, or even become impossible.
Phase detection is the normal mode used by the D3400. As with any rangefinder-like function, accuracy is better when the “base length” between the two images is larger. (Think back to your high school trigonometry; you could calculate a distance more accurately when the separation between the two points where the angles were measured was greater.) For that reason, phase detection autofocus is more accurate with larger (wider) lens openings—especially those with maximum f/stops of f/2.8 or better—than with smaller lens openings, and may not work at all when the f/stop is smaller than f/5.6. As I noted, the D3400 is able to perform these comparisons very quickly.
Cross-Type Focus Point
One feature that new Nikon D3400 owners sometimes overlook is the cross-type focus point at the center position. Why is this important? It helps to take a closer look at the phase detection system when presented with a non-ideal subject.
Figure 7.3 shows the same weathered wood pictured earlier, except in this case we’ve chosen to rotate the camera 90 degrees (say, because we want a vertically oriented composition). In the illustration, the image within the focus sensor’s area is split in two and displaced slightly side to side, but the amount and direction of the misalignment is far from obvious. A horizontally oriented focus sensor will be forced to look for less obvious vertical lines to match up. Our best-case subject has been transformed into a worst-case subject for a horizontal focus sensor.

Figure 7.3 A horizontal focus sensor doesn’t handle horizontal lines very well.
The value of the cross-type focus sensor, which can interpret contrast in both horizontal and vertical directions, can be seen in Figure 7.4. The horizontal lines are still giving the horizontal portion of the cross sensor fits, but the vertical bar can easily split and align the subject to achieve optimum focus. Cross-type sensors can handle horizontal and vertical lines with equal aplomb and, if you think about it, lines at any diagonal angle as well. In lower light levels, with subjects that were moving, or with subjects that have no pattern and less contrast to begin with, the cross-type sensor not only works faster but can focus subjects that a horizontal- or vertical-only sensor can’t handle at all.
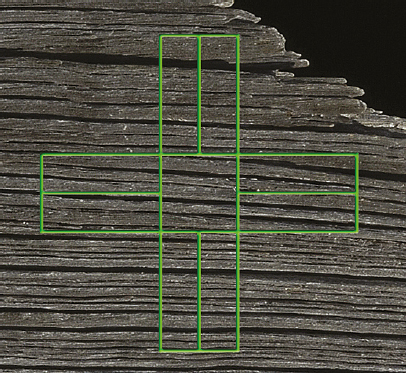
Figure 7.4 Cross-type sensors can evaluate contrast in both horizontal and vertical directions, as well as diagonally.
So, you can see that having a center cross-type focus sensor that is extra-sensitive with faster lenses is a definite advantage.
Contrast Detection
This is a slower mode, suitable for static subjects, and used by the D3400 in Live View mode. Your eye also uses contrast detection when you focus the camera manually.
Contrast detection is a bit easier to understand, and is illustrated by Figure 7.5. At top in the figure, the transitions between the edges found in the image are soft and blurred because of the low contrast between them. Although the illustration uses the same vertical lines used with the phase detection example, the orientation of the features doesn’t matter. The focus system looks only for contrast between edges, and those edges can run in any direction.

Figure 7.5 Focus in contrast detection mode evaluates the increase in contrast in the edges of subjects, starting with a blurry image (top) and producing a sharp, contrasty image (bottom).
At the bottom of Figure 7.5, the image has been brought into sharp focus, and the edges have much more contrast; the transitions are sharp and clear. Although this example is a bit exaggerated so you can see the results on the printed page, it’s easy to understand that when maximum contrast in a subject is achieved, it can be deemed to be in sharp focus.
Locking in Focus
The D3400’s autofocus mechanism, like all such systems found in SLR cameras, evaluates the degree of focus, but, unlike the human eye, it is able to remember the progression perfectly, so that autofocus can lock in much more quickly and, with an image that has sufficient contrast, more precisely. Unfortunately, while the D3400’s focus system finds it easy to measure degrees of apparent focus at each of the focus points in the viewfinder, it doesn’t really know with any certainty which object should be in sharpest focus. Is it the closest object? The subject in the center? Something lurking behind the closest subject? A person standing over at the side of the picture? Many of the techniques for using autofocus effectively involve telling the Nikon D3400 exactly what it should be focusing on, by choosing a focus zone or by allowing the camera to choose a focus zone for you. I’ll address that topic shortly.
As the camera collects focus information from the sensors, it then evaluates it to determine whether the desired sharp focus has been achieved. The calculations may include whether the subject is moving, and whether the camera needs to “predict” where the subject will be when the shutter release button is fully depressed and the picture is taken. The speed with which the camera is able to evaluate focus and then move the lens elements into the proper position to achieve the sharpest focus determines how fast the autofocus mechanism is. Although your D3400 will almost always focus more quickly than a human, there are types of shooting situations where that’s not fast enough. For example, if you’re having problems shooting sports because the D3400’s autofocus system manically follows each moving subject, a better choice might be to switch Autofocus modes or shift into Manual and prefocus on a spot where you anticipate the action will be, such as a goal line or soccer net. At night football games, for example, when I am shooting with a telephoto lens almost wide open, I sometimes focus manually on one of the referees who happens to be standing where I expect the action to be taking place (say, a halfback run or a pass reception).
Focus Modes
When you’re using the optical viewfinder (and, therefore, phase detection autofocus), the D3400 has three AF modes: AF-S (also known as Single autofocus or Single-servo autofocus), AF-C (Continuous autofocus or Continuous-servo autofocus), and AF-A (which switches between the two as appropriate). I’ll explain all of these in more detail later in this section. But first, some confusion . . .
MANUAL FOCUS
Manual focus is activated by sliding the switch on the lens (if present) to the M position. There are some advantages and disadvantages to focusing yourself. While your batteries will last longer in manual focus mode, it will take you longer to focus the camera for each photo, a process that can be difficult. Modern digital cameras, even dSLRs, depend so much on autofocus that the viewfinders of models that have less than full-frame-sized sensors are no longer designed for optimum manual focus. Pick up any film camera and you’ll see a bigger, brighter viewfinder with a focusing screen that’s a joy to focus on manually.
Adding Circles of Confusion
You know that increased depth-of-field brings more of your subject into focus. But more depth-of-field also makes autofocusing (or manual focusing) more difficult because the contrast is lower between objects at different distances. So, autofocus with a 200mm lens (or zoom setting) may be easier than at a 28mm focal length (or zoom setting) because the longer lens has less apparent depth-of-field. By the same token, a lens with a maximum aperture of f/1.8 will be easier to autofocus (or manually focus) than one of the same focal length with an f/4 maximum aperture, because the f/4 lens has more depth-of-field and a dimmer view. That’s yet another reason why lenses with a maximum aperture smaller than f/5.6 can give your D3400’s autofocus system fits—increased depth-of-field joins forces with a dimmer image, and more difficulty in achieving phase detection.
To make things even more complicated, many subjects aren’t polite enough to remain still. They move around in the frame, so that even if the D3400 is sharply focused on your main subject, it may change position and require refocusing. (This is where the Subject-tracking mode available in live view is handy; once you’ve specified an area of focus, the D3400 is smart enough to follow your subject around the frame as your subject moves or you reframe the picture. I’ll explain Subject-tracking in detail later in this chapter.)
In other cases, an intervening subject may pop into the frame and pass between you and the subject you meant to photograph. You (or the D3400) have to decide whether to lock focus on this new subject, or remain focused on the original subject. Finally, there are some kinds of subjects that are difficult to bring into sharp focus because they lack enough contrast to allow the D3400’s AF system (or our eyes) to lock in. Blank walls, a clear blue sky, or other subject matter may make focusing difficult.
If you find all these focus factors confusing, you’re on the right track. Focus is, in fact, measured using something called a circle of confusion. An ideal image consists of zillions of tiny little points, which, like all points, theoretically have no height or width. There is perfect contrast between the point and its surroundings. You can think of each point as a pinpoint of light in a darkened room. When a given point is out of focus, its edges decrease in contrast and it changes from a perfect point to a tiny disc with blurry edges (remember, blur is the lack of contrast between boundaries in an image). (See Figure 7.6.)
If this blurry disc—the circle of confusion—is small enough, our eye still perceives it as a point. It’s only when the disc grows large enough that we can see it as a blur rather than a sharp point that a given point is viewed as out of focus. You can see, then, that enlarging an image, either by displaying it larger on your computer monitor or by making a large print, also enlarges the size of each circle of confusion. Moving closer to the image does the same thing. So, parts of an image that may look perfectly sharp in a 5 × 7–inch print viewed at arm’s length, might appear blurry when blown up to 11 × 14 and examined at the same distance. Take a few steps back, however, and it may look sharp again.
To a lesser extent, the viewer also affects the apparent size of these circles of confusion. Some people see details better at a given distance and may perceive smaller circles of confusion than someone standing next to them. For the most part, however, such differences are small. Truly blurry images will look blurry to just about everyone under the same conditions.

Figure 7.6 When a pinpoint of light (left) goes out of focus, its blurry edges form a circle of confusion (center and right).

Figure 7.7 With shallow depth-of-field, a distracting background becomes blurry.
Technically, there is just one plane within your picture area, parallel to the back of the camera (or sensor, in the case of a digital camera), that is in sharp focus. That’s the plane in which the points of the image are rendered as precise points. At every other plane in front of or behind the focus plane, the points show up as discs that range from slightly blurry to extremely blurry until, as you can see in Figure 7.7, the out-of-focus areas become blurry and less distracting.
In practice, the discs in many of these planes will still be so small that we see them as points, and that’s where we get depth-of-field. Depth-of-field is just the range of planes that include discs that we perceive as points rather than blurred splotches. The size of this range increases as the aperture is reduced in size and is allocated roughly one-third in front of the plane of sharpest focus, and two-thirds behind it. The range of sharp focus is always greater behind your subject than in front of it.
Using Autofocus with the Nikon D3400
Autofocus can sometimes be frustrating for the new digital SLR photographer, especially those coming from the point-and-shoot world. That’s because correct focus plays a greater role among your creative options with a dSLR, even when photographing the same subjects. Most non-dSLR digital cameras have sensors that are much tinier than the sensor in the D3400. Those smaller sensors require shorter focal lengths, which (as you’ll learn in Chapter 10) have, effectively, more depth-of-field.
The bottom line is that with the average point-and-shoot camera, everything is in focus from about one foot to infinity and at virtually every f/stop. Unless you’re shooting close-up photos a few inches from the camera, the depth-of-field is prodigious, and autofocus is almost a non-factor. The D3400, on the other hand, uses longer focal length lenses to achieve the same field of view with its larger sensor, so there is less depth-of-field. That’s a good thing, creatively, because you have the choice to use selective focus to isolate subjects. But it does make the correct use of autofocus more critical. To maintain the most creative control, you have to choose three attributes:
- How much is in focus. Generally, by choosing the f/stop used, you’ll determine the range of sharpness/amount of depth-of-field. The larger the DOF, the “easier” it is for the autofocus system’s locked-in focus point to be appropriate (even though, strictly speaking, there is only one actual plane of sharp focus). With less depth-of-field, the accuracy of the focus point becomes more critical, because even a small error will result in an out-of-focus shot.
- What subject is in focus. The portion of your subject that is zeroed in for autofocus is determined by the autofocus zone that is active, and which is chosen either by you or by the Nikon D3400 (as described next). For example, when shooting portraits, it’s actually okay for part of the subject—or even part of the subject’s face—to be slightly out of focus as long as the eyes (or even just the nearest eye) appear sharp.
- When focus is applied. For static shots of objects that aren’t moving, when focus is applied doesn’t matter much. But when you’re shooting sports, or birds in flight (see Figure 7.8), or children (traditionally three of the most difficult subjects to capture), the target may move within the viewfinder as you’re framing the image. Whether that movement is across the frame or headed right toward you, timing the instant when autofocus is applied can be important.

Figure 7.8 When capturing moving subjects, such as birds in flight, timing the instant when autofocus is applied can be important.
Your Autofocus Mode Options
Choosing the right autofocus mode and the way in which focus points are selected is your key to success. Using the wrong mode for a particular type of photography can lead to a series of pictures that are all sharply focused—on the wrong subject. When I first started shooting sports with an autofocus SLR, I covered one game alternating between shots of base runners and outfielders with pictures of a promising young pitcher, all from a position next to the third base dugout. The base runner and outfielder photos were great, because their backgrounds didn’t distract the autofocus mechanism. But all my photos of the pitcher had the focus tightly zeroed in on the fans in the stands behind him. A simple change, such as locking in focus or focus zone manually, or even manually focusing, would have done the trick.
There are two main autofocus options you need to master to make sure you get the best possible automatic focus with your Nikon D3400: Autofocus mode and Autofocus Area. I’ll explain each of them separately.
Autofocus Mode
This choice determines when your D3400 starts to autofocus, and what it does when focus is achieved. Automatic focus is not something that happens all the time when your camera is turned on. To save battery power, your D3400 generally doesn’t start to focus the lens until you partially depress the shutter release. (You can also use the AE-L/AF-L button to start autofocus, as described in Chapter 3.) Autofocus isn’t some mindless beast out there snapping your pictures in and out of focus with no feedback from you after you press that button. There are several settings you can modify that return at least a modicum of control to you.
Your first decision, if you’ll be composing your image through the optical viewfinder, should be whether you set the D3400 to AF-S, AF-C, AF-A, or Manual. (Special issues for focusing in live view are discussed in Chapter 8.) To change to any of the automatic focus modes, use the information edit menu by pressing the i button, and select the focus mode (at the left end of the bottom row of options). With the camera set for one of the Scene modes, AF-S will be used automatically, except when using the Sports/Action scene mode. To switch to manual mode, select manual mode in the menu, or slide the AF/M or M-A/M switch on the lens to M.
AF-S
In this mode, also called Single Autofocus, focus is set once and remains at that setting until the button is fully depressed, taking the picture, or until you release the shutter button without taking a shot. You can also use the AE-L/AF-L button, as described in Chapter 3, if you’ve set that button to lock focus when pressed. For non-action photography, this setting is usually your best choice, as it minimizes out-of-focus pictures (at the expense of spontaneity). The drawback here is that you might not be able to take a picture at all while the camera is seeking focus; you’re locked out until the autofocus mechanism is happy with the current setting. AF-S/Single Autofocus is sometimes referred to as focus priority for that reason. Because of the small delay while the camera zeroes in on correct focus, you might experience slightly more shutter lag. This mode uses less battery power.
When sharp focus is achieved, the focus confirmation light at the lower left will remain green, without flashing. By keeping the shutter button depressed halfway, you’ll find you can reframe the image while retaining the focus (and exposure) that’s been set.
AF-C
This mode, also known as Continuous Autofocus is the one to use for sports and other fast-moving subjects. In this mode, once the shutter release is partially depressed, the camera sets the focus but continues to monitor the subject, so that if it moves or you move, the lens will be refocused to suit. Focus and exposure aren’t really locked until you press the shutter release down all the way to take the picture. You’ll often see Continuous Autofocus referred to as release priority. If you press the shutter release down all the way while the system is refining focus, the camera will go ahead and take a picture, even if the image is slightly out of focus. You’ll find that AF-C produces the least amount of shutter lag of any autofocus mode: press the button and the camera fires. It also uses the most battery power, because the autofocus system operates as long as the shutter release button is partially depressed.
AF-A
This setting is actually a combination of the first two. When selected, the camera focuses using AF-S AF and locks in the focus setting. But, if the subject begins moving, it will switch automatically to AF-C and change the focus to keep the subject sharp. AF-A is a good choice when you’re shooting a mixture of action pictures and less dynamic shots and want to use AF-S when possible. The camera will default to that mode, yet switch automatically to AF-C when it would be useful for subjects that might begin moving unexpectedly. However, as with AF-S, the shutter can be released only when the subject at the selected focus point is in focus.
Manual Focus
In this mode, or when you’ve set the lens autofocus switch to Manual (or when you’re using a non-AF-S lens, which lacks an internal autofocus motor), the D3400 always focuses manually using the rotating focus ring on the lens barrel. However, if you are using a lens with a maximum aperture of at least f/5.6, the focus confirmation light in the viewfinder will glow a steady green when the image is correctly manually focused.
In manual focus mode, you can use the rangefinder feature to help you achieve sharp focus when you’re shooting in Program, Aperture-priority, or Shutter-priority mode. You’ll find an additional description and illustrations for using the rangefinder in Chapter 5. As I noted in Chapter 5, the rangefinder supplements the focus confirmation indicator at the left edge of the viewfinder by using the analog exposure indicator as a focusing “scale.”
In Figure 7.9, at top you can see that the focus indicator has illuminated all the bars to the left and right of the “zero” point. That means that the current focus is grossly incorrect. In the middle illustration, the bars are illuminated to the right, indicating that the current focus setting is significantly behind the true point of focus. To focus on the piece in front, you’d need to focus more closely.

Figure 7.9 The manual focus scale in the viewfinder shows (top) that the image is very out of focus; (middle) focus is behind the correct point; (bottom) correct focus has been achieved.
At bottom, correct manual focus has been achieved, and the rangefinder indicator shows just a pair of bars, centered under the zero point.
To summarize the instructions in Chapter 5 for using the rangefinder:
Turn the rangefinder On with this option if you want an additional manual focusing aid. With a manual focus lens and the rangefinder operating, the analog exposure display at bottom center in the viewfinder will be replaced by a rangefinder focusing scale. Indicators on the scale like those in Figure 5.6 (back in Chapter 5) show when the image is in sharp focus, as well as when you have focused somewhat in front of, or behind, the subject. Follow these steps to use the rangefinder:
- Activate. Use the Setup menu’s Rangefinder entry to turn on the rangefinder, as described in Chapter 5.
- Select a focus point. Use the multi selector to move the highlighting around in the frame.
- Rotate the lens focus ring. Zoom lenses will have two rings; there’s no fixed convention as to whether the wider or narrower ring is the focus ring. Choose the one farthest from the zoom scale (on the new collapsible kit lens, the focus ring is a thin band just behind the front of the lens).
- Watch the rangefinder. If the indicator is pointing toward the left, focus farther away. If the scale points toward the right, focus more closely.
- Achieve sharp focus. When the subject you’ve selected with the focus zone bracket is in sharp focus, only two bars will appear, centered under the 0, and the focus confirmation indicator will stop blinking. If no 0 appears, the camera cannot determine focus.
Autofocus Area
Where autofocus mode chooses when to autofocus, the Autofocus Area parameter tells your Nikon D3400 how to choose which of the 11 focus points in the viewfinder should be used to evaluate and lock in focus. Ordinarily, your camera would like to be able to choose among the available AF points itself. In fact, that’s the default behavior, and when AF-area mode for Viewfinder is set to Auto-area, the D3400 chooses the focus point automatically in Auto, No-Flash, Portrait, Landscape, Night Portrait, and PAS (Program, Aperture-priority, and Shutter-priority) exposure modes. Giving the D3400 free rein in selecting a focus point works well much of the time, and you can use this default mode with confidence.
If you want to choose a focus point yourself, you must do two things. When the focus point is unlocked, you can use the multi selector pad to shift the active point to any of the 11 focus points seen in the viewfinder. The currently active focus point is highlighted in red. The available points are shown in Figure 7.10.
The second thing to do is to switch the viewfinder Focus Area mode in the Shooting menu from Auto-area (which always chooses the focus point automatically) to Single-point, Dynamic-area, or 3D-tracking (11 Points). (Different focus area options are available for Live View mode, as described later.)

Figure 7.10 There are 11 possible focus points shown in the viewfinder.
These viewfinder modes change the D3400’s behavior as follows:
- Single-point. You choose which of the 11 points are used, and the Nikon D3400 sticks with that focus bracket, no matter what. This mode is best for stationary subjects, and is used automatically in Close-up scene mode. In this mode, you always select the focus point manually, using the multi selector button. The D3400 evaluates focus based solely on the point you select, making this a good choice for subjects that don’t move much. Once you’ve moved the focus point, you can return it to the center of the frame by pressing the OK button.
- Dynamic-area. You can select the focus point, but the D3400 can use other focus points as well. You’d want to use this mode when photographing subjects that are moving unpredictably, but want the flexibility of being able to choose one of the 11 focus zones yourself. Once you’ve specified the focus bracket you want using the multi selector’s buttons, the D3400 will use that area exclusively in Single-servo autofocus mode (AF-S). If you’ve chosen Continuous-autofocus mode (AF-C) or Automatic-autofocus mode (AF-A), if the subject begins moving after autofocus is activated, the D3400 will focus based on information from one of the other focus zones. Well suited for sports photography, this mode is applied automatically with the Sports scene setting, and can be used with other types of moving subjects, such as active children.
- 3D-tracking (11 points). In this mode, you select the focus point using the multi selector, but if you subsequently reframe the picture slightly, the D3400 uses distance information when in AF-C (Continuous Autofocus) or AF-A (Automatic Autofocus) modes to refocus on the original subject if necessary. When using AF-S (Single Autofocus), this mode functions the same as Single-point focus area mode. This mode is useful if you need to reframe a relatively static subject from time to time. If your subject leaves the frame entirely, you’ll need to release the shutter button and refocus.
- Auto-area. This mode chooses the focus point for you, and can use distance information when working with a G or D lens that supplies that data to the camera. (See Chapter 10 for more on the difference between G/D lenses and other kinds of lenses.)
Focusing in Live View
When you’re not using the optical viewfinder, and instead using the D3400’s Live View mode on the back-panel color LCD, available modes differ slightly. Instead of using phase detection autofocus (or the human eye’s contrast detection system when focusing manually), the D3400 puts contrast detection to work full-time. The camera evaluates the focus of the image as seen by the sensor, and makes adjustments from there.
This section will explain your live view focus options.
Focus Mode
Activate live view by pressing the Lv button on the back of the D3400. Then press the i button to view the information edit screen. You can then adjust the focus mode. The available modes differ slightly from those possible when not shooting in live view. The following three choices are possible when your lens is not set to the manual focus position:
- AF-S. This single autofocus mode, which Nikon calls single-servo AF, locks focus when the shutter release is pressed halfway. This mode uses focus priority; the shutter can be fully released to take a picture only if the D3400 is able to achieve sharp focus.
- AF-F. This new mode is roughly the equivalent of AF-C. Nikon calls it full-time servo AF. The D3400 focuses and refocuses continually as you shoot stills in live view or record movies. Unlike AF-C, this mode also uses focus priority. You can’t release the shutter unless the camera has achieved sharp focus.
- MF. Manual focus. You focus the image by rotating the focus ring on the camera.
Focus Area
Still in information edit mode, choose the D3400’s AF-area mode for live view. (You can also choose AF-area mode in the Shooting menu under AF-Area Mode, using the Live View/Movie entry, as described in Chapter 4.) Your choices are as follows:
- Face-priority AF. The camera automatically detects faces, and focuses on subjects facing the camera, as when you’re shooting a portrait. You can’t select the focus zone yourself. Instead, a double yellow border will be displayed on the LCD when the camera detects a face. You don’t need to press the shutter release to activate this behavior. (Up to five faces may be detected; the D3400 focuses on the face that is closest to the camera.) When you press down the shutter release halfway, the camera attempts to focus the face. As sharp focus is achieved, the border turns green (see Figure 7.11). If the camera is unable to focus, the border blinks red. Focus may also be lost if the subject turns away from the camera and is no longer detectable by Face-priority.

Figure 7.11 Face-priority AF attempts to focus on the face that’s closest to the camera.

Figure 7.12 Wide-area AF is best for landscapes and other subjects with large elements.

Figure 7.13 Normal-area AF allows you to zero in on a specific point of focus.

Figure 7.14 Subject-tracking can keep focus as it follows your subject around in the frame.
- Wide-area AF. This is the mode to use for non-portrait subjects, such as landscapes, as you can select the focus zone to be used manually. It’s good for shooting hand-held, because the subjects may change as you reframe the image with a hand-held camera, and the wide-area zones are forgiving of these changes. The focus zone will be outlined in red. You can move the focus zone around the screen with the multi selector buttons. When sharp focus is achieved, the focus zone box will turn green. (See Figure 7.12.)
- Normal-area AF. This mode uses smaller focus zones, and so is best suited for tripod-mounted images where the camera is held fairly steady. As with Wide-area AF, the focus zone will be outlined in red. You can move the focus zone around the screen with the multi selector buttons. When sharp focus is achieved, the focus zone box will turn green. (See Figure 7.13.)
- Subject-tracking AF. This mode allows the camera to “grab” a subject, focus, and then follow the subject as it moves within the frame. You can use this mode for subjects that don’t remain stationary, such as small children. When using Subject-tracking AF, a white border appears in the center of the frame, and turns yellow when focus is locked in (as described in the section that follows). To activate focus or refocus, press the multi selector up button. I’ll explain Subject-tracking in more detail next. (See Figure 7.14.)
- Manual focus. In this non-automatic focus mode, you can select the focus zone to use with the multi selector buttons, press the shutter release halfway, and then adjust focus manually by rotating the focus ring on the lens. When sharp focus is achieved, the focus confirmation indicator at the lower left of the viewfinder will turn a steady green.
Introducing Subject-Tracking
The useful Subject-tracking autofocus feature is one of those features that can be confusing at first, but once you get the hang of it, it’s remarkably easy to use. Face-priority, in comparison, is almost intuitive to learn. Here’s the quick introduction you need to Subject-tracking.
- Ready, aim . . . When you’ve activated Subject-tracking, a white border appears in the center of the frame. Use that border to “aim” the camera until the subject you want to focus on and track is located within the border.
- . . . Focus. When you’ve pinpointed your subject, press the OK button to activate the D3400’s contrast detection autofocus feature. The focus frame will turn yellow and the camera will emit a beep (unless you’ve disabled the beep within the Setup menu) when locked in. To stop subject-tracking press OK again.
- Reframe as desired. Once the focus frame has turned yellow, it seemingly takes on a life of its own, and will “follow” your subject around on the LCD as you reframe your image. (See Figure 7.14.) (In other words, the subject being tracked doesn’t have to be in the center of the frame for the actual photo.) Best of all, if your subject moves, the D3400 will follow it and keep focus as required.
- Tracking continues. The only glitches that may pop up might occur if your subject is small and difficult to track, or is too close in tonal value to its background, or if the subject approaches the camera or recedes sufficiently to change its relative size on the LCD significantly.
- Grab a new subject. If you want to refocus or grab a new subject, press the OK button again.