
My Menu and Shooting Menu | 6 |
This chapter and the three that follow provide in-depth coverage of all the commands and options available from the a7 IV’s revamped menu system, which includes seven top-level menus tabs, each with multiple numbered groups, which contain the individual entries and their options.
Many of the explanations in these chapters expand on the descriptions found in other parts of this book. I integrate the technical discussions with the how-to instructions using cross-references. That makes it easier to absorb the important basics first, and access the menu reference chapters only when you really need to see every possible option.
Menu Navigation
I introduced you to the updated Sony menu system in Chapter 1, and labeled each of the main components of a typical menu in Figure 1.9. To recap, each menu consists of the elements shown in Figure 6.1:
- ■Main menu tabs. The Shooting menu tab, represented by a camera icon, is highlighted in the first column in Figure 6.1, left. Above it is a star icon marking the My Menu tab, and below it you will find icons for Exposure/Color (+/– sign), Focus (AF/MF), Playback (Right Arrow), Network (Globe), and Setup (Toolbox).
- ■Numbered groups. Also in Figure 6.1, left, you can see that the Image Quality group is highlighted. Below it are six of the ten other groups in the Shooting menu tab: Media, File, Shooting Mode, USB Streaming, Drive Mode, and Shutter/Silent. An additional three groups, Image Stabilization, Zoom, and Shooting Display appear when you scroll down.
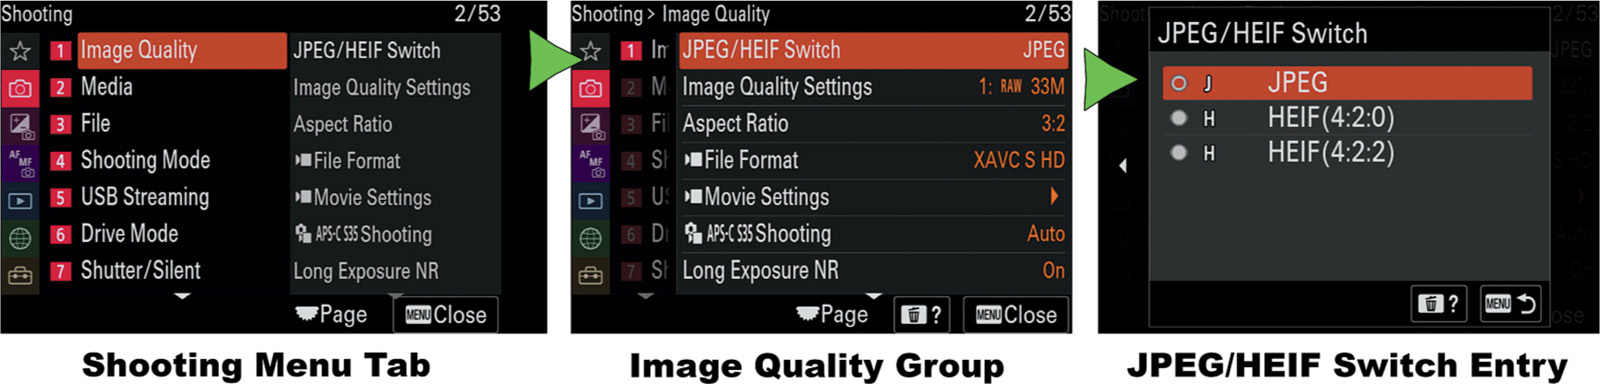
Figure 6.1 The Menu hierarchy.
- ■Menu entries. Each individual group has its own roster of entries. In Figure 6.1, center, you can see seven of the eleven entries that reside in the Shooting > Image Quality group. They include JPEG/HEIF Switch, Image Quality Settings, Aspect Ratio, etc. Again, you’ll need to scroll down within the group to see all the entries.
- ■Entry options. When you select one of the menu entries within a numbered group, the available options for that entry appear, as shown at right in Figure 6.1. Some options screens will contain several sub-entries with choices of their own.
- ■Stills/Movies. Some menu entries can be accessed only when the Still/Movie/S&Q dial is set to the Still Photo position, or one of the two Movie positions (Movie and S&Q [Slow and Quick]). I’m going to specify whether a particular entry can be accessed from a given Still/Movie/S&Q dial position, by adding (Stills) or (Stills/Movies) after the entry name. Note that while some entries can be adjusted in all modes (such as Shooting > Image Quality > Movie Settings), you may have to switch to the appropriate mode (e.g., Movie mode) to access all the options.
| TIP I will use the menu hierarchy I just described to direct you to a specific entry, for example: Shooting > Image Quality > JPEG/HEIF Switch > Options or, I may use: JPEG/HEIF Switch entry within the Shooting > Image Quality group. |

As you work with your a7 IV, you’ll learn which menu entries reside in which tab and group. They’re color-coded and arranged so that related functions are associated with an appropriate top-level tab and group within that tab. Use the up/down controls (such as the top and bottom edges of the control wheel) to move up and down within the main menu tabs, groups, and options. Press the center button to select the highlighted item. Press the MENU button to back out. If you’re in a hurry, the front dial can be used to move up and down main menu tabs; either rear dial will navigate up/down among or within groups.
- ■My Menu (Gray). You can set up your own customized menus to reside here, installing the entries from any of the other tabs for quick access. The tab initially has just one group, My Menu Setting, with options that allow you to add/delete, sort, and arrange pages of favorite entries. I’ll explain using My Menu in this chapter.
- ■Shooting (Red/Orange). This tab has 10 groups (you’ll need to scroll down to the last three of them). The groups include commands for handling image quality, recording media and files, shooting modes, USB streaming, drive modes, shutter option, image stabilization, optical/digital zoom, and shooting display. This tab is also covered in this chapter.
- ■Exposure/Color (Magenta). Includes seven groups with options for exposure, metering, flash, white balance, color rendition, and overexposure warnings. I explained about exposure and color control in Chapter 3, and will detail the menu choices available in Chapter 7.
- ■AF/MF (Violet). Here you’ll find five groups with all the controls you need to set focus parameters, and the aids built-into the a7 IV to make focusing more accurate and convenient. Chapters 4 described the a7 IV’s auto- and manual-focus systems, and I’ll explain focus setting options in Chapter 8.
- ■Playback (Blue). This tab has seven groups of entries that will enable you to review, manage, edit, and delete the photos you’ve taken. These are all explained in Chapter 8.
- ■Network (Green). The a7 IV includes a broad range of Wi-Fi, Bluetooth, and wired LAN options, all controlled through the seven groups of entries within this tab. You’ll find what you need to know in Chapter 9.
- ■Setup (Yellow). This highly customizable camera has a host of options you may not use on an everyday basis—such as Area/Date settings, custom control definitions for various dials and buttons, USB connectivity, and output to external monitors and recorders. You’ll need to scroll down to access all 13 groups found in this tab. I’ll explain Setup options in Chapter 9.
My Menu Tab
Options: Add Item, Sort Item, Delete Item, Delete Page, Delete All, Display From My Menu
My preference: N/A
The My Menu feature lets you create your own customized menu containing the entries you use most often, which can save you a lot of time wading through the a7 IV’s many pages of menu tabs and entries. You can create up to six My Menu screens, each with as many as seven menu items, for a total of42 My Menu entries. So, you can find you’ve created your own maze of entries—but, at least, it is your maze.
Virtually any menu entry from the other main menu tabs (except for the Playback menu) can be added to your personalized menu. You can even specify that your custom My Menu will appear first when you press the a7 IV’s MENU button.
The first time you access My Menu, no custom pages will exist, so you’ll see a screen similar to the one shown at upper left in Figure 6.2, except all the entries apart from Add Item will be grayed out. Press the center button, and you’ll be shown a screen with a list of menu entries (see Figure 6.2, upper right). Use the directional controls to scroll among available menu pages, and highlight a particular entry you want to add. (See Figure 6.2, center left.) Press the center button and you’ll be given the opportunity to choose which page to add it to, numbered from 1 through 6. (See Figure 6.2, center right.)
You don’t need to fill up one page before starting another one. Conceivably, you could have six My Menu pages, each with a single entry. After you’ve created a new My Menu page, the My Menu Setting command function page (Add, Sort, etc.) moves to the end of the line. Each newborn My Menu page will look something like Figure 6.2 (bottom), but with your personal entries included. My only beef with Sony is that all your custom pages are named My Menu 1, My Menu 2, etc. It would be really cool to assign them specific appropriate names, such as Sports or Landscapes (say, to group all settings you use frequently when shooting sports or landscapes).
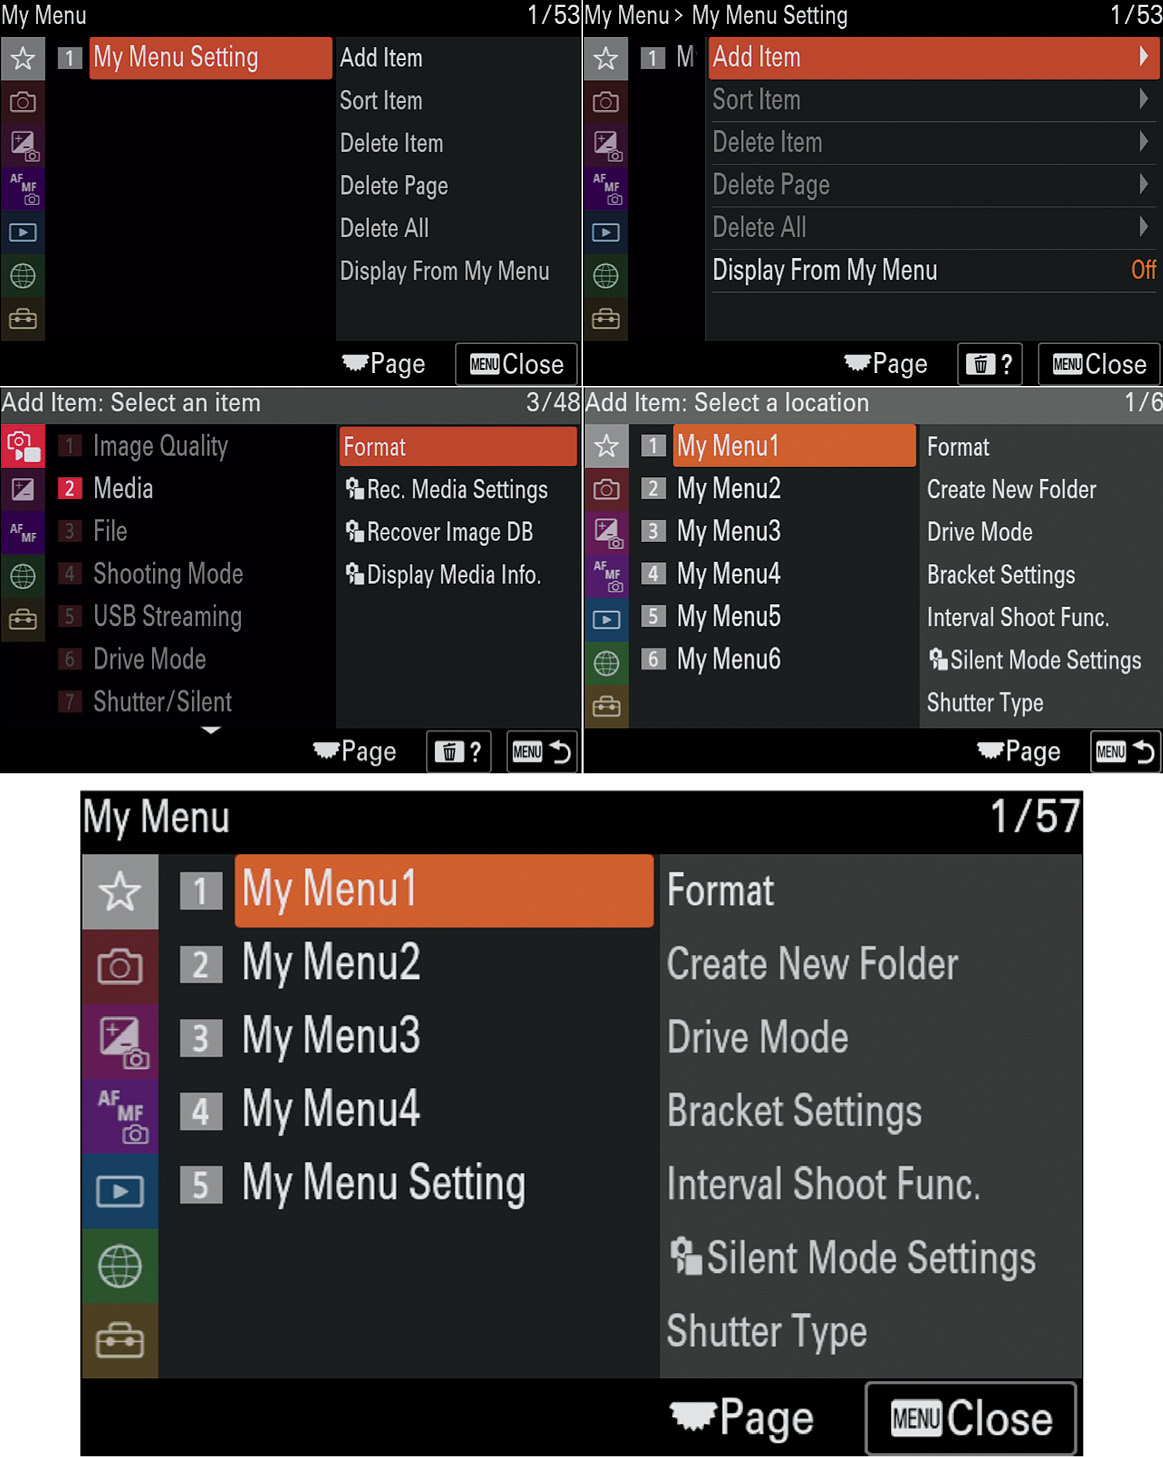
Figure 6.2 Adding My Menu functions.
The additional options available include:
- ■Sort Item. Highlight a My Menu item and press the center button. You can then use the up/down controls to move it within its current menu, or the left/right controls to transport it to a different My Menu page.
- ■Delete Item/Delete Page/Delete All. Highlight an entry or page and press the center button to remove that item or page from My Menu. Delete All will remove all your My Menu items so you can start from scratch.
- ■Display From My Menu. This setting is Off by default. When enabled, pressing the MENU button will produce the My Menu entry you last accessed. For example, if you change shutter types frequently, a press of the MENU button would take you to that setting immediately.
Shooting Menu Tab
The Sony a7 IV’s red-coded Shooting tab menus have ten groups when the Still/Movie/S&Q dial is set to the Still Photography position. Each group is devoted to specific adjustments that are most likely to be made during a given session. (See Figure 6.3.) They are as follows:
- 1.Image Quality
- 2.Media
- 3.File
- 4.Shooting Mode
- 5.USB Streaming
- 6.Drive Mode
- 7.Shutter/Silent
- 8.Image Stabilization
- 9.Zoom
- 10.Shooting Display
This chapter covers all the menu entries shared in common by the Still Photography and the two video modes, Movie and S&Q. However, when the Still/Movie/S&Q dial is set to the Movie or S&Q positions, the numbering changes and there are additional groups shown.
The first five groups in the Movie-oriented tabs have exactly the same names and numbers. The next groups that follow are:
- 6.Shutter/Silent (Similar to Still mode)
- 7.Audio Recording (Movie-only entries)
- 8.TC/UB (Movie-only entries)
- 9.Image Stabilization (Similar to Still mode)
- 10.Zoom (Similar to Still mode)
- 11.Shooting Display (Similar to Still mode)
- 12.Marker Display (Movie-only entries)
Four of those, Shutter/Silent, Image Stabilization, Zoom, and Shooting Display are covered in this chapter. I’m going to save descriptions of the Audio Recording, TC/UB, and Marker Display groups for Chapters 10 and 11, which are dedicated to movie topics.
1. Image Quality
Here you’ll find Image Quality entries (most are shown at left in Figure 6.3). You must scroll to see the others. These entries allow you to choose parameters that directly affect image quality, including image file format, aspect ratio, two types of noise reduction, HLG settings, color space, and lens aberration compensation. In the listings that follow, default values are indicated in bold with an asterisk before the option name. Note that some entries have additional sub-entries; in those cases I’ll list only the top-level choices and not show default values for the multiple entries in the extra screens.
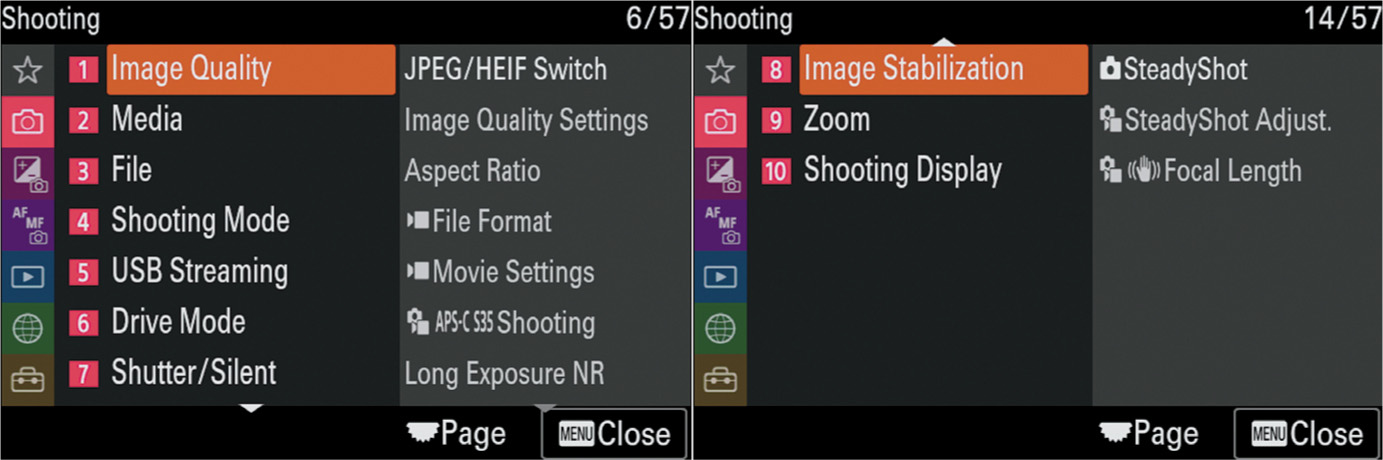
Figure 6.3 Image Quality settings
JPEG/HEIF Switch 
Options: *JPEG, HEIF (4:2:0), HEIF (4:2:2)
My preference: JPEG
For most users, I recommend sticking with the default value, JPEG, unless you have a special need for the features of HEIF (high-efficiency image file) format, such as creating still images that will match HLG (hybrid-log gamma) video (discussed later in this chapter). In this book I will, for the most part, use JPEG as an example for most functions. You can assume that in nearly all cases HEIF can be substituted for JPEG even if I don’t use “JPEG/HEIF” terminology every time. If JPEG or HEIF only apply, I will point that out.
The Apple’s iOS 11 operating system for its smart devices was the first consumer product to use the HEIF format. In a nutshell, HEIF images use an advanced compression scheme to produce files with higher image quality that may be only half the size of JPEGs, and have more features, including transparency and 16-bit color. The downside is that, as I write this, no browser supports it natively, and many software applications as well as operating systems like Windows and Android need updates to accommodate HEIF. For example, Photoshop CC currently will recognize these files only if the extension is .HEIF (not the .HIF Sony uses), while Macs need macOS High Sierra or later to interpret HEIF images.
If you’re using a recent iPhone with HEIF, it can convert your images to JPEG automatically when you export them but will use the format to deploy special features internally (say, for live images). Sony has integrated its free HEIF Converter (which can create both JPEG and TIFF images from HEIF files) into the functionality of Imaging Edge software for both Windows and macOS. So, while HEIF may eventually replace JPEG (last updated in 1994) the transition will take many years. The good news is that, if you need HEIF files, you can create them now with your Sony a7 IV.
This entry, shown earlier in Figure 6.1 center and right, gives you three choices:
- ■JPEG. This option creates highly compressed 8-bit images using 4:2:0 color (described next). Some image quality is lost, but virtually all applications are compatible with the files produced. On average, a JPEG file is about 28MB in size.
- ■HEIF (4:2:0). You end up with 10-bit images using 4:2:0 color, also highly compressed, but typically about a third the size of your average JPEG file. The image is encoded using a procedure called chroma subsampling, which does reduce the amount of information that needs to be transferred. Chroma subsampling takes advantage of the fact that human beings don’t detect changes in color (chroma) as easily as they do for brightness (luma). The designation 4:2:0 simply indicates that the full amount of brightness information is passed along (“4”) while half the information (“2”) is sampled in the horizontal direction, and the vertical information is ignored entirely (“0”).
- ■HEIF (4:2:2). Also creates highly compressed 10-bit files using 4:2:2 encoding in which every other horizontal pixel and every other vertical row are sampled. Subsampling in this way reduces the size of the otherwise uncompressed image (which would be expressed “4:4:4”), with virtually no visual difference. You’ll end up with files that are even smaller than their JPEG counterparts.
Just remember that HEIF images may not be viewable or editable by everyone if their equipment or software don’t support it. Note that by default, HEIF images are always recorded using the sRGB color space, except when the Shooting > Image Quality > HLG Still Image setting is set to On, in which case the BT.2020 color gamut is used. I’ll explain HLG and Color Spaces later in this chapter.
Image Quality Settings
Options: File Format, RAW File Type, JPEG Quality, JPEG Image Size, Recording Media Settings
My preference: File Format: RAW & JPEG; RAW File Type: Lossless Compressed; JPEG Quality: Extra Fine; JPEG Image Size: L (50M)
The multiple defaults for this menu item are listed below. The Image Quality Settings screen (see Figure 6.4) lets you choose the image settings that will be used by the a7 IV to store its still photo files. You’ll often use it in tandem with the Recording Media Settings entry discussed soon. Here’s how the two work together:
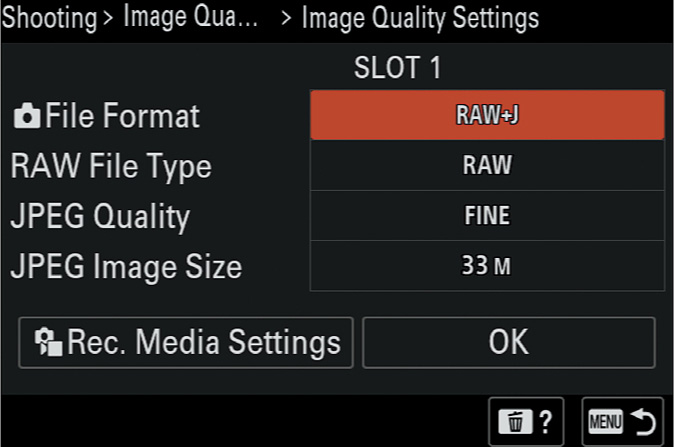
Figure 6.4 Image Quality Settings for Slot 1.
- ■Image Quality Settings: Here is where you’ll specify the file format, either (JPEG/(HEIF), RAW, or both; the type of RAW file; the JPEG Quality; and the JPEG Image Size for the currently selected slot. You jump to the Recording Media Settings entry from here to change slots.
- ■Recording Media Settings: This entry allows you to switch between slots, and select which slot is your primary slot. You can also specify the behavior of the two slots, which I’ll describe later in this chapter, and to jump directly from the Recording Media entry to the Image Quality Settings entry, as required.
You’ll get the hang of how the two entries work together after you read the descriptions I’m going to provide for this entry and its companion Recording Media Settings counterpart. The options here include:
- ■File Format: RAW, RAW & JPEG/(HEIF), *JPEG/(HEIF)
- Should you select RAW, JPEG (or its HEIF alternative), or both? You can elect to store only JPEG versions of the images you shoot, or you can save your photos as “unprocessed” RAW files, which consume several times as much space on your memory card. Or, you can store both file types at once as you shoot. Note that to open a RAW file, you must have an image editor or RAW processor capable of converting the RAW file to editable form. The free Sony Imaging Edge software can do this for you; Photoshop, Lightroom, Photoshop Elements, and other programs compatible with Adobe Camera Raw (ACR) can also make the conversion for you.
- Many photographers elect, as I do, to shoot both a JPEG and a RAW file (RAW & JPEG), so they’ll have a JPEG version that might be usable as-is, as well as the original “digital negative” RAW file in case they will later want to make some serious editing of the photo with imaging software for reasons discussed shortly. If you use the RAW & JPEG option, the camera will save two different versions of the same file to the memory card: one with a .JPG extension, and one with the .ARW extension that signifies Sony’s proprietary ARW RAW format that consists of raw data. (Later in this chapter I’ll show you how to save JPEG files to one slot, and RAW files to the other, using the Recording Mode sub-entry in the Shooting > Media group.)
- ■RAW File Type: Uncompressed, Lossless Compressed, *Compressed
- This option allows selecting Uncompressed (an average of about 70MB during my testing); Lossless Compressed (53MB during my tests); or Compressed (42MB); all are extended dynamic range 14-bit files. During Continuous Shooting, if RAW file type is set to Compressed, the a7 IV stores 12-bit files instead.
- Increased file size translates into less storage space on your memory card (and computer), and a longer wait while your camera’s buffer clears after a continuous sequence. (Using a CFe Type-A memory card instead of a slower SD card can make your buffer last longer.) I recommend using Compressed because it’s almost impossible to detect differences between Compressed and Uncompressed files.
- ■JPEG Quality: Extra Fine, *Fine, Standard, Light
- To reduce the size of your image files and allow more photos to be stored on a given memory card, the camera’s processor uses JPEG compression to squeeze the images down to a smaller size. This compacting reduces the image quality a little, so you’re offered your choice of Extra Fine, Fine, and Standard compression. Standard compression is quite aggressive; the camera discards a lot of data. While Fine is, well, just fine, you’ll find that Extra Fine provides even better results, so it should really be your standard when shooting JPEG photos. The more compressed versions lose detail, forever, that you can never regain, the price you pay for saving some storage space. The Light option produces files that may be 1/10th the size of their Extra Fine counterparts. Unless your final images are only going to be emailed over a wireless connection as, say, documentation (rather than edited or printed), it’s not worth it.
- For most work, extra compression (or lower resolution, described next) is false economy. You never know when you might need that extra bit of picture detail. Your best bet is to have enough memory cards to handle all the shooting you want to do until you have the chance to transfer your photos to your computer or a personal storage device. In my tests, the actual file size for a JPEG file can vary quite a bit, depending on the content of the image (large areas, such as sky, with little detail compress more efficiently). The typical JPEG Extra Fine, Fine, Standard, and Light files were 21MB, 8.4MB, 4.5MB, and 2.4MB, respectively.
- If you’re using HEIF format instead of JPEG, the same choices are available, and the file sizes are typically 1/4th to 1/5th the size.
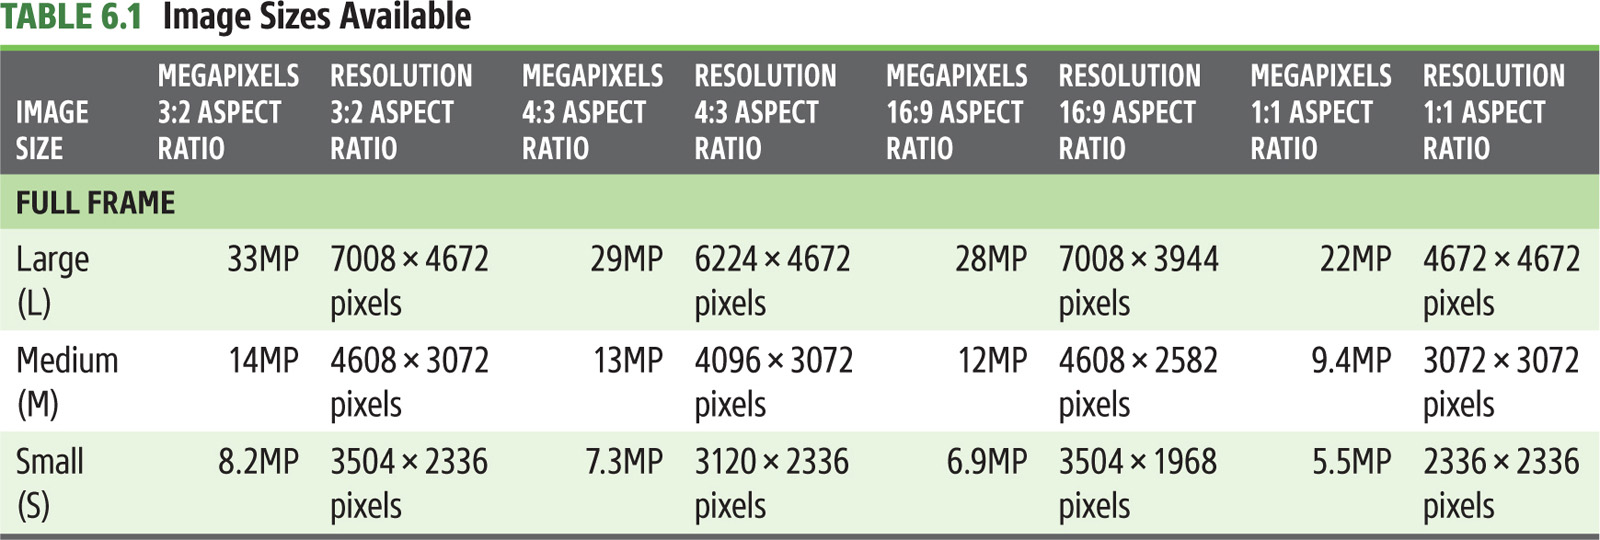
- ■JPEG Image Size: *Large: 33M, Medium: 14M, Small; 8.2M
- Here you can choose among the a7 IV’s Large, Medium, and Small settings for JPEG still pictures. The larger the size that’s selected, the higher the resolution: the images are composed of more megapixels. Note that unlike some previous Sony full-frame cameras, you can specify JPEG Image Size even if you have selected RAW or RAW & JPEG for File Format. However, the a7 IV will always shoot Large RAW files, even ifJPEG files are recorded in Medium or Small sizes.
- As you scroll among the options, you’ll note that the size for Large, Medium, and Small is displayed in megapixels, as shown for the a7 IV in Table 6.1. The number of pixels will vary, depending on the aspect ratio you’ve chosen. (I’ll explain aspect ratios next.)
- For example, with the a7 IV, you’ll get 33MP in Large mode using the 3:2 aspect ratio, 29MP in Large mode using the 4:3 aspect ratio, 28MP with the 16:9 proportions, and 22MP when capturing square 1:1 images. If you are using the cropped APS-C/Super 35mm mode (explained in more detail in Chapter 12), with the a7 IV, the image is cropped, giving you a 14MP Large image at 3:2 aspect ratio, and proportionately smaller/lower resolution images in the other ratios.
- There are some limited advantages to using the Medium and Small resolution settings, and similar space-saving benefits accrue to the Standard JPEG compression setting. All these options help stretch the capacity of your memory card, so you can shoehorn quite a few more pictures onto a single card. That can be useful when you’re away from home and are running out of storage, or when you’re shooting non-critical work that doesn’t require full resolution (such as photos taken for real estate listings, web page display, photo ID cards, or similar applications).
- ■Recording Media Settings: This option jumps to the Recording Media Settings menu, where you can specify which slot your Image Quality settings apply to.
You’ll sometimes be told that RAW files are the “unprocessed” image information your camera produces before it’s been modified. That’s nonsense. RAW files are no more unprocessed than old-school camera film is after it’s been through the chemicals to produce a negative or transparency. A lot can happen in the developer that can affect the quality of a film image—positively and negatively—and, similarly, your digital image undergoes a significant amount of processing before it is saved as a RAW file. Sony even applies a name (BIONZ XR) to the digital image processor used to perform this magic in its latest Sony cameras.
A RAW file is closer in concept to a film camera’s processed negative. It contains all the information, with no compression (in the Uncompressed RAW version), no sharpening, no application of any special filters or other settings you might have specified when you took the picture. Those settings are stored with the RAW file, so they can be applied when the image is converted to JPEG, HEIF, TIFF, or another format. However, using RAW converter software such as Adobe Camera Raw (in Photoshop, Elements, or Lightroom) or Sony’s Imaging Edge software (available for download from various Sony websites worldwide), you can override a RAW photo’s settings (such as White Balance and Saturation) by applying other settings in the software. You can make essentially the same changes there that you might have specified in your camera before taking a photo.
Making changes to settings such as White Balance is a non-destructive process in a RAW converter since the changes are made before the photo is fully processed by the software program. Adjusting settings does not affect image quality, except for changes to exposure, highlight or shadow detail, and saturation; the loss of quality is minimal however, unless the changes you make for these aspects are significant. The RAW format exists because sometimes we want to have access to all the information captured by the camera before the camera’s internal logic has processed it and converted the image to a standard file format.
A RAW photo does take up more space than a JPEG and, in uncompressed or lossless compressed modes, preserves all the information captured by your camera after it’s been converted from analog to digital form. Since we can make changes to settings after the fact while retaining optimal image quality, errors in the settings we made in-camera are much less of a concern than in JPEG (or HEIF) capture. When you shoot in these formats, any modification you make in software is a destructive process; there is always some loss of image quality, although that can be minimal if you make only small changes or are skilled with the use of adjustment layers.
JPEG/HEIF formats provide smaller files by compressing the information in a way that loses some image data. The lost data is reconstructed when you open the file in a computer, but this is not a perfect process. If you shoot at the highest quality (Extra Fine) level (Quality choices are explained below), the compression (and loss of data) is minimal; you might not be able to tell the difference between a photo made with RAW capture and a Large/Fine image. If you use the lower quality level, you’ll usually notice a quality loss when making big enlargements or after cropping your image extensively.
So, why don’t we always use RAW? Although some photographers do save only in RAW format, it’s more common to use either RAW plus the JPEG/HEIF option or to just shoot JPEG/HEIF and eschew RAW altogether. While RAW is overwhelmingly helpful when an image needs to be modified, working with a RAW file can slow you down significantly. The RAW images take longer to store on the memory card, so you cannot shoot as many in a single burst. Also, after you shoot a series, the camera must pause to write them to the memory card, so you may not be able to take any shots for a while (or only one or two at a time) until the RAW files have been written to the memory card. When you come home from a trip with numerous RAW files, you’ll find they require more post-processing time and effort in the RAW converter, whether you elect to go with the default settings in force when the picture was taken or make minor adjustments.
Those who often shoot long series of photos in one session, or want to spend less time at a computer, may prefer JPEG over RAW. Wedding photographers, for example, might expose several thousand photos during a bridal affair and offer hundreds to clients as electronic proofs on a DVD. Wedding shooters take the time to make sure that their in-camera settings are correct, minimizing the need to post-process photos after the event. Given that their JPEGs are so good, there is little need for them to get bogged down working with RAW files in a computer. Sports photographers also avoid RAW files because of the extra time required for the camera to record a series of shots to a memory card and because they don’t want to spend hours in extra post-processing. As a bonus, JPEG files consume a lot loss memory in a hard drive.
My recommendation: When shooting sports, I’ll switch to shooting Large/Extra Fine JPEGs (with no RAW file) to minimize the time it takes for the camera to write a series of photos to the card; it’s great to be able to take another burst of photos at any time, with little or no delay. I also appreciate the fact that I won’t need to wade through long series of photos taken in RAW format.
In most situations however, I shoot virtually everything as RAW & JPEG. Most of the time, I’m not concerned about filling up my memory cards, as I usually carry at least three 128GB memory cards with me. If I know I may fill up all those cards (say, on a long trip), I’ll also carry a notebook computer and an external 4 terabyte hard drive to back up my files.
Navigate to the Shooting > Image Quality > Image Size menu item, press the center button, and scroll to the desired option: L, M, or S. Then press the center button to confirm your choice. The actual size of the images depends on the aspect ratio you have chosen in the subsequent menu item (discussed below).
| TIP When the Shooting > Image Quality > APS-C/Super35 entry is set to On, or is set to Auto and an APS-C lens is mounted, the Large (L) options are not available. Only Medium and Small choices can be selected; the resolution of each is the same as in full-frame (non-APS-C) mode. |
There are few reasons to use a size other than Large with this camera, even if reduced resolution is sufficient for your application, such as photo ID cards or web display. Starting with a full-size image gives you greater freedom for cropping and fixing problems with your image editor. An 800 × 600–pixel web image created from a full-resolution (large) original can end up better than one that started out as a small JPEG.
Of course, the Medium and Small settings make it possible to squeeze more pictures onto your memory card. Indeed, the a7 IV images at Medium resolution still amount to 21MP, using the 3:2 aspect ratio. That’s nothing to sneeze at; it approaches the maximum of some very fine dSLR cameras that were available a few years ago. The smaller image sizes might come in handy in situations where your memory cards are almost full, and/or you don’t have the opportunity to offload the pictures you’ve taken to your computer. For example, if you’re on vacation and plan to make only 4 x 6-inch snapshot prints of the photos you shoot, setting a lower resolution will stretch your memory card’s capacity. Even then, it makes more sense to simply buy and carry memory cards with higher capacity and use your a7 IV camera at its maximum resolution.
Aspect Ratio
Options: *3:2, 4:3, 16:9, and 1:1 aspect ratios
My preference: 3.2; you can always crop to any of the others in your image editor
The aspect ratio is simply the proportions of your image as stored in your image file. The standard aspect ratio for digital photography is approximately 3:2; the image is two-thirds as tall as it is wide, as shown at upper left in Figure 6.5. These proportions conform to those of the most common snapshot size in the USA, 4 x 6 inches. Of course, if you want to make a standard 8 × 10-inch enlargement, you’ll need to trim some of the length of the image area since this format is closer to square; you (or a lab) would need 8 x 12-inch paper to print the full image area. The 3:2 aspect ratio was also the norm in photography with 35mm film. The a7 IV also supports the 4:3 ratio used in Panasonic and OM System (Olympus) Micro Four Thirds cameras (see Figure 6.5, upper right).
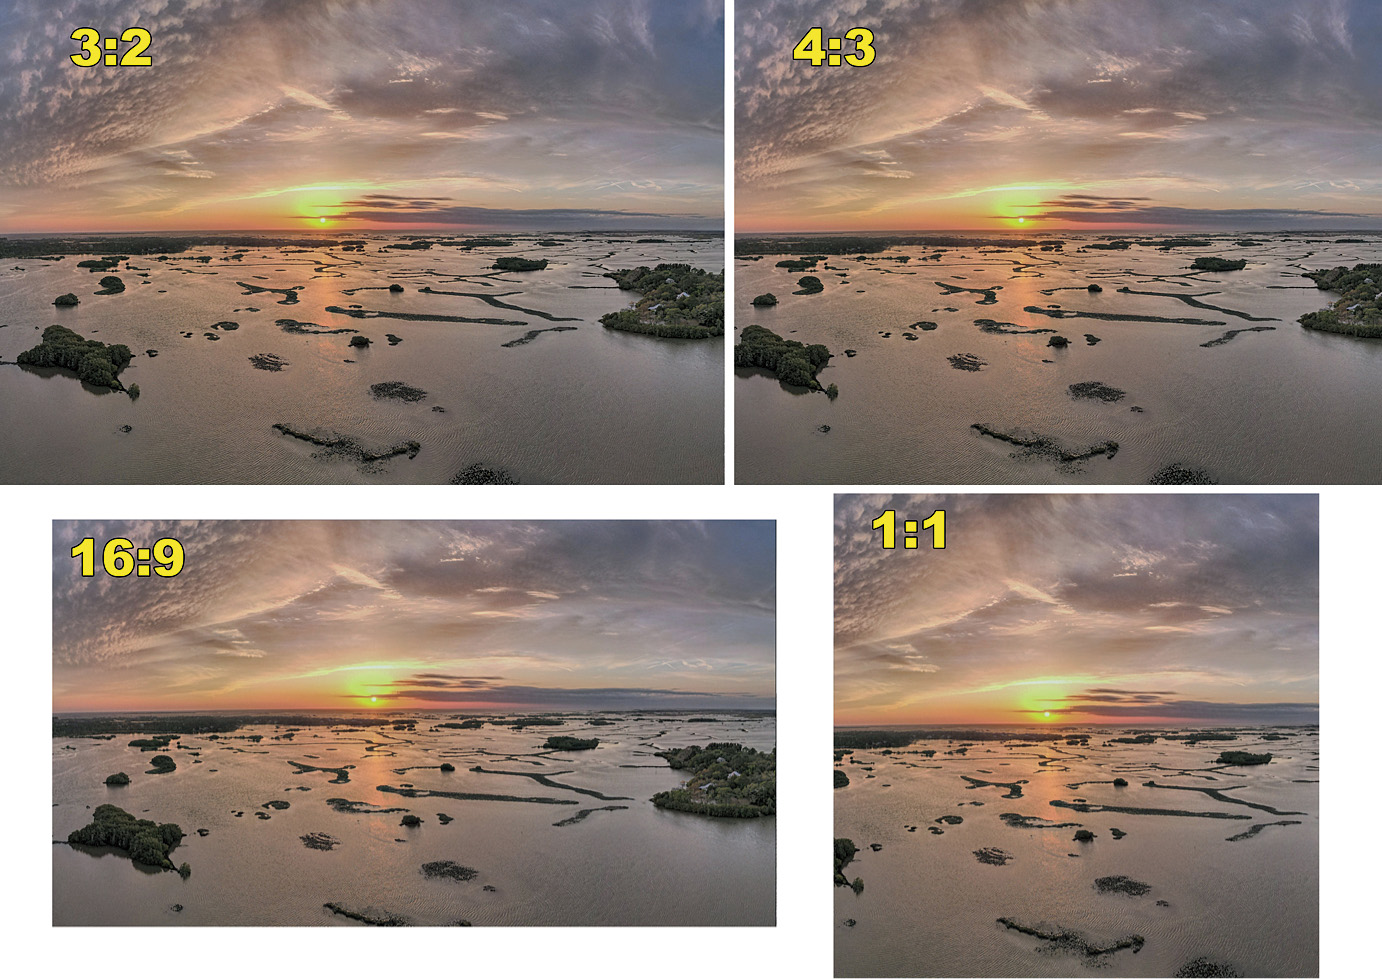
Figure 6.5 Available aspect ratios for still photos: 3:2 (upper left); 4:3 (upper right); 16:9 (lower left); 1:1 (lower right).
If you’re looking for images that will “fit” a wide-screen computer display, or a high-definition television screen, you can use this menu item to switch to a 16:9 aspect ratio, which is much wider than it is tall. (See Figure 6.5, lower left.) The camera performs this magic by cutting off the top and bottom of the frame (as shown at lower right in the figure), and storing a reduced resolution image (Table 6.1). If you need the wide-screen look, this menu option will save you some time in image editing, but you can achieve the same proportions (or any other aspect ratio) by trimming a full-resolution image with your software. The 16:9 option is most useful if you plan to take a lot of photos that will work best in that format. For example, if you’re creating a storyboard for a video production, still images taken in this format will match the proportions of4K and HD movies. Only the JPEG/HEIF version of a shot is cropped; the RAW file retains its full image area, which will be trimmed by your RAW converter when you import the image into your image editor.
You can also choose the square 1:1 aspect ratio, shown in Figure 6.5, lower right. Although the square format was popular during the film era for twin-lens reflexes and many professional cameras like early Hasselblads, it enjoyed a resurgence thanks to the popularity of Instagram. It’s been calculated that more square Instagram photos are taken each day than for all other formats combined.
(Movie) File Format 
Options: XAVC HS 4K, XAVC S 4K, *XAVC S HD, XAVC S-1 4K, XAVC S-1 HD
My preference: XAVC S HD
The a7 IV offers 4K and full HD (high-definition) video recording in several formats. By default, movies are recorded in XAVC S HD, but this menu item allows you to choose other formats. I’m going to save most of the technical details for the movie chapters (Chapters 10 and 11), but there are three major differences between the choices offered in this menu entry:
- ■Codec. The 4K HS format uses the HEVC (High-Efficiency Video Coding) codec (coder/decoder). Also known as H.265, this software produces higher image quality with the same size files as the other settings, which use the less-efficient H.264 codec. The HEIC still photo format is based on HEVC, which is why images captured in that format will better match video captured using the HEVC codec.
- ■Resolution. The 4K and full HD formats provide 3840 x 2160 and 1920 x 1080 pixel resolution, respectively.
- ■Move compression format. The first three file formats offered use long GOP (group of pictures) interframe compression. The last two, XAVC-I 4K and XAVC S-I HD, use All-I compression.
- With long GOP compression, one I-frame (intraframe) is recorded that contains all the information for a frame, minimally compressed. The next frame after this key frame is called a B-frame, and it stores only the changes from the I-frame, which greatly reduces the amount of information that must be kept. It may be followed by another B-frame, and then a P-frame, which just predicts what the actual frame should look like based on the information from the previous frames, and, eventually, the next I-frame. This type of compression is sometimes called IPB Compression, after the Intra, Predictive, and Bidirectional frame types.
- The XAVC-I 4K and XAVC S-I HD formats use All-I compression, in which each frame is an Intra or key frame. All-I compression produces larger files and the capability of the camera to support the higher transfer rate they demand, but they are more friendly for editing, particularly for those who are doing tight, frame-by-frame editing. For example, if you are capturing a video at a wedding and a still photography flash burst occurs at an inopportune time, you can edit out that particular frame.
Movie Settings
Options: Frame Rate: *60p/50p, 30/25p, 24p, 120/100p; Record Setting: 50M 4:2:2 10 bit, *50M 4:2:2 8 bit, 25M 4:2:2 8 bit
My preference: XAVC S: 60p 50M 4:2:2 8 bit
This item allows you to choose from various parameters including:
- ■Bit rate. This is the rate at which your video is transferred, ranging from 600M/sec (megabits per second) to 16M/sec. Faster transfer rates generally correspond to higher quality, depending on the amount/type of compression, and also place more demands on your camera and storage. A CFe memory card may be a must for video using the highest bit rates.
- ■Color sampling. I described the difference between 4:4:2 and 4:4:0 color sampling earlier in this chapter, under the JPEG/HEIF Switch entry. It applies here, too.
- ■Bit depth. This describes the number of bits used to record information. Formats using 4:4:2 color sampling use 10 bits of data per frame, for up to 1,024 tone levels (gradation) per channel possible. The assumption is made that the video will be displayed and/or edited on a computer that can handle that depth. In contrast, 8-bit video can capture only 256 levels per channel, but it is compatible with a wide variety of playback options.
Note that the frame rates differ between countries using the NTSC system, such as the US, Japan, and some other countries, and those using PAL. In locations using the PAL system, 25, 50, and 100 frame rates replace 30, 60, and 120 fps, respectively. I’ll explain frame rates, scanning, and bit rates in Chapters 10 and 11.
S&Q Settings. 
Options: Record Frame Rate: *60p, 30p, 24p, 120p (NTSC); Frame Rate: *120, 60, 30, 15, 8, 4, 2, 1 frames per second; Record Setting: 50M 4:2:2 10 bit, *50M 4:2:2 8 bit, 25M 4:2:0 8 bit
My preference: N/A
This is a great feature if you want to shoot some slow-motion movies as a special effect, analyze the dynamics of a particular motion, or speed up a sequence to provide a humorous herky-jerky appearance. Sony’s implementation of high/slow frame rate photography, which it now calls slow-motion/ quick-motion, allows you to capture a silent (no sound) slow-motion video at up to 120 frames-per-second rate (100 fps for PAL). It will play back 4X or 5X slower, depending on whether you select 30p/25p or 24p as your Record Setting option within this menu entry. You can also record at slower speeds (down to 1 frame per second) for speeded-up, Charlie Chaplinesque footage. Here are your options, and how it works:
- ■Record Frame Rate. This parameter is labeled a bit misleadingly. It determines the playback speed of your video clip and, therefore, how much of a slow-motion/fast-motion effect you will see when viewing the movie. Your choices are 60p, 30p, or 24p when using the NTSC television system. Think of this setting as a factor, which, when dividing the Frame Rate, determines the motion effect you get. All will become clear in a moment.
- ■Frame Rate. Here you select the number of frames per second captured in S&Q mode. You can select 120, 60, 30, 15, 8, 4, 2, and 1 frames per second. (Scroll down to find the last two options.) When the frames per second is divided by the record setting, you will arrive at the slow-motion effect or speed factor. I’ll show you some typical results next.
- ■Record Setting. Choose 50M 4:2:2 10 bit, 50M 4:2:2 8 bit, and 25M 4:2:0 8 bit to specify the bit rate, color sampling, and bit depth of your S&Q recording.
Slow-Motion
When you capture video at any frame rate and then play it back at a slower frame rate, the result is slow-motion. For example, if you choose 120 fps for the Frame Rate, a 10-second video will include 1,200 individual frames (120 fps x 10). If you’ve chosen 30 fps for your Record Setting, those frames will require 40 seconds to play back (1,200 frames divided by 30). The playback time is increased 4X. Other playback times involve different amounts of slow-motion: 24 fps gives you 5X playback. (When shooting at 120 fps, the 60 fps Record Setting is not available.) Table 6.2 shows the amount of slow-motion you get with each combination of frame rates from 30 to 120, and playback settings of 60, 30, and 24 frames per second.
Quick-Motion
Frame rates slower than 30 fps give you speeded-up quick-motion instead ofslow-motion. For example, with a Frame Rate of 4 frames per second you’ll capture just 40 frames in 10 seconds. When viewed at a Record Setting of, say, 24 fps, that 10-second clip will be compressed into only 1.7 seconds of viewing time. Obviously, because of the speed-up factor, you’ll get the maximum effect when you shoot longer sequences that can be displayed very, very quickly. Look over Table 6.2 and the explanation that follows to calculate your own slow-/quick-motion effects.

To calculate the slow-motion effects you can look forward to, multiply any of the figures labeled “slow-motion” by the number of seconds captured in your original clip. For example, if you shot a two-minute, 120 fps sequence and played it back at 30p (4X slow-motion), you’d need 8 minutes to watch the whole thing. Going the other way, a two-minute clip captured at 4 fps and played back at 30p, would zip by in four seconds of frantic action.
Obviously, in real life you probably won’t be shooting slow-motion video for two whole minutes (a golf swing or sports action sequence can be captured in a few seconds) and will be shooting quickmotion, time-lapse-like clips (such as a blooming flower or the march of the stars across the night sky) for longer periods so you’ll have time to enjoy what you see. As you work with this cool feature, you may have to experiment to see which combination of frame rate capture speeds and the three possible playback speeds work best for you in a given situation. Also, keep in mind that many videoediting programs can handle clips captured at various frame rates and output them at a different rate for playback.
All movies are recorded in XAVC S HD format, and, as noted earlier, are silent. When shooting slowmotion video, TC Run and TC Output (under TC/UB Settings, described later), and 4K Output Selection are disabled. And, obviously, fast frame rates require shorter shutter speeds, so be ready to boost your ISO settings, if necessary, to cope.
Proxy Recording
Options: Proxy Recording: On, *Off; Proxy File Format: XAVC HS HD, *XAVC S HD; Proxy Recording Settings: 16M 4:2:0 10 bit; *9M 4:2:0 10 bit
My preference: On, XAVC S HD
If you like, you can record a compact, low-bit-rate version of your XAVC S movies simultaneously while capturing your main movie. Although lower in quality, these “proxy” recordings are suitable for emailing, display on a smartphone or tablet, or uploading online. Your choices include:
- ■Proxy Recording. Select On or Off, depending on whether you feel you need that second, compact copy.
- ■Proxy File Format. Choose a higher quality XAVC HS HD to save a proxy video file at full HD (1920 × 1080) resolution or XAVC S HD standard HD (1280 × 720). The same frame rate selected for the main video will be used, (that is, 60/50p, 30/25p, or 24p). You cannot create a proxy video file when using the 120/100p frame rate.
- ■Proxy Recording Settings. If you choose the full HD 1920 x 1080 resolution option under Proxy File Format, you can specify either 16M 4:2:0 10-bit video or extra-compressed 9M 4:2:0 video. The standard HD proxy can get by with a 6M 4:2:0 8-bit transfer rate.
The proxy recordings are tucked away under the PRIVATEM4ROOTSUB folder on your memory card. A “Px” label appears over a main movie’s icon during image review to indicate that a proxy movie was recorded at the same time (the proxy itself cannot be displayed or edited in-camera). Any time you delete the main movie from your memory card the proxy is erased, too.
APS-C/S35mm Shooting
Options: On, *Auto, Off
My preference: Auto
This entry tells the a7 IV whether to automatically switch to the APS-C/Super 35mm “crop” mode when a lens not designed for full-frame coverage is mounted on the camera. (APS-C is a still-image format; Super 35mm is a movie format.) In Chapter 12, I’ll fully explain crop mode, which effectively captures pictures using only the center portion of the image, corresponding to the APS-C area used by Sony cameras that are not full-frame models and for Super 35mm film mode. There are three options within this menu entry:
- ■On. The camera always captures only the APS-C size area. If you’re using a non-FE E-mount lens, then the image will correspond to what you’d see with an ASP-C camera, such as the Sony a6600. The cropped image will have the same field of view as a lens with 1.5X the actual focal length. That is, if you’re using the Sony 16-55mm f/2.8 “kit” lens often supplied with the a6600 and other models, the effective focal length will be 24-82.5mm, and the cropped image will have a resolution of 14MP on the a7 IV. Because the On setting always activates the cropping effect, even if you’re using a full-frame FE lens (such as the Sony FE 70-200mm f/2.8 lens), the effective focal length will be 105-200mm. This APS-C crop “boost” works well with the a7 IV, because its 14MP image in crop mode in the 3:2 aspect ratio is still reasonable.
- Some sports photographers force use of the crop with FE lenses to get some extra “reach” without the need to crop later in an image editor. I generally don’t do that; when shooting sports, it’s helpful to have the full frame available so you can “see” your subject moving toward the center of the frame, while retaining the option of positioning the crop closer to the right and left edges.
- ■Auto. When you use this setting, the a7 IV will (often) detect whether you’ve mounted an FE or APS-C E-mount lens, and either crop or not crop as appropriate. It may not detect all APS-C E-mount lenses, particularly those from third-party vendors, so it’s often safest to use the On option when you know you will be using an APS-C-type lens and want to avoid vignetting.
- ■Off. With this setting, the camera never crops the image. If you are using a non-FE, non-fullframe lens, you’ll probably end up with severe vignetting in the corners. (I’ll show you this effect in Chapter 12.) I sometimes use this setting when working with lenses intended for APS-C cameras, because some lenses do cover the full frame (even if just barely) at some focal lengths. Off is not available when shooting 4K 120p/100p video.
Long Exposure NR/High ISO NR
Long Exposure NR: Options: *On, Off
High ISO NR: Options: *Normal, Low, Off
My preference: Off for both
I’ve grouped these two menu options together because they provide similar adjustments, each under slightly different circumstances. Moreover, the causes and cures for noise involve some overlapping processes. Digital noise is that awful graininess that shows up as multicolored specks in images, and these menu items help you manage it. In some ways, noise is like the excessive grain found in some high-speed photographic films. However, while photographic grain is sometimes used as a special effect, it’s rarely desirable in a digital photograph.
The visual noise-producing process is something like listening to music in your car, and then rolling down all the windows. You’re adding sonic noise to the audio signal, and while increasing the volume may help a bit, you’re still contending with an unfavorable signal-to-noise ratio that probably mutes tones (especially higher treble notes) that you really want to hear.
The same thing happens when the analog signal is amplified: You’re increasing the image information in the signal but boosting the background fuzziness at the same time. Tune in a very faint or distant AM radio station on your car stereo. Then turn up the volume. After a certain point, turning up the volume further no longer helps you hear better. There’s a similar point of diminishing returns for digital sensor ISO increases and signal amplification as well.
Your a7 IV can reduce the amount of grainy visual noise in your photo with noise reduction processing. That’s useful for a smoother look, but NR processing does blur some of the very fine detail in an image along with blurring the digital noise pattern. These two menu items let you choose whether to apply noise reduction to exposures of longer than one second and how much noise reduction to apply (Normal or Low) when shooting at a high ISO level (at roughly ISO 1600 and above).
Digital noise is also created during very long exposures. Extended exposure times allow more photons to reach the sensor but increase the likelihood that some photosites will react randomly even though not struck by a particle of light. Moreover, as the sensor remains switched on for the longer exposure, it heats up, and this heat can be mistakenly recorded as if it were a barrage of photons. To minimize the digital noise that can occur during long exposures, the a7 IV uses a process called “dark frame subtraction.” After you take the photo, the camera fires another shot at the same shutter speed, with the shutter closed to make the so-called dark frame. The processor compares the original photo and the dark frame photo and identifies the colorful noise speckles and “hot” pixels. It then removes (subtracts) them so the final image saved to the memory card will be quite “clean.”
Context-Sensitive
The a7 IV has a “context-sensitive” noise-reduction algorithm that examines the image to identify smooth tones, subject edges, and textures, and apply different NR to each. This processing works best with areas with continuous tones and subtle gradations and does a good job of reducing noise while preserving detail. Because the BIONZ XR digital processing chip is doing so much work, you may see a message on the screen while NR is underway. You cannot take another photo until the processing is done and the message disappears. If you want to give greater priority to shooting, set Long Exposure NR and High ISO NR to Off.
Long Exposure NR works well, but it causes a delay; roughly the same amount of time as the exposure itself. That would be a long 10 seconds after a 10-second exposure. During this delay the camera locks up, so you cannot take another shot. You may want to turn this feature off, as I do, to eliminate that delay when you need to be able to take a shot at any time. This feature is Off by default in continuous shooting and bracketing modes.
You might want to turn off noise reduction for long exposures and set it to a weak level for high ISO photos to preserve image detail. (NR processing blurs the digital noise pattern, but it can also blur fine details in your images.) Or, you simply may not need NR in some situations. For example, you might be shooting waves crashing into the shore at ISO 200 with the camera mounted on a tripod, using a neutral-density filter and long exposure to cause the pounding water to blur slightly. To maximize detail in the non-moving portions of your photos, you can switch off long exposure noise reduction.
It’s also important to turn off noise reduction when taking interval photos, as explained in Chapter 5. But don’t worry about that—the a7 IV does it for you when you use the Interval Shooting Function. For example, the long exposures needed to record star trails would trigger the dark frame subtraction process, producing a 30-second delay following each 30-second exposure in a continuous sequence. So noise reduction is disabled to allow shooting long exposures, one after another, to capture your star trails.
HLG Still Image
Options: On, *Off
My preference: Off
A new wrinkle in the Sony toolkit is the addition of HLG (Hybrid-Log Gamma) output, which can be applied to still photos. You can consider it a type of HDR shooting, without the need to capture and combine multiple images. Instead, all you need to do is activate HEIF shooting, using either 4:4:2 or 4:4:0 color sampling, and then enable HLG capture with this entry. You’ll then be able to capture still photos with the extended dynamic range and wide color gamut offered using this gamma setting.
As with HDR video, HLG still images may not be rendered accurately on the camera’s display or on an external monitor. For best results, set Setup > Display Option > Gamma Display Assist to On, and Setup > Display Option > Gamma Display Assist Type to Auto or HLG (BT.2020). When directing your camera’s output to an external monitor, you’ll want to use an HLG-compatible television or monitor and choose Setup > 11. External Output > HDMI Resolution to anything other than 4320p/2160p.
Two of the biggest gorillas in the broadcast industry, BBC and NHK, developed Hybrid-Log Gamma, which produces video that can show HDR content on non-HDR displays. But when you direct the same image or video to a 4K television with HLG/HDR support, it will play back with the increased contrast, brighter highlights, and larger color gamut possible with high dynamic range video.
For HLG to be activated, the JPEG/HEIF Switch must be set to HEIF (alone), rather than RAW or RAW & HEIF; shooting mode must be P, A, S, or M. D-Range Optimizer, Creative Look, DRO Bracketing, and Picture Profile are deactivated, and the available ISO range changes.
Color Space
Options: *sRGB, Adobe RGB
My preference: sRGB
The Sony a7 IV’s Color Space option gives you two different color spaces (also called color gamuts), named Adobe RGB (because it was developed by Adobe Systems in 1998), and sRGB (supposedly because it is the standard RGB color space). These two color gamuts define a specific set of colors that can be applied to the images your a7 IV captures. Note that when you’re shooting HLG, a third color space, BT.2020 is used instead.
You’re probably surprised that the Sony a7 IV doesn’t automatically capture all the colors we see. Unfortunately, that’s impossible because of the limitations of the sensor and the filters used to capture the fundamental red, green, and blue colors, as well as that of the phosphors used to display those colors on the LEDs in your camera and computer monitors. Nor is it possible to print every color our eyes detect, because the inks or pigments used don’t absorb and reflect colors perfectly.
On the other hand, the a7 IV does capture quite a few more colors than we need. A 14-bit RAW image contains a possible 281 trillion different hues (16,384 colors per red, green, or blue channel), which are condensed down to a mere 16.8 million possible colors when converted to a 24-bit (eight bits per channel) image.
The set of colors, or gamut, that can be reproduced or captured by a given device (scanner, digital camera, monitor, printer, or some other piece of equipment) is represented as a color space that exists within the larger full range of colors. That full range is represented by the odd-shaped splotch of color shown in Figure 6.6, as defined by scientists at an international organization back in 1931. The colors possible with Adobe RGB are represented by the black triangle in the figure, while the sRGB gamut is represented by the smaller white triangle. The location of the corners of each triangle represent the position of the primary red, green, and blue colors in the gamut.
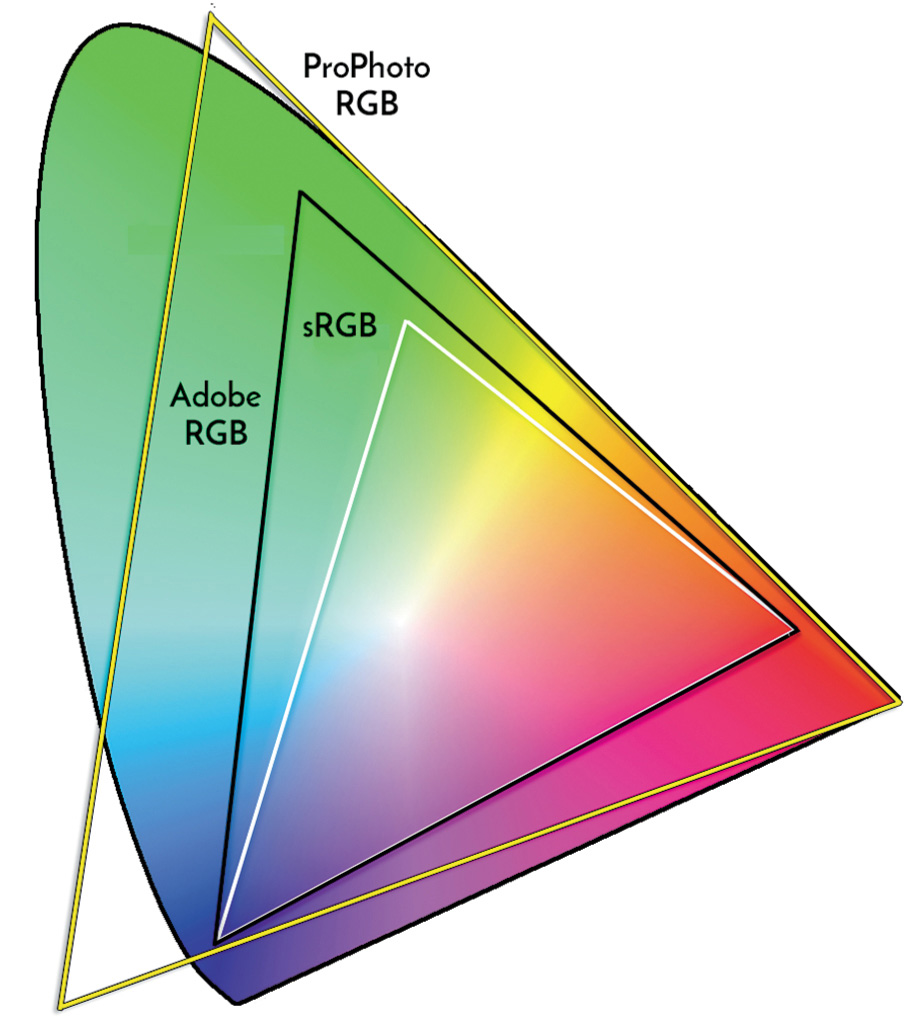
Figure 6.6 The outer curved figure shows all the colors we can see; the outlines show the boundaries of Adobe RGB (black triangle), sRGB (white triangle), and ProPhoto RGB (yellow triangle).
A third color space, ProPhoto RGB, represented by the yellow triangle in the figure, has become more popular among professional photographers as more and more color printing labs support it. While you cannot save images using the ProPhoto gamut with your a7 IV, you can convert your photos to 16-bit ProPhoto format using Adobe Camera RAW when you import RAW photos into an image editor. ProPhoto encompasses virtually all the colors we can see (and some we can’t), giving advanced photographers better tools to work with in processing their photos. It has richer reds, greens, and blues, although, as you can see from the figure, its green and blue primaries are imaginary (they extend outside the visible color gamut). Those with exacting standards need not use a commercial printing service if they want to explore ProPhoto RGB: many inkjet printers can handle cyans, magentas, and yellows that extend outside the Adobe RGB gamut.
Regardless of which triangle—or color space—is used by the a7 IV, you end up with some combination of 16.8 million different colors that can be used in your photograph. (No one image will contain all 16.8 million! To require that many, only about two pixels of any one color could be the same in a 50-megapixel image!) But, as you can see from the figure, the colors available will be different.
Adobe RGB, like ProPhoto RGB, is an expanded color space useful for commercial and professional printing, and it can reproduce a wider range of colors. It can also come in useful if an image is going to be extensively retouched, especially within an advanced image editor, like Adobe Photoshop, which has sophisticated color management capabilities that can be tailored to specific color spaces. As an advanced user, you don’t need to automatically “upgrade” your a7 IV to Adobe RGB, because images tend to look less saturated on your monitor and, it is likely, significantly different from what you will get if you output the photo to your personal inkjet. (You can profile your monitor for the Adobe RGB color space to improve your on-screen rendition using widely available color-calibrating hardware and software.) Note that HEIF doesn’t support AdobeRGB, and you can’t select it in HEIF mode. It’s another reason why sticking to JPEG is a good idea.
While both Adobe RGB and sRGB can reproduce the exact same 16.8 million absolute colors, Adobe RGB spreads those colors over a larger portion of the visible spectrum. Think of a box of crayons (the jumbo 16.8 million crayon variety). Some of the basic crayons from the original sRGB set have been removed and replaced with new hues not contained in the original box. Your “new” box contains colors that can’t be reproduced by your computer monitor, but which work just fine with a commercial printing press. For example, Adobe RGB has more “crayons” available in the cyan-green portion of the box, compared to sRGB, which is unlikely to be an advantage unless your image’s final destination are the cyan, magenta, yellow, and black inks of a printing press.
The other color space, sRGB, is recommended for images that will be output locally on the user’s own printer, as this color space matches that of the typical inkjet printer fairly closely. You might prefer sRGB, which is the default for the Sony a7 IV and most other cameras, as it is well suited for the range of colors that can be displayed on a computer screen and viewed over the Internet. If you plan to take your image file to a retailer’s kiosk for printing, sRGB is your best choice, because those automated output devices are calibrated for the sRGB color space that consumers use.
Of course, choosing the right color space doesn’t solve the problems that result from having each device in the image chain manipulating or producing a slightly different set of colors. To that end, you’ll need to investigate the wonderful world of color management, which uses hardware and software tools to match or calibrate all your devices, as closely as possible, so that what you see more closely resembles what you capture, what you see on your computer display, and what ends up on a printed hardcopy. Entire books have been devoted to color management, and most of what you need to know doesn’t directly involve your Sony a7 IV, so I won’t detail the nuts and bolts here.
To manage your color, you’ll need, at the bare minimum, some sort of calibration system for your computer display, so that your monitor can be adjusted to show a standardized set of colors that is repeatable over time. (What you see on the screen can vary as the monitor ages, or even when the room light changes.) I use the SpyderX Pro monitor color correction system from Datacolor (www.datacolor.com) for my computer’s 32-inch main monitor, flanked by two 26-inch wide-screen LCD displays. The unit checks room light levels every five minutes and reminds me to recalibrate every week or two using a small sensor device, which attaches temporarily to the front of the screen and interprets test patches that the software displays during calibration. The rest of the time, the sensor sits in its stand, measuring the room illumination, and adjusting my monitors for higher or lower ambient light levels.
Lens Compensation
Options: Shading Compensation, Chromatic Aberration Compensation, Distortion Compensation, (Default for each is *Auto), Breathing Compensation (Default is *Off)
My preference: Auto for all three; set to Off if you want to preserve a lens’s distortion effects.
This trio of submenus optimizes lens performance by compensating for optical defects; they’re useful because very few lenses in the world are even close to perfect in all aspects. All three items work only with lens compensation-compatible E-mount lenses and not when using A-mount lenses with an adapter accessory.
Shading Compensation
One key defect is caused by a phenomenon called vignetting, which is a darkening of the four corners of the frame because of a slight amount of fall-off in illumination at those nether regions. This menu option allows you to activate built-in “shading” compensation, which partially (or fully) compensates for this effect. Depending on the f/stop you use, the lens mounted on the camera, and the focal length setting, vignetting can be non-existent, slight, or may be so strong that it appears you’ve used a too-small hood on your camera. (Indeed, the wrong lens hood can produce a vignette effect of its own.)
Vignetting, even if pronounced, may not be much of a problem for you. I actually add vignetting, sometimes, in my image editor when shooting portraits and some other subjects. Slightly dark corners tend to focus attention on a subject in the middle of the frame. On the other hand, vignetting with subjects that are supposed to be evenly illuminated, such as landscapes, is seldom a benefit. Figure 6.7, left, shows an image without shading correction at top, and a corrected image at the bottom. I’ve exaggerated the vignetting a little to make it more evident on the printed page. Note that this effect is applied to both RAW and JPEG images.
Chromatic Aberration Compensation
The second defect involves fringes of color around backlit objects, produced by chromatic aberration, which comes in two forms: longitudinal/axial, in which all the colors of light don’t focus in the same plane, and lateral/transverse, in which the colors are shifted in one direction. (See Figure 6.7, top right.) When this feature is enabled, the camera will automatically correct images taken with one of the supported lenses to reduce or eliminate the amount of color fringing seen in the final photograph. (See Figure 6.7, bottom right.)
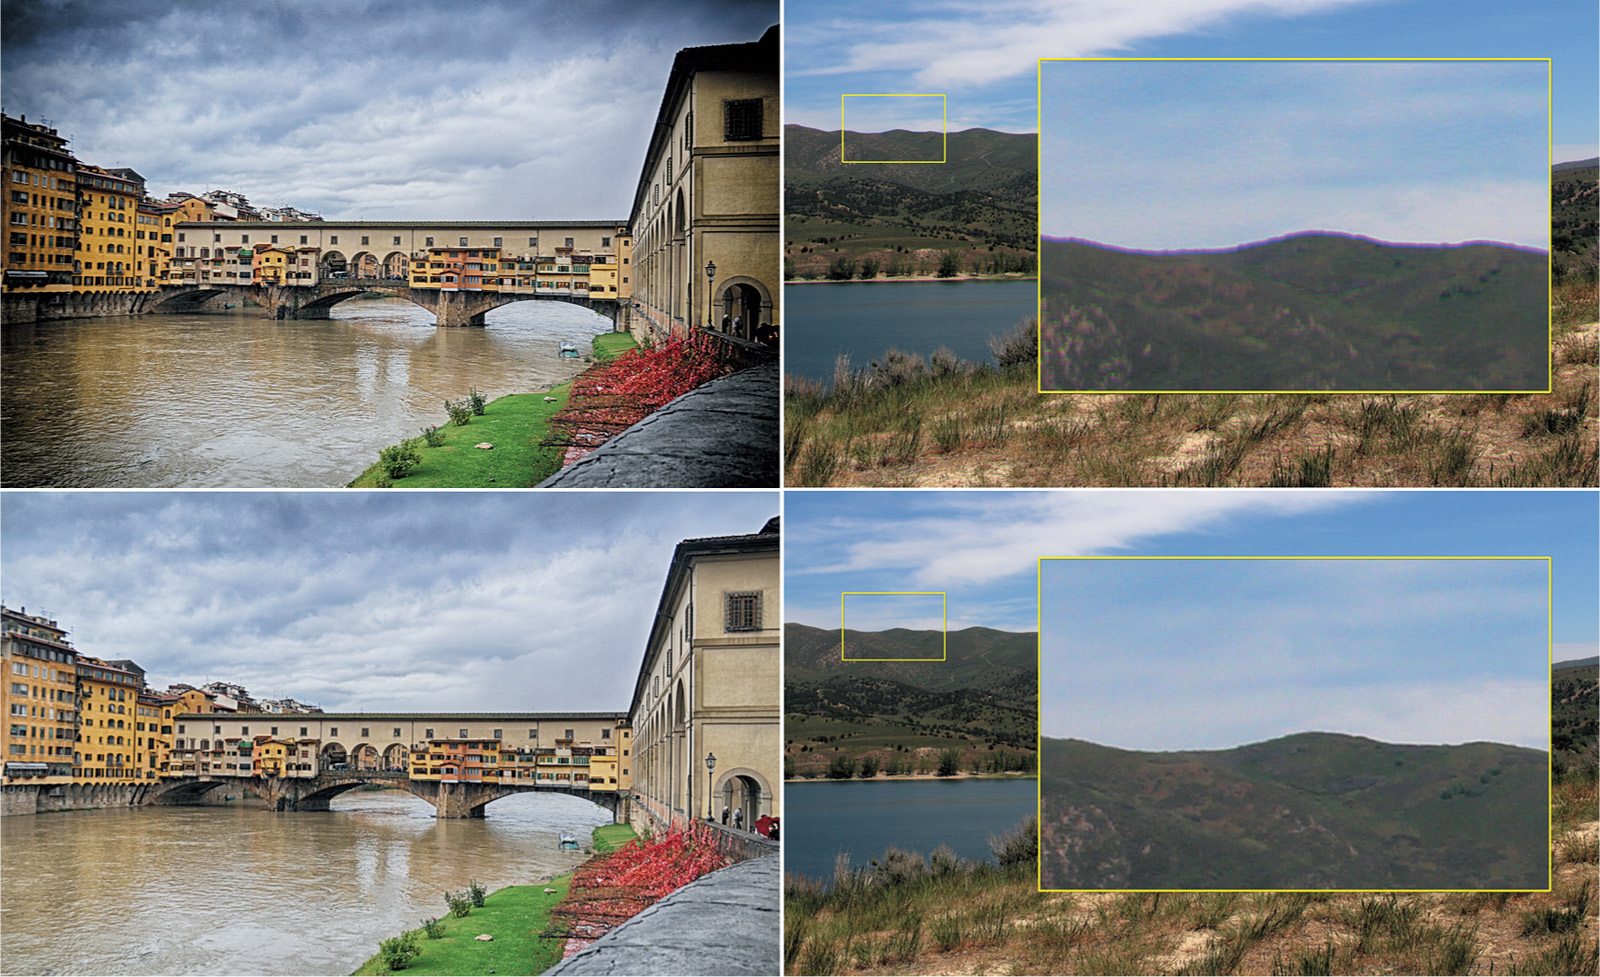
Figure 6.7 Vignetting (top left) is undesirable in a landscape photo, but the camera’s shading correction feature can fix dark corners (bottom left). Lateral chromatic aberration, which shows as color fringes (top right), can also be corrected (bottom right).
Distortion Compensation
Distortion is the tendency of some lenses to bow outward (most often wide-angle lenses) or curve inward (found in some telephoto lenses). Figure 6.8, left, shows an exaggerated version of the outward-curving variety, called barrel distortion, exhibited by many wide-angle lenses—especially in fisheye optics, where the distortion is magically transformed into a feature. This feature works with most E-mount lenses, but not with all.
In Figure 6.8, right, you can see inward bowing, or pincushion distortion, as found in many telephoto lenses. Both types can be partially fixed using Photoshop’s Lens Correction or Photoshop Elements’ Correct Camera Distortion filters. Or, you can apply this in-camera feature to fix mild distortion. You should realize that correcting lens distortion involves warping pixels, mostly at the edges of the frame, providing a little less sharpness in those areas. The image area of your final picture will be slightly smaller than the frame you composed, and, during playback, the active focus point is not shown in the review image.
In addition, applying distortion correction involves extra processing, which can reduce the number of consecutive shots possible. Because the correction is applied after you take the picture, the effect is not displayed on the screen when shooting in live view, even if Shooting > Shooting Display > Live View Display Settings > Live View Display > Setting Effect is set to On.
Figure 6.8 Left: Barrel distortion in wide-angle lenses becomes a useful feature with fisheye lenses. Right: Pincushion distortion causes straight lines at the edges of the frame to curve inward.
Breathing Compensation
This option appears only when the Still/Movie/S&Q dial is set to either Movie position. Some lenses effectively change their magnification (and thus their field of view) slightly, depending on the focusing distance. This is commonly referred to as breathing, and can actually refer to two different phenomena, a change in the angle of view or of the effective focal length of a lens. For example, a subject captured at a distance of five feet with a 100mm lens subject to breathing might actually appear to be slightly smaller, as if photographed with a 90 or 95mm optic.
In still photography, you ordinarily wouldn’t notice this change without comparing images taken with a lens that exhibits less breathing. When shooting movies, breathing can interfere with rack focus or follow focus (when you deliberately change the focus plane for dramatic effect or to track a moving subject). If you use such techniques, enable Breathing Compensation to reduce unwanted changes in your composition as you change focus. Although breathing effects are reduced, they may not be entirely eliminated. At the time I write this, only 14 lenses are compatible (it’s possible that the Sony FE 16-35mm f/4 PZ FE lens announced as this book was going to press is included).
Sony FE 14mm f/1.8 GM
Sony FE 20mm f/1.8 G
Sony FE 24mm f/1.4 GM
Sony FE 35mm f/1.4 GM
Sony FE 50mm f/1.2 GM
Sony FE 100mm f/2.8 GM
Sony FE 135mm f/1.8 GM
Sony FE 12-24mm f/2.8 GM
Sony FE 16-35mm f/2.8 GM
Sony FE 24-70mm f/2.8 GM
Sony FE 24-105mm f/4 G
Sony FE 24-135mm f/4 G
Sony FE 70-200mm f/2.8 GM
Sony FE 70-200mm f/2.8 GM II
2. Media
The Media group has just four entries (shown in Figure 6.9) allowing you to choose parameters that apply to media. You’ll use the first two most frequently. The first, Format, is used to apply the correct format to a blank memory card, or to reformat one that you want to erase and reuse. The second, Recording Media Settings, allows you to select which of the a7 IV’s card slots is your primary slot, which is the secondary slot, and to specify the way in which the slots are used. While making settings for your slots, it’s possible to jump to the Image Quality Settings entry to specify file formats for the slot.
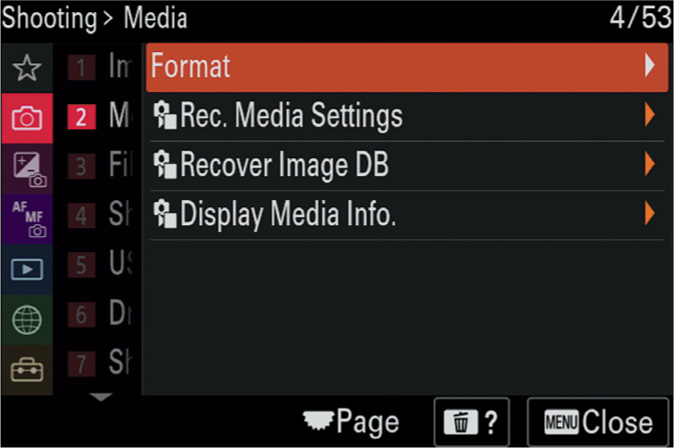
Figure 6.9 Media Settings.
Entries are also offered for recovering a damaged Image Database file, and to view information about the media currently in either of the two slots.
- ■Format
- ■Recording Media Settings
- ■Recover Image Database
- ■Display Media Information
Format
Options: Select Media; *Quick Format, Full Format
My preference: Quick Format
As you’d guess, you’ll use Format to re-format your memory card while it’s in your a7 IV. To proceed with this process, choose the slot containing the card you want to format. If you want to apply a “Quick” format, select OK and press the center button to confirm. (See Figure 6.10.) If you want to perform a more thorough “Full” format, press the trash button, then OK to receive a message about the full format process, and then press the center button to confirm. In either case, you can highlight Cancel and press the center button to chicken out.
Use the Format command to erase everything on your memory card and to set up a fresh file system ready for use. The Quick format simply zeroes out the addresses in the file system and creates new folders for storing your images, without actually removing all the previous information. This process takes only a few seconds, but theoretically can often be reversed (as long as you haven’t written anything new to the card) using file recovery software.
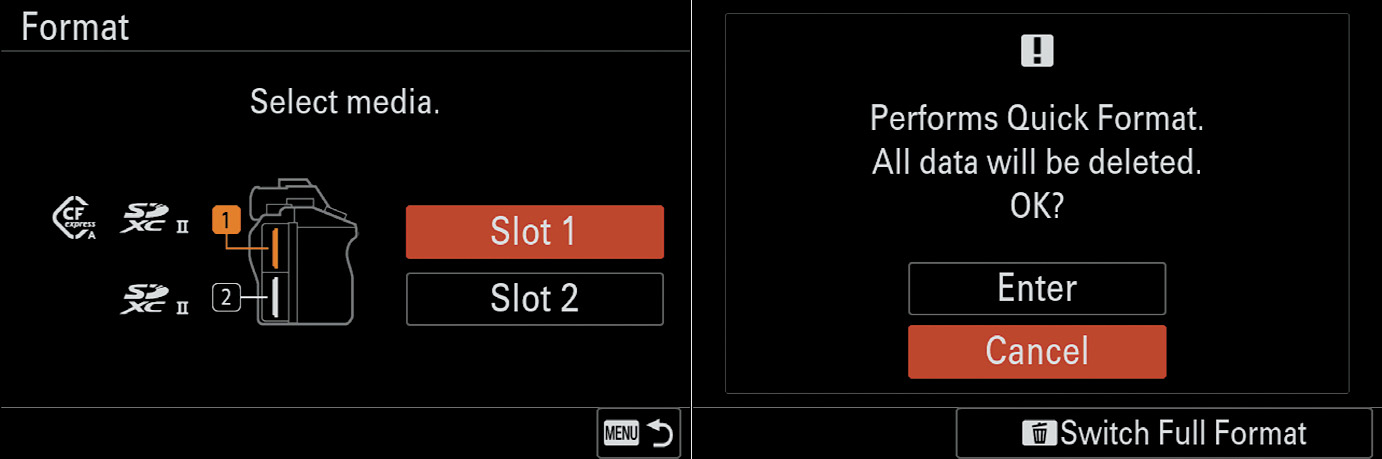
Figure 6.10 Formatting a memory card.
A “Full” format, on the other hand, removes all data that was on the memory card and reinitializes the card’s file system by defining anew the areas of the card available for image storage, locking out defective areas, and creating new folders in which to deposit your images. The Full format takes much longer, is more secure, and helps lengthen the useful life of your card by locking out those bad areas.
It’s usually a good idea to reformat your memory card in the camera, at least with a Quick format (and not in your camera’s card reader using your computer’s operating system), before each use. Formatting is generally much quicker than deleting images one by one. Before formatting the card, however, make sure that you have saved all your images and videos to another device; formatting will remove images that were marked with the Protect command.
Recording Media Settings
Options: Recording Media (Stills): *Slot 1, Slot 2, Simultaneously Recording, Sort Recording; Recording Media (Movies): Slot 1, *Slot 2, Simultaneously Recording; [Image Quality Settings]; Auto Switch Media: *Off, On
My preference: N/A
This setting provides options that specify how the memory cards in your camera should be used. You can see your four options at left in Figure 6.11. At bottom left is a diagram showing the current file types specified for Slots 1 and 2. First, here’s an overview:
- ■Recording Media (Stills). You can choose from Slot 1, Slot 2, Simultaneous Recording, or Sort Recording, as shown in Figure 6.11, center. I’ll explain these four choices shortly.
- ■Recording Media (Movies). Only Slot 1, Slot 2, and Simultaneous Recording are available. There is no Sort option, because only one type of video can be captured at a time.
- ■Auto Switch Media. If enabled, when the card in the primary slot is full, the a7 IV switches to the other card.
- ■Image Quality Settings. This option jumps to the Image Quality Settings entry, where you can specify what file types are stored in each slot, as seen in Figure 6.11, right. There is a Record Media Settings box in the Image Quality Settings entry that will jump back.
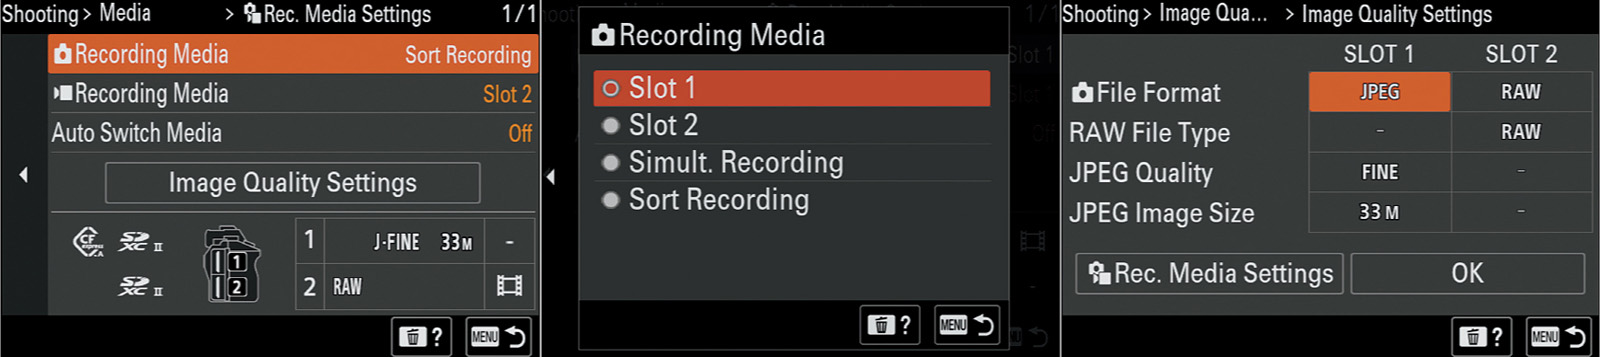
Figure 6.11 Recording Media Settings (left). Choose Slot 1, Slot 2, Simultaneous Recording, or Sort Recording for stills (center). Specify what type of files will be stored in each slot (right).
The overview above will help you understand what each of the four choices does:
- ■Recording Media (Stills):
- •Slot 1 or Slot 2. All still photos, RAW, JPEG, or RAW & JPEG, are stored on the slot you specify. The slot you select here becomes your primary slot for stills. You can switch back and forth between slots, but the Image Quality Settings you’ve specified remain the same.
- To change from RAW, JPEG, or RAW & JPEG to another combination for a particular slot, you’ll need to highlight the Image Quality Settings box and press the center button.
- •Simultaneous Recording (Stills). All still photos are stored on both memory cards, if present, using your current Image Quality Settings, in Slots 1 and 2 (excellent for backup).
- •Sort Recording. If you’ve specified different settings for each slot using Image Quality Settings, then you can use this option to store image files with different settings on different cards. You can specify one slot for JPEG files and the other for RAW, as seen at left in Figure 6.11, bottom. Or you can choose the same file format (JPEG or RAW) for both slots, but vary the parameters for each. However, both memory cards must use the same file system (FAT32 or exFAT), and, ideally, be roughly the same speed. Otherwise, the system will slow down to the speed of the slowest card.
- It’s most common to sort RAW and JPEG files onto separate cards, but other combinations are possible. For example, if you wanted Extra Fine JPEG files saved to Slot 1 and needed a set of lower quality JPEGs (say, for posting on social media), you could store JPEG Light images in the Small, 8.2-megapixel format to Slot 2.
- As you shoot, the images defined for Slot 1 will go to the card in that slot, and the images defined for Slot 2 will be directed to that card. Because JPEG files are smaller than RAW files, you may be able to get away with using a memory card with less capacity in the slot specified for JPEGs.
- •Slot 1 or Slot 2. All still photos, RAW, JPEG, or RAW & JPEG, are stored on the slot you specify. The slot you select here becomes your primary slot for stills. You can switch back and forth between slots, but the Image Quality Settings you’ve specified remain the same.
- ■Recording Media (Movies):
- •Slot 1 or Slot 2. All movies are stored on the slot you specify, using the movie parameters you’ve specified.
- •Simultaneous (Movies). All movies are stored on both memory cards. (There is no “Sort” option available for movies.)
- ■Auto Switch Media:
- This option determines what happens when a memory card fills, or you have inserted a card into only one of the two available slots. Your choices are as follows:
- •Off. The a7 IV only stores files on the available card. If it fills, you will no longer be able to capture images. When the current card is full, you’ll see a No Space on the Memory Card Slot 1 (or 2) message.
- •On. When the card being used becomes full, the camera will switch to the other card. It will continue using that card until it becomes full, and then will attempt to use the original card (which you should have replaced with a fresh one by that time). However:
- ♦If you’ve set Simultaneous (backup) recording (above), the a7 IV stops capturing simultaneous images when either memory card is full. You can simply remove the full card, and the camera starts recording to the other card, but it’s a better idea to replace the full card with one with available capacity. In that case, the a7 IV will resume normal operation until either of the two cards fills up.
- ♦If you’ve activated Sort Recording of two file types to different cards, the a7 IV also stops capturing images when either memory card is full. If you remove the depleted card, both types of files will be stored on the remaining card. Insert a replacement non-full card, and the a7 IV will resume storing the files on separate cards until either of them fills up again.
- This option determines what happens when a memory card fills, or you have inserted a card into only one of the two available slots. Your choices are as follows:
Recover Image Database
Options: Select Media; *Enter, Cancel
My preference: N/A
The Recover Image DB function is provided in case errors crop up in the camera’s database that records information about your movies. According to Sony, this situation may develop if you have processed or edited movies on a computer and then re-saved them to the memory card that’s in your camera. I have never had this problem, so I’m not sure exactly what it would look like. But, if you find that your movies are not playing correctly in the camera, or the camera reports that the image database is corrupt, try this operation. Highlight this menu option and press the center button, and the camera will prompt you, “Check Image Database File?” Press the center button to confirm, or the MENU button to cancel. The camera will create/recover a database or report that no errors were found in an existing database. You may also encounter this if using a card that includes images recorded using another camera, as it will not contain a Sony image database.
Display Media Information
Options: Select Media
My preference: N/A
This entry gives you a report of approximately how many still images and how much movie time remains on the memory card that’s in the camera, given the current shooting settings. This can be useful, but that information is already displayed on the screen when the camera is being used to shoot still photos (unless you have cycled to a display with less information), and the information about minutes remaining for movie recording is displayed on the screen as soon as you press the Record button. But, if you want confirmation of this information, this menu option is available.
3. File
This group has six entries used for creating or selecting folders, and embedding shooting, copyright, or serial number information in the file:
- ■File/Folder Settings, /File
- ■Select Recording Folder
- ■Create New Folder
- ■IPTC Information
- ■Copyright Info
- ■Write Serial Number
Sony has organized all the commands you need to organize the file system of your a7 IV in one location.
File/Folder Settings /File
Options: File Number (*Series, Reset); Forced File Number Reset (*OK, Change Folder Name); Set File Name (*DSC, User Entry); Folder Name: (*Standard Form, Date Form)
My preference: See below
This entry allows you to specify when file numbers are reset to zero, choose the first three letters of your camera’s file names and select the format for your folders. Figure 6.12, upper left, shows the array of options in the File/Folder Settings submenu. I’ll explain each of them separately.
Although your camera will create new folders automatically as needed, you can create a new folder at any time, and switch among available folders already created on your memory card. (Of course, a memory card must be installed in the camera.) This is an easy way to segregate photos by folder. For example, if you’re on vacation, you can change the Folder Name convention to Date Form (described next). Then, each day, create a new folder (with that date as its name), and then deposit that day’s photos and video clips into it. A highlighted bar appears; press the up/down buttons to select the folder you want to use and press the center button.
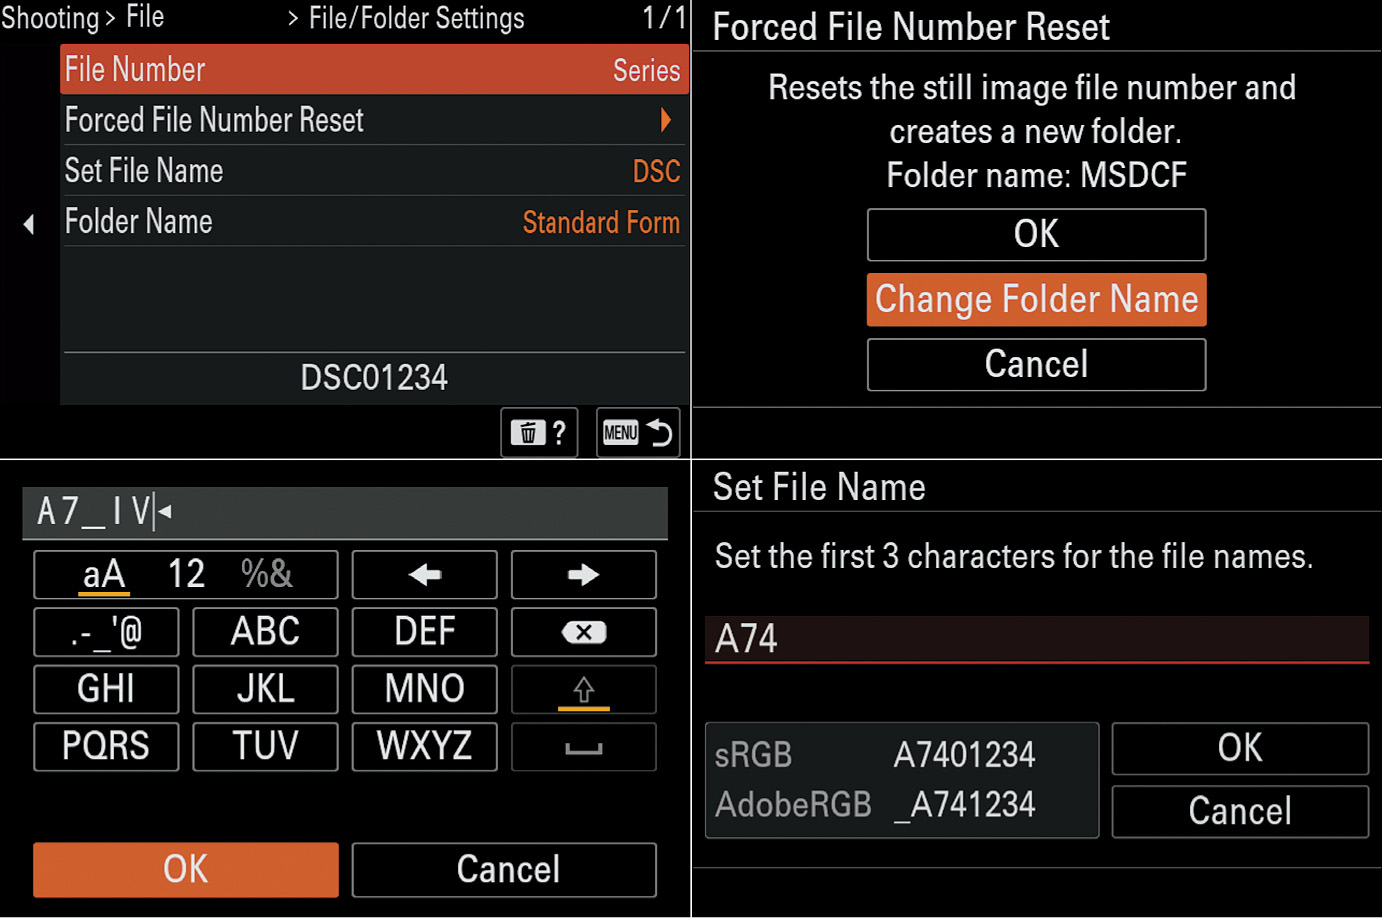
Figure 6.12 File/Folder Settings.
File Number
Options: *Series, Reset
My preference: Series
The default for the File Number item is Series, indicating that the a7 IV will automatically apply a file number to each picture that you take, using consecutive numbering; this will continue over a long period of time, spanning many different memory cards, and even if you reformat a card. Numbers are applied from 0001 to 9999; when you reach the limit, the camera starts back at 0001. The camera keeps track of the last number used in its internal memory. So, you could take pictures numbered as high as 100-0240 on one card, remove the card, and insert another, and the next picture will be numbered 100-0241 on the new card. Reformat either card, take a picture, and the next image will be numbered 100-0242. Use the Series option when you want all the photos you take to have consecutive numbers (at least, until your camera exceeds 9999 shots taken).
If you want to restart numbering back at 0001 frequently, use the Reset option. In that case, the file number will be reset to 0001 each time you format a memory card or delete all the images in a folder, insert a different memory card, create a new folder, or change the folder name format (as described in the next menu entry). I do not recommend this since you will soon have several images with exactly the same file number. However, if you import your images to your computer using a utility that renames the files as they are copied, you won’t have duplicate file number/names if you specify a unique prefix each time you transfer.
Forced File Number Reset /Series Counter Reset
Options: *OK, Change Folder Name
My preference: Folder Name: A7_ IV
If you choose Reset with the File Number entry described above, the reset will happen only when a new folder is created. However, you can also force a reset any time you want and, optionally, change the name applied to new folders. (See Figure 6.12, upper right.) In Movie mode, only the Series Counter is reset.
If you select Change Folder Name, the screen shown in Figure 6.12, lower left, appears, giving you the opportunity to replace the default MSDCF prefix with five characters of your choice (uppercase alpha plus numbers and spaces). If you do that, numbering restarts automatically. Note that entry uses the archaic multi-tap text entry system used by your parents and grandparents decades ago. For example, to enter the letter C, you must tap ABC three times. When finished, highlight OK and press the center button.
Set File Name
Options: Up to three characters
My preference: A74
This entry allows you to specify the first three characters in the file name applied to your images. The a7 IV, like other cameras in the Sony product line, automatically applies a name like _DSC0001.jpg or DSC_0001.arw to your image files as they are created. You can use this menu option to change the names applied to your photos, but only within certain strict limitations. In practice, you can change only three of the eight characters, the DSC portion of the file name. The other five are mandated either by the Design Rule for Camera File System (DCF) specification that all digital camera makers adhere to or to industry conventions.
DCF limits file names created by conforming digital cameras to a maximum of eight characters, plus a three-character extension (such as .jpg, .nef, or .wav in the case of audio files) that represents the format of the file. The eight-plus-three (usually called 8.3) length limitation dates back to an evil and frustrating computer operating system that we older photographers would like to forget (its initials are D.O.S.), but which, unhappily, lives on as the wraith of a file-naming convention.
Of the eight available characters, four are used to represent, in a general sense, the type of camera used to create the image. By convention, one of those characters is an underscore, placed in the first position (as in _DSCxxxx.xxx) when the image uses the Adobe RGB color space, and in the fourth position (as in DSC_xxxx.xxx) for sRGB and RAW files. That leaves just three characters for the manufacturer (and you) to use. The remaining four characters are used for numbers from 0000 to 9999, which is why your a7 IV “rolls over” to DSC_0000 again when the 9999-number limitation is reached.
Because the default DSC characters don’t tell you much, don’t hesitate to change them to something else. I use A74 for my a7 IV. (See Figure 6.12, lower right.) You can change the three characters to anything else that suits your purposes. You must use capital letters, numbers, or underscores, with the exception that you cannot use an underscore as the first character in your file name; it’s reserved for AdobeRGB files. You could not use _R4, for example.
You might prefer to use your initials (DDB_ or JFK_, for example), or even customize for particular shooting sessions (EUR_, GER_, FRA_, and JAP_ when taking vacation trips). You can also use the file name flexibility to partially overcome the 9999 numbering limitation. You could use the template 741_ to represent the first 10,000 pictures you take with your a7 IV, and then 742_ for the next 10,000, and 743_ for the 10,000 after that.
This capability is especially useful for those who own more than one camera, whether it’s a Sony model or another brand that also defaults to the DSC nomenclature. It’s often important to know exactly which camera produced a given image, particularly when you discover some sort of problem in your photos and would like to pin down which camera is the culprit.
This file-renaming feature assumes that you don’t rename your image files in your computer. In a way, file naming verges on a moot consideration, because, they apply only to the images as they exist in your camera. After (or during) transfer to your computer, you can change the names to anything you want, completely disregarding the 8.3 limitations (although it’s a good idea to retain the default extensions). If you shot an image file named DSC_4832.jpg in your camera, you could change it to Paris_EiffelTower_32.jpg later.
In Movie mode, the equivalent setting is Title Name Settings.
Folder Name/File Name Format
Options: *Standard Form, Date Form
My preference: N/A
If you have viewed one of your memory card’s contents on a computer, you noticed that the top-level folder on the card is always named DCIM. Inside it, there’s another folder created by your camera. Different cameras use different folder names, and they can co-exist on the same card. For example, if your memory card is removed from your Sony camera and used in, say, a camera from another vendor that also accepts the same memory cards, the other camera will create a new folder using a different folder name within the DCIM directory. (As I write this, Sony is the only company using CFexpress Type A cards, but if you use SD cards instead, you may run into this.)
By default, the a7 IV creates its folders using a three-number prefix (starting with 100), followed by MSDCF. As each folder fills up with 9999 images, a new folder with a prefix that’s one higher (say, 101) is used. So, with the “Standard Form,” the folders on your memory card will be named 100MSDCF, 101MSDCF, and so forth. As I noted earlier, the camera must be set to Standard Form if you want to be able to specify a folder using the Select Recording Folder entry described earlier.
However, you can also select Date Form instead, and the a7 IV will use a xxxymmdd format, such as 10010092, where the initial 100 is the folder number, the following 1009 representing the month and day (10/09), and the 2 is the last digit of the year (2022). If you want the folder names to be date-oriented, rather than generic, use the Date Form option instead of Standard Form. This entry allows you to switch back and forth between them for folder creation.
In Movie mode, the equivalent setting is called File Name Format.
| CAUTION Whoa! Sony has thrown you a curveball in this folder switching business. Note that if you are using Date Form naming, you can create folders using the date convention, but you can’t switch among them when Date Form is active. The Shooting > File > Select Recording Folder entry is grayed out. If you do want to switch among folders named using the date convention, you can do it. But you have to switch from Date Form back to Standard Form. Then you can change to any of the available folders (of either naming format). So, if you’re on that vacation, you can select Date Form, and then choose New Folder each day of your trip, if you like. But if, for some reason, you want to put some additional pictures in a different folder (say, you’re revisiting a city and want the new shots to go in the same folder as those taken a few days earlier), you’ll need to change to Standard Form, switch folders, and then resume shooting. Sony probably did this to preserve the “integrity” of the date/folder system, but it can be annoying. |

Select Recording Folder
Options: Choose from among available folders
My preference: N/A
This entry allows you to choose which of the folders that have already been created within the currently selected slot is used to store images as you create them. You can select the recording folder only if Folder Name is set to Standard Form. When you access this entry a list of the available folders and the number of images currently in each one is displayed for your selection.
Note that if you are using the Simultaneous Recording option to save images to both memory cards at the same time, then you can only select a recording folder that exists by that name on both cards. If no such folder exists, you can create one using the Shooting > Media > File > Create New Folder entry.
I like to use this capability to keep various images separate while they still reside on my memory card. For example, if I am working on two different projects, I can store images for one project in a particular folder, switch to a different folder for the second project, and switch back to the original one at any time. When traveling, I may spend a few hours shooting wildlife, then spend some time photographing landscapes before moving on to a different location to continue taking wildlife photos. I assign the Select Recording Folder to a Custom Key, and can switch back and forth more quickly than alternate methods, such as swapping memory cards in and out, or changing from Slot 1 to Slot 2 and back again.
Create New Folder
Options: N/A
My preference: N/A
This item will enable you to create a brand-new folder. Press the center button, and a message like “102MSDCF folder created” (if Standard Form is enabled) or “10220221 folder created” (if Date Form is enabled instead) appears. The alphanumeric format will be determined by the Folder Name option you’ve selected and either Standard Form or Date Form.
This entry allows you to create a new storage folder in the currently selected slot. Although your camera will create new folders automatically as needed, you can create a new folder at any time, and switch among available folders already created on your memory card, using the Select Recording Folder entry described above.
As I mentioned earlier, using multiple folders is an easy way to segregate photos. For example, if you’re on vacation, you can change the Folder Name convention to Date Form. Then, each day, create a new folder (with that date as its name), and then deposit that day’s photos and video clips into it. A highlighted bar appears; press the up/down buttons to select the folder you want to use and then press the center button.
IPTC Information
Options: Write IPTC Info, Register IPTC Info
My preference: N/A
This entry allows you to enable or disable embedding of IPTC (International Press Telecommunications Council) metadata in your JPEG and RAW files. The IPTC standard is used by news and photo agencies, photojournalists, libraries, and museums. You can load, edit, save, and register specifications using a free utility available from Sony, the IPTC Metadata Preset (https://www.sony.net/iptc/help/). Professional journalists should investigate Sony’s Transfer and Tagging Add-On, a smart device app that works in conjunction with Imaging Edge Mobile to streamline transfer of images and IPTC information to your smart device as you shoot. It operates with both Wi-Fi and transfer using a special USB cable connecting the camera and your device.
To embed IPTC information, just follow these steps:
- 1.Launch the IPTC Metadata Preset. Your computer will display a screen something like the one shown in Figure 6.13.
- 2.Enter your default information. For general use, you will want to enter information only for the fields shown at the bottom of the figure, under Image Rights. These include photographer’s name, title, URL, copyright notice, and credit line. You can embed this information in all the photos you take.
- 3.Enter shoot-specific data (optional). If you will be taking many pictures for a particular project, you can optionally add more information about a specific series or individual image. Photojournalists might find this especially useful, but most of us can skip entering these minutiae.
- 4.Save preset. You’ll need to save the information entered to your computer, a memory card, or both.
- •Click Save in the utility and specify a storage location on your computer. You can later retrieve your settings using the Open command in the utility to revise, edit, or create a new version.
- •Click Export to store the metadata on a memory card. Insert the card into a card reader, first. A dialog box will appear allowing you to select the drive representing your memory card. (The card will usually appear as a USB card in your file manager.)
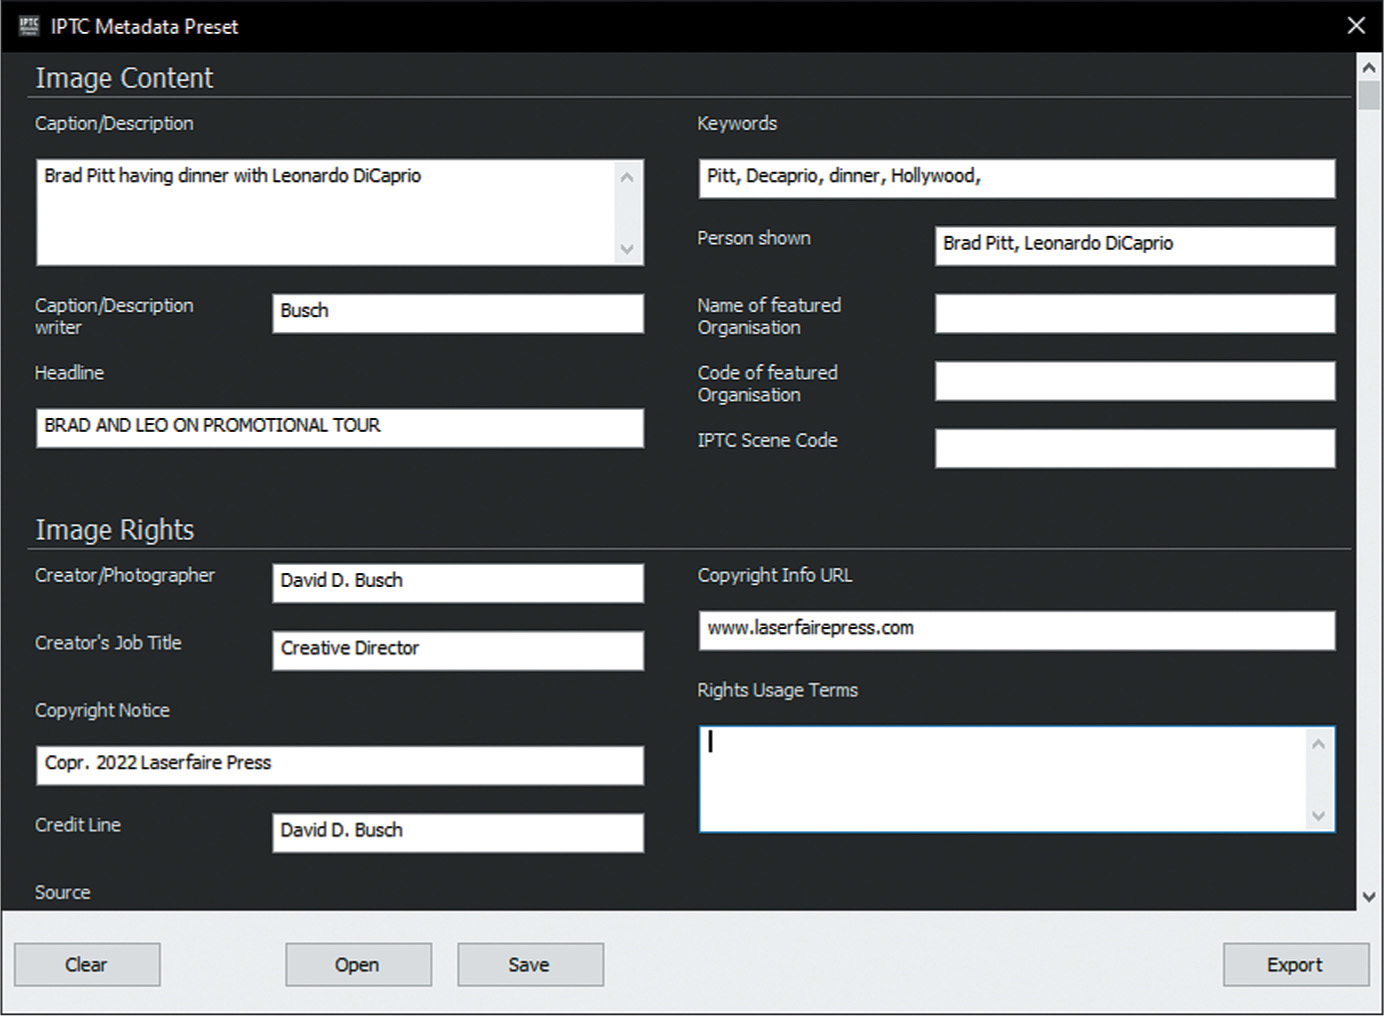
Figure 6.13 Sony IPTC Metadata Preset utility.
- 5.Copy to camera. You’ll next need to transfer the information to the a7 IV in order to make it available for embedding in your photos. With a memory card containing the information loaded into one of the camera’s slots, navigate to the IPTC Information entry and choose Register IPTC Info.
- 6.Select media. From the screen that appears, select either Slot 1 or Slot 2 to specify the card containing your IPTC metadata. Press MENU to confirm. The data will be recorded in the camera’s memory, overwriting any existing IPTC data that may already have been there. Note that you can store separate IPTC data on different memory cards and choose which one to write to the camera’s register.
- 7.Highlight Write IPTC Info. Select On to enable embedding the IPTC data you have just registered to your images.
Copyright Info
Options: *Off, Write Copyright Info, Set Photographer, Set Copyright, Display Copyright Info
My preference: Add all information
Your choices include:
- ■Write Copyright Info. Turn On to embed copyright information in your image file; Off to disable this feature. If you choose On, a copyright symbol will appear on the shooting screen to indicate that copyright data is being written to the image file.
- ■Set Photographer. Enter the name of the photographer. Highlight this and press the center button to move to the next screen, where a blank line appears. Highlight that and press the center button, and the text entry screen appears. As I mentioned earlier, the screen functions much like the multi-tap cell phone keypads in the primordial pre-smartphone era: highlight a button and press the center button multiple times to enter a particular character. For example, if you highlight the “abc” button, pressing once inserts an a, twice a b, and three times a c. When finished, highlight OK and press the center button to return to the initial screen, where you can highlight OK again and press the center button a last time to confirm.
- ■Set Copyright. Define your copyright terms, such as Cpr. 2022 David D. Busch. Strictly speaking, “Cpr.” should be used rather than a lowercase c between two parentheses. Text is entered as described above.
- ■Disp. Copyright Info. Displays whatever copyright information you’ve specified.
Write Serial Number
Options: On, *Off
My preference: On—but you probably will prefer Off
When enabled, the a7 IV will embed your camera’s unique serial number in the EXIF data for a particular image. That will help you identify which camera was used to capture a particular image. Back in the days when news organizations had large photo staffs and a pool of equipment that was sometimes (or often) shared among photographers, this would have been a killer feature (along with IPTC info) for providing a digital photo trail. Today, while equipment pools still exist, it is more likely to be used by individual shooters who own more than one a7 IV (or other Sony cameras with the Serial Number feature). I happen to be one of them: it’s also available with my Sony a1.
4. Shooting Mode
This group has four entries that are used to store settings that you can access by turning the mode dial to the 1, 2, or 3 numbered positions. Figure 6.14 shows the quartet of entries in the Shooting > Shooting Mode group. In Movie mode, a fifth option, Exposure Control Type, is available.
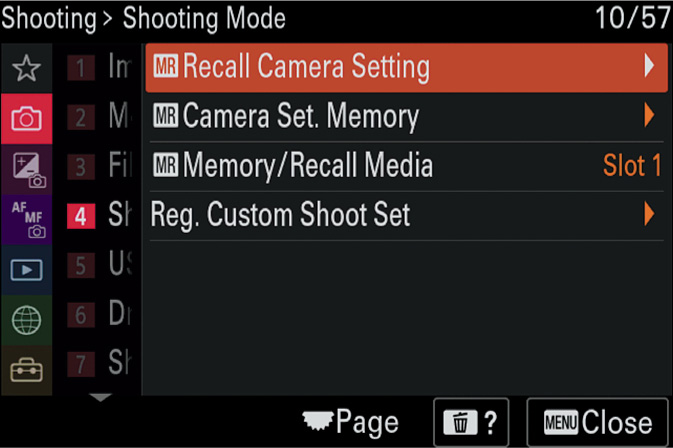
Figure 6.14 The Shooting Mode group.
- ■Exposure Ctrl Type
- ■Recall Camera Settings
- ■Camera Settings Memory
- ■Memory/Recall Media
- ■Register Custom Shooting Set
Exposure Control Type
Options: *P/A/S/M Mode, Flexible Exposure Mode
My preference: N/A
This menu item appears only when the Still/Movie/S&Q dial is set to either Movie position. (See Figure 6.15.) It provides a flexible exposure mode in which you can choose whether aperture, shutter speed, or ISO individually are set manually or automatically. When enabled, a movie camera and an F icon appear in the upper-left corner of the screen indicating that Flexible mode is active. Three of the Custom buttons have been redefined to switch between autoexposure and manual exposure mode for each of three different parameters.
- ■C2 button/Front Dial. You’ll recall the C2 button is located on top of the camera to the left of the Movie button. In Flexible mode, when you press this button, the camera toggles between automatic and manual aperture setting. When the aperture value (Av) is automatic, an A appears next to the f/stop display. When the A is not shown, you can adjust the aperture manually with the front dial.
- ■C1 button/Rear Left Dial. The C1 button is located to the left of the AF-ON button. In Automatic mode (A icon next to the ISO display), the ISO will be adjusted automatically. In manual mode, you can adjust the ISO by rotating the rear left dial.
- ■C4 button/Rear Right Dial. The C4 button doubles as the Trash/Delete button. In automatic mode, the shutter speed (Tv) is set for you. In manual mode, you can change the shutter speed by rotating the control wheel.
As I noted, this menu option is only available when the Still/Movie/S&Q dial is in a Movie position. If the Still/Movie/S&Q dial is set for Still photos, and you press the Movie button to begin video capture, the Flexible Exposure Mode, if set, will be ignored. The a7 IV will use whichever mode (P, S, A, or M) you’ve already selected.
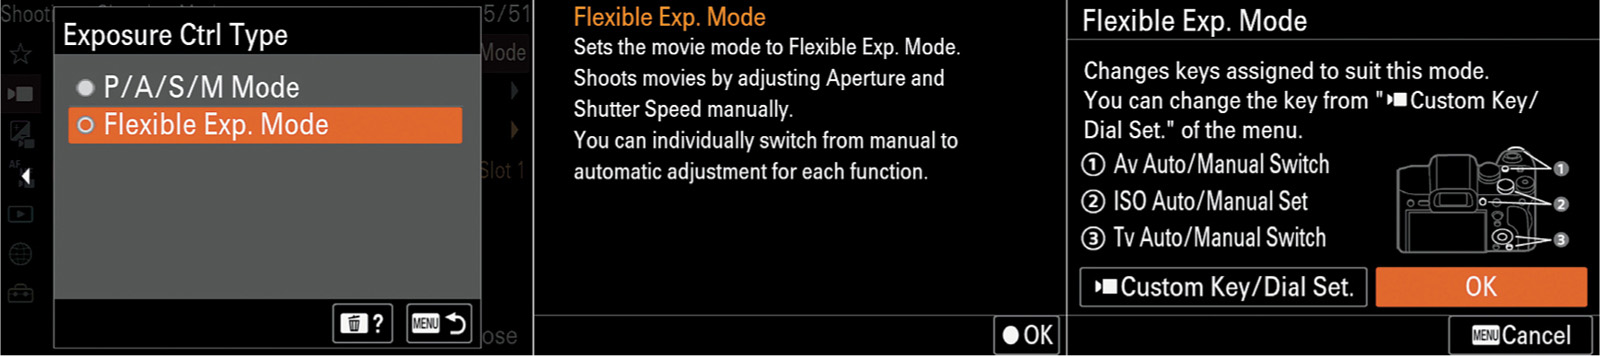
Figure 6.15 Flexible Exposure mode allows choosing aperture, ISO, or shutter speed manually or automatically.
Introduction to Memory Registers
The next four entries involve the Sony a7 IV’s memory features, which allow you to save almost all the settings that you use for a particular shooting situation, including shutter speed and aperture (but not Program Shift adjustments), and then recall them quickly. The settings you can store include most of the entries in the Shooting, Exposure/Color, and Focus tabs.
Sony has done its best to make the Memory features as confusing as possible, but I’ll straighten everything out for you. The first thing to understand is the difference between the a7 IV’s numbered physical memory card registered on the mode dial, and the numbered registers stored on your memory cards. Here’s an overview:
- ■Physical registers/slots. There are three numbered positions on the mode dial labeled 1, 2, and 3. You can store groups of settings in any or all of these registers, and once stored they do not change until you overwrite them with a new set. All you need to do to recall the settings you want is to rotate the mode dial to the 1, 2, or 3 positions.
- ■Memory card registers. There are four of these, also numbered and assigned labels M1, M2, M3, and M4. These settings are stored on the memory card in your current primary slot. Because they reside on the slot itself, they become unavailable if you reformat the card, remove the card, or switch to a different memory card in the secondary slot.
- ■Using settings. When the mode dial is in the 1, 2, or 3 positions, you can use whatever settings are currently stored in those physical registers, or you can use the settings in the M1, M2, M3, or M4 memory registers on your card. I’ll explain how to do this shortly.
- ■Adjusting settings. Once you’ve loaded settings into the camera, you can adjust them and your new settings are “sticky.” However, any changes you make don’t affect the memory registers. You can reload your saved settings at any time. Think of the memory registers as a sort of bookmark; you’re free to use different settings but can return to your “bookmarked” values any time you want.
- ■Settings library. The settings you’ve stored in the three physical slots, plus four more in the M1, M2, M3, and M4 registers give you seven groups of settings in all. Moreover, you can access four different (M1, M2, M3, and M4) settings on your other card just by switching from Slot 1 to Slot 2. If you like, you can store additional M1-M4 settings on as many different memory cards as you like, and they will remain until you reformat that card. The settings are stored in a folder on the card labeled /PRIVATE/SONY/SETTING with a subfolder for each different camera you use. The file names end in .DAT.
- The Memory feature lets you save custom-crafted sets that you can activate at any time. Simply activate the set that fits your current needs. For example, you might set up Register 1 with the settings you use while shooting volleyball in an indoor arena, Register 2 for use in landscape photography outdoors, and Register 3 for street photography. Whenever you encounter any of those three types of scenes, activate the memory channel with the suitable settings for that situation. You can then begin shooting immediately.
Recall Camera Settings
Options: Select memory register to use (current physical slot, or M1, M2, M3, M4 on memory card)
My preference: N/A
This setting is only available when you’ve rotated the mode dial to the 1, 2, or 3 position. It enables you to choose which group of settings that have already been stored in your camera or on your memory card. Choose one of the three dial positions, access Shooting > Shooting Mode > Recall Camera Setting, and a screen similar to the one shown at left in Figure 6.16 appears. The selected slot is highlighted in the top line and the stored settings shown in the panel below. Only some of the registered settings are visible; you can scroll down to see the additional values.
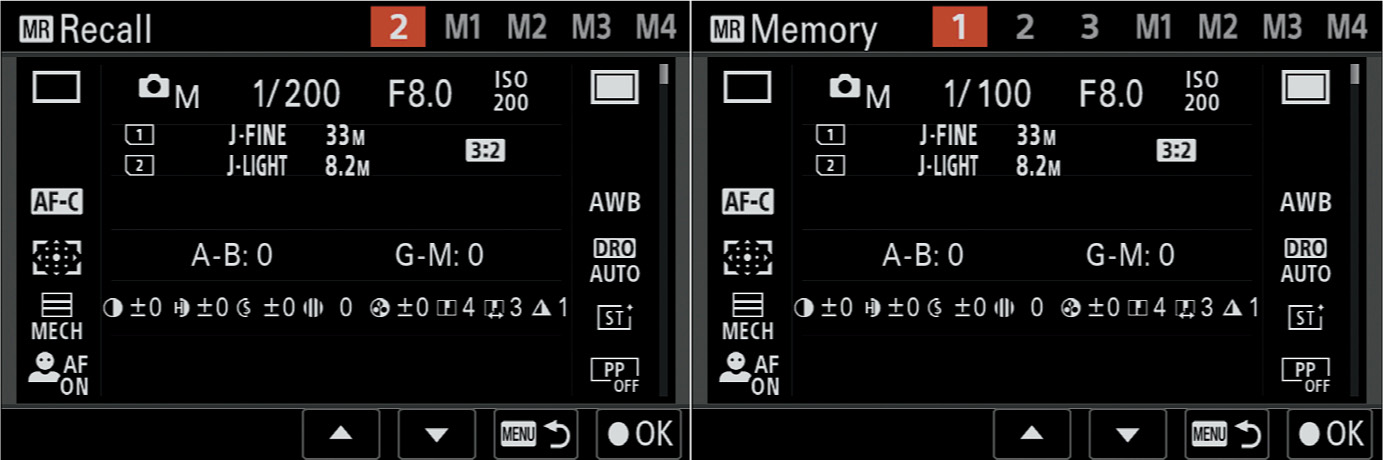
Figure 6.16 Recall settings stored on your memory card (left). Store settings in the 1, 2, or 3 mode dial positions, or as M1, M2, M3, or M4 on your memory card (right).
You can scroll to the right in the top line to highlight M1, M2, M3, or M4. Press the center button, and the values in the selected register will be loaded into the current physical slot. These settings will remain in that slot until you return to this screen and choose a different group of settings. As I noted earlier, you can change the camera settings as you take pictures, but the values stored in the memory registers remain the same until you adjust them using the Camera Settings Memory entry, described next.
Note that you can store sets of settings when using any shooting modes (using the MR Memory entry). But to recall a set of stored settings, you must rotate the mode dial to one of the three Memory positions, marked with a 1, 2, or 3 on the dial and then either use the settings already stored or, optionally, use this menu entry to load the additional settings saved in M1, M2, M3, or M4 files on your memory card. I’ll explain recalling settings here and show you how to store them under the next menu entry, Camera Settings Memory.
To recap, there are two ways to activate saved settings:
- ■Mode dial. Simply rotate the mode dial to the 1, 2, or 3 position. A set of settings for each of those positions is stored internally in the camera. When the mode dial is switched to 1, 2, or 3, the settings already loaded into that camera register automatically become active.
- ■MR Recall. This menu entry allows you to recall additional memory settings, numbered M1, M2, M3, and M4, which are stored on the memory card currently in the camera. You can load the M1, M2, M3, or M4 settings into the 1, 2, or 3 mode dial positions. That may be confusing at first, but the bottom line is that the a7 IV can use any of three memory registers (1, 2, and 3), but any of those three physical registers can be loaded with each of four sets of settings on your current memory card. Switch to the memory card in the other slot, and you can access four more! Remove your card (or reformat it), and those extra four settings are lost! (Smart move, Sony.)
To recall settings previously stored on your memory card using Memory Recall, just follow these steps:
- 1.Rotate the mode dial to the 1, 2, or 3 positions. Select the position you want to load settings into.
- 2.Access the MR Recall entry. Navigate to this menu entry. When you press the center button, a screen like the one shown at left in Figure 6.16 appears.
- 3.Review your stored settings. The 1 highlighted in orange at right in Figure 6.16 indicates that the mode dial currently has been set to the 1 position, and the settings displayed show the values currently stored for that slot. While the 1 is highlighted, you can scroll down the list with the up/down controls and review all the settings that have been stored.
- 4.Change to settings on memory card. If you want to use settings stored on your memory card instead, highlight any of the M1, M2, M3, and M4 entries, which represent four different sets of settings registered to your card. You can review the M1 to M4 settings by scrolling, as described in Step 3. If no settings have been stored for a particular M1 to M4 register, the message No File appears.
- 5.Confirm. If a selected set is satisfactory, press the center button to confirm your choice and exit. Your settings are now active in the camera.
Camera Settings Memory
Options: Store settings on your memory card
My preference: N/A
This entry registers your camera’s current settings, either to one of the three physical memory registers (1, 2, or 3) within your a7 IV or to one of the card-based M1 to M4 files. The power of the memory feature stems from the fact that so many shooting settings can be saved for instant recall in any memory register.
Before you access the Camera Settings Memory item in the menu, make sure the mode dial is not rotated to the 1, 2, or 3 positions. Instead, the dial should be moved to the shooting mode you want to store, P, S, A, M, or Auto. Then make your desired settings in terms of camera operating mode, drive mode, ISO, white balance, exposure compensation, metering mode, focus mode, and so forth.
Then, to save your current settings on your memory card to one of the physical slots in your camera, or in one of the M1, M2, M3, or M4 card-based sets, just follow these steps:
- 1.Set up your camera. Set your camera to shooting mode and adjust the camera to use the settings you’d like to store.
- 2.Navigate to this entry. Select the Shooting > Shooting Mode > Camera Settings Menu and press the center button. A screen like the one shown in Figure 6.16, right, appears.
- 3.Review settings. Use the up/down buttons to scroll through the current settings to make sure they are satisfactory. A great deal more information is available than is shown in the figure (note the scroll bar at right). You can press the up/down buttons to view additional screens with detailed listings of your current settings. Exit and change desired settings, then start again at Step 2.
- 4.Choose Register. Press the left/right buttons to select which of the memory locations you’d like to store your current settings in.
- •If you choose 1, 2, or 3, the settings will be loaded into the camera’s physical memory and will be available regardless of which card is in the camera.
- •If you choose M1, M2, M3, or M4, the settings will be stored on the memory card and will be available only when that memory card resides in the camera.
- 5.Proceed or cancel. Press the center button to confirm and store your settings, or the MENU button to cancel.
- 6.Activate register. To use your stored settings, rotate the mode dial to Register 1, Register 2, or Register 3 (1, 2, or 3 on the mode dial).
Memory/Recall Media
Options: *Slot 1, Slot 2
My preference: N/A
This entry tells the a7 IV which memory card slot is active and contains the M1, M2, M3, or M4 settings files. In practice, that means you can store one group of four settings on one memory card, and a second group on the other card, and then switch between them.
The memory card storing your settings does not have to be the memory card you are using to store your images. In fact, it is often a good idea to choose the other card slot, as that allows you to change your “main” card while retaining the stored settings in the other card. With that configuration you can also change the memory card with your M1 to M4 settings files as often as you like and keep shooting on your “main” card.
Register Custom Shooting Set
Options: Recall *Custom Hold 1, 2, or 3
My preference: N/A
This function is available when using PASM exposure modes. It allows storing sets of settings for temporary recall at the press of a custom key, and lets you choose to store some settings and ignore others. You can register three groups of settings but can assign only one at a time to your defined key. The Custom Shooting set is active only while you are holding down the defined key; when you release it the a7 IV returns to its previous settings. You might want to use this feature to switch quickly and temporarily from one set of registered settings to another. Perhaps you’re shooting landscapes and unexpectedly spy a rare raptor swooping by. If you’ve registered a set of parameters for “birds in flight” you can press your custom button, capture the bird, then release it and continue with your landscape shooting.
There are three available slots (Recall Custom Hold 1-3) and you can assign each of the three to a different button, giving you three settings available at the press of a defined button, three settings available from the 1, 2, and 3 physical mode dial positions, and four settings stored as Ml to M4 on your current memory card. Here’s how to use this feature, which is available only when PASM modes are active:
- 1.Access this setting from Shooting > Shooting Mode > Custom Shooting Settings. The screen shown in Figure 6.17, left, appears.
- 2.Choose registration number in which to store your settings. Select from Recall Custom Hold 1 to Recall Custom Hold 3.
- 3.Check current settings. You can view the current settings of the camera. Only the settings that can be registered are shown. Use the up/down controls to scroll.
- 4.Adjust or disable settings. There are two columns in the settings display: enabled/disabled checkboxes and a setting name/current setting listing. (See Figure 6.17, center.) Use the left/right controls to switch columns.
- 5.To disable registration of a setting. Highlight the left column of a setting listing and press the center button to add/remove the checkmark.
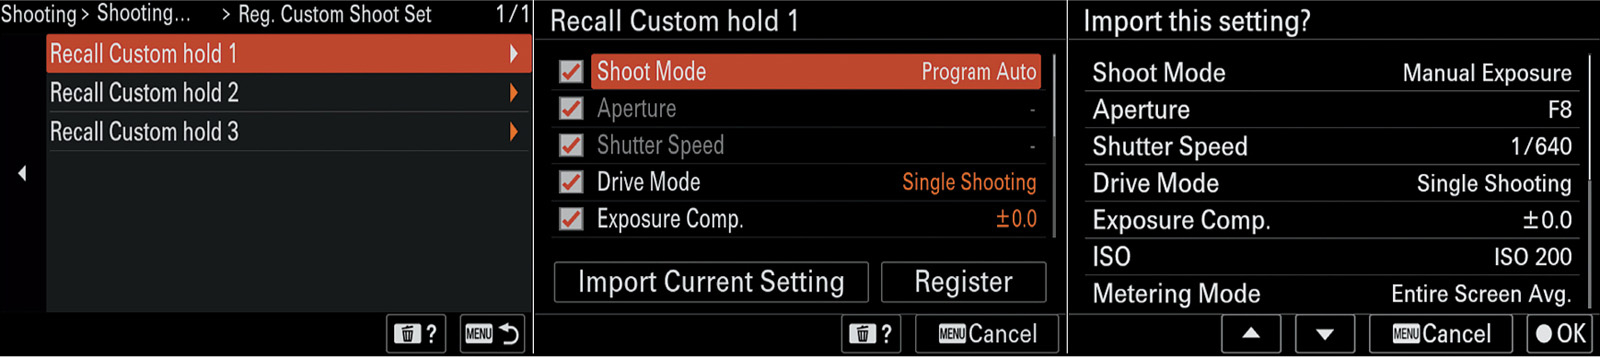
Figure 6.17 Select a Custom Hold register number (left). Review settings (center). Register settings (right).
- 6.To change a setting. Highlight the right column of a setting listing and press the center button. A screen will appear with the available options. For example, for Shoot Mode you can switch from the current mode to Program Auto, Aperture Priority, Shutter Priority, or Manual exposure.
- 7.Store settings. Scroll down to the bottom of the screen and highlight Import Current Setting. Press the center button. The screen shown in Figure 6.17, right, appears.
- 8.Register additional numbers. Highlight Register to return to the screen seen in Figure 6.17, left, to register additional groups of settings.
- 9.Assign a Custom Key. To use this feature, you must assign a button to the Recall Custom Hold x (1, 2, or 3) behavior. Use the Custom Key/Dial Settings (Stills) entry in the Setup > Operation Customize group, which I’ll describe in Chapter 9. Note that you can define settings for all three Custom Hold registration numbers and can define separate buttons for each one. That means you can instantly (and temporarily) recall three additional sets of memory settings using custom keys, if you can spare that many from other duties.
- 10.Use Custom Shooting Set. Press the defined key to activate the Custom Hold settings assigned to that key, then press the shutter release down all the way to take a picture using those settings. When you release the custom key, your a7 IV will return to its previous settings.
5. USB Streaming
Why use the webcam built into your laptop, or a $100 camera plugged into a USB port on your desktop computer when you can use your a7 IV instead? While your camera is versatile for streaming, setup can be somewhat complex. You’ll need to access entries in both the Shooting and Setup tabs, including these two:
- ■USB Stream Res/Frame Rate
- ■USB Stream: Movie Recording
The first step is to download the free Imaging Edge Webcam utility from the Sony support site for your country. URLs can change, but at the time I wrote this, the link for the USA was https://imagingedge.sony.net/en-us/ie-webcam.html. Then, follow these steps:
- 1.Disable other connections. The Webcam utility will not work if your a7 IV is linked to your smartphone or tablet or if you are using Imaging Edge Remote.
- 2.Disable sleep mode. If your computer is set to go to sleep after a period of inactivity, you should disable that function.
- 3.Enable USB Power Supply. Operating your a7 IV as a webcam for extended periods uses a lot of battery power. You’ll want to navigate to Setup > USB > USB Power Supply, and choose On.
- 4.Connect to computer. Connect your camera to your computer using a USB cable. Use the USB-C port if possible; the Micro-USB port limits resolution to 720p.
- 5.Set up PC Remote. Navigate to the Network > PC Remote Function group and set the PC Remote entry to On and the PC Remote Method to USB. (See Figure 6.18.)
- 6.Launch streaming service. After performing steps 1-3, I loaded my desktop Zoom application, which immediately recognized my a7 IV as its camera, with no additional steps required. If you are using a different service you may have to specifically enable the a7 IV, or switch from any other camera connected to your computer.
- If you’ve chosen Select When Connected, you may see a screen that asks you to choose between Live Stream (USB Streaming) and other USB modes. Select Live Stream.
- 7.Activate steaming. When using some services, a message: USB Streaming: Standby may appear on the a7 IV’s display. If Setup > USB > USB Connection Mode has been set to Select When Connected, you can choose Live Stream/USB Streaming. Then, a USB Streaming: Output message will appear.
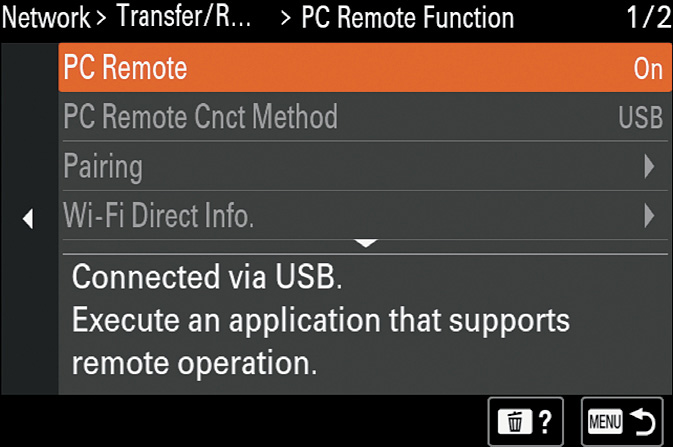
Figure 6.18 Enable PC Remote over USB.
The Sony Webcam utility does not capture sound from the a7 IV’s microphones; you’ll need to use the microphone built into or attached to your computer or an external microphone. Note that settings such as shutter speed or ISO cannot be adjusted during live streaming if you don’t assign them to a dial or control wheel or register the settings to the function menu.
The two entries in this group allow you to choose the resolution and frame rate of your video stream.
USB Stream: Res/Frame Rate
Options: 4K (2160p) 15p, HD (1080p) 60p, *HD (1080p) 30p, HD (720p) 30p
My preference: N/A
This entry lets you choose a resolution and frame rate for a video stream, if available. The default value of 1920 × 1080 progressive scan at 30 fps usually provides the best combination of image detail and bandwidth usage. If you want to stream 4K, you’re limited to a pitiful 15 frames per second.
USB Stream: Movie Recording
Options: Enable, *Disable
This setting specifies whether the live stream can be recorded. The default is to disable recording, but if you want to keep a record and have enough space on your memory card, you can enable recording. Note that the recording function itself is separate from streaming; while you are streaming, you can press the Movie button to start and stop recording.
6. Drive Mode (Stills only)
The Drive Mode group is visible only when the Still/Movie/ S&Q dial is set to Still photos. (See Figure 6.19.) It has three entries:
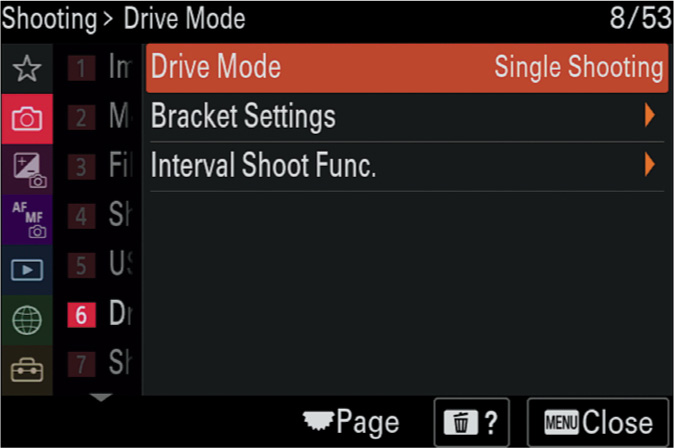
Figure 6.19 Drive Mode group.
- ■Drive Mode
- ■Bracket Settings
- ■Interval Shooting Functions
Drive Mode
Options: *Single Shooting; Cont. Shooting (Hi+, Hi, Mid, Lo); Self-timer (Single) (2/5/10 seconds); Self-timer Continuous (2/5/10 seconds with 3 or 5 shots); Continuous Bracket/Single Bracket (3, 5, or 9 images at 0.3/0.7/1.0 EV increments; 3 or 5 images at 2.0/3.0 EV increments); White Balance Bracket (Lo/Hi); DRO Bracket (Lo/Hi)
My preference: N/A
Just as with the Drive (left directional) button on the back of the camera, there are several choices available through this single menu item. Your choices include:
- ■Single shooting. Takes one shot each time you press the shutter release button. You must use this mode or one of the self-timer modes (described shortly) if you want to use the a7 IV’s built-in Auto HDR (high dynamic range) feature or take a Bulb (long exposure) setting when working with Manual exposure.
- ■Continuous shooting. Captures images at a rate of either 5 or 2.5 frames per second. When this option is highlighted, press the left/right directional buttons to switch among Hi+ (up to 10 fps), Hi (up to 8 fps), Mid (up to 6 fps), or Lo (up to 3 fps). The continuous speed will slow down if you’re shooting uncompressed RAW, or when e-Front Curtain Shutter is set to Off when using Hi, Mid, or Lo speeds. The Hi+ speed is maintained, but the viewfinder/LCD monitor doesn’t display the image in real time. You’ll be viewing a slightly delayed image as the camera churns away capturing high-speed images. (Remember, you’re shooting 10 frames per second at 33MP!)
- Focus and exposure can adjust during the burst if you set Focus Mode to Continuous AF and AEL w/Shutter to Off or Auto. However, when an f/stop smaller than f/8 is in use, focus is set for the first shot, and retained for subsequent images as long as you hold down the shutter button. Continuous shooting becomes slower when using flash, when the RAW file type is set to Uncompressed, or the e-Front Curtain Shutter is set to Off when using Hi, Mid, or Lo modes.
- If you want to keep track of your remaining shots, the Continuous Shooting Length indicator can be activated using the Setup > Display Option > Remain Shoot Display entry, as described in Chapter 9.
- ■Self-Timer (2 sec./5 sec./10 sec.). Takes a single picture after two, five, or ten seconds have elapsed. When this choice is highlighted, press the left/right buttons to switch among the three durations.
- ■Self-Timer Continuous. The self-timer counts down, and then takes either 3 or 5 images, after delays of 2, 5, or 10 seconds. The left/right buttons cycle among the choices. You can cancel the timer by pressing the Drive button and selecting Single Shooting, or by tapping the shutter button a second time. Note that if you’re using any of the continuous self-timer, continuous shooting, or continuous bracketing options, manual Bulb exposures produce an exposure time of 1/30th second.
- ■Continuous Bracket. Captures 3, 5, or 9 images in one burst when the shutter release is held down, bracketing them 0.3, 0.5, 0.7, or 1.0 stops apart. Increments of 2.0 or 3.0 stops apart are also available, but only 3 or 5 images can be taken. Use the left/right buttons to select the increment and number of shots.
- In Manual exposure (when ISO Auto is disabled), or in Aperture Priority, the shutter speed will change. If ISO Auto is set in Manual exposure, the bracketed set will be created by changing the ISO setting. In Shutter Priority, the aperture will change. Use continuous mode when you want all the images in the set to be framed as similarly as possible, say, when you will be using them for manually assembled high dynamic range (HDR) photos. You can use an external flash when continuous bracketing is active, but, because of the time required for the flash to recycle, you’ll need to press the shutter button each time to take subsequent images (effectively switching the camera into Single Bracket mode, described next).
- Only the last shot in the set is displayed when using Auto Review. With all types of bracketing, the exposure/bracket scale at the bottom of the EVF or LCD monitor (in Display All Info mode) will display indicators showing the number of images shot and the relative amount of under/ overexposure. Don’t forget that you can dial in exposure compensation, and that will affect the amount of over/underexposure applied while bracketing. Continuous bracketing (and Single Bracketing) is disabled when using Intelligent Auto.
- ■Single Bracket. Captures one bracketed image in a set of 3, 5, or 9 shots each time you press the shutter release, bracketing them 0.3, 0.7, or 1.0 stops apart. Only 3 and 5 shots are available with the 2.0 or 3.0 EV increments. The left/right buttons are used to select the increment and number of shots. In this mode, you can separate each image by an interval of your choice. You might want to use this variation when you want the individual images to be captured at slightly different times, say, to produce a set of images that will be combined in some artistic way.
- ■White Balance Bracket. Shoots three images, each with adjustments to the color temperature. While you can’t specify which direction the color bias is tilted, you can select Lo (the default) for small changes, or Hi, for larger changes using the left/right buttons. Only the last shot taken is displayed during Auto Review.
- ■DRO Bracket. Shoots three image adjustments to the dynamic range optimization. You can’t specify the amount of optimization, but you can select Lo (the default) for small changes, or Hi, for larger changes, using the left/right buttons. Again, only the last shot taken is displayed during Auto Review.
Bracket Settings
Options: Self-timer During Bracketing: *Off, 2 sec., 5 sec., 10 sec.; Bracket Order: *0-+, -0+
My preference: N/A
This item has two entries that let you customize how bracketing is applied.
- ■Self-timer During Bracketing. You can choose delays of 2, 5, or 10 seconds before bracketing begins, or disable the self-timer during bracketing. This clever option solves a problem: how to use the self-timer (say, to avoid shaking a camera mounted on a tripod) when bracketing (which resides in the same Drive menu). With continuous bracketing, all exposures will be taken after the self-timer delay; if you’re using single bracketing, the delay takes place before each shot in the bracket set is exposed.
- ■Bracket Order. The default is metered exposure > underexposure > overexposure. However, if you’re shooting photos that will later be manually assembled into an HDR photo, you might find it more convenient to expose in order of progressively more exposure: underexposure > metered exposure > overexposure. The order you choose will also be applied to white balance bracketing.
Interval Shooting Functions
Options: Interval Shooting, Shooting Start Time, Shooting Interval, Number of Shots, AE Tracking Sensitivity, Shutter Type in Interval, Shoot Interval Priority
My preference: N/A
Interval (or time-lapse) shooting has had the distinction of long being one of the most desired features for Sony’s E-mount mirrorless cameras. Until recently, you needed an external intervalometer device or a special app to capture individual shots at regular intervals—say, to take progressive photographs of a flower opening. Now, Sony has included this capability in some of its latest models; your a7 IV can now capture a series of shots of the moon marching across the sky or compile one of those extreme time-lapse picture sets showing something that takes a very, very long time, such as a building under construction.
You probably won’t be shooting such construction shots, unless you have a spare a7 IV you don’t need for a few months (or are willing to go through the rigmarole of figuring out how to set up your camera in precisely the same position using the same lens settings to shoot a series of pictures at intervals). However, other kinds of interval and time-lapse photography are entirely within reach. Best of all, with Sony’s free Imaging Edge software, you can turn a series of time-lapse stills into a movie! I provided step-by-step instructions for capturing interval stills and time-lapse video in Chapter 5, and included tips on recommended intervals between shots. There are seven major settings you have to work with. The first five are shown at upper left in Figure 6.20. The remaining two, shown at upper right, can be viewed by scrolling down.
- ■Interval Shooting. Choose On or Off to enable/disable the feature. You’ll want to keep this setting at Off until you are ready to begin interval shooting.
- ■Shooting Start Time. Use this setting to delay the start of image capture, from 0 minutes 0 seconds (begin immediately) to 99 minutes, 59 seconds. Say you’re planning on capturing a sunset and know that the best time to begin shooting will be in one hour. Specify 60 minutes and 0 seconds, set up your camera, and the a7 IV will begin taking your sequence at the designated time. You’re free to do other things in the interim. (See Figure 6.20, lower left.)
- ■Shooting Interval. Specify how often an image should be captured. You might need an interval of 3 to 4 seconds to capture the march of fast-moving clouds across the sky, or prefer a more relaxed 10 to 12 seconds to shoot clouds with a slower pace. Intervals can range from 1 to 60 seconds between shots. (See Figure 6.20, lower right.)
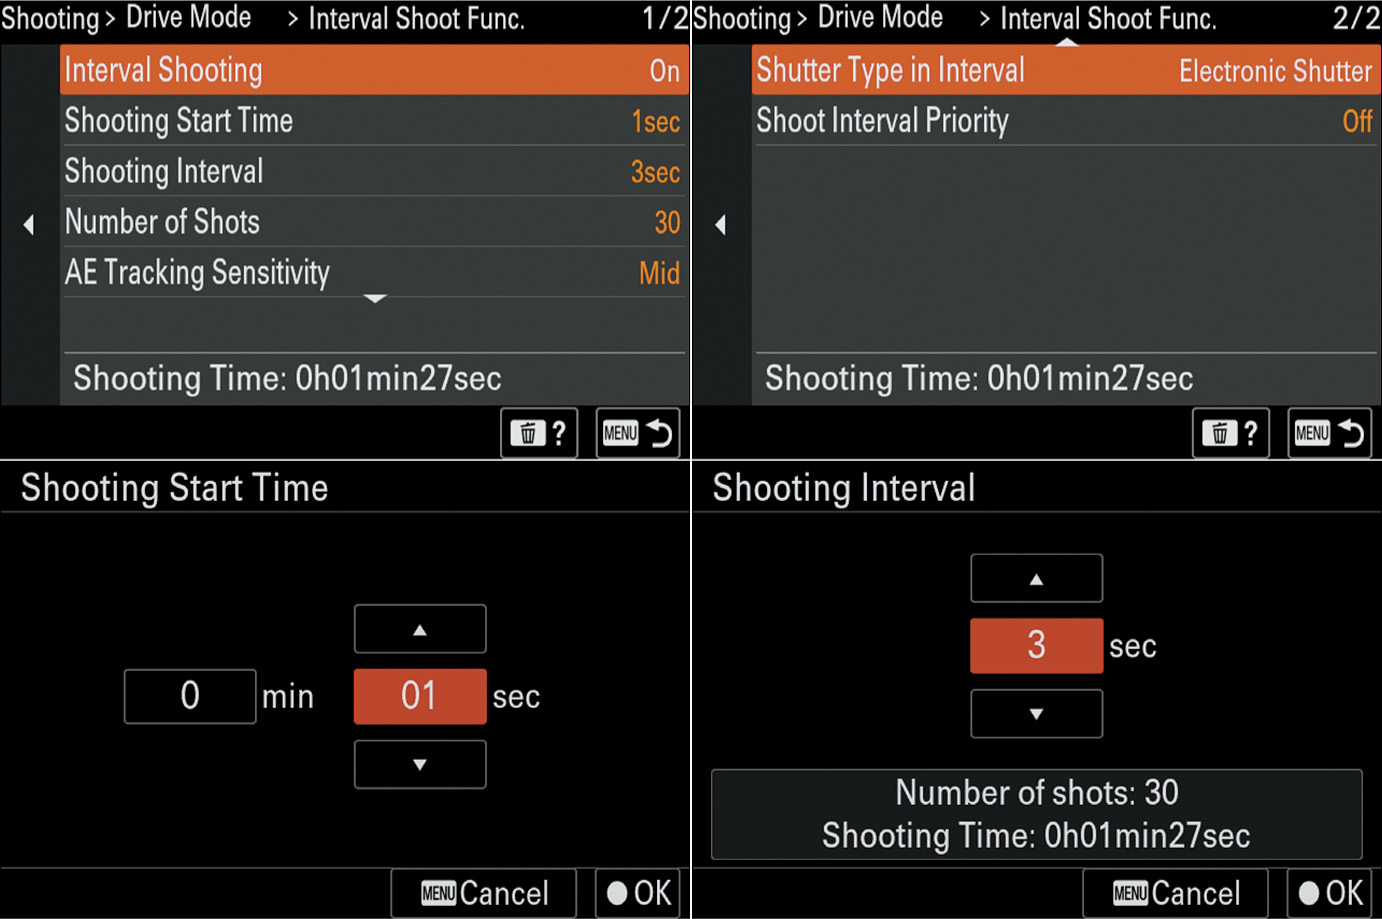
Figure 6.20 Interval Shooting options.
- ■Number of Shots. This setting determines the total number of exposures in a time-lapse sequence. You can choose from 1 to 9999 shots. A message at the bottom of the screen will display how long it will take to capture the number of shots you specify using the shooting interval you’ve chosen. If you select the maximum 60-second interval and 9999 shots, your sequence will take almost just shy of one week to capture (166 hours and 36 minutes). See Figure 6.21, upper left.
- ■Autoexposure Tracking Sensitivity. When the light levels are changing—say when capturing an entire day’s activity, or something that happens fairly quickly, such as a sunset—you can specify whether the a7 IV adjusts exposure quickly, or slowly. Select from High, Mid (Medium), or Low sensitivity. Quick changes in exposure can be jarring, especially when combining shots into a time-lapse movie. You may want to experiment to see what works for your particular sequence, but the Mid setting should work for most projects. Note that if you want to see dramatic light shifts as your scene lightens or darkens, use Manual Exposure, and set the shutter speed, ISO, and aperture to give the correct “normal” exposure (say, for mid-day when shooting a day-long series). The dawn/early morning and dusk/night exposures will have different degrees of under-exposure—probably for a more dramatic effect. (See Figure 6.21, upper right.)
- ■Shutter Type in Interval. Choose Mechanical Shutter or Electronic Shutter. If you select Electronic Shutter, the a7 IV will operate silently, which allows capturing your sequence in “stealth” mode if you need it. Silent shooting also makes the series of shots less intrusive in environments where low noise levels are prized—such as religious ceremonies, concerts, college libraries prior to finals week, or capturing a sleeping baby without interrupting parents’ “quiet time.” (See Figure 6.21, lower left.)
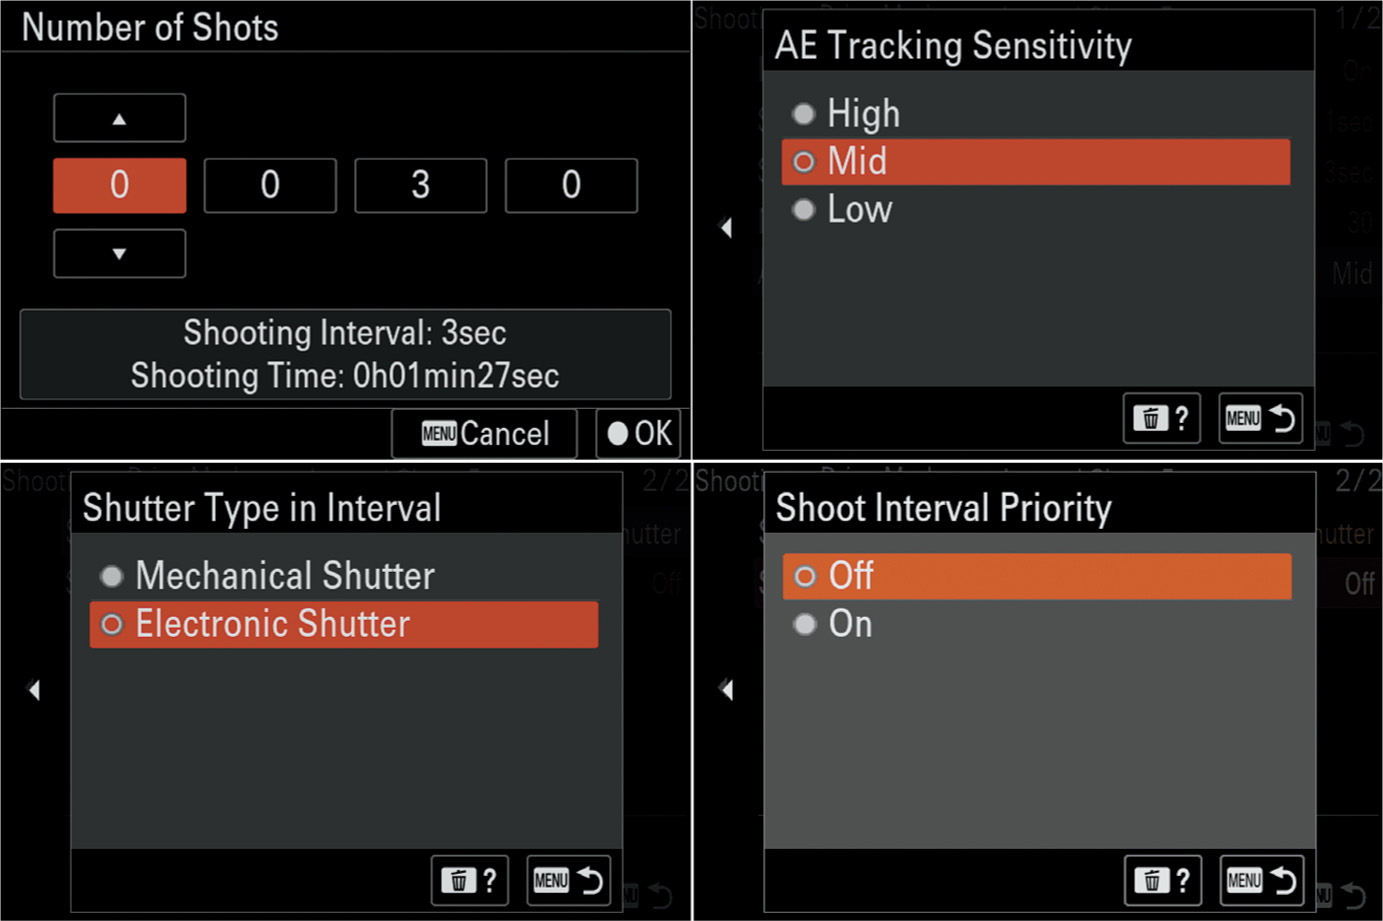
Figure 6.21 More Interval Shooting options.
- ■Shoot Interval Priority. When shooting sequences using Program or Aperture Priority modes, the a7 IV will adjust the shutter speed to provide the correct exposure. Unfortunately, when light levels are low, that may result in a shutter speed that is longer than the specified interval. That is, you may want to take a photo every two seconds, but the camera calculates that a four-second exposure is required. (See Figure 6.21, lower right.)
- If you select Off for this setting, when the a7 IV encounters a conflict, it will go ahead and expose for the correct amount of time, skipping the shot that would have taken place. This is the default behavior and often the best choice. In most cases, there is not enough subject motion between frames to result in a jarring effect. You’re more likely to dislike having that conflicting image underexposed, which is what happens when this setting is On. When another interval exposure is due, the a7 IV will terminate the previous shot (underexposing it) and begin the next one on schedule. You might use the On option if you feel that just dropping the poorly exposed image from the sequence produces the best series.
7. Shutter/Silent
This group has six settings that control how your physical and electronic shutters operate. (See Figure 6.22.)
- ■Silent Mode Settings
- ■Shutter Type
- ■e-Front Curtain Shutter
- ■Release without Lens
- ■Release without Card
- ■Anti-Flicker Settings
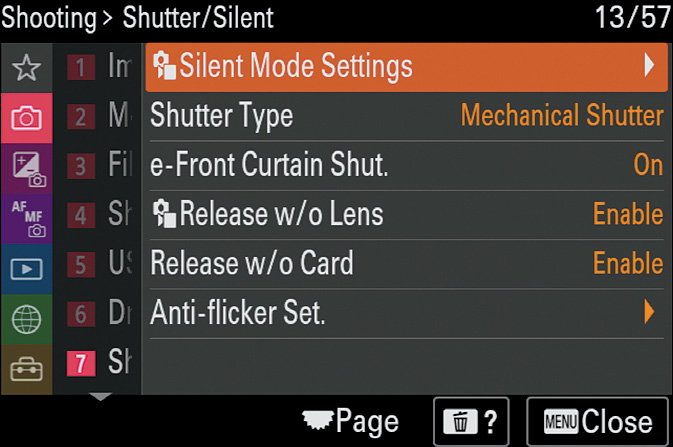
Figure 6.22 Shutter/Silent group entries.
Silent Mode Settings
Options: Silent Mode: (On, *Off); Target Function Settings: Aperture Drive in AF (Not Target, *Standard, Silent Priority), Shutter When Power Off (*Off, Not Target), Auto Pixel Mapping (*Off, Not Target)
My preference: N/A
If you shoot acoustic concerts, stage performances, weddings, or stealth street photography, you’ll want to explore this option, which lets you almost silence your a7 IV by reducing shutter sounds. You may still hear noise as the lens aperture changes, autofocus operates, you use Face Memory to register a face, and when functions including anti-dust and pixel-mapping kick in as the camera is powered down. Fortunately, this entry, available in P, S, A, and M modes has options that help improve your chances of silent operation. If you navigate to Shooting > Shutter/Silent > Silent Mode Settings, you see the two entries shown at left in Figure 6.23.
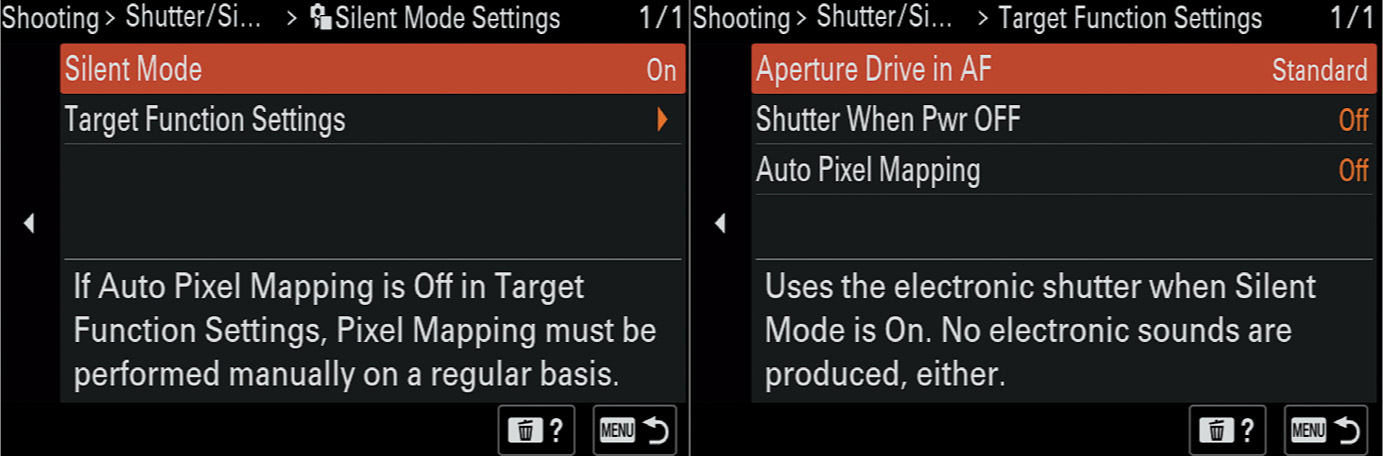
Figure 6.23 Silent Mode Settings.
These entries are:
- ■Silent Mode. Silent mode is Off by default. If you enable it by selecting On, the a7 IV always uses the electronic shutter, which doesn’t emit a sound. The Setup > Sound Option > Audio Signals entry is switched to Off, and the camera will not beep when it achieves focus in Continuous AF mode. The Shutter Type in Interval setting is locked at Electronic Shutter.
- Keep in mind that in Silent mode, flash and Bulb exposures are disabled, along with the e-Front Curtain Shutter and long exposure noise reduction.
- ■Target Function Settings. This option has the sub-entries, seen at right in Figure 6.23. They determine whether the a7 IV should simultaneously change your current values of three other settings that can cause noise when the camera has been switched to Silent mode.
- •Aperture Drive in AF. The default setting is Standard, which means the camera may emit noise as the AF mechanism operates, even when Silent mode is active. You may also choose Silent Priority, which tends to slow the focusing speed, making it quieter, but also possibly making focus more difficult (depending on the performance of the lens you are using).
- Select Not Target instead, and the a7 IV will retain whatever setting you have specified in the Focus > AF/MF > Aperture Drive in AF entry (which I’ll explain in Chapter 8). Don’t confuse this sub-entry with the entry found in the AF/MF group. The latter entry globally sets the aperture drive system used for both the Mechanical and Electronic shutters. This one is used to override the basic setting and applies only when the electronic shutter is active.
- •Shutter When Power Off. Your a7 IV has the ability to close the shutter when you turn the camera off, using the Setup > Setup Option > Anti-dust Function > Shutter When Power Off entry. The shutter closing makes a faint click. If this sub-entry is set to Off (the default), that click is eliminated during Silent mode. If you don’t mind this sound and want to retain the shutter’s dust prevention feature, choose Not Target instead and your Setup menu choice will be honored.
- •Auto Pixel Mapping. If you have turned on Auto Pixel Mapping, you’ll find that it, too, sometimes makes a slight sound when the camera is powered down. The default, Off, eliminates this noise, while selecting Not Target allows it.
- •Aperture Drive in AF. The default setting is Standard, which means the camera may emit noise as the AF mechanism operates, even when Silent mode is active. You may also choose Silent Priority, which tends to slow the focusing speed, making it quieter, but also possibly making focus more difficult (depending on the performance of the lens you are using).
Shutter Type
Options: *Mechanical Shutter, Electronic Shutter
My preference: Mechanical Shutter
Here you can choose whether the a7 IV uses its conventional mechanical shutter or its silent electronic shutter. Under very bright conditions, such as snow or beach scenes, if a very high shutter speed is required, the camera may switch to electronic shutter even if you’ve specified mechanical shutter here. In addition, this setting is only available in P, S, A, and M modes.
I tend to reserve the electronic shutter for stealthy and sound-sensitive environments, partially because of the electronic shutter’s limitations on flash shooting and long Bulb exposures. You can still make the camera quieter using the e-Front Curtain Shutter, and turning off Audio signals in the Setup tab.
But the most important limitation of the electronic shutter is the effects of its “rolling shutter,” which can be problematic both in still and video shooting. The camera records 4,672 individual lines in a full-resolution still image, one line after another. That may produce distortion with moving subjects, because as a subject crosses the frame, the portion at the top of the frame will be in a different position from the part of the subject at the bottom of the frame. For stills, this “Jell-o” effect may be most noticeable when shooting uncompressed RAW images. To reduce the distortion, change the RAW file type to Compressed, and use continuous shooting. You’ll get the best results, however, capturing in JPEG mode.
Of course the electronic shutter is also used for video. Even though a video frame is cropped at top and bottom so that fewer rows of pixels have to be captured, your subject, or even the camera, may be moving as well, which makes the Jell-o distortion even more objectionable.
e-Front Curtain Shutter
Options: *On, Off
My preference: N/A
This feature reduces the lag time between when you press the shutter, and when the picture is actually taken. It can also reduce a certain type of blurring due to slight camera motion when the physical shutter “clunks” open. When set to On, the electronic front shutter curtain is used by the camera at the start of the exposure, rather than the mechanical shutter. (The physical rear shutter curtain is still used to conclude the exposure.)
Although e-Front Curtain Shutter usually works very well, when you are using an unusually wide aperture, such as the Sony/Zeiss T* FE 55mm f/1.8 ZA lens, for example, and a very fast shutter speed, areas of the photo may exhibit a secondary (ghost) image and bokeh (the out-of-focus portion of the image) may be affected. When that happens, set this menu item to Off and the camera will use only its mechanical shutter mechanism, and the problem will not occur. Sony also recommends turning the e-curtain Off when you are using a lens made by another manufacturer, as exposure may be uneven or incorrect.
The problems pop up because the e-curtain is, in effect, too fast. It reduces the shutter lag to the point that the iris may not have sufficient time to close completely before the exposure begins. So, the f/stop used at the beginning of the exposure can be different from the one used for the rest of the exposure (after the iris closes down to the correct aperture completely). The overall exposure will thus be incorrect, regardless of shutter speed. In addition, at higher shutter speeds, exposure grading can occur. At those higher speeds, the “slit” (the gap between the front and rear curtains) is increasingly small as the shutter speed becomes faster, and parts of the image exposed initially will receive more exposure than those exposed later.
Exposure grading is worse with lenses that need a longer time to close their irises, and so is more likely with non-Sony lenses, older Sony lenses, and Sony/Minolta/third-party A-mount lenses used with one of the LA-EA adapters. The irises of those lenses aren’t designed to respond at the speeds demanded by an electronic front curtain shutter. In addition, even theoretically compatible lenses may have slower iris response due to dust/grit infiltration. You’ll want to use newer, good condition E-mount lenses, or adapted lenses that are manually stopped down to the “taking” aperture prior to exposure.
Release w/o Lens
Options: *Disable, Enable
My preference: Enable
By default, the a7 IV will refuse to try to take a photo when a lens is not mounted on the camera; this is a logical setting, especially for distracted folks who fail to notice that they have a lensless camera body hanging around their necks. If you chose Enable, however, the camera will open its shutter when you depress the shutter release button when no lens is mounted. This option will be useful if you attach the camera to some accessory such as a telescope or a third-party optic that’s not recognized as a lens. I prefer to select Enable, because I frequently use oddball third-party and “foreign” lenses on my camera, such as my favorite Lensbaby distortion lens or a fisheye lens designed with a different camera mount.
Release w/o Card
Options: Disable, *Enable
My preference: Disable
The ability to trip the shutter without having a memory card installed is not especially useful unless you want to hand your camera to someone for demonstration purposes and do not want to give them the capability of actually taking a picture. This happens frequently at trade shows, where vendors want you to try out their equipment, but would prefer you not leave the premises with any evidence/ image samples, especially if the memory card in question belongs to the vendor rather than you.
On the contrary, it’s more likely that you’d prefer to have your own camera inoperable if you’ve forgotten to insert a memory card. It’s easy to miss the orange No Card warning that flashes when the non-picture is taken. Disabling release when a card is absent can help you avoid losing a card (you removed it to load some pictures onto someone else’s computer) or having to sheepishly ask the bride and groom if they would be willing to re-stage their wedding.
Anti-Flicker Settings
Options: Anti-Flicker Shooting (On, *Off); Variable Shutter (On, *Off); Variable Shutter Settings
My preference: Off, unless shooting under flickering light source
Novice sports photographers often ask me why shots they take in certain gymnasiums or arenas have inconsistent exposure, wildly varying color, or banding. The answer is that certain types of artificial lighting actually have a blinking cycle that is imperceptible to the eye, but which the camera can capture. This setting, when enabled, detects the frequency (it’s optimized for 100 to 120 Hz illumination) of the light source that is blinking, and takes the picture at the moment when the flicker has the least effect on the final image.
Anti-flicker cannot be used with the electronic shutter, with Bulb exposures, or during movie shooting. However, even if anti-flicker is turned off, you can still use the variable shutter feature described shortly with the mechanical or electronic shutter and during video capture. Although they are adjusted within the same entry, anti-flicker and variable shutter are two different functions. They can be used individually or together. The options available are shown at left in Figure 6.24.
- ■Anti-Flicker Shooting. This option allows you to turn Anti-Flicker on or off. Some like to assign that function to a custom key using Setup > Operation Customize > Custom Key/Dial Setup, as described in Chapter 9. When anti-flicker is enabled, you should press the shutter release down halfway so the a7 IV can detect the frequency of the flicker, and then press it the rest of the way when the Flicker icon is displayed. You can also use the AF-ON button to tell the camera to measure flicker. This can be especially useful when focusing manually.
- ■Variable Shutter. If effects continue, you can activate the a7 IV’s variable shutter feature, which lets you fine-tune the actual shutter speed that will be used in Shutter Priority and Manual exposure mode in 1/4-stop increments. While anti-flicker works only with 100 to 120 Hz illumination frequencies, the variable shutter can prove helpful even if some higher frequencies are present. When you later turn the variable shutter feature off, the camera will switch to the closest conventional shutter speed.
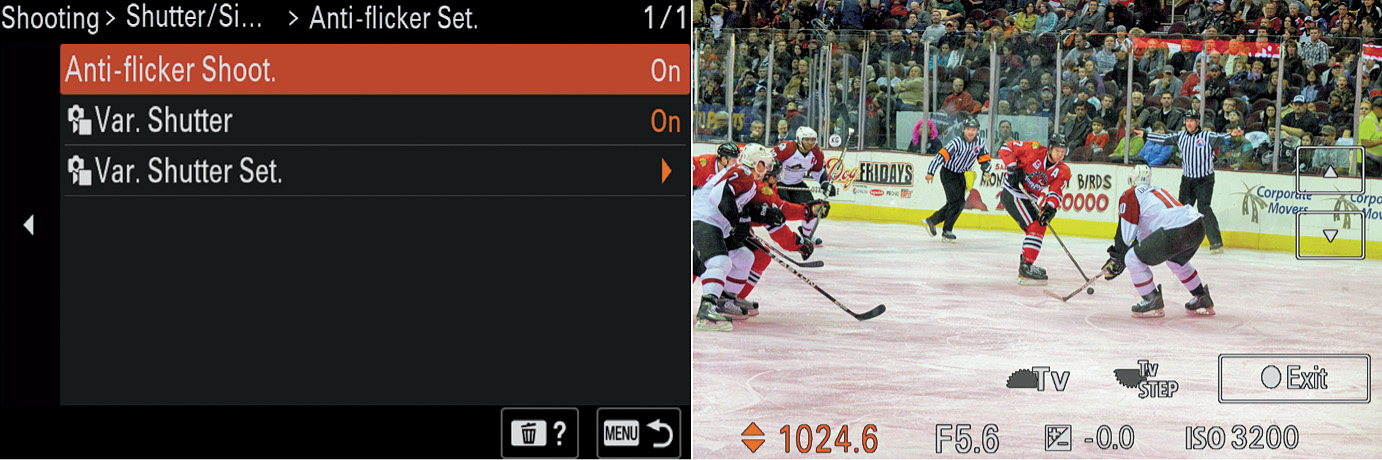
Figure 6.24 Anti-Flicker Settings (left). Set a variable shutter speed (right).
- ■Variable Shutter Settings. Here you can change the actual shutter speed in small or large increments or a range of 1/50.5th second to 1/8064.5th second. (Sony dubs this “high-resolution shutter speed.”) When you access this option, a live view image like the one shown at right in Figure 6.24 appears. Use the up/down controls to make fractional adjustments to the shutter speed until the monitor view looks okay. The front dial can be used to make 1/4-stop changes, and either rear dial can be rotated for larger increments.
- Once you’ve locked in a frequency by pressing the center button, the a7 IV will make matching adjustments in multiples (i.e., 2X, 4X, 1/2X, etc.) when you rotate the front dial. However, you should be aware that even with anti-flicker compensation, color tones may vary if a different shutter speed is used.
- You’ll want to double-check during image review to make sure flickering effects have been reduced. As shutter speeds grow shorter, there may be more of a difference between the preview and the actual image, so you may have to adjust.
You may experience a slight shutter release time lag as the camera “waits” for the proper instant, and your continuous shooting speed may be reduced, which makes this setting a necessary evil for sports and other activities involving action. Your results may vary when using P or A modes, because the shutter speed can change between shots as proper exposure requires, so, as I noted, color tones can vary. You’re better off using S or M mode, so the shutter speed remains constant.
A handy Flicker warning will appear, alerting you that the feature is enabled, except in Intelligent Auto mode. This feature may not work as well with dark backgrounds, a bright light within the image area, when using wireless flash, and under other shooting conditions. I recommend taking test shots to see how effective the feature is under the light source you are working with. The feature is not available at all when using Bulb exposures or shooting movies. If you have Priority Set in AF-S, or AF-C is set to Release or Balanced Emphasis, the camera will focus and shoot immediately when you press the shutter release down all the way. You’ll need to use a half-press first to give Anti-Flicker a chance to do its thing.
Movie Settings
When the Still/Movie/S&Q dial is set to the Movie position, two additional groups that pertain exclusively to video functions appear between Shutter/Silent and Image Stabilization. They are:
- ■Audio Recording. Six additional entries that deal with audio recording, audio levels and display, along with wind noise reduction.
- ■TC/UB. This group has six entries used when setting Time Codes for video capture.
Since this long list of entries apply only to movie making, rather than bury them in a chapter that covers features that apply to still photography, or to both still photography and movie making, I’m going to relegate those settings to Chapter 10. There, I’ll cover the basics of movie making, and discuss the hows and whys of these particular parameters in more detail.
8. Image Stabilization
This group has three settings for controlling how your a7 IV applies image stabilization as images are captured, shown at left in Figure 6.25:
- ■Steady Shot
- ■Steady Shot Adjustment
- ■Focal Length
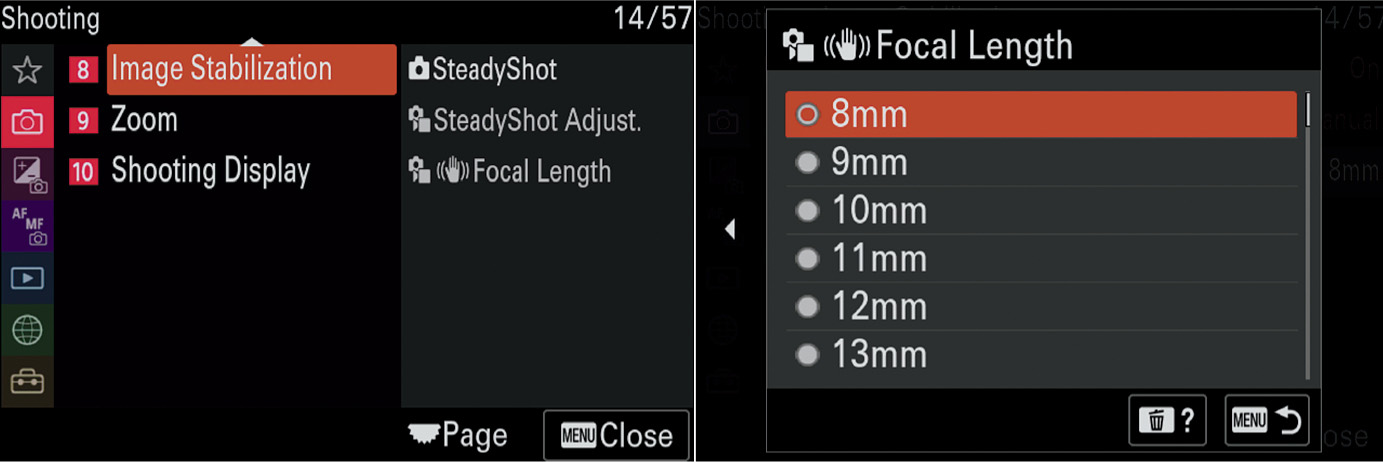
Figure 6.25 Image Stabilization settings (left). Focal length adjustments (right).
SteadyShot
Options: *On, Off
My preference: On
Sony introduced in-body image stabilization (IBIS) with its a7 Il-series cameras. So, the a7 IV has both in-body image stabilization (the awesome 5-axis SteadyShot that so many of us are crazy about), and the ability to use optical image stabilization (Optical SteadyShot or OSS) built into certain lenses. Both systems work well with each other and can be used simultaneously. If for some reason you want to disable SteadyShot, you can use this menu entry. Some lenses, like the Sony FE 24-105 f/4 G OSS have an Optical SteadyShot On/Off Switch. If so, this menu setting is not available.
SteadyShot is on by default to help counteract image blur that is caused by camera shake, but you should turn it off when the camera is mounted on a tripod, as the additional anti-shake feature is not needed, and slight movements of the tripod can sometimes “confuse” the system. In other situations, however, I recommend leaving SteadyShot turned on at all times.
SteadyShot Adjustments
Options: *Auto, Manual
My preference: Auto
This setting allows the camera to adjust the behavior of SteadyShot, based on the amount of image stabilization typically required at particular focal lengths. That is, telephoto lenses “magnify” camera shake and thus can benefit from more aggressive image stabilization. Indeed, this aspect is one reason why in-lens is often touted as superior to in-body stabilization. Your a7 IV gives you the opportunity to benefit from both! This setting is not available if you have disabled SteadyShot using the entry above. If your lens has Optical SteadyShot, settings can only be changed using the control on the lens. When the default Auto setting is enabled, the camera receives focal length information electronically from the lens and can activate the appropriate amount of SteadyShot anti-shake.
Focal Length
Options: 8mm-1000mm
My preference: N/A
You can enter the focal length of the lens or the zoom position from the range 8mm to 10 is especially useful if you’re working with a teleconverter, which produces magnification which the camera can detect from the supplied lens data alone. It’s also a good option if y a lens (possibly a “foreign” lens with an adapter) that cannot communicate focal length
9. Zoom
This group has entries for the a7 IV’s digital zoom features, which include a facility for adding an ersatz “power” zoom to many of your lenses. The entries are shown in Figure 6.26, left:
- ■Zoom
- ■Zoom Range
- ■Custom Key Zoom Speed
- ■Remote Zoom Speed
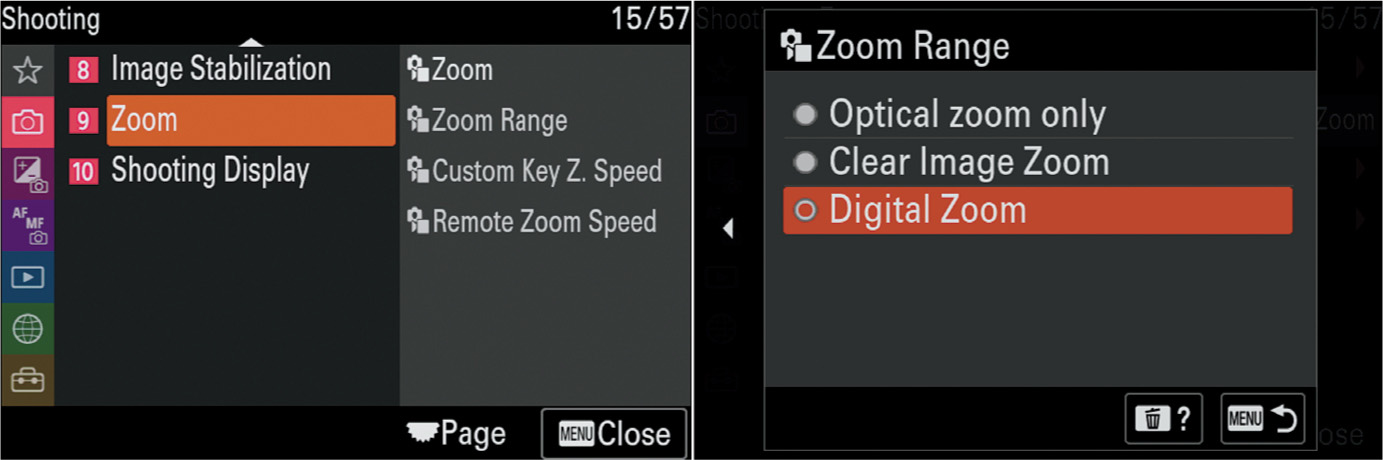
Figure 6.26 Zoom group (left). Setting Zoom Range (right).
Zoom
Options: Smart or Clear Image Zooming in shooting mode
My preference: None
This feature adds an ersatz “power zoom” control to the a7 IV, which otherwise lacks one. It’s useful once you understand what it does and how it works, but Sony has done its best to make the feature as confusing as possible. Once activated with this entry, use the left/right directional controls to zoom. The Zoom command is available only if the Zoom Range entry, which follows this one, is not set to Optical Zoom Only.
Zoom Range
Options: *Optical zoom only, Clear image Zoom, Digital Zoom
My preference: Optical Zoom only
Some other cameras in the Sony mirrorless lineup have a physical zoom lever located concentrically with the shutter release. None of the a7-series models has this feature. But, in effect, you still have five different ways to zoom while you’re taking still photographs or movies. This list will sort out the options for you:
- ■Optical zoom with zoom ring. Zoom lenses always have a ring around their barrel that can be rotated back and forth to zoom in or out on your subject. The sole exception might be a few lenses that have a power zoom lever that takes the place of the zoom ring.
- ■Optical Power Zoom. Certain E-mount lenses include a PZ (power zoom) designation in their name. These include several APS-C-format Sony lenses, and the FE Sony 28-135mm PZ F4 G OSS full-frame E-mount power zoom lens. They all have a zooming motor built in that can be activated by sliding a switch on the lens barrel itself. Alternatively, you can zoom these lenses using a camera’s zoom switch (if you own an APS-C model that has one).
- ■Smart Zoom. This is one of three zoom options that take you beyond the true optical zoom range of your lens into the realm of digitized zooming, which produces a zoom effect by taking the pixels in the center of the original image and filling the frame with them. (See Figure 6.26, right.) Smart Zoom is available only for JPEG/HEIF images when you have set the camera to M (medium) or S (small) image size. It provides a limited amount of zooming, but, technically, requires no quality-reducing interpolation. The camera simply produces each “zoomed” image by cropping the photo to the zoomed size. The resolution of your final image corresponds to the resolution of the Medium or Small image size. When using Smart Zoom, an S label appears in the viewfinder or LCD monitor zoom scale to indicate that the feature is in effect.
- ■Clear Image Zoom. This option is available when Zoom Range is set to Clear Image Zoom or Digital Zoom. When using this feature, some quality is lost, as this kind of zooming doesn’t produce any actual additional information; it just interpolates the pixels captured optically to simulate a zoomed-in perspective. Pixels are created to fill the frame at the resolution of the given Image Size setting (Large, Medium, or Small). Clear Image Zoom has many options, and I’ll explain them later in this chapter. When a zoom scale is shown in the viewfinder or on the LCD monitor, a C label appears whenever you leave optical zooming behind and enter the Clear Image realm. When Clear Image Zoom is used alone, you’ll typical achieve 1X to 2X magnifications over and above whatever optical zoom setting you’ve used. At Medium and Small image size settings, you can zoom up to 3X and 4X, respectively.
- ■Digital Zoom. This option, only available when Zoom range is set to Digital Zoom, gives you even higher magnifications than Clear Image Zoom, with an additional decrease in image quality. When a zoom scale is shown in the viewfinder or on the LCD monitor, a D label appears when you are using digital zoom. I’ll explain the options later in the chapter. When Digital Zoom is active, it takes up where Clear Image Zoom leaves off, giving you up to 4X magnification beyond the optical zoom focal length you’ve selected when using Large image size. At Medium image size, you can zoom up to 6.1X; with Small image size, up to 8X.
Custom Key/Remote Zoom Speed
Sony has added a handy function that lets you specify how fast zooming takes place if you use the controls on the a7 IV, the + and – buttons on the remote commander, or the remote shooting function with a smart phone. This feature does not affect zooming with any lens’s zoom ring, or zoom lever of a power zoom lens. There are separate entries for the camera and remotes. Specifying a speed here insures that zooming will be smooth, which may not be the case when you just press the buttons.
- ■Custom Key Zoom Speed. As I noted earlier, you can assign the Zoom function to a custom key using the Custom Key/Dial Set (Stills) or Custom Key/Dial Set entries of the Setup> Operation Customize group. Pressing the assigned key of your choice summons the Zoom feature, which you then invoke using the directional controls. This entry allows you to set separate fixed zoom speeds when the camera is in standby (STBY) mode or recording (REC) modes. You can choose from 1 (Slow) to 8 (Fast).
- Sony offers a clever suggestion: Set the STBY speed to fast so you can quickly zoom to set up a shot. Choose a slow speed for REC so you can fine-tune during the shot and avoid distracting fast zooms (like you see in Kung-fu movies of the ’70s).
- ■Remote Zoom Speed. This option sets the zoom speed when using a remote control to activate zooming. The remote can be a smart phone app, or an optional remote like the Sony RMT-P1BT wireless (Bluetooth) or Sony RM-VPR-1 (wired) remote commanders. When using these controllers, you aren’t limited to specifying a fixed speed. In addition to Fixed Speed (STBY) and Fixed Speed (REC) entries, there is a Speed Type option, which can be set to Variable or Fixed. If you select Variable, pressing and holding down the zoom buttons on compatible commanders will increase the zoom speed gradually.
Using Zoom
My basic recommendation is to use optical zoom only most of the time, and this feature might not be available. If you’ve set the camera for Optical Zoom Only in the Zoom Settings entry, then this Zoom feature is not available at all if Image Size is set to Large. If Clear Image Zoom is set to On, you can use Clear Image Zoom; if Digital Zoom is set to On, you can use both. When Image Size is set to Medium or Small, then Smart Zoom is also available for all three Zoom Settings options. After you’ve sorted out which of the zoom methods you want to use, using the Zoom feature while shooting is fairly easy. Just follow these steps:
- 1.Navigate Shooting > Zoom > Zoom. You can assign this function to a custom key and skip the menu if you like, as I noted. A live view of your sensor image appears in the EVF and LCD monitor, with a zoom scale at lower right, as shown in Figure 6.27.
- 2.Zoom in or out. You can rotate the control wheel or use the left/right directional controls to zoom in or out.
- 3.Change zoom steps. Press the up/down controls to change the size of the zoom increment, from 1X to 1.4X and thence all the way up to 8X, depending on whether you’ve selected Large, Medium, or Small as your image size.
- 4.Confirm or cancel. When you’re satisfied with the zoom level, press the center button to confirm, or the MENU button to cancel. You can then continue to shoot at the new zoomed magnification.
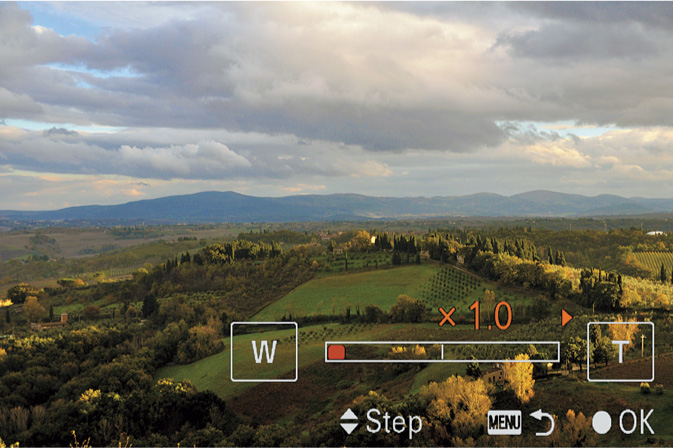
Figure 6.27 The zoom scale shows the amount of magnification and type of zoom in use.
10. Shooting Display
This group has three entries (not shown in a Figure):
- ■Grid Line Display
- ■Grid Line Type
- ■Live View Display Settings
Grid Line Display/Grid Line Type
Grid Line Display Options: On, *Off
Grid Line Type Options: *Rule of 3rds Grid, Square Grid, Diag.+Square Grid
My preference: Off, Rule of 3rds
These two entries allow you to activate one of three optional grids, so it’s superimposed on the LCD or EVF display. The grid pattern can help you with composition while you are shooting architecture or similar subjects. I sometimes use the Rule of Thirds grid to help with composition, but you might want to activate another option when composing images of scenes that include diagonal, horizontal, and perpendicular lines. Figure 6.28 shows the three types of grids available.
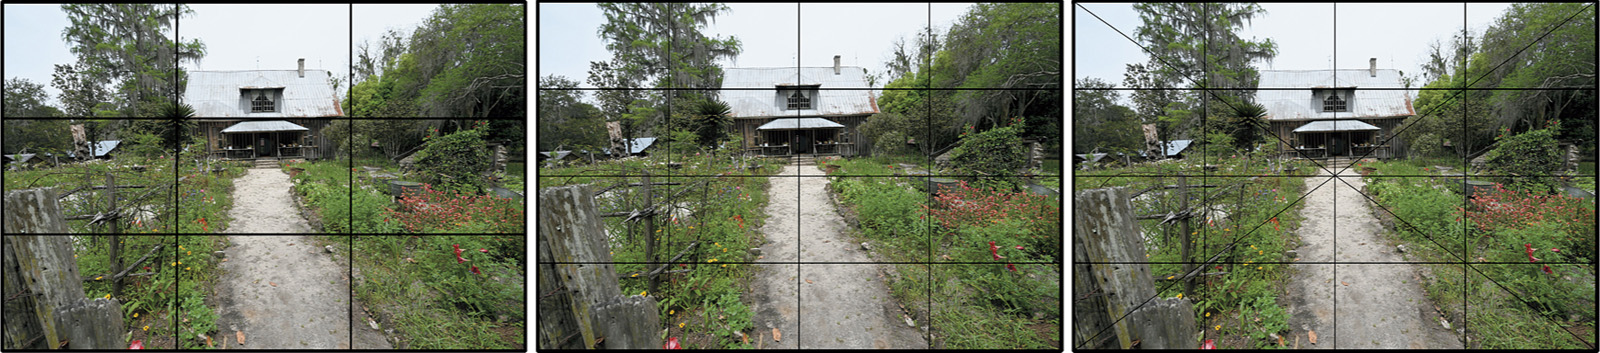
Figure 6.28 Grid lines can help you align your images on the LCD or EVF.
Live View Display Settings
Options: Setting Effect: (*On, Off); Exposure Effect (*Exposure Setting & Flash, Exposure Setting Only); Frame Rate Low Limit (On, *Off).
My preference: Setting Effect ON, unless using flash in manual mode
As a mirrorless camera, the a7-series cameras are always in a so-called “live view” mode, showing you what the sensor sees. This entry lets you specify whether the camera should apply any exposure settings or effects that you’ve selected to the image before presenting it to you as a preview.
There are times when you don’t want to see the effects of the settings you’ve made on the screen/ EVF. For example, when you are using flash in manual mode, the camera has no way of knowing exactly how much light will be illuminating your scene. That f/16 aperture may be ideal for a shot exposed by your studio strobes, but the a7 IV will, when Setting Effect is set to ON, show you a preview based on the ambient light, rather than the flash. The result? Your viewfinder or LCD monitor image is very, very dim. You’ll want to select Setting Effect OFF so the camera will boost the electronic image to viewable levels.
When Setting Effects are active, the live view display in the EVF or the LCD reflects the exact effects of any camera features that you’re using to modify the view, including as exposure compensation and white balance. In that mode, this allows for an accurate evaluation of what the photo will look like and enables you to determine whether the current settings will provide the effects you want.
The ON option can be especially helpful when you’re using any of the Creative Look effects because you can preview the exact rendition that the selected effect and its overrides will provide. It’s also very useful when you’re setting some exposure compensation, as you can visually determine how much lighter or darker each adjustment makes the image. And when you’re trying to achieve correct color balance, it’s useful to be able to preview the effect of your white balance setting.
If you’d like to preview the image without the effect of settings visible, you can set this feature to OFF. Naturally, the display will no longer accurately depict what your photo will look like when it’s taken. So, for most users, ON is the most suitable option. Unfortunately, this setting has caused more than a few minutes of head-scratching among new users who switch to Manual exposure mode and find themselves with a completely black (or utterly white) screen. The black screen, especially, may fool you into thinking your camera has malfunctioned.
There are three options:
- ■Live View Display. Choose Setting Effect On to have all shooting settings applied to the display on the monitor or electronic viewfinder. Set to Off, the display may be easier to view in darker conditions, especially when shooting in Manual exposure mode. The camera will show a VIEW icon to remind you that the display no longer reflects what the image will look like with settings applied. Off is not available when using Intelligent Auto, Movie, or S&Q Motion modes.
- ■Exposure Effect. You can choose from Exposure Setting & Flash or Exposure Setting Only. The Exposure Setting & Flash option tells the a7 IV to take into account exposure from a Sony-brand electronic flash when Setting Effect is On. (Non-Sony flashes are not supported.) If you’re basing exposure on ambient light only and using flash, choose Exposure Setting only.
- ■Frame Rate Low Limit. With the default Off setting, under dim conditions, the display’s frame rate will slow down in order to provide a brighter, more easily seen view. You might want to choose On when using shutter speeds slower than 1/60th second or panning when you want to be able to preserve the normal display frame rate. However, the image will become darker, and may even black out.
Emphasized Record Display
Options: On, *Off
My recommendation: N/A
This is a handy feature that places a red frame around the edge of the monitor display when the a7 IV is actively recording video. Akin to the light indicator on the front of conventional movie cameras and webcams, it’s a quick way to know whether the camera is in standby or recording mode. If you’ve set Setup > External Output > HDMI Information Display to On (as described in Chapter 9), the frame will show on an external monitor linked with an HDMI cable as well.