© The Author(s), under exclusive license to APress Media, LLC, part of Springer Nature 2021
V. GagliardiDecoupled Django https://doi.org/10.1007/978-1-4842-7144-5_12

12. GraphQL in Django with Strawberry

Valentino Gagliardi1  
(1)
Colle di Val D’Elsa, Italy
 
This chapter covers:
  • Code-first GraphQL with Strawberry

  • Asynchronous Django and GraphQL

  • Mutations with Apollo Client

In the previous chapter, we introduced the concept of schema-first for GraphQL APIs with Ariadne.

We explored queries and Apollo Client. In this chapter, we switch to a code-first approach to build our GraphQL API with Strawberry. In the process, we add mutations in the frontend to the mix, and we learn how to work with asynchronous code in Django.

Note

The rest of this chapter assumes you are in the repo root decoupled-dj, with the Python virtual environment active and with DJANGO_SETTINGS_MODULE configured as decoupled_dj.settings.development.

Getting Started with Strawberry in Django

In the beginning, GraphQL was mainly targeted at JavaScript.

It’s not a coincidence that most early implementations of GraphQL servers were written for Node.js. In time, most programming communities picked up interest in this new paradigm for data querying, and these days we have a GraphQL implementation in most languages. In the Python land, we explored Ariadne and we mentioned Graphene. What makes Strawberry different from these libraries? First off, Strawberry uses Python dataclasses heavily. Dataclasses in Python are a simple way to declare concise classes with attributes and optional logic. The following example shows a Python dataclass:
class User:
   name: str
   email: str

In this example, we declared a Python class with no behavior, but with two attributes, name and email. These attributes are also strongly typed; that is, they are able to enforce the kind of type they can hold, which is strings in this case. Strawberry makes heavy use of Python type hints. Type hints are an optional Python feature that can improve the robustness of our code. Python, much like JavaScript, is a dynamic language that does not enforce static types. With type hints, we can add a type layer to our Python code, which can be checked with a tool named MyPy before releasing the code in production. This can catch nasty bugs that could make their way to the runtime environment. Additionally, static type checks improve the developer experience. In Strawberry, we will use dataclasses to define our GraphQL types and type hints all along the way. Time to practice!

Installing Strawberry

To start off, we install Strawberry in our Django project:
pip install strawberry-graphql
After the installation, we update requirements/base.txt to include the new dependency. Next up, we enable Strawberry in decoupled_dj/settings/base.py, as shown in Listing 12-1.
INSTALLED_APPS = [
      ...
      "strawberry.django",
]
Listing 12-1

decoupled_dj/settings/base.py - Enabling Strawberry in INSTALLED_APPS

With Strawberry enabled, we can move to refactoring the schema from schema-first to code-first.

Designing the GraphQL Schema in Strawberry

In the previous chapter, we created a GraphQL schema in a .graphql file.

Let’s recap what we have so far. Listing 12-2 shows the GraphQL schema we assembled in Chapter 11.
enum InvoiceState {
   PAID
   UNPAID
   CANCELLED
}
type User {
   id: ID
   name: String
   email: String
}
type Invoice {
   user: User
   date: String
   dueDate: String
   state: InvoiceState
   items: [ItemLine]
}
type ItemLine {
   quantity: Int
   description: String
   price: Float
   taxed: Boolean
}
type Query {
   getClients: [User]
   getClient(id: ID!): User
}
input ItemLineInput {
   quantity: Int!
   description: String!
   price: Float!
   taxed: Boolean!
}
input InvoiceInput {
   user: ID!
   date: String!
   dueDate: String!
   state: InvoiceState
   items: [ItemLineInput!]!
}
type Mutation {
   invoiceCreate(invoice: InvoiceInput!): Invoice!
}
Listing 12-2

billing/schema.graphql - The Original GraphQL Schema

In this schema, we used most of the GraphQL scalar types the language has to offer, plus our custom types and input types definitions. We also created two queries and a mutation. To appreciate what Strawberry has to offer, let’s port each element of our schema from a plain text schema to Python code.

Types and Enums in Strawberry

To start off we begin with the base types of our GraphQL schema.

We need to declare User, Invoice, and ItemLine. To create the schema, open billing/schema.py, wipe out all the code we created in Chapter 11, and import the modules shown in Listing 12-3.
import strawberry
import datetime
import decimal
from typing import List
Listing 12-3

billing/schema.py - Initial Imports

typing is the main Python module from which we can peruse the most common type declarations. Next is strawberry itself. We also need the decimal module and the quintessential datetime. Next up, we are ready to create our first types. Listing 12-4 shows three GraphQL types in Strawberry.
import strawberry
import datetime
import decimal
from typing import List
@strawberry.type
class User:
   id: strawberry.ID
   name: str
   email: str
@strawberry.type
class Invoice:
   user: User
   date: datetime.date
   due_date: datetime.date
   state: InvoiceState
   items: List["ItemLine"]
@strawberry.type
class ItemLine:
   quantity: int
   description: str
   price: decimal.Decimal
   taxed: bool
Listing 12-4

billing/schema.py - First Types in Strawberry

For someone new to Python typings, there a lot of things here that need a bit of explanation. Thankfully, Python is expressive enough to not overcomplicate things. Let’s start from the top.

To declare a new GraphQL type in Strawberry we use the @strawberry.type decorator, which goes on top of our dataclasses. Next, each type is declared as a dataclass, each containing a set of attributes. In Chapters 1 and 11, we saw GraphQL scalar types. In Strawberry there isn’t anything special to describe these scalars, apart from strawberry.ID. As you can see in Listing 12-4, most scalar types are represented as Python primitives: str, int, and bool. The only exception to this are the types for date and due_date, which we declared as strings in the original GraphQL schema. Since types in Strawberry are dataclasses, and dataclasses are “just” Python code, instead of strings for our date, we can now use datetime.date objects. This was one of our unsolved problems in Chapter 11, and it’s now fixed.

Note

You may wonder what’s the deal with due_date here and dueDate from the previous chapter. In the original GraphQL schema, we used dueDate in camel case. Ariadne converts this syntax to snake case before it reaches the Django ORM. Now we use snake case again in the GraphQL schema. Why? Being Python code, the convention is to use snake case for longish variables and function names. But this time, the conversion happens the other way around: in the GraphQL documentation schema, Strawberry will display the field as camel case!

Moving forward, notice how the relations are described by associating the dataclass attribute with the corresponding entity, like the User dataclass assigned to user in Invoice. Also note that the List type from Python typings to associate ItemLine to items. Previously, we used the Float scalar from GraphQL for the price of each ItemLine. In Python, we can use a more appropriate decimal.Decimal. Even from a simple listing like this, we can deduce that the Strawberry approach to writing GraphQL schemas as Python code brings a lot of benefits, including type safety, flexibility, and better handling of scalar types.

In the original GraphQL schema, we had an enum type associated with Invoice, which specifies whether the invoice is paid, unpaid, or cancelled. In the new schema we already have Invoice, so it’s a matter of adding the enum. In Strawberry, we can use plain Python enums to declare the corresponding GraphQL type. In the schema file, add the enumeration, as in Listing 12-5 (this should go before User).
...
from enum import Enum
@strawberry.enum
class InvoiceState(Enum):
   PAID = "PAID"
   UNPAID = "UNPAID"
   CANCELLED = "CANCELLED"
...
Listing 12-5

billing/schema.py - Enum Type in Strawberry

This is quite similar to the choices for our Invoice model in Django. With a bit of creativity, one could reuse this Strawberry enum in the Django model (or the other way around). With the enum in place, we are almost ready to test things out. Let’s add resolvers and queries in the next sections.

Working with Resolvers (Again)

We already learned that a GraphQL schema needs resolvers to return data.

Let’s add two resolvers to our schema, copied almost straight from Chapter 11 (see Listing 12-6).
...
from users.models import User as UserModel
...
def resolve_clients():
   return UserModel.objects.all()
def resolve_client(id: strawberry.ID):
   return UserModel.objects.get(id=id)
Listing 12-6

billing/schema.py - Adding Resolvers to the Schema

To avoid clashing with the User GraphQL type here, we import our user model as UserModel. Next up, we declare resolvers to fulfill the original GraphQL queries, namely getClient and getClients. Notice how we pass an id as the argument to the second resolver to fetch a single user by ID as we did in the previous chapter. With these resolvers in place we can add a Query type and finally wire up the GraphQL endpoint in the next section.

Queries in Strawberry and Wiring Up the GraphQL Endpoint

With the fundamental types and the resolvers in place, we can create a code-first Query type for our API.

Add the code shown in Listing 12-7 to the schema file.
@strawberry.type
class Query:
   get_clients: List[User] = strawberry.field(resolver=resolve_clients)
   get_client: User = strawberry.field(resolver=resolve_client)
schema = strawberry.Schema(query=Query)
Listing 12-7

billing/schema.py - Adding a Root Query Type

Here we are telling Strawberry that there’s a Query type for GraphQL with two fields. Let’s look at these fields in detail:
  • get_clients returns a list of Users and is connected to the resolver named resolve_clients

  • get_client returns a single User and is connected to the resolver named resolve_client

Both resolvers are wrapped with strawberry.field(). Notice that both queries will be converted to camel case in the GraphQL documentation, even though they are declared as snake case in our code. In the last line we load our schema into Strawberry, so it is picked up and served to the user. It is important to note that resolvers in Strawberry don’t have to be disconnected from the Query dataclass itself. In fact, we could have declared them as methods in the Query. We leave these two resolvers outside of the dataclass, but we will see mutations as methods of the Mutation dataclass in a moment.

With this logic in place, we can connect the GraphQL layer to the Django URL system in billing/urls.py. Remove the GraphQL view from Ariadne. This time, instead of a regular view, we use the asynchronous GraphQL view from Strawberry, as shown in Listing 12-8.
...
from strawberry.django.views import AsyncGraphQLView
...
app_name = "billing"
urlpatterns = [
   ...
   path("graphql/",
        AsyncGraphQLView.as_view(schema=schema),
        name="graphql"
        ),
]
Listing 12-8

billing/urls.py - Wiring Up the GraphQL Endpoint

By running the GraphQL API asynchronously, we have a world of new possibilities, but a lot of new things to think about as well, as we will see in a moment. We explore an example in the next sections. Remember that to run Django asynchronously, we need an ASG-capable server like Uvicorn. We installed this package in Chapter 5, but to recap, you can install Uvicorn with the following command:
pip install uvicorn
Next, export the DJANGO_SETTINGS_MODULE environment variable if you haven’t already:
export DJANGO_SETTINGS_MODULE=decoupled_dj.settings.development
Finally, run the server with the following command:
uvicorn decoupled_dj.asgi:application --reload
The --reload flag ensures that Uvicorn reloads on file changes. If everything goes well, you should see the following output:
INFO: Uvicorn running on http://127.0.0.1:8000 (Press CTRL+C to quit)

Throughout the next sections, we will run Django under Uvicorn. Now we can head over to http://127.0.0.1:8000/billing/graphql/. This should open GraphiQL, a playground for exploring the GraphQL API. In the playground, we can send out queries and mutations and explore the schema and the integrated documentation, just as we did with Ariadne. Now that you have the big picture, you can complete the schema with input types and mutations.

Input Types and Mutations in Strawberry

We saw that input types in GraphQL are basically arguments for a mutation.

To define an input type in Strawberry, we still create a dataclass, but this time we use the @strawberry.input decorator on top of it. Let’s create two input types for ItemLineInput and InvoiceInput (this code can go after the Query type); see Listing 12-9.
...
@strawberry.input
class ItemLineInput:
   quantity: int
   description: str
   price: decimal.Decimal
   taxed: bool
@strawberry.input
class InvoiceInput:
   user: strawberry.ID
   date: datetime.date
   due_date: datetime.date
   state: InvoiceState
   items: List[ItemLineInput]
Listing 12-9

billing/schema.py - Adding Input Types to the Schema

Here we have dataclasses with the appropriate attribute for the input type. As the icing, ... oops, strawberry, on the cake, let’s add a mutation as well (see Listing 12-10).
...
import dataclasses
...
from billing.models import Invoice as InvoiceModel
from billing.models import ItemLine as ItemLineModel
...
@strawberry.type
class Mutation:
   @strawberry.mutation
   def create_invoice(self, invoice: InvoiceInput) -> Invoice:
       _invoice = dataclasses.asdict(invoice)
       user_id = _invoice.pop("user")
       items = _invoice.pop("items")
       state = _invoice.pop("state")
       new_invoice = InvoiceModel.objects.create(
           user_id=user_id, state=state.value, **_invoice
       )
       for item in items:
           ItemLineModel.objects.create(invoice=_invoice, **item)
       return new_invoice
schema = strawberry.Schema(query=Query, mutation=Mutation)
Listing 12-10

billing/schema.py - Adding a Mutation to the Schema

This code bears a bit of explanation. First off, we import our Django models again, this time by aliasing them to avoid clashes with the dataclasses. Next up, we define a Mutation and a method inside it. The method, named create_invoice(), takes InvoiceInput input type as a parameter and is decorated with @strawberry.mutation. Inside the method we convert the dataclass input type to a dictionary. This is important because the mutation parameter is a dataclass, not a dictionary. This way, we can pop out the keys we need, as we did with Ariadne. In the mutation, we also pop out state, which is later passed as state.value to InvoiceModel.objects.create(). At the time of this writing, Strawberry doesn’t convert automatically enums keys to strings, so we need to do a bit of data drilling. Finally, notice the type annotation for the return value of this mutation, Invoice. At the very end of the file we also load the mutation dataclass into the schema.

Mutation and input types complete our GraphQL schema for now. At this stage we could use the GraphiQL Playground to send an invoiceCreate mutation, but instead of trying things manually, we will implement the mutation in our React frontend. But first, let’s look at the implications of running Strawberry asynchronously with Django.

Working Asynchronously with the Django ORM

After setting everything up, you might have noticed that by sending even a simple query in GraphiQL, everything blows up.

Even by sending out a simple query, Django will respond with the following error:
You cannot call this from an async context - use a thread or sync_to_async.
The error is a bit cryptic, but this comes from the ORM layer. At the time of writing, Django’s ORM isn’t async-ready yet. This means we can’t simply launch ORM queries while running Django asynchronously. To work around the issue we need to wrap ORM interactions with an asynchronous adapter called sync_to_async from ASGI. To keep things digestible, we first move the actual ORM queries into separate functions. Then, we wrap these functions with sync_to_async. Listing 12-11 shows the required changes.
...
from asgiref.sync import sync_to_async
...
def _get_all_clients():
   return list(UserModel.objects.all())
async def resolve_clients():
   return await sync_to_async(_get_all_clients)()
def _get_client(id):
   return UserModel.objects.get(id=id)
async def resolve_client(id: strawberry.ID):
   return await sync_to_async(_get_client)(id)
Listing 12-11

billing/schema.py - Converting ORM Queries to Work Asynchronously

Let’s look at what is going on here. First off, we move the ORM logic to two regular functions. In the first function, _get_all_clients(), we fetch all the clients from the database with .all(). We also force Django to evaluate the queryset by converting it to a list with list(). It’s necessary to evaluate the query in the asynchronous context, because Django querysets are lazy by default. In the second function, _get_client(), we simply get a single user from the database. Both functions are then called in two asynchronous functions, wrapped in sync_to_async(). This machinery will make ORM code work under ASGI.

Resolvers are not the only piece that needs the async wrapper. While at this stage, we don’t expect anybody to hit our GraphQL mutation furiously, the ORM code for saving new invoices needs to be wrapped too. Again, we can pull out the ORM-related code to separate functions and then wrap these with sync_to_async, as shown in Listing 12-12.
...
from asgiref.sync import sync_to_async
...
def _create_invoice(user_id, state, invoice):
   return InvoiceModel.objects.create(user_id=user_id, state=state.value, **invoice)
def _create_itemlines(invoice, item):
   ItemLineModel.objects.create(invoice=invoice, **item)
@strawberry.type
class Mutation:
   @strawberry.mutation
   async def create_invoice(self, invoice: InvoiceInput) -> Invoice:
       _invoice = dataclasses.asdict(invoice)
       user_id = _invoice.pop("user")
       items = _invoice.pop("items")
       state = _invoice.pop("state")
       new_invoice = await sync_to_async(_create_invoice)(user_id, state, _invoice)
       for item in items:
           await sync_to_async(_create_itemlines)(new_invoice, item)
       return new_invoice
Listing 12-12

billing/schema.py - Converting ORM Queries to Work Asynchronously

This might seem like a lot of code to do something that Django provides out-of-the-box, namely SQL queries, but this is the price to pay at this moment in order to run Django asynchronously. In the future, we hope to have better async support for the ORM layer. For now, with these changes, we are ready to run Strawberry and Django side by side asynchronously. We can now move to the frontend to implement mutations with Apollo Client.

Working Again on the Frontend

In Chapter 11, we began to work on a React/TypeScript frontend, which acted as a client for our GraphQL API.

So far, we implemented a simple query in the frontend for a <select> component. First, we worked with Apollo client.query(), which is a lowish-level method for making queries. Then, we refactored to use the useQuery() hook. In the following sections, we tackle mutations in the frontend with Apollo Client and useMutation().

Note

For the React part, we work in decoupled_dj/billing/react_spa. Each proposed file must be created or changed in the appropriate subfolder, starting from this path.

Creating Invoices with a Mutation

We left the previous chapter with the App component shown in Listing 12-13.
import React from "react";
import { gql, useQuery } from "@apollo/client";
import Form from "./Form";
import Select from "./Select";
const GET_CLIENTS = gql`
 query getClients {
   getClients {
     id
     email
   }
 }
`;
const App = () => {
 const { loading, data } = useQuery(GET_CLIENTS);
 const handleSubmit = (
   event: React.FormEvent<HTMLFormElement>
 ) => {
   event.preventDefault();
   // client.mutate()
 };
 return loading ? (
   <p>Loading ...</p>
 ) : (
   <Form handleSubmit={handleSubmit}>
     <Select
       id="user"
       name="user"
       options={data.getClients}
     />
   </Form>
 );
};
export default App;
Listing 12-13

src/App.tsx - GraphQL Query with Apollo

This component uses a query to populate the <select> as soon as it is mounted in the DOM. It’s now time to implement a mutation. So far in Ariadne, we sent out mutations by providing the mutation payload in the GraphQL Playground. This time, things change a bit in the frontend: we need to use useMutation() from Apollo Client. First, we import the new hook, as shown in Listing 12-14.
...
import { gql, useQuery, useMutation } from "@apollo/client";
...
Listing 12-14

src/App.tsx - Importing useMutation

Next, right after the GET_CLIENTS query, we declare a mutation named CREATE_INVOICE, as shown in Listing 12-15.
...
const CREATE_INVOICE = gql`
 mutation createInvoice($invoice: InvoiceInput!) {
   createInvoice(invoice: $invoice) {
     date
     state
   }
 }
`;
...
Listing 12-15

src/App.tsx - Declaring a Mutation

This mutation looks a bit like a function, as it takes a parameter and returns some data to the caller. But the parameter in this case is an input type. Now, in App we use the new hook. The usage of useMutation() recalls useState() from React: we can array-destructure a function from the hook. Listing 12-16 shows the mutation hook in our component.
...
const App = () => {
 const { loading, data } = useQuery(GET_CLIENTS);
 const [createInvoice] = useMutation(CREATE_INVOICE);
...
Listing 12-16

src/App.tsx - Using the useMutation Hook

In addition, we can also destructure an object with two properties: error and loading. As with the query, these will provide info in case of errors, and a loading state to conditionally render the UI during the mutation. To avoid clashing with loading from the query, we assign a new name to the mutation loader. Listing 12-17 shows the changes.
...
const App = () => {
  const { loading, data } = useQuery(GET_CLIENTS);
  const [
      createInvoice,
      { error, loading: mutationLoading },
  ] = useMutation(CREATE_INVOICE);
...
Listing 12-17

src/App.tsx - Using the useMutation Hook with Loading and Error

Now that we’ve met mutations, let’s see how to use them in the frontend. From the useMutation() hook , we destructured createInvoice(), a function that we can now call in response to some user interaction. In this case we already have an handleSubmit() in our component, and that is a good place to send out a mutation to create new data into the database. It is important to note that the mutation will return a promise. This means we can use then()/catch()/finally() or try/catch/finally with async/await. What can we send in the mutation? More important, how can we use it? Once we get the mutator function from the hook, we can call it by providing an option object, which should contain at least the mutation variables. The following example illustrates how we can use this mutation:
...
   await createInvoice({
     variables: {
       invoice: {
         user: 1,
         date: "2021-05-01",
         dueDate: "2021-05-31",
         state: "UNPAID",
         items: [
           {
             description: "Django consulting",
             price: 7000,
             taxed: true,
             quantity: 1,
           },
         ],
       },
     },
   });
...
In this mutation, we send the entire input type for the mutation, as declared in our schema. In this example, we hardcode some data, but in the real world we might want to get mutation variables dynamically with JavaScript. This is exactly what we did in Chapter 6, when we built a POST payload from a form with FormData. Let’s complete our form by adding the appropriate inputs and a Submit button. To start, Listing 12-18 shows the complete React form (for brevity, we skip any CSS and stylistic concerns here).
<Form handleSubmit={handleSubmit}>
 <Select
   id="user"
   name="user"
   options={data.getClients}
 />
 <div>
   <label htmlFor="date">Date</label>
   <input id="date" name="date" type="date" required />
 </div>
 <div>
   <label htmlFor="dueDate">Due date</label>
   <input
     id="dueDate"
     name="dueDate"
     type="date"
     required
   />
 </div>
 <div>
   <label htmlFor="quantity">Qty</label>
   <input
     id="quantity"
     name="quantity"
     type="number"
     min="0"
     max="10"
     required
   />
 </div>
 <div>
   <label htmlFor="description">Description</label>
   <input
     id="description"
     name="description"
     type="text"
     required
   />
 </div>
 <div>
   <label htmlFor="price">Price</label>
   <input
     id="price"
     name="price"
     type="number"
     min="0"
     step="0.01"
     required
   />
 </div>
 <div>
   <label htmlFor="taxed">Taxed</label>
   <input id="taxed" name="taxed" type="checkbox" />
 </div>
 {mutationLoading ? (
   <p>Creating the invoice ...</p>
 ) : (
   <button type="submit">CREATE INVOICE</button>
 )}
</Form>
Listing 12-18

src/App.tsx - The Complete Form

This form contains all the inputs for creating a new invoice. At the bottom, note the conditional rendering based on the state of mutationLoading.

This is a nice thing to have in order to inform the user about the state of request. With the form in place, we can assemble the logic for sending out the mutation from handleSubmit() . For convenience, we can use async/await with try/catch. Some words before looking at the code:
  • We build the mutation payload starting from a FormData

  • In the building logic, we convert quantity to an integer and taxed to a Boolean

These last steps are necessary because our GraphQL schema expects quantity to be an integer, while in the form it is simply a string. Listing 12-19 shows the complete code.
const handleSubmit = async (
 event: React.FormEvent<HTMLFormElement>
) => {
 event.preventDefault();
 if (event.target instanceof HTMLFormElement) {
   const formData = new FormData(event.target);
   const invoice = {
     user: formData.get("user"),
     date: formData.get("date"),
     dueDate: formData.get("dueDate"),
     state: "UNPAID",
     items: [
       {
         quantity: parseInt(
           formData.get("quantity") as string
         ),
         description: formData.get("description"),
         price: formData.get("price"),
         taxed: Boolean(formData.get("taxed")),
       },
     ],
   };
   try {
     const { data } = await createInvoice({
       variables: { invoice },
     });
     event.target.reset();
   } catch (error) {
     console.error(error);
   }
 }
};
Listing 12-19

src/App.tsx - Logic for Sending the Mutation

Apart from the FormData logic , the rest is pretty straightforward:
  • We send out the mutation with createInvoice() by providing an invoice payload

  • If everything goes well, we reset the form with event.target.reset()

If we test things in the browser, we should be able to send out the mutation and get a response from the server. This process can be seen in the browser’s console, as shown in Figure 12-1, where the Response tab is highlighted.
../images/505838_1_En_12_Chapter/505838_1_En_12_Fig1_HTML.jpg
Figure 12-1

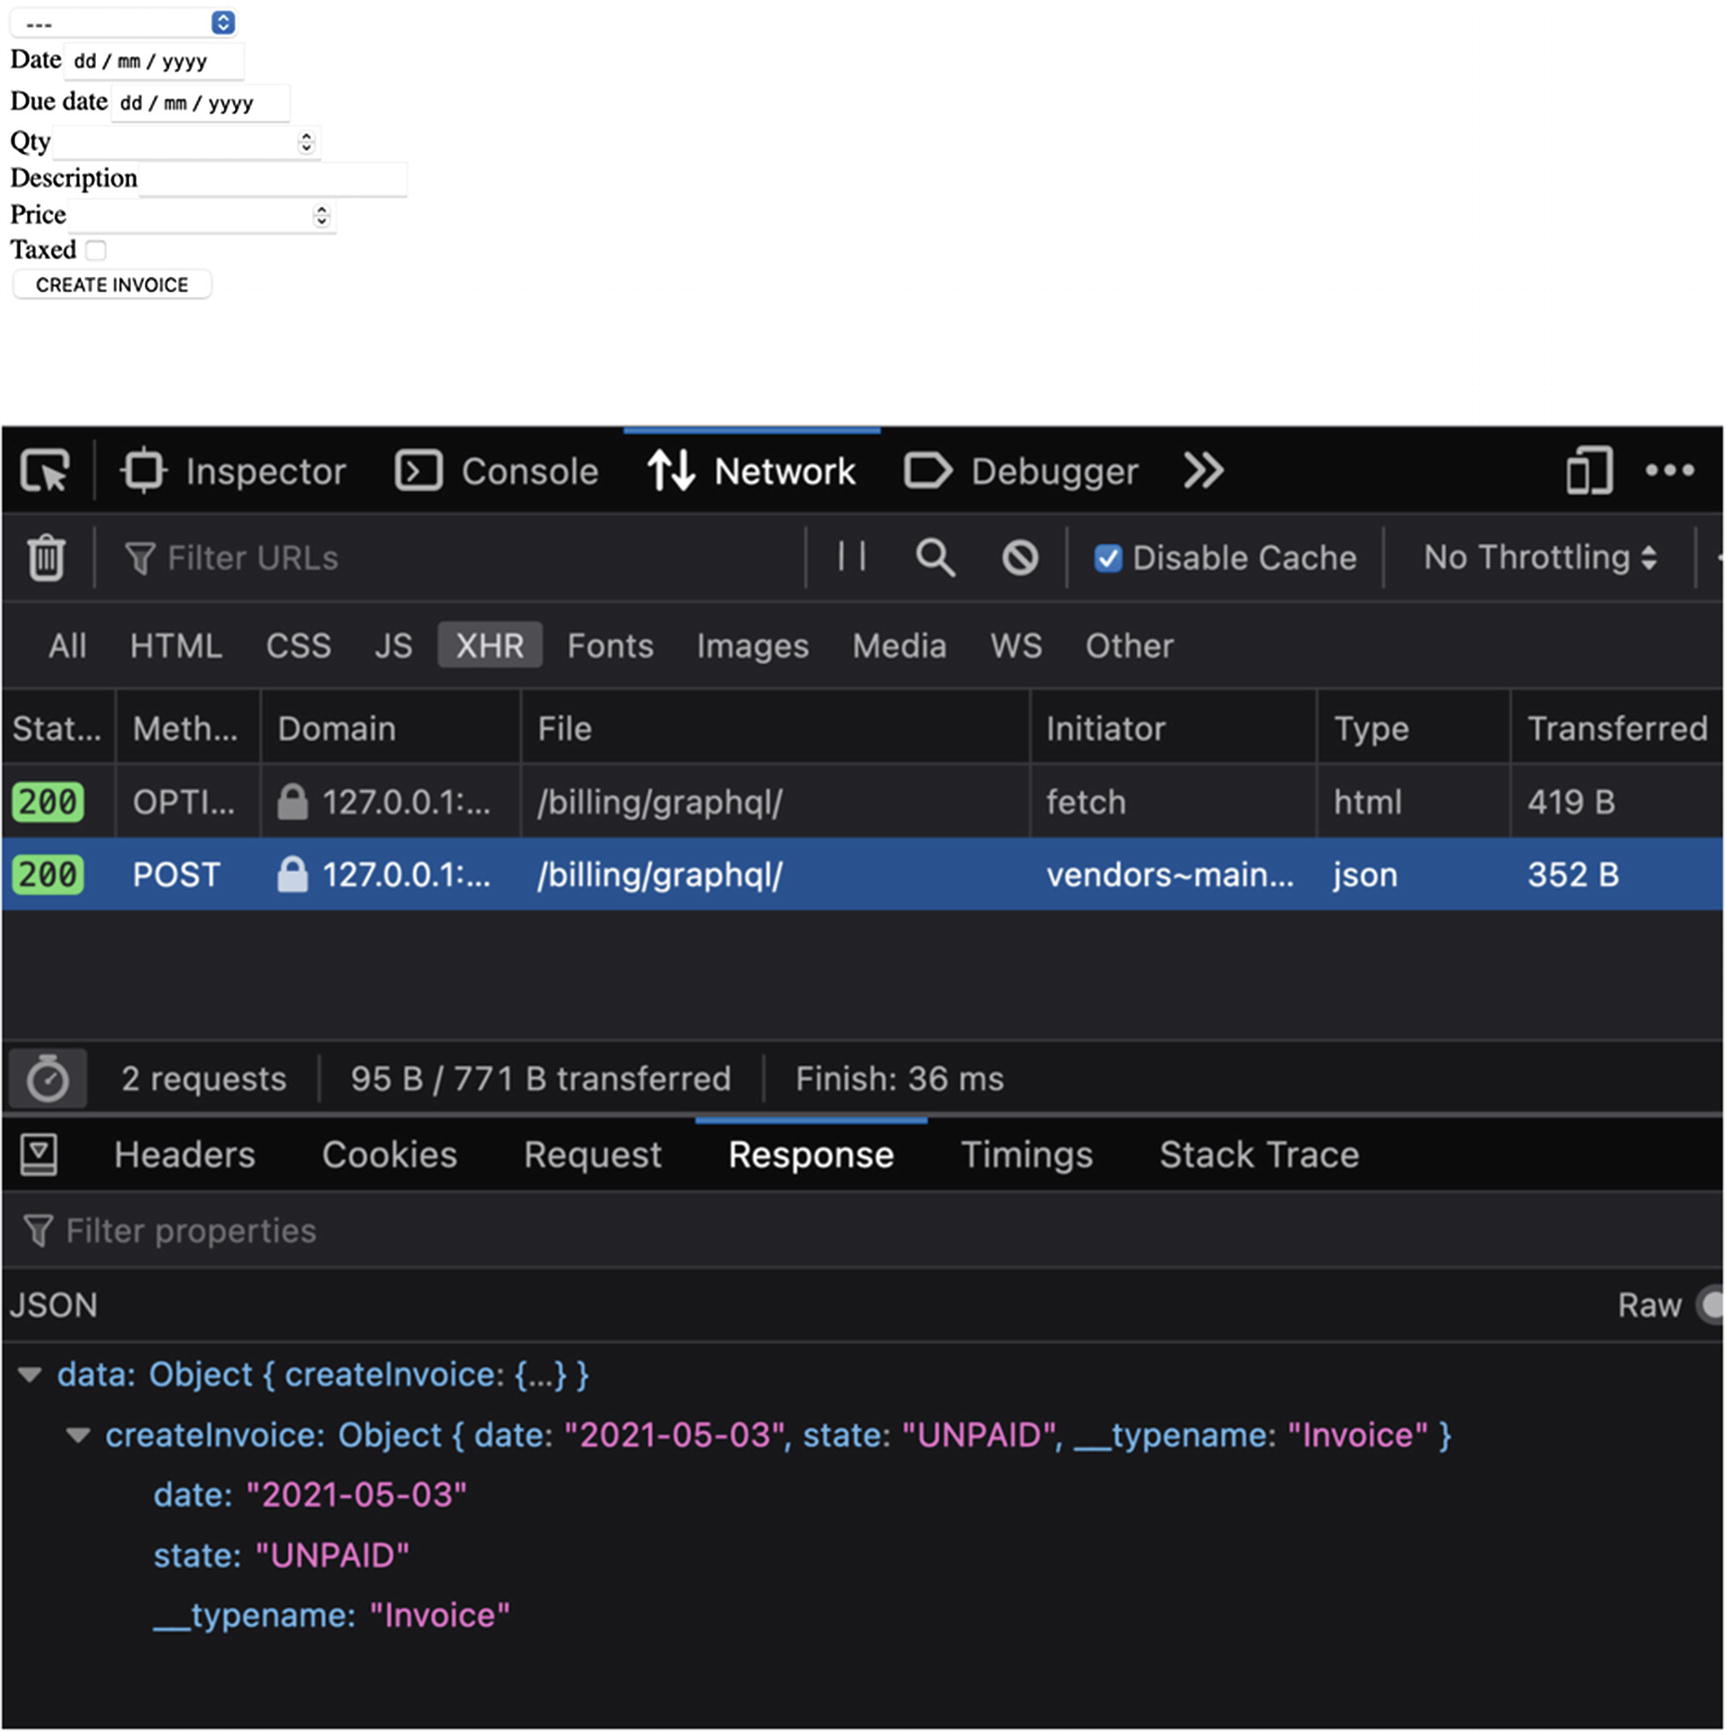
The mutation response from the GraphQL server

In REST, when we create or modify a resource with a POST or PATCH request, the API responds with a payload. GraphQL makes no exceptions. In fact, we can access the response data on the mutation, as shown in the following snippet:
const { data } = await createInvoice({
 variables: { invoice },
});
// do something with the data

In Figure 12-1, we can see the data object containing a property named createInvoice, which holds the fields we requested from the mutation. We can also see __typename. This is part of GraphQL’s introspection capabilities, which make it possible to ask GraphQL “what type is this object”? An explanation of GraphQL introspection is out of the scope of this book, but the official documentation is a good starting point for learning more.

Note

It is a good moment to commit the changes you made so far and to push the work to your Git repo. You can find the source code for this chapter at https://github.com/valentinogagliardi/decoupled-dj/tree/chapter_12_graphql_strawberry.

What’s Next?

We’ve barely scratched the surface of GraphQL in these last pages. The subject is bigger than two chapters. The following is a list of topics that you can explore on your own after finishing this book:
  • Authentication and deployment: In fully decoupled setups, GraphQL works well with JWT tokens for authentication. However, the specification does not enforce any particular type of authentication method. This means it is possible to use session-based authentication for GraphQL API, as we saw in Chapter 10 for REST.

  • Subscriptions: GraphQL Python libraries for Django can integrate with Django Channels to provide subscriptions over WebSocket.

  • Testing: Testing GraphQL API does not involve any magic. Since they accept and return JSON, any testing HTTP client for Python or Django can be used to test a GraphQL endpoint.

  • Sorting, filtering, and pagination: It’s easy to sort, filter, and paginate responses with Django and the Django REST Framework tools. However, to implement the same things in GraphQL, we need to write a bit of code by hand. But since GraphQL queries accept arguments, it’s not so hard to build custom filtering capabilities in a GraphQL API.

  • Performances : Since queries in GraphQL can be nested, great care must be taken to avoid crashing our database with N+1 queries. Most GraphQL libraries include a so-called dataloader, which takes care of caching database queries.

Exercise 12-1: Adding More Asynchronous Mutations

The wireframe in Chapter 6 has a Send Email button. Try to implement this logic in the React frontend, with a mutation. On the backend, you will also need a new asynchronous mutation to send the email.

Exercise 12-2: Testing GraphQL

Add tests to this simple application: you can test the GraphQL endpoint with Django testing tools and test the interface with Cypress.

Summary

In this chapter, we closed the circle with the basics of GraphQL and asynchronous Django. You learned how to:
  • Use GraphQL mutations in the backend and in the frontend

  • Work with asynchronous Django

Now it’s your turn! Go build your next Django project!

Additional Resources

..................Content has been hidden....................

You can't read the all page of ebook, please click here login for view all page.
Reset
18.222.163.31