
In this chapter, you will learn to configure and manage Chromebooks manually by working directly on a Chromebook, rather than by using administrative policy to configure and manage a Chromebook from another computer.
To configure and manage a Chromebook, you use the Settings app. This chapter will start by showing you how to open the Settings window and how to navigate in it. The chapter will then take you through each category of settings in turn, starting with the Network settings and moving through to the various subcategories of Advanced settings, such as the Privacy and security settings and the Accessibility settings.
There are three major categories of settings this chapter will not cover. The first category is the Bluetooth settings, which the section “Connecting and Using Bluetooth Devices” in Chapter 3 covers. The second category is the Printing settings, which the section “Printing from Chromebooks” in Chapter 7 explains. The third category is the Reset settings, which the section “Resetting and Powerwashing a Chromebook” in Chapter 9 discusses.
Opening the Settings Window and Navigating in It
To get started configuring settings, open the Settings window. Click any icon in the status area at the right end of the shelf and then click the Settings icon (the gear icon) on the status menu.
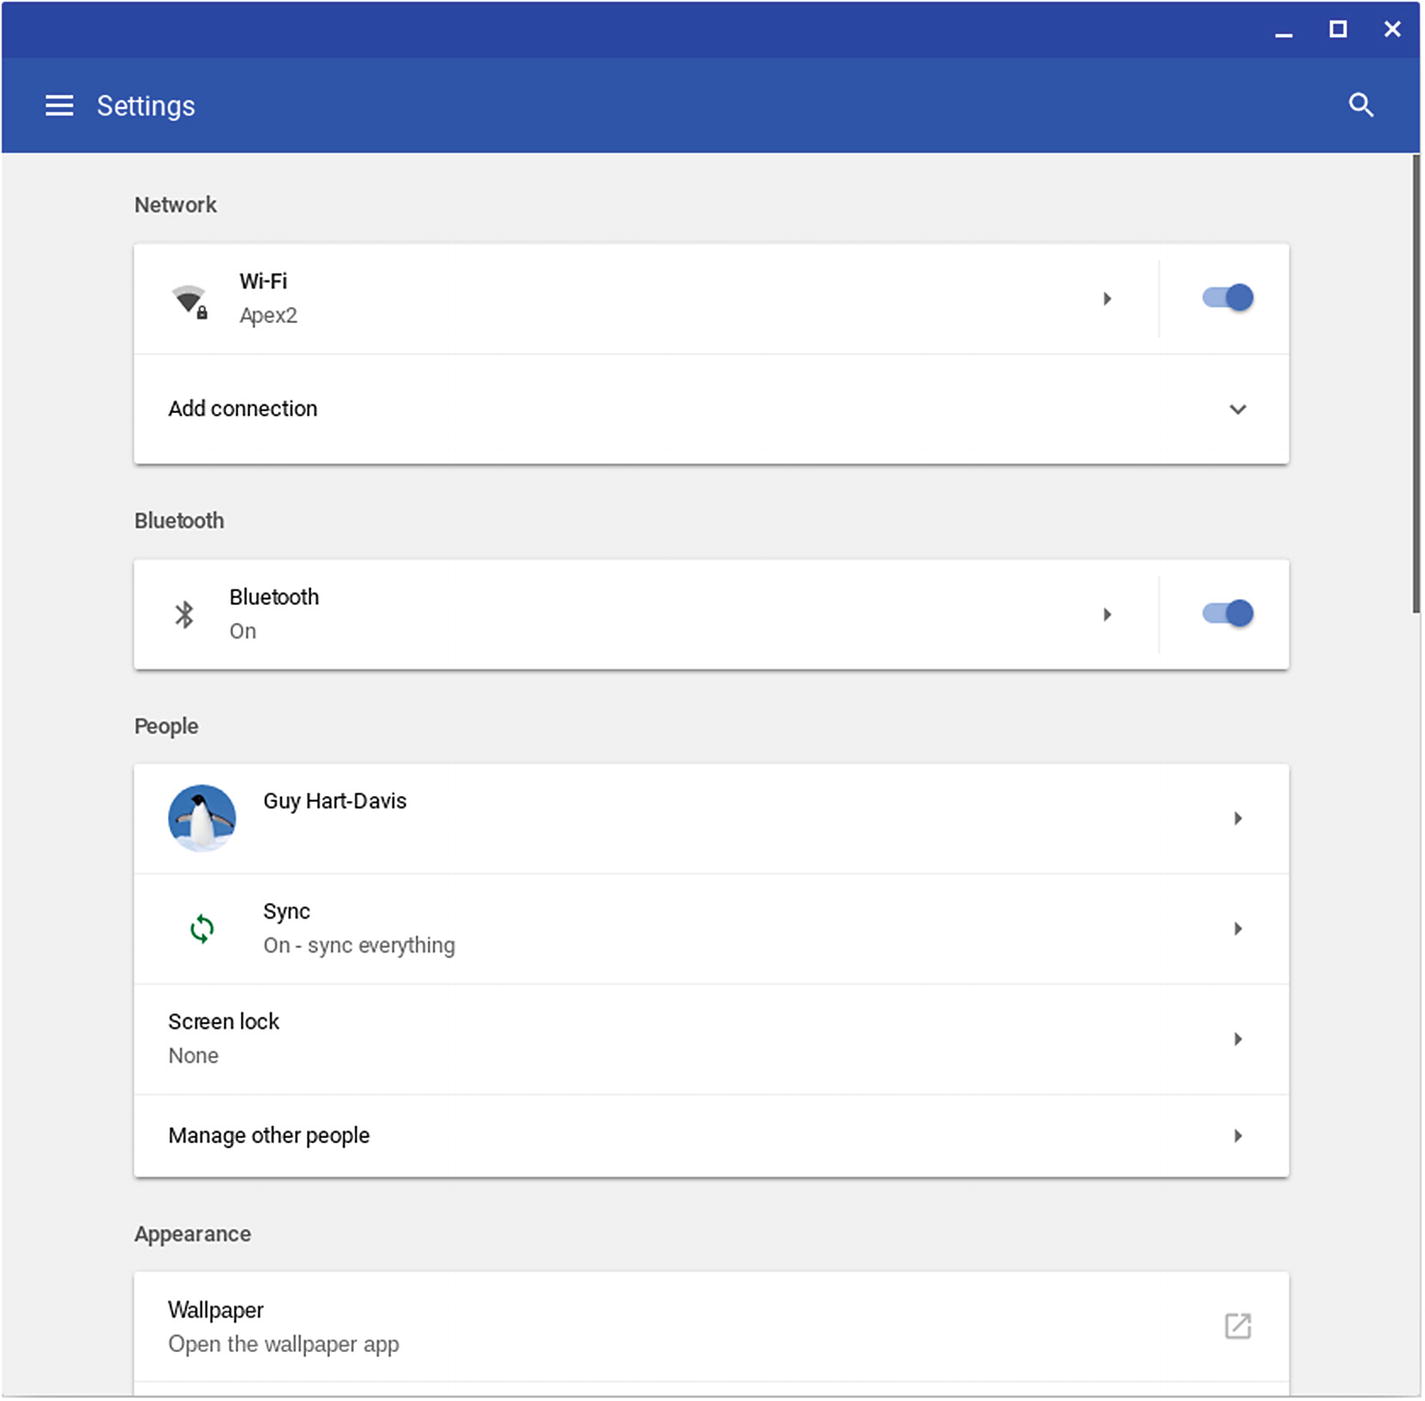
The Settings window contains many settings divided into different sections, such as Network, Bluetooth, People, and Appearance
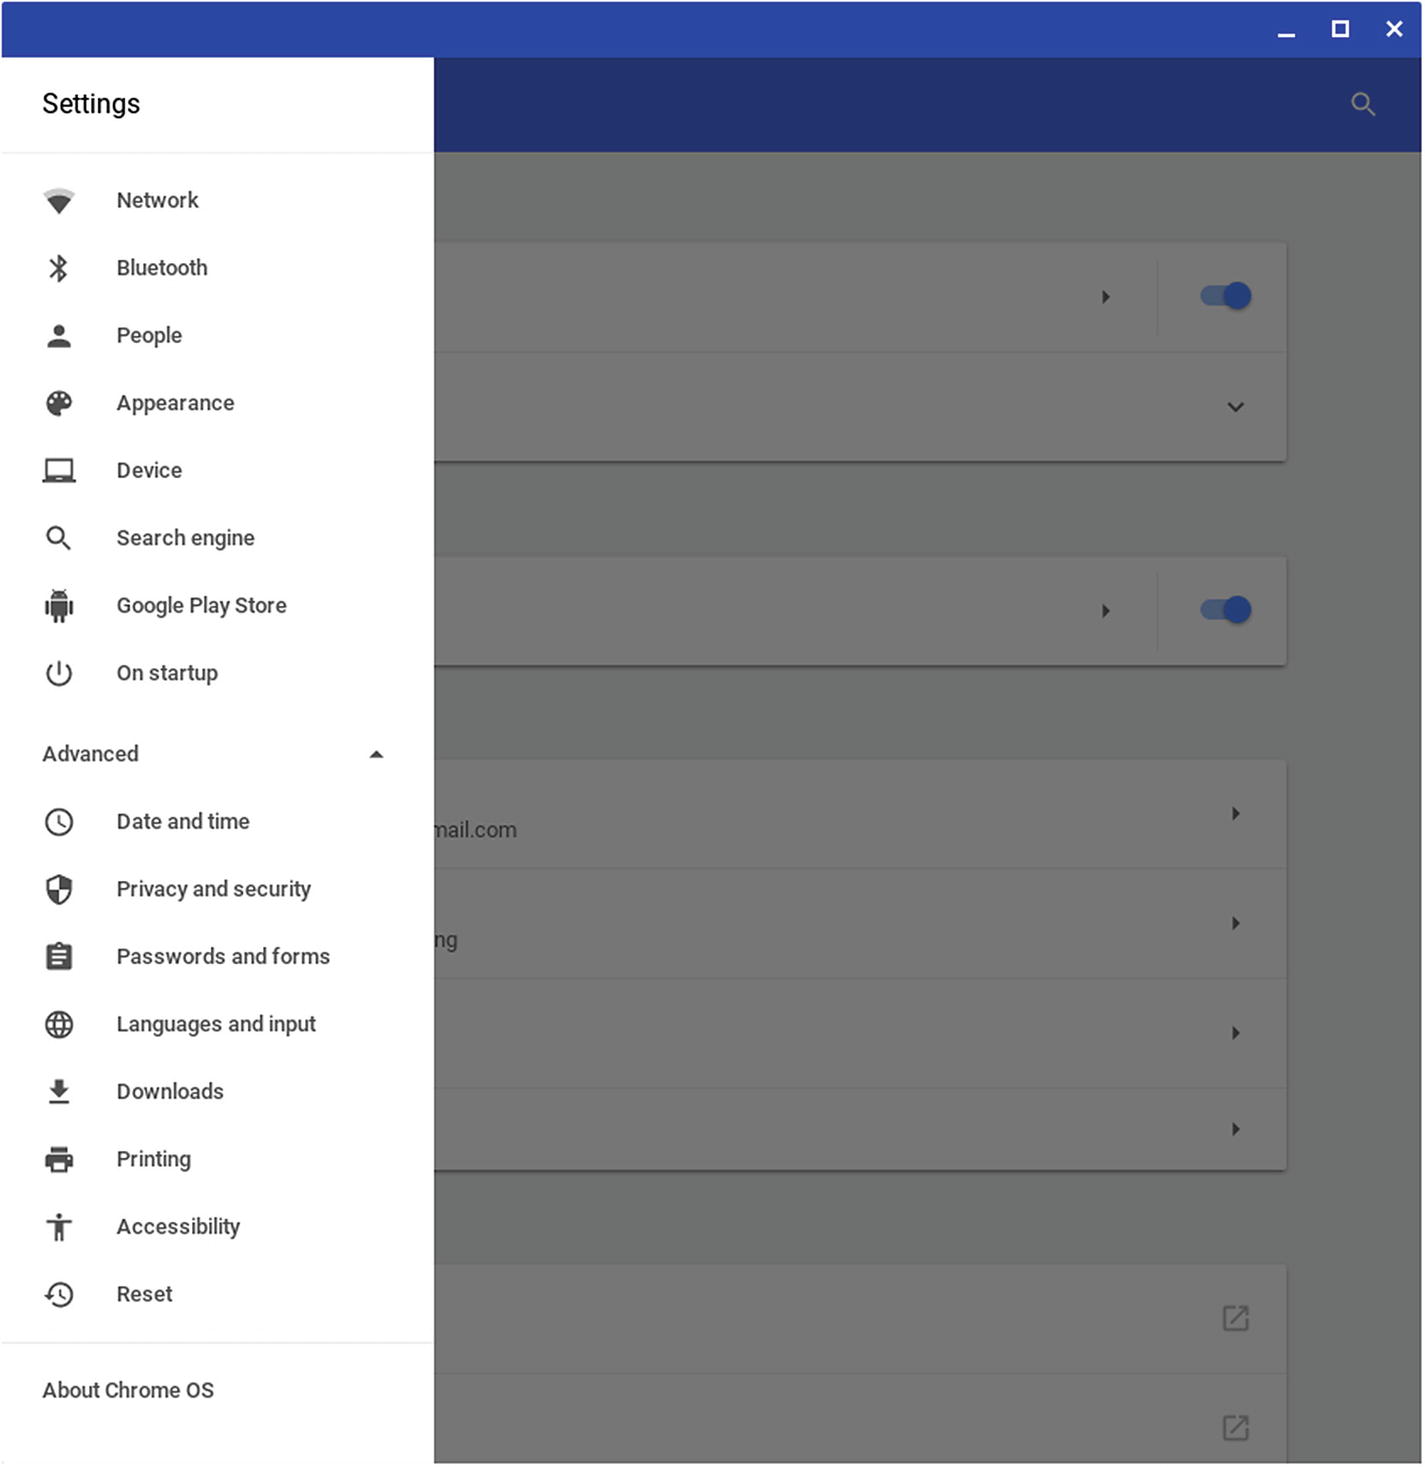
The navigation panel gives you quick access to all the categories in the Settings window. If the Advanced section is collapsed, click the Advanced heading to expand its contents.
Configuring Network Settings
Chromebooks are designed to be connected to the Internet pretty much the whole time, so you will need to give your school’s Chromebooks Internet access by connecting them to the school’s Wi-Fi network or networks. You may have already configured a Wi-Fi network connection while setting up the Chromebook, as discussed in Chapter 3. In this section, we will look at how to configure other Wi-Fi network connections and settings, as needed.
Note
Before we get started with the network settings, here is a quick reminder. Each Wi-Fi network has a name called a service set identifier, or SSID for short. The network may be open, broadcasting its SSID, or closed, not broadcasting it. See the sidebar titled “Understanding SSIDs and Open and Closed Wi-Fi Networks” in Chapter 3 for further details.
Connecting to an Open Wi-Fi Network
You can connect to an open Wi-Fi network starting either from the shelf or from the Settings window. Often, it is more convenient to work from the shelf, so we will start with that technique.
Connecting to an Open Wi-Fi Network from the Shelf
- 1.
Click the Wi-Fi icon on the shelf to open the status menu.
- 2.
Click the button for the current Wi-Fi network (if there is one) or the No network button. The Network status menu will open (see Figure 4-3).
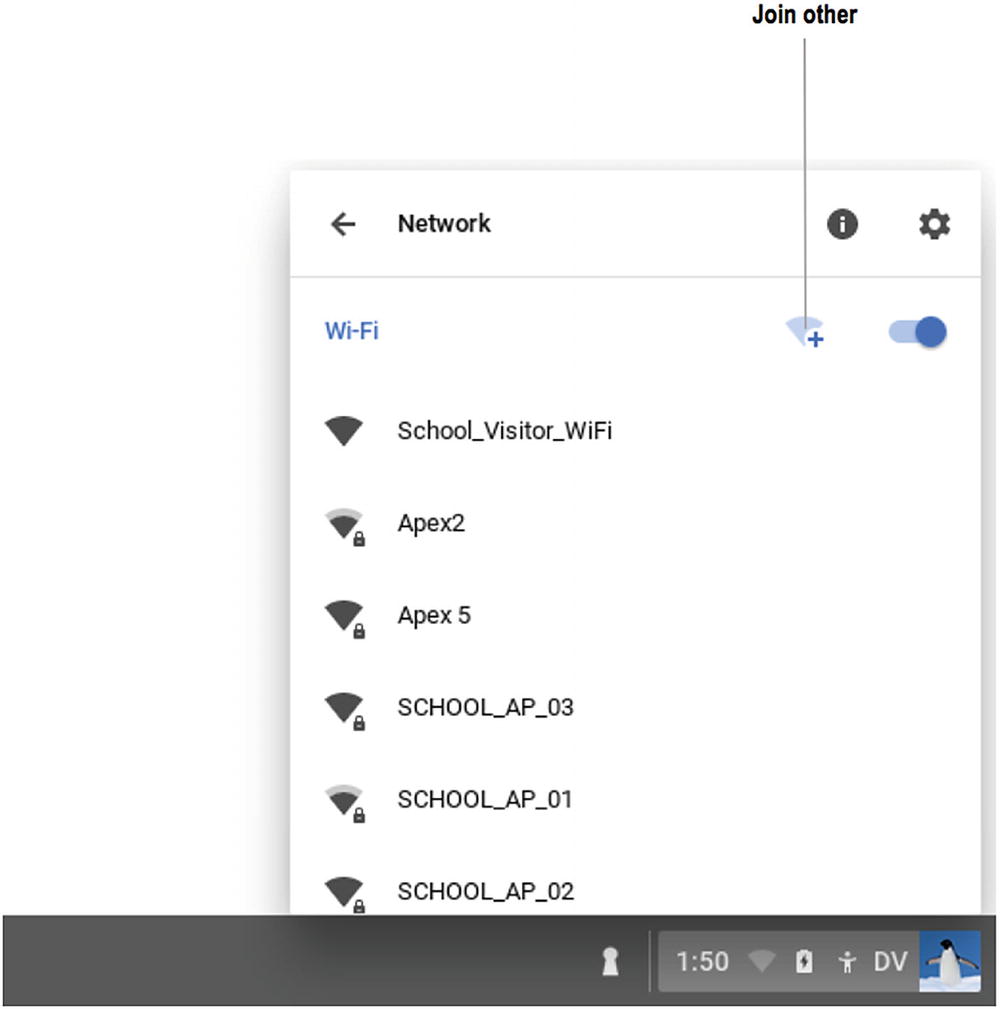
On the Network status menu, click the button for the open Wi-Fi network to which you want to connect the Chromebook. The Join other button enables you to connect to a closed network.
- 3.
Make sure the Wi-Fi switch is set to On. If not, set the switch to On and then wait until the list of networks appears.
- 4.
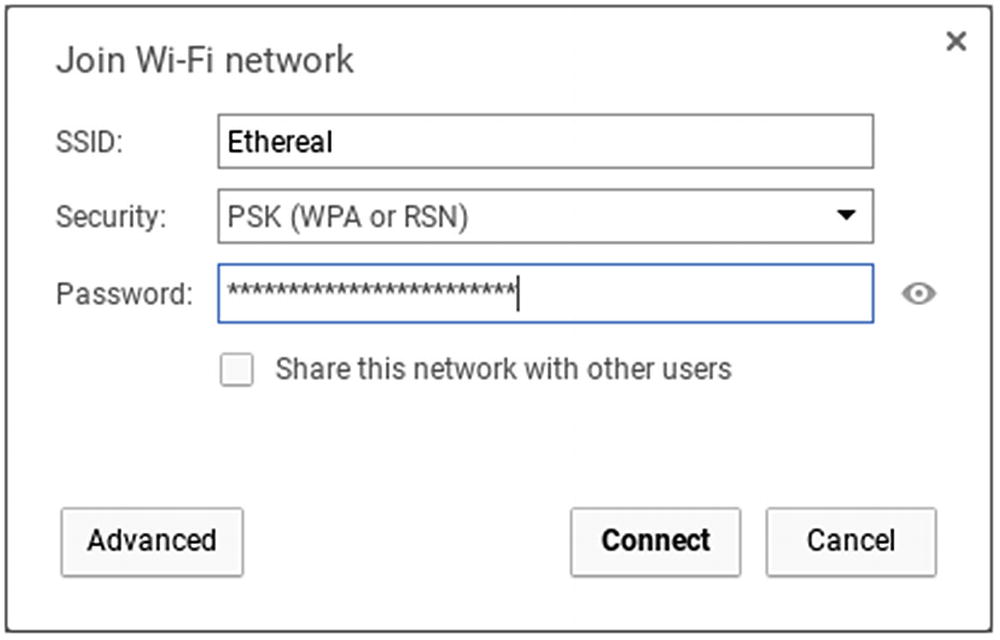
Click the button for the Wi-Fi network to which you want to connect the Chromebook. The Join Wi-Fi network dialog box for an open network opens (see Figure 4-4).

In the Join Wi-Fi network dialog box for an open network, enter the password or other security information for the network. Check the “Share this network with other users” check box if you want other users of this Chromebook to be able to use the network.
Note
If the Network status menu does not contain a button for the Wi-Fi network to which you want to connect the Chromebook, follow the instructions in the next section, “Connecting to a Closed Wi-Fi Network.”
- 5.
Click the Password box and type the password for the network. (If the network uses another means of security, enter the appropriate information instead.) You can click the Show password icon (the eye icon) to the right of the Password box to reveal the characters you typed; this is especially handy for complex passwords.
- 6.
Check the “Share this network with other users” check box if you want the network to be available to other users of this Chromebook. In a school situation, you will normally want to do this.
- 7.
Click the Connect button. Chrome OS will connect to the Wi-Fi network. Once the connection is established, you can look at the Wi-Fi icon on the shelf to get an idea of the signal strength—the more of the Wi-Fi icon that is white rather than gray, the stronger the signal is.
Connecting to an Open Wi-Fi Network from the Settings Window
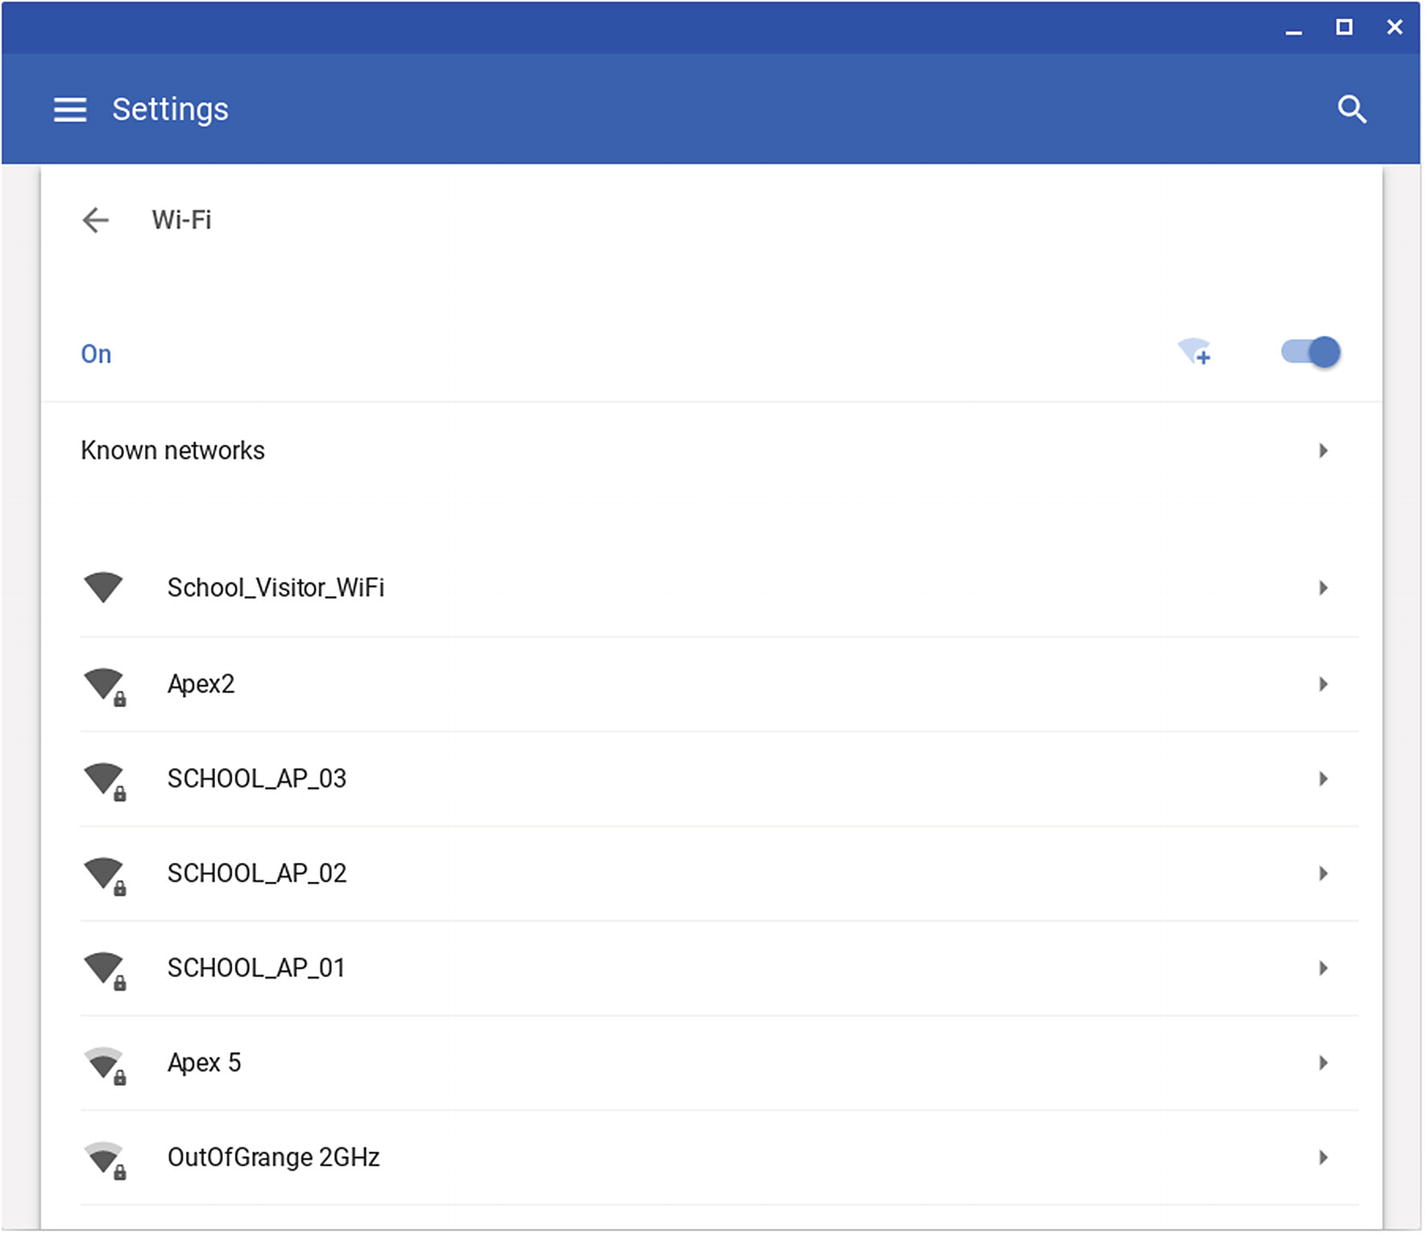
On the Wi-Fi screen, click the button for the open network to which you want to connect the Chromebook
Connecting to a Closed Wi-Fi Network
To connect to a closed Wi-Fi network that’s within range of the Chromebook, you use a slightly different technique than that used for an open network. You can use the same technique to connect to a Wi-Fi network—either open or closed—that’s currently out of range of the Chromebook. You will need to know the network’s name, the security type, and the appropriate security information (such as the password).
As with an open Wi-Fi network, you can connect to a closed Wi-Fi network starting either from the shelf or from the Settings window. The shelf is usually the easiest place to start setting up the connection.
Connecting to a Closed Wi-Fi Network from the Shelf
- 1.
Click the Wi-Fi icon on the shelf to open the status menu.
- 2.
Click the button for the current Wi-Fi network (if there is one) or the No network button. The Network status menu will open.
- 3.
Make sure the Wi-Fi switch is set to On. If not, set the switch to On and then wait until the list of networks appears.
Tip
You can also start setting up a connection to a closed Wi-Fi network from the main Settings window. In the Network section at the top, click the Add Connection button to expand the Add Connection section. Then click the Add Wi-Fi button to display the Join Wi-Fi network dialog box for other networks.
- 4.
Click the Join other button, the button to the left of the Wi-Fi switch. The Join Wi-Fi network dialog box for other networks appears (see Figure 4-6).
In the Join Wi-Fi network dialog box for other networks, type the network’s SSID, choose the security type, and enter the password
Note
If you need to set up a Wi-Fi network connection that uses other types of authentication than a password, click the Advanced button at this point to expand the Join Wi-Fi network dialog box so that it shows extra fields. Then skip ahead to the section “Connecting to a Wi-Fi Network with Complex Authentication” later in this chapter for instructions.
- 5.
Type the Wi-Fi network’s name in the SSID box .
- 6.
If the Wi-Fi network uses security (as most networks do), click the Security pop-up menu and then click the PSK (WPA or RSN) item or the WEP item. See the sidebar titled “Wi-Fi Security: WEP, PSK, WPA, and RSN” in Chapter 3 for details on the acronyms. If the Wi-Fi network does not use security, leave the default setting, None, selected in the Security pop-up menu box.
- 7.
Assuming the network uses security, click the Security box and type the password. You can click the Show password icon to the right of the Password box if you need to check what you are typing.
- 8.
Check the “Share this network with other users” check box if you want the network to be available to other users of this Chromebook. In a school situation, you will normally want to do this.
- 9.
Click the Connect button. Chrome OS will connect to the closed Wi-Fi network. Once the connection is established, the Wi-Fi icon on the shelf will show the signal strength by the number of white bars.
Note
If you are using this method to connect to a Wi-Fi network that’s not within range of the Chromebook, Chrome OS will attempt to connect to the network. When the attempt to connect times out, Chrome OS will display a Network Connection Error alert. Chrome OS will also display the Join Wi-Fi network dialog box for an open network so that you can re-enter the password, in case a wrong password caused the network connection error. Click the Cancel button to dismiss the Join Wi-Fi network dialog box. You can also click the Network Connection Error alert to display the Settings window for the Wi-Fi network; we’ll examine this window in the section “Configuring the Settings for a Wi-Fi Network Connection” later in this chapter.
Connecting to a Closed Wi-Fi Network from the Settings Window
To start connecting to a closed Wi-Fi network from the Settings window rather than from the shelf, click the right-arrow button on the right of the Wi-Fi button in the Network section at the top of the Settings window. (The Wi-Fi button’s readout shows either Not connected or the name of the current Wi-Fi network.)
On the Wi-Fi screen, click the Join other button, the icon to the left of the switch near the top of the screen. The Join Wi-Fi network dialog box will open, and you can set up the connection by following steps 5–9 in the previous section.
Connecting to a Wi-Fi Network with Complex Authentication
As you have seen in the sections on connecting to open and closed Wi-Fi networks, Chrome OS uses passwords as the default means of authentication on Wi-Fi networks. Generally, this works well, but for those school or organization networks that use stronger forms of authentication, such as digital certificates, you need to use the Advanced version of the Join Wi-Fi network dialog box.
Before setting up a Wi-Fi connection that uses complex authentication, make sure you have the information you need, together with any digital certificates required. Normally, you would consult your school’s network administrator to get this information and the certificates.
Note
If you need to install certificates, see the section “Managing Certificates” later in this chapter for instructions on how to do so.
- 1.
Begin connecting to the Wi-Fi network as usual, whether it is open, closed, or out of range.
- 2.
Click the Advanced button in the Join Wi-Fi network dialog box to display a larger version of the dialog box (see Figure 4-7).
Note
The Advanced button appears in the Join Wi-Fi network dialog box for an open network only if Chrome OS determines that the network requires complex authentication. This button always appears in the Join Wi-Fi network dialog box for other networks because Chrome OS cannot determine what type of authentication the network requires.
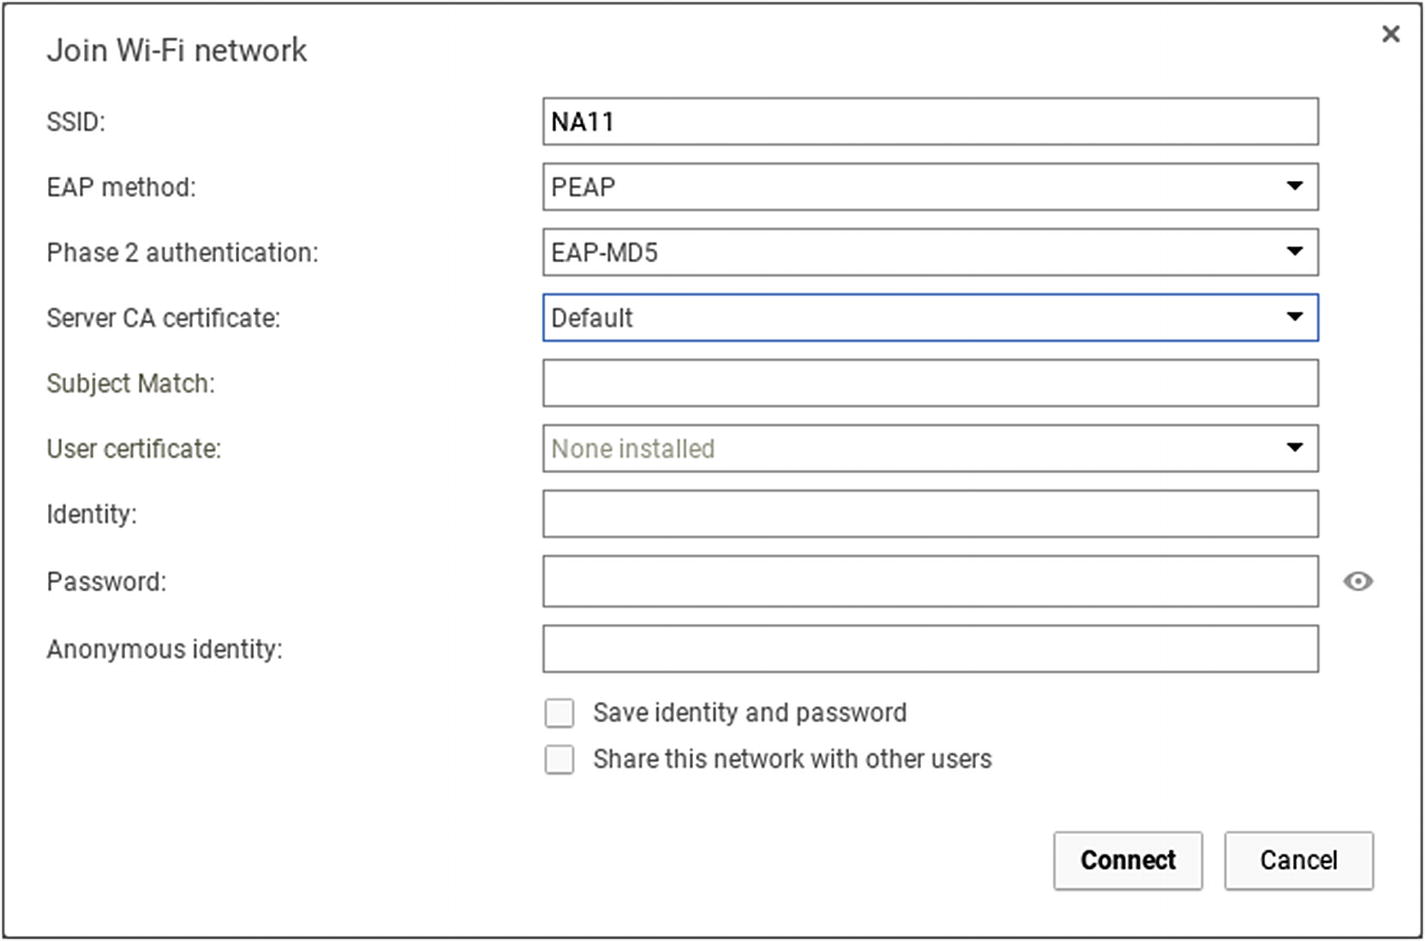
Use the Advanced version of the Join Wi-Fi network dialog to set up a connection to a Wi-Fi network that uses stronger forms of authentication
- 3.
If you are connecting the Chromebook to a closed network or a network that is out of range, type the network’s SSID in the SSID box. If you are connecting to an open network, Chrome OS already knows the network’s name.
- 4.
Click the EAP method pop-up menu and then click the appropriate Extensible Authentication Protocol (EAP) method:
LEAP: Choose this item to use Lightweight Extensible Authentication Protocol (LEAP). LEAP does not require digital certificates.
PEAP: Choose this item to use Protected Extensible Authentication Protocol (PEAP).
EAP-TLS: Choose this item to use EAP Transport Level Security (EAP-TLS).
EAP-TTLS: Choose this item to use EAP Tunneled Transport Level Security (EAP-TTLS).
- 5.
For PEAP or EAP-TTLS, click the Phase 2 authentication method pop-up menu and then click the appropriate authentication type. For PEAP, the choices are Automatic, EAP-MD5, or MSCHAPv2. For EAP-TTLS, the choices are Automatic, EAP-MD5, MSCHAPv2, MSCHAP, PAP, or CHAP. LEAP and EAP-TTLS do not use this setting .
- 6.
For PEAP, EAP-TLS, or EAP-TTLS, open the Server CA certificate pop-up menu and then click the server certificate. LEAP does not use this setting.
- 7.
If the Subject match box is available, click it and then type the name of the server certificate. (The box is available if a cursor appears when you click the box.)
- 8.
If the User certificate pop-up menu is available, click it and then then click the digital certificate for authenticating the user.
- 9.
If the Identity box is available, click it and type the user identity.
- 10.
If the Password box is available, click it and type the password for the identity.
- 11.
If the Anonymous identity box is available, you can click it and type the identity to use for anonymous connections.
- 12.
Check the “Save identity and password” check box if you want to save this identity and password for future usage. Normally, you would want to save the credentials unless you will use this Wi-Fi network only once.
- 13.
Click the Connect button. The Join Wi-Fi network dialog box will close, and Chrome OS will attempt to establish the connection.
GIVING A CHROMEBOOK INTERNET ACCESS VIA A PHONE
Sometimes, you may need to use a smartphone to give one or more Chromebooks access to the Internet. For example, if you take a Chromebook home to get work done, and your Internet connection goes down, you could use the hotspot feature on your phone to get the Chromebook online.
In a pinch, you could use a phone hotspot to get several Chromebooks online at school; your phone’s carrier controls how many devices can connect through the phone’s hotspot, but most carriers allow between five and nine devices to customers who pay for the hotspot functionality. However, connecting a group of Chromebooks through your phone is probably one of the fastest ways of burning through your data plan.
To use your phone’s hotspot, enable the hotspot functionality on the phone and then connect the Chromebook (or Chromebooks!) via Wi-Fi. Whereas Windows and MacOS support USB tethering, in which the smartphone provides Internet access to the PC or Mac at the other end of the USB cable, Chrome OS does not support tethering.
Configuring the Settings for a Wi-Fi Network Connection
Control whether the Chromebook prefers the network
Control whether the Chromebook connects automatically to the network
View the network connection details, such as the Chromebook’s MAC address
Note
The MAC address is the hardware address of the Chromebook’s Wi-Fi network interface. MAC stands for Media Access Control.
Configure network settings manually
Configure proxy settings for the connection
View the list of networks to which the Chromebook has connected
Opening the Settings for a Wi-Fi Network Connection
- 1.
Click the Wi-Fi icon on the shelf to open the status menu.
- 2.
Click the button for the current Wi-Fi network (if there is one) or the No network button. The Network status menu will open.
- 3.
Click the Network Settings icon (the gear icon) in the upper-right corner of the Network status menu. The Settings screen will appear, showing the Network section at the top.
- 4.
Click the Wi-Fi button (which shows the current network’s name) to display the Wi-Fi screen (see Figure 4-8).
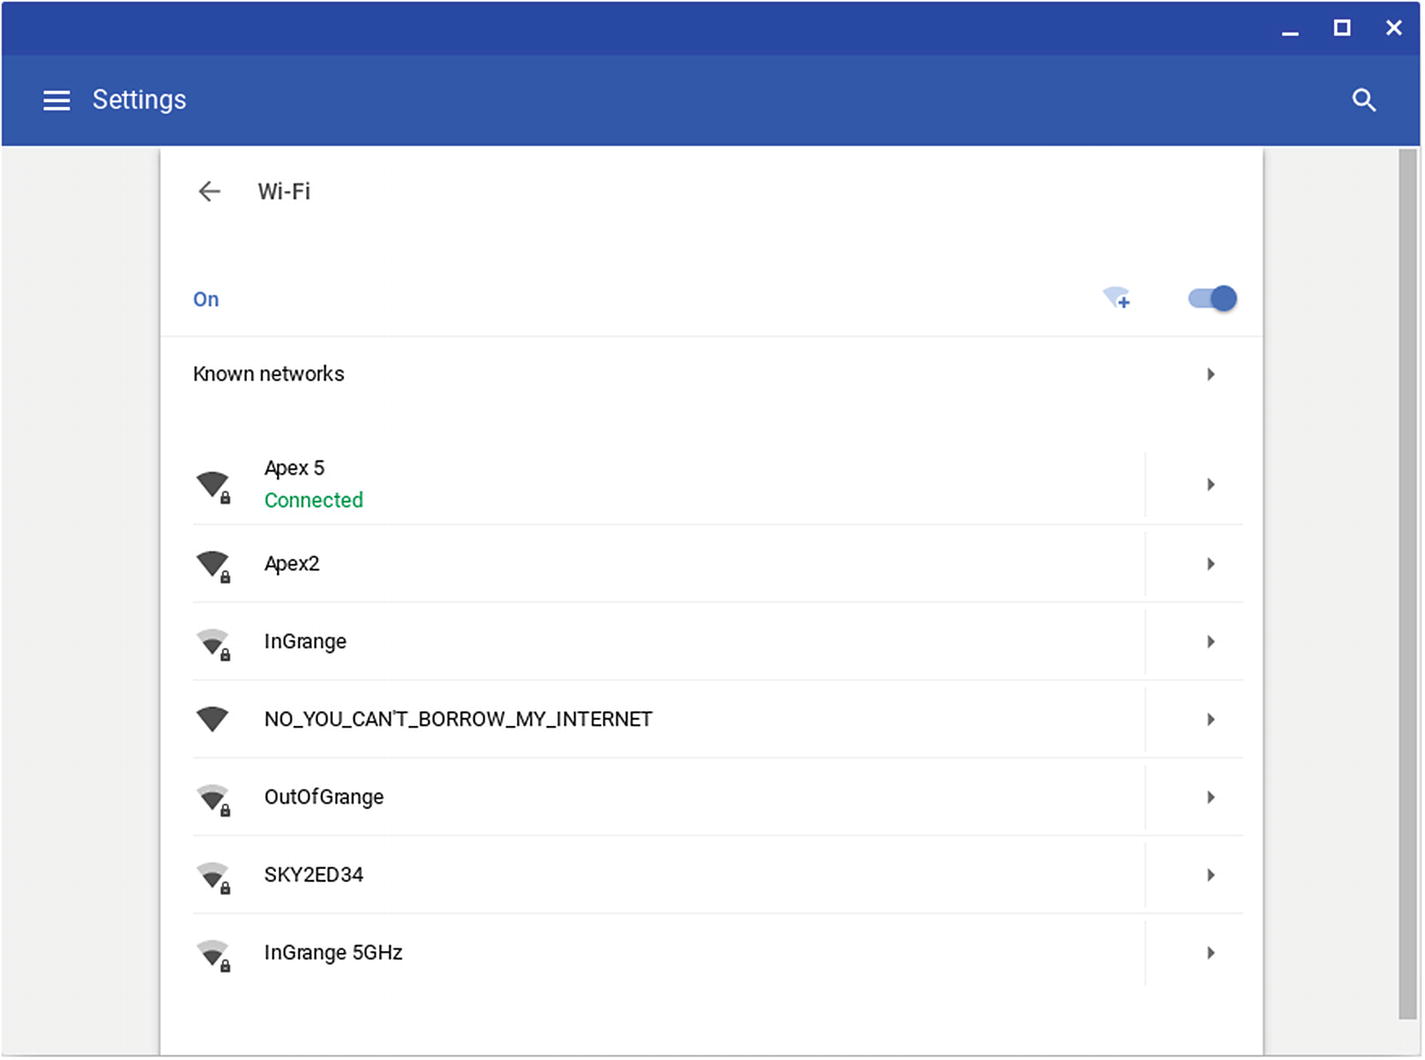
On the Wi-Fi screen, click the Wi-Fi network you want to configure
- 5.
Click the right-pointing arrow on the button for the Wi-Fi network you want to configure. The Settings screen for that network will appear (see Figure 4-9, which shows the screen for the Wi-Fi network to which the Chromebook is currently connected).
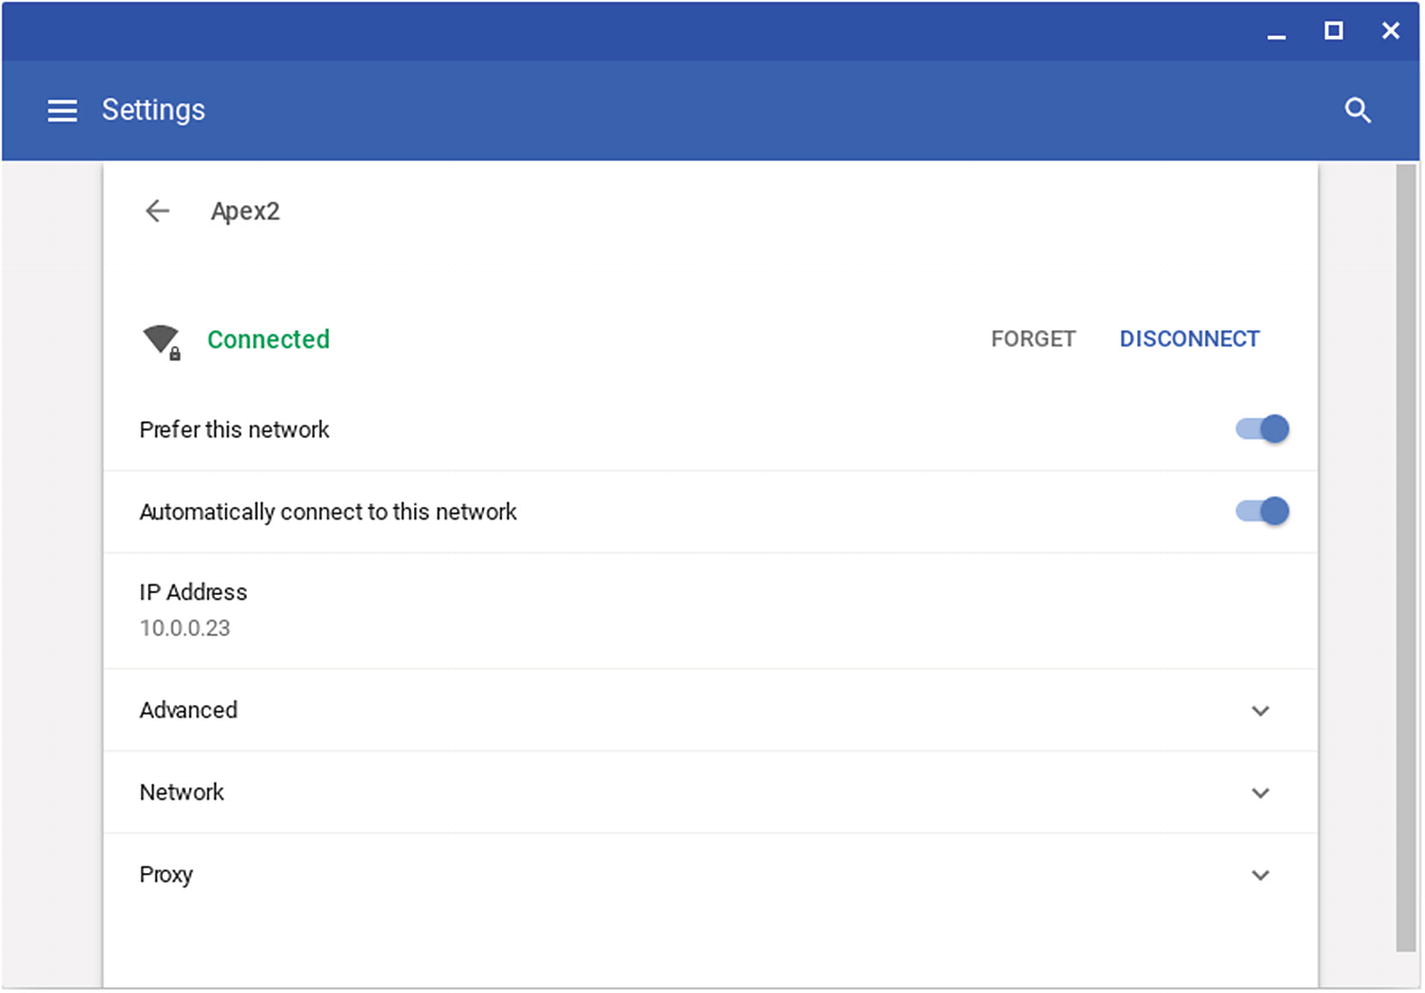
From the Settings screen for a Wi-Fi network, you can control whether the Chromebook prefers the network and whether it connects to it automatically. You can also view the connection details, set network information, and configure proxy settings.
You can now configure the Wi-Fi network as explained in the following subsections .
Note
If the Chromebook is currently connected to the Wi-Fi network whose Settings screen you are displaying, the Connected readout will appear below the network’s name. You can click the Disconnect button to the right of the Connected readout to disconnect the Chromebook from the network.
Controlling Network Preference and Automatic Connection
Prefer this network: Set this switch to On if you want the Chromebook to treat this network as a preferred network—a network to which the Chromebook will connect in preference to other networks that are not marked as preferred. You can set up multiple preferred networks on a Chromebook. We’ll look at how to do this in the section “Working with the Chromebook’s Known Networks” later in this chapter.
Automatically connect to this network: Set this switch to On if you want the Chromebook to connect automatically to this network when it is within range of the network and is not connected to another Wi-Fi network.
Viewing Network Information
When the Chromebook is connected to the Wi-Fi network, the IP Address button shows the IP address, such as 192.168.1.155 or 10.0.0.55. The IP Address button does not appear for a Wi-Fi network to which the Chromebook is not connected.
MAC address: This readout shows the Media Access Control address (MAC address) for the Chromebook’s wireless network adapter. The MAC address is an identifier burned into the device’s hardware; the address is supposed to be unique, so that it identifies only a single device, but hackers can use software and hardware tools to make a device show a different MAC address. Changing the MAC address like this is called spoofing.
SSID: This readout shows the SSID of the network—in lay terms, the network’s name.
BSSID: This readout shows the Basic SSID (BSSID) of the network. The BSSID is the MAC address of the wireless access point.
Security: This readout shows the type of security used to secure the network, such as WPA-PSK.
Signal strength: This readout shows the network’s signal strength on a scale of 1 (weakest) to 100 (strongest).
Frequency: This readout shows the frequency the network is using, such as 2412 or 5500. A frequency starting with 24 indicates that the network is using the 2.4 GHz band; a frequency starting with 5 indicates that the network is using the 5 GHz band.
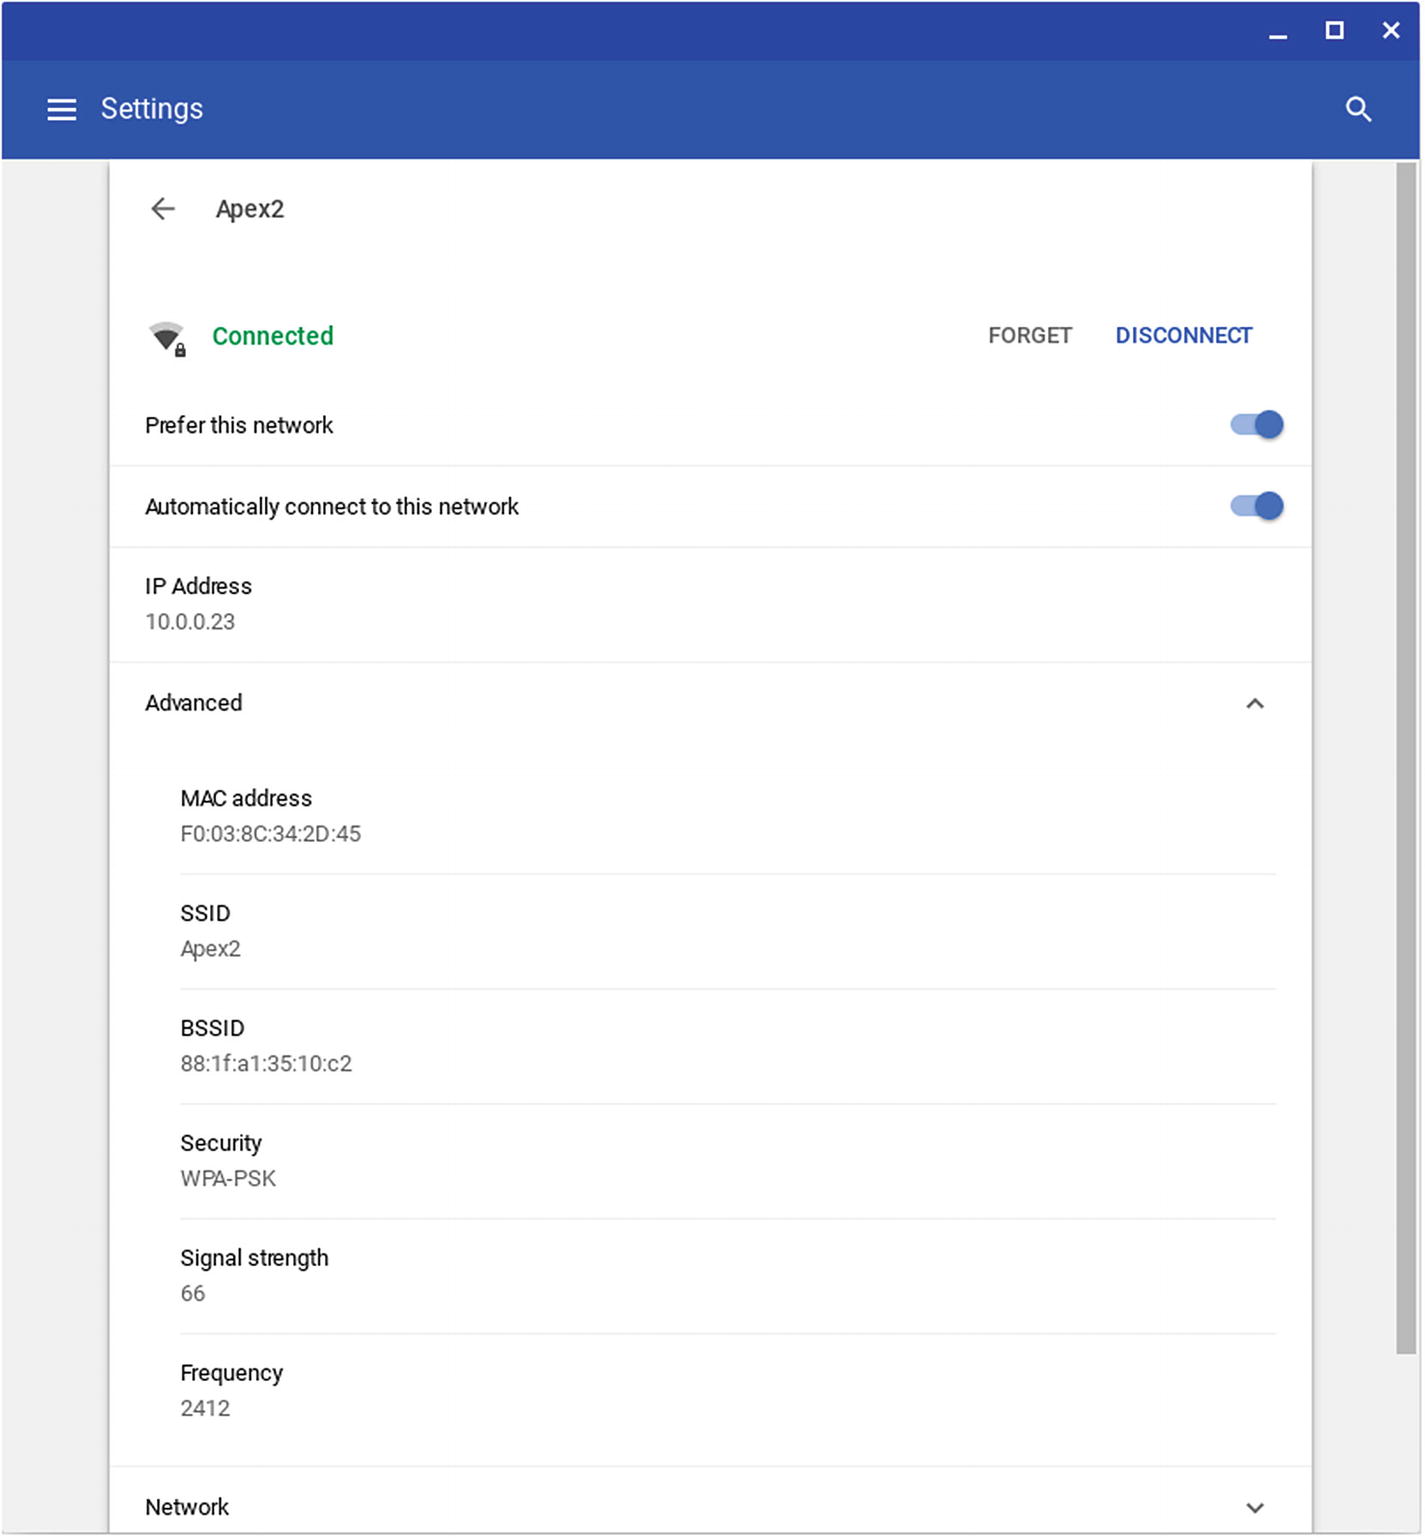
The Advanced section of the Settings screen for a Wi-Fi network shows the MAC address, the network’s SSID and BSSID, the security type, the signal strength, and the network’s frequency
Configuring Wi-Fi Network Settings Manually
By default, Chrome OS configures network settings automatically, making the Chromebook contact the network’s Dynamic Host Configuration Protocol (DHCP) server to get an IP address and other network information. Assuming your school’s network is using DHCP, you may want to stick with automatic configuration for most Chromebooks. However, if you need to ensure that some Chromebooks have specific IP addresses, you can assign them manually.
Note
If the only change you want to make to the Wi-Fi network settings is to use different name servers, leave the “Configure IP address” switch set to On and skip ahead to step 7 in the numbered list.
- 1.
After displaying the Settings screen for the appropriate Wi-Fi network, click the Network heading. The Network section will expand, showing several fields (see Figure 4-11).
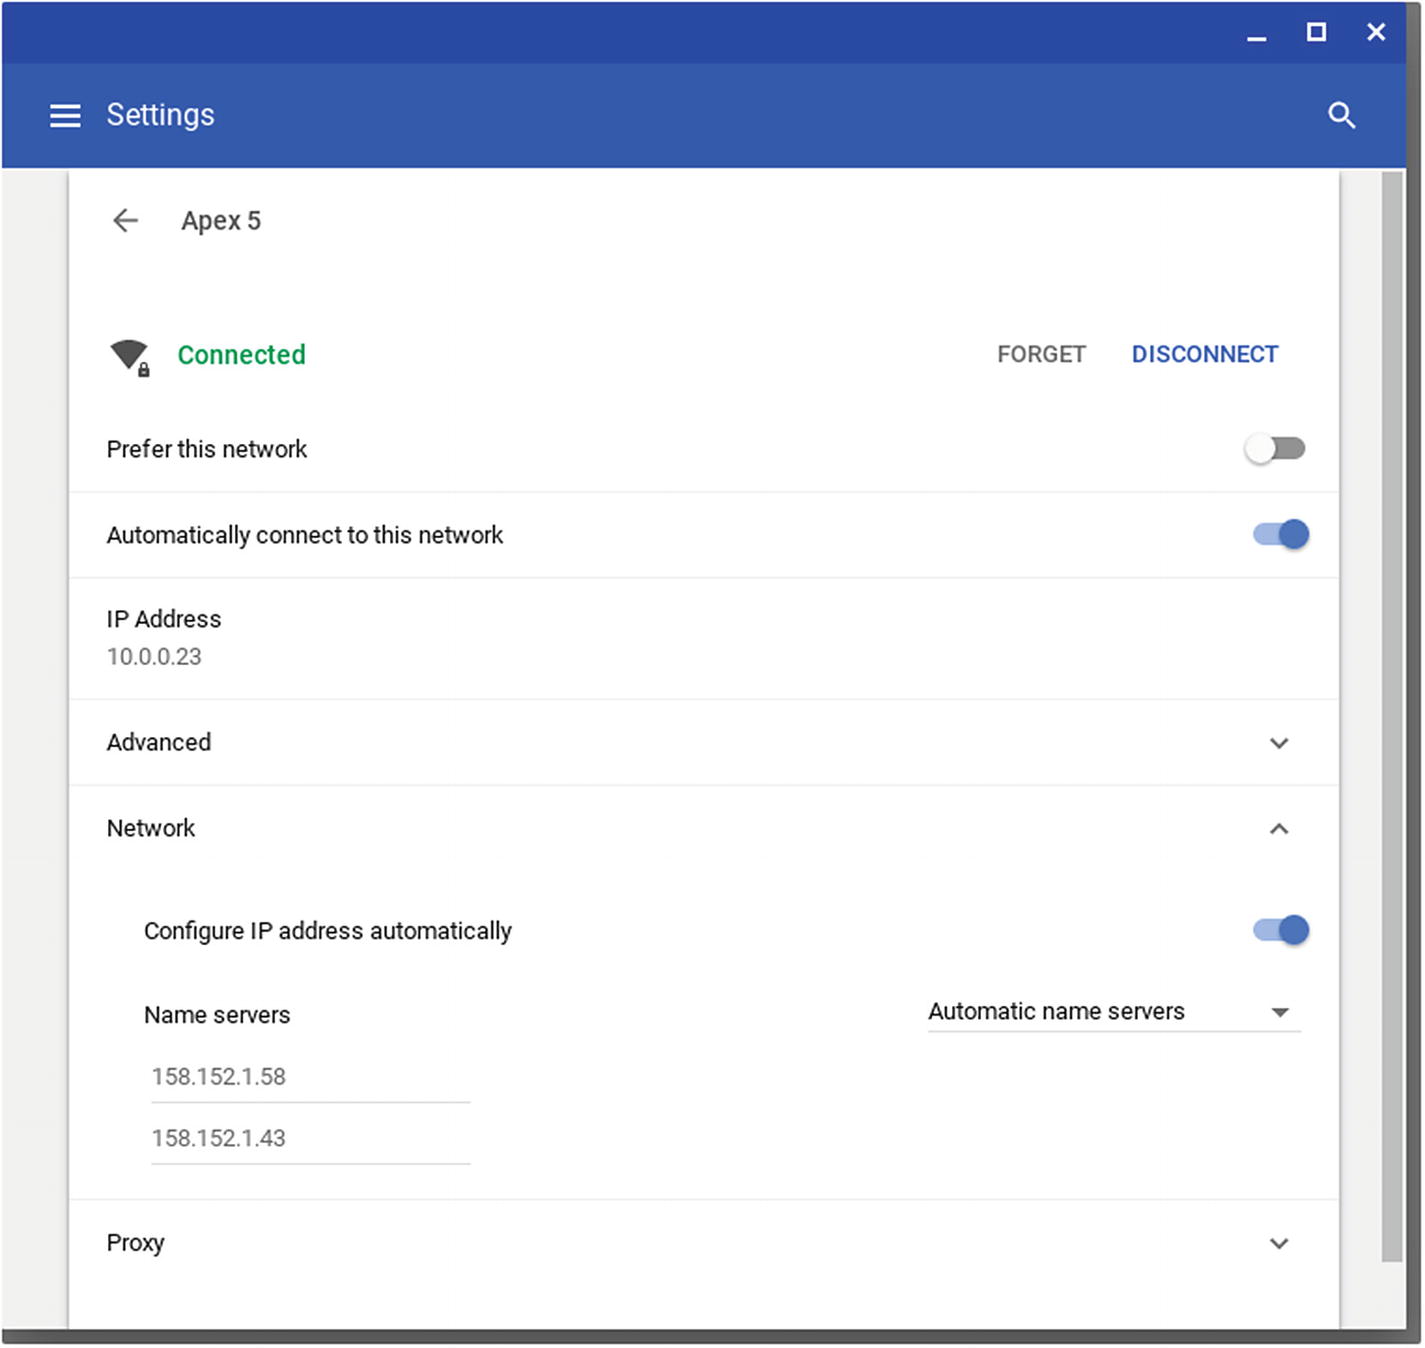
To configure network settings manually, expand the Network section of the Settings screen for the appropriate Wi-Fi network and then set the “Configure IP address automatically” switch to Off
- 2.
If the “Configure IP address automatically” switch is set to On, set it to Off . Further fields will appear (see Figure 4-12).
- 3.
Click the “IP address” field and type the static IP address you want to assign to the Chromebook, such as 192.168.1.200 or 10.0.0.99.
- 4.
Click the “Routing prefix” field and type the routing prefix (also called the subnet mask) for the network, such as 255.255.255.0.
- 5.
Click the “Gateway” field and type the IP address at which the network gateway is located.
- 6.
Click the “IPv6 address” field and type the IPv6 address, if the Chromebook needs one. Chrome OS automatically fills in this field with the IP address you set in the “IP address” field in step 3, and you do not need to change it unless the Chromebook needs an IPv6 address .
- 7.
In the Name servers section, click the pop-up menu on the right and choose which name servers (DNS servers) the connection should use:
Automatic name servers: Select this item to use the name servers specified by the DHCP server.
Google name servers: Select this item to use Google’s public name servers, 8.8.4.4 and 8.8.8.8.
Custom name servers: Select this item to specify the name servers yourself by typing their hostnames or IP addresses in the fields on the left. The upper field is for the primary name server, and the lower field is for the secondary name server.
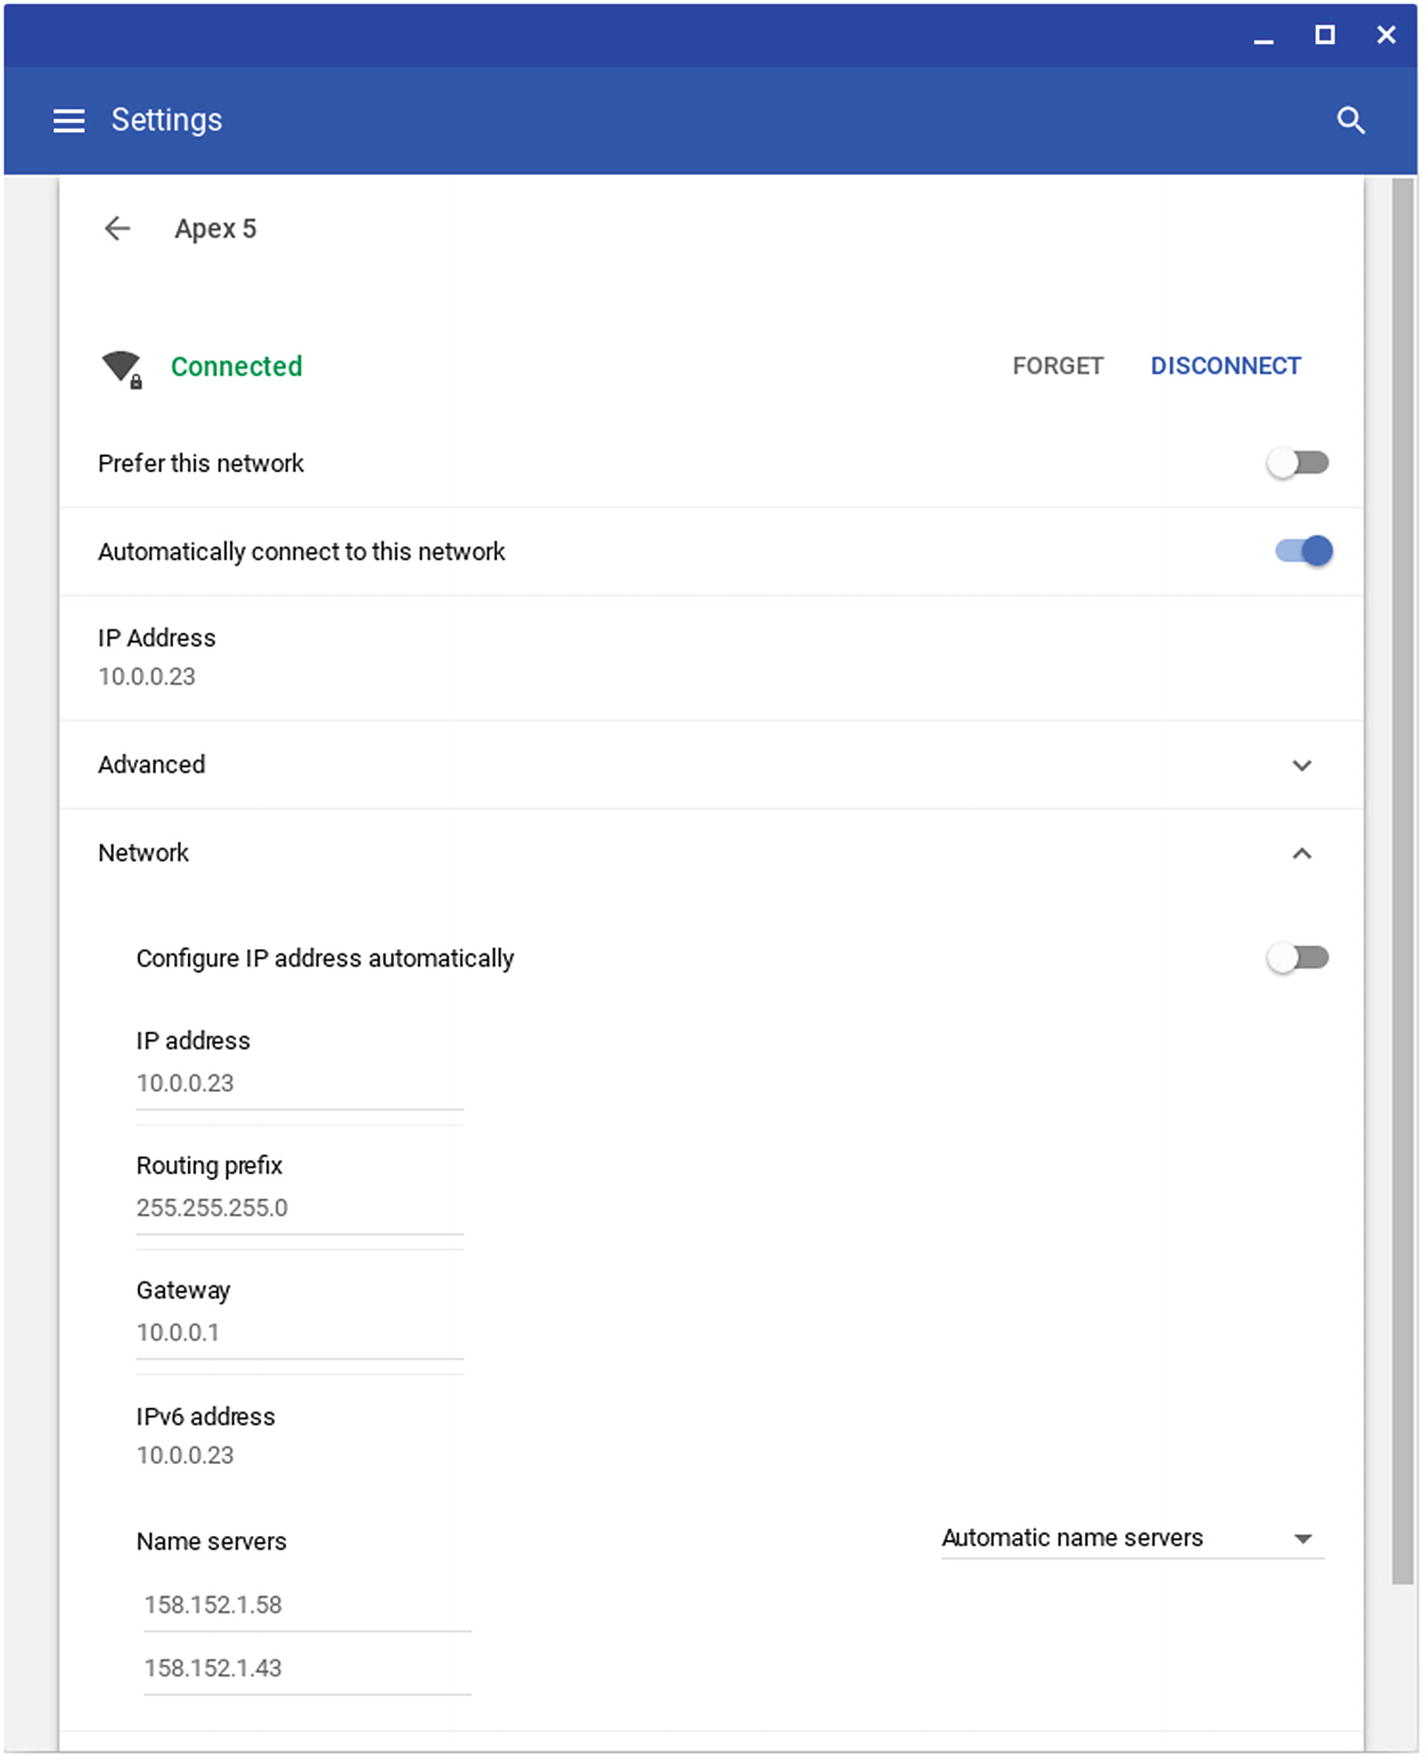
After setting the “Configure IP address automatically” switch to Off, you can set the IP address, the routing prefix, the gateway, the IPv6 address , and the name servers
Configuring Proxy Settings
A proxy server is a server that receives requests from network clients, such as the Chromebooks on your school’s network. The proxy server evaluates each request and either fulfills it or denies it, depending on the policies with which it is configured. If the request is permitted, and the proxy server contains the required data in its cache, it returns the data from its cache, providing the client with data quickly and reducing the amount of data transferred across the Internet connection. If the request is permitted, but the proxy server’s cache does not contain the required data, the server redirects the request to the appropriate destination (such as an Internet website) and then returns the resulting data to the client.
Depending on how your school’s network is configured, the Chromebooks may automatically connect to the Internet through the proxy server. You can also configure proxy settings manually, which enables you to use different proxy servers for different protocols if necessary. For example, you might need to use a different proxy server for FTP than you use for HTTP.
If you need to configure proxy settings , click the Proxy heading at the bottom of the Settings screen for the appropriate Wi-Fi network. The Proxy section will expand, at first showing just the Connection Type pop-up menu.
Direct Internet connection: Click this item to have the Chromebook connect directly to the Internet without going through a proxy server.
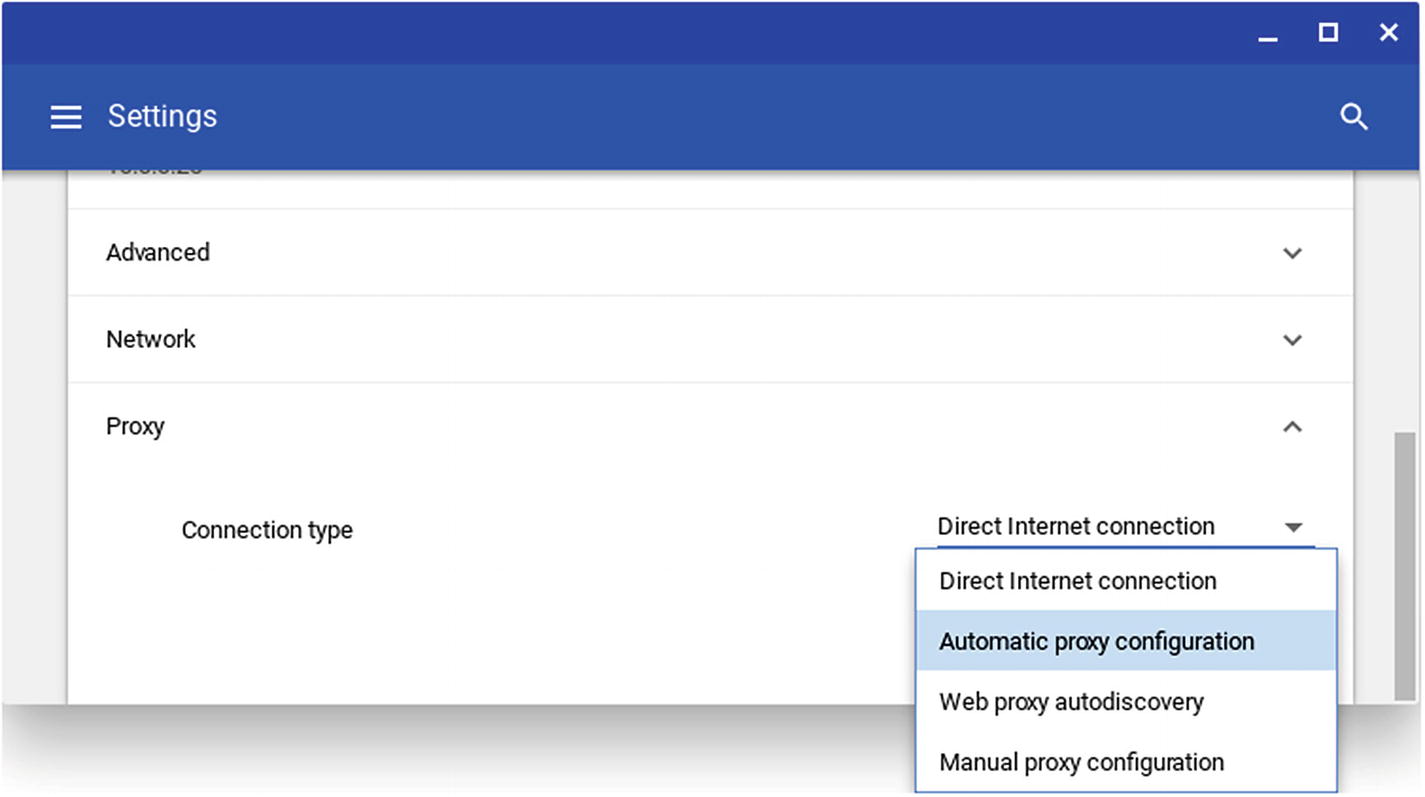
In the Proxy section of the Settings screen for a Wi-Fi network connection, click the Connection type pop-up menu and then click the appropriate connection type
Automatic proxy configuration: Click this item to have the Chromebook automatically detect the network’s proxy server and apply suitable proxy settings. In the “Autoconfiguration URL” field that appears, type or paste the URL at which the Chromebook should look for the proxy server.
Web proxy autodiscovery: Click this item to have the Chromebook use the Web Proxy Auto-Discovery Protocol (WPAD for short) to detect and configure proxy settings. In the “Web Proxy Auto Discovery URL” field that appears, type or paste the URL at which the Chromebook will find the WPAD settings.
Manual proxy configuration: Click this item if you want to enter the proxy settings manually, and then follow the instructions in the next bulleted item. Normally, you’d want to enter proxy settings manually only for Chromebooks that have special needs; for most of your school’s Chromebooks, either automatic proxy configuration or Web Proxy Auto-Discovery is a better bet.
Use the same proxy for all protocols: Leave this switch set to On (as it is by default) unless you need to make the Chromebook use different proxy servers for different protocols. To use different proxy servers, set this switch to Off and then enter the details of the proxy servers and ports on the HTTP Proxy row, the Secure HTTP Proxy row, the FTP Proxy row, and the SOCKS Host row (see Figure 4-15).

After choosing the Manual proxy configuration item, you can set the proxy, specify the port, and add any proxy exceptions
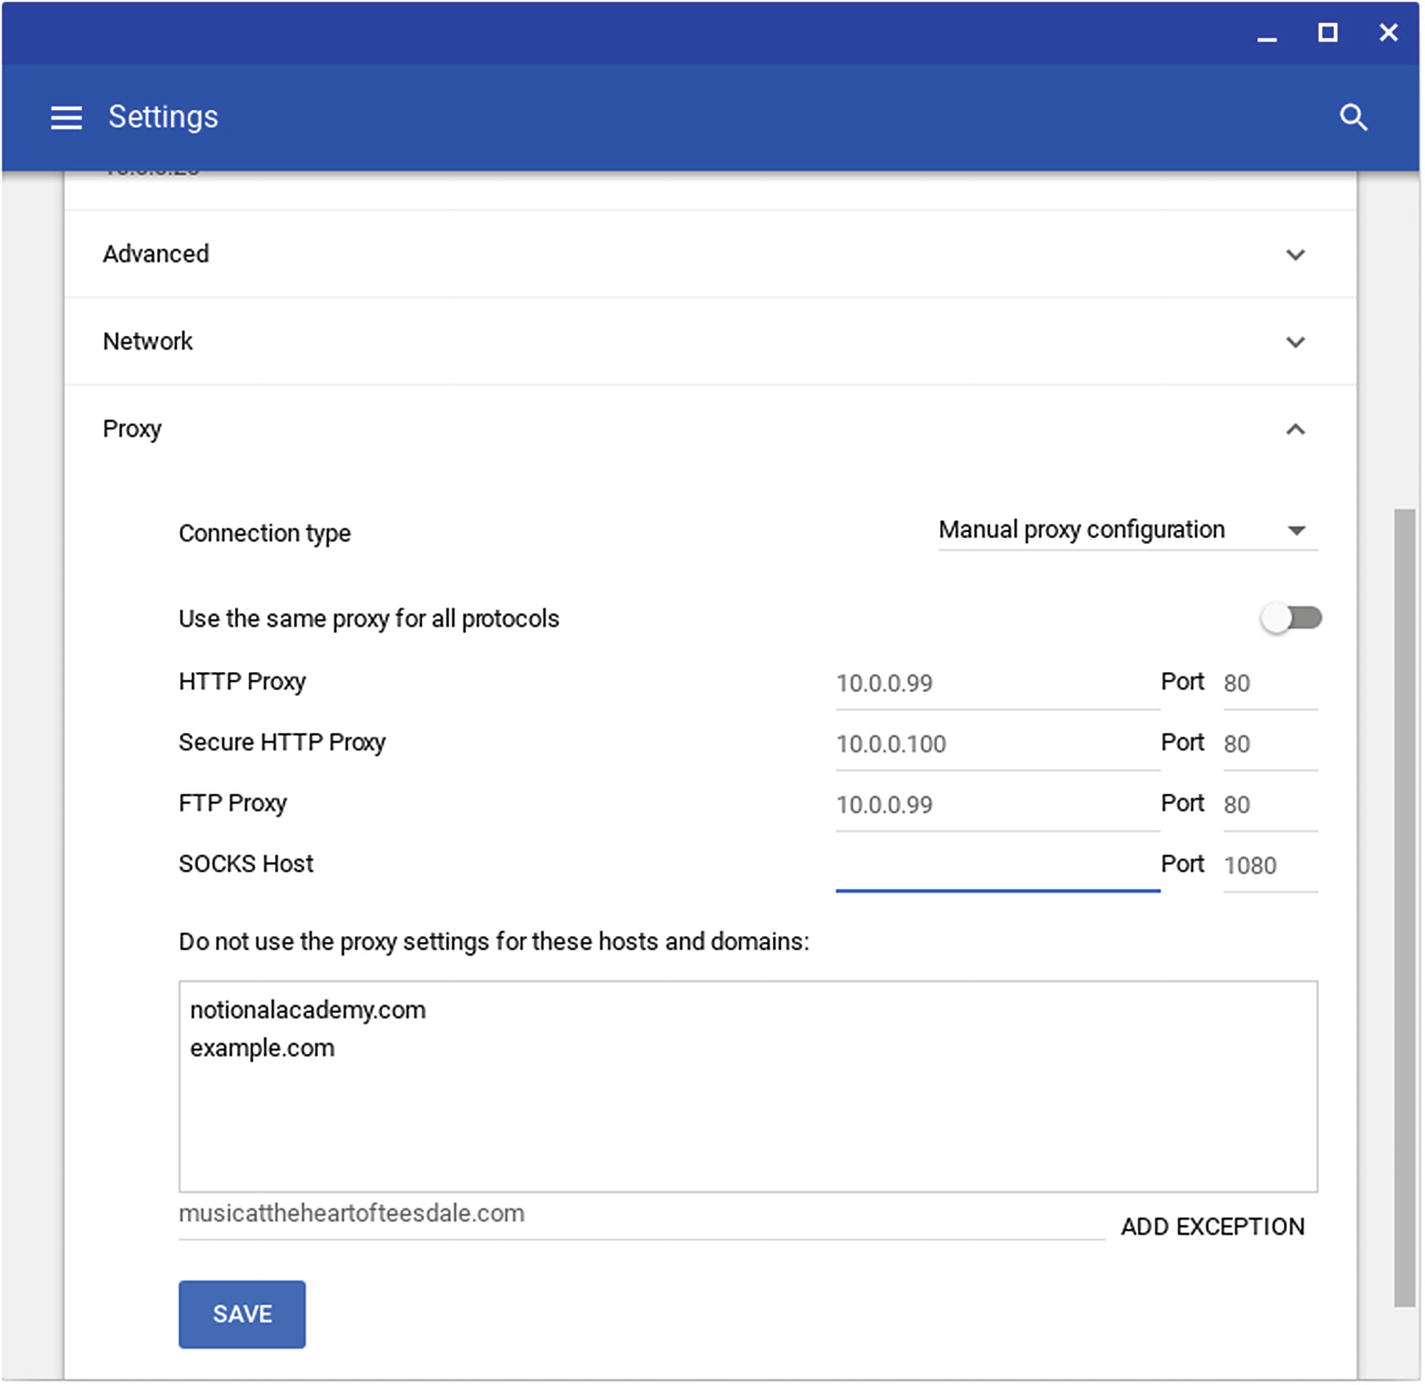
To use different proxying for different protocols, set the “Use the same proxy for all protocols” switch to Off and then set the proxying details for the HTTP Proxy, Secure HTTP Proxy, FTP Proxy, and SOCKS Host rows
Proxy: Click this box and type the hostname or IP address of the proxy server .
Port: Click this box and type the port for the proxy server.
Do not use the proxy settings for these hosts and domains: In this box, create a list of any hosts or domains to which the Chromebook should connect directly rather than using the proxy service. Click the field to the left of the Add Exception button, type the hostname or domain name, and then click the Add Exception button to add it to the list.
When you finish specifying the details of the proxying, click the Save button to save the changes.
Working with the Chromebook’s Known Networks
Chrome OS maintains a list of the Wi-Fi networks to which you have previously connected the Chromebook. These networks are called known networks; you can view them and work with them on the Known Networks screen.
- 1.
Click the status area at the right end of the shelf to open the status menu.
- 2.
Click the Settings icon to display the Settings window.
- 3.
Click the right-arrow on the right side of the Wi-Fi button to display the Wi-Fi screen.
- 4.
Click the Known networks button. The Known Networks screen will appear (see Figure 4-16).
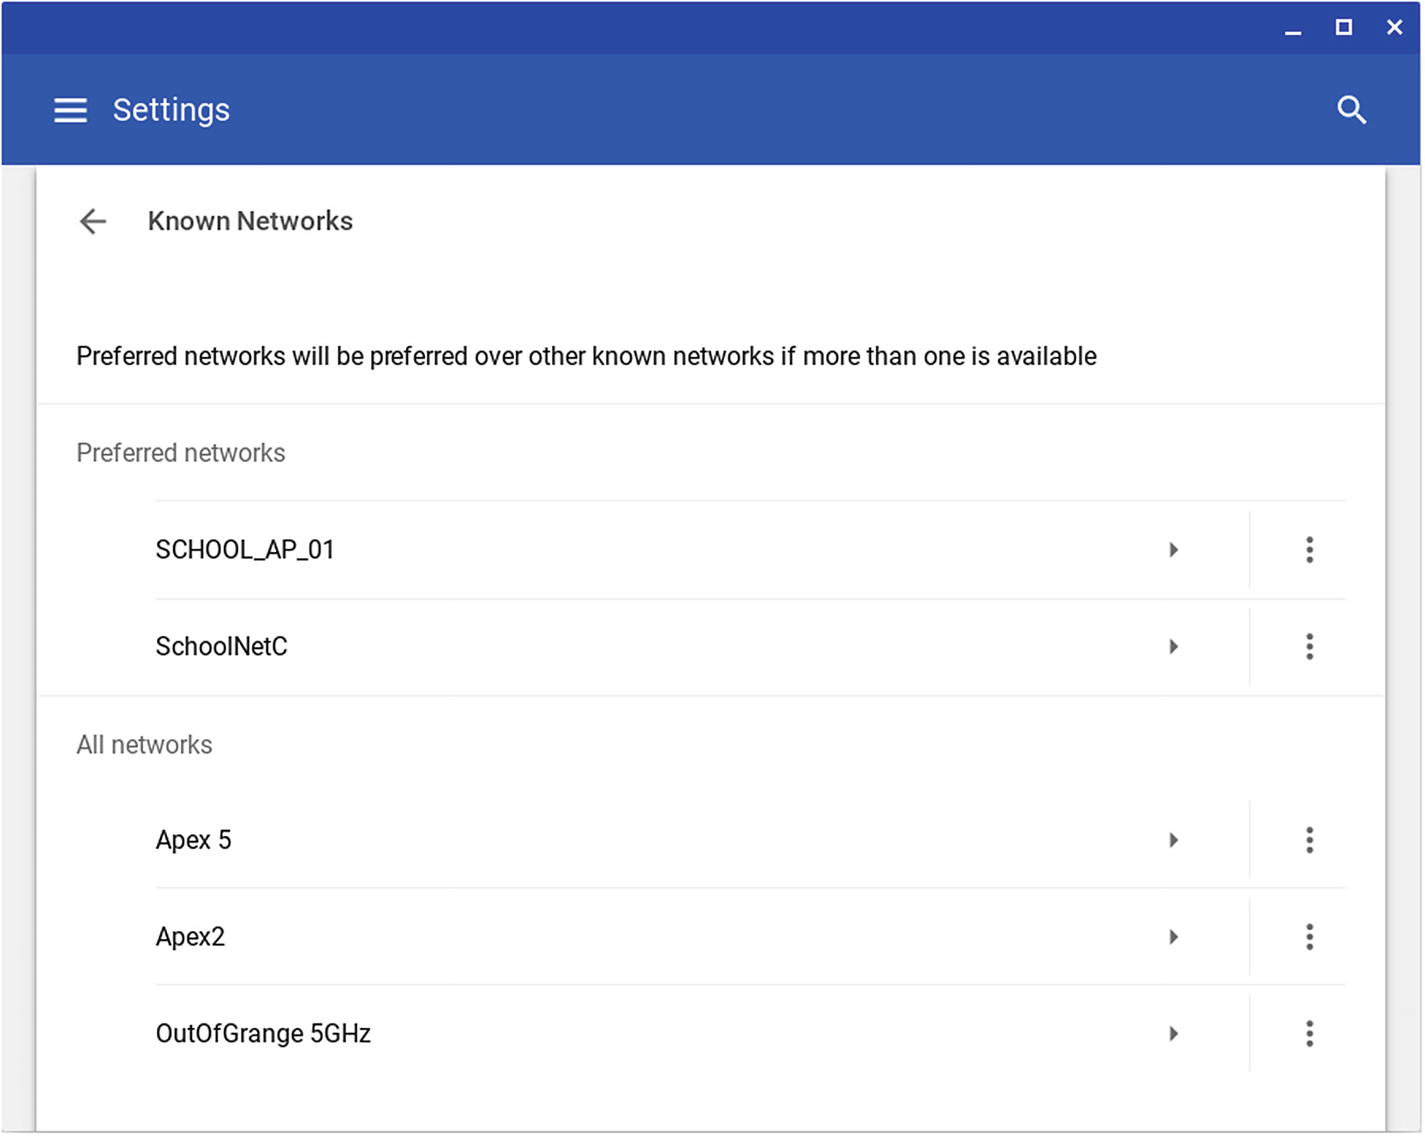
On the Known Networks screen, you can set your preferred networks or forget networks you no longer want to use
Add a network to the Preferred networks list: Click the network’s More Actions button (the three vertical dots) in the All networks list and then click the Add to preferred item on the menu.
Remove a network from the Preferred networks list: Click the network’s More Actions button in the Preferred networks list and then click the Remove from preferred item on the menu.
Forget a network: Click the network’s More Actions button and then click the Forget item on the menu.
Note
As of this writing, you cannot set the order of the networks in the Preferred networks list.
Removing a Wi-Fi Network
When you no longer want a Chromebook to use a Wi-Fi network that’s configured on it, you can remove the network by telling Chrome OS to forget the network.
To forget the network, go to the Wi-Fi screen in the Settings app. Next, go to the network’s screen by clicking the right-arrow on the network’s button. Then click the Forget button. Chrome OS will forget the network immediately with no confirmation.
Configuring People and Sync Settings
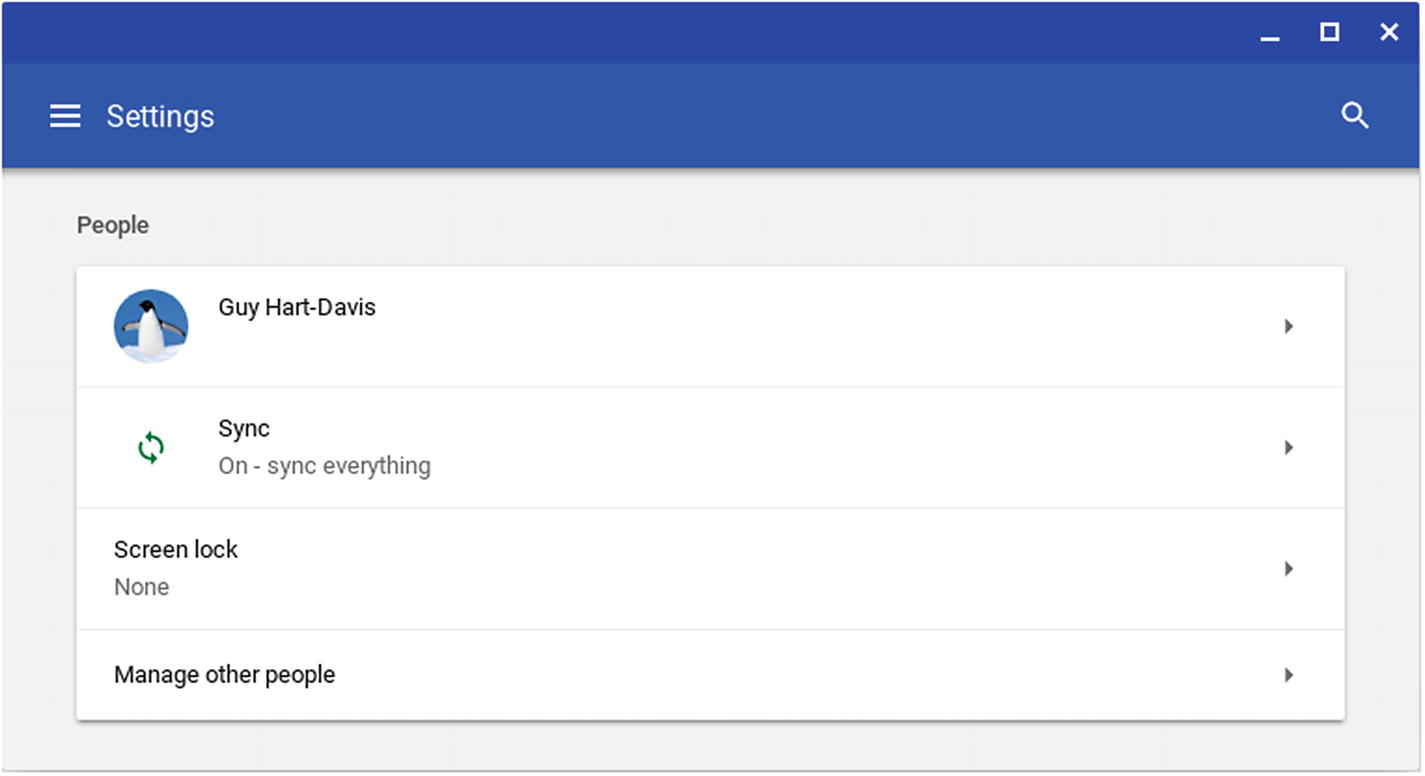
From the People section of the Settings window, you can change the picture for the current account, configure sync settings, set up a screen lock, and start managing other people
Change the picture: Click the current picture or username to display the Change picture screen; then click the picture you want to apply.
- Configure sync settings: Click the Sync button to display the Advanced sync settings screen (see Figure 4-18). You can then either set the “Sync everything” switch to On to sync all the items or set the individual switches for the following items to On or Off, as needed:
Apps: Set this switch to On to sync apps across devices running Chrome.
Autofill: Set this switch to On to sync Autofill data for forms.
Bookmarks: Set this switch to On to sync bookmarks and bookmark folders.
Extensions: Set this switch to On to sync Chrome extensions.
History: Set this switch to On to sync the browsing history.
Passwords: Set this switch to On to sync saved passwords for sites.
Settings: Set this switch to On to sync Chrome settings.
Themes & Wallpapers: Set this switch to On to sync the themes and wallpapers applied to the Chromebook.
Open Tabs: Set this switch to On to sync the list of open tabs , enabling you to pick up browsing immediately on a different device running Chrome.
Credit cards and addresses using Google Payments: Set this switch to On to sync credit card and address information you have saved.
Personalize Google services: Click this button to open a Chrome window to the Activity Controls screen for your Google account. Here, you can set the “Web & App Activity” switch to On if you want to save your search activity or to Off if you do not. You can also check or uncheck the “Include Chrome browsing history and activity from websites and apps that use Google services” check box, as needed.
Manage synced data: Click this button to open a Chrome window to the Data from Chrome sync screen for your Google account. Here, you can see how many of the synced items there are—how many apps, how many extensions, how many passwords, and so on. You can also click the Reset Sync button if you need to clear the data from the server; the data will remain on your devices, and you can sync it again if you so choose.
Encryption options: In this area, select the “Encrypt synced passwords with your Google username and password” option if you want to encrypt just your passwords . Doing so provides a moderate level of security. For greater security, select the “Encrypt synced data with your own sync passphrase” option, type the passphrase in the “Password” field and the “Confirm Password” field, and then click the Save button.

On the Advanced sync settings screen, you can choose between syncing all items and syncing only specific items; visit pages for personalizing Google services and managing your synced data; and choose between different methods of encrypting your Chrome data
Setting Up a Screen Lock
- 1.
Click the Screen lock button in the People section of the Settings window. The Confirm your password dialog box will open.
- 2.
Type your password in the “Password” field.
- 3.
Click the Confirm button. The Screen lock screen will appear (see Figure 4-19).
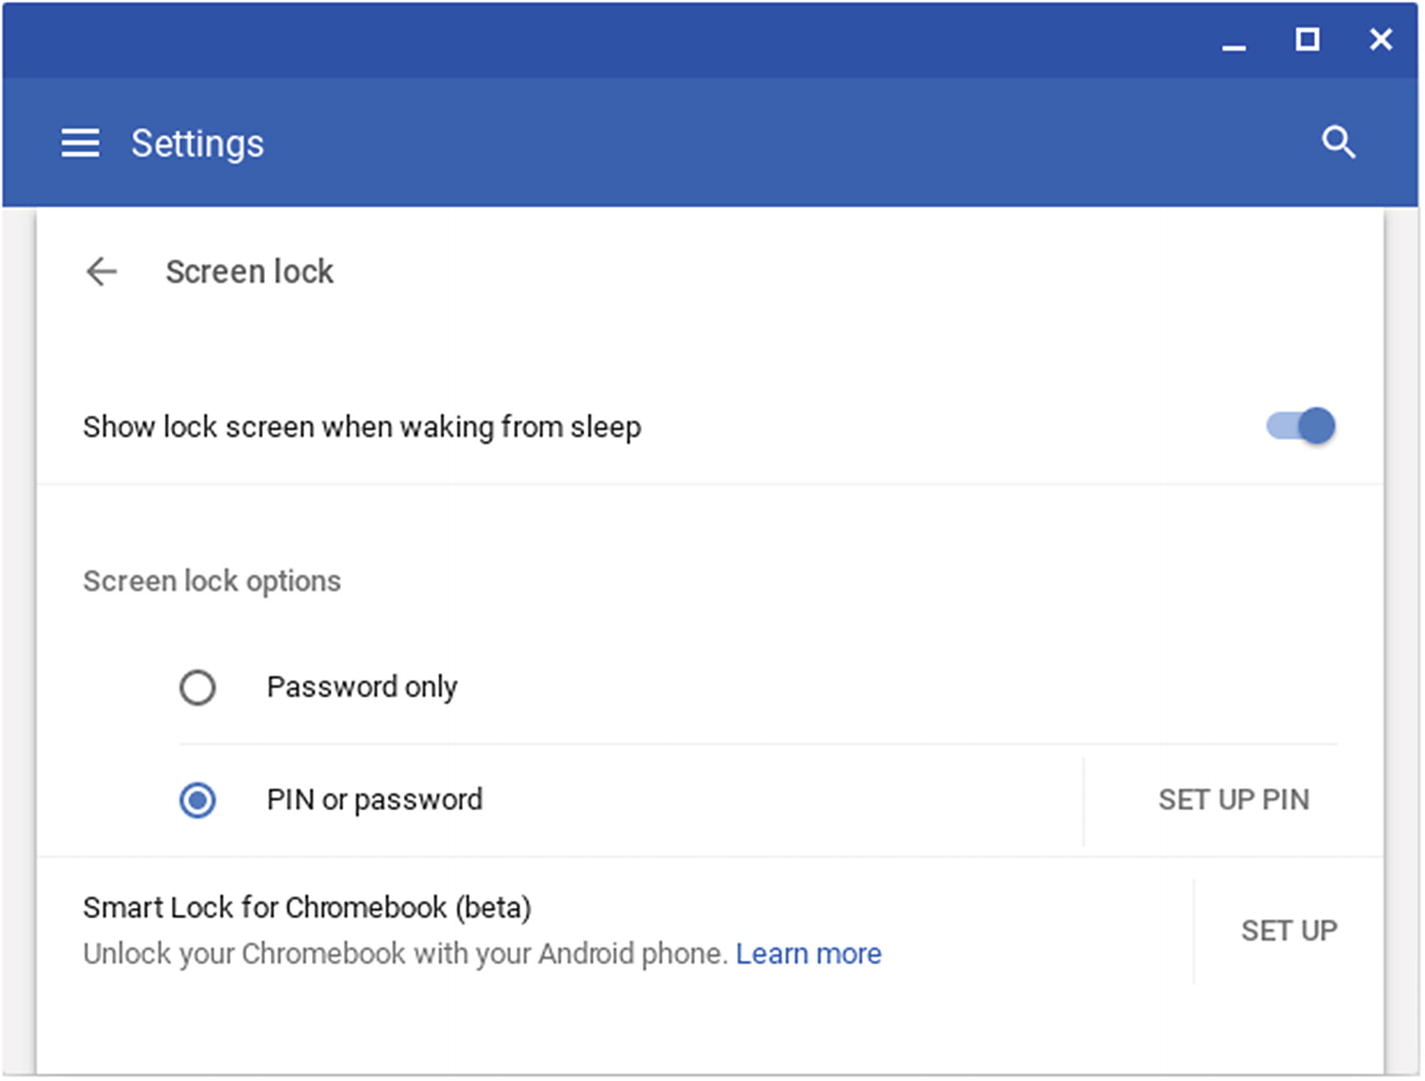
On the Screen lock screen, set the “Show lock screen when waking from sleep” switch to On to protect the Chromebook during sleep and then choose between using only a password and using either a PIN or a password
- 4.
Set the “Show lock screen when waking from sleep” switch to On for greater security. When this switch is set to Off, anyone who wakes the Chromebook from sleep can start using it without having to provide the password or PIN.
- 5.
In the Screen lock options area, select the “Password only” button or the “PIN or password” option. If you select the latter, click the Set Up PIN button, create the pin in the Enter your PIN dialog box that opens, and then click the Continue button. Re-enter the PIN in the Confirm your PIN dialog box, which opens next, and then click the Confirm button.
Note
Another option is to use your Android phone to unlock a Chromebook. This feature looks promising but is in beta at this writing. To explore this feature, click the Set Up button to the right of the Smart Lock for Chromebook button on the Screen lock screen.
Managing Other People
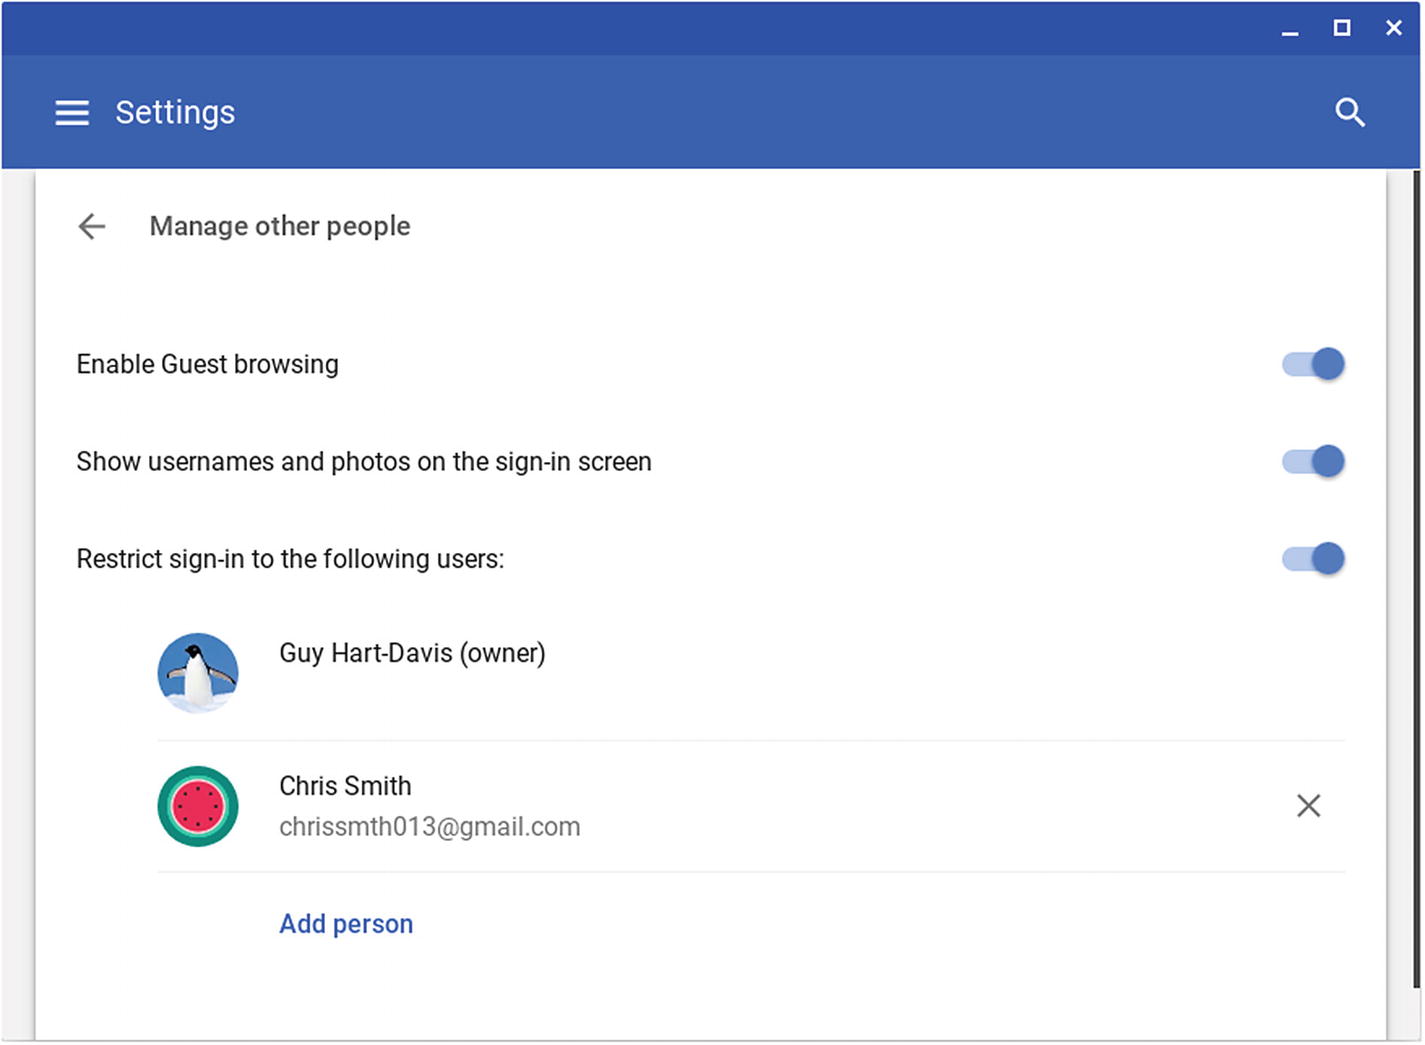
On the Manage other people screen, you can enable or disable Guest browsing, control whether usernames and photos appear on the sign-in screen, and restrict sign-in to specific users
Enable Guest browsing: Set this switch to On to allow people to use the Guest account on the Chromebook. The Guest account enables the user to browse only, not to create files. Chrome OS wipes the Guest account clean when the guest user ends the session.
Enable supervised users: If this switch appears, set it to On to enable supervised users. As the Chromebook’s owner, you can monitor what supervised users do on the Chromebook.
Show usernames and photos on the sign-in screen: Set this switch to On to have the sign-in screen show a list of usernames and photos, enabling users to start the sign-in process by clicking the appropriate username or photo. Set this switch to Off if you want the user to have to type in his or her username to log in. Setting this switch to Off is better for security, as it reduces the chance of an attacker’s being able to guess a password from a username; you may also find it better for Chromebooks that are set up with more user accounts than fit easily on the sign-in screen.
Restrict sign-in to the following users: If you need only some users to be able to sign in to the Chromebook, set this switch to On. You can then click the X (remove) button on the right of any existing user you want to remove from the list. To add a user, click the Add person button, type the user’s email address in the Add person dialog, and then click the Add button.
Configuring Appearance Settings
Wallpaper: Click this button to launch the Wallpaper app (see Figure 4-22). You can then click the appropriate tab at the top—All, Landscape, Urban, Colors, Nature, or Custom—to display all the wallpapers or just a particular category. Once you find the wallpaper you want, click its thumbnail to apply it, and then click the Close (X) button to close the Wallpapers app.
Note
Here are three other things you should know about setting wallpaper. First, if you want to have Chrome OS select a wallpaper for you, check the “Surprise Me” check box in the lower-right corner of the Wallpapers window. Second, you can add your own photos to the Custom tab of the Wallpapers window by clicking the Add (+) button. And third, you can also set the wallpaper by right-clicking an image file in the Files app and then clicking the Set wallpaper item on the shortcut menu.
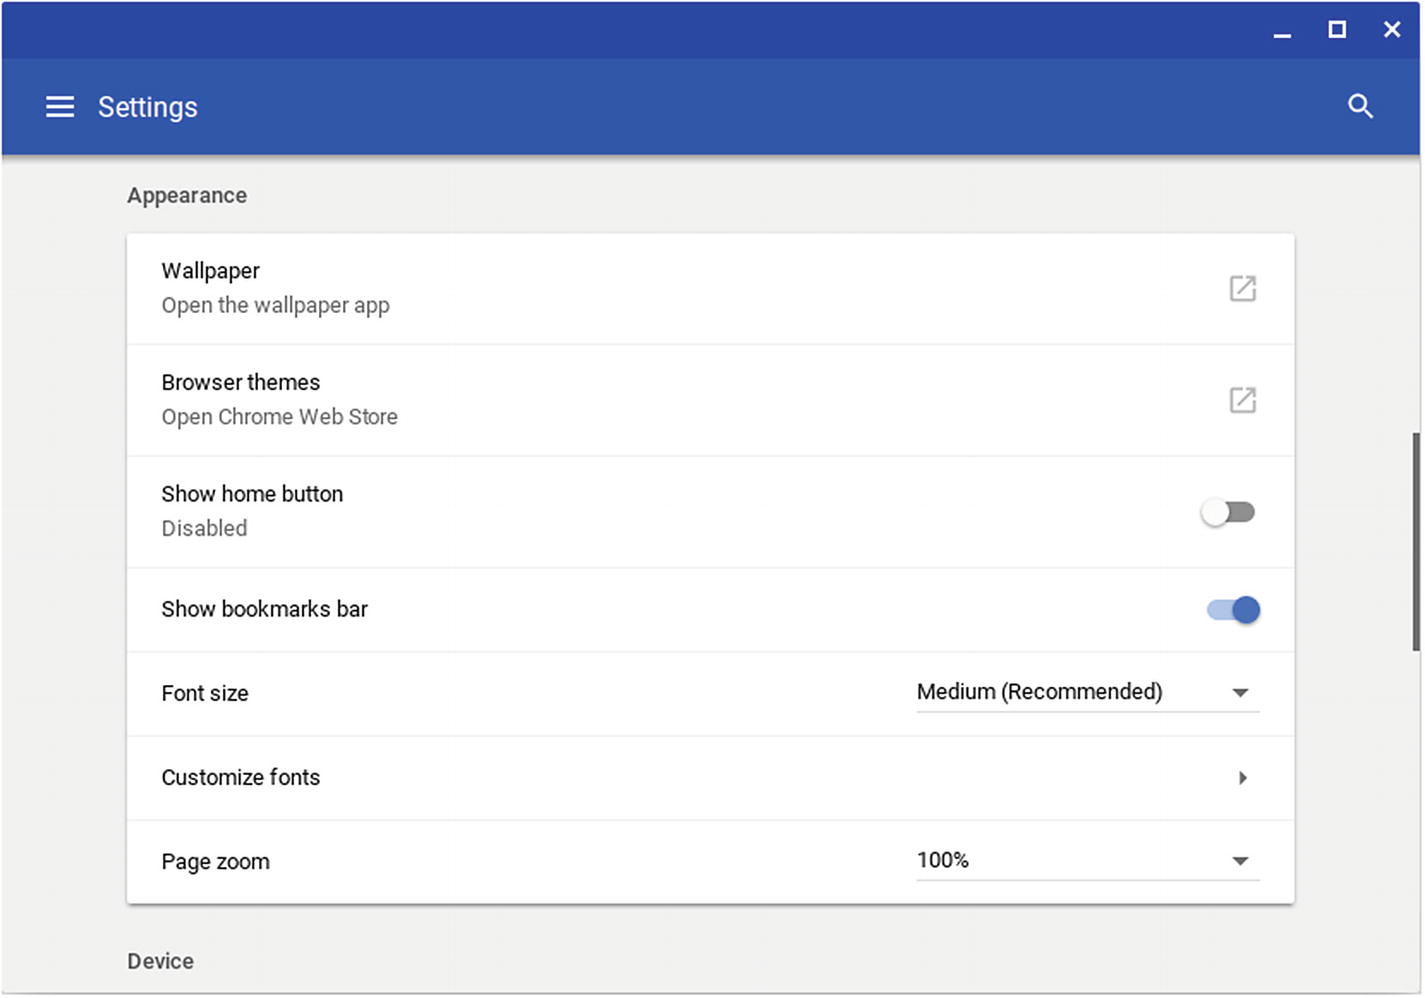
From the Appearance section of the Settings window, you can change the wallpaper, apply browser themes, control the display of the home button and the bookmarks bar, customize the fonts, and set the page-zoom percentage
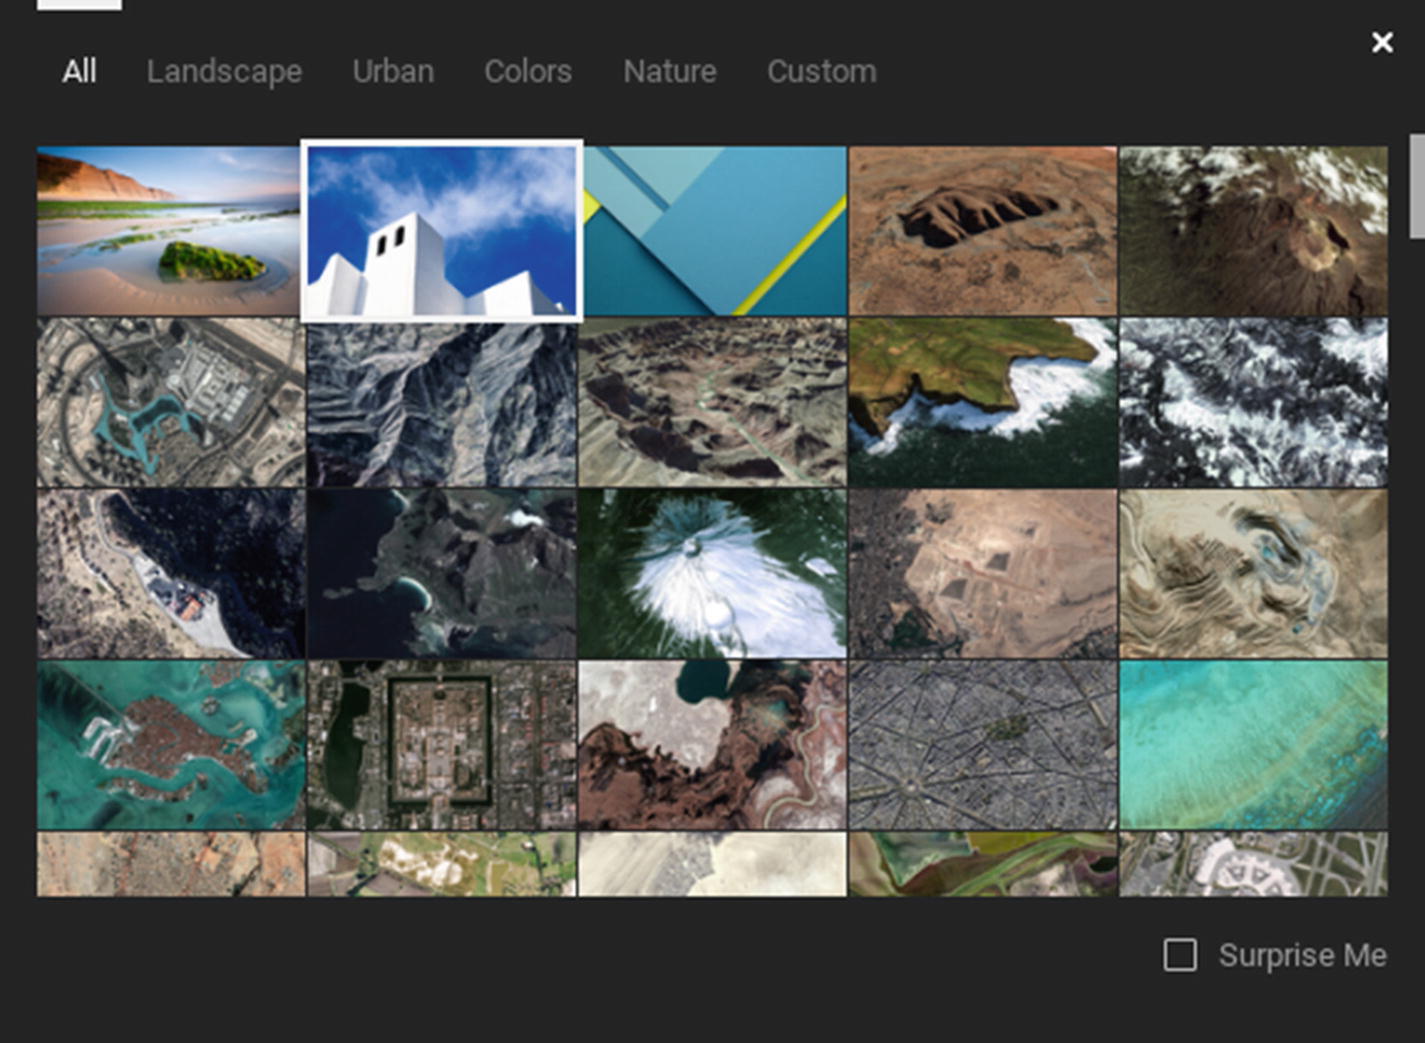
Use the Wallpapers app to apply one of the wallpapers built in to Chrome OS to the desktop. You can check the “Surprise Me” check box to have Chrome OS select a wallpaper. You can also add your own wallpapers using the controls on the Custom tab.
Browser themes: Click this button to open a Chrome tab to the Themes category in the Chrome Web Store, where you can browse the themes that are available. A theme is a coordinated look for the Chrome OS user interface.) Some themes are free, but others you must pay for.
Show home button: Set this switch to On to make the Chrome browser display a Home button to the right of the Reload button on the toolbar. When you set this switch to On, two option buttons will appear below the “Show home button” line in the Appearance section. To make clicking the Home button display a new tab, select the “New Tab page” option. To make clicking the Home button display a specific web page, select the other option button (which has no name) and type the web page’s URL in the text field.
Show bookmarks bar: Set this switch to On if you want the Chrome browser to display the bookmarks bar . Set this switch to Off to hide the bookmarks bar.
Font size: In this pop-up menu, select the font size for the Chrome browser to use: Very small, Small, Medium (Recommended), Large, or Very large.
- Customize fonts: Click this button to display the Customize fonts window (see Figure 4-23). Here, you can choose the following settings:
Font size: Drag the slider along the Tiny–Huge axis to set the standard font size.
Minimum font size: Drag the slider along the Tiny–Huge axis to set the minimum font size.
Standard font: In this pop-up menu, choose the standard display font.
Serif font: In this pop-up menu, choose the font for text marked to be displayed using a serif font. (Serifs are the little flick marks at the end of letters in fonts such as Times New Roman.)
Sans-serif font: In this pop-up menu, choose the font for text marked to be displayed using a sans-serif font (one without serifs).
Fixed-width font: In this pop-up menu, choose the font for text marked to be displayed in a fixed-width (monospace) font.
Advanced font settings: If you need to be able to customize font settings for different scripts (for example, setting different fonts for Japanese or for Hebrew), click this button. Chrome OS will open a tab to the Advanced Font Settings extension in the Chrome Web Store. Click the Add to Chrome button to start adding the extension and then click the Add extension button in the Add “Advanced Font Settings”? dialog box that opens. After adding the extension, click the Advanced font settings button in the Customize fonts window. This will open a Chrome tab showing the controls for the Advanced Font Settings extension, which you can then use to customize the font settings on a per-script basis.
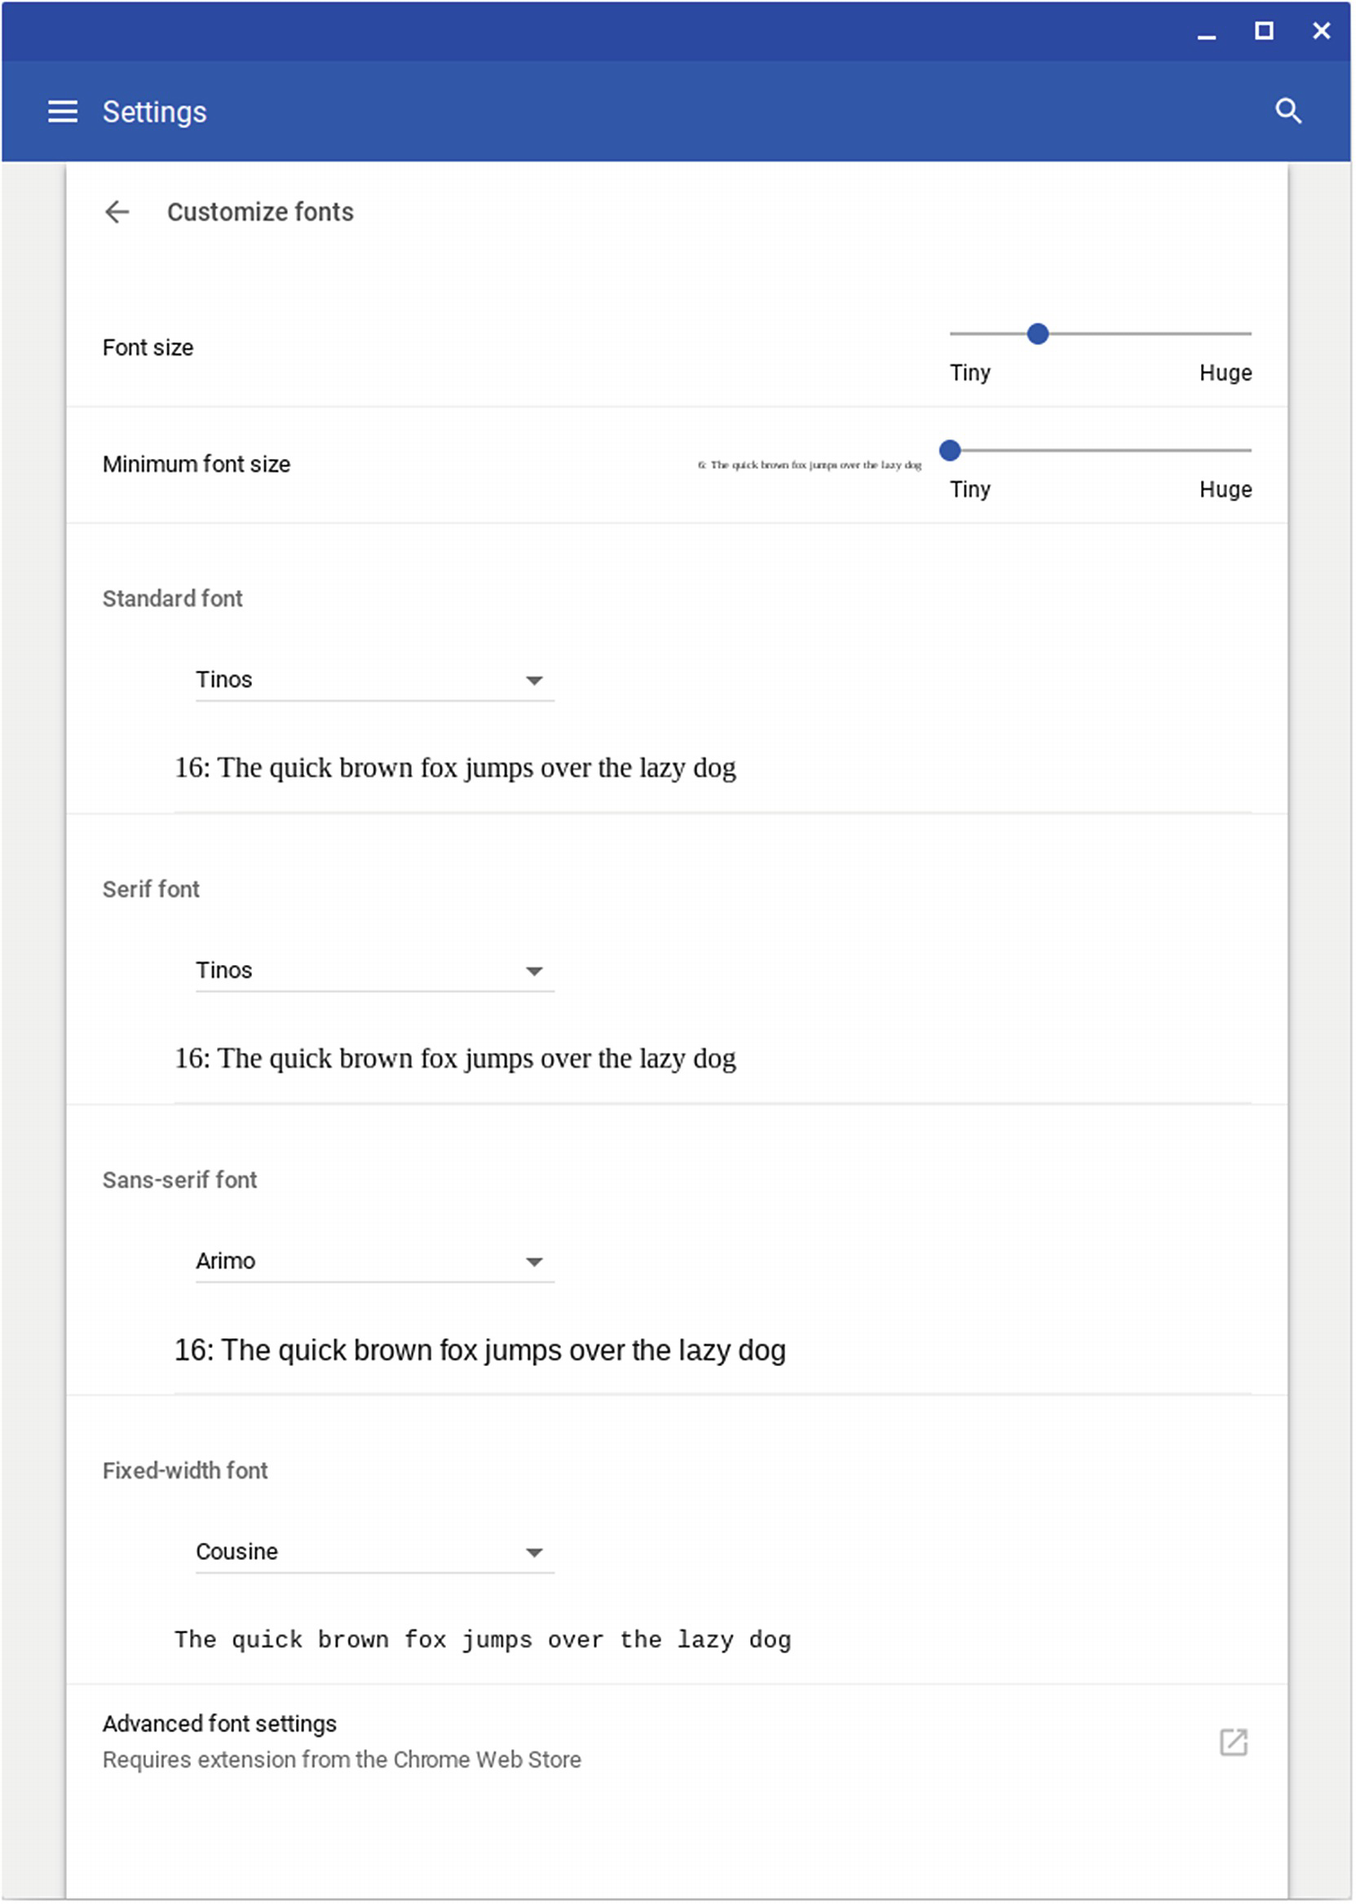
The Customize fonts window enables you to set the default font size, the minimum font size, and the standard, serif, sans-serif, and fixed-width fonts
Page zoom: In this pop-up menu , choose the zoom percentage to apply to the screen. Your choices range from 25% to 500%; the default setting is 100%.
Note
Increasing the page zoom can be a big help in making text readable on small screens or high-resolution screens. The disadvantage, as you would expect, is that you can see less at once at a higher zoom percentage.
Configuring Device Settings
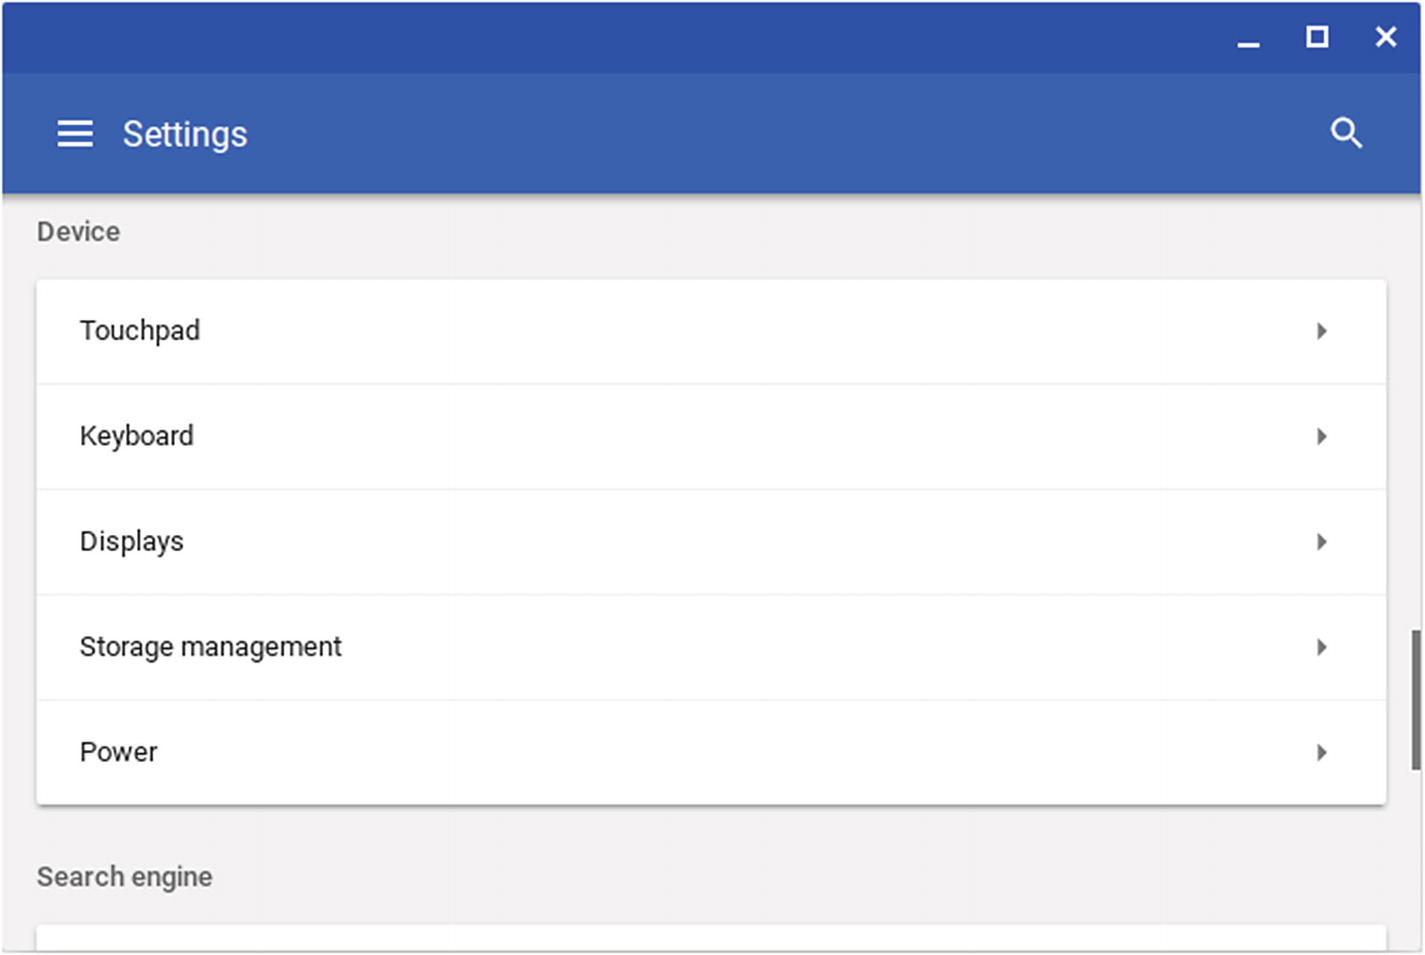
Click the buttons in the Device section of the Settings window to display the corresponding screen of settings, such as the Touchpad screen
Configuring Touchpad Settings
A Chromebook’s touchpad enables you to take a wide variety of essential actions on a Chromebook, from selecting items to giving commands and switching among open windows. To get the best results from the touchpad, you may need to configure its settings.
Enable tap-to-click: Set this switch to On to let the user click by tapping the touchpad with one finger. Tap-to-click is usually useful, but some people find it makes the touchpad register clicks they don’t intend. If the Chromebook’s user has this problem, set the switch to Off.

On the Touchpad screen in the Settings app, you can enable the tap-to-click feature and the tap-dragging feature, set the touchpad speed, and choose between traditional scrolling and Australian scrolling
Enable tap dragging: Set this switch to On to let the user drag by tapping the touchpad and holding. If the Chromebook’s user finds this feature unhelpful, set the switch to Off.
Touchpad speed: Drag this slider left or right along the Slow–Fast scale to set the speed at which the pointer moves when a finger moves across the touchpad.
Scrolling: In this area, select the “Traditional” option or the “Australian” option , as needed. With Traditional scrolling, you place two fingers on the touchpad and move them in the direction you want to scroll. For example, if you want to scroll down, you move your fingers downward. With Australian scrolling, you place two fingers on the touchpad and move them in the opposite direction from that in which you want to scroll. For example, if you want to scroll down, you move your fingers up. This sounds counterintuitive, but because it is the way that many phones and tablets implement scrolling, some users prefer it.
CHOOSING SETTINGS FOR A MOUSE
If you connect a mouse to a Chromebook, you can configure it by opening the Settings app and then clicking the Mouse and touchpad button in the Device section. The Mouse and touchpad screen will appear, showing the same controls as in Figure 4-25, but also the Mouse section, which contains controls for configuring the mouse.
Swap primary mouse button: Set this switch to On to make the right mouse button the primary button instead of the left mouse button. Normally, you’d swap the primary mouse button for left-handed use.
Mouse speed: Drag this slider along the Slow–Fast scale to set the speed at which the pointer moves when the user moves the mouse.
Depending on the type of mouse and the driver that Chrome OS has loaded for it, the Mouse section may also contain other controls that you can configure.
Configuring Keyboard Settings
Search, Ctrl, Alt, Caps Lock, Escape, Backspace: Use these six pop-up menus to set the functionality for the Search, Ctrl, Alt, Caps Lock, Escape, and Backspace keys. By default, each key is mapped to the command for its name, so the Search key invokes the Search function, the Ctrl key gives the Ctrl modification, and so on. You can map each key to any of the six commands—Search, Ctrl, Alt, Caps Lock, Escape, or Backspace—or to Disabled if you want the key to have no effect.
Note
The normal reason for remapping the keys is for users accustomed to a different keyboard layout. For example, because standard keyboards have a Caps Lock key where the Chrome OS keyboard has the Search key, you might want to map the Search key to give the Caps Lock command. If a user tends to press one of these keys unintentionally, you could set that key to Disabled to mitigate the problem.
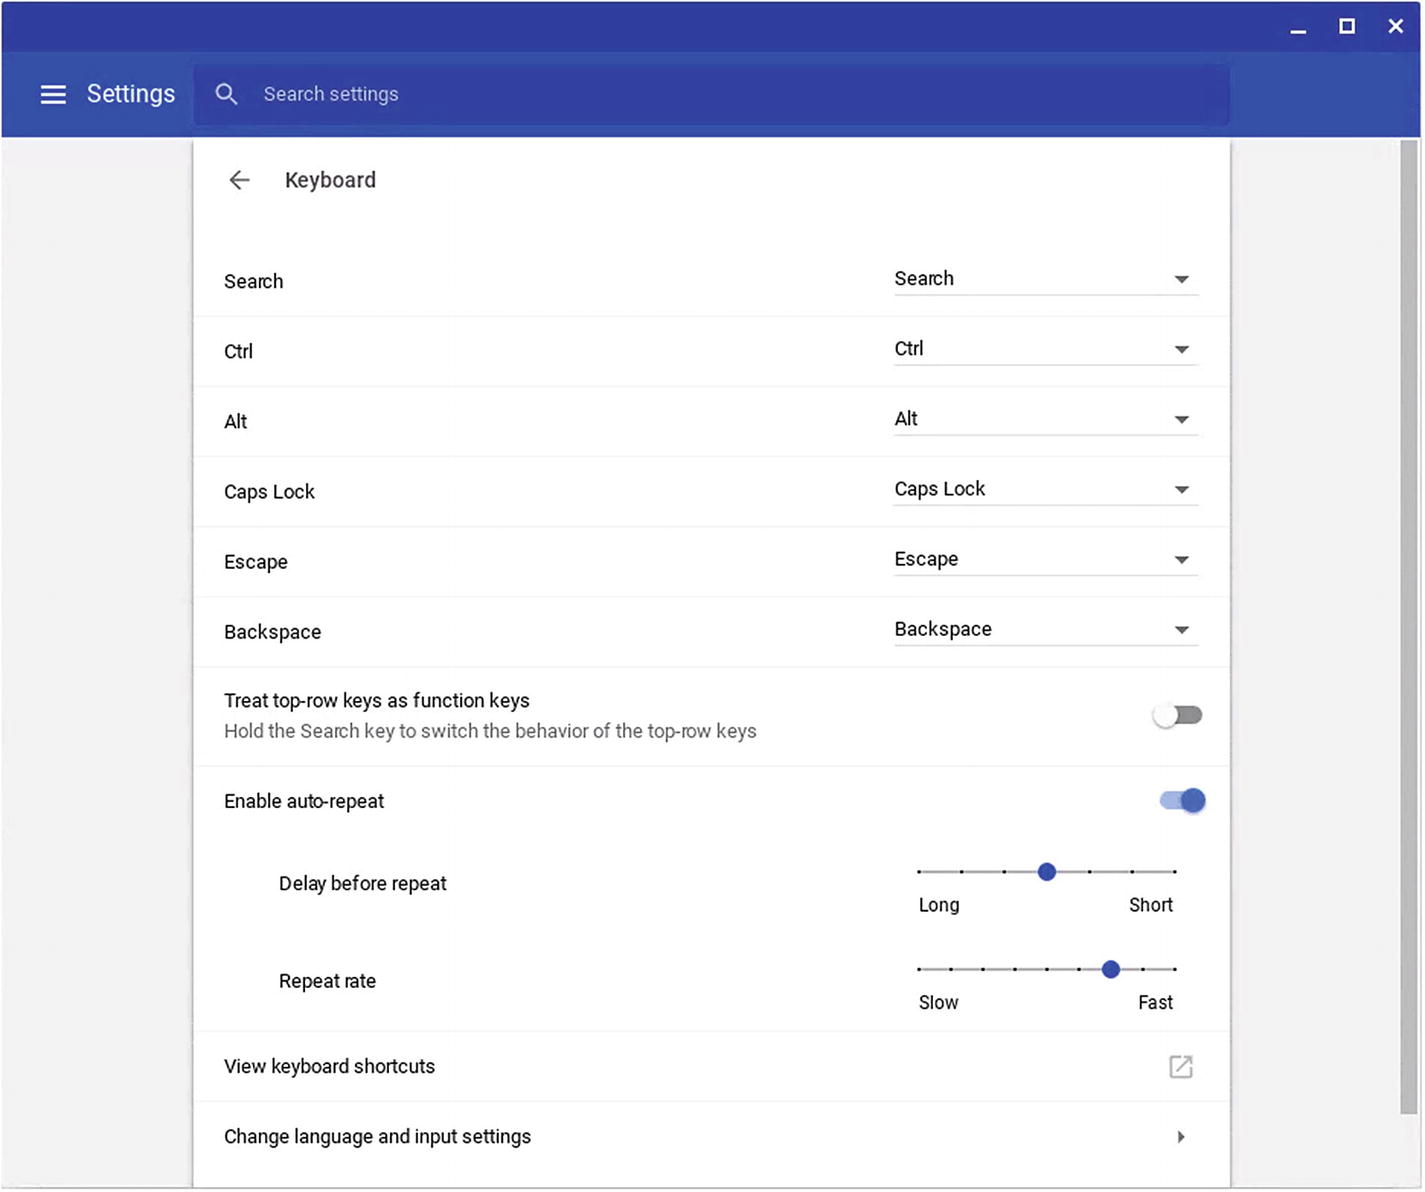
The Keyboard screen in the Settings app enables you to configure individual keys, such as the Search key and the modifier keys, specify how to treat the top-row keys, and control automatic repetition
Treat top-row keys as function keys: Set this switch to On if you want to make the keys on the top row of the keyboard work as the function keys F1 through F12. This setting can be useful when you are using your Chromebook to access a remote system that uses function keys for commands. If you enable this feature, you can get the standard Chrome OS functionality back temporarily by holding down the Search key as you press the top-row keys.
Enable auto-repeat: Set this switch to On if you want the keys on the keyboard to repeat when you hold them down. This feature is enabled by default and works well for many users, but if a user gets unintentional repetitions, you can either set the “Enable auto-repeat” switch to Off or adjust the Delay before repeat setting and the Repeat rate setting, as explained next.
Note
You can click the View Keyboard Shortcuts button on the Keyboard screen to display the on-screen map of keyboard shortcuts. The quick way to display this map is to press Ctrl+Alt+? (pressing Shift as needed to type the ? character).
Delay before repeat, Repeat rate: Assuming the “Enable auto-repeat” switch is set to On, drag the Delay before repeat slider along the Long–Short scale to set the length of the delay before keys start repeating. Then drag the Repeat rate slider along the Slow–Fast scale to set how fast the keys repeat.
Note
If you want to configure language and input settings, you can click the Change language and input settings button on the Keyboard screen to go straight to them. We’ll look at these settings in the section “Configuring Language and Input Settings” later in this chapter, which will also show you the more direct way to get to these settings .
Configuring Displays Settings
Arrangement: When you have connected an external display, drag the icons in this area to tell Chrome OS where the external display is positioned relative to the built-in display. When the icons are positioned correctly, the pointer should move logically from one screen to the other.

The Displays screen lets you configure the Chromebook’s internal display and any external display you have connected
Mirror Internal Display: When you have connected an external display, you can check this check box to make the external display show the same content as the internal display . Mirroring is useful for giving presentations.
Note
See the section “Connecting an External Display” in Chapter 3 for instructions on connecting and configuring an external display.
Resolution: Drag this slider to set the resolution. The display should be clearest when you set the resolution that is marked “(Best),” but you may find another resolution easier to view.
Orientation: In this pop-up menu, choose the orientation for the display: Standard, 90, 180, or 270. For example, if you have connected an external display in portrait orientation rather than landscape, apply the 90 setting or the 270 setting to make the content appear correctly. (Which setting you need depends on which way the monitor is rotated. Either 90 or 270 will be correct portrait orientation, whereas the other will be inverse portrait orientation.)
Overscan: If the image does not reach the edges of the screen, leaving a black border, or if the image overlaps the edges, click this button to display the Overscan dialog box (see Figure 4-28). Press the arrow keys to shrink or expand the image, or hold down Shift and press the arrow keys to move the image. Click the OK button when you are satisfied with the image.
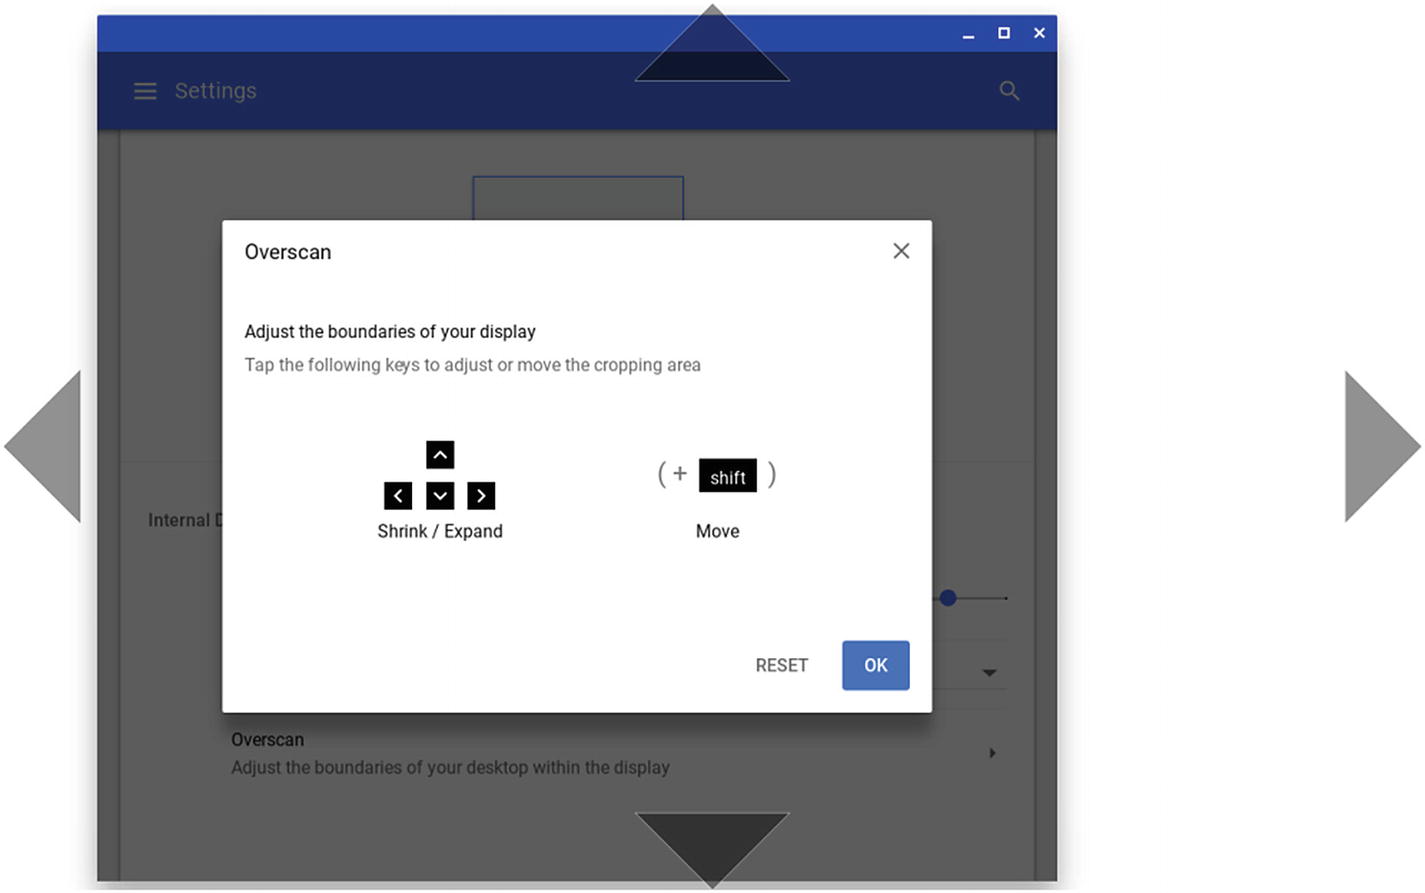
Follow the instructions in the Overscan dialog box to enlarge, shrink, or reposition the image to fit the screen better
Configuring Settings on the Storage Management Screen
The Storage management screen enables you to check how much of the Chromebook’s storage is in use, how much is still available, and what categories of files are taking up space.
Storage histogram: The blue section shows how much space is in use; the gray section shows how much is still available.
Downloads: This button shows the amount of space occupied by downloaded files. You can click this button to open a Files window showing the Downloads folder. From here, you can delete any downloaded files you no longer need.
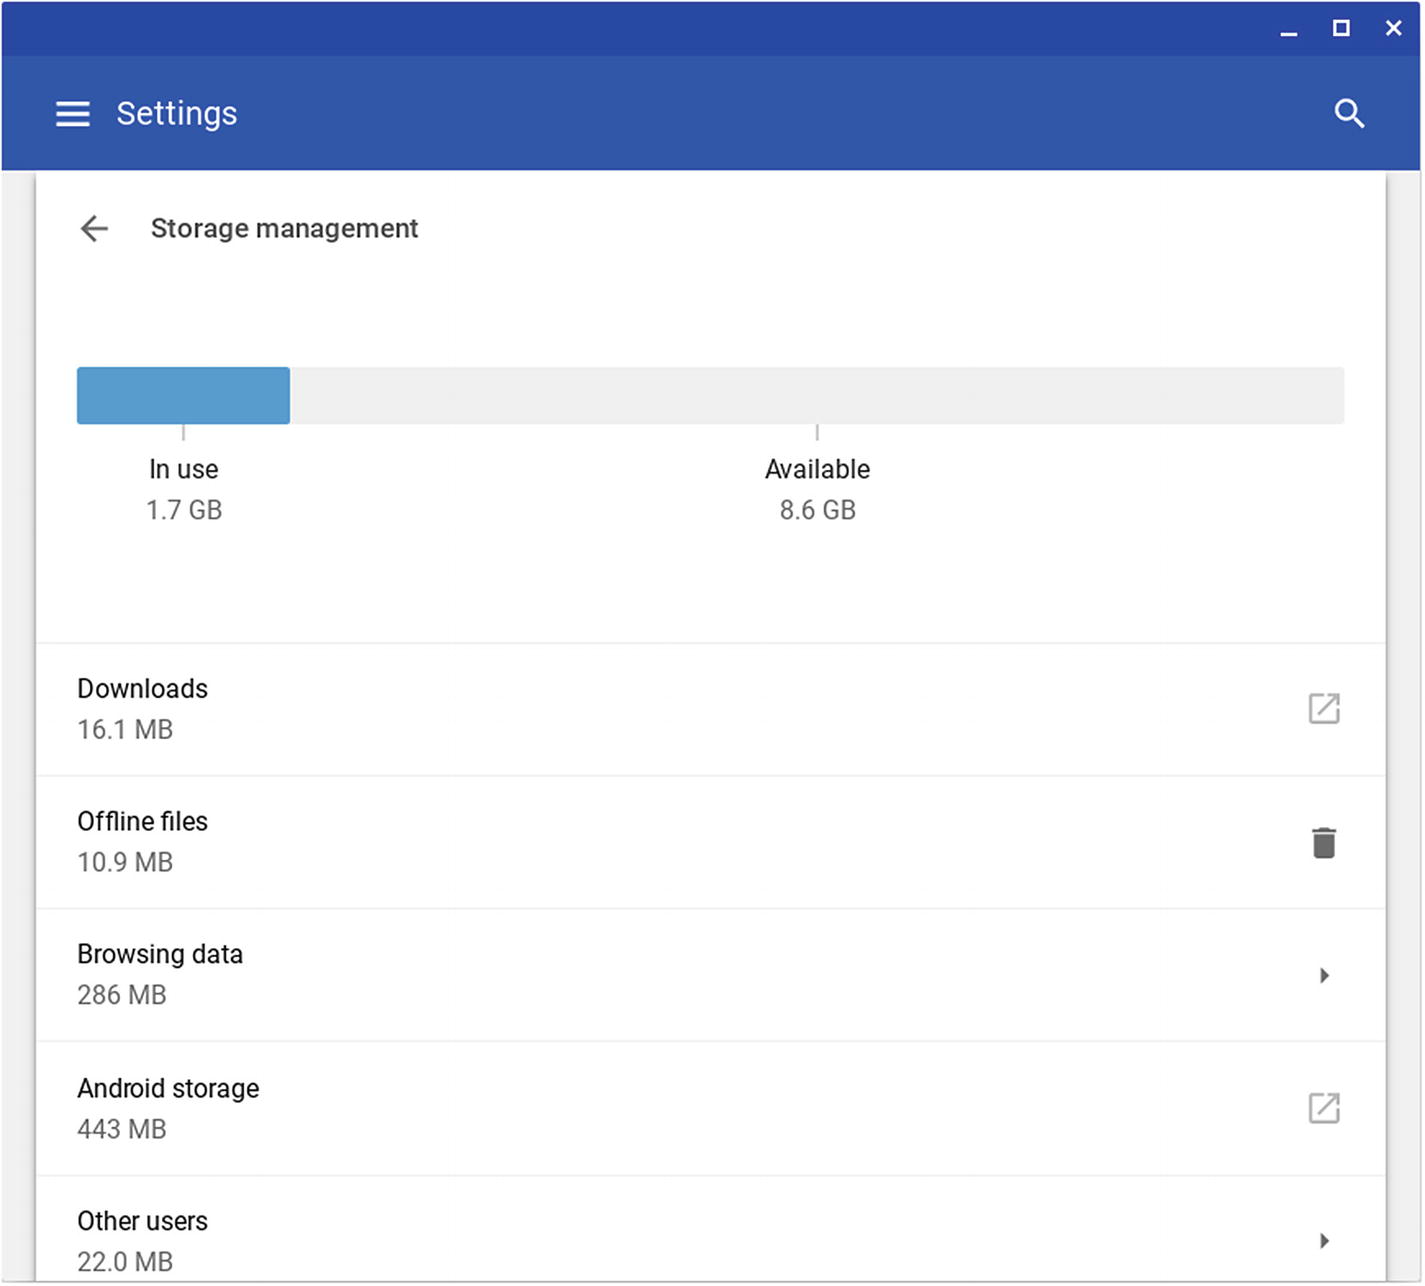
The Storage management screen shows how much of the Chromebook’s storage is in use and how much is available. You can see how much space is taken up by different categories of files, such as offline files and other users’ files.
Offline files: This button shows the amount of space being taken up by files you have selected for offline use. To delete all the offline files, click this button (or the Delete icon—the trash icon—at its right end) and then click the Delete Files button in the Delete offline files? dialog box that opens (see Figure 4-30).

Click the Delete Files button in the Delete offline files? dialog box to remove all your offline files from the Chromebook
Browsing data: This button shows the amount of space being occupied by data Chrome has gathered about your browsing. You can click this button to display the Clear browsing data dialog box, which enables you to clear some or all of this data. See the section “Clearing Browsing Data” later in this chapter for coverage of this topic.
Android storage: This button, which appears only on Chromebooks that can run Android apps, shows how much storage space the Android subsystem is using for files. You can click this button to display the Internal shared storage screen in Android settings; see the section “Choosing Storage Preferences” later in this chapter for coverage of what this screen shows.
Other users: This button shows how much space is being taken up by other users’ files. You can click this button to display the Manage other people screen; see the section “Managing Other People” earlier in this chapter for coverage of this screen .
Configuring Power Settings
Power source/Battery: This readout shows “Power source: AC Adapter” when the Chromebook is getting power from its power supply. When the Chromebook is running on battery power, the readout shows “Battery” and the estimated runtime available, such as 12 hours and 52 minutes left.
When idle: In this pop-up menu, choose what the Chromebook should do when it is left idle: Sleep, Turn off display, or Keep display on.
Sleep when lid is closed: Set this switch to On if you want the Chromebook to go to sleep automatically when you close the lid. This is usually a good choice unless you are using an external keyboard, pointing device, and monitor, in which case you may want to run the Chromebook with the lid closed. (If you do this, make sure the Chromebook does not get too hot.)
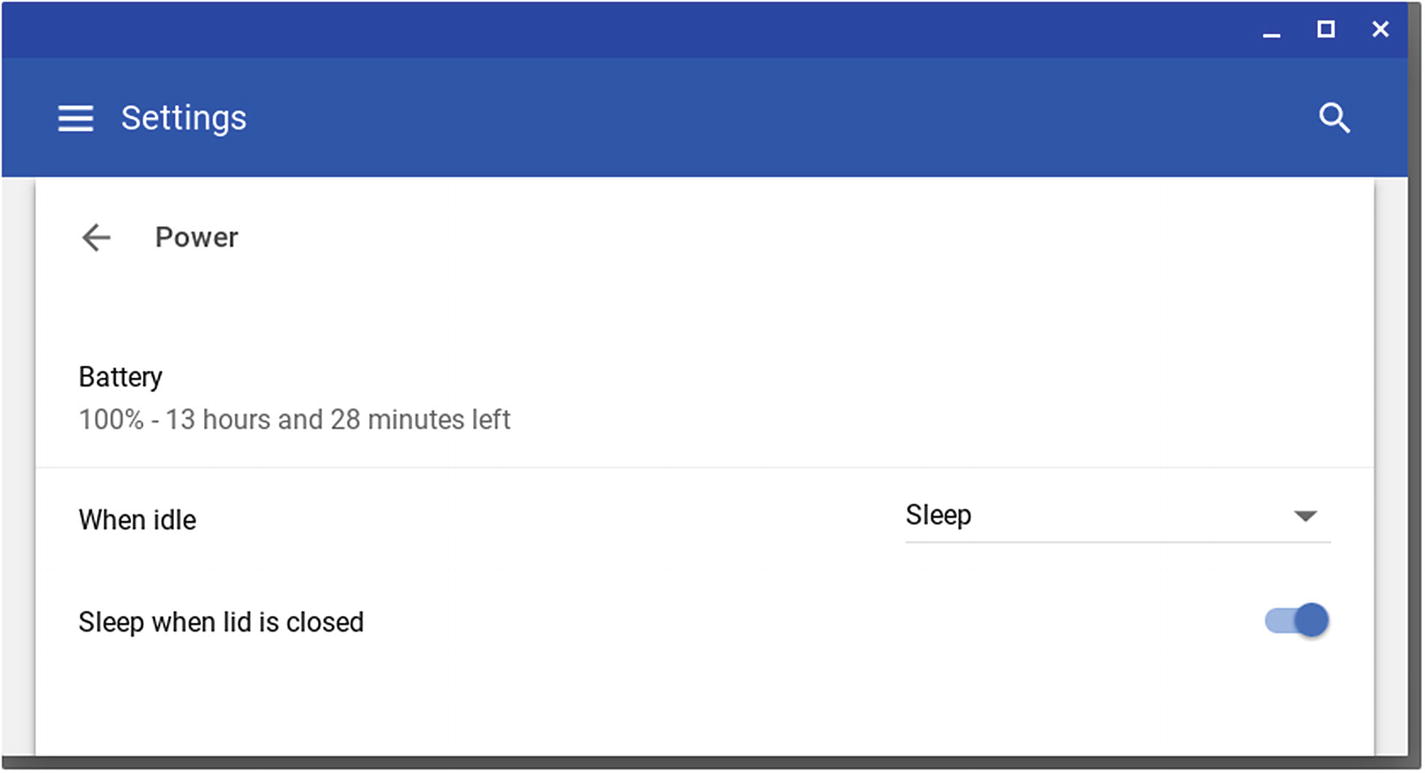
The Power screen shows the power source—battery or AC power—and lets you choose what happens when the Chromebook is idle and when you close the lid
Configuring Search Engine Settings
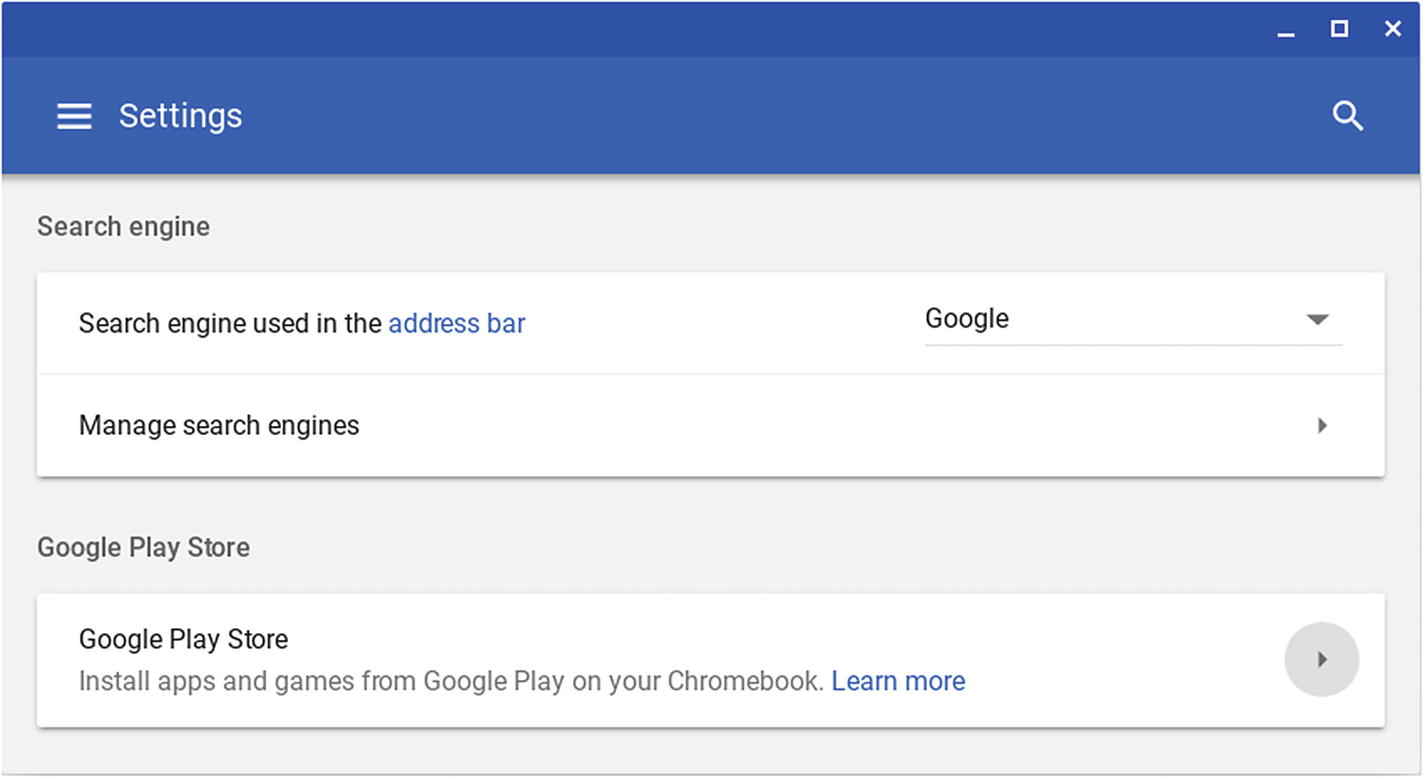
In the Search engine section of the Settings window, you can configure the search engine used in the Chrome address bar
Change the default search engine: Click the More Actions button (the three vertical dots) on the right of the search engine’s row and then click the Make default item on the menu.
Edit a search engine’s URL: Click the More Actions button on the right of the search engine’s row, click the Edit item on the menu, make the changes in the Edit search engine dialog box, and then click the Save button.
Remove a search engine: Click the More Actions button on the right of the search engine’s row and then click the Remove from list item on the menu.
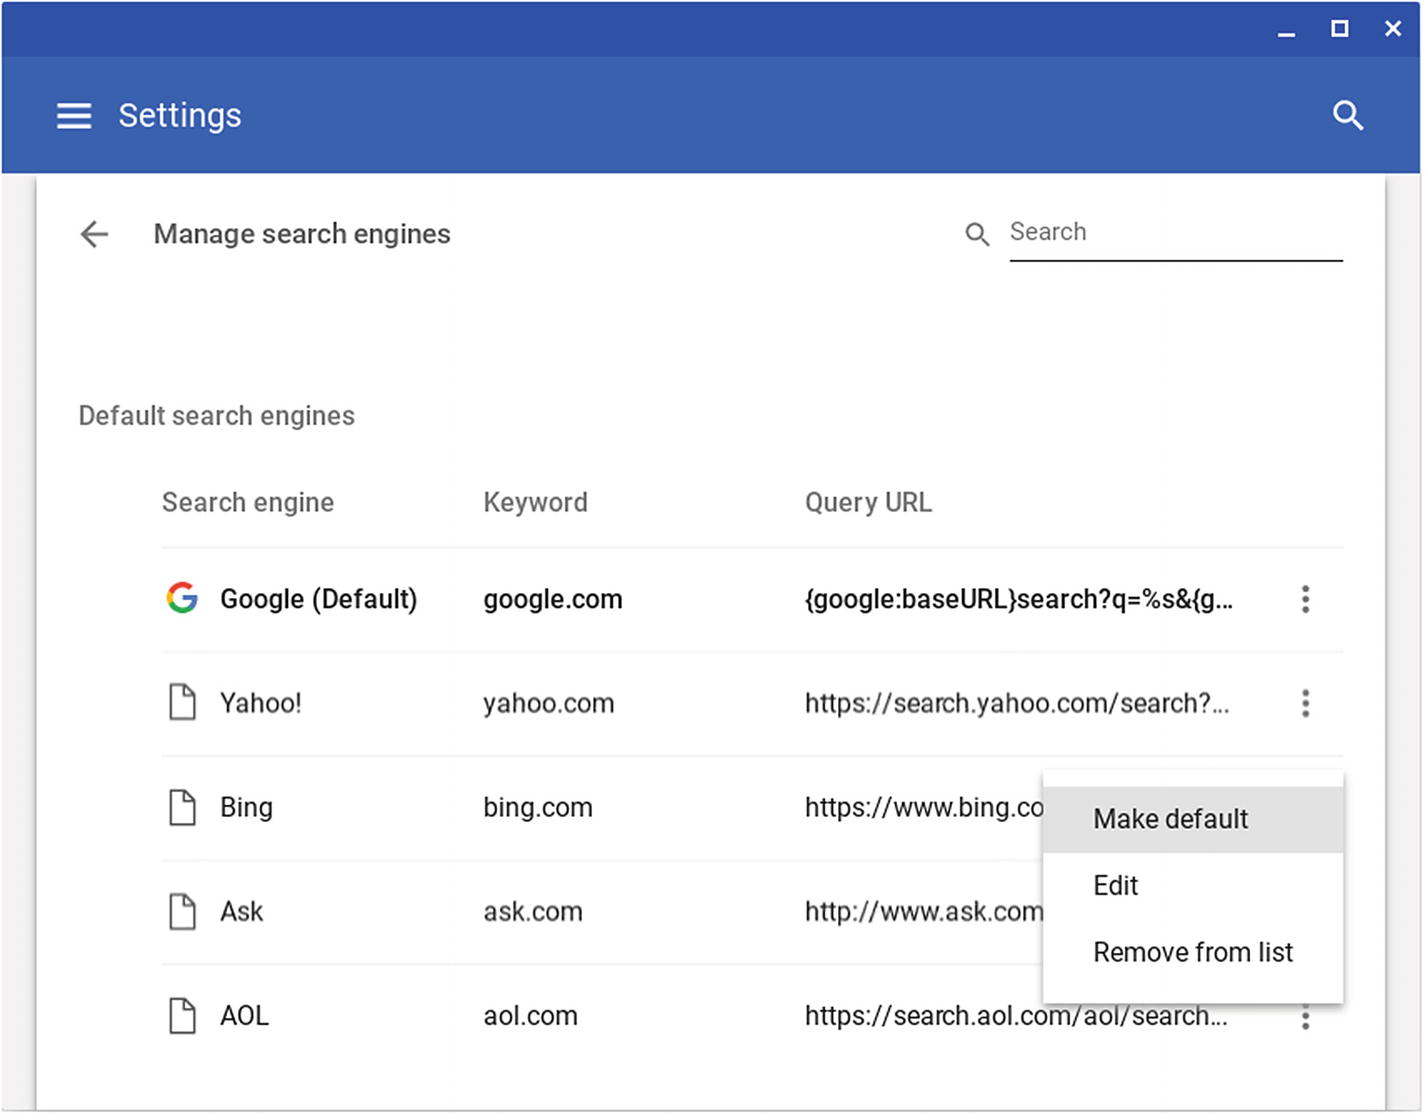
On the Manage search engines screen, you can change your default search engine, edit a search engine entry, or remove a search engine entry from the list
Configuring Google Play Store Settings
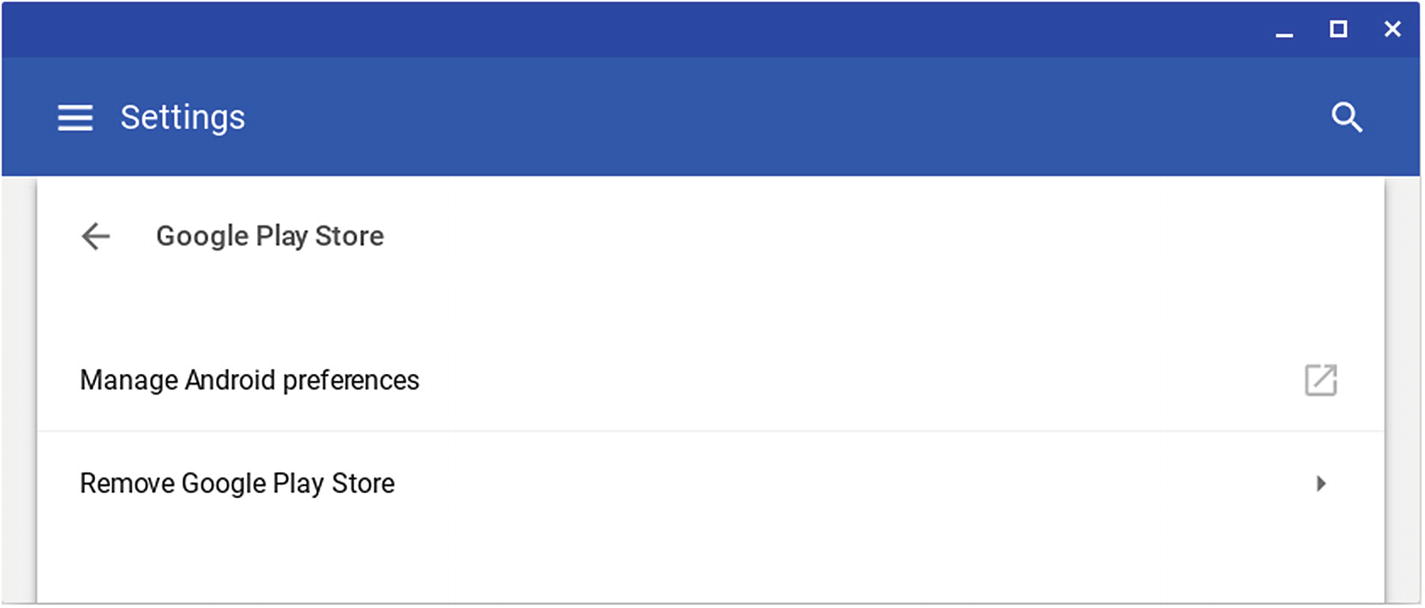
From the Google Play Store screen, you can manage Android preferences for the Chromebook or remove the Google Play Store from the device
Note
The Google Play Store section of the Settings window appears only if the Chromebook supports Android apps .
Configuring Android Preferences

The Settings screen for Android apps enables you to configure settings for any Android apps you install on the Chromebook
Although this looks like a long list, it is only the settings that are relevant for running Android apps on a Chromebook.
The following subsections will explain the settings you can choose.
Choosing Sound & Notification Preferences
The sound and notification preferences enable you to configure settings for the Do not disturb feature, set the alarm ringtone, and choose when to receive which app notifications. You can also control access to notifications and to the Do not disturb feature.
Do not disturb: Click this button to display the Do not disturb screen (shown on the right in Figure 4-36). On this screen, click the Do not disturb button and then choose the appropriate setting—Off, Priority only, Alarms only, or Total silence—on the pop-up menu. Next, click the Priority only allows button to display the Priority only allows screen, and then choose the appropriate settings for alarms, reminders, events, and messages.
Default alarm ringtone: Click this button to open the Default alarm ringtone dialog box. Click the “None” option or the option for the ringtone you want to use, and then click the OK button.

The Sound & notification screen (left) lets you configure sounds, notifications, and access to notifications and the Do not disturb feature. The Do not disturb screen (right) allows you to control what notifications can disturb you and when.
App notifications: Click this button to display the App notifications screen (see the left screen in Figure 4-37). At first, this screen shows all the non-system apps installed on Android. You can display the system apps by clicking the More Actions button (the three vertical dots) and then clicking the Show system item on the menu. You can restrict the apps shown by clicking the Apps pop-up button (which shows All apps in the figure) and then clicking the Blocked item or Override Do Not Disturb item on the menu instead. Click an app’s button to display the notifications screen for the app, such as the Notifications screen for the Clock app (see the right screen in Figure 4-37). You can then set the “Block all” switch to On if you want to block all notifications for the app, or set the “Override Do Not Disturb” switch to On if you want the app’s notifications to appear even when the Do Not Disturb feature is set to Priority Only mode.
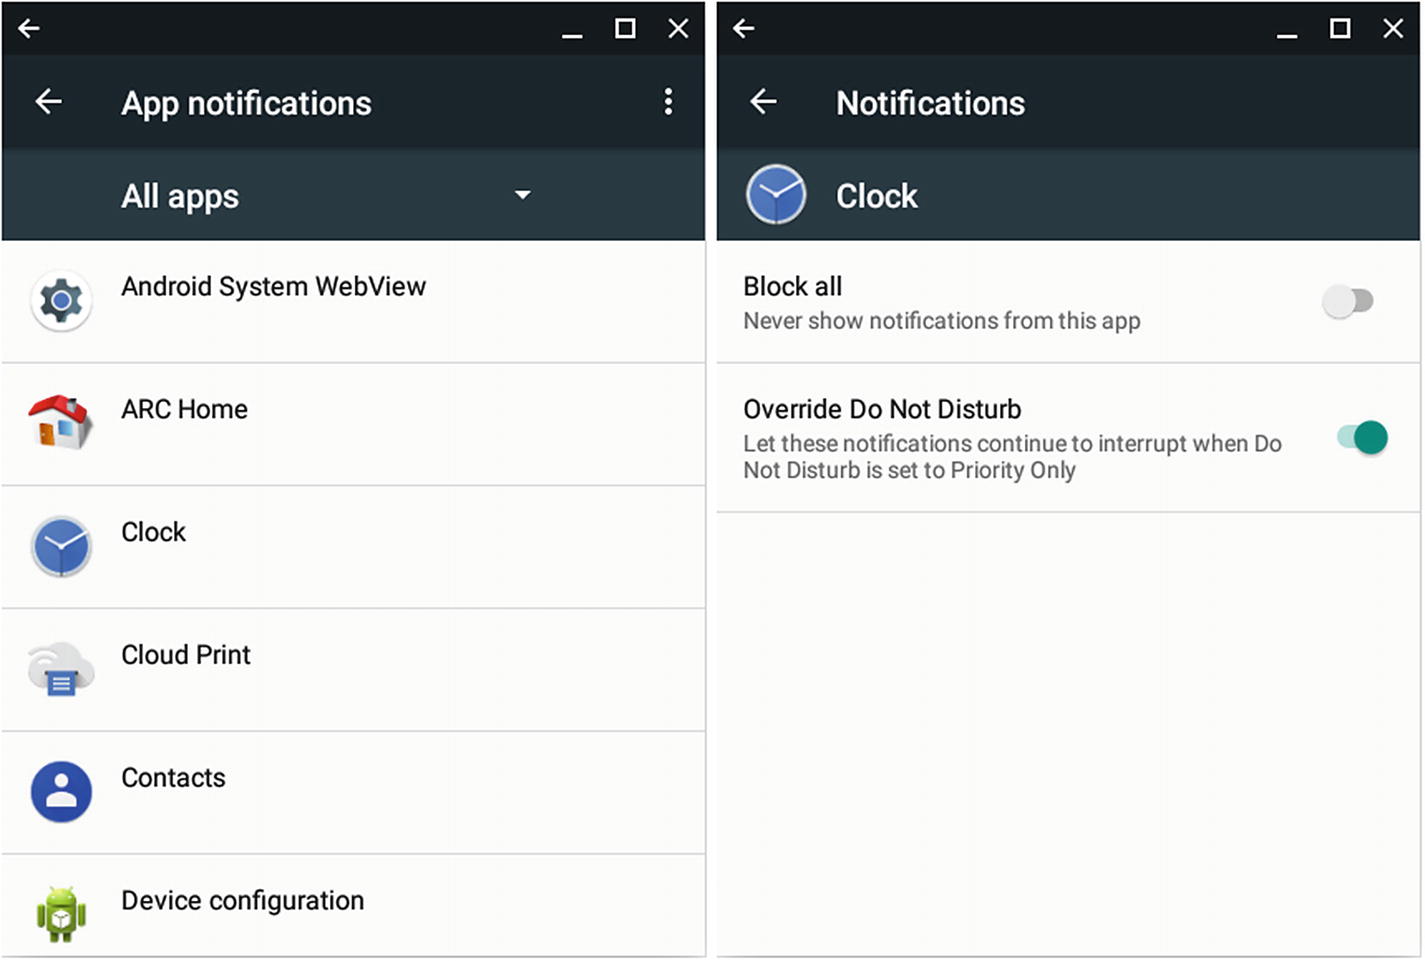
Click an app on the App notifications screen (left) to display the Notifications screen for that app, such as the Notifications screen for the Clock app (right)
Notification access: Click this button to display the Notification access screen, which shows you the installed apps that have requested access to notifications.
Do Not Disturb access: Click this button to display the Do Not Disturb access screen, which shows you the installed apps that have requested access to the Do Not Disturb feature.
Choosing App Preferences
The app preferences enable you to view the list of Android apps installed on the Chromebook. You can also force apps to stop, disable some apps, and configure settings for most apps.

The Apps screen (left) lists non-system apps at first, but you can add system apps by clicking More Actions and then Show system. Click an app to display its App info screen (right).
Disable the app: Click the Disable button. You would do this for an app that should not be running. For various system apps, the Disable button is itself disabled.
Force the app to stop: Click the Force Stop button. You would do this for an app that you were not able to close normally.
View the app’s use of storage: Look at the Storage readout on the App info screen. For more detail, click the Storage button to display the Storage screen, which shows how much space the app itself occupies, how much space the app’s data takes up, and how much cached data the app currently has. On the Storage screen, you can click the Manage Data button to display a Storage screen for managing the app’s data, or click the Clear Cache button to clear the cached data.
View the app’s data usage: Look at the Data usage readout on the App info screen to see how much data the app has transferred. Data usage is a hot-button issue on Android phones and tablets that have cellular connections, but it is usually less important on a Chromebook unless it is a cellular model or is using metered Wi-Fi connections. If you want to dig into the app’s data usage, click this button to show the App data usage screen for the app. Here, you can see how much data the app transferred when it was in the foreground (when it was the active window, in Chrome OS terms) compared to when it was in the background (when it was not the active window). You can set the “Background data” switch to Off to prevent the app from using cellular data when in the background, and you can set the “Unrestricted data usage” switch to On to allow the app unrestricted data usage when Android’s Data Saver feature is turned on; these features, too, are usually not relevant to Chromebooks.
View and change the app’s permissions: Look at the Permissions readout on the App info screen to see what permissions the app has. To change the permissions, click the Permissions button and then set the switches on the App permissions screen (shown on the left in Figure 4-39). You can see that these permissions are designed for Android phones and tablets rather than Chromebooks, which typically lack body sensors, phone functionality, and SMS messaging.
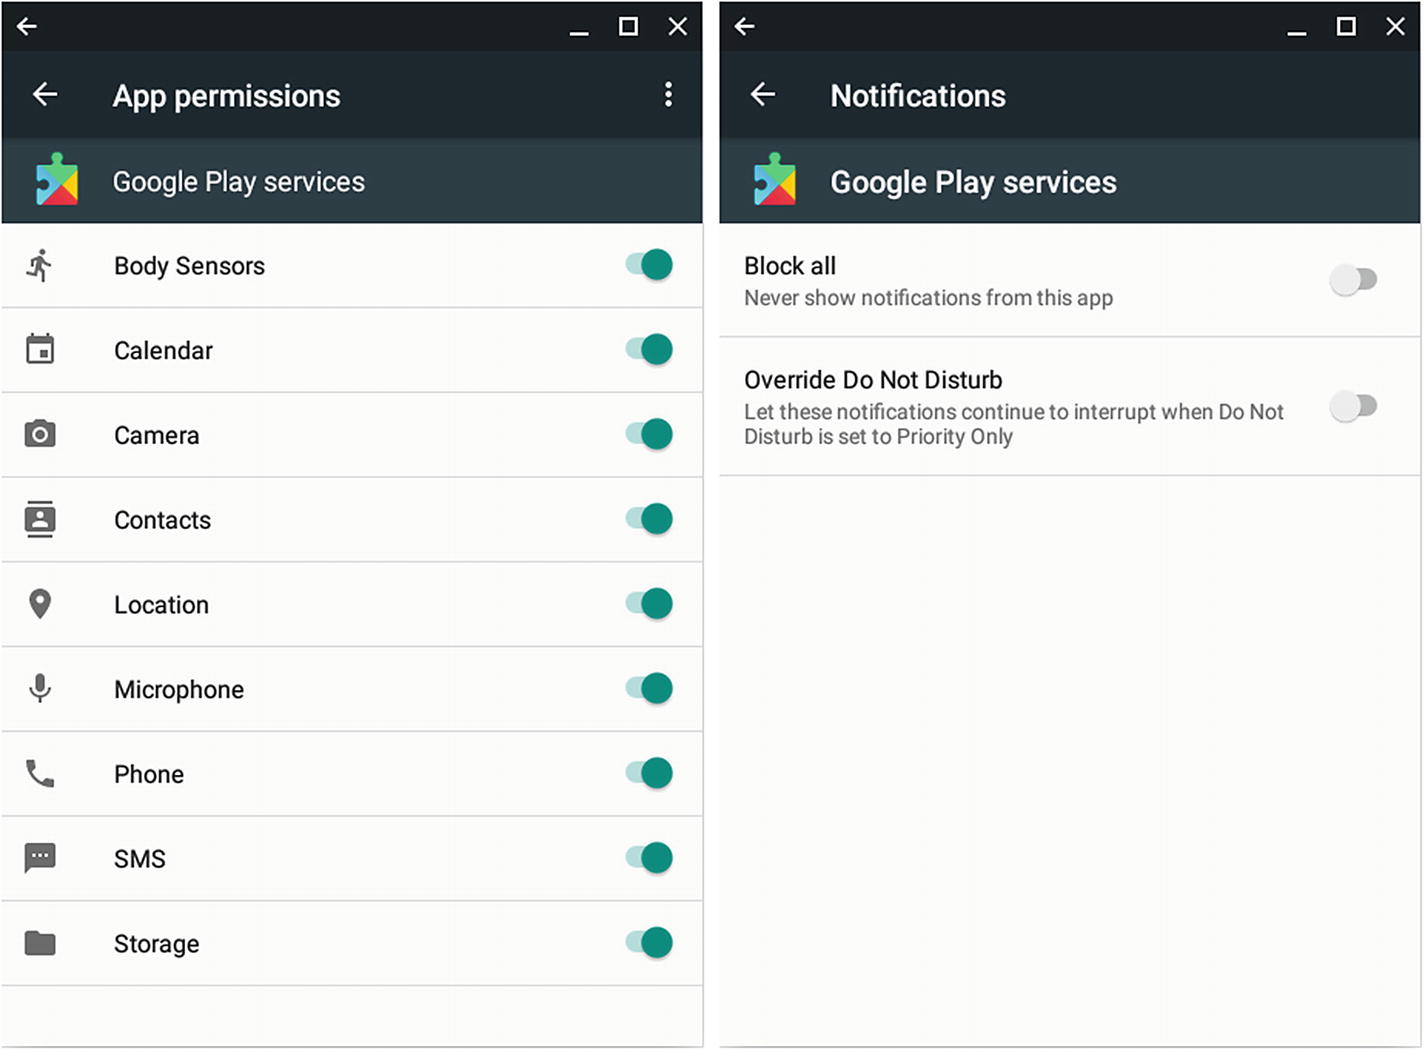
On the App permissions screen (left), set the switches to Off or On to control which features the app can use. On the Notifications screen (right), you can block all notifications from the app or allow it to override Priority Only mode in Do Not Disturb.
Configure notifications settings: Click the Notifications button to display the Notifications screen for the app (shown on the right in Figure 4-39). Here, you can set the “Block all” switch to On if you want to block all notifications from the app. You can also set the “Override Do Not Disturb” switch to On if you want the app’s notifications to appear even when the Do Not Disturb feature is set to Priority Only mode.
View and configure open-by-default settings: Look at the Open by default button to see what items (if any) the app is set to open by default. To change the settings, click the Open by default button to display the Open by default screen, where you can click the Open supported links button and then click the appropriate item—Open in this app, Ask every time, or Don’t open in this app—on the pop-up menu .
Choosing Storage Preferences
The storage preferences let you see how much space Android is occupying on the Chromebook. Click the Storage button in the Settings window to display the Internal shared storage screen (shown on the left in Figure 4-39), which shows the total amount of space occupied at the top and, below that, a breakdown of how much space each category of files occupies: Apps, Images, Videos, Audio, System, Other, and Cached data.
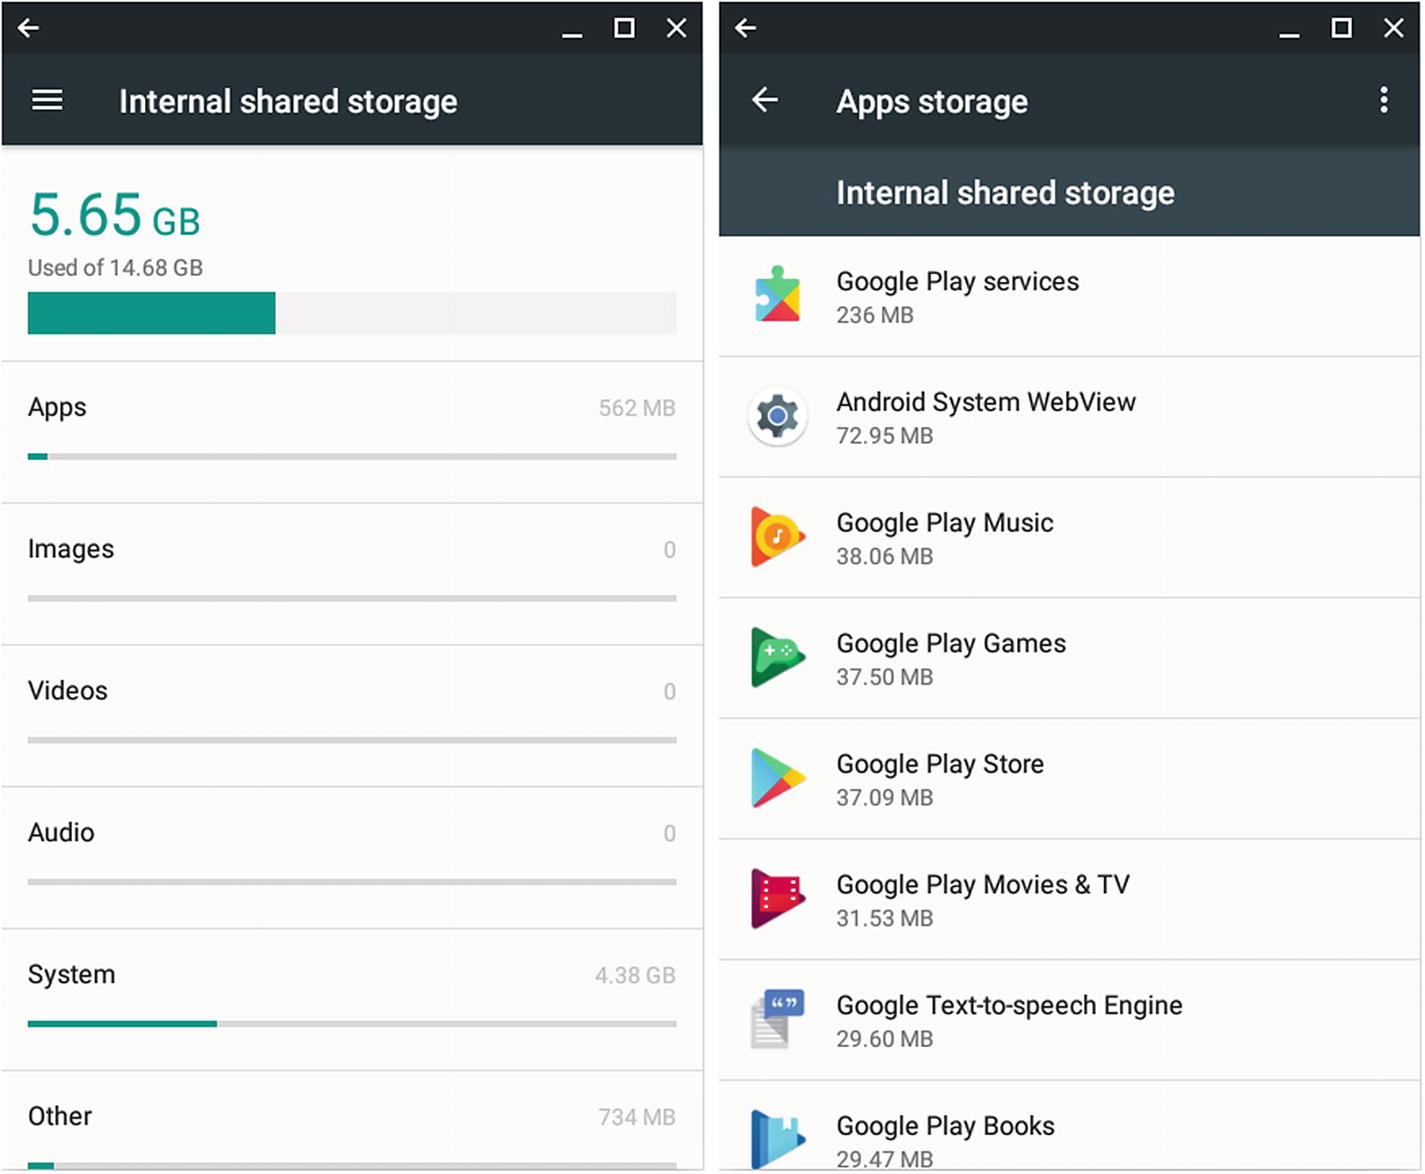
The Internal shared storage screen (left) shows how much space Android is taking up on the Chromebook. Click a button to display a screen containing more information on a category, such as the Apps storage screen (right).
Choosing Location Preferences
The location preferences enable you to control whether the Chromebook shares its location with Google. You can see which apps have recently requested location information, configure the location history, and check whether Google Location Sharing is on.

On the Location screen (left), set the master switch at the top to On or Off to enable or disable use of location services. Click an app in the Recent location requests list to display the App info screen for the app (right).
The Recent location requests list shows the apps that have requested location information recently. You can click an app here to display the App info screen for the app, such as the App info screen for Google Play services, shown on the right in Figure 4-41. From the App info screen, you can take various actions; see the section “Choosing App Preferences” earlier in this chapter for details.
Configuring Security Preferences
The security preferences enable you to permit the installation of Android apps from unknown sources, view information about the storage of digital credentials and install digital certificates to the Chromebook, and see which apps have access to data on app usage.
Allow the installation of apps from unknown sources: First, enable Developer Mode in Chrome OS. You can then set the “Unknown sources” switch to On to allow the Android subsystem to install apps from sources other than the Google Play Store.
Caution
Installing apps from unknown sources is not safe unless the app is one that you or your school have developed and that you can be certain does not contain malevolent code.
View credential information: The Storage type readout shows how the credentials are stored, such as “Hardware-backed”(secured by the device’s security hardware). You can click the Trusted credentials button to display the Trusted credentials screen (shown on the right in Figure 4-42), whose two tabs—the System tab and the User tab—list the trusted certificates. You can set a certificate’s switch to Off to stop using that certificate; you would do this if you learned that a certificate had been compromised. You can click the User credentials button to display the User credentials screen, which shows any user credentials installed (there may not be any).

From the Security screen (left), you can allow the installation of apps from unknown sources, view credential information, install digital certificates, and see which apps can access app-usage data. On the Trusted credentials screen (right), you can view system and user certificates and disable any compromised certificate.
Install a digital certificate: You can click the Install from SD card button to start installing a digital certificate from a file, either literally from an SD card or (more usually) from another location that you specify, such as the Downloads folder.
See which apps can view app-usage data: Click the Apps with usage access button to display the Apps with usage access screen (shown on the left in Figure 4-43). You can click an app to display its Usage access screen (shown on the right in Figure 4-43). Here, you can set the “Permit usage access” switch to Off if you need to disable the app’s access to usage data.
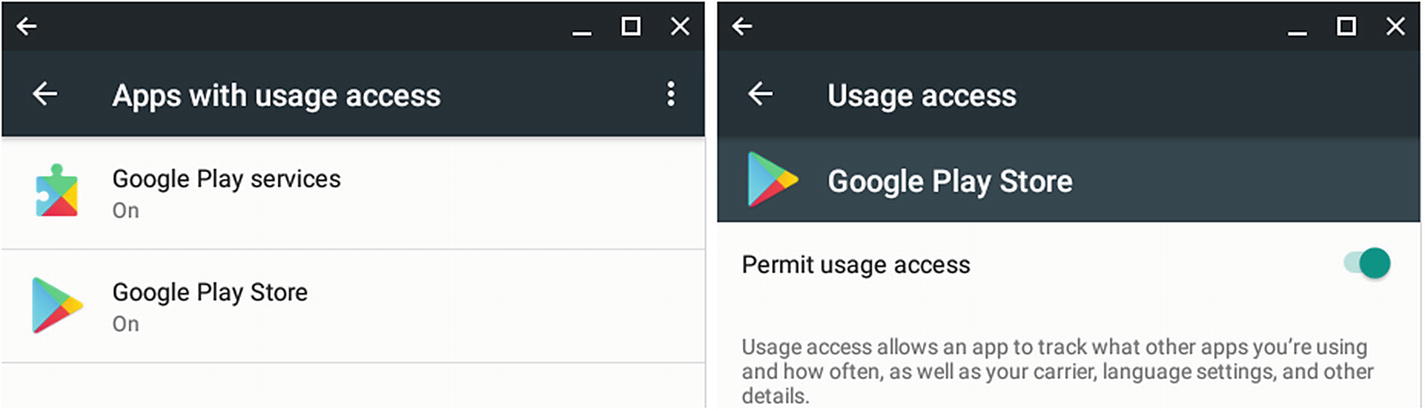
The Apps with usage access screen (left) lists the apps that can access app-usage data. Click an app to display its Usage access screen (right), where you can set the “Permit usage access” switch to Off to disable the app’s access to app-usage data.
Configuring Accounts Preferences
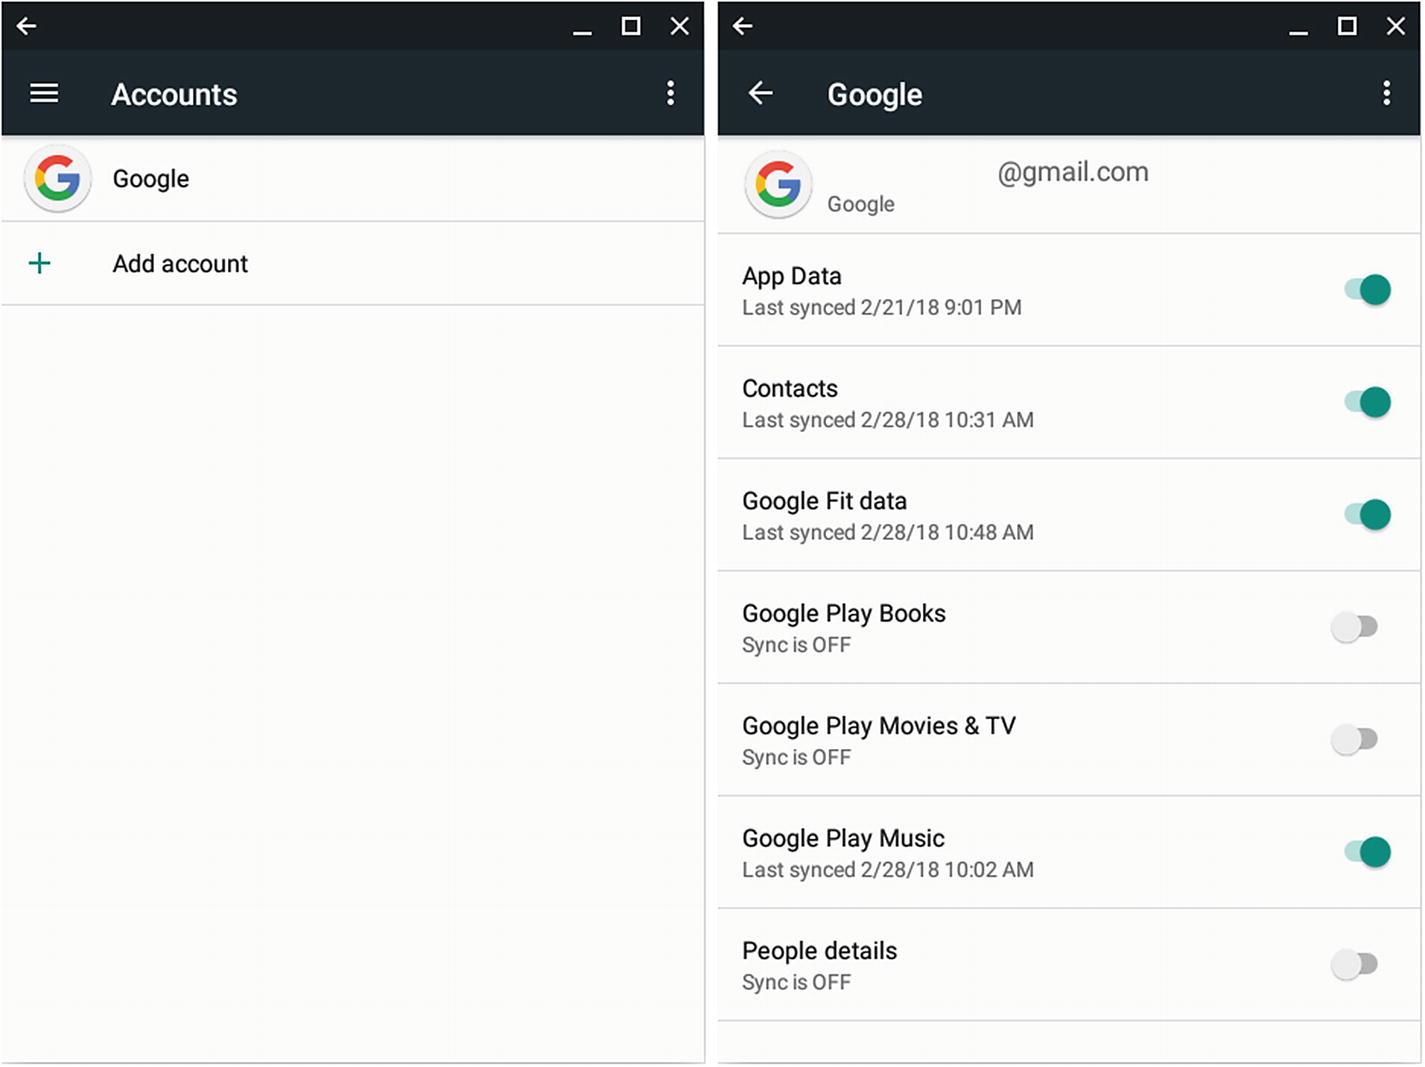
The Accounts screen (left) shows the accounts set up for use by Android apps. Click an account to display the details screen (right), where you can choose which items to sync.
To view an account’s details or choose which items to sync, click the account’s button . On the details screen that appears, such as the Google screen shown on the right in Figure 4-44, set the switches to On or Off to specify which items to sync.
Note
Any accounts you add on the Accounts screen in Android settings are for the Android subsystem to use, not for Chrome OS as a whole to use.
To add an account, click the Add account button and then follow the prompts.
Configuring Google Preferences
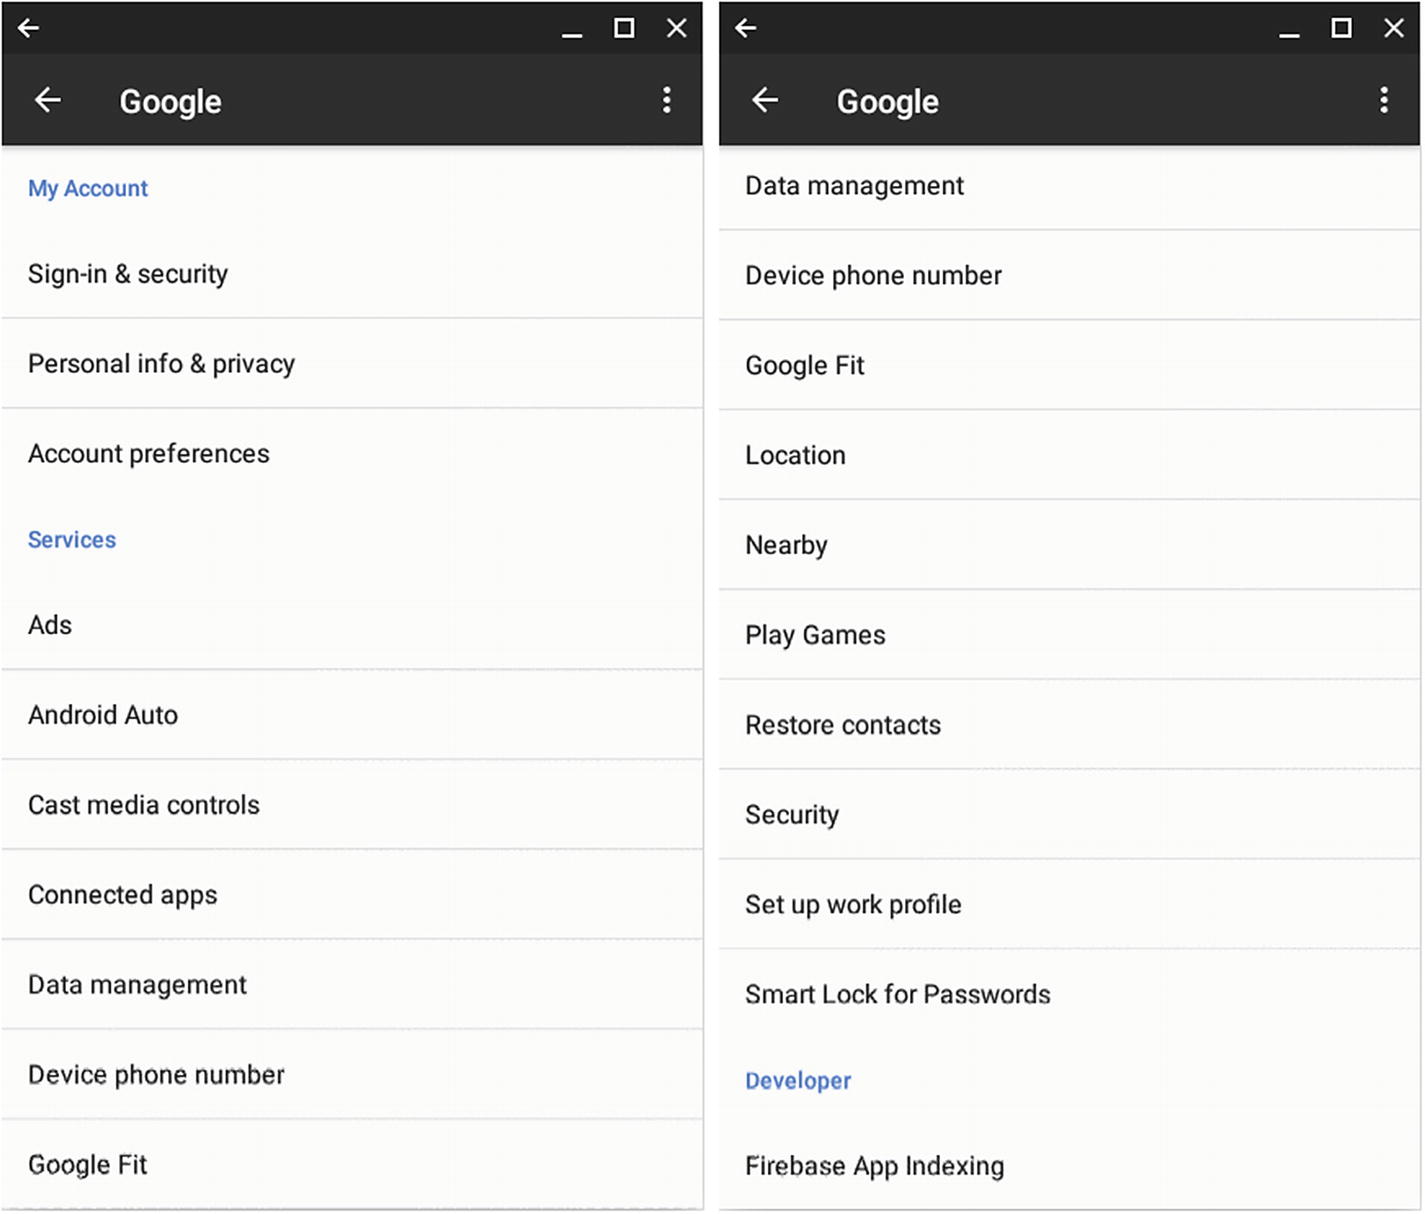
From the Google screen (left and right), you can configure many settings for your Google account
Sign-in & security: Click this button to display the Sign-in & security screen, on which you can run a security checkup, change your password, configure two-step verification, set your recovery phone number and email address, and choose other security settings.
Personal info & privacy: Click this button to display the Personal info & privacy screen, on which you can run a privacy checkup, edit your personal information, change your photo, and manage other related settings, such as settings for location sharing and search.
Account preferences: Click this button to display the Account preferences screen, where you can review your purchase history, manage your purchase methods and subscriptions, set the language, and review your Google Drive storage. You can also delete individual Google services from your account or delete your Google account and all its data.
Ads: Click this button to display the Ads screen, on which you can learn your advertising ID, reset your advertising ID, and opt out of the Ads Personalization feature.
Android Auto: Click this button to display the Android Auto screen, which lets you find out about the Android Auto app (which offers navigation help, media playback, messaging, and voice control) and download the app. As helpful as Android Auto can be, you probably will not want to install it on a Chromebook.
Cast media controls: Click this button to display the Cast media controls screen, on which you can set the “Media controls for Cast devices” switch to On if you want the Android subsystem to display notifications that you can use to control playback to Chromecast devices and similar devices. These notifications are helpful on Android devices but less so on Chromebooks.
Connected apps: Click this button to display the Connected apps screen, which shows a list of the apps and devices that are connected to your Google account. The list includes Chrome OS apps as well as Android apps.
Data management: Click this button to display the Data management screen. Here, you can click the Update Drive-enabled app files button to choose how to update files: Over Wi-Fi or Cellular, or Over Wi-Fi only. Unless the Chromebook has a cellular connection, choose Over Wi-Fi only.
Device phone number: Click this button to display the Device phone number screen. For Android phones, this screen displays the device’s phone number. For Chromebooks, it does not.
Google Fit: Click this button to display the Google Fit screen, which lets you view the apps and devices that are connected to Google Fit, manage your data sources, and delete your Google Fit history. While you can take these actions on a Chromebook, it is usually more helpful to take them on an Android phone that can provide Google Fit input.
Location: Click this button to display the Location screen, on which you can configure Location settings. See the section “Choosing Location Preferences” earlier in this chapter for coverage of the Location screen.
Nearby: Click this button to display the Nearby screen, on which you can set the “Notify you when links are available” switch to On if you want Android to show you information about apps and websites near your current location.
Play Games: Click this button to display the Settings screen for Google Play Games. Here, you can configure settings for games, such as toggling your gamer profile between being hidden and being public, signing in automatically to games, and vibrating to announce notifications.
Restore contacts: Click this button to display the Restore contacts screen, which provides controls for restoring contacts from your Google account to your device.
Security: Click this button to display the Security screen. Here, you can click the Security code button to display your ten-digit security codes for signing in to your Google account when you have forgotten your password; click the Find My Device button to learn about ways to locate missing Android devices; and click the Google Play Protect button to control whether the Google Play Protect feature scans your device for security threats (usually a good idea).
Set up work profile: Click this button to display the Set up work profile screen, which is your starting point for setting up a work profile on Android, installing the Android Device Policy app so that administrators can remotely manage your device. You would not normally want to set up a work profile on a Chromebook.
Smart Lock for Passwords: Click this button to display the Smart Lock for Passwords screen. Here, you can set the “Smart Lock for Passwords” switch to On to have Android offer to save passwords to your Google account. You can also set the “Auto-sign in” switch to On to have Android apps automatically sign in to apps and websites that you have connected to your Google account. You can use the controls in the Saved passwords section and the Never save section to control which apps are allowed to save passwords.
The Developer section of the Google screen contains only the Firebase App Indexing button, which you can click to display the Applications screen. Here, you can set the “Capture Actions and Errors” switch to On to capture recent user actions and errors that have occurred. You would seldom need to use this setting on a Chromebook.
Configuring Language Preferences

On the Language screen (left), click the Personal dictionary button to display the Personal dictionary screen (right). Here, you can click the Add button to add a custom word or text shortcut.
Click the Personal dictionary button on the Language screen to display the Personal dictionary screen (shown on the right in Figure 4-46). Here, you can click the Add button to display a screen on which you can create a new custom word or shortcut. To modify or delete an existing custom word or shortcut, click the button for that item.
Configuring Back Up My Data Preferences
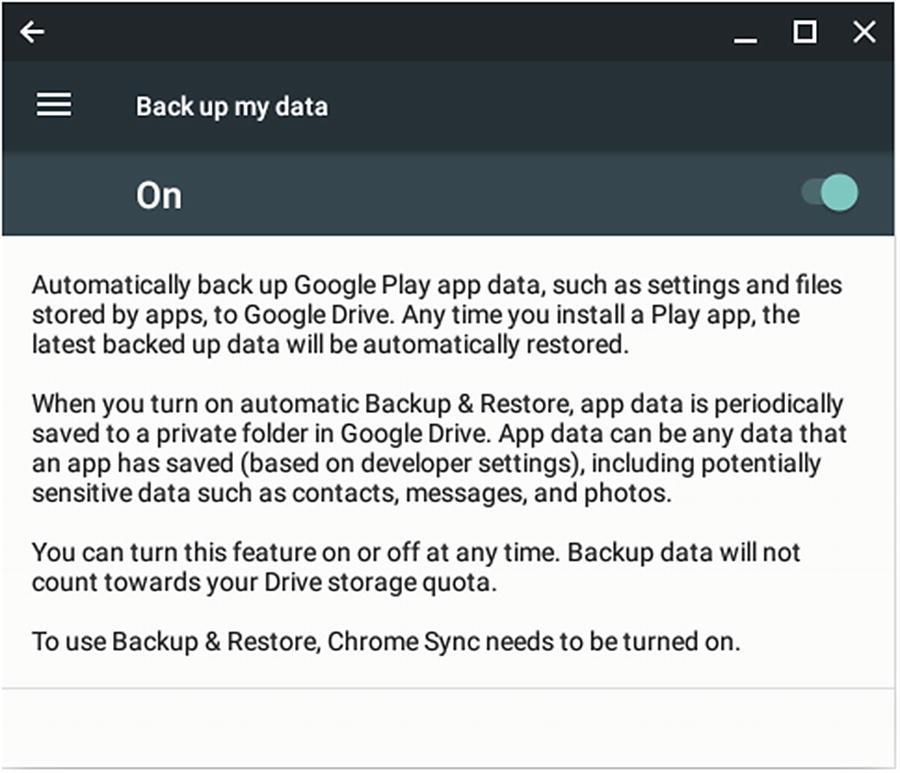
Set the master switch on the Back up my data screen to On to have the Android subsystem back up your Google Play app data to Google Drive
Note
Chrome Sync must be turned on for automatic backup to work.
Configuring Accessibility Preferences for Android
Captions: Click this button to display the Captions screen (shown on the right in Figure 4-48). Set the master switch to On to enable captions. You can then click the Language button to open the Language dialog box, in which you choose the caption language, and click the Text size button to open the Text size dialog box, in which you specify the text size (your options are Very small, Small, Normal, Large, and Very large).
Display size: Click this button to show the Display size screen, which enables you to change the size of items on the screen.
High contrast text: Set this switch to On to increase the contrast of text.
Touch & hold delay: Click this button to open the Touch & hold delay dialog box, in which you can set the delay for a touch-and-hold operation by tapping the “Short,” “Medium,” or “Long” option buttons.
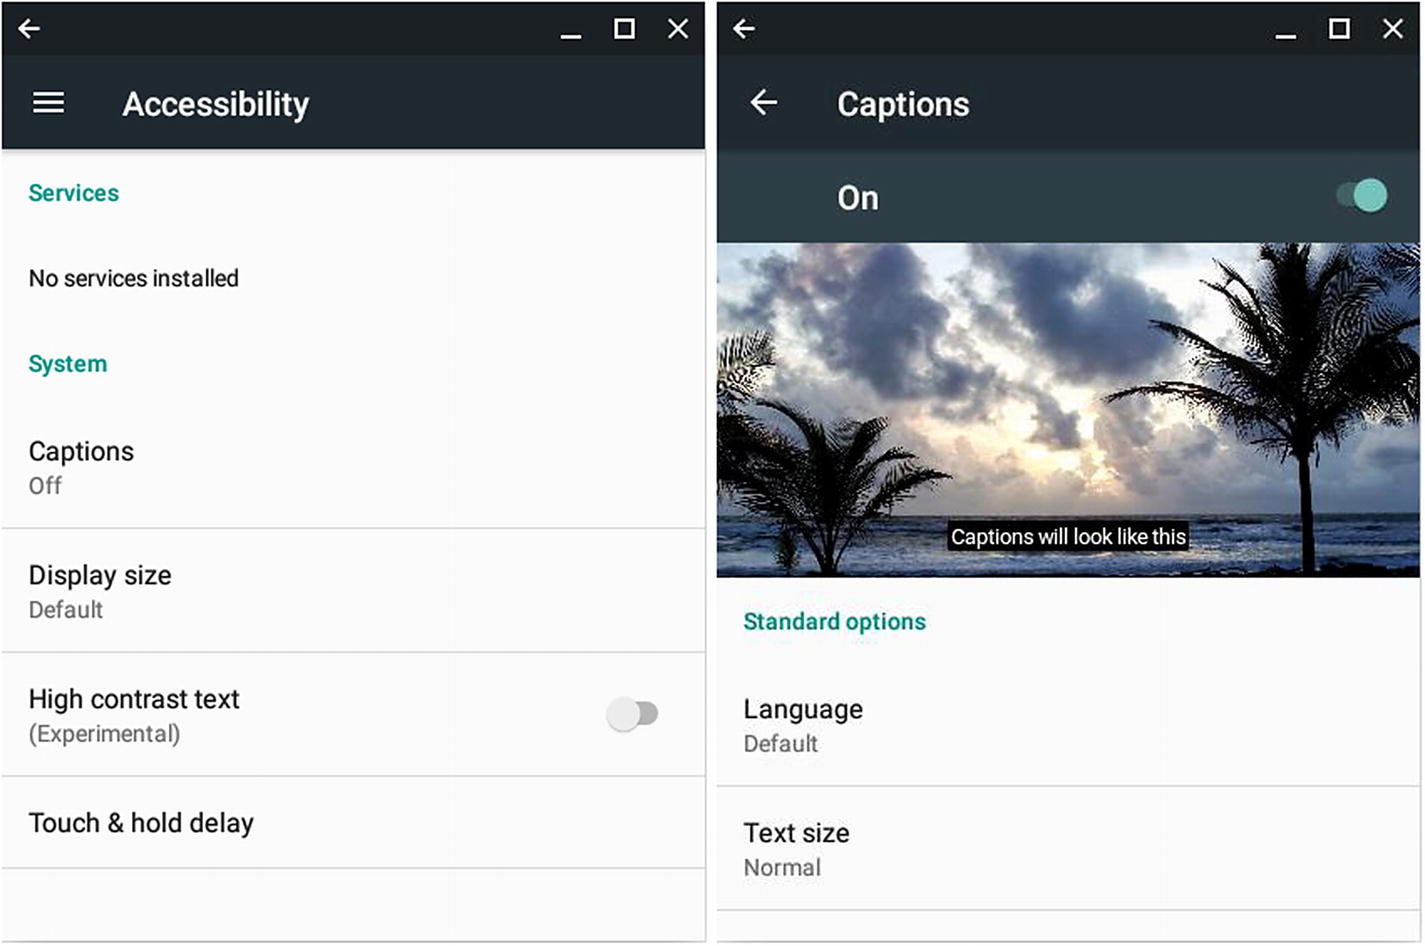
The Accessibility screen (left) shows the accessibility services and system settings available. Use the Captions screen (right) to configure captions on Android apps.
Configuring Printing Preferences
To configure printing preferences for Android, click the Printing button in the Settings window and then work on the Printing screen (shown on the left in Figure 4-49). Here, the Print services list shows the print services Android is set up to use. You can click a print service to display its details screen, such as the Cloud Print screen shown on the right in Figure 4-49, where you can enable or disable the service by moving its master switch to On or Off.
To add a print service to Android, click the Add service button. A window will open showing the print service plugins available on Google Play. You can then browse the print services and install the appropriate one for the printer you want to use.
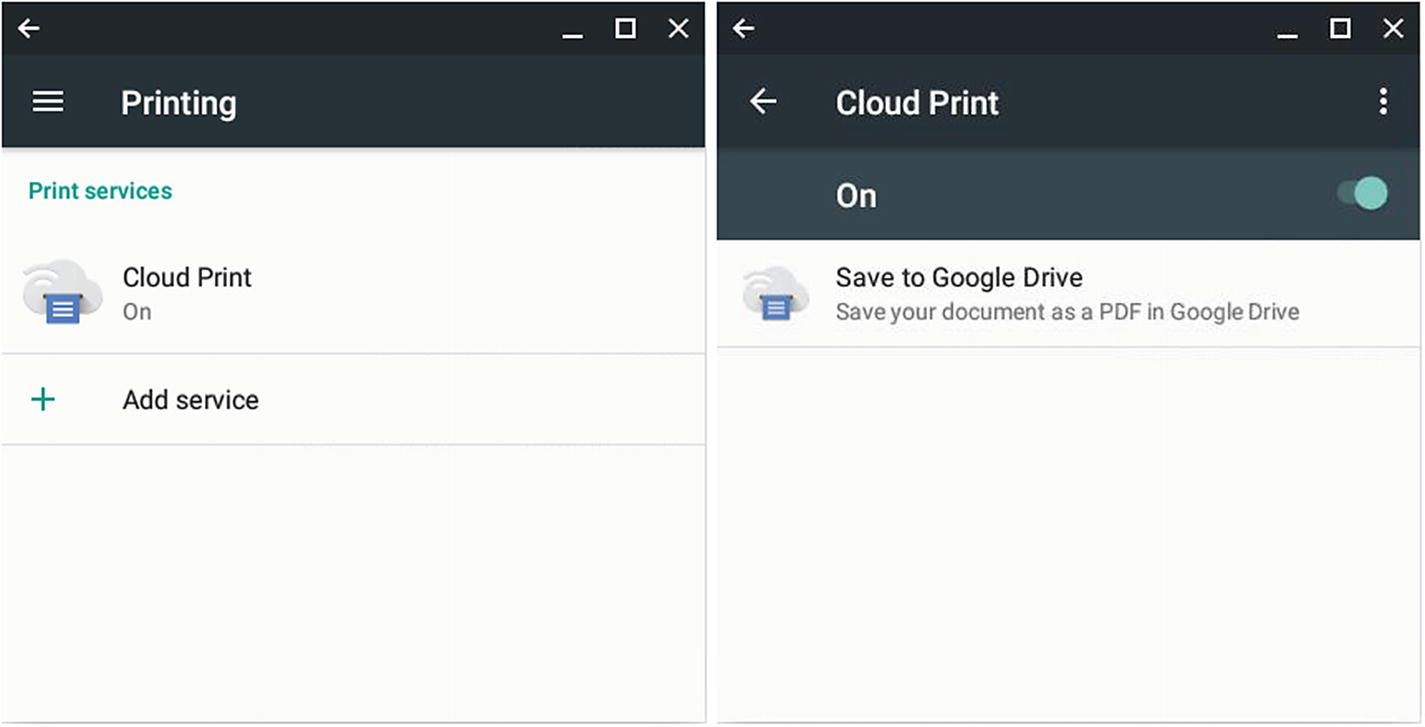
The Printing screen (left) shows the print services currently configured for Android . Click a print service to display its details (right).
Viewing About Device Preferences
To see the details about the Android subsystem, click the Device status button and then look at the four readouts on the Device status screen (shown on the left in Figure 4-50): Android version, Android security patch level, Kernel version, and Build number.
The Device status screen also contains the Legal information button, which you can click to display the Legal information screen (shown on the right in Figure 4-50). Here, you can click the Open source licenses button to display information about the open source licenses Android uses, or click the System WebView licenses button to display the credits for the System WebView components.
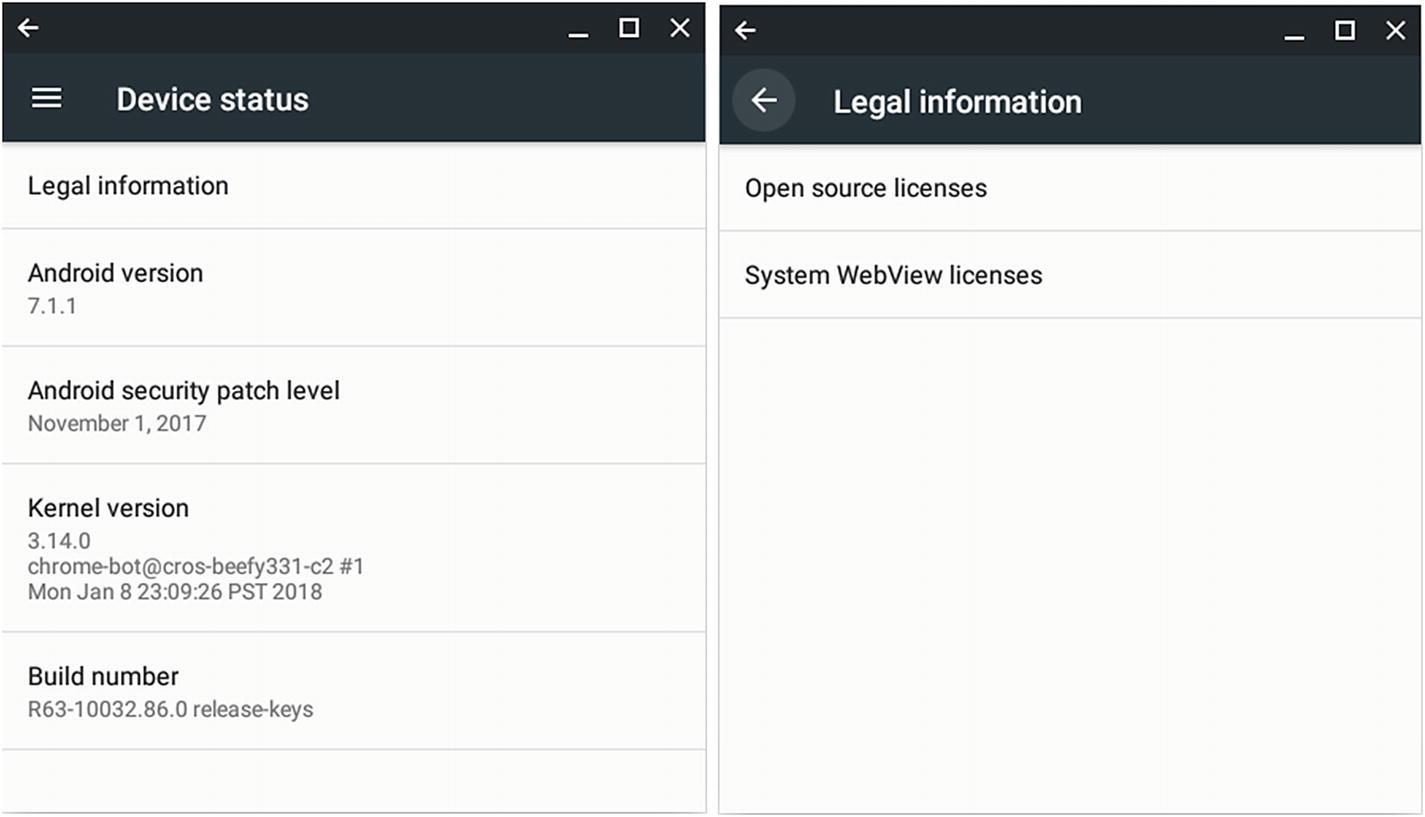
The Device status screen (left) shows the Android version, Android security patch level, the kernel version, and the build number. Click the Legal information button to display the Legal information screen (right), from which you can examine the open source licenses and the System WebView licenses.
DISPLAYING THE ANDROID DEVELOPER OPTIONS
The Settings app in Android includes a Developer Options section that is hidden by default because Google feels that most users are better off not using the settings intended for app developers. You can display the Developer Options section by clicking the Build number readout on the Device status screen six times. When the message “You are now a developer!” appears, click the Back button in the upper-left corner of the screen, and you will find the Developer options button has appeared above the About Device button in the Settings window.
Removing the Google Play Store

Click the Remove Android Apps button in the Remove Android apps? dialog box if you want to remove the Google Play Store and all Android apps from the Chromebook.
Configuring Startup Settings
Open the New Tab page: Select this option button to have Chrome display the New Tab page.
Continue where you left off: Select this option button to have Chrome reload the pages you were using last. This can be a good way to resume what you were doing.
Open a specific page or set of pages: Select this option button to have Chrome load the page or pages you specify. You can then click the Use current pages button to display a list of the pages you currently have open; you can remove a page from the list by clicking the More Actions button (the three vertical dots) and then clicking the Remove item on the menu that opens, or edit the address by clicking the More Actions button and then clicking the Edit item on the menu. To add a page, click the Add a new page button, type the URL in the “Site URL” field in the Add a new page dialog box, and then click the Add button .
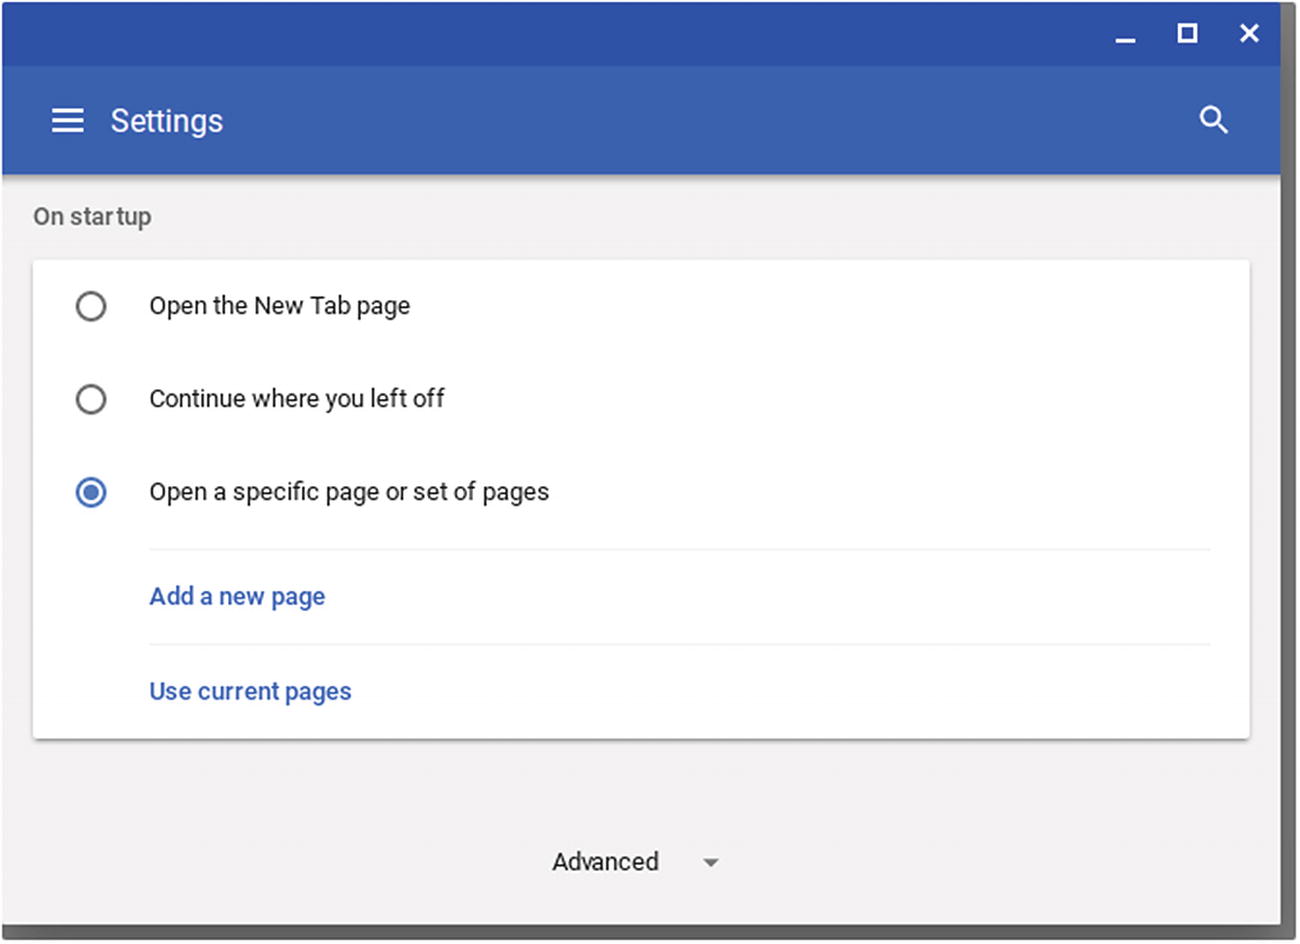
In the On startup section of the Settings window, choose which pages you want the Chromebook to display when you log in.
Configuring Date and Time Settings
Chrome OS can set the date and time automatically, but you can also set them manually if you prefer. You can also choose whether to set the time zone automatically and whether to use the 24-hour clock.
Set time zone automatically using your location: Set this switch to On to have Chrome OS detect your location and set the time zone accordingly. To set the time zone manually, set this switch to Off, click the pop-up menu, and then click the appropriate time zone.

In the Date and time section of the Settings window, you can choose between setting the time zone automatically and setting it manually. You can also use the 24-hour clock and set the date and time.
Use 24-hour clock: Set this switch to On to make Chrome display the time in 24-hour format, such as 13:18 instead of 1:18.
Set date and time: To set the date and time, click this button, adjust the date and time as needed in the Check your system time dialog box (see Figure 4-54), and then click the Done button.
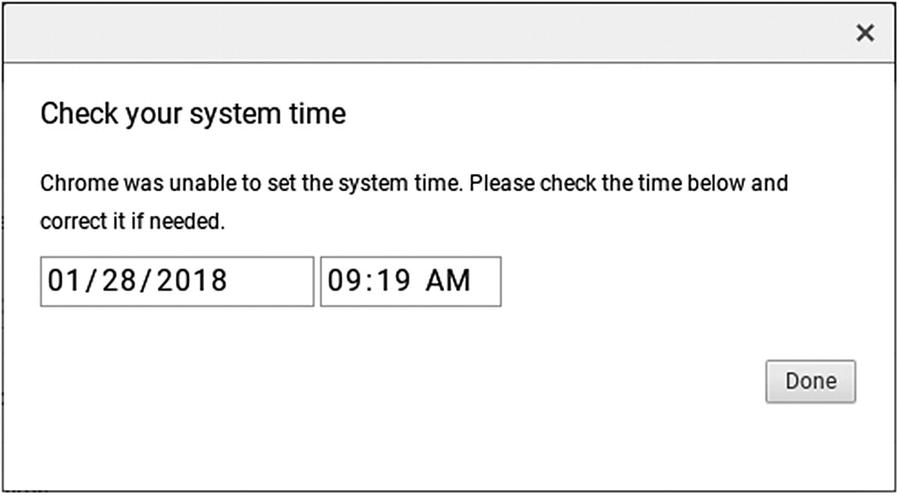
The Check your system time dialog box enables you to set the Chromebook’s date and time manually
Configuring Privacy and Security Settings
Use a web service to help resolve navigation errors: Set this switch to On if you want Chrome to automatically provide suggestions when the browser is unable to connect to a web page. Chrome sends the web address to Google, which returns the suggestions for correcting the address or accessing similar addresses. Set this switch to Off if sharing browsing data with Google like this is a privacy concern.
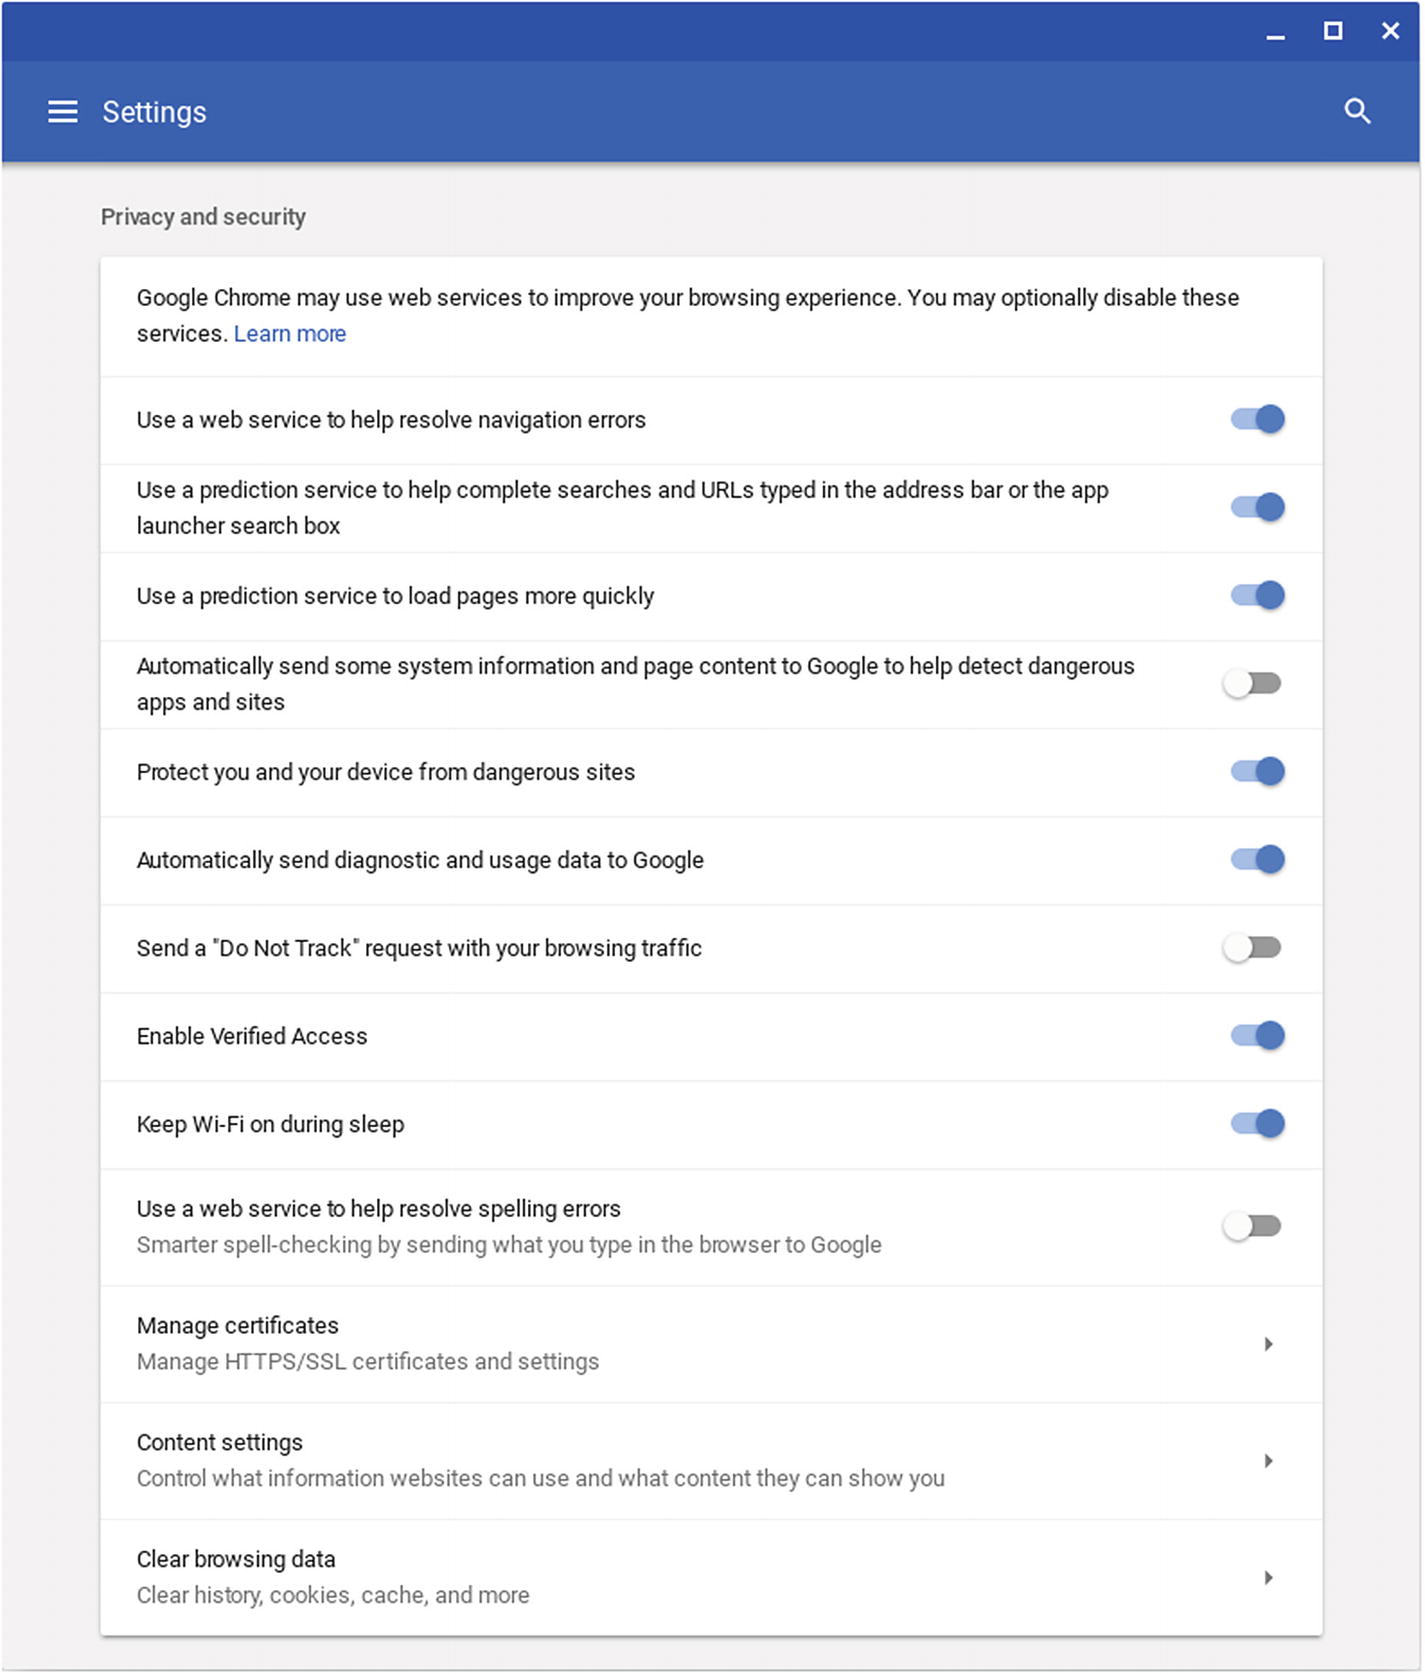
The Privacy and security section of the Settings window includes settings for protecting the Chromebook and its user from dangerous websites, for managing certificates and customizing content settings, and for clearing browsing data
Use a prediction service to help complete searches and URLs typed in the address bar or the app launcher search box: Set this switch to On to allow Chrome OS to share search terms and partial URLs typed in the Chrome omnibox or in the app launcher with your search engine in order to provide search results or to complete the URLs.
Use a prediction service to load pages more quickly: Set this switch to On to speed up browsing by preloading information on linked web pages. With this feature enabled, Chrome looks up the IP addresses of the web pages linked to the current page and preloads data from those pages so it can display a page more quickly when the page’s link is clicked.
Caution
Be careful with the Use a prediction service to load pages more quickly setting. While this setting can speed up browsing, preloading data from linked web pages has two downsides. First, preloading linked pages increases the amount of data transferred across the Internet connection; even if your school’s Chromebooks go through proxy servers rather than connecting to the Internet directly, network performance may take a hit from preloading, especially on link-heavy pages. Second, preloading may make Chrome appear to have accessed sites that the Chromebook’s user has not in fact accessed. For example, preloading may cause Chrome to store cookies from sites whose pages are linked to a page that was actually visited.
Automatically send some system information and page content to Google to help detect dangerous apps and sites: Set this switch to On to allow Chrome OS to share system information and web-page content with Google when the OS detects a dangerous app or a dangerous website.
Protect you and your device from dangerous sites: Set this switch to On to have Chrome check the websites you visit against a list of known bad sites. Chrome displays a warning when you go to access a site that may be harmful.
Automatically send diagnostic and usage data to Google: Set this switch to On to have Chrome OS automatically send data about the Chromebook’s usage and about diagnosed errors to Google.
Send a “Do Not Track” request with your browsing traffic: Set this switch to On to have the Chrome browser request that websites not track your browsing. Many websites do not honor Do Not Track requests.
Enable Verified Access: Set this switch to On to enable the Verified Access security feature. Verified Access enables network devices, such as your school’s Wi-Fi access points and servers on the Internet, to obtain a cryptographic guarantee of the identity of the Chromebook and its user.
Keep Wi-Fi on during sleep: Set this switch to On to allow Chrome OS to use the Wi-Fi even when the Chromebook is asleep. Keeping Wi-Fi on during sleep uses some battery power, but it enables the Chromebook to update notifications and app data so that when you wake the Chromebook the content is up to date and you can resume work more quickly. Chrome OS can also connect to a different Wi-Fi network if necessary while the Chromebook is asleep—for example, because the Chromebook is moved to a different location or because the previous Wi-Fi network goes offline.
Use a web service to help resolve spelling errors: Set this switch to On to make Chrome send the text you type to Google servers to resolve any spelling errors in search terms and other content you type online. Set this switch to Off if sharing this data with Google raises privacy concerns.
Managing Certificates
Your Certificates: This tab lists the certificates that identify you. (You may find no certificates here.) You can add a certificate by clicking the Import button and then following the prompts. You can add a certificate and bind it to the Chromebook’s Trusted Platform Module (TPM) encryption hardware by clicking the Import and Bind button and then following the prompts. You can view a certificate by clicking its More Actions button (the three vertical dots) and then clicking the View item on the menu. You can delete a certificate by clicking the More Actions button and then clicking the Delete item on the menu.
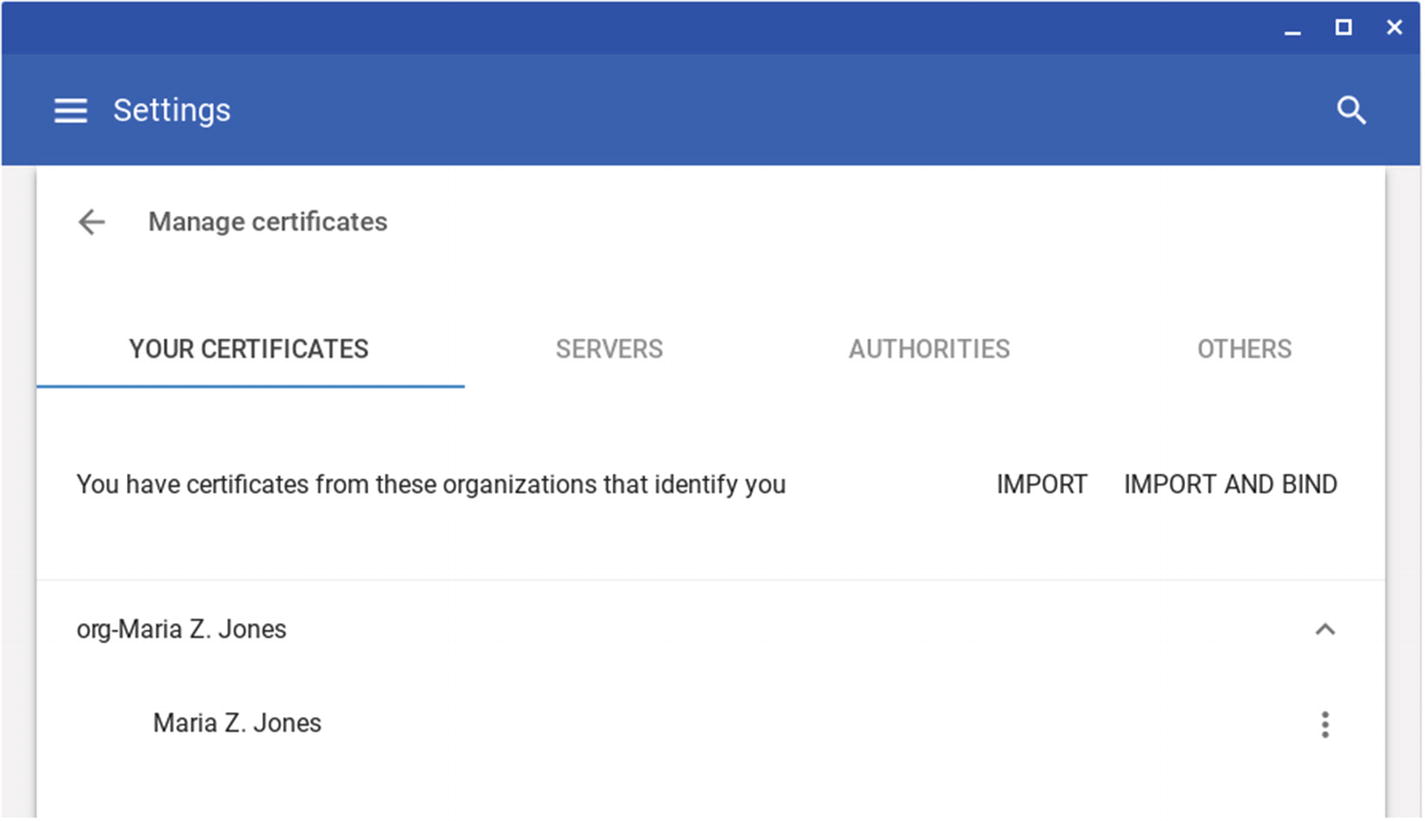
The Manage certificates screen contains four tabs: Your Certificates, Servers, Authorities, and Others
Note
A digital certificate bound to the Chromebook’s TPM has “(hardware backed)” after its display name. For example, a digital certificate listed as Maria Z. Jones (hardware backed) is bound to the TPM, whereas a digital certificate listed as Maria Z. Jones is not bound.
Servers: This tab lists the certificates that identify specific servers. You can add a certificate by clicking the Import button and then following the prompts. You can view a certificate’s details by clicking the More Actions button and then clicking the View item on the menu. You can export a certificate by clicking the More Actions button and then clicking the Export item on the menu.
Authorities: This tab lists the certificates that identify certificate authorities, the bodies that issue digital certificates. Here, too, you can add a certificate by clicking the Import button, view a certificate’s details by clicking the More Actions button and then clicking the View item, and export a certificate by clicking the More Actions button and then clicking the Export item. You can also edit the trust settings for a certificate authority’s certificate like this:
- a.
Click the More Actions button for the certificate and then click the Edit item on the menu. The Certificate authority dialog box will open (see Figure 4-57).
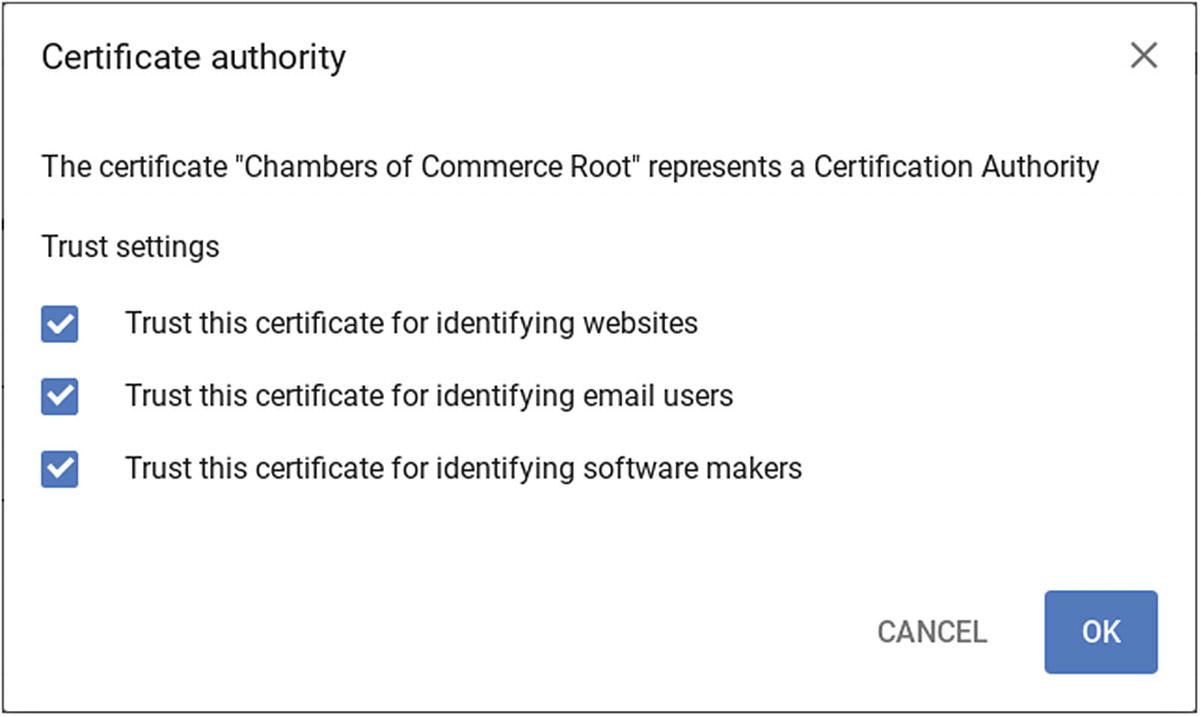 Figure 4-57
You can edit the trust settings for a certificate authority by checking and unchecking the check boxes in the Certificate authority dialog box
- b.
Check or uncheck the “Trust this certificate for identifying websites” check box, as needed.
- c.
Check or uncheck the “Trust this certificate for identifying email users” check box, as needed.
- d.
Check or uncheck the “Trust this certificate for identifying software makers” check box, as needed.
- e.
Click the OK button to close the Certificate authority dialog box.
- a.
Others: This tab lists other certificates installed on the Chromebook. You may find no certificates here; if there are any, you can view their details and export them from the More Actions menu.
Choosing Content Settings
Chrome’s content settings enable you to specify what content websites can display on the Chromebook, control which of the device’s features websites can use, and control what information websites can use. For example, you can prevent websites from displaying pop-up messages and allow only specific websites to access the Chromebook’s camera and microphone. You can also control whether websites are allowed to ask to become default handlers for specific protocols; for example, the site mail.google.com is the default handler for the mailto protocol, which is used for sending email messages.
You can configure content settings for all websites, for specific sites, or for a combination of the two.
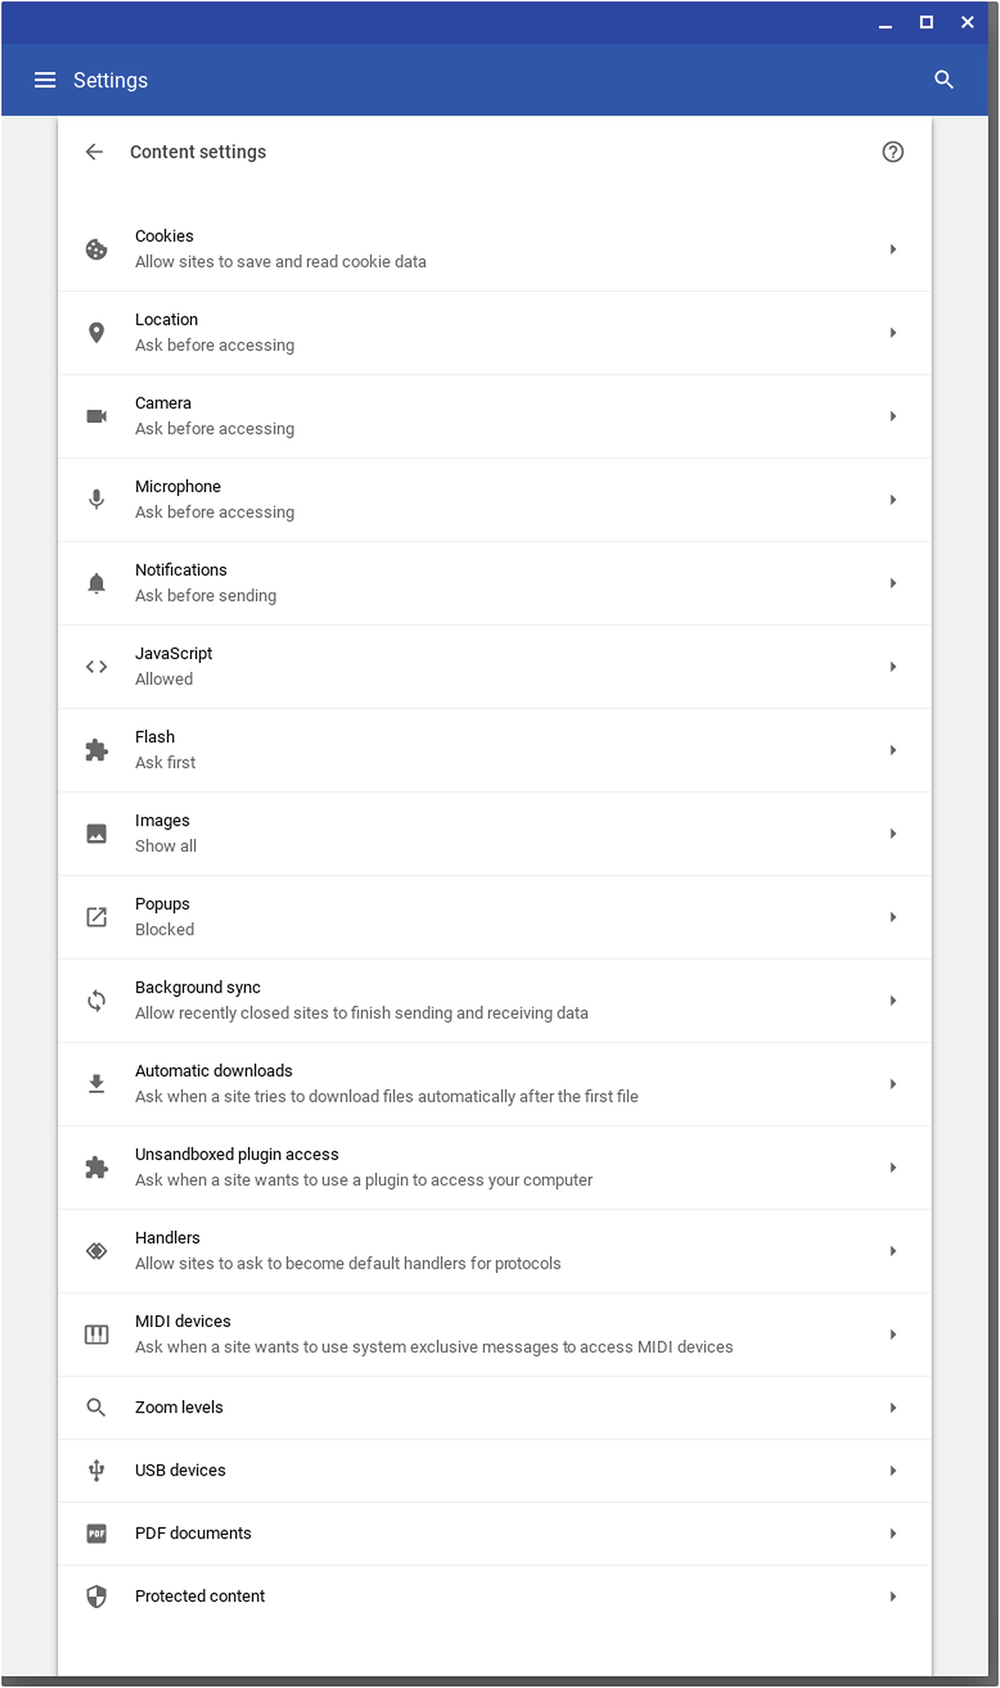
The Content settings screen gives you tight control over the actions that websites are able to take on the Chromebook
Most of these category screens have similar controls to each other and are based around a Block list and an Allow list. The Block list contains sites that are explicitly blocked from using that particular feature, and the Allow list contains sites that are explicitly allowed to use it. Some of the screens enable you to edit the Block list and the Allow list directly, whereas others let you edit the lists only indirectly, by clicking the Allow button or the Block button when Chrome prompts you for permission for a site. Some screens also have a master switch at the top that you can set to On or Off to control the default setting for the feature. Confusingly, the name displayed for this switch changes depending on the setting. For example, on various screens, the switch is labelled “Ask first (recommended)” when it is set to On and “Blocked” when it is set to Off.
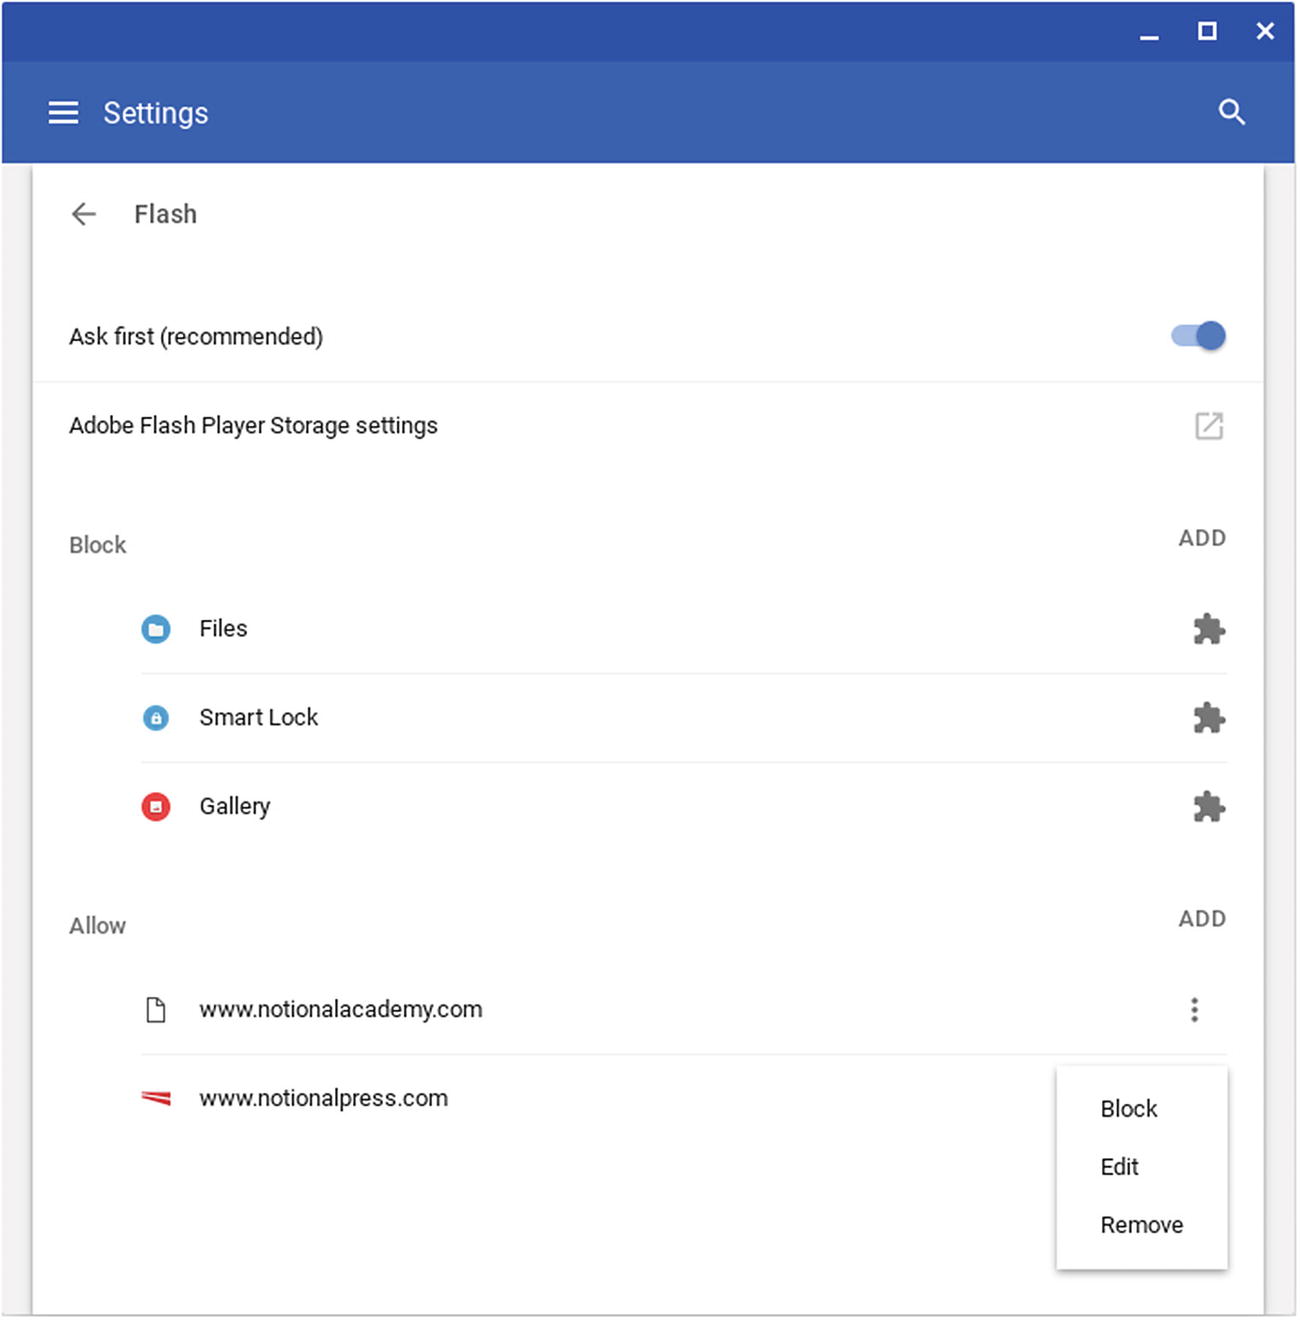
The Flash screen in Settings includes the “Ask first (recommended)” switch, the Block list, and the Allow list. The starlike symbol to the right of Files, Smart Lock, and Gallery indicates that the blocking is enforced by a Chrome extension.
Below these two settings is the Block list, which shows apps and sites blocked from using Flash Player. In the figure, you can see that the Files app, the Smart Lock app, and the Gallery app are blocked from using Flash. The starlike symbol that appears on the right side of the buttons for these apps denotes “This setting is enforced by an extension,” which means that you cannot change it.
Add a site: Click the Add button at the right end of the Block or Allow headings to open the Add a site dialog box. Type or paste the site’s URL in the Site box and then click the Add button .
Remove a site: Click the More Actions button (the three vertical dots) to the right of an item to display the menu, and then click the Remove item.
Edit a site: Click the More button (the three vertical dots) to the right of an item to display the menu, and then click the Edit button. In the Edit site dialog box that opens, edit the URL as needed and then click the Edit button.
Block an allowed site: Click the More button (the three vertical dots) to the right of an allowed site to display the menu, and then click the Block item. Chrome OS will move the site to the Block list.
Allow a blocked site: Click the More button (the three vertical dots) to the right of an item to display the menu, and then click the Allow item. Chrome OS will move the site to the Allow list.
When you finish choosing settings on the category screen, click the Back button (the arrow in the upper-left corner) to return to the Content settings screen.
Cookies: The Cookies screen enables you to specify which sites can save cookies on the Chromebook and how long the cookies persist. We’ll look at the specific settings on this screen in the example in the next section.
Location: The Location screen lets you control whether websites can learn the Chromebook’s location. Set the switch at the top to On, setting its label to “Ask before accessing (recommended),” if you want Chrome to prompt the user to allow location access; otherwise, set the switch to Off, changing its label to “Blocked.” The Block list shows sites that have been blocked from accessing the location, and the Allow list shows sites that have been permitted to access it.
Camera: The Camera screen enables you to control which websites can use the Chromebook’s camera or cameras. If the Chromebook has multiple cameras (either built-in or connected), choose the appropriate camera in the pop-up menu at the top and then set the switch at the top to On, setting its label to “Ask before accessing (recommended),” or to Off, setting its label to “Blocked.”
Microphone: The Microphone screen lets you control which websites can use the Chromebook’s microphone or microphones. In the pop-up menu at the top, choose the Default item to configure the default microphone; otherwise, select the specific microphone you want to affect. Then set the switch to On, setting its label to “Ask before accessing (recommended),” if you want the microphone to be available; set the switch to Off, setting its label to “Blocked,” if you want to prevent websites from accessing it.
Notifications: The Notifications screen allows you to specify which sites can send notifications. Set the switch at the top to On, setting its label to “Ask before sending (recommended),” if you want notifications to be available; otherwise, set the switch to Off, setting its label to “Blocked.” Next, use the controls to adjust the Block list and the Allow list. The Allow list contains entries for Google Docs, Google Drive, and Google’s mail servers that are enforced by extensions.
JavaScript: The JavaScript screen enables you to allow or disallow JavaScript by setting the switch to the top to On, setting its label to “Allowed (recommend),” or to Off, setting its label to “Blocked.” You can also customize the Block list and the Allow list.
Flash: The Flash screen, as explained earlier in this section, contains the master switch and the Adobe Flash Player Storage settings button as well as the Block list and the Allow list.
Images: The Images screen enables you to control whether specific websites can display images. Set the switch at the top to On, setting its label to “Show all (recommended),” if you want websites to be able to display images by default; if you want to block images, set the switch to Off, changing its label to “Do not show any images.” You can then customize the Block list and the Allow list as needed.
Pop-ups: The Pop-ups screen lets you control whether websites can display pop-up windows. When set to Off, the switch has the label “Blocked (recommended)”; when set to On, the switch has the label “Allowed.” After setting the switch, customize the Block list and the Allow list as needed.
Background sync: The Background sync screen allows you to control whether websites can sync data in the background. To permit background sync, set the switch at the top to On, which sets its label to “Allow recently closed sites to finish sending and receiving data (recommended).” To prevent background sync, set the switch to Off, which sets its label to “Do not allow recently closed sites to finish sending and receiving data.” After setting the switch, customize the Block list and the Allow list as necessary.
Automatic downloads: The Automatic downloads screen enables you to control whether a website can prompt the user to allow it to download further files after the user downloads one file manually. To allow this prompting, set the switch at the top to On, so its label appears as “Ask when a site tries to download files automatically after the first file (recommended)”; to prevent the prompting, set the switch to Off, so its label appears as “Do not allow any site to download multiple files automatically.” You can then customize the Block list and the Allow list as needed.
Unsandboxed plugin access: The Unsandboxed plugin access screen enables you to control whether sites can ask to use plugins to access the Chromebook without working in the sandbox, the protected area to which a plugin is normally restricted for safety. Set the switch to On, making its label “Ask when a site wants to use a plugin to access your computer (recommended),” to allow sites to prompt the user. Otherwise, set the switch to Off, making its label “Do not allow any site to use a plugin to access your computer.” Next, customize the Block list and the Allow list as needed.
Handlers: The Handlers screen enables you to control whether sites can ask to become the default handlers for specific networking protocols. To allow sites to ask permission, set the switch to On, making its label “Allow sites to ask to become default handlers for protocols (recommended)”; otherwise, set the switch to Off, making its label “Do not allow any site to handle protocols.” You can then customize the settings in the mailto section and the webcal section. The mailto protocol is for sending email messages, and the webcal protocol is for calendaring.
MIDI devices: The MIDI devices screen enables you to control whether sites can ask to get exclusive access to MIDI devices. To allow requests for exclusive access, set the switch to On, making its label “Ask when a site wants to use system exclusive messages to access MIDI devices (recommended)”; to prevent requests, set the switch to Off, making its label “Do not allow any sites to use system exclusive messages to access MIDI devices.”
Zoom levels: The Zoom levels screen lists sites for which a custom zoom level is set in Chrome. You cannot adjust any of the custom zoom levels here, but you can get rid of a custom zoom level by clicking the Remove zoom level (X) button to its right.
USB devices: The USB devices screen shows USB devices connected to the computer.
PDF documents: The PDF documents screen contains only the “Download PDF files instead of automatically opening them in Chrome” switch, which you can set to On to make Chrome download PDF files instead of displaying them. This setting is useful if you want to store PDF files on the Chromebook so you can read them offline.
Protected content: The Protect content screen enables you to control whether sites can play protected content, such as movie files protected by licenses. Set the “Allow sites to play protected content (recommended)” switch to On or Off, as needed. Set the “Allow identifiers for protected content (computer restart may be required)” switch to On if you want to allow content services to store unique identifiers on the Chromebook for authorizing access to protected content. You can also customize the Block list and the Allow list as needed.
An Example of Content Settings: Configuring Cookies
As an example of configuring content settings, let us look at the Cookies category of content. Cookies, as you likely know, are small text files that websites set on a computer. A cookie enables a site to track the user’s movement around the site and is needed for features such as keeping a list of items you have browsed on the site or maintaining the contents of a shopping cart.
Cookies set by the websites you visit are called first-party cookies and are usually beneficial, so you would normally not want to prevent websites from setting them. But advertisers on the websites you visit can also set cookies that track your movement from one site to another. These cookies are called third-party cookies and are not usually beneficial. Various browsers, including Chrome, block third-party cookies by default.
Control whether sites in general can set cookies: Set the switch at the top to On, making its label “Allow sites to save and read cookie data (recommended),” to allow cookies. Set the switch to Off, making its label “Blocked,” to block cookies.
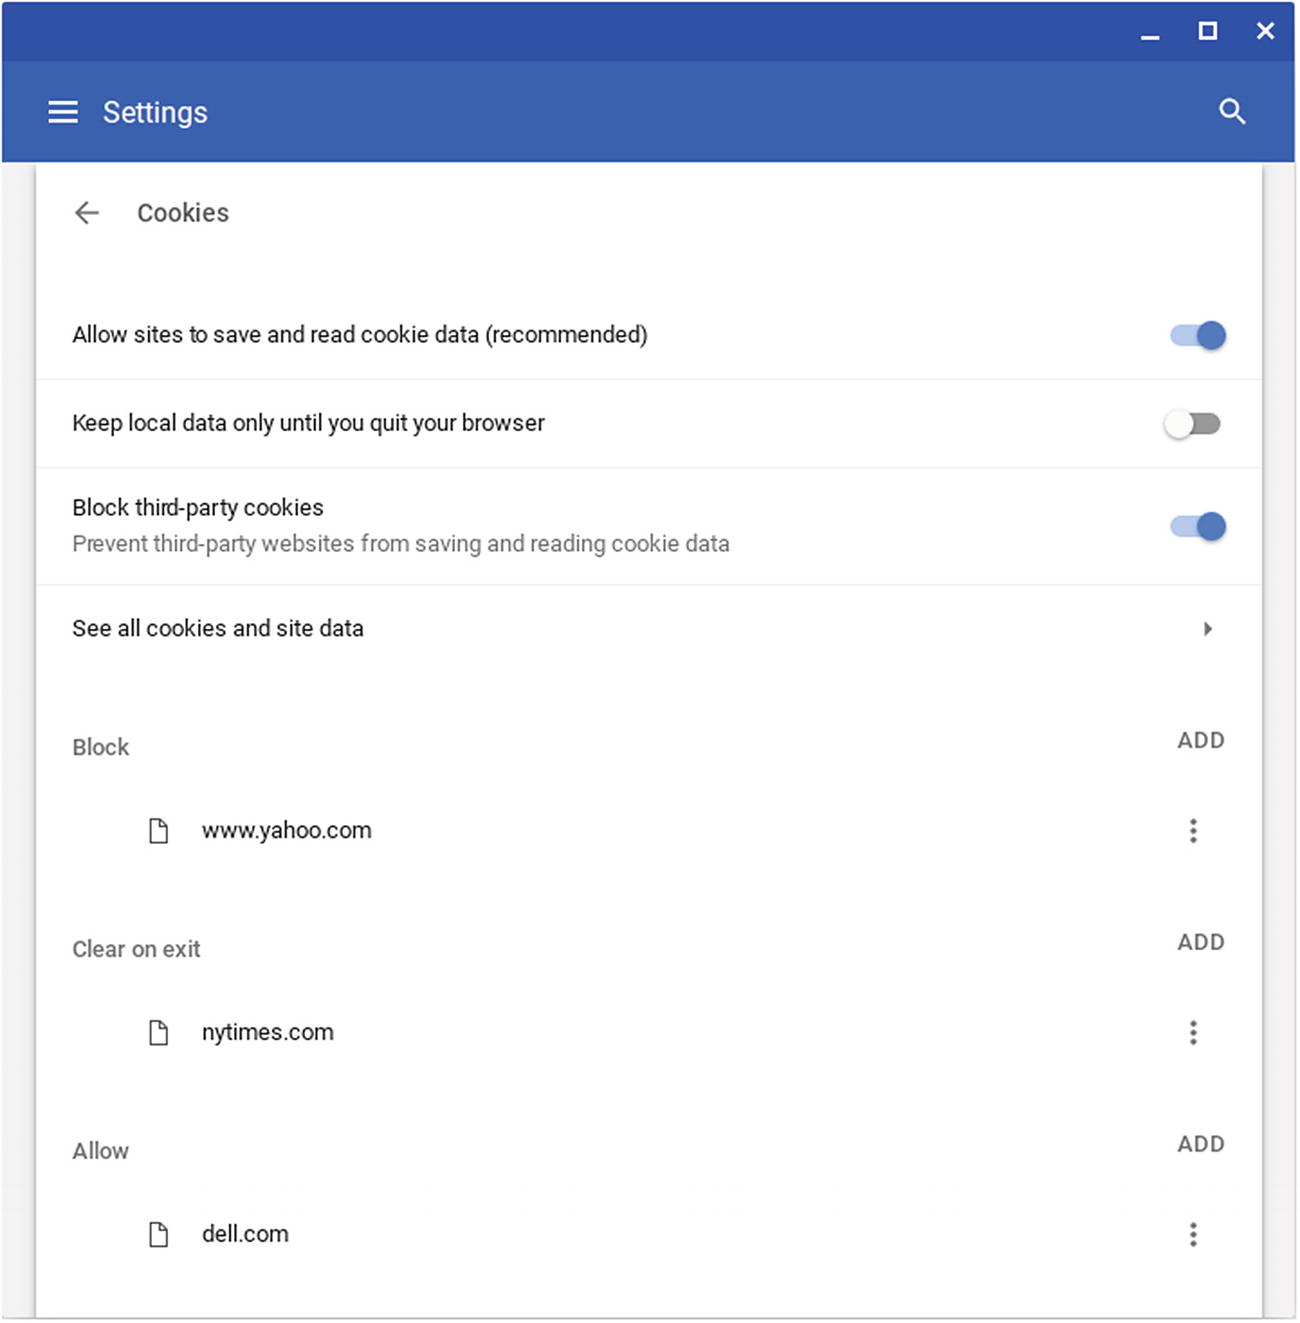
The Cookies screen enables you to control which websites can save cookies on the Chromebook
Set Chrome to delete cookies at the end of each session: Set the “Keep local data only until you quit your browser” switch to On. With this switch set to Off, the cookies will persist from one browsing session to another, which is what you normally want.
Block third-party websites from setting cookies: Set the “Block third-party cookies” switch to On. This is usually a good idea.
See all cookies and data: Click this button to display the All cookies and site data screen, which shows a complete list of all the sites that have set cookies. You can dig into the details of the cookies, delete cookies for individual sites, or delete all the cookies.
See which sites you have blocked, set to be cleared at the end of the browsing session, or allowed: Look at the Block list, the Clear on exit list, or the Allow list.
Add a site to the Block list, the Clear on exit list, or the Allow list: Click the Add button, type or paste the URL in the Site box, and then click the Add button.
Allow a blocked site: Click the More Actions button (the three vertical dots) on its line and then click the Allow item on the menu.
Set a site to be cleared at the end of your browsing session: Click the More Actions button on the site’s line and then click the Clear on exit item on the menu.
Edit a site’s URL: Click the More Actions button on the site’s line, click the Edit item on the menu, edit the URL in the Edit site dialog box, and then click the Edit button.
Remove a site from its current list: Click the More Actions button on the site’s line and then click the Remove item on the menu.
Block an allowed site: Click the More Actions button on the site’s line in the Allow list and then click the Block item on the menu.
Clearing Browsing Data
Browsing the Web causes the Chrome browser to store a variety of different types of data—the list of web pages visited, the list of files downloaded, cookie files from sites that set them, and various other types of data. Chrome enables you to clear some or all of your browsing data as needed. You can choose to delete just some types of data, just a specific time range, or both.

In the Clear browsing data dialog box, click the Basic tab (left) or the Advanced tab (right) as needed. Choose the appropriate time range in the Time range pop-up menu, check or uncheck the check boxes to specify what data to clear, and then click the Clear Data button.
Browsing history: The browsing history contains the list of websites visited in Chrome when it is not in incognito mode.
Cookies and other site data: Cookies are small text files that websites use to track a visitor’s movement around the site. Other site data comprises non-cookie files that websites store on your computer, such as data for plugin software required by the site.
Cached images and files: Cached images and files are the items that Chrome stores so that it can display web pages again more quickly when you return to them. For example, if you frequently visit the same website, Chrome will cache images such as the site’s logo so that it does not need to download them on each visit.
Download history: The download history contains the list of files downloaded. Clearing the download history does not remove the downloaded files themselves.
Passwords: The Passwords list contains the passwords you have chosen to store in Chrome.
Autofill form data: The Autofill form data contains data you have stored in Chrome for automatically populating the fields in forms—for example, name and address information.
Content settings: The Content settings category contains sites for which you have configured special settings, as explained in the section “Choosing Content Settings” earlier in this chapter. For example, you might block a site from raising notifications.
Hosted app data: The hosted app data is data stored by apps installed on the Chromebook from the Chrome Web Store.
Media licenses: The media licenses are digital files that permit Chrome to play back protected content, such as movies or music files. When you acquire a media license the first time you play back a protected file, Chrome saves the license so you can play the file again later. You wouldn’t normally want to delete media licenses unless you will no longer be using the Chromebook—for example, because you are passing it on to someone else.
- 1.
Click the Basic tab or the Advanced tab, depending on which categories of browsing data you want to clear.
- 2.
Click the Time Range pop-up menu and then click the time period for which you want to clear the data. Your choices are Last hour, Last 24 hours, Last 7 days, Last 4 weeks, or All time.
- 3.
Check the check box for each category of data you want to clear.
- 4.
Click the Clear Data button.
Configuring Passwords and Forms Settings
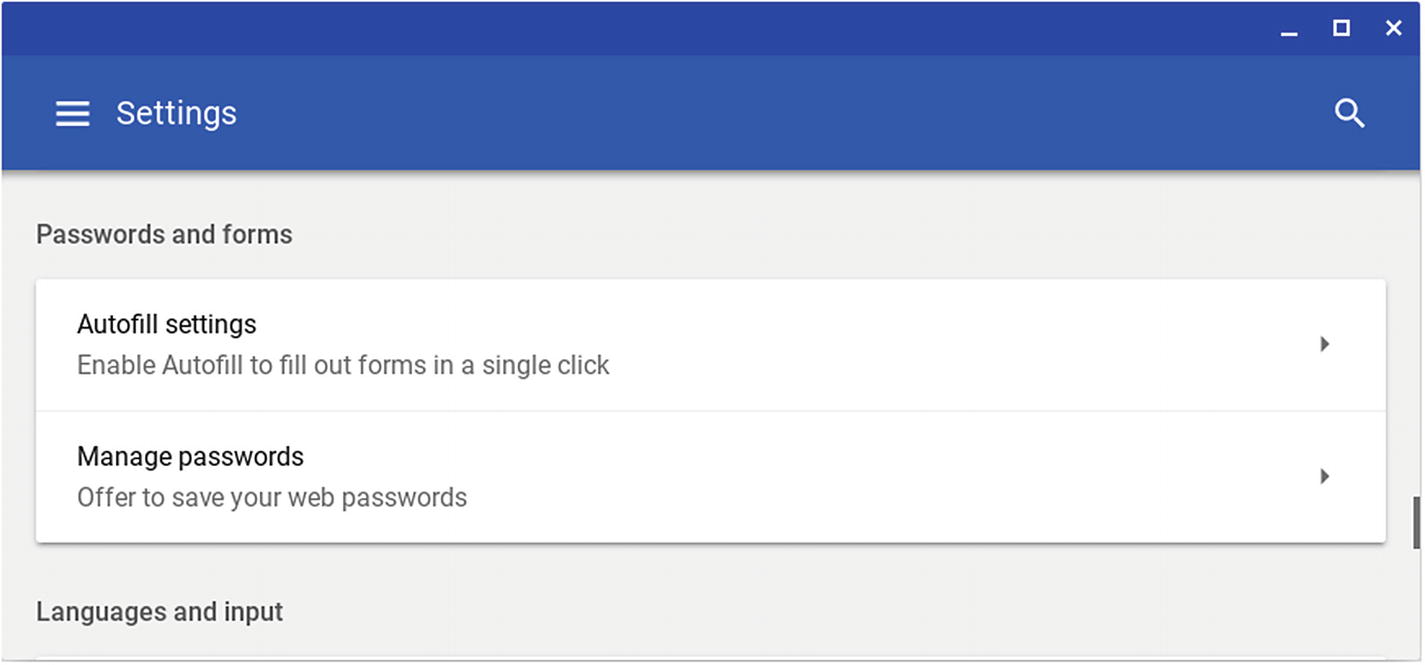
From the Passwords and forms section of the Settings window you can configure autofill settings and settings for managing passwords.
Configuring Autofill Settings
Enable or disable Autofill: Set the master switch to On or Off as needed.
Add an address: Click the Add button on the Addresses line, enter the details in the Add address dialog box that opens, and then click the Save button.
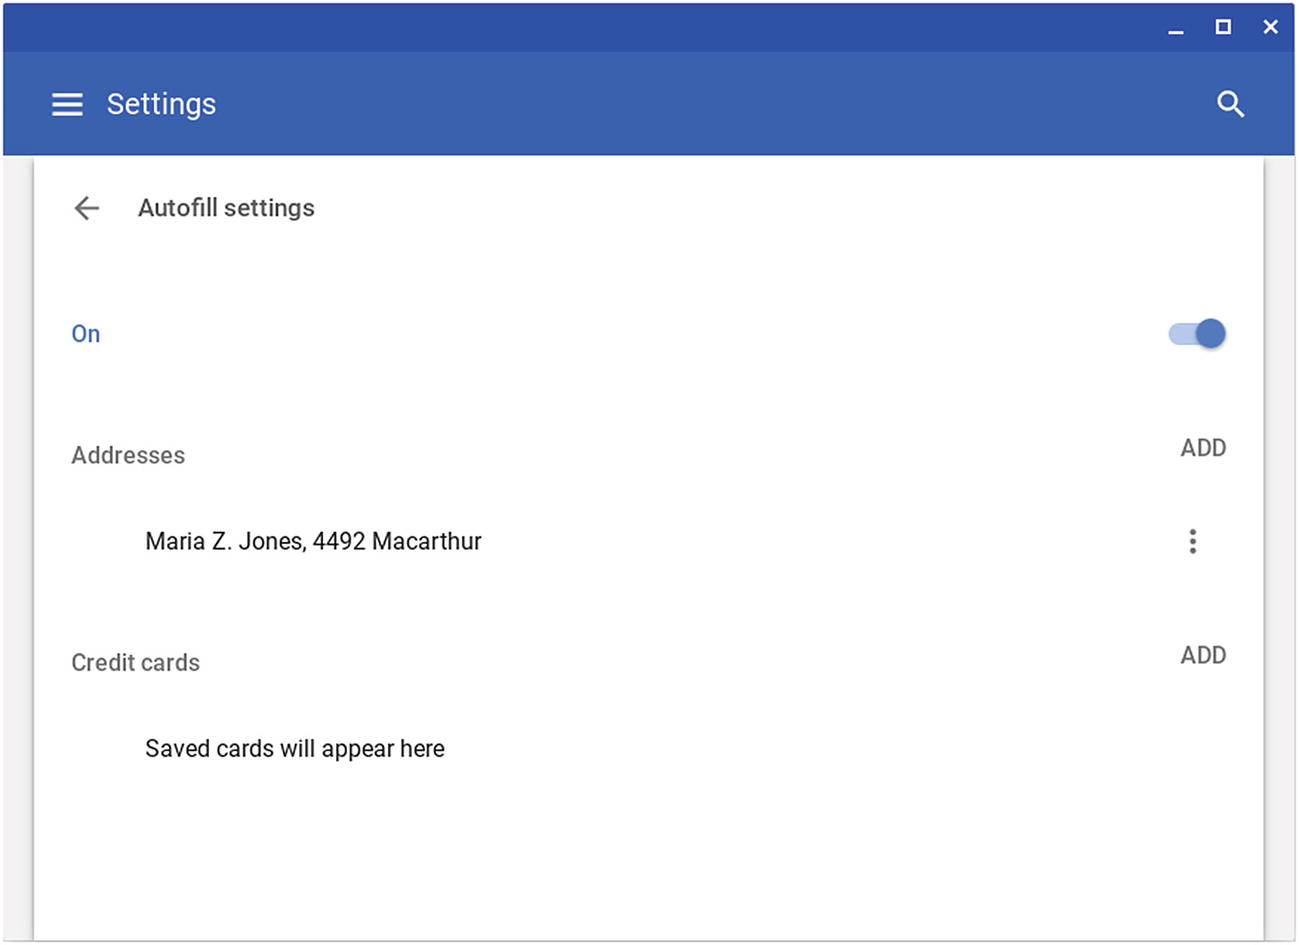
The Autofill screen lets you enable and disable autofill, add and edit addresses, and add and edit credit card details
Edit an existing address: Click the More Actions button (the three vertical dots) to the right of the address and then click the Edit item on the menu. Make the changes needed in the Edit address dialog box (see Figure 4-64) and then click the Save button.
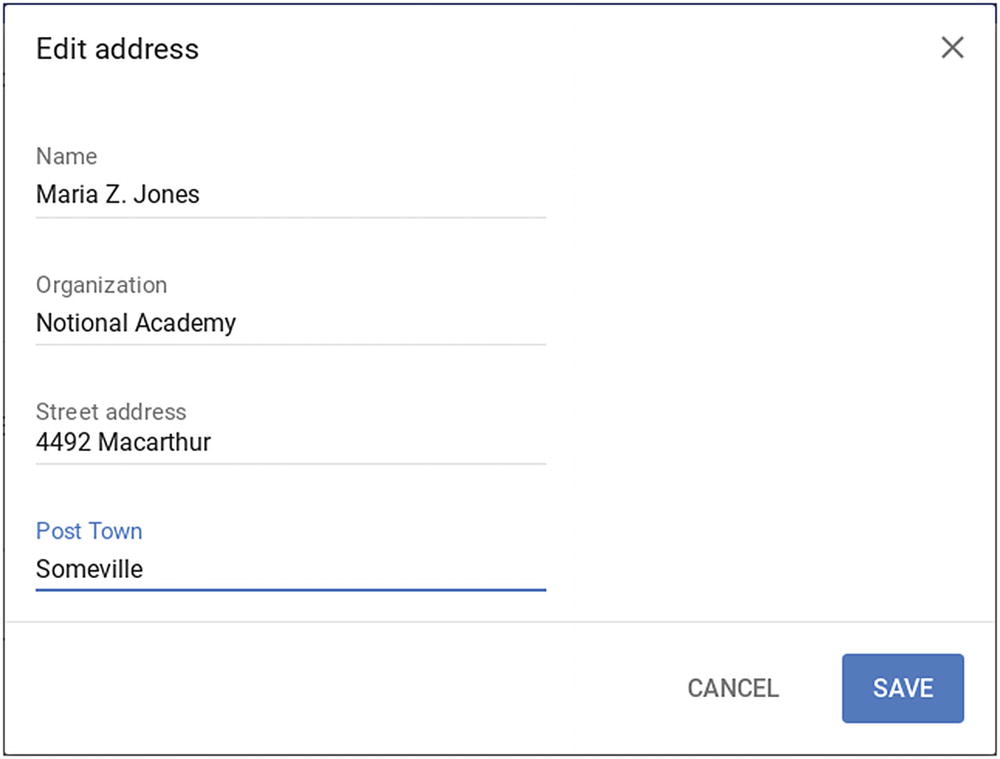
Use the Edit address dialog box to edit an existing address for Autofill
Remove an existing address: Click the More Actions button to the right of the address and then click the Remove item on the menu.
Add a credit card: Click the Add button on the Credit cards line, enter the details in the Add card dialog box, and then click the Save button .
Edit an existing card: Click the More Actions button to the right of the card and then click the Edit item on the menu. Change the details as needed in the Edit card dialog box and then click the Save button.
Remove an existing card: Click the More Actions button to the right of the card and then click the Remove item on the menu.
Managing Your Passwords
Chrome OS can save passwords for you so that it can automatically enter them on subsequent visits to those websites. Storing passwords like this is a major time saver, so you will likely want to use it for many sites.
Search for a website’s password: Click the Search passwords box in the upper-right corner and then start typing the website’s name. A list of matches will appear in the Saved Passwords area, and you can take other actions for the password—for example, viewing it or deleting it. Click the Clear (X) button at the right end of the Search passwords box when you finish searching.
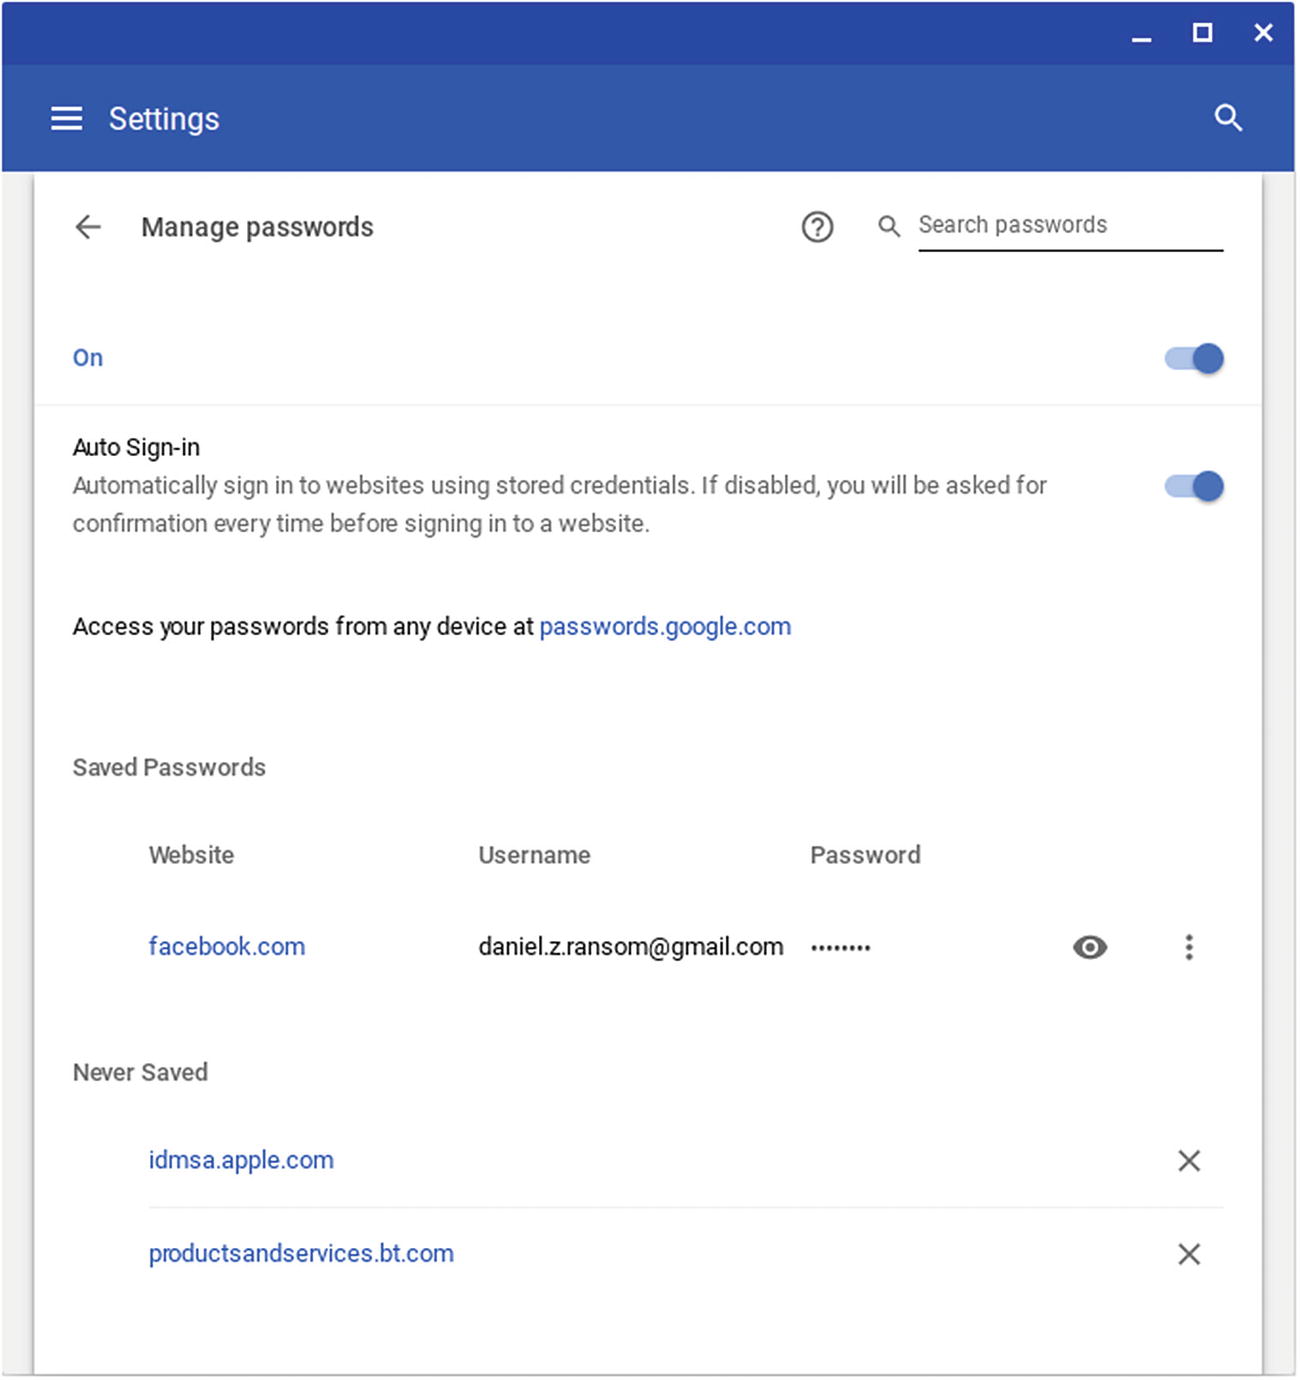
On the Manage passwords screen, you can choose whether to store passwords and whether to sign in automatically to websites. You can also review your saved passwords and the sites for which you have chosen not to save passwords.
Enable or disable storing passwords: Set the master switch to On or Off as needed.
Enable or disable the Auto Sign-in feature: Set the “Auto Sign-in” switch to On or Off as needed. If you disable Auto Sign-in, Chrome will prompt you to allow the use of each stored password.
Review the list of saved passwords: Look at the Saved Passwords list.
View a saved password: Click the Show password icon (the eye icon) on the site’s row.
View the details for the saved password: Click the More Actions button (the three vertical dots) on the site’s row and then click the Details item on the menu. The Saved password details dialog box opens, showing the website address, the username, and the password (as dots; click the Show password icon to display the characters). Click the Done button when you are ready to close the Save password details dialog box.
Remove a saved password: Click the More Actions button on the site’s row and then click the Remove item on the menu.
Review the sites for which you have chosen not to save passwords: Look at the Never Saved list.
Remove a site from the Never Saved list: Click the X (Remove) button on the site’s row.
Configuring Languages and Input Settings
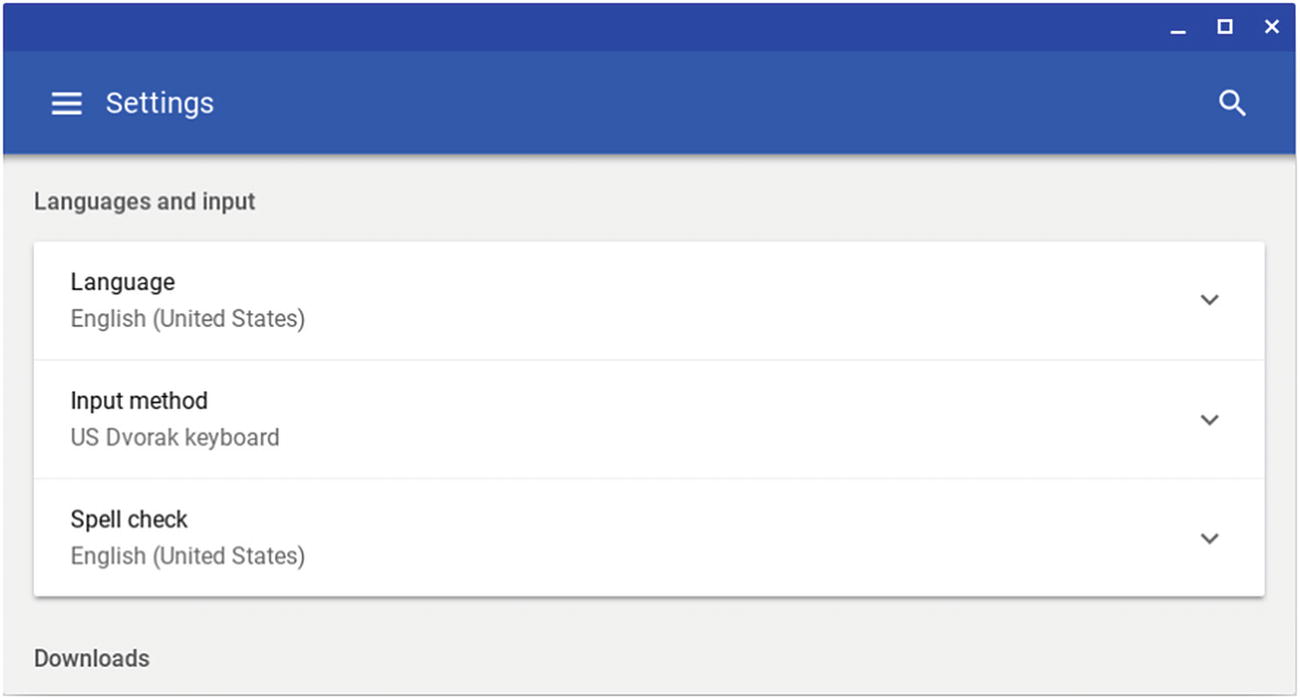
From the Languages and input section of the Settings window you can configure the language, the input method, and the language for spell checking
Note
You can also access the Languages and input section of the Settings window by clicking the Change language and input settings button on the Keyboard screen.
Setting Up the Languages for the Chromebook
Normally, the Chromebook will be set up to use a single language, such as English (United States). If the Language button in the Languages and input section of the Settings screen shows the right language, and you don’t need to add any other languages, you are all set.
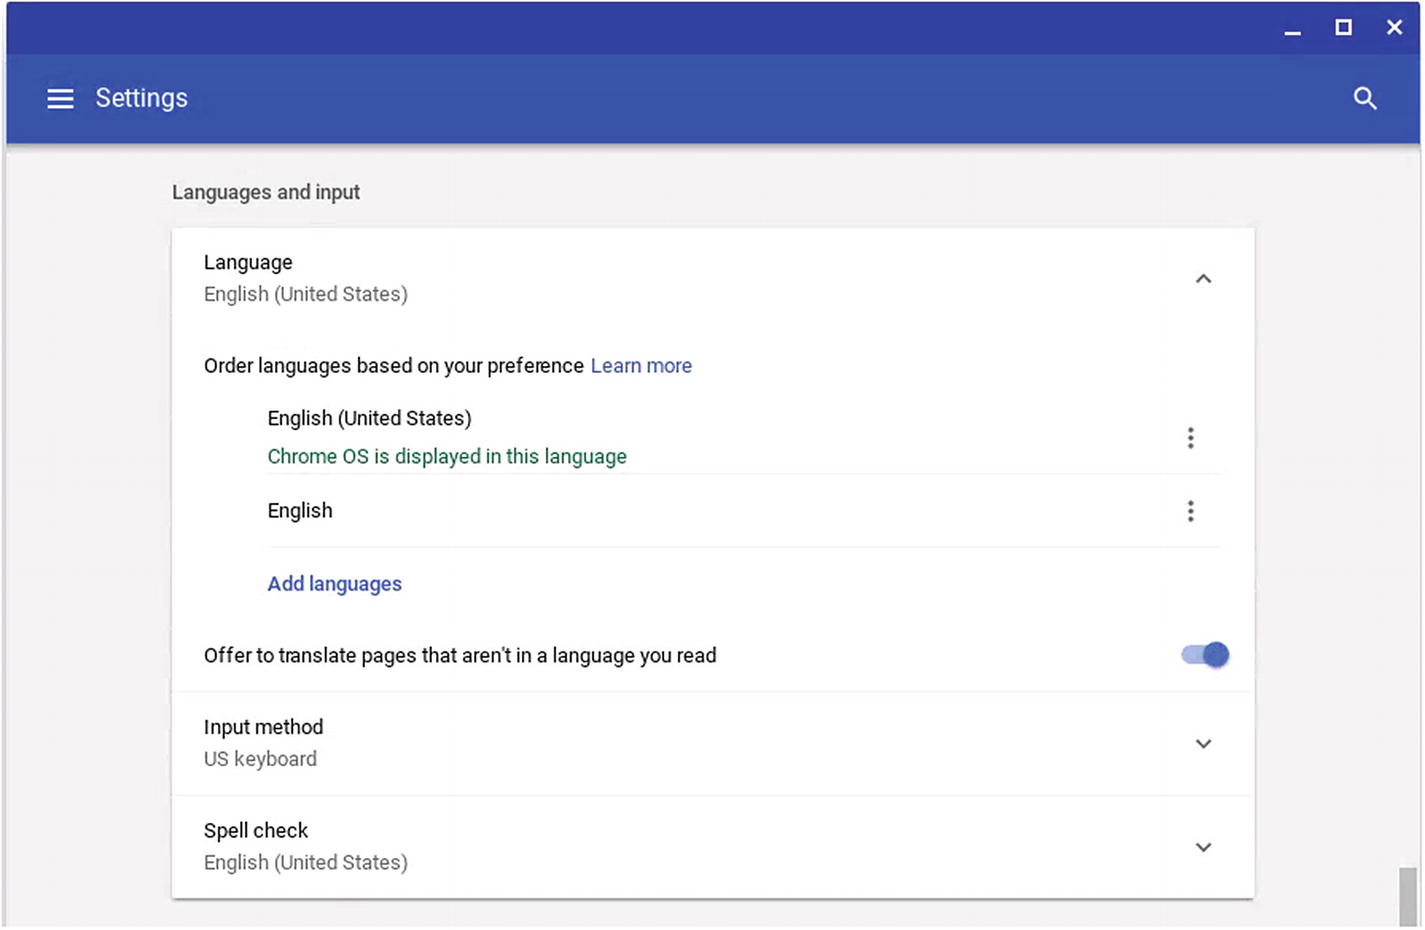
After you click the Language button at the top of the Languages and input section, the controls for adding and configuring languages appear
Adding or Removing a Language
- 1.
Click the Add languages button to display the Add languages dialog box (see Figure 4-68).

In the Add languages dialog box, you can narrow the selection of languages by starting to type the name of the language you want. When you locate the language, check its check box and click the Add button.
- 2.
Either scroll down the list to find the language you want to add or start typing its name in the search box at the top of the Add languages dialog box.
- 3.
Check the check box for the language or languages you want to add.
- 4.
Click the Add button to close the Add languages dialog box and add the language. The language will appear in the “Order languages based on your preferences” list in the Settings window.
Note
If you want to remove a language, click its More Actions button (the three vertical dots at the right end of the button for the language) and then click the Remove item on the menu.
Putting the Languages into Your Preferred Order
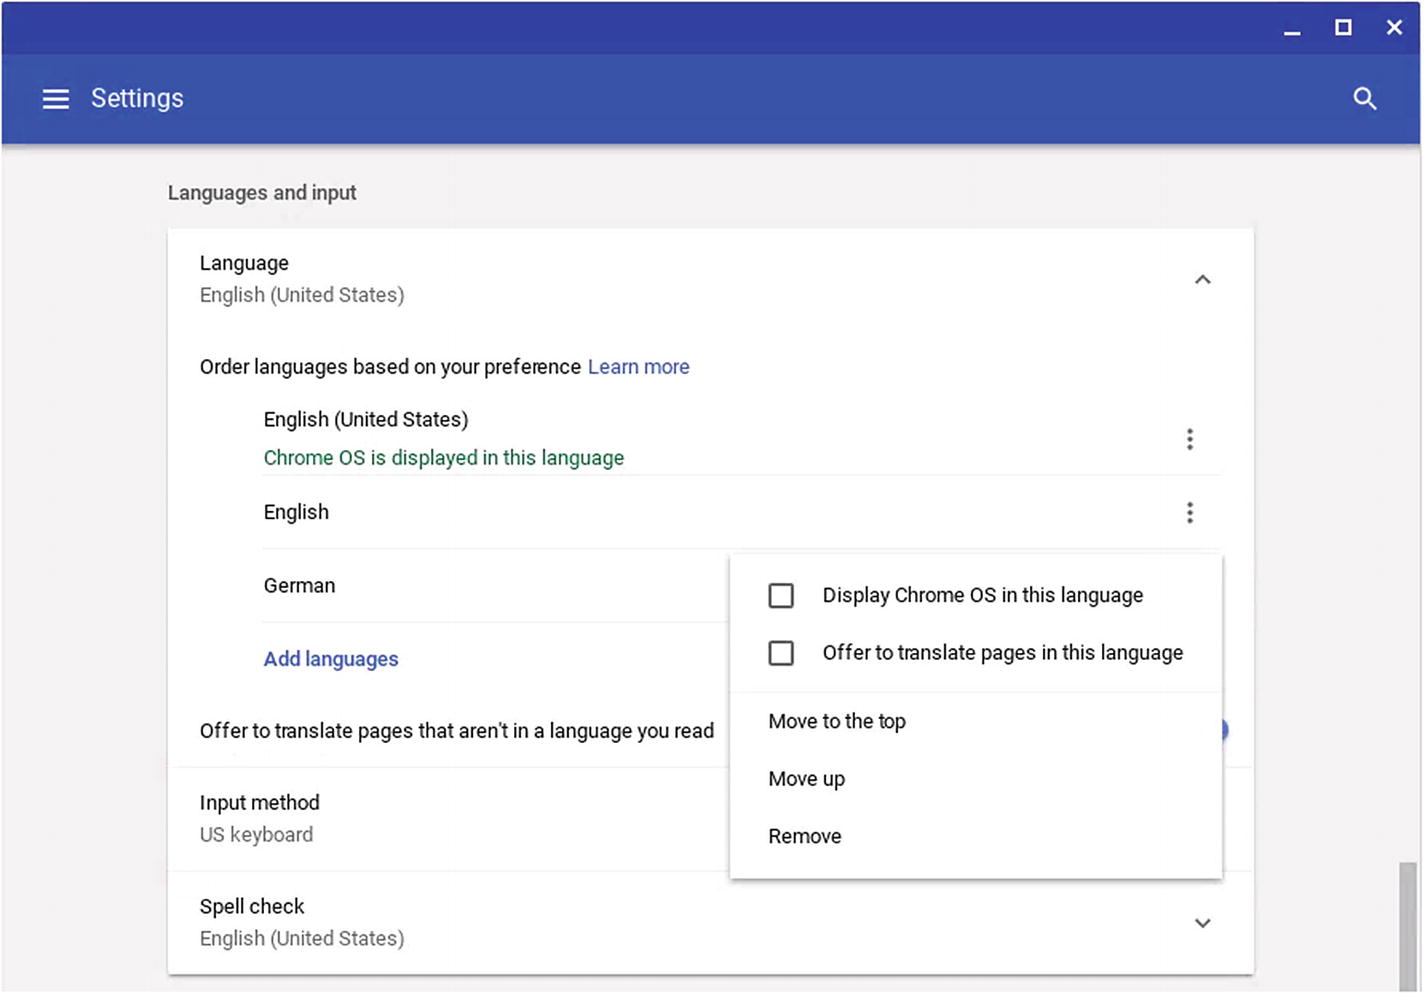
To change the order of the languages in the “Order languages based on your preference” list, click the More Actions button (the three vertical dots) on a language’s button and then click the Move to the top item, the Move up item, or the Move down item on the menu
Note
If the “Display Chrome OS in this language” check box on the menu is available, you can check it and then click the Restart button (which appears when the menu closes) to restart the Chromebook and switch the display to that language. If the “Offer to translate pages in this language” check box on the menu is available, you can check it to make Chrome OS offer to translate pages that it detects are in that language. These two check boxes are available only for some languages; if the check boxes and the text are dimmed, they are not available for that language.
Configuring the Chromebook’s Input Methods
Each Chromebook has a built-in keyboard that serves as the prime input method—as usual, you press the keys on the keyboard to enter characters in a document or to give commands (often including modifier keys). Normally, a Chromebook’s input method is configured so that pressing a key enters the character shown on the key—for example, when you press the s key on the keyboard, you get an s in the document. But you can change the logical keyboard layout that Chrome OS uses to interpret the keyboard. For example, you might apply the Dvorak keyboard layout, which some people use because it is considered more efficient than the standard QWERTY layout.
- 1.
In the Languages and input section, click the Input method button to display the Input method controls (see Figure 4-70).
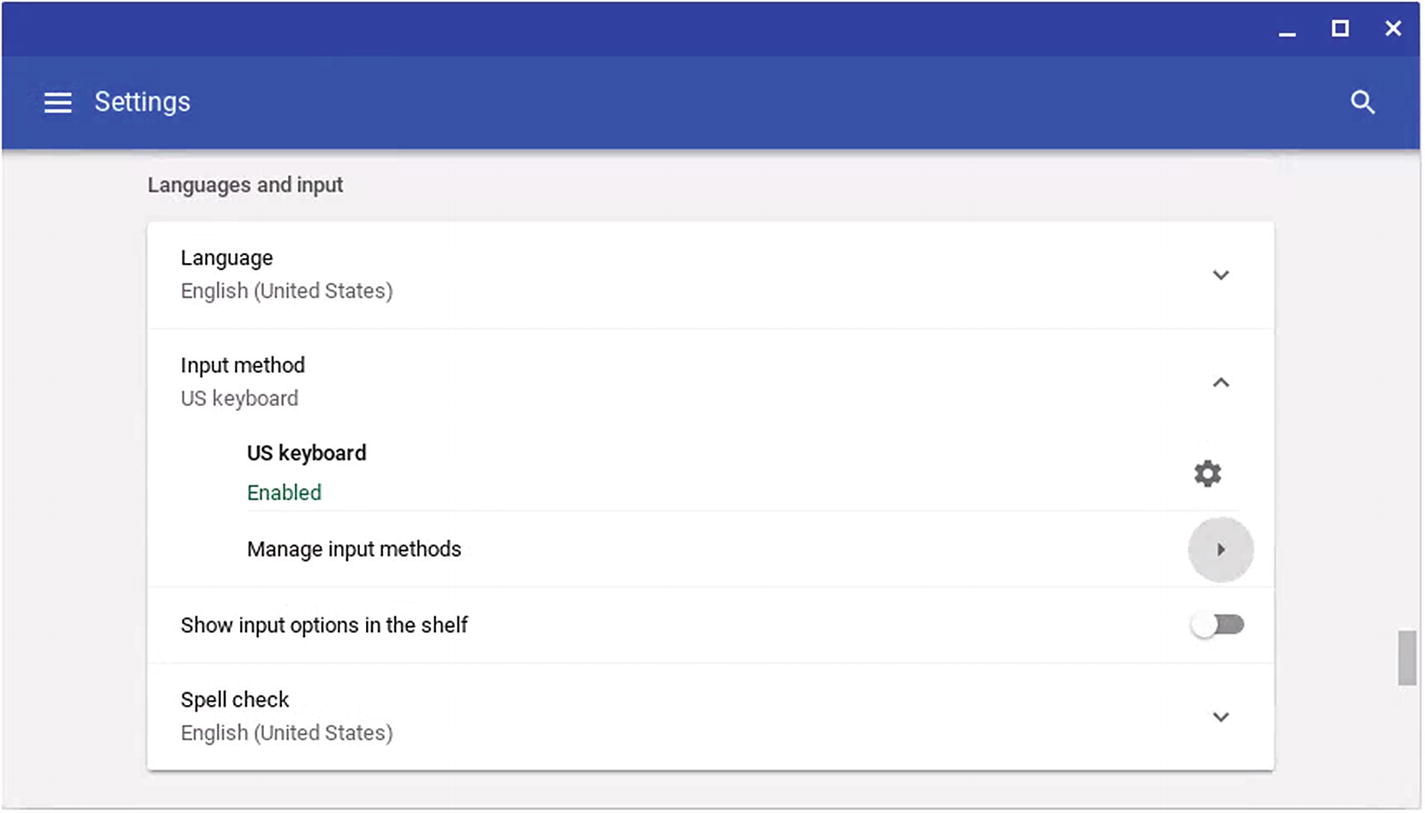
In the Languages and input section of the Settings window, click the Input method button to display the Input method controls. You can then click the Manage input methods button to add or remove input methods.
- 2.
Click the Manage input methods button to display the Manage input methods screen (see Figure 4-71).

On the Manage input methods screen, check the check box for each input method you want to add
- 3.
Check the check box for each input method you want to add. For example, you might check the “US Dvorak keyboard” check box to add the standard Dvorak layout, or check the “US Programmer Dvorak” keyboard check box to add the Programmer Dvorak layout.
- 4.
Uncheck the check box for any input method you want to remove.
Note
The Chromebook needs an input method at all times, so if only one input method’s check box is checked on the Manage input methods screen, you cannot uncheck that input method’s check box until you have checked the check box for another input method.
- 5.
Click the Back button (the left-arrow button) in the upper-left corner of the Manage input methods screen, or press the Back key on the keyboard, to return to the Languages and input screen. The input method you added will appear in the list.
- 1.
Click the status area to display the status menu.
- 2.
Click the button for the current input method to display the Input methods status menu (see Figure 4-72).
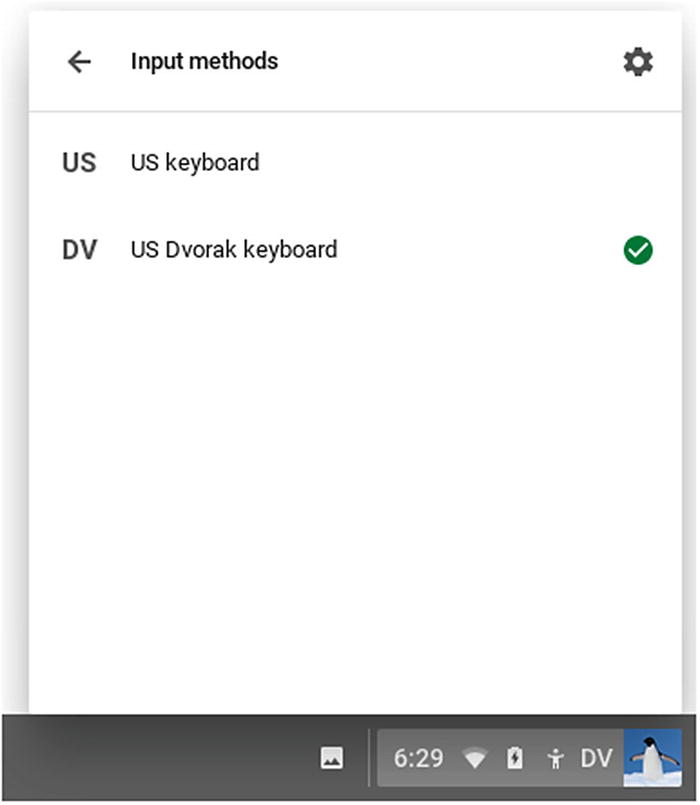
Use the Input methods status menu to switch from one input method to another
- 3.
Click the input method you want to use.
Configuring Downloads Settings
Location: This button shows the folder in which Chrome OS stores files you download—usually the Downloads folder. To use a different folder, click the Change button, click the folder in the Select a folder to open dialog box, and then click the Open button.
Ask where to save each file before downloading: Set this switch to On if you want Chrome OS to prompt you as to where to save each file you go to download. Set this switch to Off if you want Chrome OS to put all the files in the folder specified on the Location button.
Disconnect Google Drive account: Set this switch to On if you want to disconnect your Google Drive account from the Chromebook.
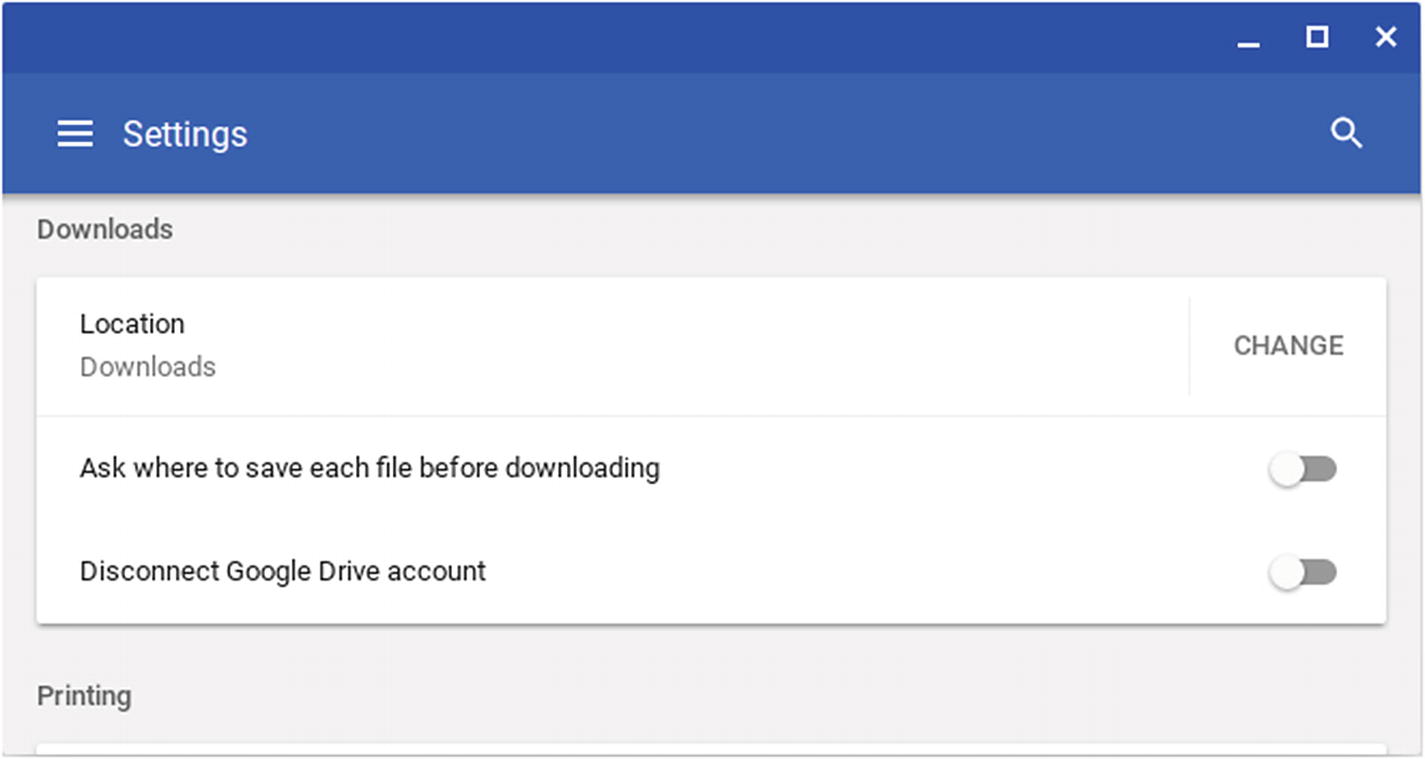
In the Downloads section of the Settings screen, you can change the default folder for downloads, control whether Chrome OS prompts you to decide where to save each file you download, and disconnect your Google Drive account
Configuring Accessibility Settings
To configure accessibility settings for the Chromebook , navigate to the Accessibility section near the bottom of the Settings window.
First, set the “Always show accessibility options in the system menu” switch to On if you want the Accessibility button to always appear in the status menu. This is helpful if the user needs quick access to accessibility features.
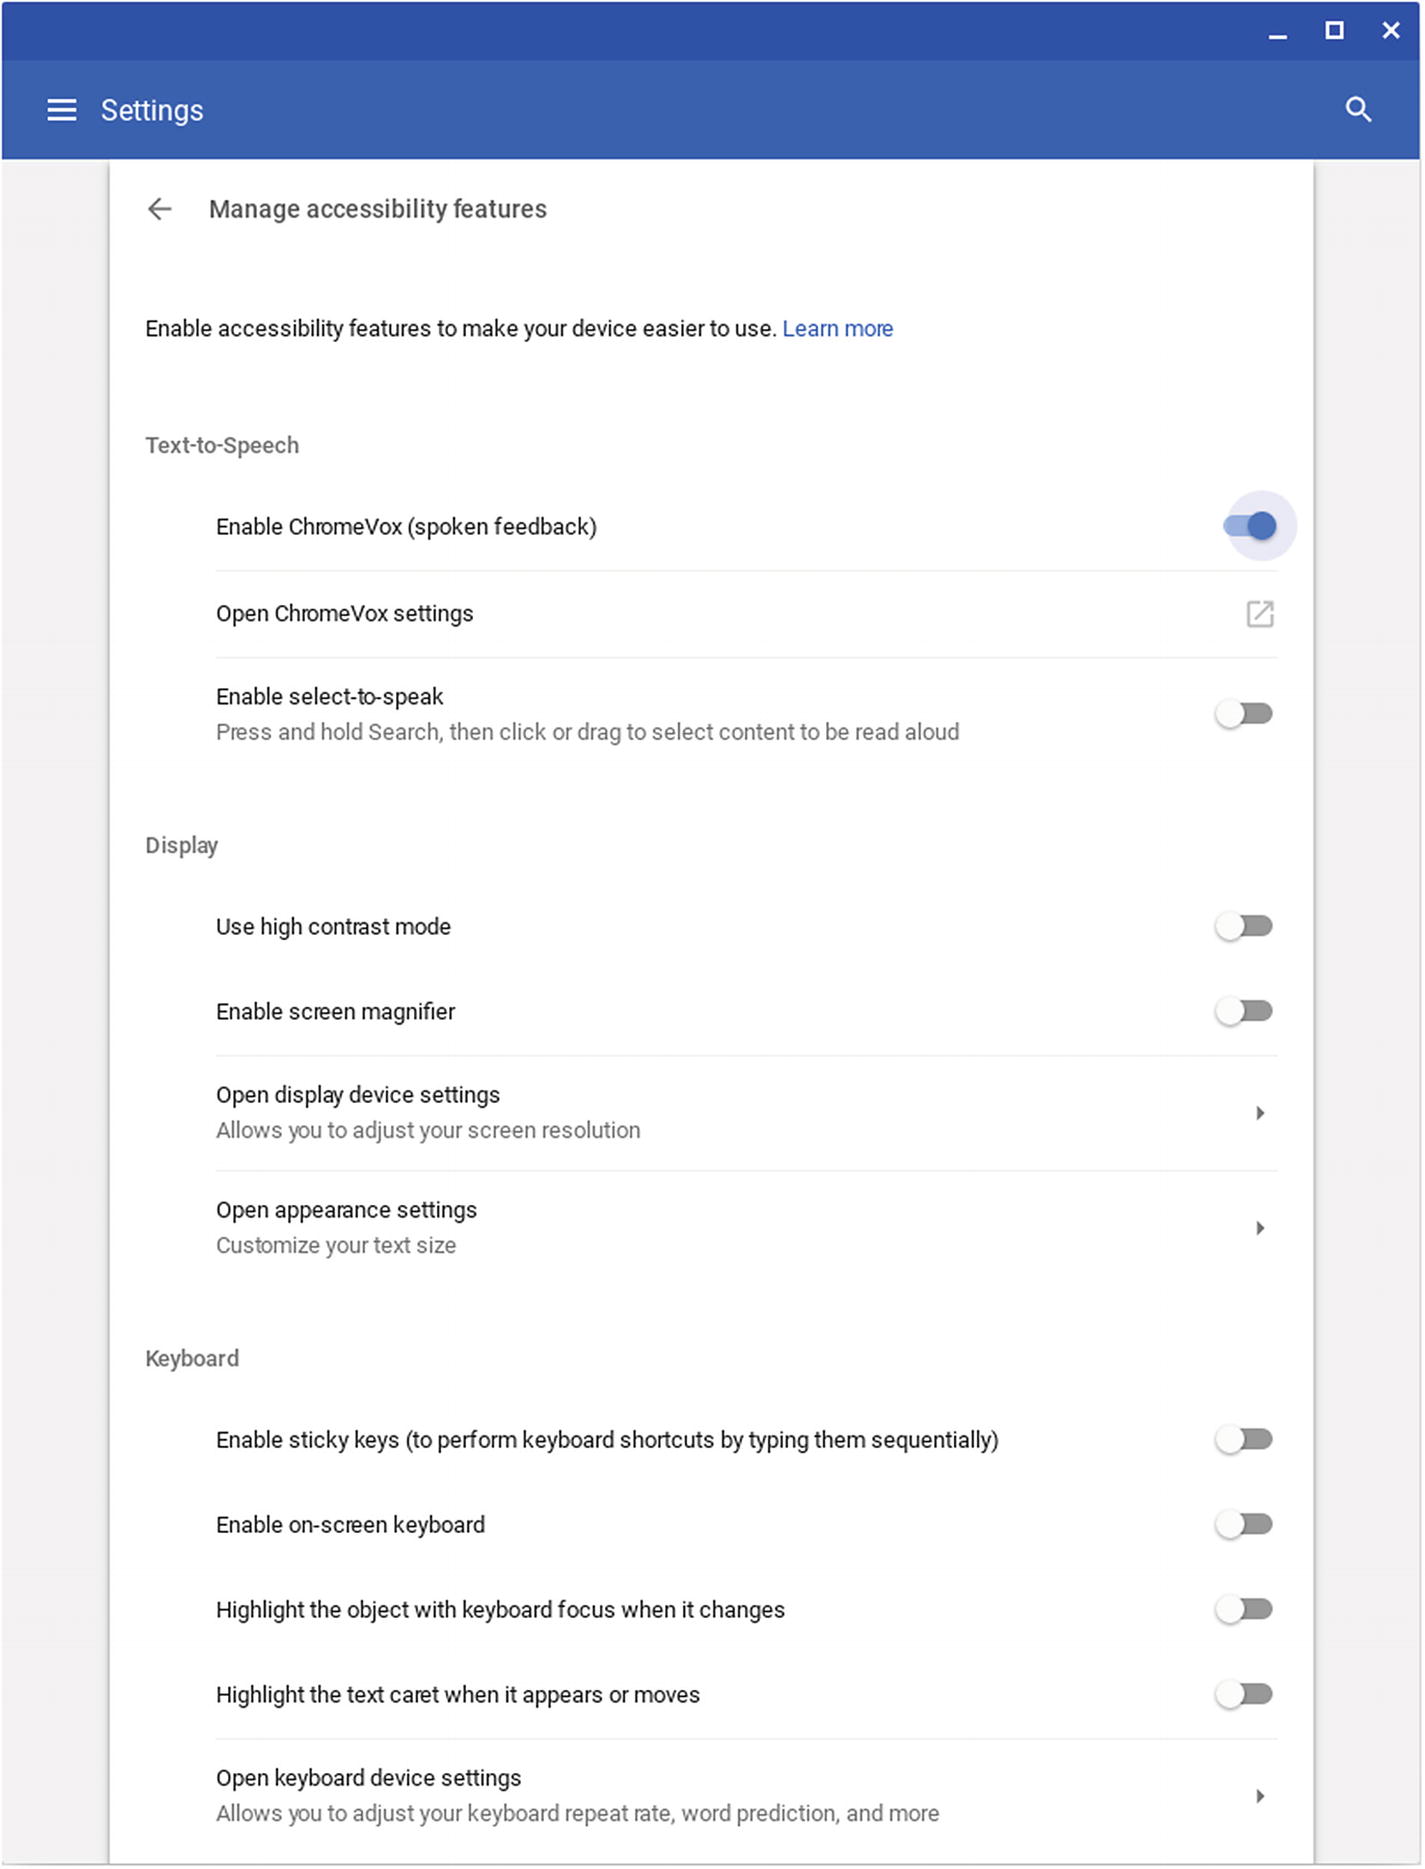
The upper half of the Manage accessibility features screen includes the Text-to-Speech features, the Display features, and the Keyboard features
Configuring Text-to-Speech Accessibility Features
- Enable ChromeVox (spoken feedback): Set this switch to On to enable the ChromeVox feature, which gives spoken feedback about what is shown on screen. When you set this switch to On, the Open ChromeVox settings button will appear. Click this button to open a browser window showing the ChromeVox Options screen (see Figure 4-75), in which you can configure the following settings:
Enable verbose descriptions: Set this switch to On to have ChromeVox give verbose descriptions rather than shorter descriptions. Users with visual impairments may find it helpful to use verbose descriptions for navigating Chrome OS at first and then switch to shorter descriptions once they have become familiar with Chrome OS.
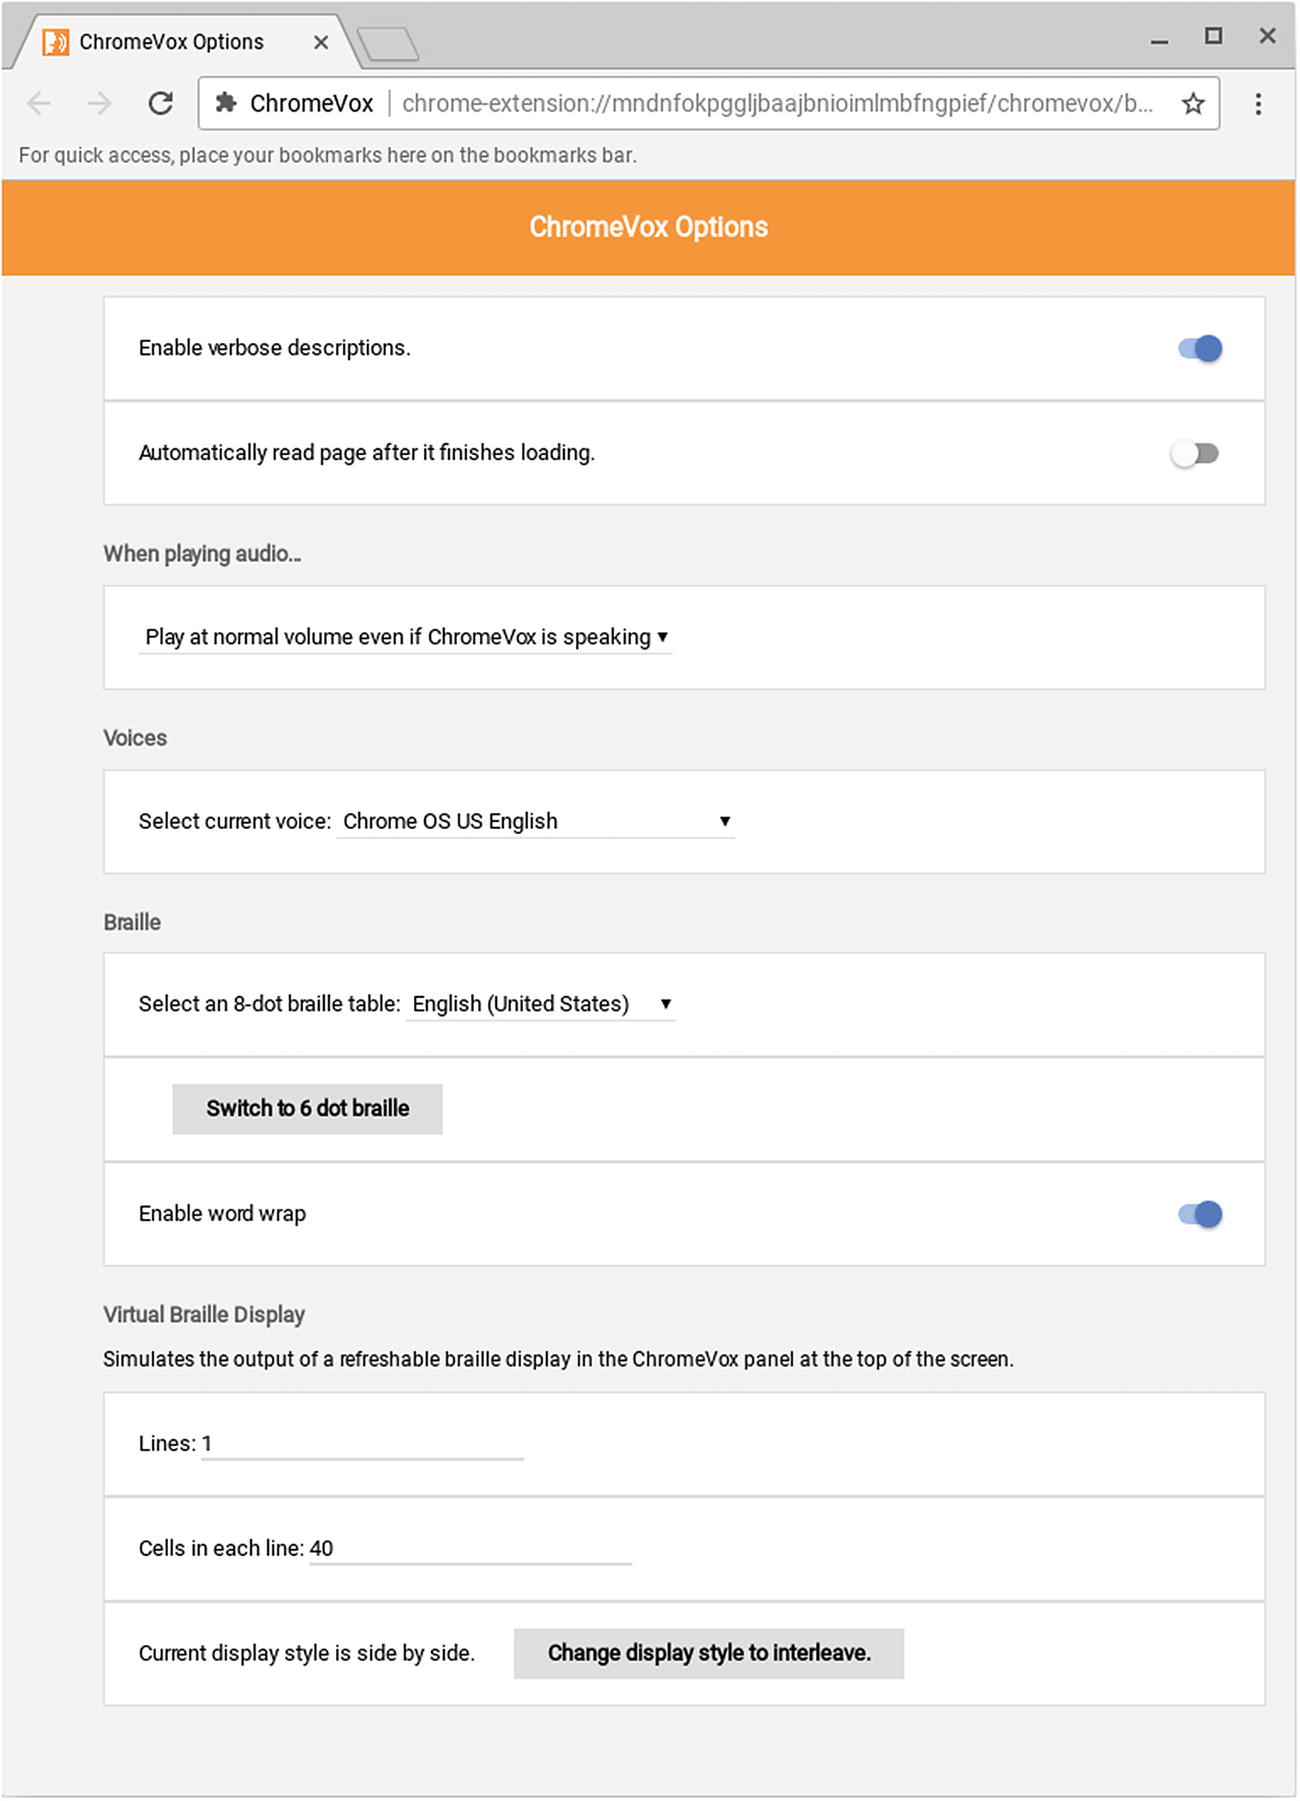 Figure 4-75
After enabling ChromeVox, you can configure its settings on the ChromeVox Options screen
Automatically read page after it finishes loading: Set this switch to On to have ChromeVox automatically read the active page aloud when the page has finished loading.
When playing audio: In this pop-up menu, select the “Play at normal volume even if ChromeVox is speaking” item, the “Play at lower volume when ChromeVox is speaking” item, or the “Pause playback when ChromeVox is speaking” item, as needed.
Voices: In this box, click the Select current voice pop-up menu and then click the voice you want to use, such as Chrome OS US English or Chrome OS español de Estados Unidos.
- Braille: In this box, configure settings for the ChromeVox Braille feature. Open the Select an 8-dot Braille table pop-up menu and then click the Braille table to use, such as English (United States). The Braille box also contains the following three settings:
Switch to 6-dot braille: Click this button to switch from 8-dot Braille to 6-dot Braille. The Switch to 8-dot Braille button replaces the Switch to 6-dot Braille button, and you can click it to switch back to 8-dot Braille.
Enable word wrap: Set this switch to On to enable the Word Wrap feature for ChromeVox.
Virtual Braille Display: Use the controls in this box to configure the virtual Braille display, which simulates a refreshable Braille display in the ChromeVox panel. In the Lines box, type the number of lines to include in the display; the default setting is 1 line. In the “Cells in each line” field, type the number of cells to include in each line; the default setting is 40 cells. The virtual Braille display can use either a side-by-side style or an interleave style. Click the Change display style to interleave button or the Change display style to side by side button to switch between side-by-side style and interleave style.
Enable select-to-speak: Set this switch to On to enable the Select-to-Speak feature. With Select-to-Speak enabled, you can hold down the Search key and drag the pointer over on-screen content to have ChromeVox read it aloud.
Configuring Display Accessibility Features
Use high contrast mode: Set this switch to On to apply a high-contrast mode that’s similar to reverse video.
Enable screen magnifier: Set this switch to On to magnify the screen. With the screen magnifier on, you will need to pan around the screen to see all of it.
Open display device settings: Click this button to go to the Displays screen, in which you can configure the display resolution, orientation, and other settings. See the section “Configuring Display Settings” earlier in this chapter for coverage of these settings.
Open appearance settings: Click this button to display the Appearance screen, in which you can configure fonts, wallpaper, themes, and other appearance settings. See the section “Configuring Appearance Settings” earlier in this chapter for coverage of these settings.
Configuring Keyboard Accessibility Settings
Enable sticky keys (to perform keyboard shortcuts by typing them sequentially): Set this switch to On to enable the Sticky Keys feature. Sticky Keys lets you press the modifier keys for keyboard shortcuts in sequence rather than having to press the keys together. For example, instead of pressing Ctrl+P to give the Print command, you can press Ctrl and then press P.
Enable on-screen keyboard: Set this switch to On to display the on-screen keyboard, which enables you to type characters by clicking.
Highlight the object with keyboard focus when it changes: Set this switch to On to have Chrome OS apply a highlight to the screen object that has the keyboard focus when the focus changes. For example, when you press Tab to move the keyboard focus to the next object in a window, Chrome OS will apply a highlight to that object. The highlight is a gray circle for objects such as switches and expansion buttons (the triangular buttons) and a blue outline for text items.
Highlight the text caret when it appears or moves: Set this switch to On to have Chrome OS display a highlight circle around the text caret when it appears on screen and when it moves. This setting is useful if the user finds it difficult to locate the text caret.
Open keyboard device settings: You can click this button to display the Keyboard screen, where you can configure the settings discussed in “Configuring Keyboard Settings” earlier in this chapter.
Configuring Mouse and Touchpad Accessibility Settings
Automatically click when the mouse cursor stops: Set this switch to On to have Chrome OS generate a mouse click shortly after the mouse cursor stops moving. Then open the Delay before click pop-up menu and choose the delay: extremely short (0.6s), very short (0.8s), short (1s), long (2s), or very long (4s). This automatic click can be helpful for users who have trouble clicking, but you will typically need to experiment to find which delay works best for a particular user.
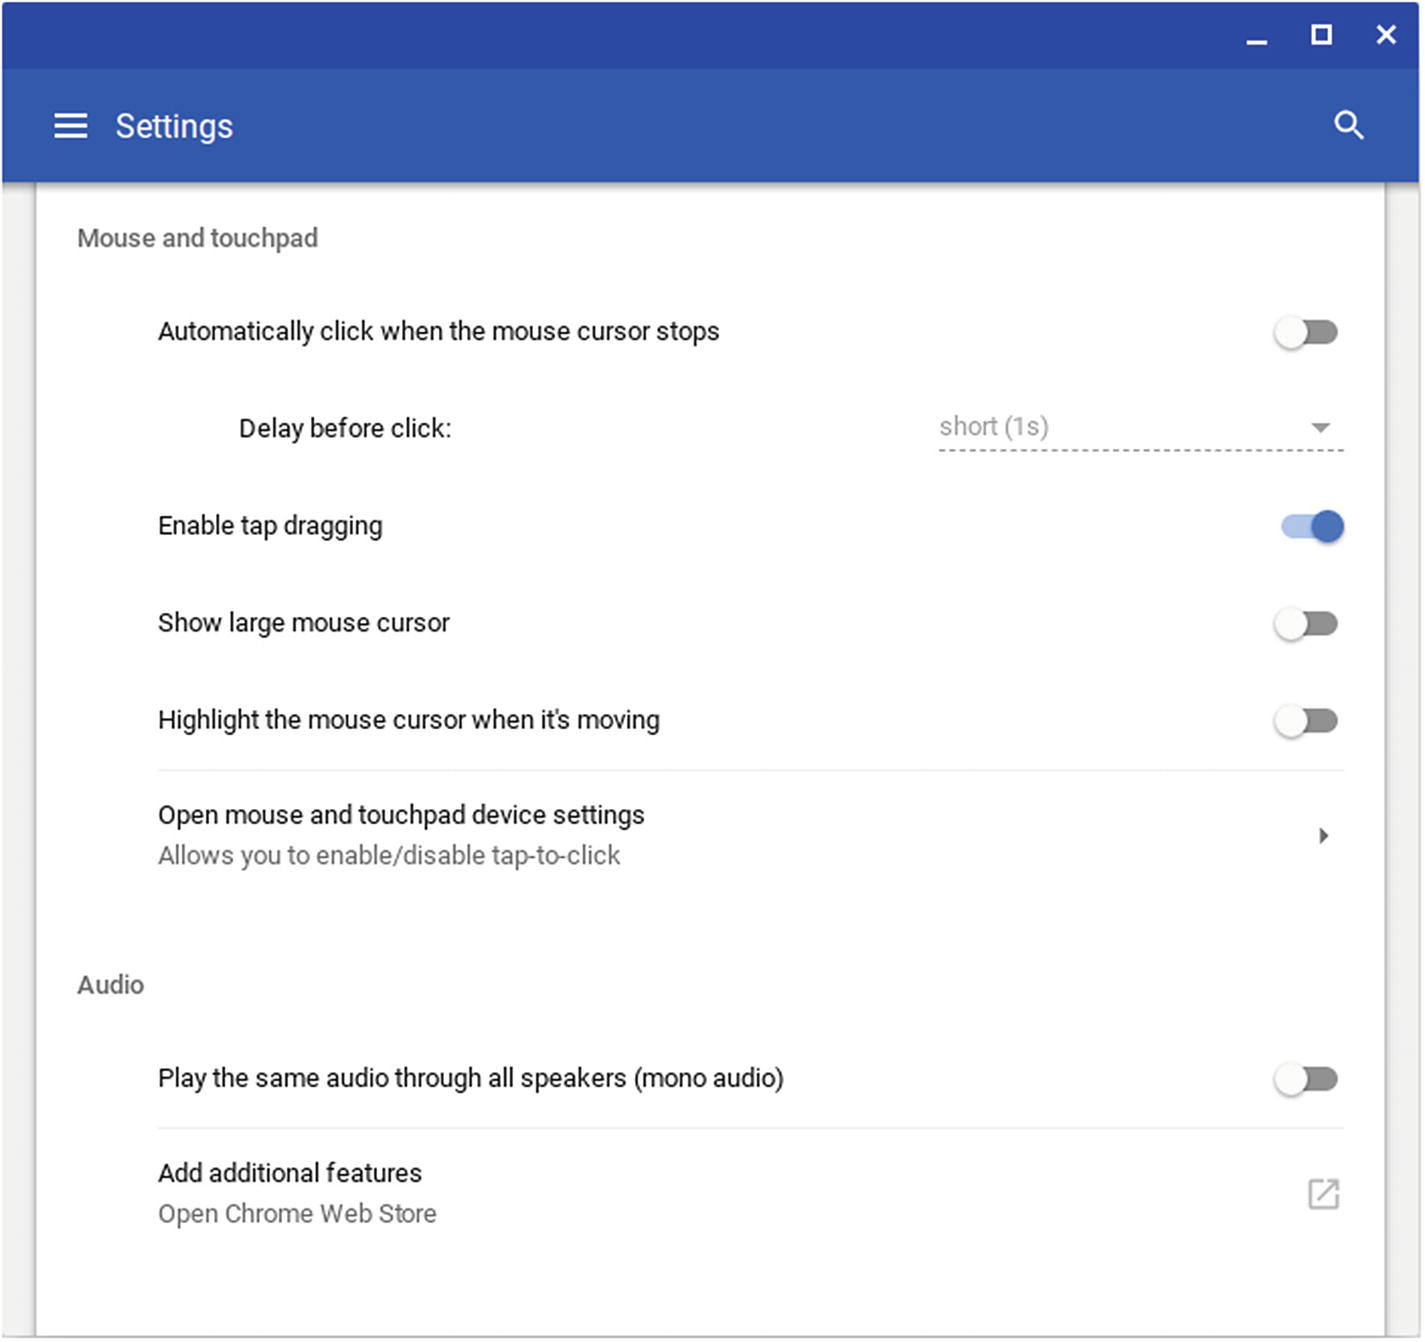
The Mouse and touchpad section of the Accessibility screen enables you to configure automatic clicks and tap dragging, enlarge the pointer, and hide the pointer when it is moving
Enable tap dragging: Set this switch to On to enable the Tap Dragging feature , which lets you tap and hold (without clicking) an object, such as the title bar of a window , and then drag it to a different position. This feature appears not to work consistently across all Chromebooks.
Show large mouse cursor: Set this switch to On to display the mouse cursor (the pointer) at a larger size. Drag the Adjust cursor size slider to set the exact size. This setting is especially useful for small, high-resolution screens on which the pointer goes missing.
Highlight the mouse cursor when it’s moving: Set this switch to On to display a red circle around the mouse cursor when it is moving. This circle, too, is helpful for making the mouse cursor easier to see.
Open mouse and touchpad settings: Click this button to display the Touchpad screen (if no mouse is connected) or the Mouse and touchpad screen (if one or more mice are connected). See the section “Configuring Touchpad Settings” and the sidebar “Choosing Settings for a Mouse,” both earlier in this chapter, for coverage of these settings.
Configuring Audio Accessibility Settings
Play the same audio through all speakers (mono audio): Set this switch to On if you want the Chromebook to play back audio in mono rather than stereo.
Add additional features: Click this button to display the Chrome Accessibility page in the Chrome Web Store. This page displays various types of accessibility features, not just audio features.
Summary
In this chapter, you have learned how to configure a Chromebook manually by working directly on the Chromebook rather than managing it via administrative policy. You know how to open the Settings app, navigate to the appropriate category of settings, and configure the settings to achieve the results you want.
In the next chapter, we will consider how to configure and manage Chromebooks with Google Management Console.