
In this chapter, you will learn how to configure and manage Chromebooks via policy. To do so, you sign in to your school’s Google Admin console and use the tools it provides to manage Chromebooks centrally. The primary tool is the Chrome Management console, which is fully integrated into the Google Admin console.
In the first section, we will cover how to get Chrome subscription licenses for your school’s Chromebooks. If someone else has already taken care of the licenses, you can probably skip this section and go straight to the second section, “Getting Started with Your Google Admin Console,” instead.
Once you are up to speed with your Google Admin console, we will go through the process of enrolling your school’s Chromebooks, controlling forced re-enrollment, and disabling and deprovisioning Chromebooks. We will then dig into the many user settings you can configure to customize the user experience before exploring the equally plentiful device settings you can configure to customize the Chromebooks themselves.
Getting Chrome Subscription Licenses
To manage your school’s Chromebooks centrally, you will need to sign up for Google’s Chrome Education service and get a subscription license for each Chromebook. This section will explain how to accomplish these tasks. Along the way, this section will also briefly cover Google’s three other Chrome services and their licenses because the license types overlap somewhat but vary enough to be confusing.
Note
Apart from Chrome Education, Google offers three other Chrome services: Chrome Enterprise, Chrome Nonprofit, and Chrome Kiosk. As the names suggest, Chrome Enterprise is for business administration of Chrome OS devices; Chrome Nonprofit is for use by nonprofit organizations, such as charities; and Chrome Kiosk is for deploying Chrome OS devices in single-app kiosk-style situations, such as using a Chromebook as a point-of-sale device or as a digital sign.
Signing Up for the Chrome Education Service
To sign your school up for the Chrome Education service and to buy licenses for managing the school’s Chromebooks, you must work with a Google Cloud partner. To view a list of partners for Chrome OS, open the address https://cloud.withgoogle.com/partners/?products=CHROME&sort-type=RELEVANCE# in a web browser.
The Google Cloud partner handles the signup process for your school. The partner also provides and manages the subscription licenses; you do not manage them directly yourself.
Note
Google’s licensing models, including Chrome Enterprise and Chrome Education, are based on domains. Your school may use its existing domain name (such as notionalacademy.com ) or set up a new domain name to use for Chrome Education. Each domain can be divided into multiple subunits called organizational units for more granular administration.
Getting Subscription Licenses for Your School’s Chromebooks
A perpetual license is tied to a particular Chrome OS device.
If a Chrome OS device fails, you can transfer its license to another Chrome OS device from the same manufacturer. Normally, the device needs to be the same model, but you can get a dispensation to transfer the license to a different model from that manufacturer.
Apart from in the case of the Chrome OS device failing (as explained in the previous bulleted paragraph), you cannot transfer a perpetual license to another device in the same domain. You also cannot transfer a perpetual license to a device in another domain.
Note
Google also offers perpetual licenses for the Chrome Enterprise service and the Chrome Nonprofit service, but not for the Chrome Kiosk service. For the Chrome Enterprise service and the Chrome Kiosk service, Google also offers annual subscription licenses. As the name suggests, this is a license for which the business or organization pays a yearly fee. Google allows the business or organization to unenroll a Chrome OS device and transfer its license to another device in the same domain, but not to another device in a different domain.
Getting Started with Your Google Admin Console
In this section, we will look at how to get started with your Google Admin console. The Google Admin console is Google’s overarching tool for administering and managing G Suite and devices, including Chromebooks. The Google Admin console gives you seamless access to various other tools, including the Chrome Management console, which is designed for managing Chrome devices.
Note
If you are already familiar with your Google Admin console, you may want to skip this section.
Signing In to Your Google Admin Console
- 1.
Open the Chrome app or another web browser.
- 2.
Go to the Google Admin home page, https://admin.google.com .
- 3.
Click the Add account button. The Sign in dialog box will open (see Figure 5-1).
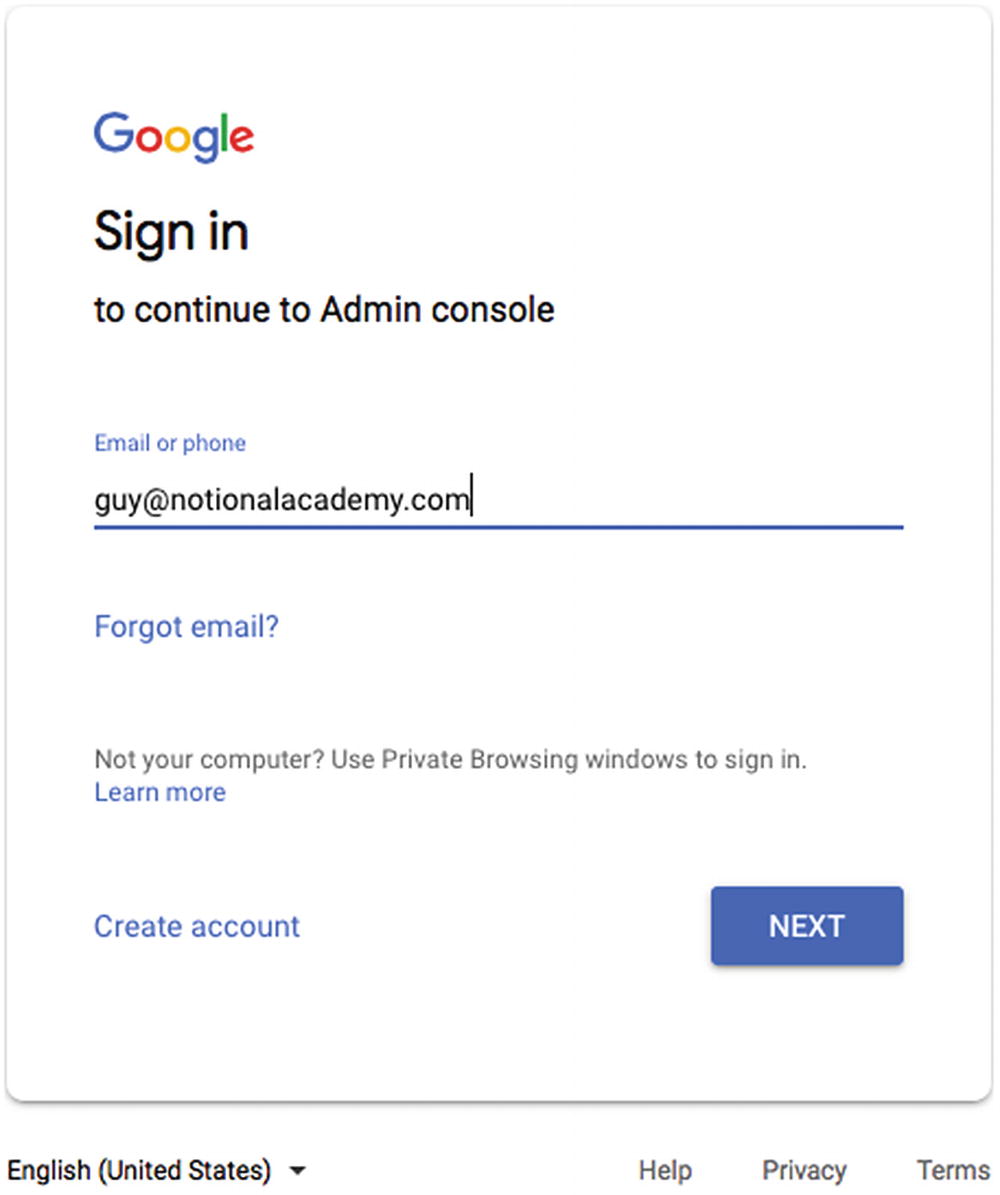
Type your administrator username in the “Email or phone” field in the Sign in dialog box on the Google Admin home screen and then click the Next button
- 4.
In the “Email or phone” field, type the email address for your administrator account.
- 5.
Click the Next button. The Password dialog box will open.
- 6.
Type your administrator password.
- 7.
Click the Next button. For a new account, follow through any further verification checks that Google throws at you. For example, you may need to enter a six-digit code sent via text message to your mobile phone or telephoned via an automated system.
- 8.
If the Welcome to your new account screen appears (see Figure 5-2), read the information, following as many links as necessary to make sure you know what you are agreeing to. Then, click the Accept button.
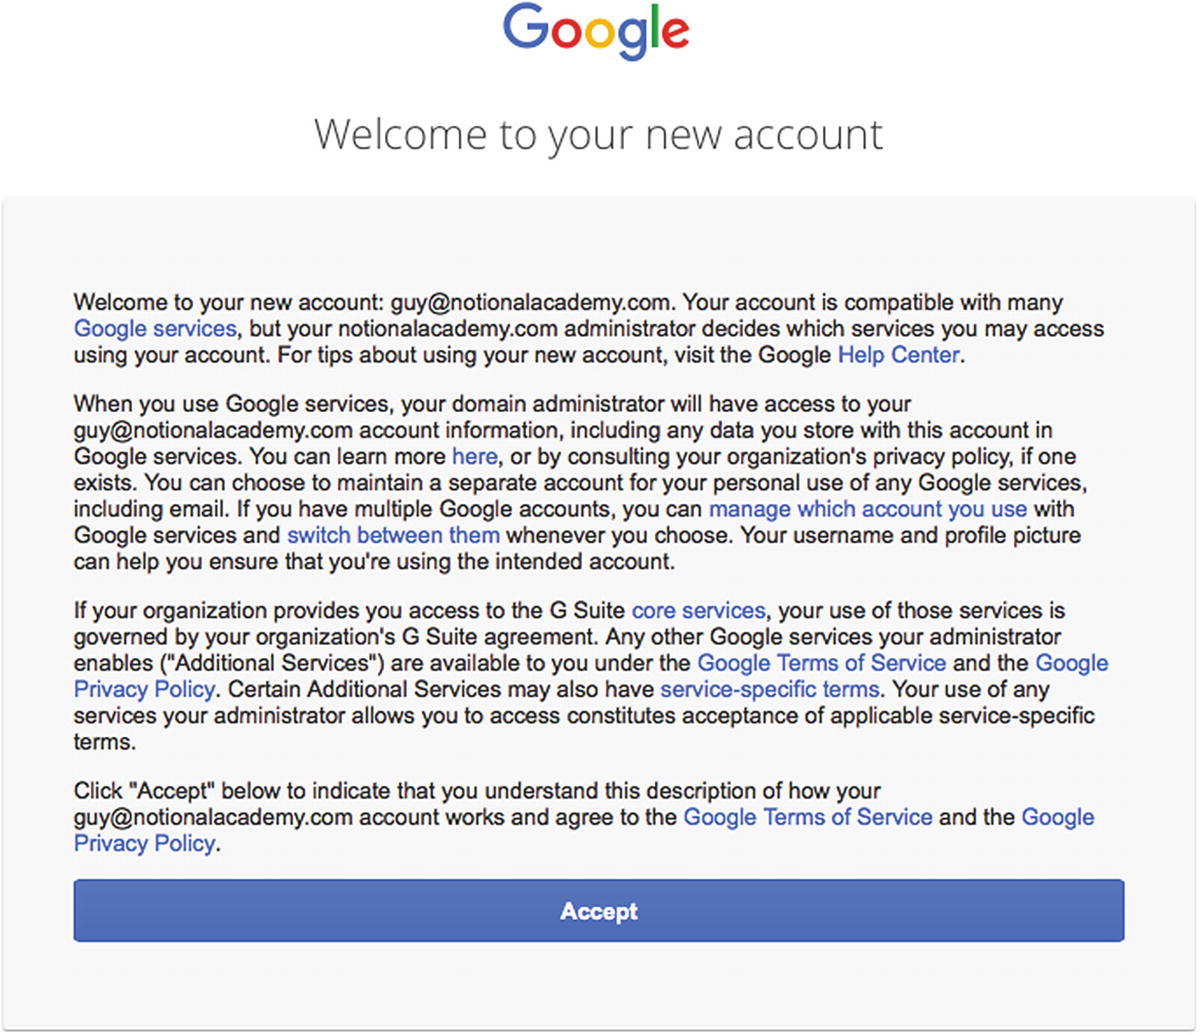
The Welcome to your new account screen includes links to various information resources, including the Google Terms of Service and the Google Privacy Policy. Click the Accept button if you want to proceed.
At this point, Google Admin may prompt you to perform some setup actions. Once you have completed these actions, you will see the Google Admin Home screen.
Navigating the Google Admin Home Page
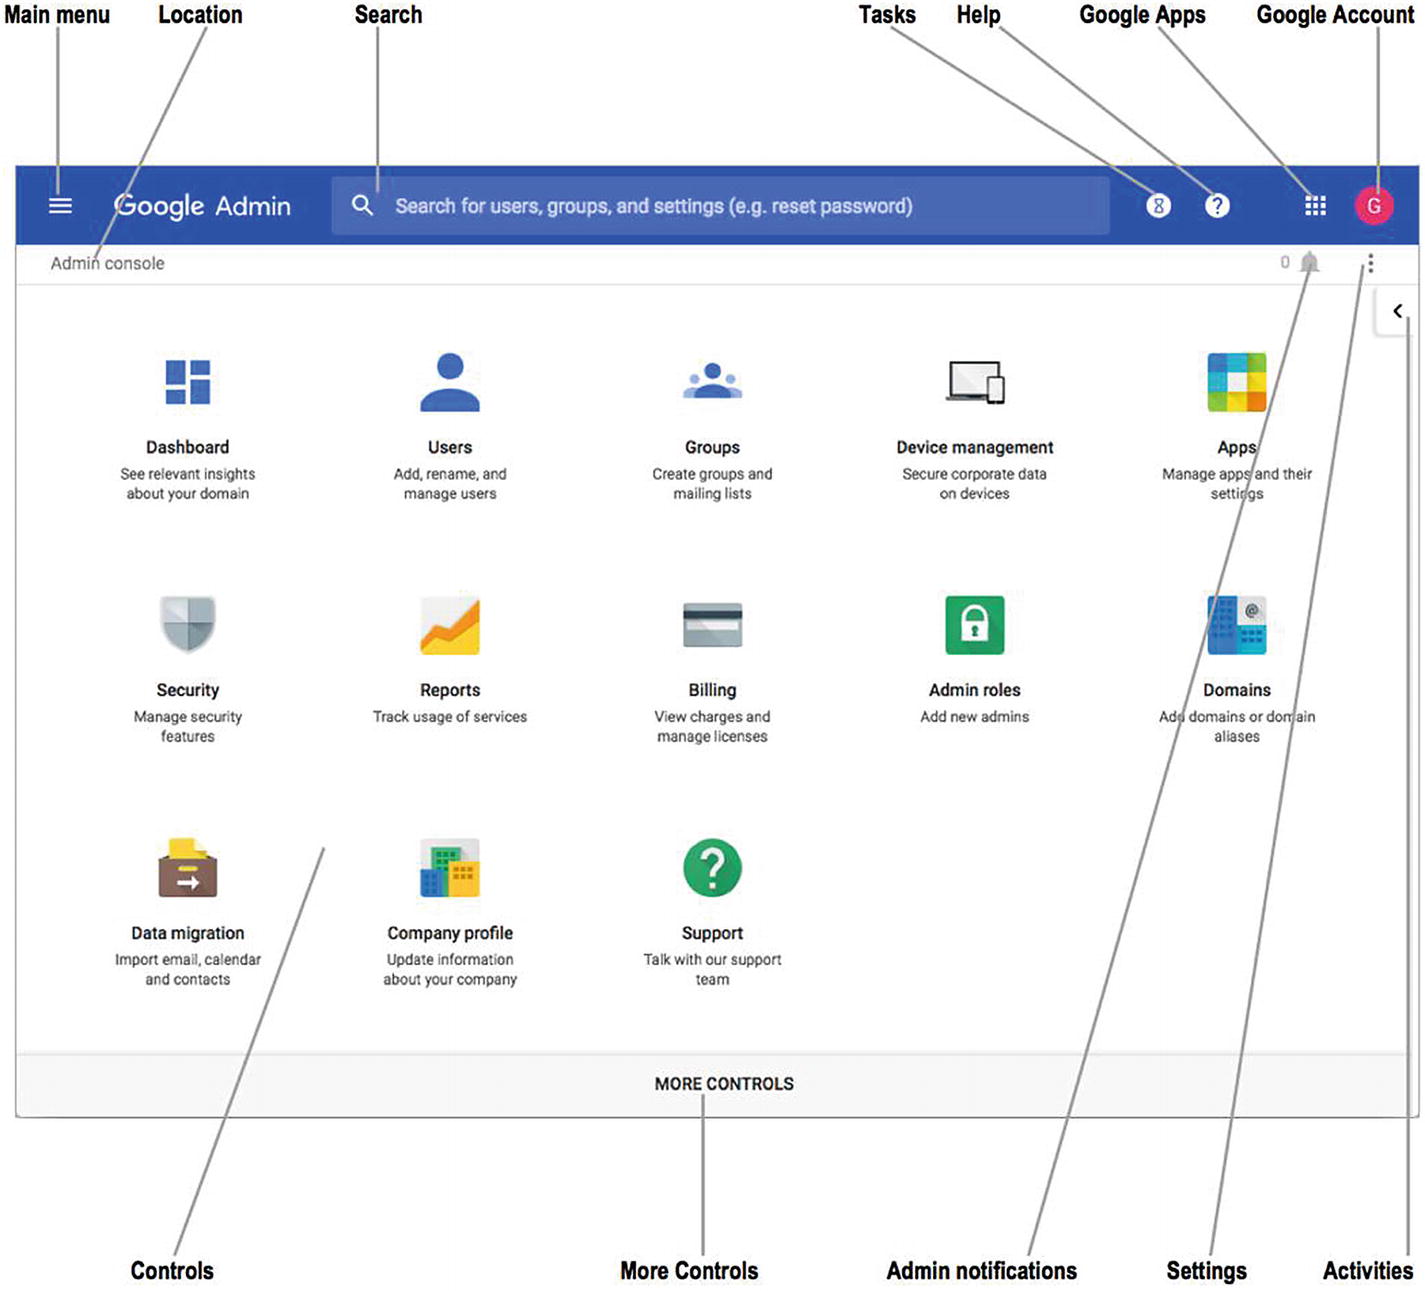
The Home page in the Google Admin console
Main menu: Click this button to display the Main menu on the left side of the screen (see Figure 5-4).
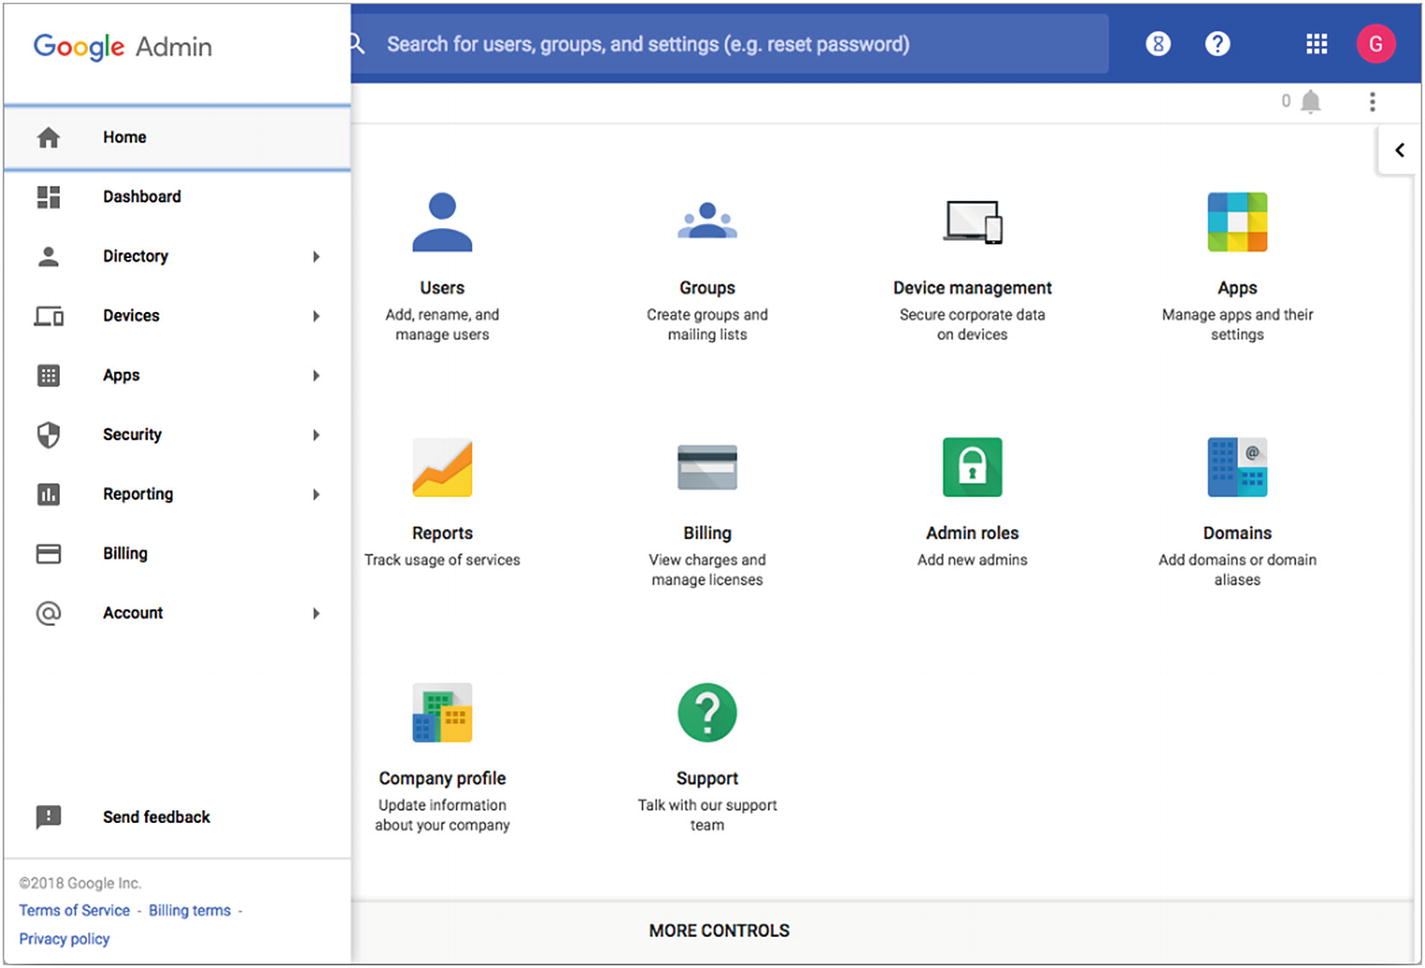
The Main menu provides quick access to the key areas of Google Admin
Location: This bar shows the location of the current page—in this case, Admin console. As you move from one page to another, the Location bar will change to show your current location, including a “breadcrumb bar” that enables you to navigate back. For example, when you click the Device management icon on the Home page, the Location bar will show Device management to indicate you are viewing the Device management page. If you then click the Chrome devices button on the Device management page, and then click the User Settings icon, the Location bar will show Device management ➤ Chrome ➤ User Settings. You can click the Chrome item to return to the Chrome page or click the Device management item to return to the Device management page.
Search: Click this box to search for users, groups, or settings by using keywords.
Tasks: Click this button to display a pop-up pane showing your ongoing tasks—or none, if you are lucky.
Help: Click this button to display a Help pane, in which you can browse help topics or search using keywords.
Google apps: Click this button to display a pop-up pane showing the leading Google apps, such as Mail, Drive, and Docs . Click the button for the app you want to launch. If the app you want does not appear at first, click the More button at the bottom of the pop-up pane to extend the pane, revealing other apps.
Google Account: Click this button to display the Account pop-up pane. Here, you can click the My Account button to manage your account, click another account to switch to it, click the Add account button to add another Google account, or click the Sign out button to sign out of your Google Admin console.
Admin notifications: Click this button to display a pop-up pane showing administrative notifications.
Activities: Click this button to display the Activities pane (see Figure 5-5), which shows your recent activities, gives you access to reports, and provides a Tools list of links and a Common tasks list of links.

The Activities pane shows your recent activities, gives you access to reports, and provides links to tools and common tasks
Controls pane: This pane shows icons for the main controls in Google Admin, such as the Dashboard icon, the Users icon , the Groups icon, and the Device management icon.
More Controls: Click this bar to display any controls that are not currently displayed in the main pane.
CUSTOMIZING THE CONTROLS PANE
You can customize the Controls pane by dragging the icons into your preferred order. If you find you seldom or never use certain icons, you may be able to remove them by dragging them to the More Controls bar, which changes to a Delete bar (with a Trash icon) when you drag an icon you are allowed to delete.
However, Google Admin does not allow you to delete some icons, such as the Billing icon. If you try to drag one of these icons to the More Controls bar, the bar will show the message “This icon cannot be removed from Dashboard” instead of the Trash icon.
Enrolling Your School’s Chromebooks
Now that you are up and running with your Google Admin console, you need to enroll your school’s Chromebooks in the school’s domain. You can enroll Chromebooks manually either yourself or by having users enroll them. You can also force re-enrollment for Chromebooks that have been wiped or recovered.
Making Sure a Chromebook Is Ready for Enrollment
For enrollment, each Chromebook must be in a clean, unused state, with no user—not even an administrator—having signed in on the Chromebook. If anyone has signed in on the Chromebook, you must wipe the Chromebook clean before you can enroll it.
- 1.
Shut down the Chromebook as usual by clicking the Shut down button on the status menu or on the sign-in screen.
- 2.
Hold down the Esc key and the Refresh key and then press the Power key or Power button. The Chromebook will boot to the Recovery screen, which warns you that Chrome OS is missing or damaged.
- 3.
Press Ctrl+D. Chrome OS will prompt you to press the Enter key to enable or disable Developer mode.
- 4.
Press the Enter key to enable Developer mode.
- 5.
Wait while the Chromebook restarts and erases itself. This takes several minutes.
- 6.
When the Chromebook restarts, it will boot to a Developer mode screen that tells you that OS verification is off and invites you to press the spacebar to re-enable it. Press the spacebar to re-enable OS verification.
- 7.
Press the Enter key to confirm you want to turn OS verification on. The Chromebook will restart into Normal mode.
The Chromebook is now clean, and you can enroll it.
Note
Wiping some Chromebook models requires extra steps, such as removing the battery for a few seconds and then reinserting it. It is a good idea to consult the documentation for the particular Chromebook model to see if extra steps are needed.
Enrolling a Chromebook Manually
- 1.
Make sure the Chromebook is clean, as explained in the previous section.
- 2.
Power on the Chromebook. Chrome OS will start, and the Welcome! dialog box will open.
- 3.
Choose language and accessibility settings as needed. See the section “Navigating the Welcome Dialog Box! Choosing Language and Accessibility Settings” in Chapter 3 for details.
- 4.
Connect the Chromebook to a network. See the section “Working in the Connect to Network Dialog Box,” also in Chapter 3, for details.
- 5.
Accept the terms and conditions in the Google Chrome OS terms dialog box. (If necessary, see the section “Navigating the Google Chrome OS Terms Dialog Box” in Chapter 3 for more information.)
- 6.
When the sign-in screen appears, press Ctrl+Alt+E. The enrollment screen will appear.
- 7.
Type your Google admin username and password.
Note
At this point, if the person enrolling the Chromebook is a user rather than an administrator, the user enters his G Suite username and password. You need to have made this G Suite user eligible to enroll the Chromebook.
- 8.
Click the Enroll device button. Chrome OS will enroll the Chromebook , and you will see a confirmation message saying that the device has been enrolled.
DEALING WITH ENROLLMENT ERRORS
You do not have enough software licenses to enroll this device: This error is straightforward—you have run out of licenses, so none are available for this Chromebook. Get in touch with your Chrome Education partner to get more licenses.
This user account is not eligible for the service: This error occurs when a user whose user account does not have the Enrollment Permissions policy is trying to enroll the Chromebook. The solution is for an administrator to add the Enrollment Permissions policy via the Admin console.
Apart from these two common errors, there is an esoteric one: The Samsung Chromebook 303 model may give an Invalid parameters error. The solution is to restart the Chromebook and wait for 90 seconds or more at the Terms of Service screen before proceeding with enrollment .
Controlling Forced Re-Enrollment for Wiped or Recovered Chromebooks
Enrolling a Chromebook automatically applies the Forced Re-Enrollment device policy to it. This policy is designed to make sure that a Chromebook cannot be removed from the management system by being wiped.
CONSIDERATIONS FOR FORCED RE-ENROLLMENT
Normally, you will want to keep Forced Re-enrollment enabled for most of your school’s Chromebooks to avoid the possibility that someone could wipe a Chromebook and thus remove it from your management system. However, you may need to exempt some Chromebooks from Forced Re-enrollment so as to use features such as Developer mode, which is not compatible with Forced Re-enrollment.
You can configure Forced Re-enrollment at the domain level or at the organizational-unit level. What is usually best is to turn on Forced Re-enrollment at the domain level so every Chromebook is protected by default. You can then turn off Forced Re-enrollment for a particular organizational unit, such as the organizational unit to which you and your IT colleagues belong.
Another way to exempt a Chromebook from Forced Re-enrollment is to deprovision it. Normally, you would want to deprovision a Chromebook only when getting rid of a Chromebook or sending it in for repair.
- 1.
In the Google Admin console, click the Device management icon . The Device management page will appear (see Figure 5-6).
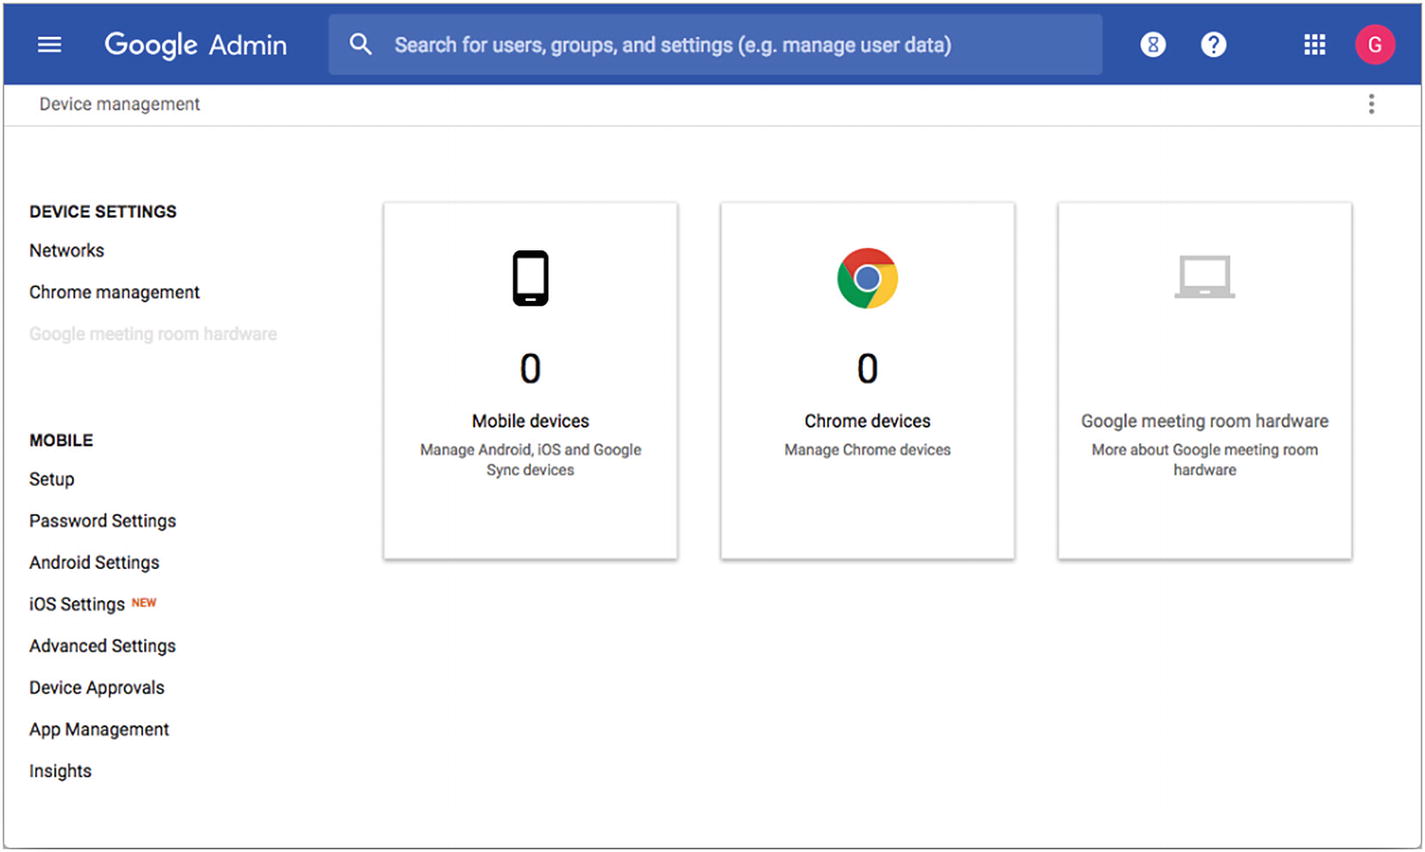
On the Device management page, click the Chrome management item in the Device Settings list in the left pane
- 2.
In the Device Settings list in the left pane, click the Chrome management item. The Chrome Management page will appear (see Figure 5-7).
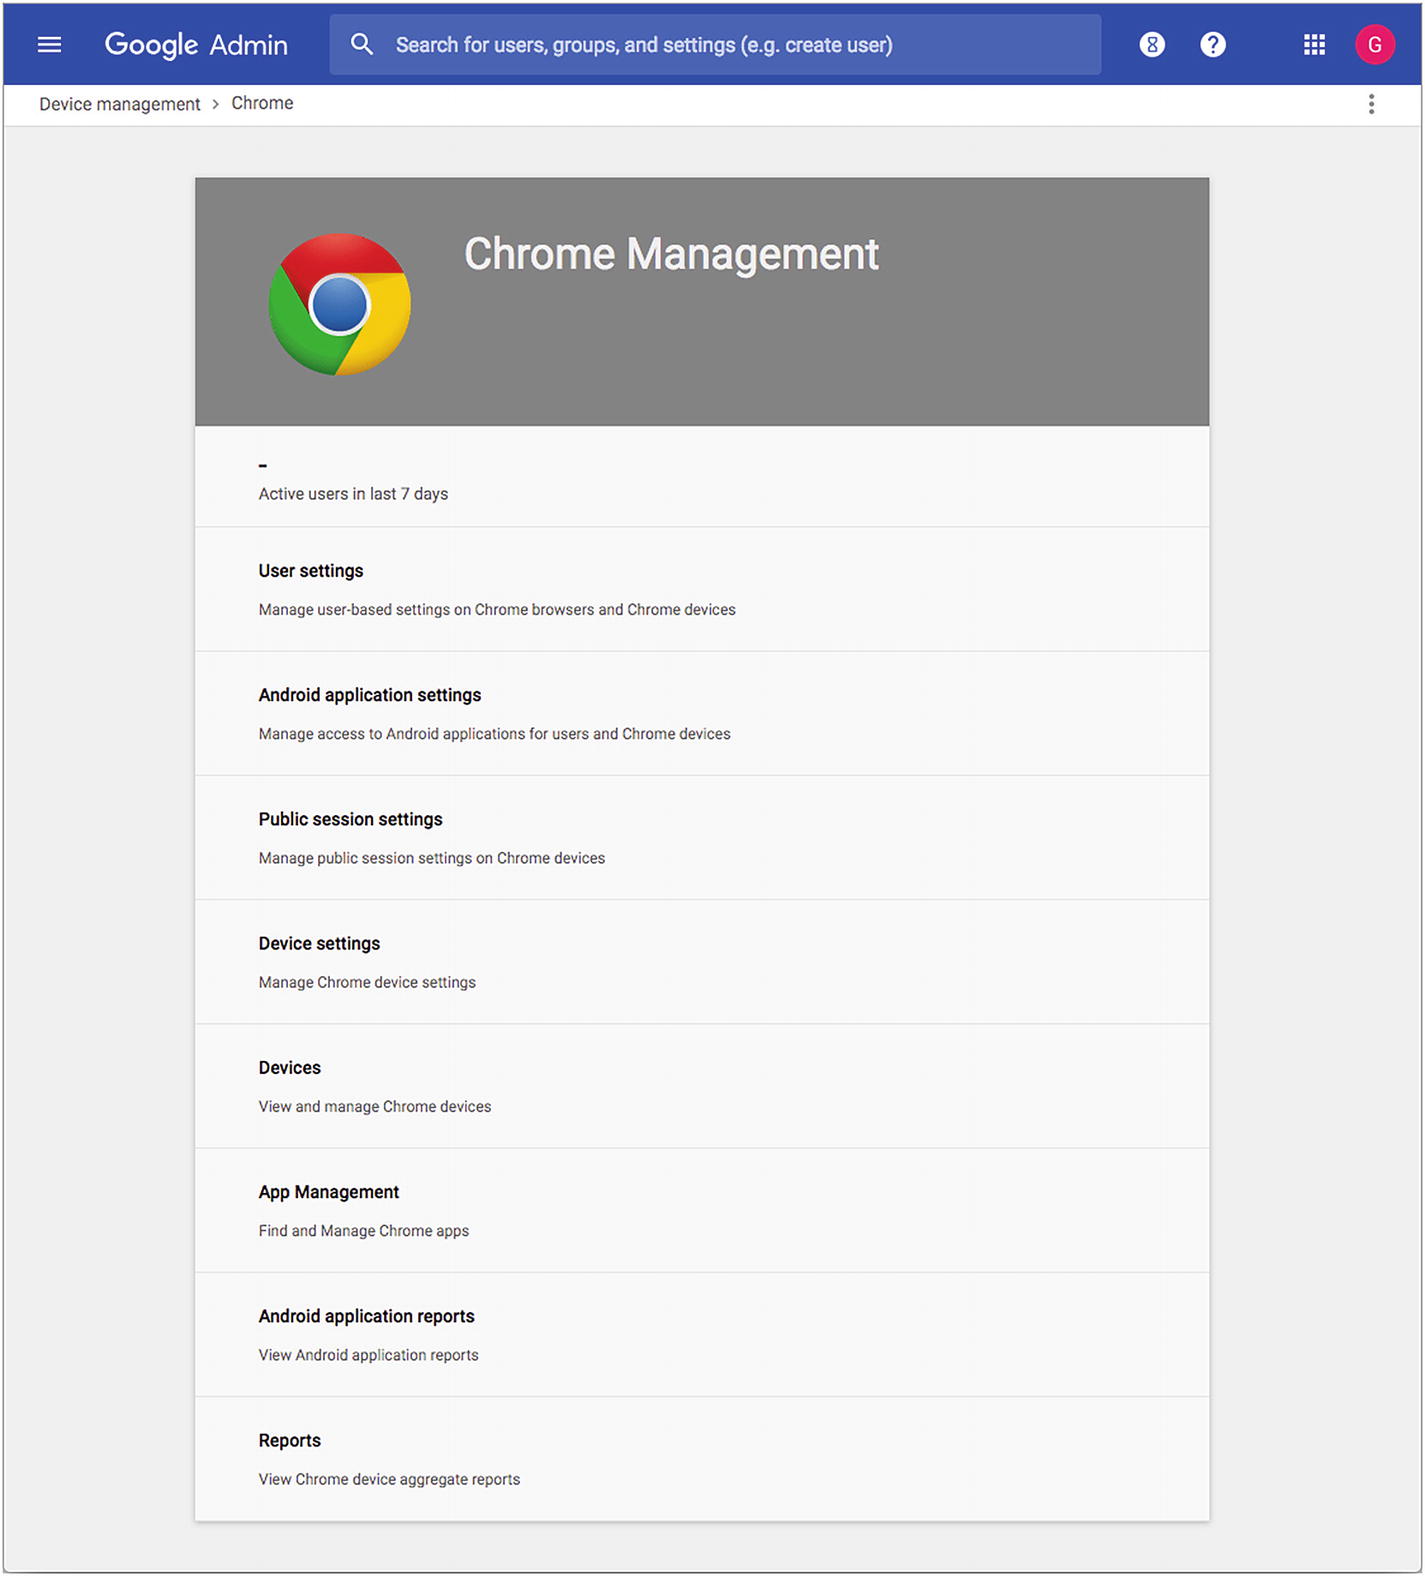
On the Chrome Management page, click the Device settings button
- 3.
Click the Device settings button to display the Device Settings page .
Note
If your domain contains multiple organizational units, go to the organizational tree and click the domain or organizational unit for which you want to control Forced Re-enrollment.
- 4.
In the Enrollment & Access section at the top of the Device Settings page, select the appropriate setting for Forced Re-enrollment:
Force device to re-enroll into this domain after wiping: Select this setting to turn on Forced Re-enrollment.
Device is not forced to re-enroll after wiping: Select this setting to turn off Forced Re-enrollment.
- 5.
Click the Save button.
Note
It may take an hour or so for the Forced Re-enrollment setting to take effect on all your school’s Chromebooks.
Disabling and Re-Enabling a Missing Chromebook
If a Chromebook goes missing, you can disable it to prevent whoever has it from using it. When you disable a Chromebook, you can display a message on the locked screen telling the reader how and where to return the Chromebook. When (or if) the Chromebook does return, you can re-enable it.
Note
The Forced Re-enrollment device policy needs to be enabled for you to be sure you can disable a Chromebook. (If this device policy is not enabled, whoever has taken the Chromebook can wipe it, thus freeing it from your management.)
Disabling a Chromebook
- 1.
In the Google Admin console, click the Device management icon.
- 2.
Click the Chrome devices icon.
- 3.
Make sure the Filters pane is open on the left. If it is not, click the Filter button to open the Filters pane.
- 4.
Go to the By Status section on the left and click the Provisioned status.
- 5.
In the left pane, click the organization that contains the Chromebook. A list of the devices in the organization will appear.
- 6.
Check the check box for the Chromebook you want to disable.
- 7.
Click the More Actions button at the top of the screen and then click the Disable item. The Disable dialog box will open.
- 8.
In the text field, type the message to display on the locked screen of the Chromebook. Normally, you would want to include contact details, such as the school’s email address and phone number.
- 9.
Click the Disable button. The Disable dialog box will close, and Chrome OS will disable the Chromebook.
Re-Enabling a Chromebook
To re-enable the Chromebook after it has returned to the fold, follow the same steps as in the list in the previous section, but select the Disabled status in the By Status list. In the list of disabled Chromebooks, check the check box for the Chromebook you want to re-enable, then click the More Actions button and click the Re-enable item. In the confirmation dialog box that opens, click the Re-enable button.
Deprovisioning a Chromebook
When you need to remove management features from a Chromebook, you can deprovision it. Normally, you would deprovision a Chromebook before sending it in for repair or before disposing of it—for example, selling the Chromebook or donating it.
- 1.
In the Google Admin console, click the Device management icon.
- 2.
Click the Chrome devices icon.
- 3.
Make sure the Filters pane is open on the left. If it is not, click the Filter button to open the Filters pane.
- 4.
Go to the By Status section on the left and click the Provisioned status.
Note
If the Chromebook has been disabled, click the Disabled status in the By Status section instead.
- 5.
In the left pane, click the organization that contains the Chromebook . A list of the devices in the organization will appear.
- 6.
Check the check box for the Chromebook you want to deprovision.
- 7.
Click the More Actions button at the top of the screen and then click the Deprovision item. The Deprovision dialog box will open to confirm the action and to prompt you for the reason for deprovisioning.
- 8.
Check the confirmation check box.
- 9.
Click the reason for deprovisioning the Chromebook:
Same Model Replacement: Select this reason if you are replacing a defective Chromebook with another Chromebook of the same model, or if you are replacing a defective Chromebook under warranty with a new Chromebook from the same manufacturer.
Different Model Replacement: Select this reason if you are replacing a Chromebook with a newer model.
Retiring from Fleet: Select this reason if you are removing the Chromebook from use, selling it, or donating it.
- 10.
Click the Deprovision button. The Deprovision dialog box will close.
After deprovisioning a Chromebook, you can wipe it to remove all device management from it. See the section “Making Sure a Chromebook Is Ready for Enrollment” earlier in this chapter for instructions on wiping a Chromebook .
Configuring User Settings
The Chrome Management console enables you to configure a wide range of settings to control the user experience on your school’s Chromebooks. In this section, we will first navigate to the User Settings page, which contains those settings, and then explore the various sections and many settings on that page.
Displaying the User Settings Page
- 1.
On the Home page, click the Device management icon to display the Device management page.
- 2.
In the Device Settings list in the left pane, click the Chrome management item to display the Chrome Management page.
- 3.
Click the User settings button to display the User Settings page. Figure 5-8 shows the top part of this long page .

The top part of the User Settings page includes the Mobile section, the General section, the Managed Chrome Browser section, and the Enrollment Controls section
Configuring Mobile Options
In the Mobile section of the User Settings page, you can check the “Apply supported user settings to Chrome on Android” check box if you want to use the Chrome Mobile feature to apply user settings to Chrome on Android devices. As of this writing, the Chrome Mobile feature is still in beta, so it may not work consistently.
If you are mostly concerned with managing Chromebooks, you likely need not use this feature.
Configuring General Settings
Avatar: Click the Upload Avatar File to start uploading a JPEG image file to replace the default avatar. This file has a maximum size of 512 KB.
Wallpaper: Click the Upload Wallpaper File button to start uploading a JPEG file to use as wallpaper. For example, you might upload your school’s preferred wallpaper file. This file has a maximum size of 16 MB, but it is usually better to keep wallpaper files considerably smaller than this.
Smart Lock for Chrome: If you want to allow users to use their Android phones to unlock their Chromebooks, open the Allow Smart Lock on Chrome device pop-up menu and select the Allow Smart Lock for Chrome item. If you prefer to prevent the use of this feature, select the Do not allow Smart Lock for Chrome item. If you do not want to control this setting via policy, select the “No policy set (default = Do not allow Smart Lock for Chrome)” item.
Configuring Managed Chrome Browser Settings
Apply all user policies when users sign in to Chrome, and provide a managed Chrome experience
Do not apply any policies when users sign in to Chrome. Allow users access to use Chrome as an unmanaged user.
Configuring Enrollment Controls Settings
Device Enrollment: Open the Place Chrome device in user organization during manual enrollment pop-up menu and select the Place Chrome device in user organization item if you want to move the Chrome device to a user organization. If you want to leave the Chrome device where it is, select the Keep Chrome device in current location item.
Asset Identifier During Enrollment: Open the Populate Asset ID and Location fields during enrollment pop-up menu and select the Users in this organization can provide asset ID and location during enrollment item if you want each user to be able to enter an asset ID and a location when enrolling a Chromebook. When you do this, Chrome will display the Device Information screen with suggested data in the fields; the user can accept the suggestions or change them. To prevent users from adding this information, select the Do not allow for users in this organization item. If you do not want to control this setting via policy, select the “No policy set (default = Do not allow for users in this organization)” item.
- Enrollment Permission: Open the Enrollment Permission pop-up menu and select the appropriate item on it:
Allow users in this organization to enroll new or re-enroll existing devices: Select this item to let users both enroll new devices and re-enroll existing devices.
Only allow users in this organization to re-enroll existing devices (cannot enroll new or deprovisioned devices): Select this item to allow re-enrollment but prevent new enrollment.
Do not allow users in this organization to enroll new or re-enroll existing devices: Select this item to prevent both enrollment and re-enrollment.
No policy set (default = Allow users in this organization to enroll new or re-enroll existing devices): Select this item if you do not want to control enrollment permission via policy.
Configuring Apps and Extensions Settings
- Allowed Types of Apps and Extensions: In the Allowed Types of Apps and Extensions list, check or uncheck the following check boxes to specify which types of apps and extensions Chrome OS should allow:
Extension: An extension is a small program that adds functionality to the Chrome browser.
Theme: A theme is a custom look for Chrome OS.
Google Apps Script: A Google Apps Script is an automated series of actions in a Google Apps app (such as Docs or Sheets).
Hosted App: A hosted app is an app that runs on a web host rather than running locally on Chrome OS.
Legacy Packaged App: A Legacy Packaged app is a full app for installation on Chrome OS, but in an older format than a Chrome Packaged app.
Chrome Packaged App: A Chrome Packaged app is a full app for installation on Chrome OS—for example, an app that you download from the Chrome Web Store.

In the Apps and Extensions section of the User Settings page, you can set up apps and extensions to be installed automatically. You can also block unwanted items.
App and Extension Install Sources: In this box, you can enter one or more URLs that are permitted to install apps, extensions, and themes on your school’s Chromebooks . When a Chromebook navigates to one of these URLs, Chrome OS will prompt the user to install the app, extension, or theme.
Force-installed Apps and Extensions: In this area, click the Manage force-installed apps link to display the Force-installed Apps and Extensions dialog box (see Figure 5-10). Select the apps and extensions you want to force-install, and then click the Save button.
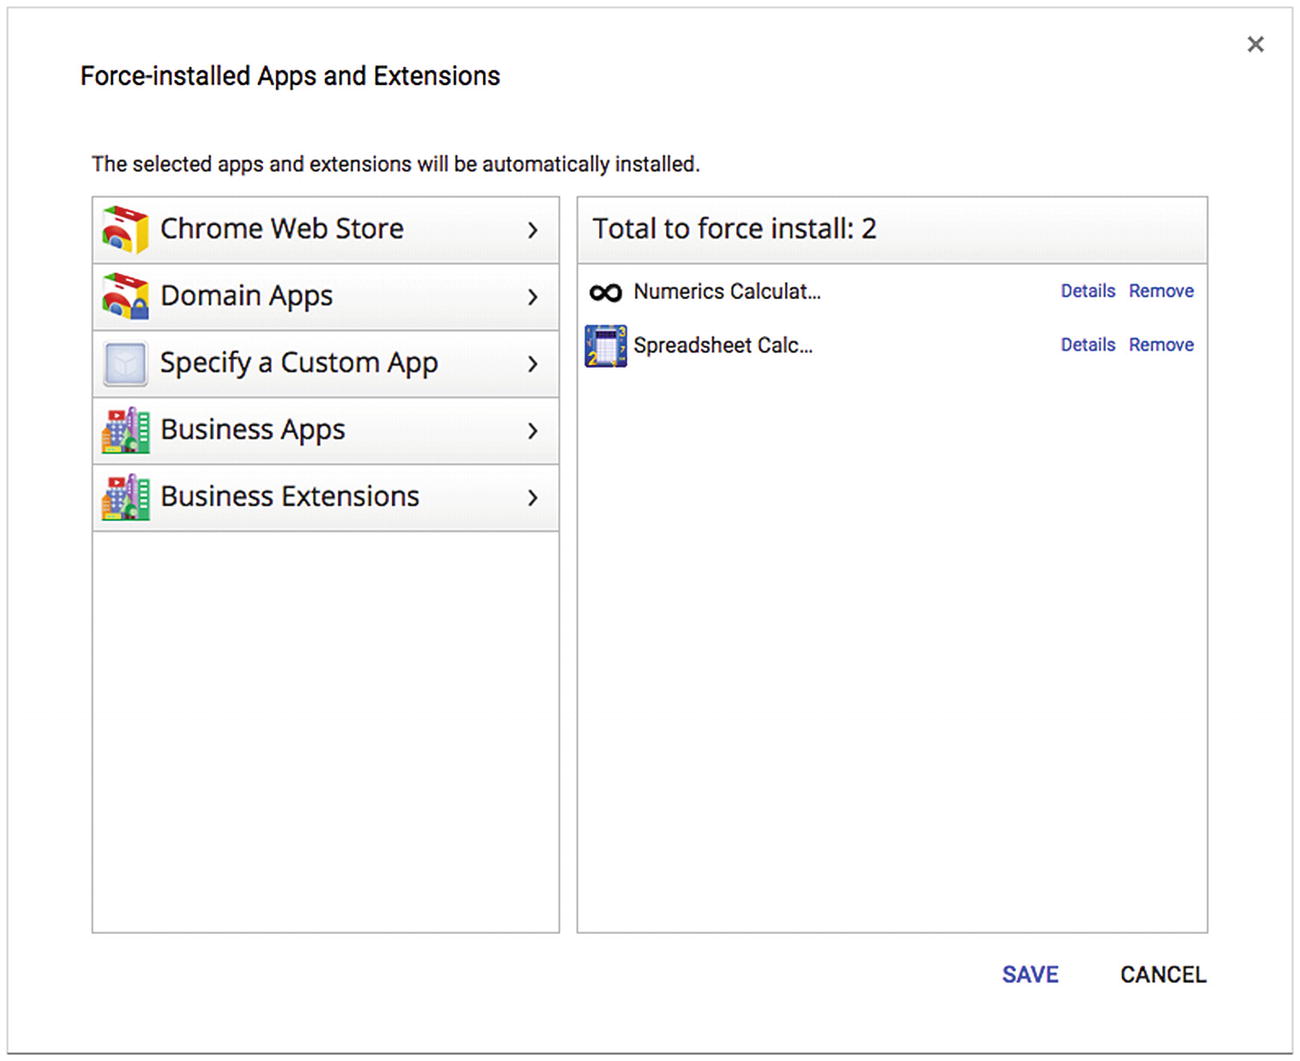
In the Force-installed Apps and Extensions dialog box, select the apps and extensions you want to install automatically, and then click the Save button
Allow or Block All Apps and Extensions: Open the Choose which Chrome apps and extensions to allow pop-up menu and select the Allow all apps and extensions except the ones I block item or the Block all apps and extensions except the ones I allow item.
Allowed Apps and Extensions: In this area, click the Manage link to display the Allowed apps and extensions dialog box or the Blocked apps and extensions dialog box, depending on which Allow or Block All Apps and Extensions setting you chose. Both these dialog boxes look and work like the Force-installed Apps and Extensions dialog box shown in Figure 5-10. Select the apps and extensions you want to allow or block and then click the Save button .
Block Extensions by Permission: In this area, specify which extensions to block by the types of permissions they need. First, choose whether you will specify blocked permissions or allowed permissions; to do so, open the Block extensions by permissions and URLs pop-up menu and select the “If the extension uses one of the selected permissions, block users from installing or using it” item if you want to specify blocked permissions; select the “If the extension uses a permission that is not selected, block users from installing or using it” item if you want to specify allowed permissions. Then, go to the list of permissions and check the appropriate check boxes to specify which permissions to block or allow. In the Blocked URLs box, enter any URLs you want to block. Then, in the Allowed URLs box, enter any URLs you want to allow.
Task Manager: Open the Task Manager pop-up menu and select the “Allow users to end processes with the Chrome task manager” item if you want users to be able to use Task Manager. Select the “Block users from ending processes with the Chrome task manager” if you want to prevent users from using Task Manager. If you do not want to apply policy to Task Manager, select the “No policy set (default = Allow users to end processes with the Chrome task manager)” item.
Choosing Site Isolation Settings
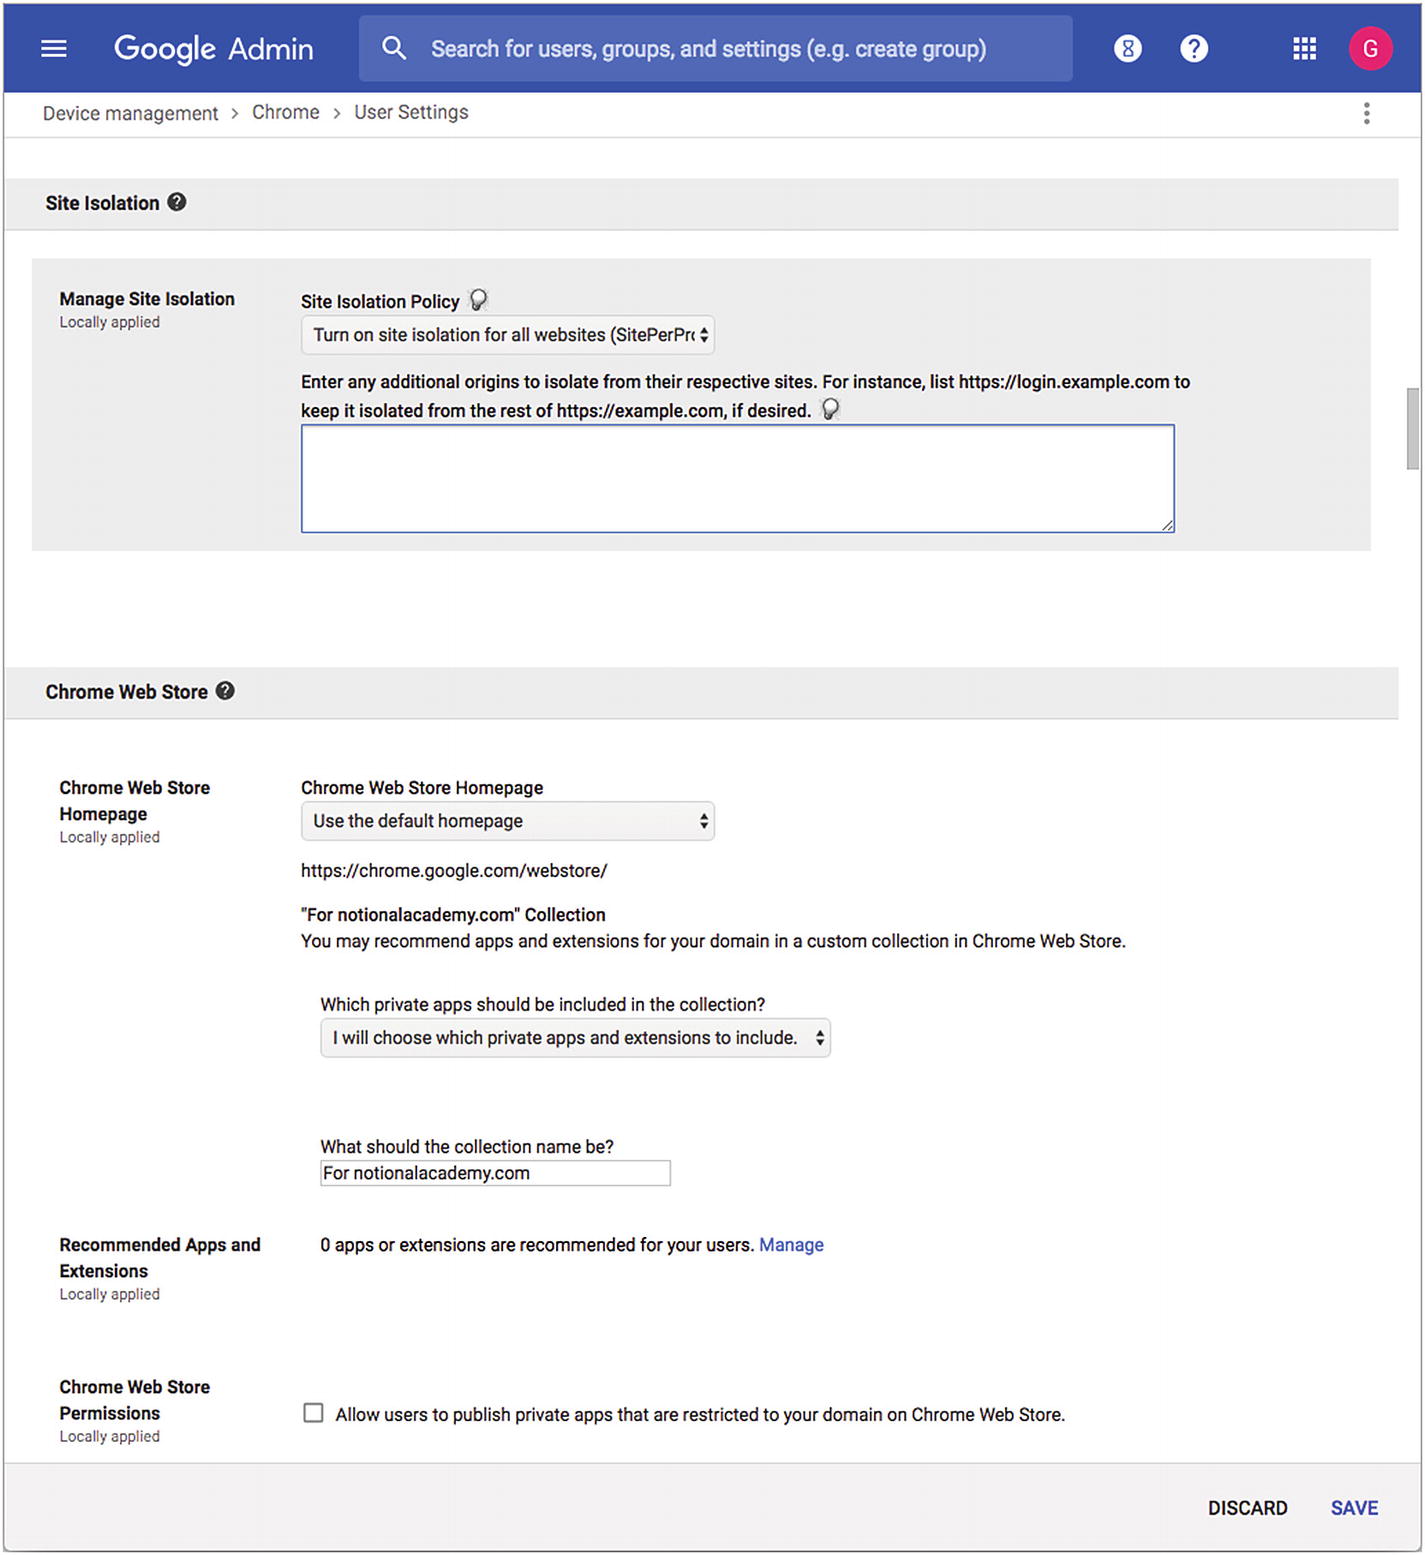
The Site Isolation section of the User Settings page lets you specify which websites to isolate. The Chrome Web Store section enables you to add private apps to the users’ view of the Chrome Web Store.
Site isolation not enabled: Select this item to allow users to turn site isolation on or off.
Turn on site isolation for all websites (SitePerProcess): Select this item to enable site isolation for all websites. This is the most secure setting. In the text box below the Site Isolation Policy pop-up menu, you can also enter specific web pages you want to isolate from their own sites .
Turn on site isolation for specific websites, set below (IsolateOrigins): Select this item to turn on site isolation only for the websites you enter in the text box below the Site Isolation Policy pop-up menu.
Configuring the Chrome Web Store Settings
- Chrome Web Store Homepage: Open this pop-up menu and select the page you want your school’s users to see as the home page of the Chrome Web Store:
Use the default homepage: Select this item to use the Chrome Web Store’s default home page.
Use the “For [your school’s domain]” collection: Select this item to use the collection of apps, extensions, and themes that the Chrome Web Store provides for your school. You can customize this collection.
Use a custom page, set below: To use a custom page, select this item and type the URL of the page within the Chrome Web Store that you want to use.
Which private apps should be included in the collection?: In this pop-up menu, choose the I will choose which private apps and extensions to include item or the Include all private apps and extensions from my domain item, as needed.
What should the collection name be?: In this text field, type the description you want the Chrome Web Store to show for your school’s collection.
Recommended Apps and Extensions: In this area, click the Manage button. The Recommended apps and extensions dialog box will open. This dialog box is similar to the Force-installed Apps and Extensions dialog box (see Figure 5-10, earlier in this chapter) and works in a similar way. Select the apps you want to include and then click the Save button.
Chrome Web Store Permissions: In this area, check the “Allow users to publish private apps that are restricted to your domain on Chrome Web Store” check box if you want users to be able to publish apps. Normally, you would allow only your school’s developers to publish apps. If you check this check box, the “Allow users to skip verification for websites not owned” check box appears. You can check this check box to enable users to publish apps without having to prove that they own your school’s domain.
Choosing Settings in the Android Applications Section
In the Android applications section of the User Settings page, you can configure settings for Android apps running on Chrome devices. This feature is currently in beta, and we will not explore it here.
Configuring Security Settings
Password Manager: In this pop-up menu, select the Allow user to configure item, the Always allow use of password manager item, or the Never allow use of password manager item, as needed.
Lock Screen: In this pop-up menu, select the Allow locking screen item if you want the Chromebooks to display the locking screen; if not, select the Do not allow locking screen item. If you do not want to configure this setting via policy, select the “No policy set (default = Allow locking screen)” item.
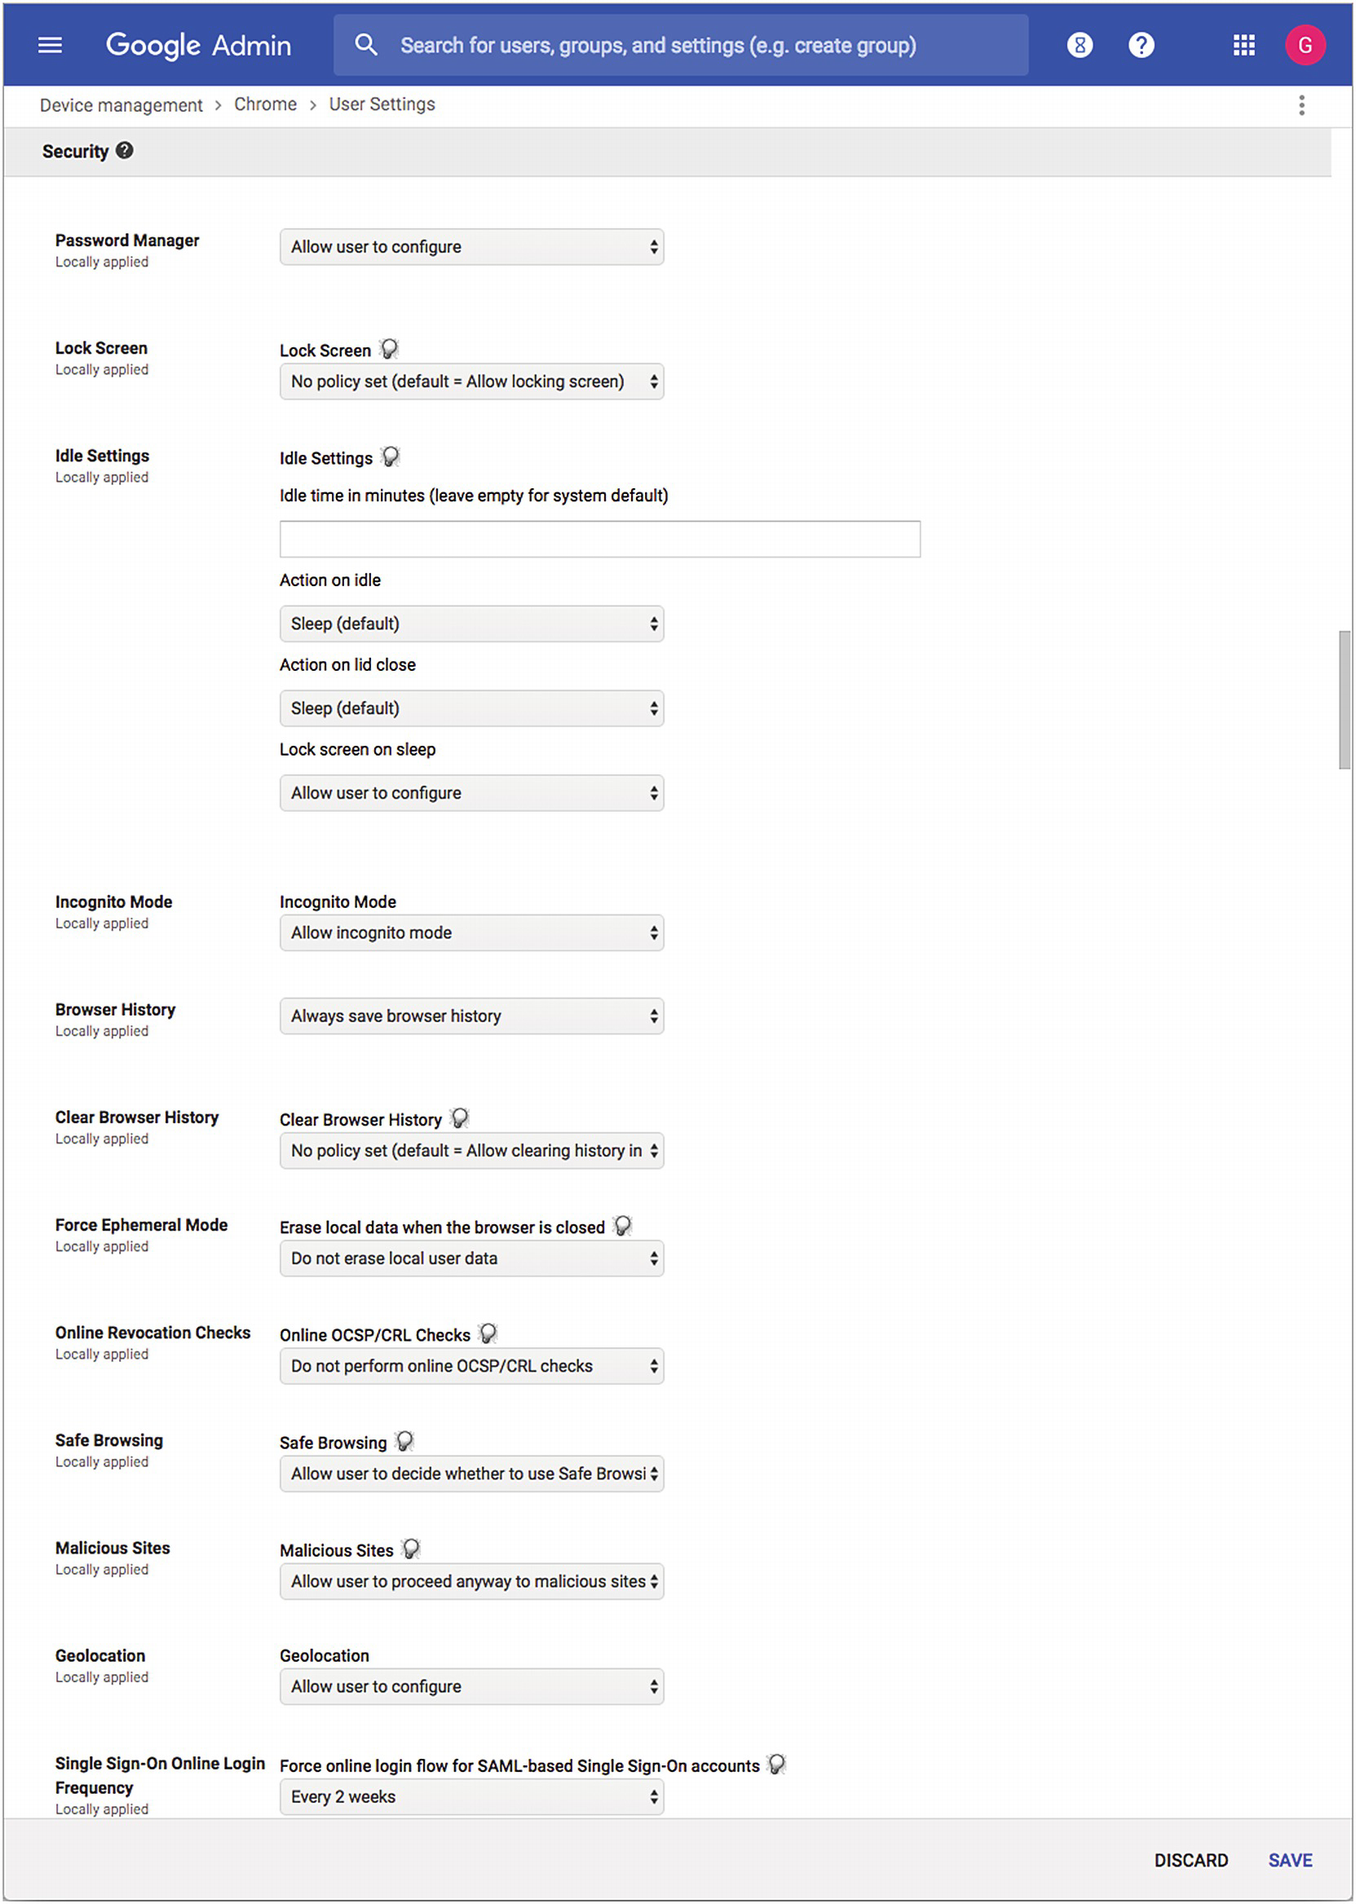
The Security section of the User Settings page gives you access to a wide range of important settings
- Idle Settings: In this area, specify settings for idle time, lid closing, and sleep:
Idle time in minutes (leave empty for system default): In this box, type the number of minutes a Chromebook should remain idle before going to sleep or signing the user out. Leave this box empty to use the system default setting.
Action on idle: In this pop-up menu, select the Sleep (default) item or the Logout item to specify what the Chromebook should do at the end of the idle period.
Action on lid close: In this pop-up menu, select the Sleep (default) item or the Logout item to specify what the Chromebook should do when someone closes its lid.
Lock screen on sleep: In this pop-up menu, select the Lock screen item if you want the Chromebook to lock the screen when it goes to sleep. Select the Don’t lock screen item to leave the screen unlocked. Select the Allow user to configure item to let the user configure which action occurs.
Incognito Mode: In this pop-up menu, select the Allow incognito mode item if you want to allow users to use Incognito mode in the Chrome browser. Otherwise, select the Disallow incognito mode item.
Browser History: In this pop-up menu, select the Always save browser history item or the Never save browser history item, as needed.
Clear Browser History: In this pop-up menu, select the Allow clearing history in settings menu item if you want to allow the user to clear the browsing history, or the Do not allow clearing history in settings menu item if you do not. If you do not want to configure this setting via policy, select the “No policy set (default = Allow clearing history in settings menu)” item.
Force Ephemeral Mode: In the Erase local data when the browser is closed pop-up menu, select the Do not erase local user data item or the Erase all local user data item, as needed.
Online Revocation Checks: In the Online OCSP/CRL Checks pop-up menu, select the Perform online OCSP/CRL checks item if you want Chrome OS to check that websites’ digital certificates are valid. If not, select the Do not perform online OCSP/CRL checks item.
Note
OCSP is the abbreviation for Online Certificate Status Protocol , a protocol for verifying the validity of digital certificates. CRL is the abbreviation for Certificate Revocation Lists, which are lists of certificates that have been revoked.
Safe Browsing: In this pop-up menu, select the Always use Safe Browsing item if you want to enforce the use of Safe Browsing, a Chrome feature that provides some protection from websites that contain malware. Select the Always disable Safe Browsing item if you want to turn off Safe Browsing. Select the Allow user to decide whether to use Safe Browsing item if you want to let the user make the choice.
Malicious Sites: In this pop-up menu, choose the Allow user to proceed anyway to malicious sites item if you want to allow users to disregard warnings about potentially dangerous sites and go to them anyway. Select the Prevent user from proceeding anyway to malicious sites item if you want to prevent the user from going to such sites.
- Geolocation: In this pop-up menu, select the appropriate item to control the use of geolocation services:
Allow sites to detect users’ geolocation: Select this item to allow sites to detect geolocation.
Do not allow sites to detect users’ geolocation: Select this item to block sites’ attempts to detect geolocation.
Always ask the user if a site wants to detect their geolocation: Select this item to have Chrome OS prompt the user when a site asks for geolocation information.
Allow user to configure: Select this item to enable the user to configure geolocation settings.
Single Sign-On Online Login Frequency: In the Force online login flow for SAML-based Single Sign-On accounts pop-up menu , select the frequency with which to force login. For example, you might select the Every two weeks item.
Single Sign-On: In the SAML-based Single Sign-On for Chrome Devices pop-up menu, select the Enable SAML-based Single Sign-On for Chrome item or the Disable SAML-based Single Sign-On for Chrome item, as needed.
Remote access clients: In the “Remote Access Host Client Domain” field, enter the domain name that remote access clients should enter.
- Local Trust Anchors Certificates: In the Local Anchors Sha1 pop-up menu, select the appropriate item to control how the Chromebooks treat SHA-1 signed certificates issued by local trust anchors:
Allow SHA-1 for local trust anchors: Select this item to allow SHA-1.
Follow the publicly announced SHA-1 deprecation schedule: Select this item to make the Chromebooks follow the publicly announced schedule for discontinuing use of SHA-1 certificates (which have certain security problems).
No policy set (default = Follow the publicly announced SHA-1 deprecation schedule): Select this item if you do not want to configure this feature via policy.
Local Anchors Common Name Fallback: In this pop-up menu, select the Allow item to allow certificates issued by local trust anchors that are missing the subjectAlternativeName extension; select the Block item to block such certificates; or select the “No policy set (default = Block)” item to avoid configuring this feature via policy.
Symantec Corporation’s Legacy PKI Infrastructure: In this pop-up menu , select the Allow item if you want to trust certificates issued by Symantec Corporation’s Legacy PKI operations; select the Block item if you want to block such certificates: or select the “No policy set (default = Block)” item to avoid configuring this feature via policy.
Configuring Session Settings
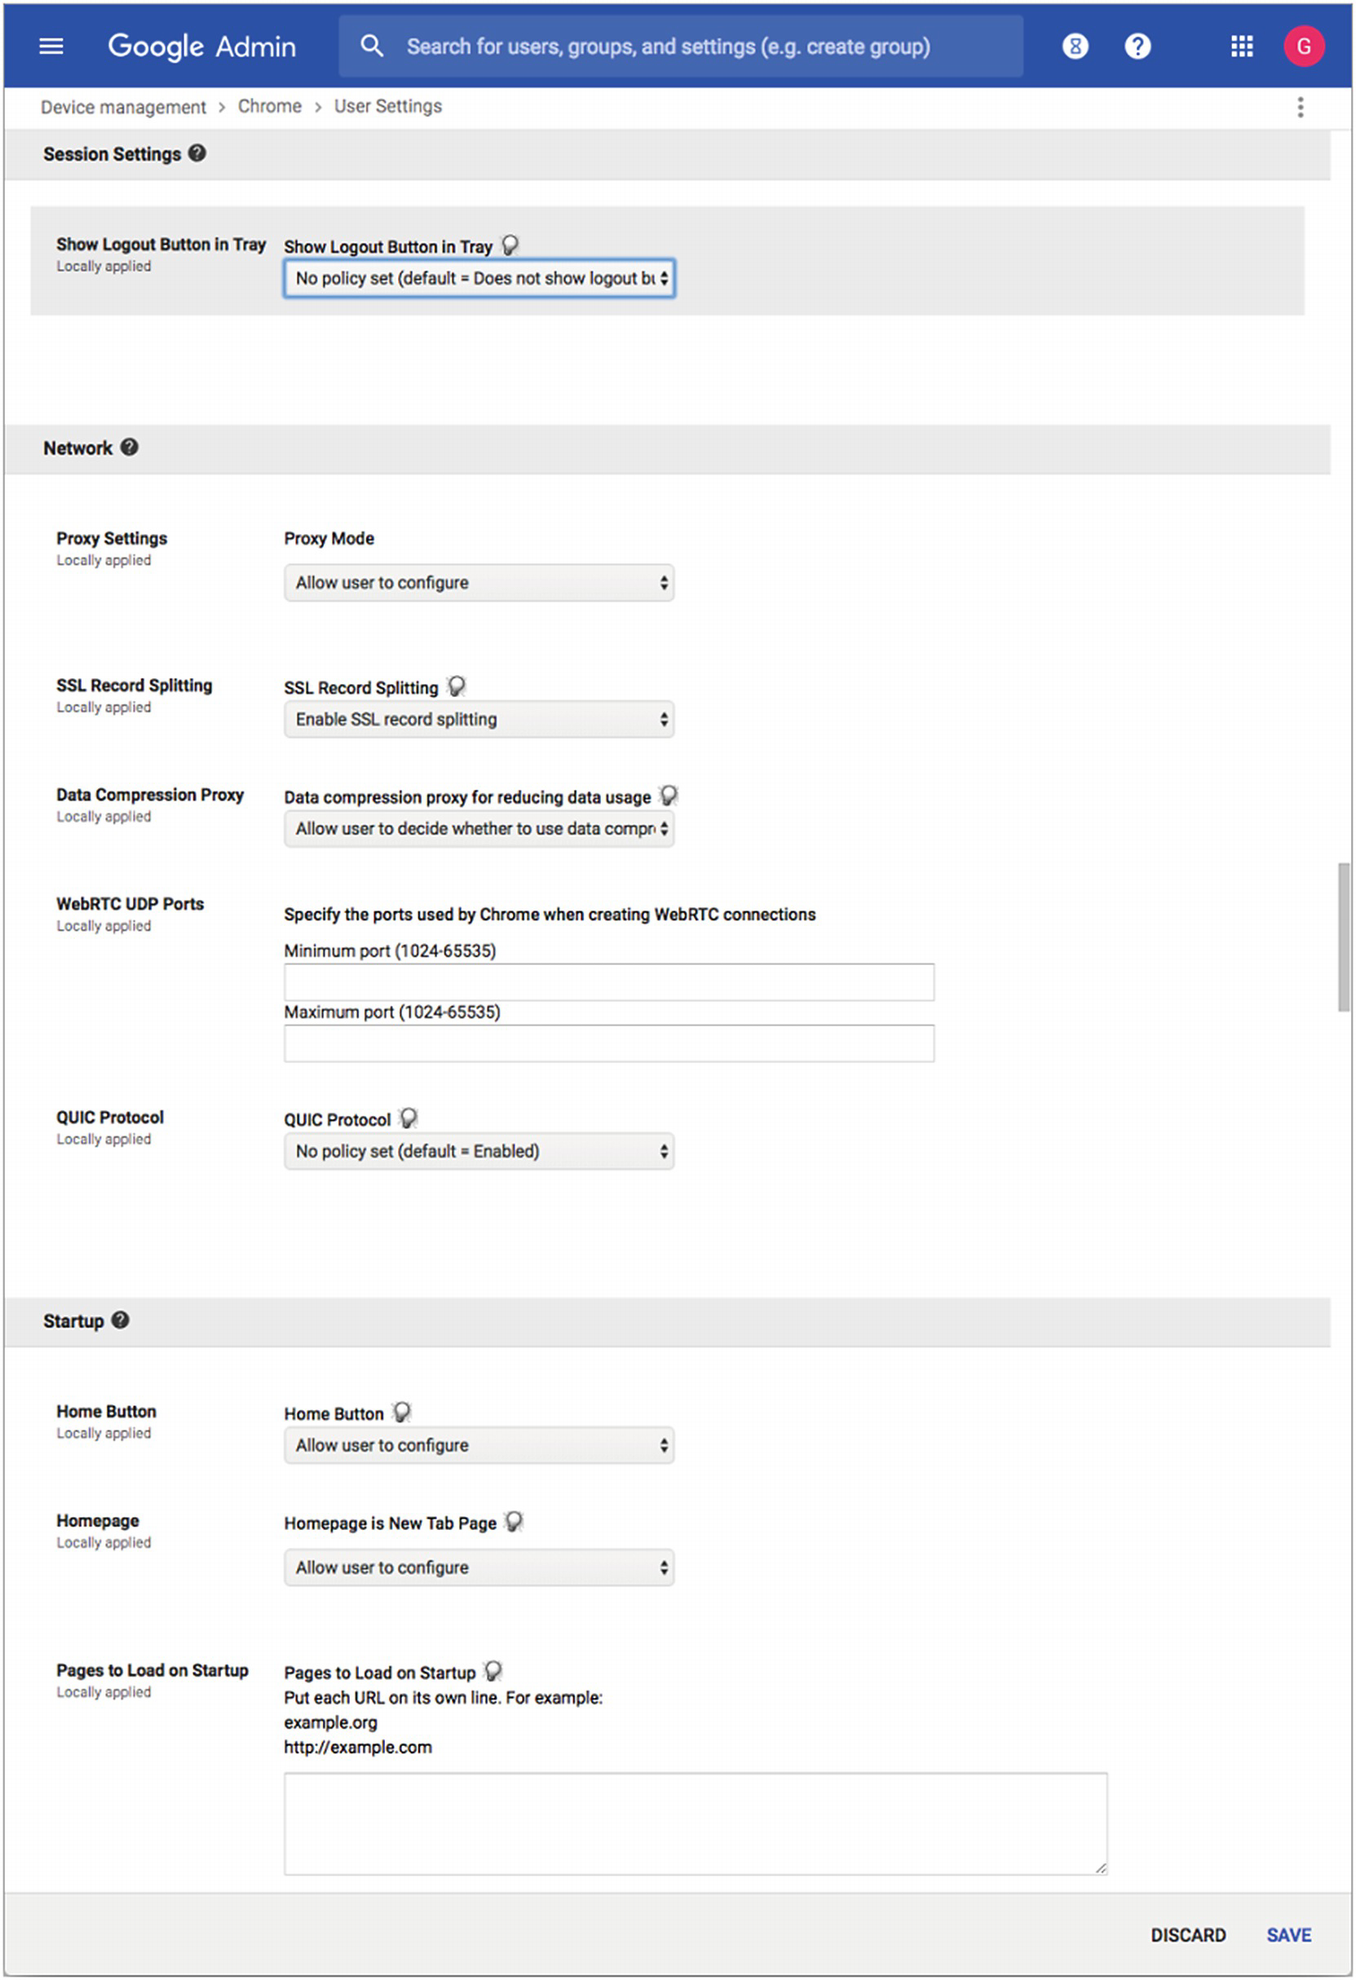
The Session Settings section, Network section, and Startup section of the User Settings page
Configuring Network Settings
- Proxy Settings: Open the Proxy Mode pop-up menu and then select the appropriate item:
Allow user to configure: Select this item to let the user configure proxy settings.
Never use a proxy: Select this item to turn off proxying.
Always auto detect the proxy: Select this item to use auto-detection of the proxy server.
Always use the proxy specified below: Select this item to make the Chromebooks use the proxy server whose URL you enter in the Proxy Server URL box. If necessary, you can then go to the Proxy Bypass List box and enter a list of URLs that should bypass the proxy server.
Always use the proxy auto-config specified below: Select this item to make the Chromebooks use the proxy server auto-configuration file you enter in the Proxy Server Auto Configuration File URL box.
SSL Record Splitting: Open this pop-up menu and select the Enable SSL record splitting item if you want to permit SSL record splitting (a workaround for a security issue in SSL 3.0 and TLS 1.0). Otherwise, select the Disable SSL record splitting item.
Data Compression Proxy: Open this pop-up menu and select the Always enable data compression proxy item if you want your school’s Chromebooks to use Google’s data compression proxy service, which is intended to reduce cellular data usage and speed up mobile browsing. Select the Always disable data compression proxy item if you want to turn off the use of the data compression proxy service . To leave the choice up to the user, select the Allow user to decide whether to use data compression proxy.
WebRTC UDP Ports: In the Specify the ports used by Chrome when creating WebRTC connections area, specify the port range that Chrome OS should use for real-time connections over the Web. Enter the minimum port in the Minimum port (1024–65535) box and the maximum port in the Maximum port (1024–65535) box.
QUIC Protocol: Open this pop-up menu and select the Enabled item if you want to allow Chrome OS to use the Quick UDP Internet Connections (QUIC) protocol. Select the Disabled item if you do not want Chrome OS to use QUIC. If you do not want to configure this feature via policy, select the “No policy set (default = Enabled)” item.
Choosing Startup Settings
Home Button: Open this pop-up menu and select the Always show “Home” button item if you want the Chrome browser to display the Home button. If you prefer to suppress the Home button, select the Never show “Home” button item. To let the user decide, select the Allow user to configure item.
- Homepage: Open the Homepage is New Tab Page pop-up menu and select the appropriate item:
Allow user to configure: Select this item to let the user configure the home page.
Homepage is always the new tab page: Select this item to set the home page to the new tab page.
Homepage is always the Homepage URL, set below: Select this item to make the home page the page at the URL you enter in the Homepage URL box.
Pages to Load on Startup: In this box, enter a list of the web pages you want the Chrome browser to load on startup. Place each URL on a separate line.
Choosing Content Settings
- Safe Search and Restricted Mode: In this area, you can configure the Google Safe Search feature and the Restricted Mode for YouTube feature:
Google Safe Search for Google Web Search queries: Open this pop-up menu and select the Always use Safe Search for Google Web Search item if you want to ensure the Chromebooks always use the Safe Search feature. Select the Do not enforce Safe Search for Google Web Search item if you do not require Safe Search. If you do not want to configure this feature via policy, select the “No policy set (default = Do not enforce Safe Search for Google Web Search)” item.
Restricted Mode for YouTube : Open this pop-up menu and select the Enforce Strict Restricted Mode on YouTube item, the Enforce at least Moderate Restricted Mode on YouTube item, or the Do not enforce Restricted Mode on YouTube item, as needed. If you do not want to configure this feature via policy , select the “No policy set (default = Do not enforce Restricted Mode on YouTube)” item.
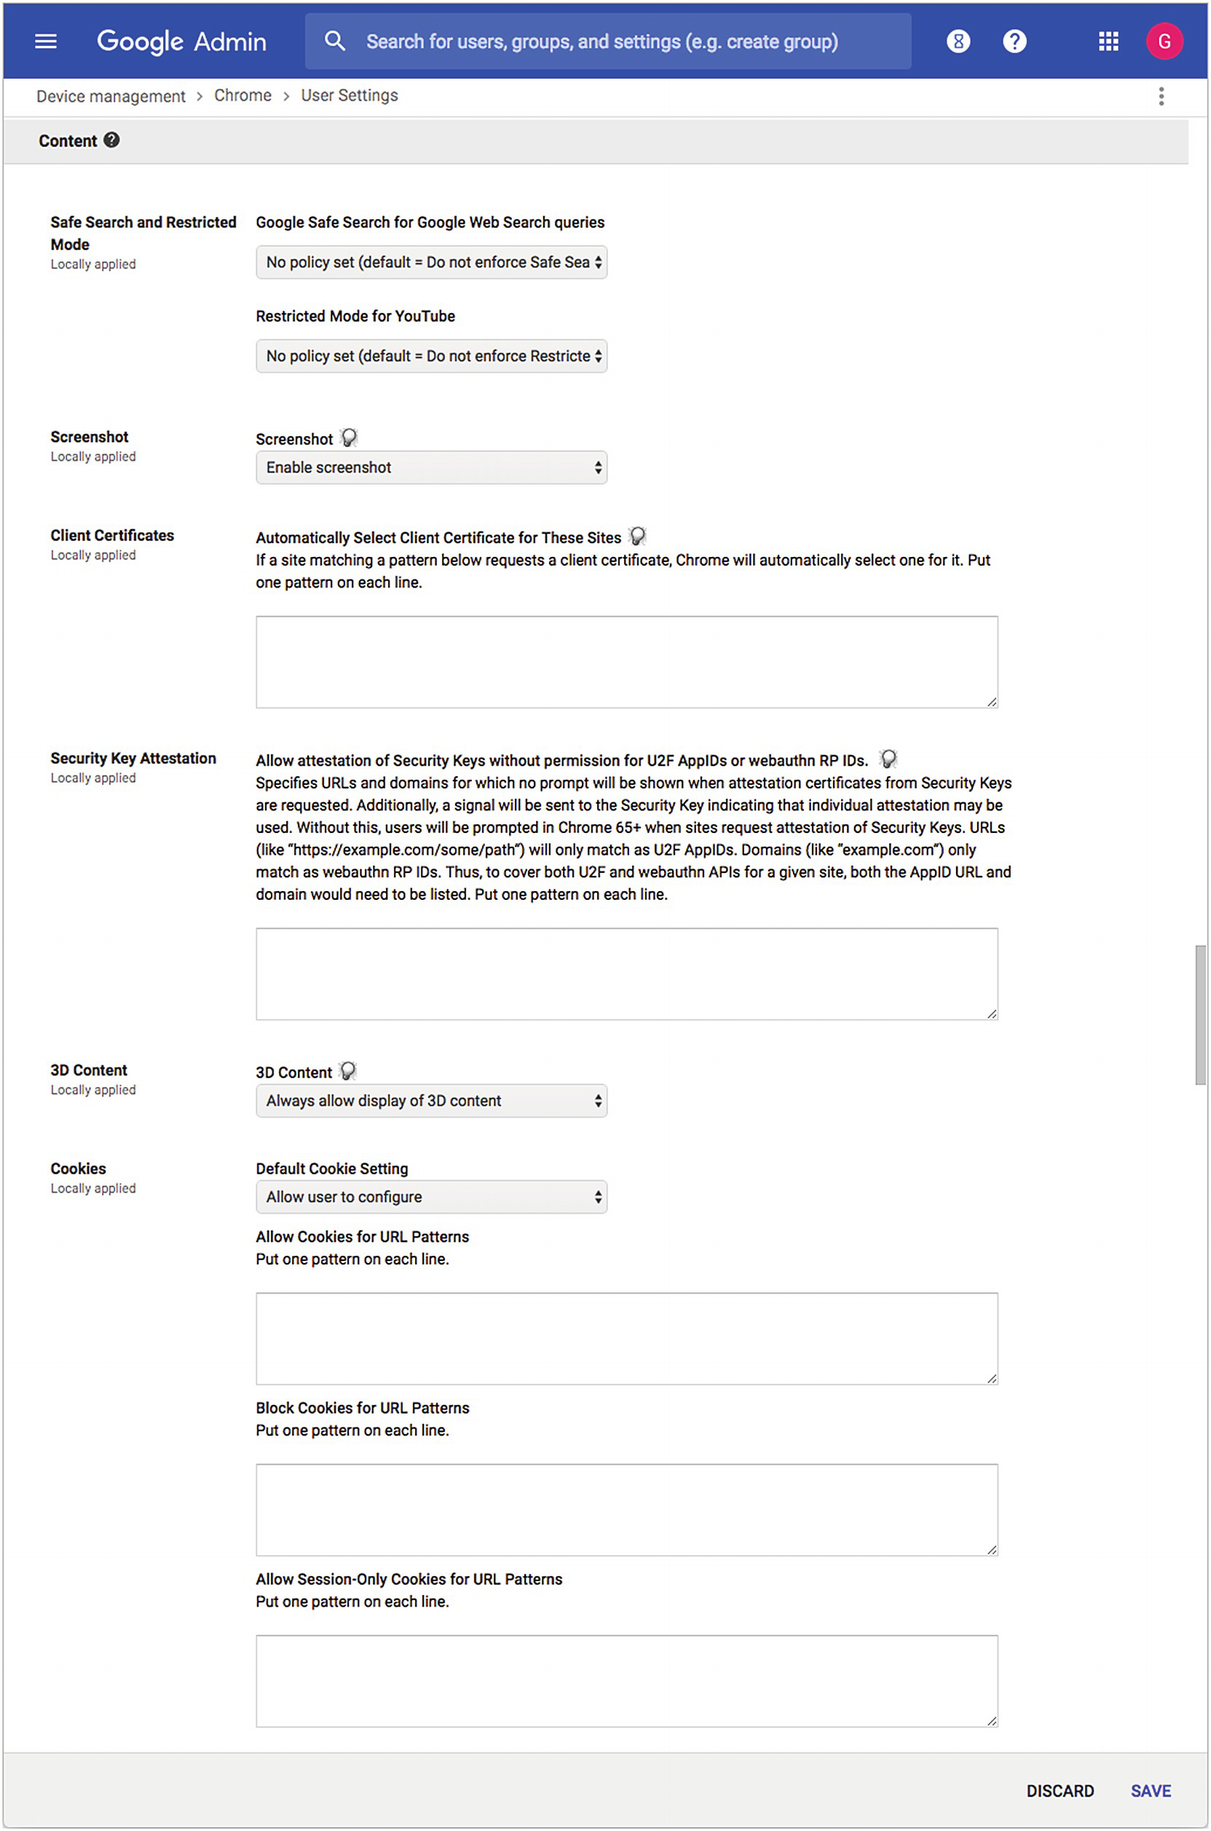
The Content section of the User Settings page enables you to control Safe Search, Restricted Mode for YouTube, screenshots, cookies, and more
Screenshot: In this pop-up menu, select the Enable screenshot item if you want to let users take screenshots, or select the Disable screenshot item if you do not.
Client certificates: In the Automatically Select Client Certificate for These Sites box, enter a JSON string containing a list of patterns specifying the websites for which Chrome OS should automatically select client certificates.
Security Key Attestation: In this box, you can enter a JSON string containing a list of URLs and domains for which you want to suppress prompts when attestation certificates from security keys are requested.
3D Content: Open the 3D Content pop-up menu and select the Always allow display of 3D content item or the Never allow display of 3D content item, as needed.
- Cookies: Use the controls in this area to specify how to handle cookies:
Default Cookie Setting : Open this pop-up menu and select the Allow sites to set cookies item, the Never allow sites to set cookies item, the Keep cookies for the duration of the session item, or the Allow user to configure item, as needed.
Allow Cookies for URL Patterns: In this box, enter a list of URL patterns specifying sites for which to allow cookies.
Block Cookies for URL Patterns: In this box, enter a list of URL patterns specifying sites for which to block cookies.
Allow Session-Only Cookies for URL Patterns: In this box, enter a list of URL patterns specifying sites that are permitted to set session-only cookies.
Third-Party Cookie Blocking: Open this pop-up menu and select the Allow third-party cookies item, the Disallow third-party cookies item, or the Allow user to decide whether to allow third-party cookies item, as needed.
Images: Open this pop-up menu and select the Show images item, the Do not show images item, or the Allow user to configure item, as needed. In the Show Images on These Sites box, enter a list of URL patterns specifying sites that are allowed to show images. In the Block Images on These Sites box, enter a list of URL patterns specifying sites to block from showing images.
JavaScript: Open this pop-up menu and select the Allow sites to run JavaScript item, the Do not allow sites to run JavaScript item, or the Allow user to configure item, as needed. In the Allow These Sites to Run JavaScript box, enter a list of URL patterns specifying sites allowed to run JavaScript. In the Block JavaScript on These Sites box, enter a list of URL patterns specifying sites to block from running JavaScript.
Notifications: Open this pop-up menu and select the Allow sites to show desktop notifications item, the Do not allow sites to show desktop notifications item, the Always ask the user if a site can show desktop notifications item, or the Allow user to configure item, as needed. In the Allow These Sites to Show Desktop Notifications box, enter a list of URL patterns specifying sites allowed to show desktop notifications. In the Block Desktop Notifications on These Sites box, enter a list of URL patterns specifying sites to block from displaying desktop notifications.
Plug-ins: Open this pop-up menu and select the Run plug-ins automatically item, the Block all plug-ins item, or the Allow user to configure item, as needed. In the Allow Plug-ins on These Sites box, enter a list of URL patterns specifying sites allowed to run plugins. In the Block Plug-ins on These Sites box, enter a list of URL patterns specifying sites to block from running plugins.
Enabled and Disabled Plug-ins: In the Enabled Plug-ins box, enter a list containing the names of plugins to always enable. These names are case sensitive. You can use wildcards (such as *). In the Disabled Plug-ins box, enter a list containing the names of plugins to always disable. In the Exceptions to Disabled Plug-ins box, enter a list of plugins that users can enable or disable even if those plugins appear in the Disabled Plug-ins box.
Plug-in Finder: Open this pop-up menu and select the Enable automatic search and installation of missing plug-ins item or the Disable automatic search and installation of missing plug-ins item, as needed.
Plug-in Authorization: Open this pop-up menu and select the Ask for user permission before running plug-ins that require authorization item or the Always run plug-ins that require authorization item, as needed.
Outdated plug-ins: Open this pop-up menu and select the Allow outdated plug-ins to be used as normal plug-ins item, the Ask user for permission to run outdated plug-ins item, or the Disallow outdated plug-ins item, as needed.
Pop-ups: Open this pop-up menu and select the Allow all pop-ups item, the Block all pop-ups item, or the Allow user to configure item, as needed. In the Allow Pop-ups on These Sites box, enter a list of URL patterns specifying sites allowed to display pop-ups. In the Block Pop-ups on These Sites box, enter a list of URL patterns specifying sites to block from displaying pop-ups.
URL Blocking: In the URL Blacklist box, enter a list of URLs to block. In the URL Blacklist Exception list, enter a list of URLs to allow even if they appear in the URL blacklist.
Google Drive Syncing: Open the Syncing Data with Google Drive pop-up menu and select the Enable Google Drive syncing item, the Disable Google Drive syncing item, or the Allow user to decide whether to use Google Drive syncing item, as needed.
Google Drive Syncing over Cellular: Open the Syncing Data with Google Drive over Cellular Connections pop-up menu and select the Enable Google Drive syncing over cellular connections item or the Disable Google Drive syncing over cellular connections item, as appropriate.
Cast: Open the Allow users to Cast from Chrome pop-up menu and select the Allow users to Cast item, the Do not allow users to Cast item, or the “No policy set (default = Allow users to Cast)” item, as needed. Open the Show Cast Icon in the toolbar pop-up menu and select the Always show the Cast icon in the toolbar item, the Do not show the Cast icon in the toolbar item, or the “No policy set (default = Do not show the Cast icon in the toolbar)” item, as required.
Configuring Printing Options
Printing: Open this pop-up menu and select the Enable printing item or the Disable printing item, as appropriate.

In the Printing section of the User Settings page, you can enable and disable printing and print preview, configure Google Cloud Print, and configure native Chrome OS printing
Print Preview: Open the Allow Print Preview pop-up menu and select the Allow using print preview item or the Always use the system print dialog instead of print preview item, as needed.
Google Cloud Print Submission: Open the Allow Submission to Google Cloud Print pop-up menu and select the Allow submission of documents to Google Cloud Print item or the Disallow submission of documents to Google Cloud Print item, as needed.
Google Cloud Print Proxy: Open the Using Chrome as a Proxy for Google Cloud Print pop-up menu and select the Allow using Chrome as a proxy for Google Cloud Print item or the Disallow using Chrome as a proxy for Google Cloud Print item, as appropriate.
Print Preview Default: Open the Default printer selection pop-up menu and select the Use default print behavior item or the Define the default printer item. If you select the Define the default printer item, open the Printer Types pop-up menu and select the appropriate printer type: Cloud & Local printers, Cloud only, or Local only. Open the Printer Matching pop-up menu and select the Match by Name item or the Match by ID item, as needed. Then, click in the Default Printer box and type a regular expression that identifies the printer you want to use as the default.
Native Chrome OS Printing: In this area, click the Manage link to display the Native Chrome OS Printers dialog box (shown on the left in Figure 5-16). Click the Add a Printer button to display the Add a native printer dialog box (shown on the right in Figure 5-16), enter the printer’s details, and then click the Save button. The printer will then appear in the Native Chrome OS Printers dialog box. When you have added all the printers, click the Save button to close the dialog box.
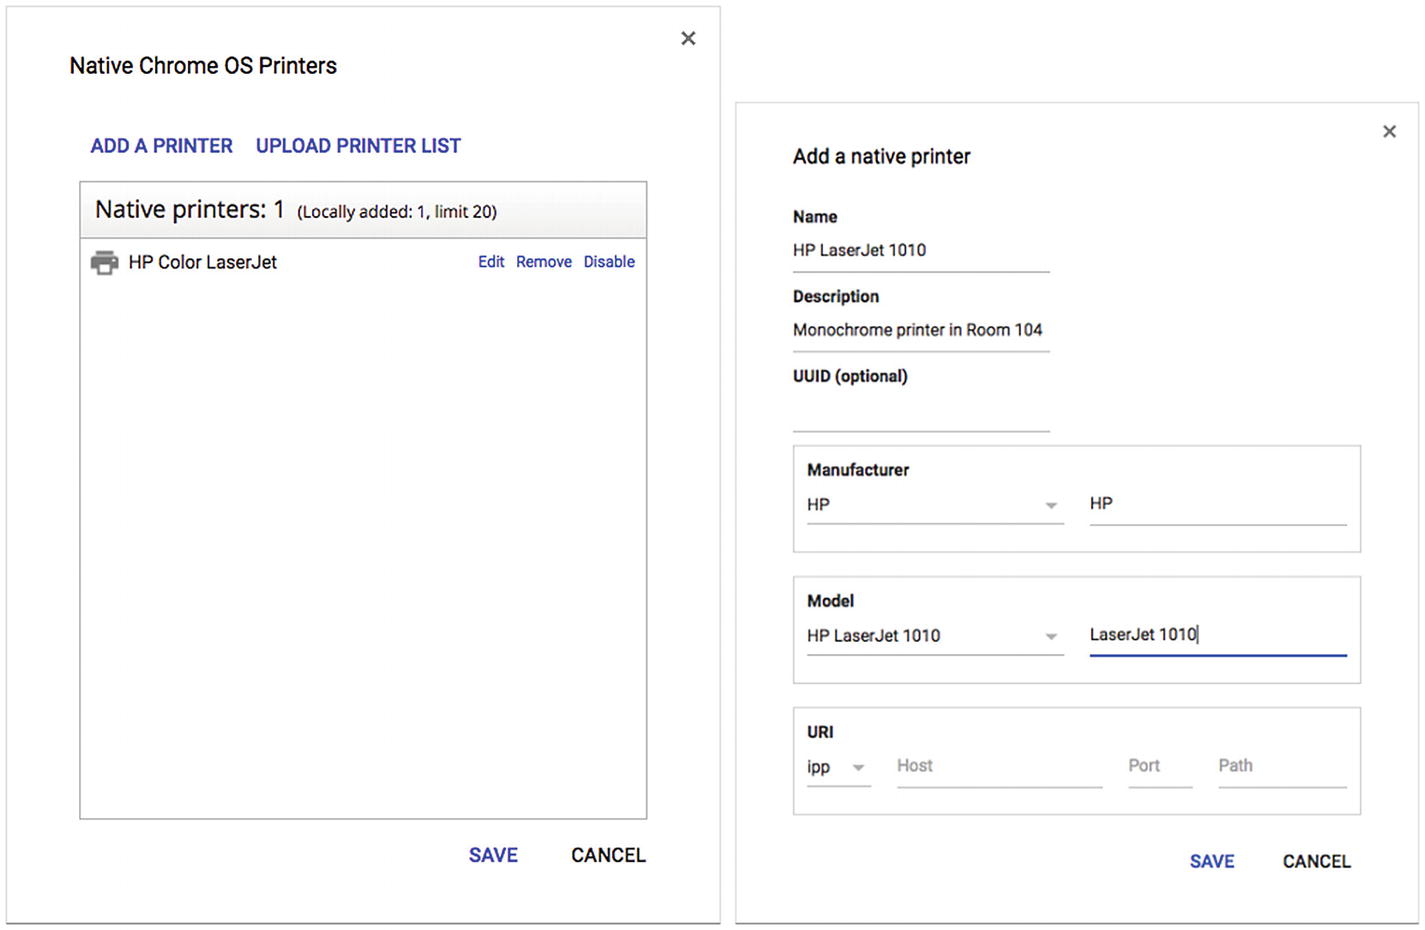
In the Native Chrome OS Printers dialog box (left), click the Add a Printer button to display the Add a native printer dialog box (right). Specify the printer’s details and then click the Save button.
Configuring User Experience Settings
Managed Bookmarks: In the “Managed Bookmarks Folder Name” field, type the name that the Chromebooks should display for the managed bookmarks you provide. For example, you might call the folder School Links. Add each managed bookmark by typing its name in the URL column, typing a descriptive name in the Name column, and then clicking the Add (+) button.
Bookmark Bar: Open this pop-up menu and select the Enable bookmark bar item, the Disable bookmark bar item, or the Allow user to decide whether to enable bookmark bar item, as needed.
Bookmark Editing: Open this pop-up menu and select the Enable bookmark editing item or the Disable bookmark editing item, as needed.

The User Experience section of the User Settings page enables you to control a wide range of aspects of the user experience, from bookmarks to network prediction
- Download Location: Open this pop-up menu and select the appropriate location:
Set Google Drive as default, but allow user to change: Select this setting when it is better to have users store files on Google Drive but it is okay to store files locally as well.
Local Downloads folder, but allow user to change: Select this setting when users use the same Chromebooks regularly—for example, when each student has been issued a Chromebook.
Force Google Drive: Select this setting when you need to make sure that users keep files on Google Drive rather than locally—for example, when the users use shared Chromebooks.
Spell Check Service: Open this pop-up menu and select the Enable the spell checking web service item, the Disable the spell checking web service item, or the Allow user to decide whether to use the spell checking web service item, as needed.
Google Translate: Open this pop-up menu and select the Always offer translation item, the Never offer translation item, or the Allow user to configure item, as needed.
Alternate Error Pages: Open this pop-up menu and select the Always use alternate error pages item, the Never use alternate error pages item, or the Allow user to configure item, as needed. Alternate error pages contain the suggestions that the Chrome browser shows when it is unable to connect to a particular web address.
Developer Tools: Open this pop-up menu and select the Always allow use of built-in developer tools item, the Never allow use of built-in developer tools item, or the “No policy set (default = Always allow use of built-in developer tools)” item. Normally, you would restrict developer tools to developers and those learning programming.
Form Auto-fill: Open this pop-up menu and select the Never auto-fill forms item or the Allow user to configure item, as appropriate.
DNS Pre-fetching: Open this pop-up menu and select the Always pre-fetch DNS item, the Never pre-fetch DNS item, or the Allow user to configure item, as needed.
UNDERSTANDING DNS PRE-FETCHING AND NETWORK PREDICTION
DNS pre-fetching is the Chrome feature that automatically looks up the IP address of each link on a web page that is displayed in the Chrome browser. DNS pre-fetching can speed up browsing, but it increases use of your school’s Internet connection somewhat. In Chrome Settings, the “Predict network actions to improve page performance” check box controls DNS pre-fetching.
Network prediction is a wider-ranging feature that not only pre-fetches DNS data but also connects to web pages linked to the current page (this is called TCP and SSL preconnection) and downloads their contents (this is called pre-rendering) so as to be able to display any page quickly when the user clicks its link. Network prediction can greatly increase the usage of the Internet connection because it involves downloading much more data.
Network Prediction: Open this pop-up menu and select the Predict network actions item, the Do not predict network actions item, or the Allow user to configure item, as needed. See the nearby sidebar “Understanding DNS Pre-Fetching and Network Prediction.”
- Multiple Sign-in Access: Open this pop-up menu and select the appropriate item:
Block multiple sign-in access for users in this organization: Select this item to disable multiple sign-in access.
Managed user must be the primary user (secondary users are allowed): Select this item to allow multiple sign-in access as long as the primary user is a managed user.
Unrestricted user access (allow any user to be added to any other user’s session): Select this item to allow multiple sign-in access to all users.
No policy set (default = Managed user must be the primary user (secondary users are allowed)): Select this item if you do not want to configure multiple sign-in access via policy.
Unified Desktop: To use the Unified Desktop feature, which enables an app to span multiple displays and is in beta as of this writing, open the Unified Desktop pop-up menu and select the Make Unified Desktop mode available to user item. To prevent the use of Unified Desktop, select the Do not make Unified Desktop mode available to user item. If you do not want to manage this feature via policy, select the “No policy set (default = Do not make Unified Desktop mode available to user)” item.
Configuring Omnibox Search Provider Settings
Search Suggest: To control whether the Chrome browser uses a prediction service to suggest completions for web addresses or search terms, open the Search Suggest pop-up menu and select the Always allow users to use Search Suggest item, the Never allow users to use Search Suggest item, or the Allow user to configure item.
Omnibox Search Provider: Open the Omnibox Search Provider pop-up menu and choose the Allow user to select the Omnibox Search Provider item if you want to allow the user to choose the search provider. The alternative is to select the Lock the Omnibox Search Provider settings to the values below item and then enter the details in the boxes that appear.
Configuring Hardware Settings
External Storage Devices: Open the Secure Digital (SD) Cards, USB Flash Drive Devices, and MTP devices pop-up menu and select the Allow external storage devices item, the Allow external storage devices (read only) item, or the Disallow external storage devices item.
Audio Input: Open the Microphone and Audio Input pop-up menu and select the Disable audio input item or the Prompt user to allow each time item, as needed.
Audio Output: Open the Speakers and Audio Output pop-up menu and select the Enable audio output item or the Disable audio output item, as needed.
Video Input: Open the Video Input pop-up menu and select the Enable video input item or the Disable video input item, as needed.
- Keyboard: Open the Set default top-row key behavior pop-up menu and select the appropriate item:
Treat top-row keys as media keys, but allow user to change: Select this item to have the top row of keys provide the functionality displayed on them, such as navigation and volume controls, but also allow the user to switch the keys to work as function keys.
Treat top-row keys as function keys, but allow user to change: Select this item to have the top row of keys work as function keys but also allow the user to switch them to media keys.
No policy set (default = Treat top-row keys as media keys, but allow user to change): Select this item if you do not want to control the top-row functionality via policy .
Choosing Verified Access and User Verification Settings
In the Verified Access section of the User Settings page, open the Verified Access pop-up menu and select the Enable for Enterprise extensions item if you want to allow Chrome extensions in the user session to interact with the Trusted Platform Module (TPM). Otherwise, select the Disable for Enterprise extensions item.
The User Verification section of the User Settings page contains only the Verified Mode area. Open the Verified Mode Boot Check pop-up menu and then select the Require verified mode boot for Verified Access item if you want the Chromebooks to boot with verified boot mode in order to use the Verified Access feature. This is normally a good idea. If you need to allow some Chromebooks to boot into Developer mode (which is not verified) but still use Verified Access, select the Skip boot mode check for Verified Access item instead.
Note
If you will use the Skip boot mode check for Verified Access setting, use it only for an organizational unit to which you assign those teachers or users who require Developer mode.
Service accounts which are allowed to receive device ID: In this box, you can list the email addresses of service accounts that you want to give full access to the Google Verified Access application programming interface (API).
Note
A service account is a developer account created in the Google Developers Console.
Service accounts which can verify devices but do not receive device ID: In this box, you can list the email addresses of service accounts that you want to give limited access to the Google Verified Access API.
Choosing Chrome Management—Partner Access Settings
In the Chrome Management—Partner Access section of the User Settings page, you can check the “Enable Chrome Management—Partner Access” check box to enable your school’s Google Cloud partner to access your school’s Chromebooks programmatically to manage policies, get information about the Chromebooks, and control them remotely. If you check this check box, follow through the confirmation screens to confirm the action.
Saving Your Changes to the Settings
When you have finished making changes on the User Settings page, click the Save button in the lower-right corner of the screen to save your changes.
Configuring Device Settings for Chromebooks
In this section, we will cover the settings that you can configure on the Device Settings page in the Chromebook Management console. We will start by displaying the Device Settings pane and then dig into the many sections and settings it contains.
Displaying the Device Settings Page
- 1.
On the Home page, click the Device management icon to display the Device management page.
- 2.
In the Device Settings list in the left pane, click the Chrome management item to display the Chrome Management page.
- 3.
Click the Device settings button to display the Device Settings page. Figure 5-18 shows the topmost section of the Device Settings pane.
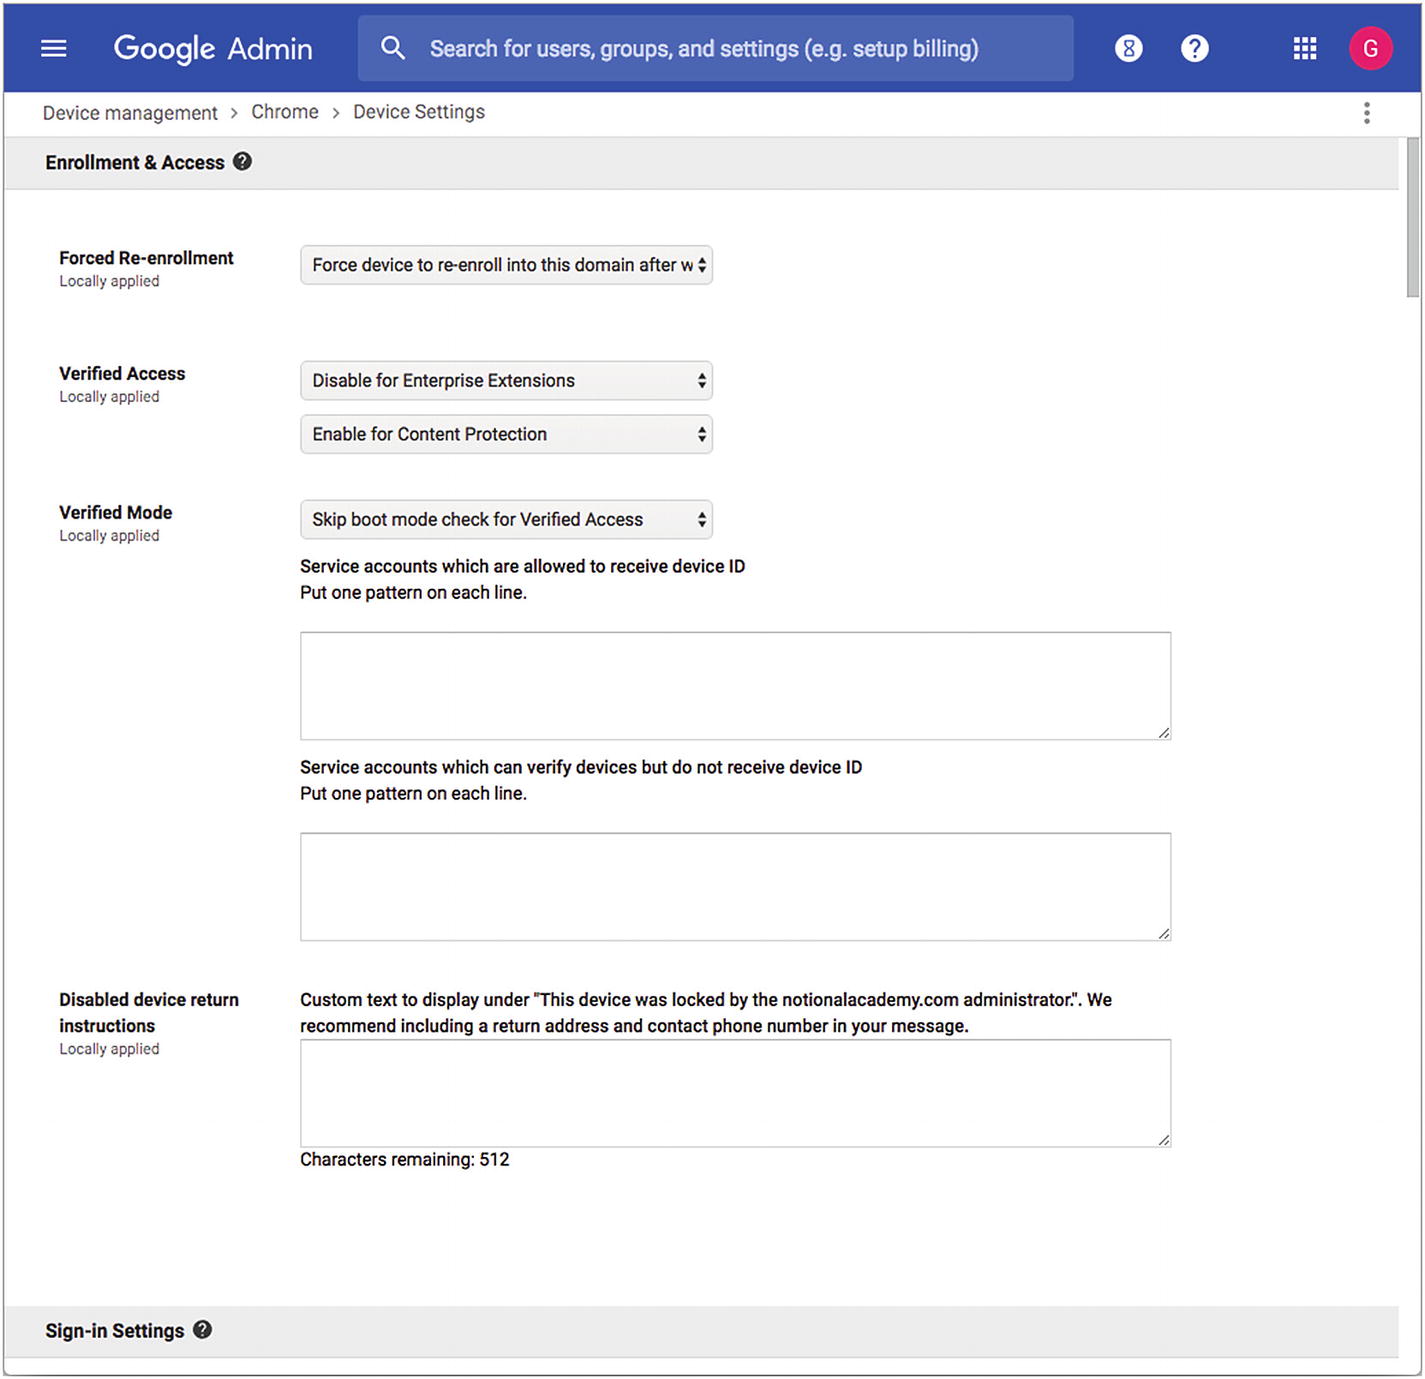
The topmost part of the Device Settings screen contains the Enrollment & Access section of settings
Controlling Enrollment & Access
Forced Re-enrollment: In this pop-up menu, choose the Force device to re-enroll in this domain after wiping item if you want the device to re-enroll itself automatically. Select the Device is not forced to re-enroll after wiping item if you want to free the device from Forced Re-enrollment.
Verified Access: In the upper pop-up menu, select the Enable for Enterprise Extensions item if you want to enable the Verified Access feature, which allows Chrome extensions to interact with the Trusted Platform Module (TPM) on the Chromebook; if not, select the Disable for Enterprise Extensions item. In the lower pop-up menu, select the Enable for Content Protection item if you want to have the Chromebooks verify their identity to content providers using the TPM; if not, select the Disable for Content Protection item instead.
Verified Mode: In this pop-up menu, select the Require verified boot mode for Verified Access if you want the Chromebooks to boot with verified boot mode in order to use the Verified Access feature. This is normally a good idea. If you need to allow some Chromebooks to boot into Developer mode (which is not verified) but still use Verified Access, select the Skip boot mode check for Verified Access item instead.
Note
If you will use the Skip boot mode check for Verified Access setting, use it only for an organizational unit to which you assign those teachers or users who require Developer mode.
Service accounts which are allowed to receive device ID: In this box, you can list the email addresses of service accounts that you want to give full access to the Google Verified Access application programming interface (API).
Note
A service account is a developer account created in the Google Developers Console.
Service accounts which can verify devices but do not receive device ID: In this box, you can list the email addresses of service accounts that you want to give limited access to the Google Verified Access API.
Disabled device return instructions: In this box, you can type the information you want to display on disabled Chromebooks to encourage whoever has them to return them to the school. The screen receives the automatic heading “This device was locked by the [your school’s domain name] administrator.” Normally, you would include contact information, such as the school’s email address, phone number, and address.
In the Google Admin console, click the Device management icon. The Device management page will appear.
Choosing Sign-In Settings to Control Sign-In to Chromebooks

In the Sign-in Settings section of the Device Settings page, you can configure many sign-in options for your school’s Chromebooks
Guest Mode: In the Allow Guest Mode pop-up menu, select the Allow guest mode item if you want to allow guest usage. If not, select the Do not allow guest mode item.
- Sign-in Restriction: In the Restrict sign-in pop-up menu, select the Restrict Sign-in to list of users item if you want to either allow a specific list of users to sign in or if you want to allow anybody with a Google account to sign in:
Allow a specific list: Type the list in the text box, using commas to separate the addresses—for example, [email protected], [email protected]. You can use the * wildcard in the local (non-domain) part of the address—for example, entering *@notionalacademy.com allows any user from that domain to sign in.
Allow anybody with a Google account to sign in: Leave the text box empty.
Prevent anyone from signing in: Select the Do not allow any user to Sign-in item in the Restrict sign-in pop-up menu.
- Autocomplete Domain: In the Domain name autocomplete at sign in pop-up menu, choose the appropriate setting:
Use the domain name, set below, for autocomplete at sign in: Choose this setting to have the Sign-in screen suggest the domain you enter in the text box. This setting is usually helpful.
Do not display an autocomplete domain on the sign in page: Choose this setting if you do not want the Sign-in screen to suggest a domain.
No policy set (default = Do not display an autocomplete domain on the sign in page): Choose this setting if you do not want to control the Autocomplete Domain setting via policy.
Sign-in Screen: In the Show user names and photos on the sign-in screen pop-up menu, select the Always show user names and photos item or the Never show user names and photos item, as needed.
Off Hours: If you need to apply sign-in restrictions only during some hours, use the five pop-up menus to specify the time zone, the starting day, the starting time, the ending day, and the ending time. After specifying the first set of hours in the first row, you can click the Copy icon at the end of that row to copy the settings to a second row of controls; you can then make minor adjustments to that row as needed. You can also click the Add another set of hours link to add another row of boxes without copying existing data into them.
Wallpaper: To upload a JPEG graphic for use as wallpaper, click the Upload Wallpaper File button, select the file in the unnamed dialog box that opens, and then click the Open button. For example, you might upload a wallpaper graphic that identifies your school, provides inspiring quotes, or both.
User Data: In the Erase all local user info, settings, and state after each sign-out pop-up menu, choose the Do not erase all local user data item or the Erase all local user data item, as needed. On a shared Chromebook, erasing local user data can help avoid the storage getting filled with user files, but it means that when a user signs in again on a Chromebook she has used before, the Chromebook will need to sync all her user data from the cloud instead of only those parts that have changed since her last use.
Single Sign-On IdP Redirection: In this pop-up menu, choose the “Default. Take users to the default Google login page” item if you want users to log in at the regular Google login page. Choose the Allow users to go directly to SAML SSO IdP page item if you have configured Security Assertion Markup Language (SAML) Single Sign-On (SSO) for your school’s domain and want users to go straight to your SAML Identity Provider (IdP) page instead.
Single Sign-On Cookie Behavior: If you have configured SAML SSO, you can open the Transfer of SAML SSO Cookies into user session during login pop-up menu and choose the Enable transfer of SAML SSO Cookies into user session during login item to enable Single Sign-On users to log in to your school’s internal websites by using the SAML SSO cookies. If you have configured SAML SSO but do not want to use this feature, choose the Disable transfer of SAML SSO Cookies into user session during login item instead. If you have not configured SAML SSO, make sure the “No policy set (default = Disable transfer of SAML SSO Cookies into user session during login)” item is selected in this pop-up menu.
Single Sign-On Camera Permissions: If you have configured SAML SSO , you can click in the Whitelist of single sign-on camera permissions box (see Figure 5-20) and enter a whitelist of third-party apps or services that can directly access the camera on the user’s Chromebook. Enter the URL for each app or service on a separate line in the box.

The controls in the lower part of the Sign-in Settings section of the Device Settings screen enable you to configure Single Sign-On camera permissions, Single Sign-On client certificates, accessibility control, the sign-in language, and the sign-in keyboard
Single Sign-On Client Certificates: If you have configured SAML SSO , you can go to the Automatically Select Client Certificate for these Single Sign-On Sites box and enter a JSON string that contains a list of URL patterns identifying those certificates to use automatically when accessing particular sites that require credentials.
Accessibility Control: Check the “Turn off accessibility settings on sign-in screen upon logout” check box if you want to disable the accessibility settings on the sign-in screen when a user logs out of the Chromebook. You might use this setting on shared Chromebooks if your school prefers to have teachers manually enable accessibility options only for those students who actually need them. For Chromebooks issued to individual students, make sure this check box is unchecked so that the Chromebooks will automatically use the accessibility settings from one session to the next.
Sign-in Language: In this pop-up menu, either choose the specific language—such as English (United States)—you want the Sign-in screen to use or select the Allow user to configure item if you want the Chromebook’s user to be able to select the language.
Sign-in Keyboard: In the Create an ordered list of keyboards to use on the sign-in screen box, go to the left box and check the check box for each keyboard needed on the Sign-in screen. You can filter the keyboards shown by clicking in the Filter keyboard layouts box and starting to type a keyword (for example, French). Those keyboards you check will appear in the right box, the Selected layouts box, where you can drag them into the order you need.
Configuring Device Update Settings
- Auto Update Settings: This category contains the following four pop-up menus:
Auto Update: In this pop-up menu, select the Allow auto-updates item if you want to use automatic updating; select the Stop auto-updates item if you do not.
Restrict Google Chrome version to at most: In this pop-up menu, choose the No restriction item if you want to allow Chrome OS to update to the newest versions when they become available. If your school is using tools that you know have problems with the newest versions of Chrome OS, you can choose a specific version number (such as 65.* as of this writing) to specify the most recent version you want to use.
Randomly scatter auto-updates over: In this pop-up menu, choose the None item to allow auto-updates to occur when Chrome discovers them. To stagger auto-updates to reduce the impact on your school’s network and Internet connection, choose one of the other items in the pop-up menu. The items range from 1 day to 14 days.
Auto reboot after updates: In this pop-up menu, select the Allow auto-reboots item or the Disallow auto-reboots item, as needed.
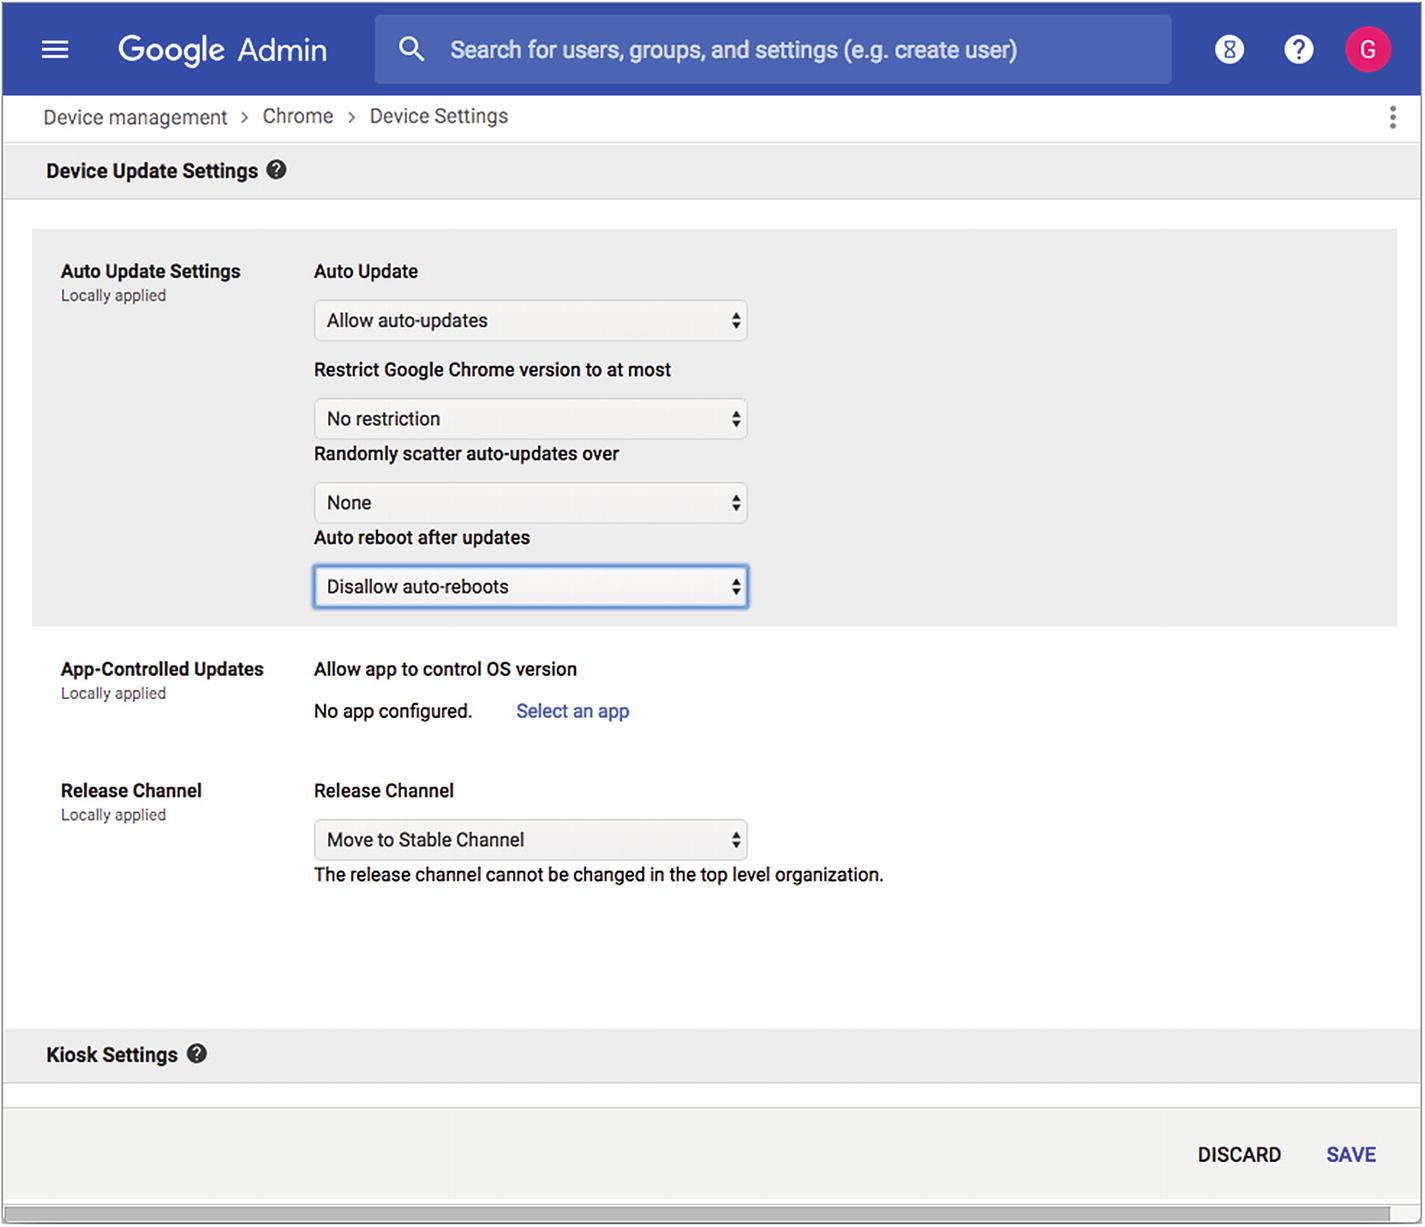
In the Device Update Settings section of the Device Settings screen, you can specify how to update your school’s Chromebooks
Note
As of this writing, the Allow auto-reboots setting works only for Chrome devices configured as public-session kiosks. For Chrome devices configured any other way, such as your school’s Chromebooks, you will need to reboot the Chromebooks manually.
App-controlled updates: This setting applies only to kiosk apps.
Release channel: This pop-up menu enables you to choose which Chrome OS release channel to use. Your school’s top-level organization must use the Move to Stable Channel item, but for organizational units, you can choose the Move to Beta Channel item, the Move to Development Channel item, or the Allow user to configure item.
Understanding the Purpose of the Kiosk Settings
The settings in the Kiosk Settings section of the Device Settings screen enable you to configure a Chrome OS device to act as a kiosk device—a device that you leave running in a public setting so that passers-by can interact with it. For example, you might deploy a Chrome OS device as a kiosk device in a school lobby so that parents of current or prospective students can view information about the school.
Deploying a Chrome OS device as a kiosk device is outside the scope of this book, so I will leave you to explore the Kiosk Settings section of the Device Settings screen on your own.
Configuring the User & Device Reporting Settings
- Device Reporting: This section contains the Device State Reporting pop-up menu and the Device User Tracking pop-up menu:
Device State Reporting: Open this pop-up menu and select the Enable device state reporting item if you want to monitor the state of Chrome devices enrolled in your domain; select the Disable device state reporting item if you do not. With device reporting enabled, each device reports information including its firmware version, its Chrome version, its platform version, and its boot mode.
Device User Tracking: Open this pop-up menu and select the Enable tracking recent device users item if you want to be able to track recent users of your Chromebooks; otherwise, select the Disable tracking recent device users item.

The User & Device Reporting section of the Device Settings gives you control over device reporting and inactive device notifications. The Power & Shutdown section lets you control power management, schedule reboots, and control shutdown.
Note
If you have selected the Erase all local user data item in the Erase all local user info, settings, and state after each sign-out pop-up menu in the Single Sign-In section, the Device User Tracking feature does not work.
- Inactive Device Notifications: Use the controls in this area to configure reporting about inactive devices:
Inactive Device Notification Reports: Open this pop-up menu and select the Enable inactive device reporting item if you want to receive information about Chromebooks that haven’t synced in the number of days you specify in the Inactive Range (days) box. If you do not want to receive reports, select the Disable inactive device reporting item. If you do not want to control inactive device notifications via policy, select the “No policy set (default = Disable inactive device reporting)” item.
Inactive Range (days): In this box, type the number of days Chrome OS should wait before deeming a Chromebook to be inactive.
Notification Cadence (days): In this box, type the number of days to wait between successive reports of inactivity.
Email addresses to receive notification reports: In this box, enter the email addresses to which the notification reports should be sent. Put each email address on a separate line.
Anonymous Metric Reporting: Open this pop-up menu and select the Always send metrics to Google item or the Never send metrics to Google item, as needed.
Choosing Power & Shutdown Settings
Power Management: Open the Power management on sign-in screen pop-up menu and select the Allow device to sleep/shut down when idle on the sign-in screen item or the Do not allow device to sleep/shut down when idle on the sign-in screen item, as needed. Normally, you would want to allow Chromebooks to go to sleep on the sign-in screen; keeping a Chrome device awake is more useful in a kiosk setting.
Scheduled reboot: In the “Number of days before reboot; leave empty for unset” box, you can in theory type the number of days to wait before automatically rebooting a Chrome OS device. As of this writing, this setting works only for devices configured as Public Session kiosks.
Shut down: Open the Allow shut down pop-up menu and select the “Allow users to turn off the device via the Shut down icon on the screen, or the physical power button” item if you want to allow users to shut down the Chromebooks via the keyboard, trackpad, screen, or power button. If you prefer to let users shut down Chromebooks only using the power button, select the “Only allow users to turn off the device using the physical power button” item instead. If you do not want to control shutdown via policy, select the “No policy set (default = Allow users to turn off the device via the Shut down icon on the screen, or the physical power button)” item.
Choosing Other Settings on the Device Settings Screen
Cloud Print: In this area, click the Manage link to start the process of enabling Cloud printers.
- Time Zone: Open the System timezone pop-up menu and then click either the Keep timezone as it is on device currently item or the item for the specific timezone you want the Chromebook to use, such as the GMT-07:00 Pacific Time (Los Angeles Time) item. Open the System timezone automatic detection pop-up menu and select the appropriate option:
No policy set (default = Let users decide): Select this item to set no policy for determining the timezone.
Let users decide: Select this item to enable the user to set the Chromebook’s timezone.
Never auto-detect timezone: Select this item to disable Chrome OS’s automatic detection of timezones.
Always use coarse timezone detection: Select this item to have Chrome OS use the Chromebook’s IP address to determine the timezone the device is in.
Always send WiFi access-points to server while resolving timezone: Select this item to use the Wi-Fi access point to which the Chromebook is connected as the basis for determining the timezone. This is the most accurate way of determining the timezone.
Mobile Data Roaming: In this pop-up menu, select the Allow mobile data roaming item if you want to allow cellular Chromebooks to use mobile data roaming. Otherwise, select the Do not allow mobile data roaming item. If your school’s Chromebooks are Wi-Fi–only, this setting does not apply.
USB Detachable Whitelist: In this box, you can enter a list of USB devices that are directly accessible to apps. You enter each USB device on a separate line, putting the USB vector identifier (VID) first, a colon next, and then the product identifier (PID)—for example, if a device’s VID is 541E and the PID is 8114, you would enter 541E:8114 to add the device to the whitelist. Both the VID and PID are hexadecimal values.
- Bluetooth: Open the Disable Bluetooth on device pop-up menu and select the appropriate item:
No policy set (default = Do not disable Bluetooth): Choose this item if you do not want to control Bluetooth via policy. Choosing this item leaves Bluetooth enabled.
Do not disable Bluetooth: Choose this item to leave Bluetooth enabled.
Disable Bluetooth: Choose this item to disable Bluetooth.
Throttle Device Bandwidth: Open the Throttle network bandwidth consumption at the device level pop-up menu and then select the Enable network throttling item or the Disable network throttling item, as needed. If you select the Enable network throttling item, enter the maximum download speed in the Download speed in Kbps box and the maximum upload speed in the Upload speed in Kbps box.
- TPM Firmware Update: Open this pop-up menu and then select the appropriate setting for updating the Trusted Platform Module (TPM) firmware on your school’s Chromebooks:
No policy set (default = Block users from performing TPM firmware updates): Select this item if you do not want to control TPM firmware updates via policy.
Block users from performing TPM firmware updates: Select this item if you want to prevent users from updating the TPM firmware on Chromebooks. This is normally the best choice for Chromebooks deployed to students.
Allow users to perform TPM firmware updates: Select this item to allow users to update the TPM firmware on Chromebooks .
Choosing Settings in the Chrome Management—Partner Access Section
In the Chrome Management—Partner Access section of the Device Settings screen, you can check the “Enable Chrome Management—Partner Access” check box to enable your school’s Google Cloud partner to access your school’s Chromebooks programmatically to manage policies, get information about the Chromebooks, and control them remotely. If you check this check box, follow through the confirmation screens to confirm the action.
Summary
In this chapter, you have learned how to configure and manage Chromebooks using your Google Admin console and its Chrome Management console component. You know how to get Chrome subscription licenses for your school’s Chromebooks; how to sign in to your Google Admin console; and how to perform essential maneuvers, such as enrolling the Chromebooks in your school’s domain, controlling forced re-enrollment, and disabling and deprovisioning Chromebooks. You have also learned how to work with the many user settings and device settings to customize the user experience and the Chromebooks themselves.
In the next chapter, we will examine how to manage Chrome apps and extensions.