Chapter 13
Bringing it to Life
Now that you have gone through most of the design process with the considerations that are needed to create an XR experience, it is time to bring it to life. With this next step there are a number of considerations, and in this chapter we are breaking them down:
TO CODE OR NOT TO CODE That is the question that is often asked by designers. The good news is that you have options.
KEEP IT AGILE Look to continuously check on how your designs are working with each major design milestone. In XR, this is a series of small sprints, not a marathon.
TRY, AND TRY AGAIN Technology is not perfect, and there will be times when you will need to problem-solve to figure out how to fix errors that occur.
USER EXPERIENCE RESEARCH How do you know if your design is ready to launch? Ask the users.
PRIVACY AND ETHICAL CONSIDERATIONS With great power comes great responsibility—to protect and respect the humans who use your products.
To code or not to code
Sure, I can code. However, I am certainly not a programmer. My programming journey started with ActionScript back in the days of Flash. If you do not know what that is, you are not missing anything; it is no longer used. At the time, in the early 2000s, I learned it out of necessity, as it was the only way I could achieve a desired look. Subsequently, my work in interaction design led me down the path to learn and appreciate all things HTML and CSS. This started with a desire to customize a web experience, and eventually I wanted to create a fully custom experience.
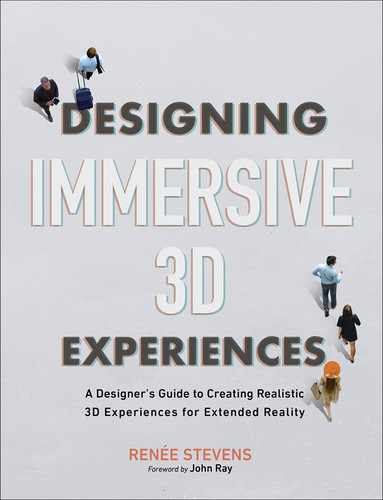
Throughout my career, I have learned what I have needed when I needed it. Prosthetic knowledge, remember? The night that the ARKit framework was announced to Apple developers I stayed up all night and started learning Xcode and Swift so I could program a mobile app to create tagAR. I learned everything I needed to learn to start testing ARKit to see what it was capable of. This exploration was all based on the image I had in my mind of seeing augmented name tags appear right above someone’s head. Most of my coding journeys begin with an image in mind. I then try to bring it to life, as close as possible, using code and any other means necessary (FIGURE 13.1).
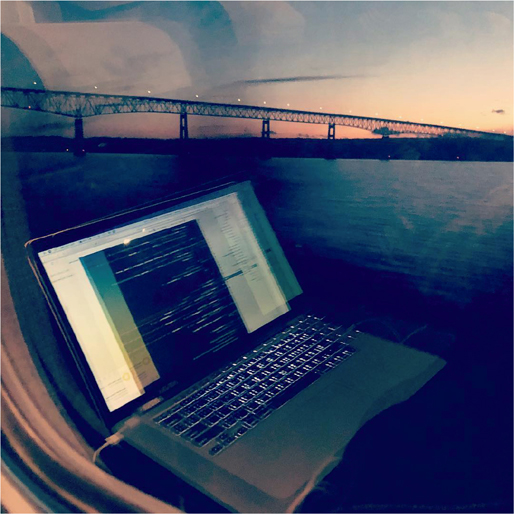
FIGURE 13.1 Coding on a Train. Coding in Xcode while traveling, using the Swift programming language. When you are working through a programming solution, you need to seize any time that allows you to focus and problem-solve.
All of this is to say that knowing coding is great; I highly encourage designers to learn and understand the basics of the programming language that will be used to create the experience. I also highly recommend that you build your coding skills to be “conversational” in HTML, CSS, and JavaScript. Rank your skill level as you would in other languages on a resume: fluent, conversational, or basic. You can use that same system to understand the level of proficiency I encourage you to have. You should be more advanced than just knowing the very basics, but I certainly don’t expect you to be fluent. You are a designer first, so you should be fluent in that. Programming skills are just supporting skills that can help you improve as a designer. Having a conversational knowledge of these programming languages will allow you to:
Customize experiences
Understand how things are structured
Understand relationships between elements
Understand some of the interactive limitations that may exist
Help improve how you work with the full-time programmers
For example, a designer typically submits a full flat design to the programmer with some notes on the functionality. Designers should also go a step further to export all the separate elements: icons, buttons, and other UI elements. Each element must be in a separate file in order to be imported into the program. Once you have gone through the developmental process, you will see how much more efficient the workflow is when you have each element ready to go. This is, of course, just one example of many reasons why learning some code is beneficial. Exploring and testing a particular platform, all the way through a complete cycle from design to implementation to testing, will help you understand the technical capabilities of the system.
There are many great resources to help you jumpstart or deepen your knowledge of HTML, CSS, JavaScript, or Swift. Here are a few options to explore:
Codecademy
Apple’s Swift Playgrounds
Treehouse
W3Schools
LinkedIn Learning
Once you have even a basic understanding of HTML, you can start to test your skills. Using the prosthetic knowledge philosophy, learn as you go along; when you get stuck, research more to help you get through the pain points. There is a reason there are so many community-based forums for developers: Each project is unique and will bring you to problems that are hard to solve. Don’t be afraid to search for answers or reach out to others when a problem arises.
Partnership and collaboration
Despite how much I advocate for designers to know code, that doesn’t mean they should do all the programming. Developers are really good at what they do. Even if you can code, are you up-to-date on best practices in terms of scalability, security, and cross-platform development? And even just with coding, programmers are much more efficient at it, because it’s what they do all the time. Is diving into code really the best use of your time? Or should you be focusing your skills where your strengths are?
From a business standpoint, let’s say you make $100/hour designing or $800 per day. Think about what you could accomplish in that time and how many projects you could work on. Then, consider how long it would take you to program an experience. If it takes you five days to do what you could hire a programmer to do for less than $4,000, then you are missing out on producing income from your design work. What I have come to realize in my time as a freelancer and business owner is that you make more money doing the things you are best at. You can actually make more profit hiring others to help in the areas where you aren’t as efficient, even though you pay them for their time. Early on in my career, I thought “Why would I pay someone else to do it, if I can do it myself?” Now I realize that the answer is, “Because they are better at it than you.”
There is also another option. Being conversational in a specific programming language will help you become a better designer and will help you explore the potential of new technology to discover what is possible. Maybe you do want to try to create at least a test project on your own. Just as there are businesses and services that tailor to designers for design-first web development, there are also similar services for 3D and XR design. What is great about this kind of option is that you may not be responsible for writing full lines of code yourself, but rather will be editing existing code to customize an experience to match your design direction. Of course, you have to first learn enough about the code to start to understand it and edit it.
3D web frameworks
As you start to explore practicing code, there are a number of web-based frameworks that will allow you to explore with 3D objects and immersive experiences and their underlying code, often side by side. With this split-screen view, you can see the design and the code at the same time. This layout allows you to explore the relationship between the elements and the programing that is powering them.
In order for 3D and to work directly in a web browser, the code must follow web standards. The current standard is WebGL, which is a JavaScript API for rendering interactive 2D and 3D graphics without the need for installing any plug-ins. This has allowed stand-alone XR experiences and even 3D interactions to exist on the web. Some also use WebXR, which allows these experiences to connect to a VR or AR device for the user to interact with. These standards allow someone to visit a website and start interacting with the experience in seconds, without downloading an app or anything else to their device.
Although this implementation is exciting, the upcoming standard to watch is the implementation of the WebGPU standard, which has positioned itself to be the future of JavaScript to provide “modern 3D graphics and computation capabilities” according to the massive collaboration of developers and engineers in the W3C GPU for the Web Community Group. This group has members from such companies as Google, Apple, Microsoft, and Mozilla, to just name a few. It is something to keep an eye on as you explore creating for XR. As WebGPU starts to become the new web standard for all things 3D, it will certainly bring great web experiences along with it.
The key components for these web-based experiences are a combination of HTML and JavaScript. Because 3D integration on the web still faces a number of challenges, there are some different frameworks that have been created to help. These leverage, and often piggy-back on, what already exists to create a web-based experience.
Here are a few to get you started:
A-FRAME (www.aframe.io) A web framework for building 3D, AR, and VR experiences. It is built on top of HTML, making it easy to use, and it doesn’t require anything additional to get started. This is my recommended place to start as you can find a lot of great documentation to guide you. The documentation also is straightforward, making it easier to read through and start to understand the code and the relationships of objects. It works as a structure with three.js.
THREE.JS (www.threejs.org) A framework that creates and displays animated 3D computer graphics in a web browser using WebGL.
AMAZON SUMERIAN (aws.amazon.com/sumerian) A service that enables 3D, AR, and VR applications within the browser experience using WebGL and WebXR.
BABYLON.JS (www.babylonjs.com) A real-time 3D engine using a JavaScript library for displaying 3D graphics in a web browser using HTML. It uses WebGL, with some WebGPU support as well, but only for certain browsers that have this capability enabled. (But, it is a start!)
PLAYCANVAS (www.playcanvas.com) An open source HTML-based game engine built on WebGL for building VR and AR.
Powered by these frameworks, some software companies are offering integrated development platforms. The framework provides the foundation and the capability, but it is enhanced by tools to create AR/VR content, collaborate with others working on the project, and publish the content right to the web for instant access by the user. Three of these developer platforms to check out are MetaVRse 3D/XR engine, Amazon Sumerian, and 8th Wall (FIGURE 13.2). Of course, this convenience comes at a price, and launching this way will require a budget. However, it will still be less than designing and developing a full independent app—and you can do it with minimal to no code.
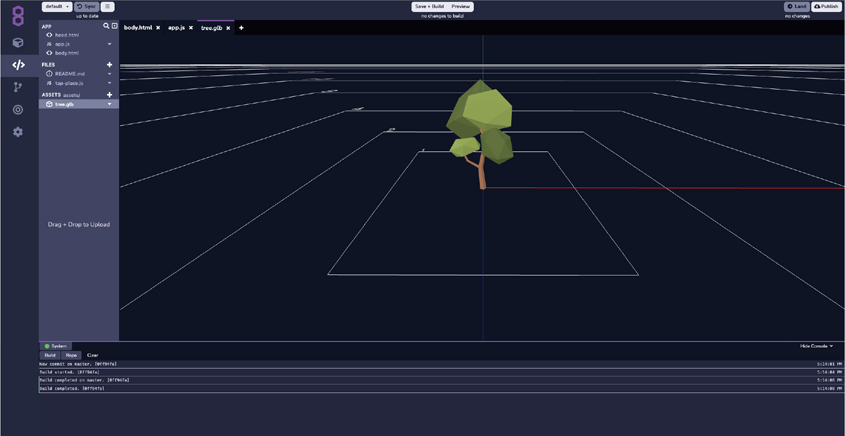
FIGURE 13.2 8th Wall Cloud. 8th Wall is the leading web-based augmented reality platform. It features a cloud-based coding environment to create, collaborate, and publish WebAR content—all within a web browser.
Image provided by 8th Wall
When it comes to code, you don’t need to know all the answers—just how to find them. That may mean that you work in partnership with an individual or a team who can. It is important to be familiar with the programming languages that your experiences are leveraging. Read lines of code; try to understand what is happening and how. Even explore debugging as a way to problem-solve and deepen your understanding of how the code affects the experience. But be sure to acknowledge your strengths and use those to help advance every project you work on first.
Keep it agile
Test early, and test often. When you are working with technology that is not perfect (which is all technology if we are being honest), then it is best to constantly check how your designs will work. With every big design evolution, there should be a built-in testing phase to see how that design will translate into actual 3D space. This is even more essential knowing that you are designing in 2D but your work will be viewed in 3D space. The risk of designing too much too fast is that you may “finish” a design, then test it out, and find out none of it actually works the way you expected. Then you will have to go back and redesign everything accordingly. That is a lot of wasted time and resources. Instead, if you test as you design, then you can be making adjustments constantly, both globally and on the detail level, to accommodate.
Agile workflow The process of developing solutions collaboratively, in a cyclical pattern, to ensure an idea works for all areas of the project, from ideation to testing, before moving on to the next phase.
This cycle is part of an agile workflow. The philosophy of this kind of creation cycle is that there is a continuous check-in with all members of the team, in a collaborative effort to ensure the project is working as expected in all aspects. Because we become emotionally attached to our ideas, testing early is key to get feedback and make adjustments to them before you spend more time and become even more invested. The idea might not be as great as you think, or you might envision something great but might not be able to implement it at this time. In which case, it is better to find that out sooner rather than later. Or it could be well received, and then you know it is worth the time and resources to forge ahead.
Agile versus waterfall
This agile workflow is the opposite of the traditional waterfall workflow, which, just as the name suggests, works from the top down. Each stage is completed before the next one begins. First, the research stage is completed. Then the design stage is completed, then the developmental stage. Once those three stages are complete, testing is done. The problem with this philosophy is that it doesn’t promote team collaboration, nor does it build in testing all along the way to identify problems. They will all come to the surface at the end of project, which can cause significant delays in delivery times. More significantly, you may identify issues in the design that may not even be possible in the final product. If you are working for a client, who has approved the design and the overall functionality of the project, then you could be in trouble when you later have to turn around and explain that what everyone agreed to isn’t possible. All of these outcomes are best to avoid.
The agile approach breaks a project into smaller segments that allow for each part of the team to work together and develop together. Research is done, and that influences the design. Some programming is done, and the testing is done for just that one small segment. Then the team reassesses before they go onto the next segment of work (FIGURE 13.3). This allows for pivots and adjustments to any and all parts of the process.
FIGURE 13.3 Waterfall versus Agile. This visualization shows the difference between a waterfall approach, which goes through each step before moving to the next one, versus the agile approach, which works in cyclical movements throughout the process.
The concept of an agile workflow is something that has been adopted by many teams working with technology—specifically software development. Agile workflows have been especially embraced by teams working on website, mobile applications, and immersive and interactive experiences. The overall concept was first pitched as a manifesto by a number of software engineers in 2001 (agilemanifesto.org). As a group, they collaboratively list their key values as:
Working software over comprehensive documentation, customer collaboration over contract negotiation, and responding to change over following a plan.1
1 Beck, K., Beedle, M., van Bennekum, A., Cockburn, A., Cunningham, W., Fowler, M., Grenning, J., Highsmith, J., Hunt, A., Jeffries, R., Kern, J., Marick, B., Martin, R. C., Mellor, S., Schwaber, K., Sutherland, J., & Thomas, D. (2001). Manifesto for agile software development. Agile Manifesto. agilemanifesto.org
As part of this manifesto they also list 12 principles. They vary in topic, but include key highlights such as: early and continuous delivery, embracing change, team work, including developers in decision-making (along with business partners and other key members of the project), and the concept of frequent delivery. However, the goal is the creation of a minimum viable product early in the process, which allows you to get a working product, even if basic, to the client to test, and build upon that.
This manifesto became the ripple that has spread into team workflows in interactive studios and agencies. People have mostly embraced this concept, as they have recognized the value it adds; it is the mindset that still holds the most value in the industry today. Working based on a team mentality has even changed the physical layouts of offices. Traditionally, there have been workspaces where all the designers sit in one group, all the developers sit in another group, and all the business and marketing teams are spaced out even more separately. As part of embracing an agile workflow, project teams sit together, with one person from each of those departments working in a shared space to collaborate through every step of the project.
This concept can work no matter the size of the project. If you are working independently, there are still many important reasons to adapt an agile workflow. The most important element of being agile is to continuously test how your designs will look on the device or platform where it will be viewed. This will allow for constant refinement of the experience through testing and analysis for each part of the design process.
Scrum An agile-based approach focusing on specific developmental needs through timed rounds exploring the complete process to provide clarity on what changes are needed.
Scrum
The agile methodology has been adapted in many different ways for different projects. The most common iteration that has been used effectively for designers is Scrum. This is a specific agile method that creates short design sprints that allow for quick exploration into one area. These sprints have to complete the full circle for them to be effective (FIGURE 13.4).
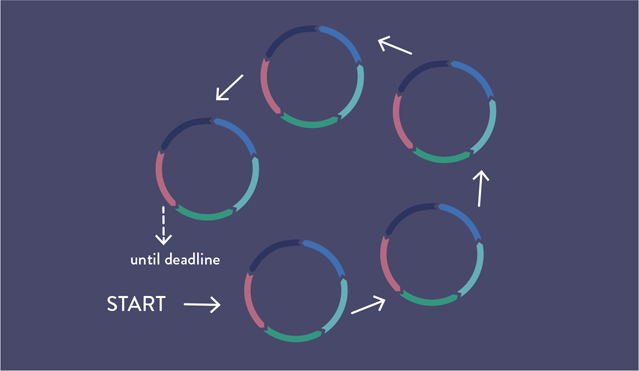
FIGURE 13.4 Design Sprint. Using the agile process, a focus, and clear timeline, this cycle helps propel the project forward through a series of back-to-back design sprints exploring the full design process.
Let’s say, for example, that you wanted to create an AR experience that allows the user to walk around a neighborhood. As they reach different places they would be able to scan a house, or any other landmark, and then see historical photos of that exact space overlaid on the live image. The concept is to learn more about the history and narratives from each location on the street. How would you start this process using the Scrum method? Well, the idea is to use Scrum to problem-solve any challenges or conflicts, as well as see how each person on the team will contribute to the project. Some initial problems that might need to be solved in their own design sprints are:
Determine what technology would be best for this kind of experience. Does it need to be downloaded as a stand-alone app, or can it be a web-based experience?
Test what objects work best to scan as an image target. Signs, buildings, or something else?
Is image recognition the best option, or would location services be more accurate?
What are the privacy concerns with the user sharing their location with the experience?
What kind of content will be displayed in AR? Videos, audio, photos, or 3D models?
How will the experience change if people visit during different times of day?
What is the traffic like on this street? Is it safe for people to be walking around this street distracted by their phones?
To start to find some of these answers out, it might be helpful to do some smaller sprints. Instead of trying to find the answers for the whole street at once, you could just focus on the experience for one house. Collectively as a team, you could determine what content will be displayed for that one house. Then based on that, and by visiting that exact location, you could determine the best spot for a person to stand to see the changes that have happened from the past to the present. From that location, you could determine what might work to use for image recognition. Is the house or landmark easily visible? Would there be room for a sign? What would make it easily seen so that the user would stop and know they could engage with the AR experience if they were just walking down the street?
Knowing what is possible with the technology at this stage is helpful, which is why it is great to have a programmer weigh in even at this ideation stage. Because these are sprints, you don’t have to be so worried about the details just yet. The first rounds can be used to test different options to see what will produce the most reliable results. Let’s say for the first round it is determined to use the house as the image target. The idea is that the user would hold their phone up toward the house, and the camera would recognize the house as an image target. This would activate an augmented menu to appear overlaid on the image of the house to explain about the various parts of the house. The user could select one area and have options: Choose to see what it looks like inside, watch a video, or see historic photos.
Okay. Now create that experience, but keep it small; just choose one room of the house. Design how the user will know what room is selected and what menu options are available. Then have this concept developed so it can be tested. Go to the physical space to see if the image target works and what it is like to be the user interacting with the proposed design in that way.
1. Take notes, and talk about it.
2. Decide what works and what doesn’t.
3. Keep what works, and throw out what doesn’t.
4. Come up with a new experience.
That completes one sprint. The next one will take what was learned in the first sprint and improve it. Depending on how well the first sprint went, you could move on to another room in the house, or you could stay in the same location with the same interaction, but built in a different way. You will be able to determine this based on how the first experience went. With each sprint, each person on the team should be able to assist in problem-solving, as well as making adjustments in a way that will continuously improve the experience for the user.
If you are working on a concept independently, than this is a great way to quickly test and rule out technology.
Try, and try again
In a perfect world, applications would work flawlessly on the first try. But the chances of that happening are very unlikely, especially when working with new and rapidly evolving technology. The languages created to communicate with a computer have to be very strategic and specific. Just as there are miscommunications between humans, it is also common that there are miscommunications in the way we communicate with our devices. It is important to know this going into the project to account for debugging as part of your process.
Debugging The identification, analysis, and resolution of defects and errors that prevent the intended operation of a program or software.
The term bug for a programming flaw that causes an issue has been used for many years, though the origin of the term is disputed. Some credit the term to Thomas Edison as a term he used to describe the difficulties of a project. The more popular story, however, credits Grace Hopper, a programming language pioneer. As the story goes, Hopper was working on a Mark II Aiken Relay Calculator at Harvard University in the 1940s. There was an error with the machine, which was later resolved when a moth was found stuck inside. She quite literally debugged the machine, and the issue was resolved. The terms for the problem and the effort to solve it both stuck, and they are still used today.
Regardless of the origin of the term, the process of debugging is an extremely valuable skill that relies on strong problem-solving skills (FIGURE 13.5). It involves understanding the process of:

FIGURE 13.5 Debugging. Whether for a mobile app development project or other XR experience, reviewing lines of code to identify and solve errors is the key to producing smooth-running software.
Photographer: Zakharchuk for Shutterstock
Identifying that there is an error
Isolating the bug
Working to identify the cause
Problem-solving a solution to fix the bug
Resolving the bug and testing to ensure the issue is resolved
Although that seems like a straightforward process, the act of isolating a bug and identifying its cause is no small task. To clarify, testing and debugging are not the same thing. They are both equally important to the process, but serve different roles.
TESTING is a check that can be done by a developer to look for any problems. Unlike user testing, which is human based, this kind of testing is solely computer based. Within minutes, a developer can have the computer run the code through a number of scenarios to identify any trouble areas. The testing process may find any number of issues and will send error codes for each.
DEBUGGING is the process of searching for the source of an error revealed by that testing and then attempting to fix it. Then, the developer will do more testing to confirm there are no more errors.
There are a number of techniques that can be used in the debugging process, as well as a variety of debugging programs that work to help identify certain issues. The theme of all of these techniques—and programming, in general—is trying and trying again. The best way to resolve these errors is to try something, and if that doesn’t work, try something else. Notable techniques include unit testing and agile programming testing as just two possibilities to consider.
UNIT TESTING In order to identify the location of the error, a programmer can write tests for units or small sections of code to see if they work as expected during the developmental process. Section by section the code is checked, often automatically. If the unit test fails, then an error will be reported identifying the method where the failure occurred. Beyond identifying an error, this approach helps the programmer narrow their focus to a section to work on to resolve, or debug, the error.
AGILE PROGRAMMING TESTING While this process can vary in approach, the core concept utilizes frequent testing by completing the full loop of an interaction. Instead of designing the full experience and then handing it off to be developed and tested, with this approach you in partnershop with the programmer would design one element or interaction point which would go through the full process of development and testing. Then changes would be made to adjust it based on the feedback of that one process loop. Then another part of the process can be designed, programmed, and tested. This concept helps the designer make accommodations based on feedback from the programmer as they work through the project. With this approach, any issues that arise along the way can be backtracked to the time of the previous successful build.
It is likely that you will be working with a group of developers to build various XR projects. While you may not be responsible for the debugging, the creative and problem-solving thinking that designers have often proves quite useful in identifying troubling issues. Having a few basic debugging techniques in your wheelhouse will help you work alongside developers on your team.
User experience research
How do you know when a design is finished? There will come a time in your design process when you will officially release your product so that it becomes available for others to interact with. How do you know when to do this? When do you call the design finished? Is it when it is deemed good, or even good enough? Or, is it when you reach the deadline, which may force you to release it by a certain date regardless of its completion?
The way to find out the answers to all these questions is to go back to the why.
Why did you create this experience?
What was the goal?
Who is the target audience?
If you can, go back to the beginning of your ideation stage and identify why you started in the first place. Look at your goals. Have you met those goals? You are not able to answer these questions on your own. Unless you set out to design this experience for only yourself, then you cannot unilaterally determine its success. The people who you designed it for, they decide. The best way to know if the experience helps your audience is to ask them. This is where user experience research comes in again.
In Chapter 6, “The UX of UR,” we discussed how you can learn all about your audience. We identified steps that helped determine what their needs were, which helped your decision-making in the earlier to middle stages of the design process. Now, at the end of the design process, it is time to check back in with your users to see if your work achieved what it set out to do through. It’s time for user testing.
It is often said that people don’t know what they want until they see it. That holds true here. You will be sharing your project with a variety of people, to see how they react to this new experience that they have never had before. The experience should have a clear goal, backed with research-based design decisions and supported by frequent testing along the way. The user testing at the end of the project should be a great way to see how all that collaborative work between the users, the technology, and the design comes to life.
Qualitative research
This part of the process is when you become the student and the users become the teachers. It isn’t time to question each and every design decision made, but rather to gather information based on how the users interact with the experience. This can be done through a number of usability tests:
Usability testing The practice of testing the ease of use of an experience with a group of users.
Observation of use in a controlled environment
Observation of use in a natural location
Observation of use in a virtual location
Interview
Before diving into these different approaches, let’s first consider the act of observation.
How to observe
You are there to learn. That should be your main objective as you observe a user testing your experience. Don’t expect users to do certain things; just watch what they actually do and how they appear while doing it. Are they squinting? Do they look confused? Observe and learn how the user responds to the experience without any direction from anyone. It is best if you don’t guide them in any way; simply watch and note how they start the experience. As Lorne Covington said, you want to determine “how much guidance to provide without sucking the magic out of it.”2 There are many things that the user can teach you, when you see them do something you didn’t even know was possible; that is a teachable moment for you, the designer, as well.
2 Covington, L. (2021). Personal interview.
The first 30 seconds are really important in this process. Be ready to observe before they launch or officially start the process. If it is possible to record these interactions, then you can always go back and watch again. If recording isn’t possible, then you can just watch and take down notes to review later. As you watch, notice anything the user does that may seem incorrect and what instigated it. This isn’t anything they have done wrong, but instead is a cue on something that might be wrong with the design. Pay special attention to what happens when they trigger and start the immersive part of the experience: What is their reaction to that transfer of realities?
Remember that the way people interact with a new product or experience is primarily based on their previous knowledge and interactions. They will have expectations about where to find certain things, such as a menu or settings. The user will rely on that first to help them navigate this new territory. Of course, you can’t know what all their past experiences have been, so you can rely only on standard conventions that they are likely to be familiar with from apps and the web.
As you watch, see how the user interacts with your design. Be sure to note:
The order in which they do things
The ways in which they try to engage
Any pain points and failed interactions
Successful interactions
Failed interactions could be places where they try to interact with something that isn’t actually interactive, or conversely, where you counted on them interacting with something and they ignore it. Take notes on all the things that worked well and didn’t work well. What surprised you? What excited you?
Then, before engaging with the user again, let them finish the interaction to see how they complete their session. At the end, observe their overall satisfaction based on their facial reaction, body language, and what they spontaneously provide as immediate feedback. These are all great indicators of how they felt about the overall experience. Remember, with usability testing you are not testing how well the experience functions—that should have been done before this point. Instead, you are testing the user’s experience with the product and how well the design communicates to the user.
Observation based on location
You can learn a lot from just watching. There are different ways that observation research can be conducted, ranging from in-person to virtual sessions. For example, some observation could be done in a controlled environment. Having a user come to a specific location to do the testing does make the test easier to conduct. Depending on the type of experience, however, it may not be a true representation of how the user will experience your design in reality. If you are testing a VR experience, this option is ideal because you will need to make sure the user has access to the right equipment and software, and you will need to be in a place where you can observe both the user and the view from inside their headset (FIGURE 13.6).
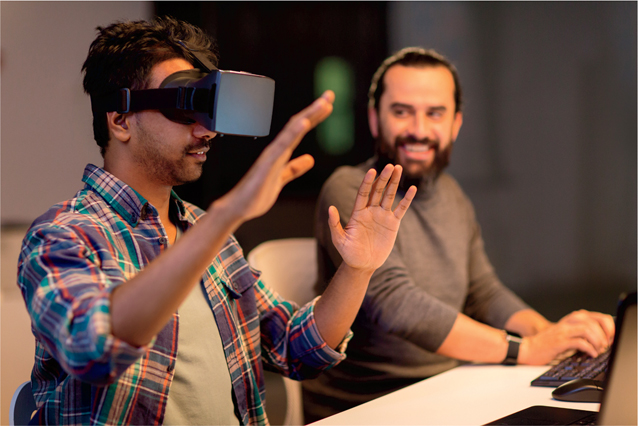
FIGURE 13.6 User Observation. Observe and take notes of a user exploring your virtual reality experience as part of your user testing.
Photographer: dolgachov for 123RF
This option may be less ideal for AR, however, because you want to test the experience in a variety of locations. In this case, doing observations from a more natural location, selected by the user, will provide more valuable feedback. Be sure to do testing both inside and outside, at different times of the day, with different lighting conditions, and with various Wi-Fi and cellular data connection strengths. These can help identify issues that may arise based on the physical environment. Some issues will have less to do with your specific design, but will provide insight on how the experience will change based on environmental factors.
You could also perform these observations in a virtual setting. These can be conducted via a video conference platform such as Zoom or Google Meet. However, this could be limiting as you will be able to observe from only the singular vantage point of the camera aimed at the user. If you are able, have the user share their device screen, perhaps by plugging in their phone to a computer to share what they are seeing. Having this information, in addition to be being able to see their face and body language, makes this a viable option. Using this virtual approach may also increase your reach to include users who wouldn’t be able to meet in person and will help diversify your results. This option also allows for easier video recording—no need of additional equipment. It might be helpful to record your observation for later review, and with this virtual option, you could do so easily (with the permission of your user).
Each option of observation has pros and cons that will need to be weighed based on the product you are testing. The best option is really to do a bit of each observation so that you can collectively observe users in different spaces and in different ways to best collect data that can be used to improve the experience.
It is important to note that someone who knows they are being observed will make more attempts to have a successful experience than someone who is testing it on their own. Each user will strive to accomplish their goal or perceived goal of the experience, but users who know they are being observed will spend more time than those who are testing the experience on their own accord.
Interview
Once you have completed the observation, you can then engage with the user and talk with them about their experience. This works nicely in partnership with what was observed, as it allows the user to provide insight from their point of view, describing what the experience was like for them. You should have questions prepared and should ask each person you test the same questions. However, you can customize a few questions that may arise as a result of your observation. It is best to ask open-ended questions here, to have the user provide more detail in their answers beyond a simple yes or no (see the “Context” section in Chapter 12, “Sound Design”). Through this interview you can identify problems areas and talk with users about possible solutions. Instead of just asking them about how the experience was, you can also ask them about what they think would have made it better. If they had an expectation that was not met, discuss what that was and how things could be changed to meet it (if appropriate).
The downside to interviews, and the reason you must have the observation data, is that people may tell you things you ask about only. They also may not be 100% honest, thinking that it would more “kind” to tell you that they had a good experience. By observing, you can see their reactions without relying on their recounting of them or having to ask about each one. It is also possible that a user may recount their experience a bit differently, if they are talking about it after some time has passed. Observation allows for the feedback in context.
With qualitative research there is a risk that opinions and bias may alter the overall results, since it is not based on measurable data but relies instead on how people observe and the feedback that the user testers feel comfortable sharing. With observations, you will form opinions about how the user is feeling or reacting. Though these are helpful, they are created without factual backing. This is why qualitative research is also used in combination with quantitative data.
Quantitative research
To support your observations and interviews, quantitative research relies on numeric and mathematical data that can then be analyzed. Because this data is more fact-based and not colored by an observer’s opinion, it can provide helpful information to suggest how usability can be improved.
Of course, although this data can provide insight to where users are looking, success and failure rates, and other statistical information, it can’t tell you what is wrong with the product and what can be done to improve it. This is why the two kinds of research work well together to provide rounded feedback. There are different ways to conduct this type of research for XR, including:
Surveys (post experience or overlaid within the experience)
Eye tracking
Physiological response (motion and possible discomfort)
App-generated reports
Surveys
After you complete a user interview, you can follow up with a survey to collect more input. Because the interview is with a person, the user may behave and alter their responses to appeal to that individual. When they fill out a survey, they don’t have that same human connection, and they may answer more honestly or in a more direct way.
Surveys also allow for feedback on a rating scale, which can help provide data points for mathematical calculations that can share more insights. Though it may make sense to wait to do a survey until the very end, there could be a benefit to including a few questions for feedback overlaid within the XR experience. This way, the user can answer as they are experiencing something. Keep these questions very short, easy to answer, and based on the device being used. Selecting one button to rate an experience would work well, but asking a user to provide a long sentence without a keyboard would not. The other alternative would be to allow for voice responses, within context of the experience, to allow for more contextual questions.
Eye tracking
As the technology for observing our gaze and focus improves for XR, it can provide great insight to where the user is looking during an experience (FIGURE 13.7). This concept has been used for websites to determine where on the screen people spend the most time looking. The difference here is that the user could already be wearing a device on their eyes that might be able to track their eye flow. This data could provide invaluable feedback to help improve the hierarchy and flow of the design within each of your scenes.
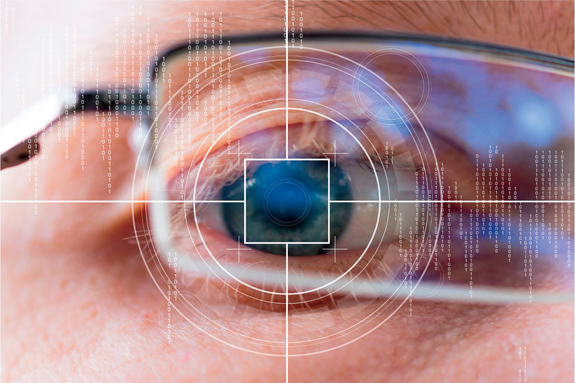
FIGURE 13.7 Eye Tracking. Tracking of the eye position to collect data about where the user is looking throughout an XR experience can help improve the flow of your design.
Photographer: MaximP for Shutterstock
Physiological response
Some VR headsets can cause nausea or motion sickness, often as a result of the disorientation between a user’s position in physical space versus in the virtual space they are immersed in. Being unable to see their physical space can cause disorientation. Any discomfort or illness should be noted—and specifically connected to the exact moment in the experience that caused it—so that it can be evaluated. If multiple people report feeling sick at the same point in the experience, that is a clear indicator that a change needs to be made.
Depending on the type of content, additional monitoring can provide insightful data, such as the user’s heart rate. Monitoring heart rates could identify physical responses triggered by the experience. This could give insight into to the user’s comfort, anxiety, stress, or even physical exertion, as they are immersed within your experience.
Generated report
If the product you are testing is connected to an individual app or software, then it is possible to allow users to opt in to submit reports on their sessions. This will help provide data including how many sessions users started, how long they visited, crash data, and possibly information about what they selected within the experience. These analytics can offer additional statistical information to see how users are engaging. If a crash occurred, this data can help identify the problem that caused the crash.
Going back to the original question, how do you know when you are finished designing an experience?
The answer is: When users show you, tell you, and the data supports that you’ve created a positive user experience that fulfills their expectations.
Accessibility testing
An important test during this user research phase, and throughout bringing the experience to life, is to make sure that your experience is accessible and inclusive to the diverse needs of the users. Throughout the design process we have discussed accessibility considerations. These considerations are an essential part of designing experiences for humanity. As part of receiving feedback from user testing you can check accessibility of:
POSTURE AND POSITION Make sure each part of an experience isn’t limited to working in only the sitting or standing position.
SPATIAL AUDIO Using depth in your audio will help provide physical cues to the user. Utilize these capabilities. To be most inclusive, you can provide an option to convert this to a mono audio channel for those who need it.
MULTIMODAL Engage multiple senses to deepen the emotional connection of the experiences and to provide alternative inputs and outputs options to accommodate the needs of the user. Offer interactions through voice, screen reading, touch, gesture, and eye tracking or gaze. Offer a text to speech as well as an audio input option.
CAPTIONING Provide captioning for audio elements.
COLOR AND CONTRAST Make sure to provide contrast in color and value in your design to aid in readability.
READABLE TEXT Allow users to change the size of text and change the color contrast of background elements.
CUSTOMIZATIONS Allow users to adjust the brightness for different lighting conditions and reduce the amount of content shown at one time. Options allow users to make the adjustments they need to make the experience most helpful. This can also include an option to show objects that are out of the field of view.
To help you, here are a few resources for accessibility and inclusive testing and consideration:
Unity WCAG Contrast Checker:
www.unitylist.com/p/t3m/Unity-wcag-contrast-checker
Omnitone (spatial audio renderer):
googlechrome.github.io/omnitone
AR for VIPs (augmented reality for visually impaired people):
arvips.squarespace.com
Customizable head straps:
debugger.medium.com/the-oculus-go-a-hard-ware-problem-for-black-women-225d9b48d098
WalkinVR:
www.walkinvrdriver.com
SeeingVR:
www.microsoft.com/en-us/research/project/seeingvr
Cognitive Augmented Reality Assistant (CARA):
tadviser.com (search for CARA)
TalkBack app:
support.google.com/accessibility/android/answer/6283677?hl=en
As you test and make options to accommodate users who may need to make adjustments to an experience, the goal should be to provide a comparable experience for those with any limitations. Accessibility can be permanent, temporary, and situational, and the needs of each user will change over time. These considerations are essential to creating a holistic user experience.
Privacy and ethical considerations
“With great power comes great responsibility.” This quote is often attributed to the superhero Spider-Man, which is appropriate because the abilities that XR provides really are like superpowers. They allow you to perform actions and learn about things in a way that wouldn’t be possible in any other way. They take a new form of reality that wasn’t possible before—unless, of course, you had superpowers. Just as Spider-Man learns through his many action-packed adventures, having these super XR abilities comes with the responsibility to use them for good and to help those around you. When you are provided with these capabilities, there are so many different ways you could use them, so it is important to make ethical and responsible choices. The bad guys in this instance are data leaks, privacy concerns, and technological biases.
As a designer, you have an ethical responsibility to create experiences that will first and foremost, do no harm, and instead benefit the user. With all of the steps we have walked through to get to this point in the process, the user has been the central focus. With such a human-centered focus, it makes sense to do everything you can to continue this protection.
XR is personal (FIGURE 13.8). It includes technology that you will wear on your face, providing access to what you see and what you hear. It can learn about the spaces where you live and visit. It can be brought into your daily routines and habits. It can be part of your life. So, it is really personal.

FIGURE 13.8 Wearables. The computers we carry with us and wear on us are personal, as they cover our eyes and are carried with us everywhere we go throughout the day.
With any new moment of transformation or innovation there is a timeframe that exists to create a new set of standards. This amount of time is limited, as more and more people who create for this new space will (knowingly or not) create precedents. These standards have already been set for technology such as the web and social media. We have seen the negative effects of a lack of standards for privacy. A famous example of this was the Facebook–Cambridge Analytica data scandal, in which millions of Facebook users had personal data obtained without their consent. This case opened the eyes of many users to pay more attention and to be more cautious when creating accounts and engaging with technology. In XR, we are at an important point where there is still time to create standards to ensure that digital data for users is protected. Now is the time to get this right. This is more important than ever before, because as said, XR is personal.
Layers of privacy
Imagine walking into a restaurant: Either you are handed a menu in digital form or one becomes available through your smartglasses. What makes this menu even more special is that it is completely tailored to you. It knows your dietary restrictions and taste preferences, plus it offers some suggestions or options for you. For someone who is gluten-free, for example, having a customized menu to just show which menu items are safe to eat is a luxury. Currently, determining a restaurant’s gluten-free choices requires asking for a special menu, going through the restaurant’s binder with each dish’s allergens listed, or even having the waitstaff relay questions to the chef or bring bottles of sauces to the table for you to check the ingredients—if such options are even available.
Having a personalized and customized menu option for each person would be impossible for a restaurant to do right now. But when each person who enters is wearing a device that has all their preferences saved, then this becomes a very real possibility. While this may be very helpful to some people, it might feel intrusive and undesirable to others. This is where choice comes in.
A user may value the privacy of different personal data at different layers. While it may not be considered private to share a food allergy, it would be to share something like a Social Security number. Privacy concerns when sharing your location with a computer vary widely based on the user. Some users would protect this highly, while others may decide the convenience outweighs the sharing of data. As you design a product, it is important to understand that each user has different layers of privacy that they want to protect. The outer layers comprise less personal information that many users are more willing to share, but as you go deeper, data will be, and should be, protected to a greater degree.
As you engage in a mobile AR experience, before the camera launches, a required message pops up asking for permission to use the camera to launch the AR experience. There will also be permission required to access the camera roll, share a location, and access the microphone on the smartphone (FIGURE 13.9). All of these are mandated by the phone manufacturer, and apps will not be approved to be released if they don’t follow these privacy protocols. For some of these options, there are different levels of privacy offered. In terms of sharing their location, for example, the user may have the choice to share it always, never, or only when the app is in use. As you design an experience, consider ways to place the control into the user’s hands. Let them decide how their data is used, as it is really their choice to make.
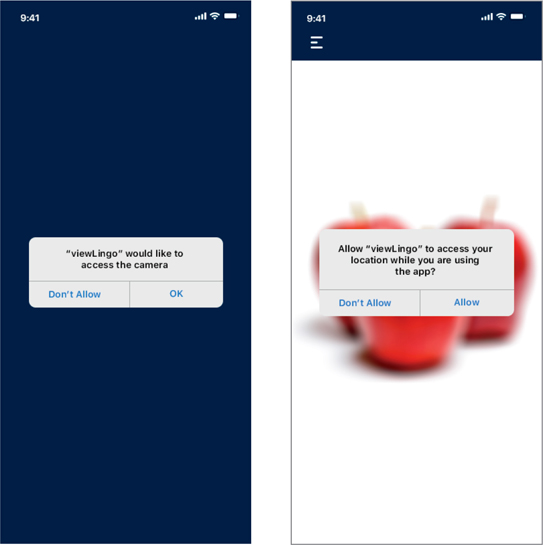
FIGURE 13.9 Pop-up Permissions. The built-in iOS UI pops up to ask a user whether they wish to allow an app access the camera and location on a mobile device.
Users should be in charge of their own data. They should clearly know:
What information they are sharing
How it is being used
What they get out of that as a result
That means that shared data can be used only for the purposes that a user has agreed to. Data is the new currency, and, as such, it should be protected accordingly. Luckily, actions are in motion already to make sure that data is being guarded in a way that will provide protection to the user.
AR Cloud
One of the ways that people are being proactive to ensure that this technology does better is by creating a set of standards in how to connect the physical and digital worlds to benefit the greater good. The largest initiative in this space is called the AR Cloud from the Open AR Cloud Association (OARC; openarcloud.org). The organization’s mission is to create standards, guidelines, and tools for how data stored in the AR cloud can be protected. Their main focus is to be respectful of the user’s rights to keep their different layers of information private. To do so, they are working to collaborate with businesses and XR professionals to create a cloud technology that would house and protect this information. Instead of data being held by large conglomerate business, who might share that data among partners and stakeholders, the data is held by this organization whose mission is to protect it.
The reason cloud data has emerged is that there isn’t enough space on our devices to hold all our digital information. So, we need to offload data to other places where we can access it as we need. This becomes very important for AR technology, especially as we look toward wearable AR glasses. With this wearable technology, physical storage space, weight, and even heat produced by processing are all big concerns. Having a place where information can be stored and accessed, as needed, provides a great opportunity (FIGURE 13.10). Many of these data clouds have emerged, but they are often created by the businesses that may also have a motivation to learn from their users. OARC’s idea of a separate space is a step toward moving in the right direction.

FIGURE 13.10 AR Cloud Data. The future of AR is powered by cloud computing and data.
Photographer: Tashatuvango for Shutterstock
We are used to our smartphones knowing our shopping preferences and knowing our location, but the future of this XR tech means that our devices will be able to track everything we see and, specifically, what we look at. With cameras always in use and available, it becomes even more of a priority that we protect the privacy of the data collected. The cloud is promising a place that can hold digital clones of the spaces we interact with. To make sure users are okay with that, OARC is also creating standards to protect that digital information. OARC is looking to make trust the new commodity by placing information in a safe space and into the hands of the user.
Ethics
Because XR provides you the opportunity for users to have superpowers, what powers are you going to allow? As you design experiences, you have to determine what control to provide users based on what you feel comfortable with and what you don’t. With more and more features enhancing this space every day, there are many to choose from. While AR and VR are a component, they often work with other technologies such as machine learning, artificial intelligence, and facial recognition—to just name a few. Within each of these there are ethical considerations to consider.
With techniques like photogrammetry and 3D model scanning becoming faster, better, and more mainstream, it brings up the issue of what is real in our realities. If something looks like a photograph, how do we know if it has been edited? When is it okay to fictionalize an experience, and when is it not okay?
These lines have been drawn more clearly in the photography world, where the field of photojournalism emerged with a strong ethical commitment to document the world as they see it without alteration. But, just as in that field, instances have arisen where people have unethically edited a photograph for a wide variety of reasons.
When you create a digital scan of a physical space, there is editing that has to happen. Merging the images all together into one shape requires manipulation to make it work and to minimize any seams that occur. In 360-degree video, often the camera has to be edited out of the space. If that element has been removed, what else has been? What has been added or altered?
These are important conversations that need to take place throughout the project—and especially as you prepare to share your product with the world. The narrative you wrap around an experience will alter how people understand it. If you share a VR experience that promises to bring people to a place from history and experience it just as someone would have had years ago, then you ethically have an obligation to call out any editing that you have done that may have altered the original images. Even if it was only done for the purposes of the experience or to format it for the device, it is important to be transparent with the users. This narrative should also make it clear when you are fictionalizing an experience. People may make assumptions about digital content not being real, but if images in an experience are based on a real event, that is something that should be shared to clarify. As you present your experience with users, do the ethically conscious thing and also share what lens they should view it with: fiction, non-fiction, or reenactment.
Facial recognition
As we have discussed, cameras have evolved to do more than just capture a moment in time; they can also capture spatial information and data. This has led to the creation of what is called facial recognition (FIGURE 13.11). This technology can very useful in instances like unlocking a smartphone so that only a specific user can have access.
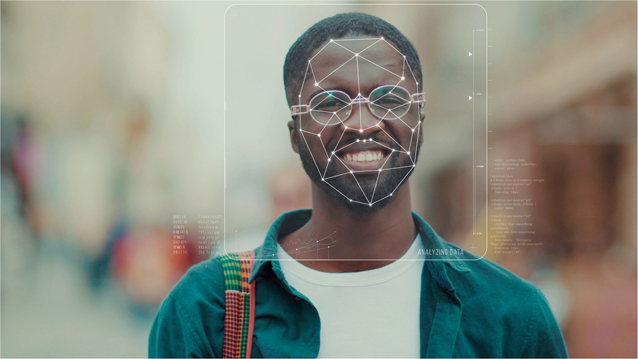
FIGURE 13.11 Facial Recognition Scan. 3D identification of a man using animated dots and grids identifies specific features of the face for facial recognition.
Photographer: Fractal Pictures for Shutterstock
Facial recognition Technology used to match a physical human face with a digital face model within a database for identification.
However, this technology has revealed a larger issue of computer bias. Based on the information released in a federal study The Washington Post reported that,
Asian and African American people were up to 100 times more likely to be misidentified than white men, depending on the particular algorithm and type of search. Native Americans had the highest false-positive rate of all ethnicities, according to the study, which found that systems varied widely in their accuracy.3
3 Harwell, D. (2019, December 19). Federal study confirms racial bias of many facial recognition systems, casts doubt on their expanding use. The Washington Post. www.washingtonpost.com/technology/2019/12/19/federal-study-confirms-racial-bias-many-facial-recognition-systems-casts-doubt-their-expanding-use
The study also showed that women were more likely to be misidentified than men. This is important information to pay attention to as many XR experiences use facial scanning and even identification as one of their core functionalities.
The accuracy of a facial scan may not be as significant when the purpose is just to apply digital content onto it, such as a makeup app or an app adding animated stickers. However, when the app is being used by law enforcement to identify suspects, accuracy becomes essential.
The Algorithmic Justice League is an organization led by Joy Buolamwini, a computer scientist and digital activist who has a mission to challenge companies from using this technology in decision-making software. As Buolamwini stated in her TEDxBeaconStreet talk titled “How I’m Fighting Bias in Algorithms,”
Computer vision uses machine-learning techniques to do facial recognition. So how this works is, you create a training set with examples of faces. This is a face. This is a face. This is not a face. And over time, you can teach a computer how to recognize other faces. However, if the training sets aren’t really that diverse, any face that deviates too much from the established norm will be harder to detect.4
4 Buolamwini, J. (2016, November). How I’m fighting bias in algorithms [Video]. TED. www.ted.com/talks/joy_buolamwini_how_i_m_fighting_bias_in_algorithms
The Algorithmic Justice League (www.ajl.org) is working to create equitable technology that is for everyone.
When you are working with this kind of technology, there cannot be a buffer for accuracy. Either it has to work 100% accurately, or it does not work at all. Imagine if you opened your favorite map application and entered a destination. You expect the map to bring you to the correct place. If the app cannot show you the correct directions, then it doesn’t work. You’d deem it unusable. Why then would we accept anything less than that for other applications, such as facial recognition? If it is not 100% accurate, then it doesn’t work and should not be used.
Keep it super
As you bring an XR experience to life, there are a great number of considerations to take into account. How do you know when it is finished? Should you code it? How do you ensure that it works correctly? How can you make sure to protect your users and their data? The best way to tackle all these questions is to consider them throughout the entire design process. As you go through this full process for the first time, you may focus on understanding the technology, all the acronyms, or the best way to use type, to use color, and to create a visual hierarchy. Those are all great things to start with. But as you set out to create an experience that will go beyond an exercise or design challenge, you need to consider the full impact it has on users, as well as what you can do to design the full experience with them as the focus. XR is magical, and as you set out to share its superpowers, be sure to check on the ethical considerations that need to be part of the process every step of the way.