
Chapter 7. Programming the CICS Java Component
In this chapter:
In this chapter you will be using VisualAge for Java Enterprise Edition to develop the CICS Java component together with the Enterprise Toolkit/390 (ET/390) that comes with it. The procedure is based on VisualAge for Java Version 2. The panels and screens in Version 3 are different.
Before you can complete the procedure in this chapter you need to install the COBOL application and have all the definitions outlined in Appendix A set up.
The IIOP client/server programming model starts with interface definitions. Here are the steps for developing a CORBA application:
Write a definition for each object using IDL.
Compile the IDL code using an IDL-to-Java compiler to produce server skeleton code and client stub code.
Create and add the Java implementation classes.
Build the server application (Export and bind to a CICS region).
Build the client application.
Tools
The main tool detailed in this chapter is VisualAge for Java for Windows NT, Enterprise Edition, which is an end-to-end Java application development tool that lets you develop Java code on the workstation and deploy it on OS/390. It provides a comprehensive Integrated Development Environment (IDE) that supports browsing, editing, compiling, testing, debugging, and deployment. The Enterprise Toolkit for OS/390 (ET/390), a feature of VisualAge for Java Enterprise Edition, provides OS/390 support. It provides a SmartGuide to export class files to the OS/390 Hierarchical File System (HFS) for native compilation and debugging. Native code built on PDSEs is a dynamic link library (DLL) that, while not portable, is suited for high-performance server programs.
Setting Up Your Development Environment
This section shows how to prepare your Windows NT environment before you start developing your CORBA application using VisualAge for Java. The CICS ORB classes and the JCICS APIs are shipped with VisualAge for Java 3.0 Enterprise Edition as additional features. If you are working with Version 2.0, you need to copy the required packages from the CD-ROM that accompanies this book, set up the CICS IDL environment, and configure the ET/390 environment, as explained here:
- Downloading the required packages from CICS Transaction Server
To develop a JCICS IIOP application on the workstation, you need, at a minimum, the CICS ORB and IDL compiler. If your application uses JCICS classes, you need the JCICS package as well. CICS TS for OS/390 Version 1.3 provides these packages and utilities in the HFS directory called $CICS_HOME/classes during CICS installation. FTP them to your workstation in binary format. They are also on the CD-ROM that accompanies this book in the directory that is called cicsadpCORBA ServerCICS classes. The three jar files supplied with CICS are:
- dfjcics.jar
The JCICS API classes, required for compilation of Java server programs that uses JCICS to access CICS services.
- dfjcorb.jar
The CICS ORB classes, required to build the IIOP server application. This also contains the GenericFactory utility that is used to help build your client program.
- dfjcidl.jar
The CICS IDL compiler to be used in building the IIOP server application.
After transferring the required packages to the workstation, import them into the VisualAge for Java IDE so their references can be resolved when you develop your application using the package classes.
- Importing the JCICS classes
To import the JCICS classes, use the following steps:
Go to the menu bar and select File and then Import. The Import SmartGuide dialog is displayed.
Choose Jar File and select Next.
In the Import from a jar/zip file SmartGuide dialog, click Browse and navigate to the directory containing the dfjcics.jar file. This is on the CD-ROM in the directory called cicsadpCORBA ServerCICS classes.
Select the file, dfjcics.jar, and click Open to return to the Import from a jar/zip file SmartGuide dialog.
Ensure that the checkboxes for class and resource are checked.
In the Project field, type in a name to identify the JCICS project, such as JCICS Classes and click Finish.
A question box appears stating that the JCICS Classes project does not exist and asking if you want to create it. Click Yes and wait until it finishes importing.
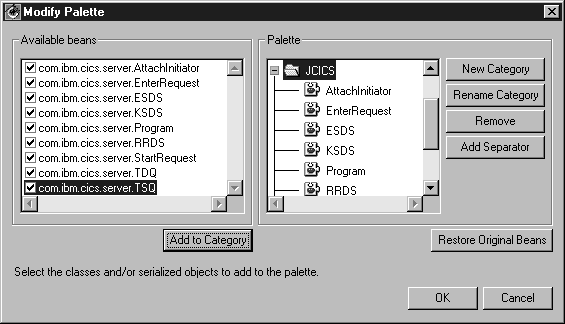
The JCICS classes contain bean classes, so you are prompted to create a bean category for the bean classes. Select New Category and type a name for the new category, such as JCICS. Ensure that all beans under Available beans are selected and that the new category JCICS is selected, click Add to Category.
Finally, click OK.
Figure 7-1 shows the results of this procedure, including the JCICS beans:
- Importing the CICS ORB classes and the CICS IDL compiler
After importing the JCICS classes, use the same procedure to import the CICS ORB classes into the IDE. These are in the file called dfjcorb.jar. Unlike the JCICS classes, the CICS ORB does not contain any bean classes in the package, so you won’t be asked to create a bean category.
Now repeat the process to import the CICS IDL compiler; this is found in the file called dfjcidl.jar.
Tip
VisualAge for Java Enterprise Edition Version 3.0 includes the CICS ORB and JCICS classes. To ensure that you are using these classes, you need to add them as a feature. Select File → Quickstart → Feature → Add Feature and click OK. From the list select JCICS Application Programming Library 3.0, then OK. If you are using Version 2.0, add these features to the IDE as shown in this section.
- Preparing the IDL development environment
The IDL development environment is an additional feature of VisualAge for Java. It provides an environment to create IDL objects and generate server skeletons and client stubs by invoking the IDL-to-Java compiler. To add the IDL development environment into the IDE:
From the Workbench, go to the menu bar and select File and click Quick Start. The Quick Start SmartGuide dialog is displayed. Alternatively press the F2 key.
Ensure that Features is highlighted in the left column, then select Add Feature and click OK. The Selection Required SmartGuide dialog is displayed.
Navigate the list and highlight IDL Development Environment 2.0, then click OK.
The IDL development environment is added to the IDE and is ready for use.
- Mounting a network drive
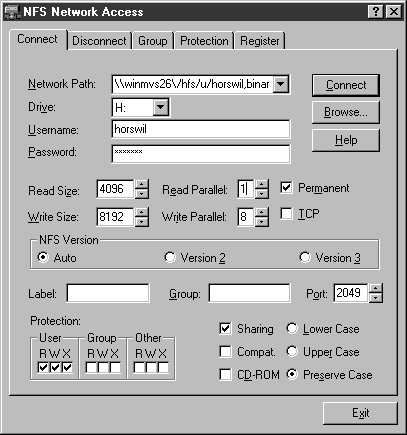
In order to export and bind the Java code so that it works in your CICS region, you need to have HFS mounted as one of the drives in your development environment; you need to install an NFS client. Hummingbird’s NFS Maestro Solo is a client-based program that allows Windows NT and Windows 95/98 users to access file and print resources of other network attached machines, or any other system that supports NFS. To do this:
Start NFS Maestro Solo—NFS Network Access. Select Start → Programs → NFS Maestro → NFS Network Access.
Enter your Network Path, for example, \winmvs26/hfs/u/horswil,binary, a Drive letter, Username and Password. On the remainder of the screen change Read Size to 4096 and the Write Size to 8192, and finally select Preserve Case. Figure 7-2 shows you the settings that we used.
- Configuring your ET/390 host environment
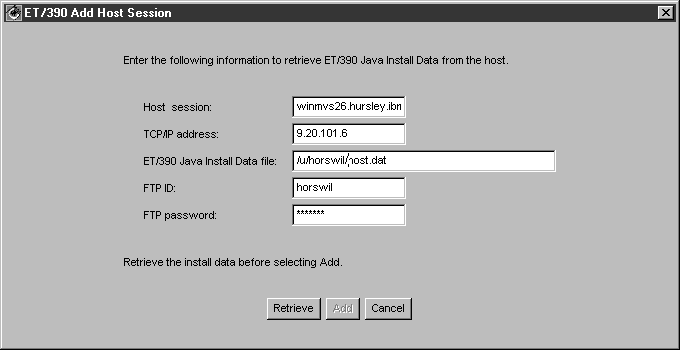
When you use ET/390 to bind and run your OS/390 Java applications, you have to provide the OS/390 host session information to VisualAge for Java. A sample ET/390 Java Install Data file can be found in your ET/390 install tree on OS/390. It describes your working environment and where the ET/390 bytecode binder is installed. You can modify it to fit your working environment. When you add the host session, ET/390 downloads a copy of the ET/390 Java Install Data file to the workstation and saves a copy for your ET/390 development work. The information in the Data file is used by ET/390 to locate the host where it exports the class files and binds the application. To add an ET/390 host session:
Go to the menu bar of the Workbench page and select Workspace → Tools → ET/390 → Host sessions → Add. Figure 7-3 shows the panel.
Enter the information appropriate to your host system and user ID, select Retrieve and then Add. You only need to add the host session once before you first use ET/390. The file names are case sensitive.
We have provided a sample file on the CD-ROM called cicsadpCORBA Serverhost.dat. You will have to edit this file to point to your own system. Example 7-1 shows a sample file definition that works for our environment. You have now done all the preparation work and you can start writing your IIOP application.
@@HPJHostName:@@HPJHome: /u/hpj/extract.spe23/hpj.dev @@HPJBinderExecutablesPDSE: HPJ.R14.TOBEY.JAV2R0M0.SPE23 @@HPJBinderMessagesPDSE: HPJ.R14.TOBEY @@HPJLERuntimeBind: PP.ADLE370.OS39025.SCEELKED:PP.ADLE370.OS39025.SCEELKEX:PP. ADLE370.OS39025.SCEEOBJ:PP.ADLE370.OS39025.SCEECPP @@HPJLERuntimeRun: PP.ADLE370.OS39025.SCEERUN @@HPJRuntime: HPJ.BUILD.JAV2R0M0.SPE23.LOAD @@HPJDebugger: HPJ.DEBUG.VISUAL.SEQAMOD @@HPJProfiler: @@HPJJavaHome: /usr/lpp/java114/J1.1 @@HPJPICLHome: @@HPJCICSRegion:Host machine address@@HPJCICSEXCI: CTS130.GA3.CICS.SDFHEXCIregionName
Creating and Compiling the IDL Definition
This procedure describes how to write the IDL definition and operations that generate the necessary classes for a customer account object.
If you haven’t done this already, create a KanDoIT Server project in your VisualAge for Java Workbench. From the main menu bar, select File and Quickstart (or press F2), highlight Basic and Create project, and click OK. Enter the project name in the Create a new project named: field and click Finish.
To make life easier for you, we’ll describe the import process and use the files that we have supplied on the CD-ROM. The procedure below imports the accountObject.idl file which is part of the sample application. To import an existing IDL into the project:
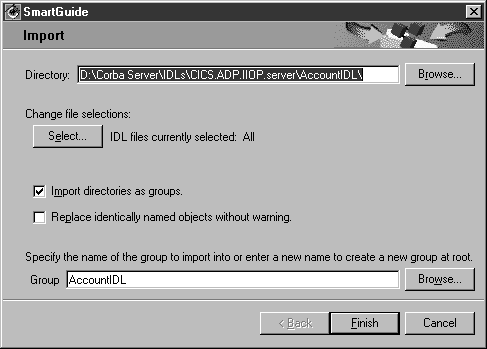
From the Workbench, double-click on your project name; this will show the project’s screen. Select the IDLs tab (it’s on the right hand side). Go to the menu bar and select IDLs and Import. The Import SmartGuide appears; see Figure 7-4.
In the Directory field, enter the directory (CORBA ServerIDLsCICS.ADP.IIOP.ServerAccountIDL) where the IDL file is located. Ensure that Import directories as groups checkbox is selected.
In the Group field, enter an IDL group name, for example, AccountIDL, to identify this group of objects and click Finish. The IDL file is imported into the KanDoIT Server project. The IDL defines the interface to the accountObject object and its methods (operations). This is done by the following two lines of code which is at the end of the IDL definition:
interface AccountInterface
      accountObject::AccountData getAccount(in string acctno);
Example 7-2 shows the complete IDL definition.
module accountObject {
          string respcode;
          string reascode;
          string cicsfunc;
          string acctid;
          string lastname;
          string firstname;
          string midinit;
          string title;
          string telnum;
          string addr1;
          string addr2;
          string addr3;
          string auth1;
          string auth2;
          string auth3;
          string auth4;
          string cards;
          string issuemonth;
          string issueday;
          string issueyear;
          string reason;
          string code;
          string approver;
          string scode1;
          string scode2;
          string scode3;
          string status;
          string limit;
  };
  interface AccountInterface {
      //getter methods
      accountObject::AccountData getAccount(in string acctno);
   };
Once the IDL definition has been imported, invoke the CICS IDL-to-Java compiler to compile it in the form of both stub and skeleton code. The VisualAge for Java IDL development environment lets you specify compiler options before you invoke the compiler:
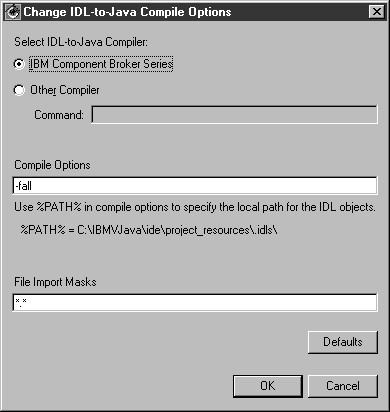
In the IDLs pane, select the AccountIDL group and right-click, select Change Compile Options…. The Change IDL-to-Java Compile Options dialog screen appears, as shown in Figure 7-5.
Ensure that the radio button IBM Component Broker Series is selected. The ORB that ships with CICS TS for OS/390 1.3 is part of the IBM Component Broker Series.
In the Compile Options field, type -fall to instruct the compiler to omit all bindings and click OK. This returns you to the IDL pane.
Having set the options for compiling, you are now ready to generate the code. Select the AccountIDL group and right-click, then select Generate Java and All Objects.
If no errors occur, one or more Java classes and interfaces are generated for the IDL objects contained in AccountIDL group. The Java classes and interface are displayed in the Types pane.
Warning
An X icon will appear beside any IDL object in error. Error messages are displayed in the Log window. The status bar at the bottom of the window also indicates errors.
Now all the server skeletons and helper classes are generated, you can move on to write the server implementation class. At this point you should return to the main Workbench window and select your project (in our case, the KanDoIT Server project).
Writing the Server Implementation Class
You create the server application by extending the base implementation class, _AccountInterfaceImplBase, which is generated by the IDL compiler as seen in Example 7-3. The class name of the server implementation must be _AccountInterfaceImpl.
/**
accountObject/_AccountInterfaceImplBase.java
* Generated by the IBM IDL-to-Java compiler, version 1.0
* from accountObject.idl
* 25 February 2000 18:22:35 o'clock GMT-05:00
*/

public abstract class _AccountInterfaceImplBase extends com.ibm.CORBA.portable.
ObjectImpl implements accountObject.AccountInterface, com.ibm.CORBA.portable.Skeleton
{
  private static com.ibm.CORBA.portable.OperationDescriptor __dispatchTable[][] = new
com.ibm.CORBA.portable.OperationDescriptor[1][0];

  static {
__dispatchTable[0] = accountObject._AccountInterfaceStub._get_operations ();
  }

  // Type-specific CORBA::Object operations
  private static String[] __ids = {
"IDL:accountObject/AccountInterface:1.0"  };
}
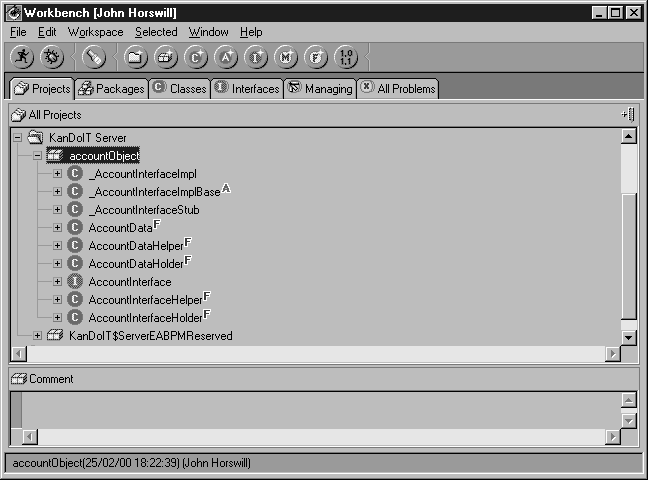
In the Workbench you will see that there are a number of classes and one interface created in the accountObject package. You can see the list in Figure 7-6. The interface was created as a result of the interface defined in the IDL called AccountInterface. The interface contains one method called getAccount method. We will be implementing the getAccount method in our implementation class and that is expecting to receive an account number and return the AccountData structure.
import com.ibm.cics.server.*;
import java.io.*;
/**
* This type was created in VisualAge.
*/
public class _AccountInterfaceImpl extends _AccountInterfaceImplBase {
CommAreaHolder crudCA;
Program cobolProg;
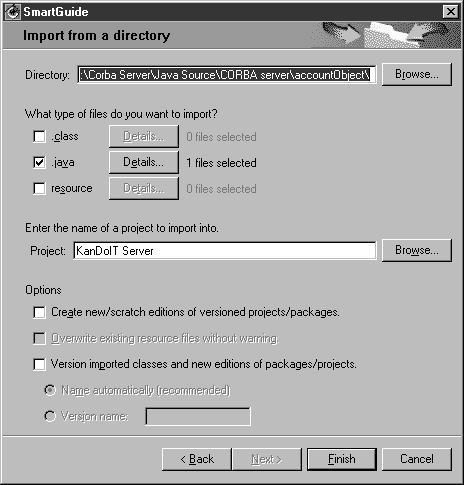
}An Implementation class for the sample application is supplied on the CD-ROM. Import the file called _AccountInterfaceImpl.java into your project as follows:
Highlight the KanDoIT Server project, right-click and select Import.
Select the Directory radio button to indicate the file that is to be imported from a directory and click Next. The Import from a directory SmartGuide dialog appears as seen in Figure 7-7.
In the Directory field, browse to find the directory on the CD-ROM where the file is located, for example, cicsadpCORBA ServerJava SourceCORBA ServeraccountObject.
Ensure that only the .java file type checkbox is selected, select Details next to .java and ensure that the _AccountInterfaceImpl.java file is the only file that is checked. Now select OK and then Finish.
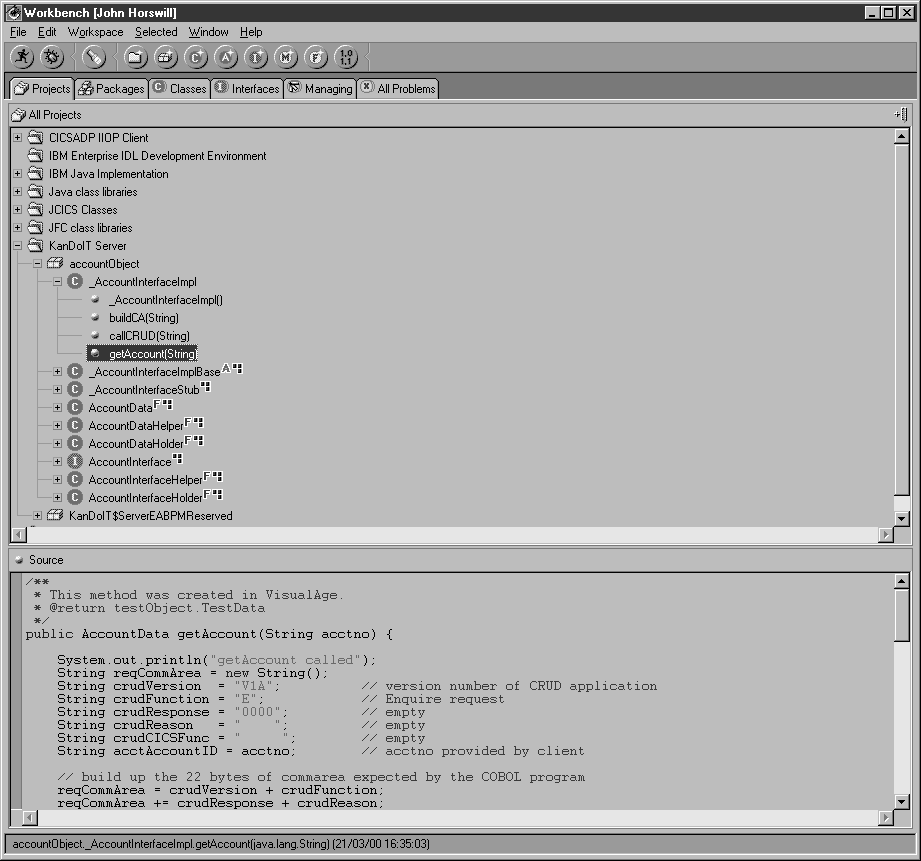
The .java file will be compiled into bytecode and the package is created under the KanDoIT Server project. This adds a further class to the accountObject class and extends the _AccountInterfaceImplBase class that was generated from the IDL definition. You can view the source code for the class and see the methods it contains. Examples Example 7-4 through Example 7-7 show the resulting code. Figure 7-8 shows the resulting structure.
Examining the Methods in the _accountInterfaceImpl Class
There are three methods in the _accountInterfaceImpl class:
- getAccount( )
Builds a request string and invokes the callCRUD( ) method to retrieve account data; it then sets each field in the account object.
- callCRUD( )
Links to another CICS program, in this case, the NACT02 program.
- buildCA( )
Builds a COMMAREA and converts it to a byte array.
Although working with byte arrays is simple in COBOL, C, or PL/I, this is not a normal way of working with data in Java. In this sample application we’ve used string manipulation to keep the sample simple and clear. A better way to work with this data is to use the IBM Java Record Framework.
- getAccount( )
This is the method specified in the IDL definition of accountObject that will be invoked by CORBA clients. The declaration for the method shows that the method will take an account number (as a string) and return an AccountData structure. Several variables are then declared and initialized with values in the order that the NACT02 program expects them. We only want to request data from the NACT application, so crudFunction is set to
Eto specify an enquire request. crudResponse, crudReason, and crudCICSFunc are set to zero or blank values to ensure false errors are not detected when the NACT02 program returns with customer account information. These string variables are concatenated to form the 22 bytes that will make up the request COMMAREA accepted by the NACT02 program, into a string variable calledreqCommArea. This is passed to another method in _AccountInterfaceImpl class called callCRUD, which will convert reqCommArea into a byte array and link to the NACT02 program, and finally return the customer account record into a variable returnedCommArea.At this point returnedCommArea is just a string of characters. A new variable result is declared of type AccountData, to hold the customer data in the format the client expects, and as defined in the IDL. The next block of code then extracts the customer data fields from returnedCommArea using the matching field in result, which is then returned to the requesting client application.
Example 7-5. getAccount( ) Methodpublic AccountData getAccount(String acctno) { String reqCommArea = new String(); String crudVersion = "V1A"; // version number of CRUD application String crudFunction = "E"; // Enquire request String crudResponse = "0000"; // empty String crudReason = " "; // empty String crudCICSFunc = " "; // empty String acctAccountID = acctno; // acctno provided by client // build up the 22 bytes of commarea expected by the COBOL program reqCommArea = crudVersion + crudFunction; reqCommArea += crudResponse + crudReason; reqCommArea += crudCICSFunc + acctAccountID; // pass the request data to the COBOL CRUD program and receive account into // returnedCommArea String returnedCommArea=callCRUD(reqCommArea); // create objects to hold returned account data AccountData result = new AccountData(); try { // extract the returned data and set each field in account object result.respcode = returnedCommArea.substring(4,8); result.reascode = returnedCommArea.substring(8,12); result.cicsfunc = returnedCommArea.substring(12,17); result.acctid = returnedCommArea.substring(17,22); result.lastname = returnedCommArea.substring(22,40); result.firstname = returnedCommArea.substring(40,52); result.midinit = returnedCommArea.substring(52,53); result.title = returnedCommArea.substring(53,57); result.telnum = returnedCommArea.substring(57,67); result.addr1 = returnedCommArea.substring(67,91); result.addr2 = returnedCommArea.substring(91,115); result.addr3 = returnedCommArea.substring(115,139); result.auth1 = returnedCommArea.substring(139,171); result.auth2 = returnedCommArea.substring(171,203); result.auth3 = returnedCommArea.substring(203,235); result.auth4 = returnedCommArea.substring(235,267); result.cards = returnedCommArea.substring(267,268); result.issuemonth = returnedCommArea.substring(268,270); result.issueday = returnedCommArea.substring(270,272); result.issueyear = returnedCommArea.substring(272,274); result.reason = returnedCommArea.substring(274,275); result.code = returnedCommArea.substring(275,276); result.approver = returnedCommArea.substring(276,279); result.scode1 = returnedCommArea.substring(279,280); result.scode2 = returnedCommArea.substring(280,281); result.scode3 = returnedCommArea.substring(281,282); result.status = returnedCommArea.substring(282,284); result.limit = returnedCommArea.substring(284,292); } catch (Exception e) { System.err.println("Exception occurred trying to build response: " + e.toString()); } // return the account object to the client return result; }- callCRUD( )
This method links to another CICS program, in this case the NACT02 program. This method is invoked by the getAccount method which provides a string variable containing the 22 bytes to be passed to the NACT02 program. The first step is to instantiate a new program object, cobolProg, which is one of the classes in the JCICS class library. The program object represents the NACT02 program to be linked to, and the name is specified using the setName( ) method.
Next, a new instance of a CommAreaHolder object, crudCA, is created to contain the COMMAREA data. Before linking to NACT02, the request data must be converted to byte array format. This is done by invoking the buildCA( ) method and providing the request data requestCA as a parameter. The buildCA( ) method returns the byte array and we store it into the value property of crudCA.
The next line performs the link to NACT02, passing the request COMMAREA in crudCA.value. The requestCA.length parameter specifies the length of the COMMAREA being passed—in this case 22 bytes. The link populates crudCA.value with the response from the NACT02 program, which will be the entire customer account record. The method then converts the returned COMMAREA to a string and returns to the getAccount( ) method.
Example 7-6. callCRUD( ) Method: Links to NACT02public String callCRUD(String requestCA) { try { cobolProg=new Program(); cobolProg.setName("NACT02"); // the CRUD COBOL CICS program crudCA=new CommAreaHolder(); crudCA.value=buildCA(requestCA); // requestCA is the string of COMMAREA passed // to linked program cobolProg.link(crudCA.value, requestCA.length()); // cah.value is type converted // to byte array } catch (Exception e) { System.err.println("Problem with program link to NACT02"); System.err.println("> " + e.toString()); } return new String(crudCA.value); }- buildCA( )
This method converts a request string to a byte array. This method takes the request string passed by the callCRUD( ) method and converts it to byte-array format, required by the progam link. The request string, passed in the variable value, is appended to a string of spaces long enough to contain the COMMAREA that will be returned by the NACT02 program. This string is written to the ByteArrayOutputStream baos using the OutputStreamWriter osw. The method converts the ByteArrayOutputStream to byte-array format using the toByteArray( ) method and returns to callCRUD( ).
public byte[] buildCA(String value)   {
     ByteArrayOutputStream baos = new ByteArrayOutputStream();
     try  {
          DataOutputStream dos = new DataOutputStream(baos);
          OutputStreamWriter osw = new OutputStreamWriter(dos);
         // add a character string big enough to hold returned COMMAREA
         // This is a long string of spaces the same length as the returned COMMAREA
         // Note This line has been shortened in this example to fit the page
         // Your data will be truncated.  You should use the code from the CD-ROM
         osw.write(value + "                                                  ");
         osw.flush();
         dos.flush();
          }   catch (Exception e) {
     System.err.println("Unable to build commarea");
     System.err.println(">" + e.toString());
     }
     return baos.toByteArray();
}
Exporting and Binding the Server Application to the CICS Region
At this point you have extended the base classes generated from the IDL and provided an implementation class to build a request COMMAREA, converted it to byte array format, performed the link to the COBOL program, retrieved account data, and returned it to the calling program. The accountObject package now needs to be deployed in a CICS region. ET/390 uses FTP to export class files on OS/390. You should have already mounted a drive on your machine using an NFS client, which points to your host.
Tip
Check that your CICS region has the correct parameters defined. See Configuring the CICS Java Component in Appendix A for the details about setting up the sample definitions on OS/390.
In the VisualAge for Java Workbench:
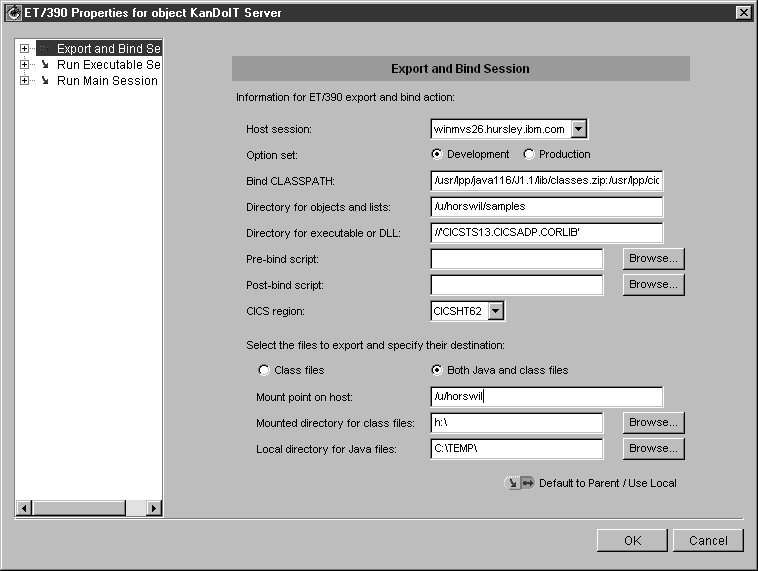
Highlight the KanDoIT Server project, right-click and select Tools → ET/390 → Properties. The ET/390 property panel will appear, which allows you to define the Export and Bind Session properties. These settings affect the entire project, but can be overridden at the package level. Fill out the panel as follows:
- Host session
Host session you added to VisualAge for Java in the preparation step.
- Bind CLASSPATH
Classpath on the host you use to bind your application. To bind the sample application, ensure that ORB (dfjcorb.jar) and JCICS (dfjcics.jar) are in the classpath; for example, /usr/lpp/java114/J1.1.1/lib/classes.zip:/usr/lpp/cicsts/satinc07/classes/dfjcorb.jar:/usr/lpp/cicsts/satinc07/classes/dfjcidl.jar.
- Directory for objects and lists
HFS directory where you want to save the object and list files on the host.
- Directory for executable or DLL
PDSE name where you want to save the DLL. Specify the PDSE //‘CICSTS13.CICSADP.CORLIB’ to save the DLL.
- CICS region
The applid of the CICS region where your DLL is loaded.
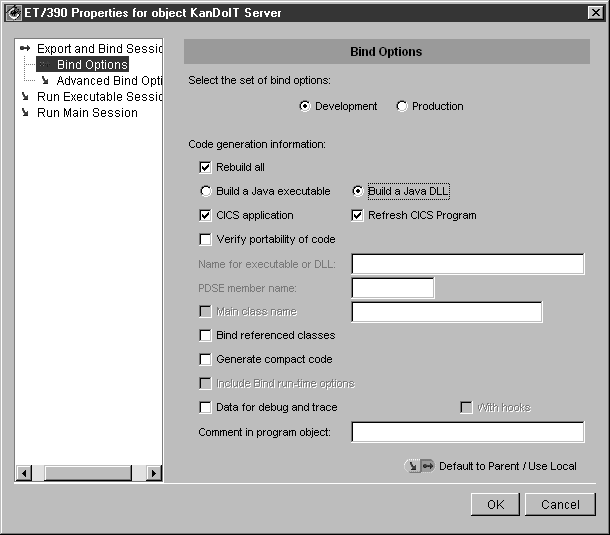
Expand the Export and Bind Session and select Bind Options. Ensure that the Rebuild all, CICS application, and Refresh CICS program checkboxes are all selected and the Build a Java DLL radio button is selected, see Figure 7-10. Rebuild all instructs the compiler to compile all the classes in the package. Finally, select OK.
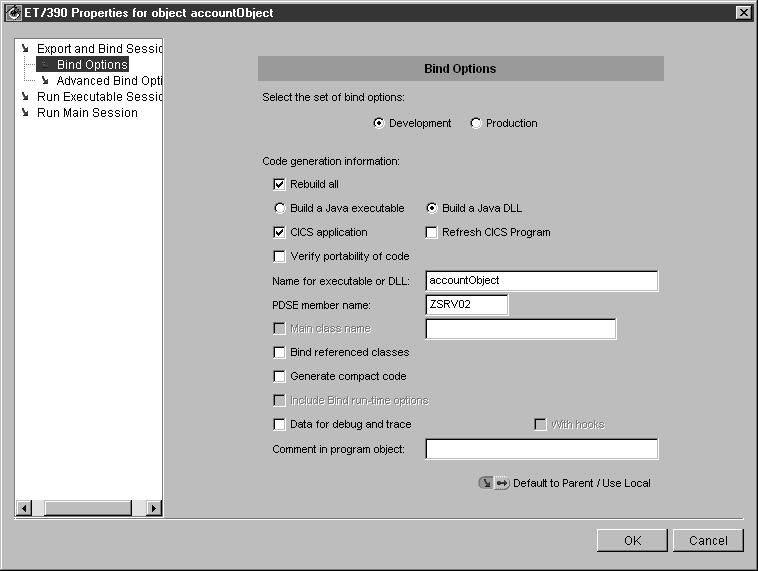
We now have to define the properties that are specific to this package. Some of the ET/390 properties will have been inherited from the project. To do this, expand the KanDoIT Server project and select the accountObject package. Right-click and select Tools → ET/390 → Properties. Expand the Export and Bind Session and select Bind Options. Enter a PDSE member name, for example, ZSRV02, to identify the package you are building, see Figure 7-11 and click OK.
You are now ready to export the package to OS/390. Select the accountObject package, right-click and choose Tools → ET/390 → Export and bind. If the OS/390 Logon Data dialog appears, enter your host user ID and password and select Save. While this is happening a progress bar appears.
Any output from the bind is written to the VisualAge for Java log window. If the export and bind fails, access your host system and you will see a bin file in /tmp. Copy this to the subdirectory where you are saving your classes and run it with the Unix Services Shell on OS/390 to determine what is wrong.
Creating the CORBA Client
So far we have created the IDL definition, written the server-side application and exported that application to an OS/390 server. Now we need to write a CORBA client to test the CORBA server code that we have just created.
Tip
In VisualAge for Java, the compilation of IDL in our KanDoIT Server project has already created helper classes and stub files so we will re-use them in the client implementation.
Creating the Client Program
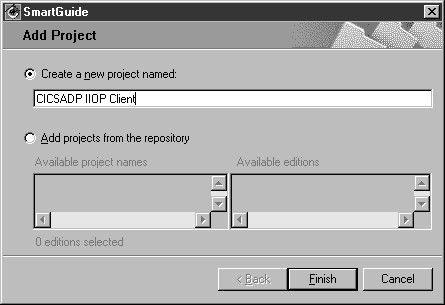
To create the client program, return to VisualAge for Java Workbench and create a new project called, for example, CICSADP IIOP Client:
Select the Add New or Existing Project to Workbench button on the toolbar and the screen shown in Figure 7-12 appears. Enter the name of your project and select Finish. The project is added to your VisualAge for Java Workbench.
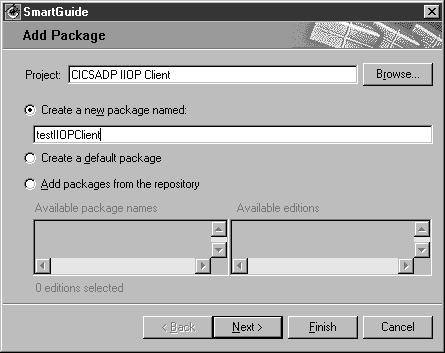
Add a package called testIIOPClient to the project. Highlight the name of your project, right-click and select Add followed by Package. Enter testiiopclient (lowercase) in the Create a new package named: field; see Figure 7-13. Select Finish (not Next).
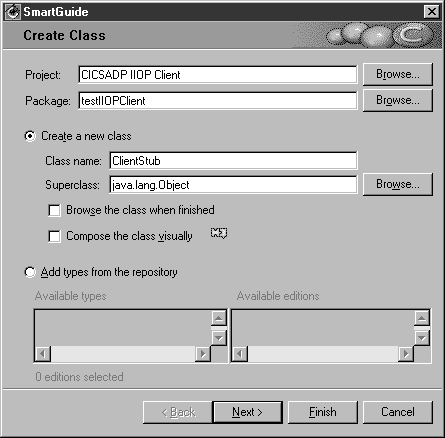
Add a class called ClientStub to your new package. Highlight the name of your package, right-click and select Add following by Class. Figure 7-14 shows you the panel. Enter ClientStub in the Class name field and click Next.
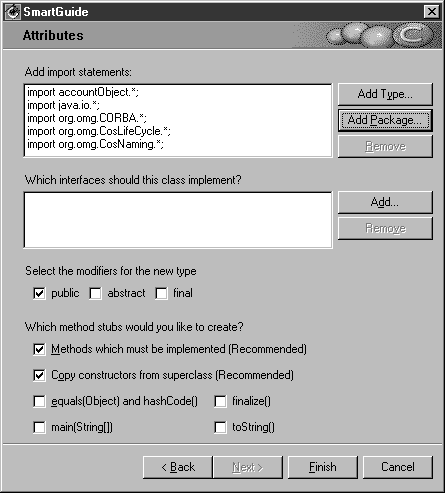
Select the Add Package… button. Add the packages that you need to import as shown in Figure 7-15. The packages are accountObject, java.io, .org .omg CORBA, org .omg .CosLifeCycle, org .omg .CosNaming. Ensure that the Public, Methods and Copy constructors checkboxes are selected, then click Finish.
Add a method called getFactoryIOR, specifying that it returns a String (to contain the IOR). To do this highlight the clientStub class, right-click and select Add following by Method. Figure 7-16 shows the Create Method panel. Select the Types button and choose String and then add getFactoryIOR( ) in the input field. Click Next.
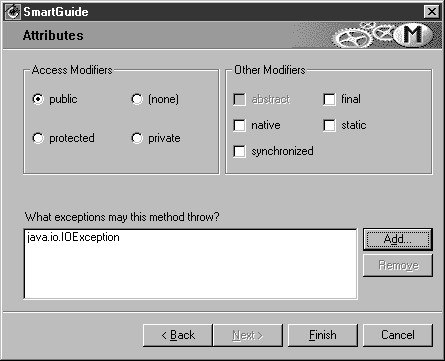
Specify that the method throws an IOException. To do this select the Add button and choose IOException from the list. Click the Add button and then Close, see Figure 7-17.
Add user code to the getFactoryIOR( ) method so that it reads a genfac.ior file from the local file system. You may wish to change the location of the genfac.ior file in the following example so that it is correct for your system. Cut and paste the relevant section from Example 7-8 or cicsadpCorba ServerJava SourceCORBA client estIIOPClientClientStub.java into your getFactoryIOR( ) method.
Example 7-8. Sample to Show getFactoryIOR( ) Method/** * This method was created in VisualAge. * @return java.lang.String * @exception java.io.IOException The exception description. */ public String getFactoryIOR() throws IOException { String line;final String filename = "C://IORFiles/genfac.ior";FileInputStream in = null; InputStreamReader isr = null; BufferedReader br = null; try { in = new FileInputStream(filename); isr = new InputStreamReader(in); br = new BufferedReader(isr); } catch(IOException e) { System.out.println("Client: Error opening file " + filename); throw e; } try { line = br.readLine(); } catch(IOException e) { System.out.println("Client: Error reading file " + filename); throw e; } return line; }Now modify the ClientStub constructor so that it returns a string and add user code to create a reference to the remote object. Cut and paste the code from Example 7-9 or from cicsadpCorba ServerJava SourceCORBA client estIIOPClientClientStub.java into your ClientStub constructor:
Example 7-9. Modifying the ClientStub Constructor/** * ClientStub constructor comment. */ public ClientStub(String acctID) { String factoryIOR; AccountInterface ai = null; try { // create and initialize the ORB System.out.println("Client: creating and initializing the ORB"); ORB orb = ORB.init(); // create the generic factory System.out.println("Client: creating the generic factory"); factoryIOR = getFactoryIOR(); org.omg.CORBA.Object genFacRef = orb.string_to_object(factoryIOR); System.out.println("Client: narrowing the generic factory"); GenericFactory fact = GenericFactoryHelper.narrow(genFacRef); // use generic factory to make accountObject object System.out.println("Client: using generic factory to make testObject object"); NameComponent nc = new NameComponent("accountObject::AccountInterface", "object interface"); NameComponent key[] = {nc}; NVP mycriteria[] = {}; System.out.println("about to create object reference"); org.omg.CORBA.Object objRef = fact.create_object(key, mycriteria); System.out.println("about to narrow"); ai = AccountInterfaceHelper.narrow(objRef); getDetails(ai, acctID); } // Catch NoFactory catch (org.omg.CosLifeCycle.NoFactory nf) { System.out.println("Client: NoFactory thrown by create_object for accountObject: :AccountInterface"); System.out.println(" - check server program with alias accountObject.jll is available on the CICS server"); } // Catch any unexpected exceptions catch (Exception e) { System.out.println("Client: Unexpected exception : " + e); e.printStackTrace(System.out); } }You will notice a number of red X’s appearing, don’t worry, when we complete the code they should all resolve themselves. Now you need to add another method called getDetails that takes accountObject.AccountInterface and String as its parameters. The accountObject.AccountInterface is the reference to the remote object and the String is the account ID we want to retrieve data for. To do this highlight the ClientStub class, right-click and select Add and Method. The user code is shown in Example 7-10.

/**
 * This method was created in VisualAge.
 * @param ai accountObject.AccountInterface
 */
public void getDetails(accountObject.AccountInterface ai, String acctID) {
          // Invoke the getAccount method
          System.out.println("Client: invoking getAccount method on accountObject
object");
          AccountData acctData = ai.getAccount(acctID);
         if (acctData.respcode.equals("0000") && acctData.reascode.equals("0000"))  {
               System.out.println("Account ID: " + acctData.acctid);
               System.out.println("First name: " + acctData.firstname);
               System.out.println("Last name: " + acctData.lastname);
               System.out.println("Mid init: " + acctData.midinit);
               System.out.println("Title: " + acctData.title);
               System.out.println("Tel Number: " + acctData.telnum);
               System.out.println("Address 1: " + acctData.addr1);
               System.out.println("Address 2: " + acctData.addr2);
               System.out.println("Address 3: " + acctData.addr3);
               System.out.println("Auth 1: " + acctData.auth1);
               System.out.println("Auth 2: " + acctData.auth2);
               System.out.println("Auth 3: " + acctData.auth3);
               System.out.println("Auth 4: " + acctData.auth4);
               System.out.println("Cards: " + acctData.cards);
               System.out.println("Issue Date: " + acctData.issueday + "/" +
                                  acctData.issuemonth + "/" + acctData.issueyear);
               System.out.println("Reason: " + acctData.reason);
               System.out.println("Code: " + acctData.code);
               System.out.println("Approver: " + acctData.approver);
               System.out.println("Scode 1: " + acctData.scode1);
               System.out.println("Scode 2: " + acctData.scode2);
               System.out.println("Scode 3: " + acctData.scode3);
               System.out.println("Status: " + acctData.status);
               System.out.println("Limit: " + acctData.limit);
         } else {                                             // non-zero return code
              System.out.println("An error occurred: ");
              System.out.println("Response Code: " + acctData.respcode);
              System.out.println("Reason Code: " + acctData.reascode);
              System.out.println("Account ID: " + acctData.acctid);
              System.out.println("CICS Function: " + acctData.cicsfunc);
           }
}Create genfac.ior File
The GenFacIOR utility supplied on the CD-ROM in Corba ServerGenFac utilitymygenfac is used to generate the genfac.ior file. Use the following guidelines for compiling:
Import the Java package into VisualAge for Java. Use the File and Import options.
Expand mygenfac package and the DoIt class to edit the main method. Change the host name, port number, and the directory where the resulting file is to be stored.
Now compile the package.
Alternatively, you can use the JDK from the command line to create the genfac.ior file. Check that you have dfjcorb.jar in your classpath. At a command prompt (DOS shell), enter:
java com.ibm.cics.server.ts.iiop.GenFacIOR -host
hname-portpnum-dC:IORFileswhere hname is the appropriate hostname and pnum is the appropriate portnumber.
Creating the RunClient Class
Still in the testIIOPClient package, we need to add another class called RunClient. This has a main( ) method so we can run and test the client-server interactions within the VisualAge environment. To do this:
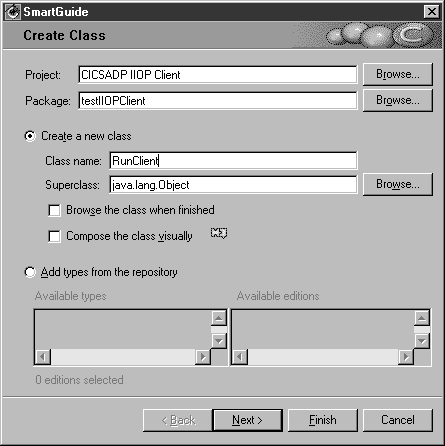
Highlight the testIIOPClient package and select the Create Class button on the toolbar. Enter RunClient in the Class name field as shown in Figure 7-18.
Click Next and on the SmartGuide Attributes dialog box, check the main(String [ ]) option, see Figure 7-19 and select Finish.
In the main method of the RunClient class, add user code to instantiate a new ClientStub object, passing an account number as its input parameter. The code is shown in Example 7-11.
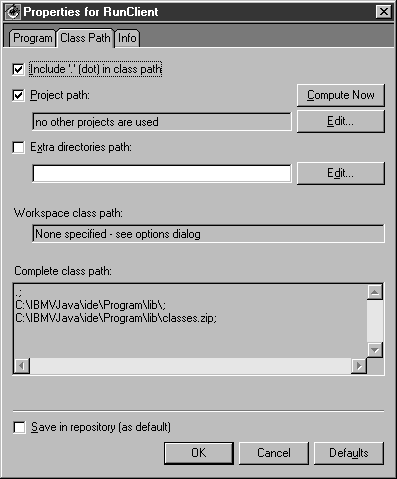
Right-click the RunClient class and from the popup menu that appears. Choose Run and then Check Class Path…; see Figure 7-19 for details. Click the Compute Now button; this adds the necessary Class Path for the runtime code. This is used for testing only.
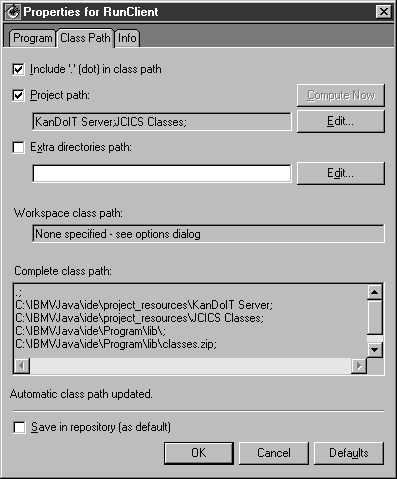
The computed class path appears in the project path text area; see Figure 7-20. Now click OK.
Testing the Client
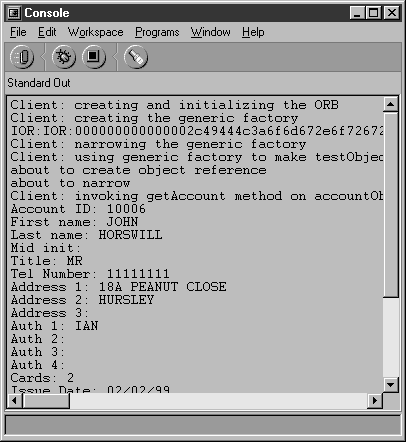
To test the client, select the RunClient class and click the running man button on the toolbar. The console panel should appear with output from the ClientStub class. See Figure 7-21 for a sample output.
What’s Next…
So now we have a working CORBA application in which our test client, running in the VisualAge for Java IDE is invoking methods on the accountObject object running in the CICS region. To build a complete web application, we now need to incorporate our CORBA client into a web server environment. This allows KanDoIT customers to retrieve their account data from the Web using their browsers. This is described in detail in Part IV.