
Appendix A. Configuring Your CICS for OS/390 Environment
Up until now we have described the individual components in the KanDoIT business application. This appendix explains how to configure your CICS region on OS/390 so that you can run the sample application. The CD-ROM that accompanies this book contains both compiled code and source code.
Warning
The COBOL code has been compiled and is ready to run with CICS TS for OS/390 Version 1.3 and Language Environment (LE) for OS/390 2.8. If you are running any earlier version of CICS or LE you need to compile the source files that are provided.
This chapter is solely concerned with the installation of the compiled sample code.
Before you start to use the application you need to check the systems requirements in Getting Ready.
The COBOL business logic is the core of the sample and is mandatory if you are to use any of the presentation interfaces. Installing the COBOL code supplied includes the 3270 interface so you will be able to use the application (see Configuring the COBOL Component). The other options for the presentation logic are:
The CORBA Server and the web component as described in Configuring the CICS Java Component and “Programming the Web Component” in Chapter 9.
The customer services frontend using Visual Basic as described in Accessing Applications on the CICS Server in Chapter 13.
The MQSeries-CICS bridge as described in Setting Up MQSeries and CICS in Chapter 15.
You will find a complete list of the programs that are provided on the CD-ROM in Appendix B.
Getting Ready
Before you can install the complete sample program you need:
A Windows desktop system with a 3270 emulator such as IBM Personal Communications (PCOMM).
Ability to log on to TSO on an OS/390 system.
Authority to update the program libraries of that CICS region from your TSO ID, or if not, access to someone else who can update the libraries for you.
Authority on that CICS region to issue resource definition DEFINE and ALTER commands, or if not, access to someone else who will issue the commands for you.
Check your local site procedures to ensure that you have all the necessary software installed.
Using the CD-ROM
Insert the CD-ROM into your workstation CD-ROM drive. This brings up the welcome panel and gives you four options:
These options need not be invoked all together and can be invoked on different workstations at different times.
You can also browse the CD-ROM directly to read and copy the source code for all parts of the application. Appendix B lists the files on the CD-ROM.
Getting the Data from the CD-ROM
You need to upload the following files from the directories shown:
File(s) | Directory |
cicsadp.loa and cicsadp.cor | cicsadpCobol ApplicationTsoloadlib |
cicsadp.csd | cicsadpCobol ApplicationTsocsddefs |
cicsadp.jcl | cicsadpCobol ApplicationTsovsam_jcl |
cicsadp.cpy | cicsadpCobol ApplicationTsocopybook |
cicsadp.txt | cicsadpCobol ApplicationTsovsam_data |
cicsadp.mac and cicsadp.src | cicsadpCobol ApplicationTsosource |
Uploading the Files
There are many tools that you can use to upload the files from the CD-ROM to your OS/390 system. Whichever tool you use, you should be sure that you can define the process to transfer files:
As binary
Fixed record length of 80
With a file extension of *.seq when they are received on your mainframe.
If you miss any of these attributes, then when you receive the file into the datasets you will probably receive a message describing the files as invalid or something similar.
We will describe two methods that you can use to upload the load modules to the host. The first uses File Control Protocol (FTP) and doesn’t require any additional software other than that which comes with TCP/IP. Secondly, we describe how to use IBM Personal Communications (PCOMM) product. Other tools that you can use include WS_FTP_Pro and a SNA Server 3270 applet.
Example A-1 shows the FTP commands that you can use. The most important line is bin fixed 80 and the filename extension that includes the .seq at the end. When you have completed this process, you can go directly to the receive commands shown in Example A-3.
FTPhostnameuseridYour_useridpwd Your_passwordbin fixed 80 put cicsadp.loa cicsadp.loaseq put cicsadp.cor cicsadp.corseq put cicsadp.src cicsadp.srcseq put cicsadp.jcl cicsadp.jclseq put cicsadp.txt cicsadp.txtseq put cicsadp.csd cicsadp.csdseq put cicsadp.cpy cicsadp.cpyseq put cicsadp.mac cicsadp.macseq quit
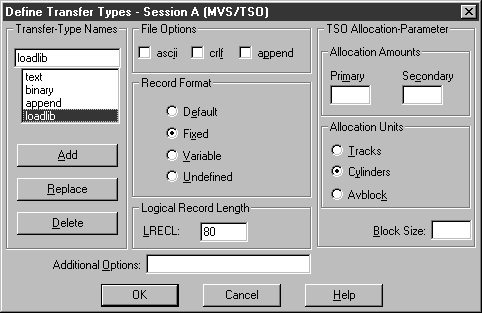
If you are using Personal Communications (PCOMM) to upload the files, first set up the transfer type of loadlib before you initiate the send. To do this, use the Setup → Define Transfer Types option from the Transfer menu bar pull-down and create the loadlib type (with the ASCII, CRLF, and Append checkboxes all unselected), the Fixed radio button selected and the LRECL set to 80. See Figure A-1.
Select the Send File to Host option from the Transfer menu of your PCOMM host session, specify the PC filename, host filename, and transfer type, as shown in Example A-2. Once you have completed this process, you can proceed to the receive process described in Example A-3.
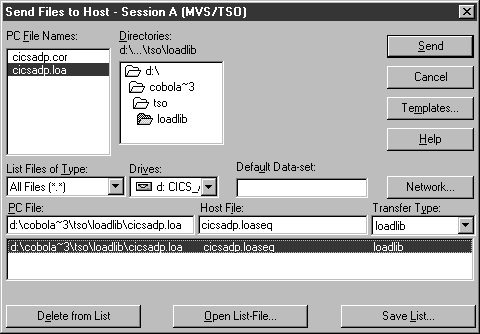
PC File:         cicsadp.loa
Host File:       cicsadp.loaseq
Transfer Type:   loadlib

PC File:         cicsadp.cor
Host File:       cicsadp.corseq
Transfer Type:   loadlib

PC File:         cicsadp.src
Host File:       cicsadp.srcseq
Transfer Type:   loadlib

PC File:         cicsadp.mac
Host File:       cicsadp.macseq
Transfer Type:   loadlib

PC File:         cicsadp.jcl
Host File:       cicsadp.jclseq
Transfer Type:   loadlib

PC File:         cicsadp.txt
Host File:       cicsadp.txtseq
Transfer Type:   loadlib

PC File:         cicsadp.csd
Host File:       cicsadp.csdseq
Transfer Type:   loadlib

PC File:         cicsadp.cpy
Host File:       cicsadp.cpyseq
Transfer Type:   loadlib
Receiving the data sets
Logon to your TSO system to receive the data sets. Issue the commands in Example A-3 to unload the sequential files into TSO partitioned data sets.
receive indsname(cicsadp.loaseq)
dsn('CICSTS130.CICSADP.LOADLIB')  (when prompted for a dataset)

receive indsname(cicsadp.corseq)
dsn('CICSTS130.CICSADP.CORLIB')  (when prompted for a dataset)

receive indsname(cicsadp.macseq)
dsn('CICSTS130.CICSADP.COBSRCE')  (when prompted for a dataset)

receive indsname(cicsadp.srcseq)
dsn('CICSTS130.CICSADP.COBSRCE')  (when prompted for a dataset)

receive indsname(cicsadp.jclseq)
dsn('CICSTS130.CICSADP.JCLLIB')  (when prompted for a dataset)

receive indsname(cicsadp.txtseq)
dsn('CICSTS130.CICSADP.VSAMDATA')  (when prompted for a dataset)

receive indsname(cicsadp.csdseq)
dsn('CICSTS130.CICSADP.CSDDEFS')  (when prompted for a dataset)

receive indsname(cicsadp.cpyseq)
dsn('CICSTS130.CICSADP.COBCOPY')  (when prompted for a dataset)
Where the high-level qualifier used in the examples, it is called CICSTS130.CICSADP.NAME. This is only a suggestion and you should follow the guidelines for your site. Opening any of these datasets shows you the files that have been received.
Configuring the COBOL Component
This section describes which files to copy to the CICS program libraries and how to configure CICS to use the files. You may not have the authority to perform some if these steps, where this is the case please ask the appropriate person at your site for assistance.
Setting up the VSAM File
Using the following guidelines to set up the VSAM file:
Edit the sample VSAM file in JCLLIB:
Add a job card at the beginning.
Enter the appropriate High Level Qualifiers for correct data file CICSADP.DATA.
Enter the input file name for the repro job to load the VSAM DATA into ACCTFILE.
Run the JCL; this creates three VSAM files of the form:
high.level.qualifer.ACCTFILE
high.level.qualifier.ACCTNAIX with the path high.level.qualifier.ACCTNAME
high.level.qualifier.ACTINUSE
Setting Up and Installing the CICS Resource Definitions
The following guidelines will help you set up and install the CICS resource definitions:
Edit the supplied CSD definitions file. If you followed our conventions, it is the data set in the PDS called CICSTS130.CICSADP.CSDDEFS. The CICS files in group CICS0ADP (ACCTFIL, ACCTNAM, and ACINUSE) need to be updated to point to the dataset names. For example:
high.level.qualifer.ACCTFILE
high.level.qualifier.ACCTNAME
high.level.qualifier.ACTINUSE
Update your CSD with the definitions contained in your file. This probably means asking someone at your site with the right authorization to run the DFHCSDUP job.
Enter ADD GROUP(CICS0ADP) LIST(YourGroupList) where YourGroupList is specified in your GRPLIST system initialization parameter (SIP) in your CICS startup job.
If you do a warm start of your CICS region, this new definition will not be recognized.
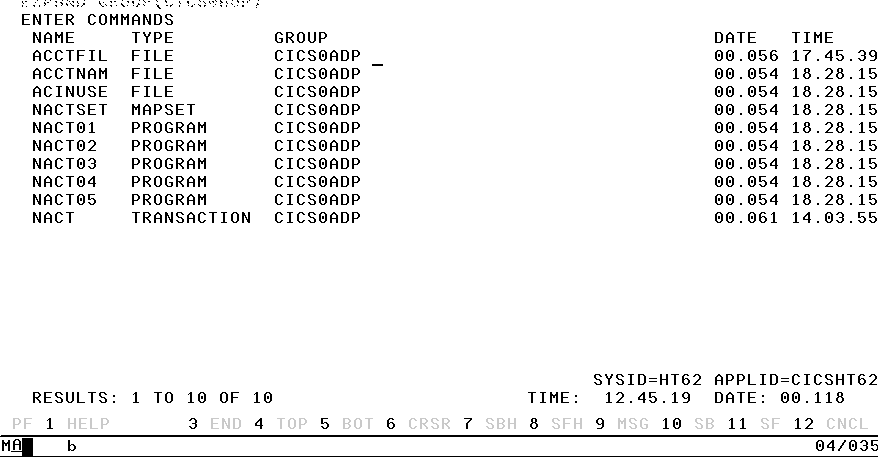
If you are cold starting CICS, the definitions that you have added to your CSDDEFS job are automatically installed. On the other hand, it is more likely that you will be warm starting CICS, in which case you should logon to your CICS region and install the CICS0ADP group (or your self-defined group) using:
CEDA INSTALL GROUP(CICS0ADP)
CEDA INSTALL GROUP(CICSJADP)
You should see these resource definitions shown in Figure A-3.
Running the Application
Edit your CICS startup JCL to add the loadlibrary containing the load module into the DFHRPL concatenation. The statement looks like this:
DFHRPL DD DISP=SHR,DSN=
High.Level.qualifier.LoadlibDD DISP=SHR,DSN=High.Level.qualifier.CorlibStart CICS and logon to your CICS region from a 3270 emulation screen or a 3270 monitor.
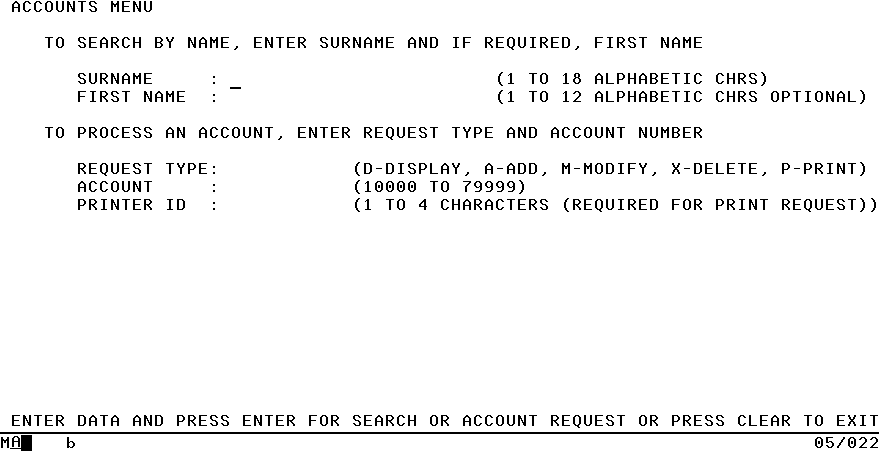
Issue the transaction NACT. You should now be running the application. Figure A-4 shows the screen that you see.
So far you have the main COBOL application running and you will be using this as the backend application to run the remaining parts of the sample application.
Configuring the CICS Java Component
To find out more about configuring the CICS Java component, see Part III. These instructions describe the steps that you need to carry out to set your CICS TS for OS/390 system.
As this is a client/server setup, you also need to configure the client sample code, as explained in the instructions that relate to Part IV. It is also assumed you have successfully installed and have running the COBOL application, which is invoked by starting the NACT transaction.
Warning
PDSEs (Partition Data Set Extended) must be defined to hold the CICS Java programs and resource files you have built. You must use PDSE libraries (not PDS ones) so that you can create long-name aliases in addition to the eight-character primary member name. At run time, CICS searches the PDSE directories for the long name to obtain the corresponding short name. In the sample application we describe in the book, the long name is accountObject.
Defining Your CICS Resources
Before you startup or log on to your CICS region, you need to check your CICS startup JCL and also some system initialization parameters as follows:
Edit the DFHRPL concatenation of your CICS startup JCL. Add the loadlibrary containing the location of the Java DLLs (you may have already done this), add the location of your SDJLOAD library and also the HPJ build library. Clearly these will be different from ours, but to give you an idea, an example of the statement looks like this:
DFHRPL DD DISP=SHR,DSN=
Corlib(location of Java dlls) DD DISP=SHR,DSN=High.Level.qualifier.SDFJLOAD DD DISP=SHR,DSN=HPJ.BUILD.TST1015P.LOADCheck that your system initialization parameters include the following settings:
The maximum number of tasks should be set to at least 75, if it isn’t already set much higher.
Warning
If your installation is not using Record Level Sharing (RLS) and you add it to your CICS TS 1.3 system initialization parameters, when you try to run the NACT transaction, you will receive an abend in NACT01 and a DFHFC0541 message.
The COBOL application installation process should have installed the group CICSJADP, which contains resource definitions for the CORBA Server sample. In addition to those definitions you also need to add a definiton for both TCPIPSERVICE and REQUESTMODEL togther with the associated transactions CIOF and ACTO. They are defined and installed using CEDA, into a group called CICSJADP:
- TCPIPSERVICE
Configures a port to listen for incoming IIOP requests. For IIOP requests, the transaction ID must be set to CIOR. When requests are made to the specified port, CIOR is attached and started. We are not using Secure Sockets Layer (SSL), and the socket remains open at all times.
Logon to your CICS region and enter:
CEDA EXPAND GROUP(CICSJADP)
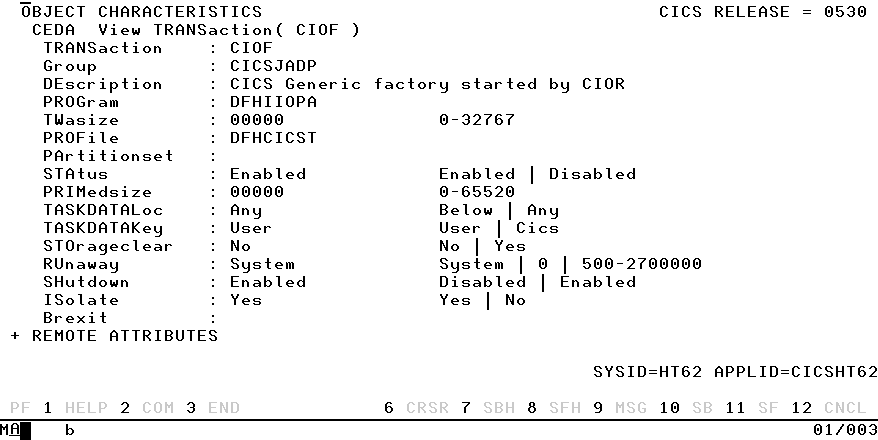
Figure A-5 shows you the screen that contains all the definitions that you need in the group, CICSJADP. Enter A alongside the PRMTCPIP entry to view and, if necessary to change the values.
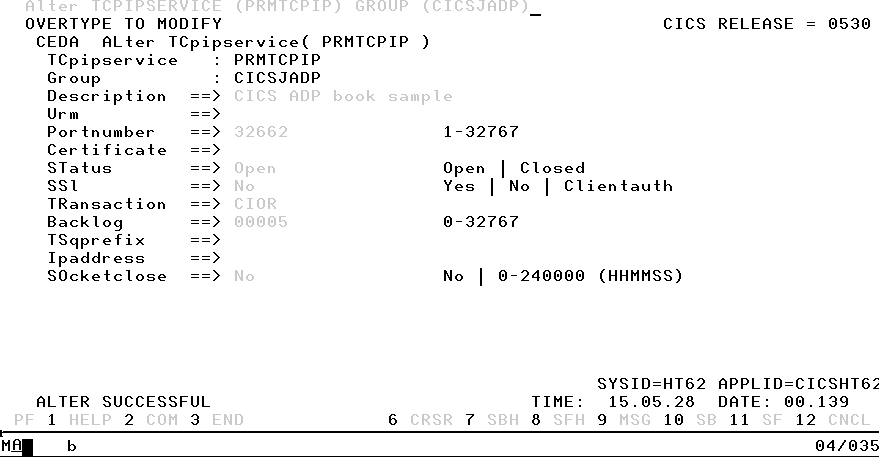
Figure A-6 shows you the values that you could enter for the TCPIPSERVICE called PRMTCPIP.
If you need to change the port number, overtype the port number as shown in Figure A-6 and hit the Enter key. Before you can re-install this resource you will have to close the previous port. To do this enter:
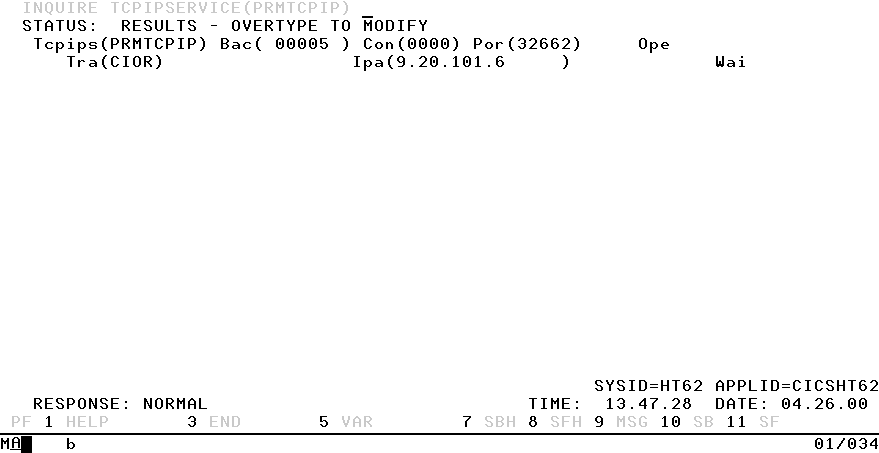
CEMT INQUIRE TCPIPSERVICE(PRMTCPIP)
Figure A-7 shows the list of the resource definitons. Overtype Ope with Clo to close the port. Now you can re-install the TCPIPSERVICE resource definition using CEDA.

Tip
Make a note now of the port you are using and the hostname (or IP address) as this will be needed in the set up for Part IV, to generate the genfac.ior file used by the CORBA client to locate the remote object in CICS. The IPA value in Figure A-8 shows you the IP address that you are using.
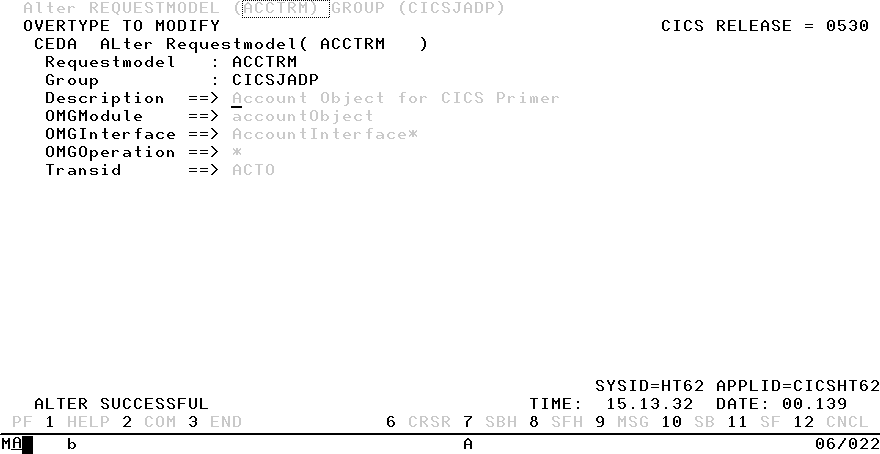
- REQUESTMODEL
Defines the pattern for the remote object and its exposed interface and methods. In this case, we’re specifying that any method (by using a * wildcard) in the accountObject module in the interface AccountInterface will run under transaction ACTO.
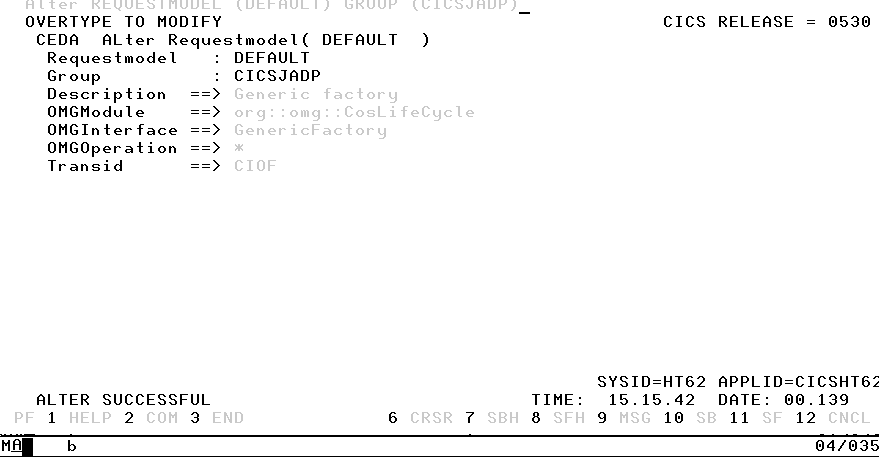
Similarly for the Generic Factory, we set up a default REQUESTMODEL, which runs under the default transaction of CIOF.
For each REQUESTMODEL we need to define corresponding transactions, ACTO and CIOF.
The program for IIOP requests is always DFHIIOPA (only transaction ID, group, description and program were specified, all other parameters left at default values).
Finally, you need to install a CICS-supplied group DFH£EXCI if it isn’t already installed. To do this enter:
CEDA INSTALL GROUP(DFH£EXCI)

Setting Up CICS Java on OS/390
Deit your CICS Startup JCL as follows:
Add the loadlibrary containing the load module into the DFHRPL concatenation. The statement looks like this:
DFHRPL DD DISP=SHR,DSN=High.Level.qualifier.LoadlibDD DISP=SHR,DSN=High.Level.qualifier.CorlibSYSIN DD * DB2CONN=YES (Connect to DB2) MXT=75,SEC=NO (Increased max tasks) RLS=YES (Invoke RLS support, if enabled) TCPIP=YES (Add TCPIP support) DFHRPL DD DISP=SHR,DSN=CICSTS130.CICSADP.CORLIB (location of Java dlls) DD DISP=SHR,DSN=CICSTS130.CICS530.SDFJLOAD DD DISP=SHR,DSN=CICSTS130.CICS530.SDFHLOAD DD DISP=SHR,DSN=HPJ.BUILD.TST1015P.LOAD
Using the PDF Files for the CICS Main Library
The pdf files of the CICS library for CICS TS for OS/390 Version 1.3 are provided on the CD-ROM. To use it you need to have an Adobe Reader installed. This is provided on the CD-ROM as cicsadppdfsadobe s405eng.exe. This installs the Adobe Reader Version 4.0.5, which includes search facilities. To download the latest version of the Adobe Reader, visit their web site at http://www.adobe.com.
To access the CICS TS 1.3 library: