
Until now, we have built independent microservices. They had a specific purpose and dealt with one specific part of our system: e-mail sending, product management, and order processing, but now we are building a microservice whose only purpose is to facilitate the communication between microservices.
Now we are going to build a microservice that interacts with others and is the front-facing façade to the customer.
When I was planning the contents of this chapter, a service like this one wasn't in it. However, after thinking about it, this chapter wouldn't have been the same without showing a few concepts around API aggregation that are fairly easy to show in a frontend microservice.
Think about scalability. When dealing with HTTP traffic, there is a pyramid of traffic. There are more hits in the frontend than in the backend. Usually, in order to reach the backend, the frontend needs to process the following few requests from the frontend:
- Read a form
- Validate it
- Manage the PRG pattern (https://en.wikipedia.org/wiki/Post/Redirect/Get)
As you can see, there is a lot of logic that needs to be processed by the frontend, so that it is not hard to see capacity problems if the software is busy. If we are using a microservice, and we are using it in the right way, scaling up or down should be an automatic process that can be triggered with a couple of clicks (or commands).
Until now, we have pretty much always tested the code in a single server. This is fine for testing, but when we are building microservices, we want them to be distributed. Therefore, in order to achieve it, we need to indicate to Seneca how to reach the services:
var senecaEmailer = require("seneca")().client({
  host: "192.168.0.2",
  port: 8080
});
var senecaProductManager = require("seneca")().client({
  host: "192.168.0.3",
  port: 8080
});
var senecaOrderProcessor = require("seneca")().client({
  host: "192.168.0.4",
  port: 8080
});
What we have done is create three Seneca instances. They are like communication pipes between servers.
Let's explain the code:
Seneca, by default, uses the transport plugin TCP. It means that Seneca will be listening to the /act URL on the server. As an example, when we create senecaEmailer, the URL where Seneca will be pointing to is http://192.168.0.2:8080/act.
We can actually verify it with curl. If we execute the following command line, replacing <valid Seneca pattern> by a valid Seneca command, we should get a response from the server in the JSON format, which would be the second parameter in the done function for the action:
curl -d '<valid Seneca pattern>' -v http://192.168.0.2:8080/act
Let's see an easy example:
var seneca = require("seneca")();
seneca.add({cmd: "test"}, function(args, done) {
  done(null, {response: "Hello World!"});
});

seneca.listen({port: 3000});
If we run this program, we can see the following output from the terminal:

It means that Seneca is listening to the port 3000. Let's test it:
curl -d '{"cmd": "test"}' -v http://127.0.0.1:3000/act
This should print something very similar to the following code in the terminal:
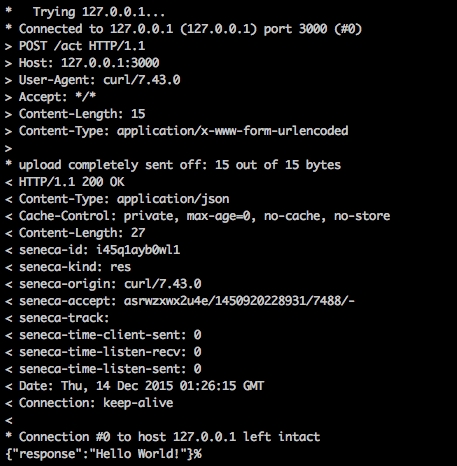
The preceding code is the TCP/IP dialog between our terminal and Seneca server with the result of the response in the last line.
So, what we achieved earlier on having three different instances of Seneca is configuring our network of microservices; Seneca will transport the messages across the network for us.
The following flow diagram describes how a single API can hide multiple Seneca servers in the backend with different microservices (different Seneca instances, basically):

Now, let's take a look at the skeleton of the microservice:
var express = require("express");
var bodyParser = require('body-parser');
var senecaEmailer = require("seneca")().client({
  host: "192.168.0.2",
  port: 8080
});
var senecaProductManager = require("seneca")().client({
  host: "192.168.0.3",
  port: 8080
});
var senecaOrderProcessor = require("seneca")().client({
  host: "192.168.0.4",
  port: 8080
});

function api(options) {
  var seneca = this;

  /**
   * Gets the full list of products
   */
  seneca.add({area: "ui", action: "products"}, function(args, done) {
    // More code to come
  });
  /**
   * Get a product by id
   */
  seneca.add({area: "ui", action: "productbyid"}, function(args, done) {
    // More code to come
  });

  /**
   * Creates an order
   */
  seneca.add({area: "ui", action: "createorder"}, function(args, done) {
    // More code to come
  });

  this.add("init:api", function(msg, respond){
    seneca.act('role:web',{ use: {
      prefix: '/api',
      pin:  'area:ui,action:*',
      map: {
        products:  {GET:true}
        productbyid: {GET:true, suffix:'/:id'}
        createorder: {POST:true}
      }
    }}, respond)
  });
}
module.exports = api;
var seneca = require("seneca")();
seneca.use(api);

var app = require("express")();
app.use( require("body-parser").json());
app.use(seneca.export("web"));
app.listen(3000);
We have actually left the functionality that calls other microservices for later discussion. Now we are going to focus on how the code is articulated:
- We are creating a new plugin. The plugin is called
api(the name of the function for wrapping the plugin isapi). - The plugin has to perform the following three actions:
- List all the products
- Get a product by ID
- Create an order
- These three actions will call to two different microservices: Product Manager and Order Manager. We will come back to this topic later.
Until here, everything is well known, but what about the initialization function of the plugin?
At first look, it looks like dark magic:
  this.add("init:api", function(msg, respond){
    seneca.act('role:web',{ use: {
      prefix: '/api',
      pin:  'area:ui,action:*',
      map: {
        products:  {GET:true}
        productbyid: {GET:true, suffix:'/:id'}
        createorder: {POST:true}
      }
    }}, respond)
  });
Let's explain it:
- Seneca will call the
init: <plugin-name>action in order to initialize the plugin. - Through the
prefixargument, we are listening to URLs under the/apipath. - We are instructing Seneca to map the URLs to action by pinning a base common argument. In this case, all our
seneca.add(..)contains an argument calledareawith theuivalue. We are also asking Seneca to route calls that contain theactionargument (no matter the value, that is why we use the*) so that it would ignore calls that don't specify theactionargument.
The following argument (map) specifies the methods allowed in the matching.
How is the argument matching done?
The area argument is implicit as we have pinned it with the ui value.
The action argument needs to be present.
The URL must start with /api as we specified a prefix.
So, with this information, /api/products will correspond to the {area: "ui", action: "products"} action. In the same way, /api/createorder will correspond to the {area: "ui", action:"createorder"} action.
The Productbyid argument is a bit special.
Now, although it is not simple, this looks much easier.
Let's go back to the Seneca actions that are going to provide the functionality:
  /**
   * Gets the full list of products.
   */
  seneca.add({area: "ui", action: "products"}, function(args, done) {
    senecaProductManager.act({area: "product", action: "fetch"}, function(err, result) {
      done(err, result);
    });
  });

  /**
   * Get a product by id.
   */
  seneca.add({area: "ui", action: "productbyid"}, function(args, done) {
    senecaProductManager.act({area: "product", action: "fetch", criteria: "byId", id: args.id}, function(err, result) {
      done(err, result);
    });
  });

  /**
   * Creates an order to buy a single prodct.
   */
  seneca.add({area: "ui", action: "createorder"}, function(args, done) {
    senecaProductManager.act({area: "product", action: "fetch", criteria: "byId", id: args.id}, function(err, product) {
      if(err) done(err, null);
      senecaOrderProcessor.act(area: "orders", action: "create", products: [product], email: args.email, name: args.name, function(err, order) {
        done(err, order);
      });
    });
});We are actually using everything that we've discussed in the previous chapters, but we are taking a step forward in the Seneca semantics.
We have created an API with a very limited set of functionalities, but through them, we are aggregating the functionality of different microservices into one.
A detail to take into account is the amount of nested calls in the create order action (the last one). In this case, we are creating orders out of only a product to simplify the code, but if we are nesting too many calls for non-blocking actions waiting for the response in a callback, we will end up having a pyramid of code that makes your program difficult to read.
The solution for it would be to refactor how the data is fetched and/or reorganize the anonymous functions, avoiding inlining.
Another solution is the usage of promises libraries such as Q or Bluebird (http://bluebirdjs.com/) that allow us to chain the flow of the methods through promises:
myFunction().then(function() {
// Code here
}).then(function(){
// More code here
}).catch(function(error){
// Handle the error.
});
In this way, instead of building a sea of callbacks, we are nicely chaining the calls to the methods and adding error handlers to avoid the exceptions from bubbling up.
As you can see, we are using the UI as a central point of communication for all the microservices, except for the mailer, and we have a really good reason for it.
Microservices are great, and we have demonstrated that by writing a small system in a few hundred lines of code that is fairly easy to understand.
They are also great as they allow us to react in the event of a failure:
- What happens if the e-mailer microservice stops working?
- What happens if the order processor stops working?
- Can we recover from the situation?
- What does the customer see?
These questions, on a monolithic system, are nonsense. The e-mailer probably would be a part of the application. The failure on sending an e-mail implies a general error, unless it is specifically handled. Same with the order processor.
However, what about our microservices-oriented architecture?
The fact that the e-mailer has failed to deliver a few e-mails does not prevent the orders from being processed, even though the customers aren't getting the e-mails. This is what we call performance or service degradation; the system might be slower, but some functionalities will still work.
What about the order manager? Well...we can still make the products-related calls work, but we won't be able to process any order…which might still be a good thing.
The fact that the order manager is responsible for sending the e-mail instead of the UI microservice is not coincidental; we only want to send the e-mail with the acknowledgement of a sale on the success event, and we don't want to send the success e-mail in any other case.
In the previous section, we talked about system degradation in the event of a failure, but everybody who has worked in IT for a number of years knows that a system does not fail suddenly in most cases of failures.
The most common event is a timeout; the server is busy for a period of time, which makes the request to fail, giving our customers a terrible user experience.
How can we solve this particular problem?
We can solve this problem with a circuit breaker, as shown in the following image:

A circuit breaker is a mechanism to prevent requests from reaching an unstable server that could cause our application to misbehave.
As you can see in the preceding schema, the circuit breaker has the following three statuses:
- Closed: The circuit is closed; the requests reach their destination.
- Open: The circuit is open; the requests don't get past the circuit breaker and the client gets an error. The system will retry the communication after a time period.
- HalfOpen: The circuit tests the service again, and if there is no error reaching it, the requests can flow again and the circuit breaker is Closed.
With this simple mechanism, we can prevent the errors to cascade through our system, avoiding catastrophic failures.
Ideally, the circuit breaker should be asynchronous. This means that even if there are no requests, every few seconds/milliseconds, the system should be trying to re-establish the connection to the faulty service in order to continue the normal operation.
Circuit breakers are also an ideal place to alert the support engineers. Depending on the nature of our system, the fact that a given service cannot be reached could mean a serious issue. Can you imagine a bank that is unable to reach the SMS service to send two-factor authentication codes? No matter how hard we try, it will always happen at some point. So, be prepared for it.
Note
There is a very inspiring article from Martin Fowler (one of the big names in microservices) about circuit breakers at http://martinfowler.com/bliki/CircuitBreaker.html.
Seneca is great. It enables the developers to take a simple and small idea and translate it into a piece of code with a connection point that does not make any assumption, just facts. An action has a clear input and provides you the interface to give an answer for it through a callback.
How many times have you found your team struggling with the class structure of an application just to reuse code in a nice way?
Seneca focuses on simplicity. The fact that we are not modeling objects, but just parts of systems using small portions of code that are extremely cohesive and idempotent to objects makes our life much easier.
Another way how Seneca makes our life easy is through the plugability.
If you review the code that we have been writing in this book, the first thing that will be spotted is how convenient the plugins are.
They provide the right level of encapsulation for a bunch of actions (Does it look similar to a class?) that are somehow related to each other.
I always try not to over-engineer solutions. It is really easy to fall into premature abstraction, preparing the code for a future that we don't know whether it it is going to happen in the majority of the cases.
We don't realize how long we spend maintaining features that have been overdesigned and need to be tested every time someone changes the code around them.
Seneca avoids (or at least discourages) this type of designs. Think about Seneca actions as a small piece of paper (like a post-it), where you need to write what happened last week. You need to be smart about what to fit in there, and possibly, split it into another post-it if the content gets to dense.
Another point where Seneca is good is in configurability. As we have seen before, Seneca comes with a number of integrations for data storage and transport.
An important side of Seneca is the transport protocol. As we know by now, the default transport is carried over TCP, but can we use a message queue to do it? The structure is shown as follows:

Yes, we can. It is already done and maintained.
If you look into the code of the plugin (it looks really complex, but it is not), you can spot where the magic happens in few seconds:
  seneca.add({role: 'transport', hook: 'listen', type: 'rabbitmq'}, hook_listen_rabbitmq)
  seneca.add({role: 'transport', hook: 'client', type: 'rabbitmq'}, hook_client_rabbitmq)
Seneca is using Seneca actions to delegate the transport of the message. Although it looks a bit recursive, it is brilliant!
Once you understand how Seneca and the transport protocol chosen work, you are immediately qualified to write a transport plugin for Seneca.
Note
When I started learning about Seneca in order to write this book, I also wrote a transport plugin to use NServiceBus (http://particular.net/).
NServiceBus is an interesting idea, it allows you to connect a number of storages and AMPQ-compliant systems and use them as clients. For example, we could be writing messages in a SQL Server table and consuming them from a queue once they get routed through NServiceBus, having immediate auditing capabilities on the history of the messages.
With such flexibility, we could potentially write a plugin that uses pretty much anything as a transport protocol.
All our code from the previous chapters is relying on callbacks. Callbacks are good as far as your code does not nest them on more than three levels.
However, there is an even better way of managing the asynchronous nature of JavaScript: promises.
Take a look at the following code:
<!doctype html>
<html lang="en">
<head>
  <meta charset="utf-8">
  <title>promise demo</title>
<script src="https://code.jquery.com/jquery-1.10.2.js"></script>
</head>
<body>

<button>Go</button>
<p>Ready...</p>
<div></div>
<div></div>
<div></div>
<div></div>

<script>
var effect = function() {
  return $( "div" ).fadeIn( 800 ).delay( 1200 ).fadeOut();
};

$( "button" ).on( "click", function() {
  $( "p" ).append( " Started... " );

  $.when( effect() ).done(function() {
  $( "p" ).append( " Finished! " );
  });
});
</script>

</body>
</html>
The preceding code is an example of the JQuery fragment using promises.
A promise, by its definition is:
A declaration or assurance that one will do something or that a particular thing will happen.
That is exactly it. If you see the preceding code, $.when, returns a promise. We don't know how long the effect function will take, but we can guarantee that once it is ready, the function inside of done will be executed. It looks very similar to callbacks, but take a look at the following code:
callhttp(url1, data1).then(function(result1) {
   // result1 is available here
   return callhttp(url2, data2);
}).then(function(result2) {
   // only result2 is available here
   return callhttp(url3, data3);
}).then(function(result3) {
   // all three are done now, final result is in result3
});
Don't try to execute it, it is just a hypothetical example, but what we are doing in there is chain promises; and that makes the code vertical instead of ending up in a pyramid-shaped program, which is a lot harder to read, as shown in the following diagram:

Seneca, by default, is not a promise-oriented framework, but (there is always a but) using Bluebird, one of the most famous promises libraries in JavaScript, we can promisify Seneca, as follows:
var Promise = require('bluebird');
var seneca = require('seneca')();

// Promisify the .act() method; to learn more about this technique see:
// http://bluebirdjs.com/docs/features.html#promisification-on-steroids
var act = Promise.promisify(seneca.act, seneca);

// Return no error and a success message to illustrate a resolved promise
seneca.add({cmd: 'resolve'}, function (args, done) {
  done(null, {message: "Yay, I've been resolved!"});
});

// Return an error to force a rejected promise
seneca.add({cmd: 'reject'}, function (args, done) {
  done(new Error("D'oh! I've been rejected."));
});

// Use the new promisified act() with no callback
act({cmd: 'resolve'})
  .then(function (result) {
  // result will be {message: "Yay, I've been resolved!"} since
  // its guaranteed to resolve
  })
  .catch(function (err) {
  // Catch any error as usual if it was rejected
  });

act({cmd: 'reject'})
  .then(function (result) {
  // Never reaches here since we throw an error on purpose
  })
  .catch(function (err) {
  // err will be set with message "D'oh! I've been rejected."
  });
There are two important details in the preceding code:
var act = Promise.promisify(seneca.act, seneca);
This creates a promisified version of the act function and its use, as follows:
act({cmd: 'reject'})
  .then(function (result) {
  // Never reaches here since we throw an error on purpose
  })
  .catch(function (err) {
  // err will be set with message "D'oh! I've been rejected."
  });
An important detail in this last fragment; instead of receiving a callback with the following two parameters:
- An error
- The results
We are chaining the following two methods:
- Then: This is executed when the promise is resolved
- Catch: This is executed if there is an error while resolving the promise
This type of constructions allows us to write the following code:
act({cmd: 'timeout'})
  .then(function (result) {
  // Never reaches here since the gate executer times out
  })
  .catch(function (err) {
  // err will be set with a timeout error thrown by the gate executer
  });
This code is handling something that we have never talked about before: the gate executor timeouts. It happens when Seneca cannot reach the destination in some situations, and it can be easily handled with a promise as shown earlier. The then part would never be executed as the function will only be called when there is an error.
There are a few well-consolidated options in the market now for promises in JavaScript. Nowadays, my preferred choice would be Bluebird (https://github.com/petkaantonov/bluebird) because of its simplicity. Q is another option used by AngularJS (one of the most popular SPA frameworks), but for day-to-day use, it looks more complicated than Bluebird.