Chapter 6. OS Interactions
Open in Browser
From within your application, you can open a link using the device’s
native browser in the same way you can within a traditional browser-based
Flex application. This is accomplished with the
URLRequest class. Simply creating a new
URLRequest and passing this into the
navigateToURL method will invoke the user’s browser to
handle the request. Figure 6-1 shows the
sample application running:
<?xml version="1.0" encoding="utf-8"?>
<s:Application xmlns:fx="http://ns.adobe.com/mxml/2009"
                  xmlns:s="library://ns.adobe.com/flex/spark">

    <fx:Script>
          <![CDATA[
               protected function sendIt_clickHandler(event:MouseEvent):void
               {
                     var s:String = "";
                     s+= address.text;
                     navigateToURL(new URLRequest(s));

               }
          ]]>
    </fx:Script>

    <fx:Declarations>
          <!-- Place non-visual elements (e.g., services, value objects) here -->
    </fx:Declarations>

    <s:Label text="URL" top="40" left="50"/>
    <s:TextInput id="address" top="30" left="160" text="http://www.happytoad.com" width="400"/>
    <s:Button id="sendIt" label="Open" click="sendIt_clickHandler(event)" top="110" left="160"/>
</s:Application>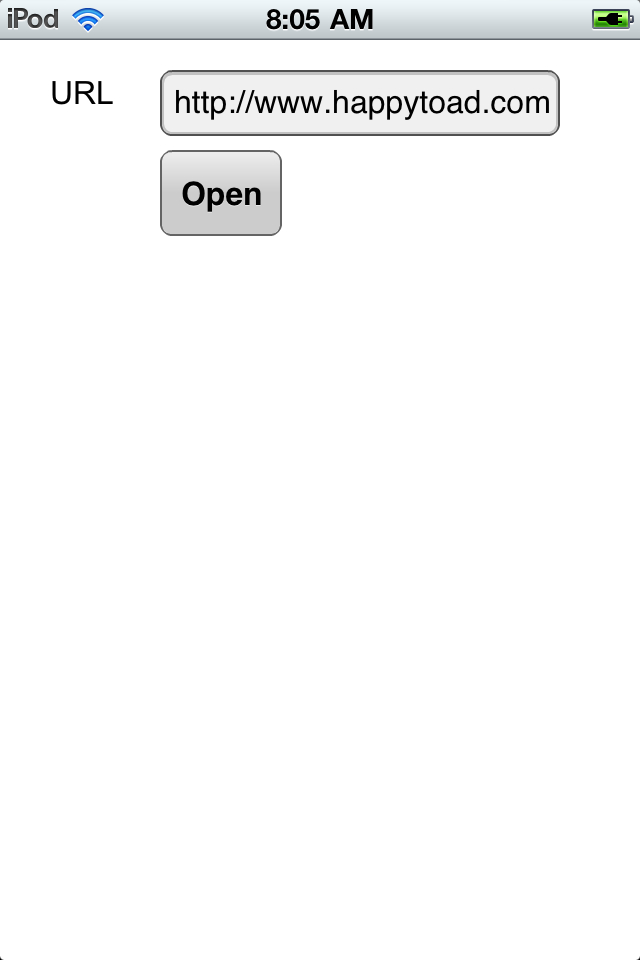
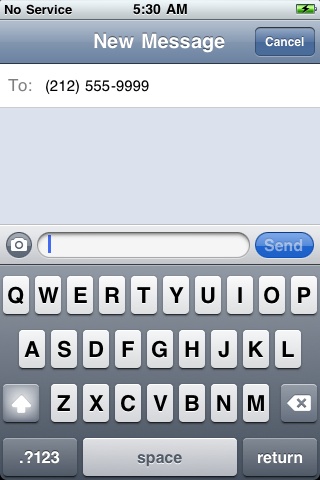
Create Text Message
The URLRequest class can be used to open the
Messages application to send text messages. By prepending the request with
sms:, iOS will launch the Messages application when
the navigateToURL method is called. Figure 6-2 shows the sample
application running and Figure 6-3 shows the Messages
application with the phone number prepopulated. Unfortunately, at this
time it is not possible to send a message along with the phone number when
opening the Messages application:
<?xml version="1.0" encoding="utf-8"?>
<s:Application xmlns:fx="http://ns.adobe.com/mxml/2009"
                  xmlns:s="library://ns.adobe.com/flex/spark">

    <fx:Script>
          <![CDATA[
               protected function sendIt_clickHandler(event:MouseEvent):void
               {
                     var s:String = "";
                     s += "sms:";
                     s+= sendTo.text;
                     navigateToURL(new URLRequest(s));

               }
          ]]>
    </fx:Script>

    <fx:Declarations>
          <!-- Place non-visual elements (e.g., services, value objects) here -->
    </fx:Declarations>

    <s:Label text="Send To" top="40" left="50"/>
    <s:TextInput id="sendTo" top="30" left="110" text="2125559999" width="200"/>
    <s:Button id="sendIt" label="Send" click="sendIt_clickHandler(event)" top="110" left="110"/>
</s:Application>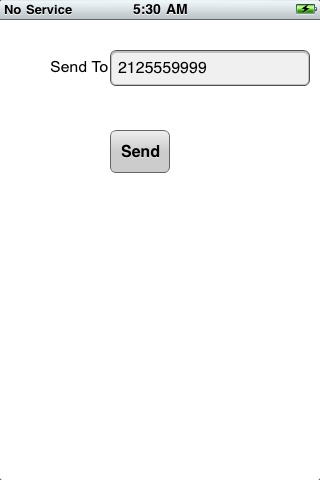
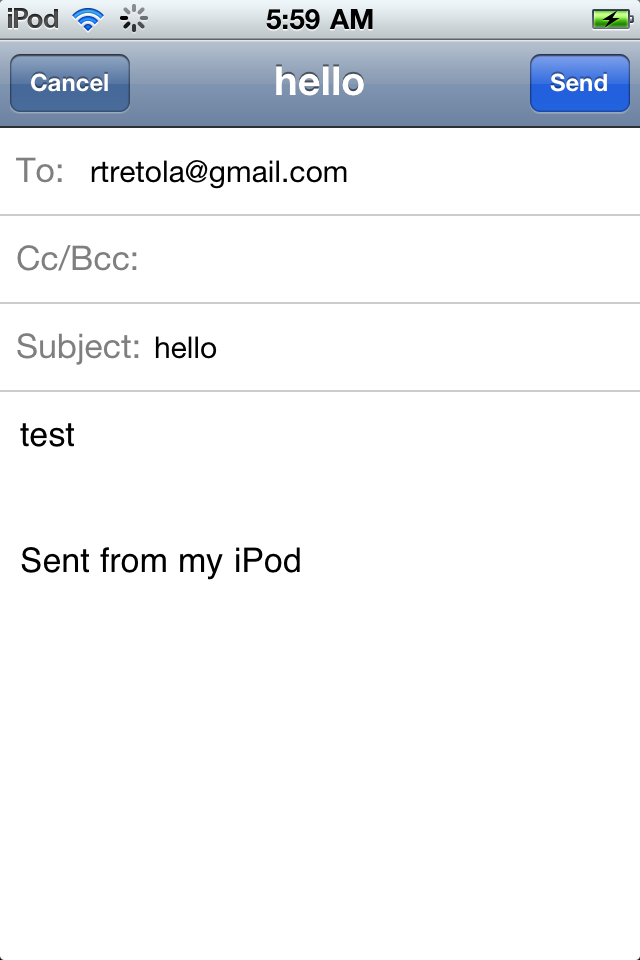
Create Email
The URLRequest class can be used to open the
Messages application to send text messages. By prepending the request with
mailto:, iOS will launch the Email application when
the navigateToURL method is called. There are several
properties that can be passed into the URLRequest to
set the send-to email address, the email subject, and the email
message.
Figure 6-4 shows the sample application running, Figure 6-5 shows the email selection window being launched after the Send button has been clicked, and Figure 6-6 shows the properties being prepopulated in the Gmail application:
<?xml version="1.0" encoding="utf-8"?>
<s:Application xmlns:fx="http://ns.adobe.com/mxml/2009"
                  xmlns:s="library://ns.adobe.com/flex/spark">

    <fx:Script>
          <![CDATA[
               protected function sendIt_clickHandler(event:MouseEvent):void
               {
                     var s:String = "";
                     s += "mailto:";
                     s+= sendTo.text;
                     s+= "?";
                     s+= "subject=";
                     s+= subject.text;
                     s+= "&";
                     s+= "body=";
                     s+= message.text;
                     navigateToURL(new URLRequest(s));

               }
          ]]>
    </fx:Script>

    <fx:Declarations>
          <!-- Place non-visual elements (e.g., services, value objects) here -->
    </fx:Declarations>

    <s:Label text="Send To" top="40" left="50"/>
    <s:TextInput id="sendTo" top="30" left="200" text="[email protected]"
        width="300"/>
    <s:Label text="Subject" top="120" left="50"/>
    <s:TextInput id="subject" top="110" left="200" text="hello" width="300"/>
    <s:Label text="Message" top="200" left="50"/>
    <s:TextInput id="message" top="190" left="200" width="300"/>
    <s:Button id="sendIt" label="Send" click="sendIt_clickHandler(event)" top="270" left="200"/>
</s:Application>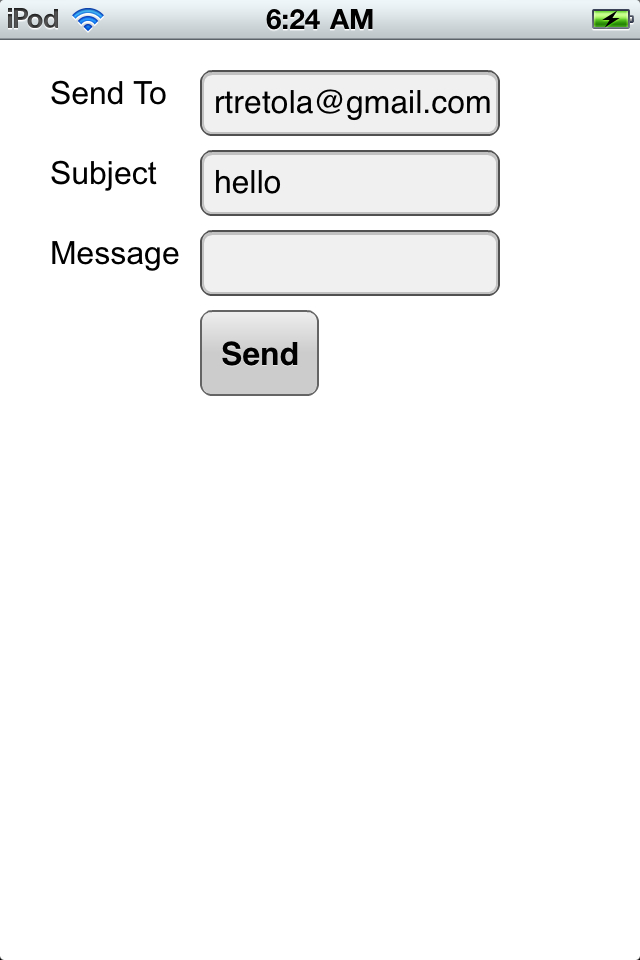
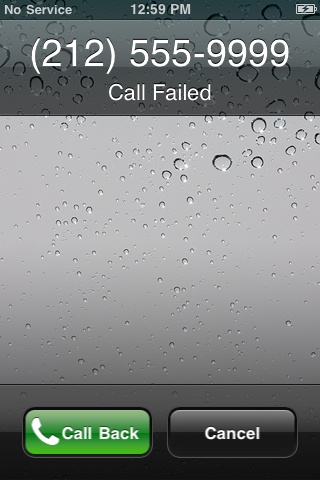
Place Call
The URLRequest class can be used to open the
Phone application to place a call. By prepending the request with
tel:, iOS will launch the Phone application when the
navigateToURL method is called. Figure 6-7 shows the sample application
running and Figure 6-8 shows
the Phone application with the phone number prepopulated:
<?xml version="1.0" encoding="utf-8"?>
<s:Application xmlns:fx="http://ns.adobe.com/mxml/2009"
                  xmlns:s="library://ns.adobe.com/flex/spark">

    <fx:Script>
          <![CDATA[
               protected function sendIt_clickHandler(event:MouseEvent):void
               {
                     var s:String = "";
                     s += "tel:";
                     s+= call.text;
                     navigateToURL(new URLRequest(s));

               }
          ]]>
    </fx:Script>

    <fx:Declarations>
          <!-- Place non-visual elements (e.g., services, value objects) here -->
    </fx:Declarations>

    <s:Label text="Phone #" top="40" left="50"/>
    <s:TextInput id="call" top="30" left="160" text="2125559999" width="250"/>
    <s:Button id="sendIt" label="Send" click="sendIt_clickHandler(event)" top="110" left="160"/>
</s:Application>
Splash Screen
Adobe has made it very easy to add a splash screen to your
application. A splash screen is an image that loads first and displays
while the application is loading. There are also several options for the
display of this splash screen. Let’s look as a basic sample, which shows
the splashScreenImage property being set to a
.png image. Figure 6-9 shows a splash
screen with the default settings:
<?xml version="1.0" encoding="utf-8"?>
<s:Application xmlns:fx="http://ns.adobe.com/mxml/2009"
                  xmlns:s="library://ns.adobe.com/flex/spark"
                  splashScreenImage="@Embed('happytoad.png')">
    <fx:Declarations>
          <!-- Place non-visual elements (e.g., services, value objects) here -->
    </fx:Declarations>
</s:Application>
There are also some options that can be set on the splash screen.
Setting the splashScreenMinimumDisplayTime and
splashScreenScaleMode properties on the
Application,
ViewNavigatorApplication, or
TabbedViewNavigatorApplication tag sets these options.
The example below sets the display time to 3 seconds and the scale mode to
stretch.
The available options for the
splashScreenScaleMode property are
letterbox, none,
stretch, and zoom. Figure 6-10 shows a splash screen
with the splashScreenScaleMode set to
stretch.
<?xml version="1.0" encoding="utf-8"?>
<s:Application xmlns:fx="http://ns.adobe.com/mxml/2009"
                  xmlns:s="library://ns.adobe.com/flex/spark"
                  splashScreenImage="@Embed('happytoad.png')"
                  splashScreenMinimumDisplayTime="3000"
                  splashScreenScaleMode="stretch">
    <fx:Declarations>
          <!-- Place non-visual elements (e.g., services, value objects) here -->
    </fx:Declarations>
</s:Application>
ViewMenu
The ViewMenu allows your application to show a
menu within your mobile application. By default, this menu will appear at
the bottom of your application. ViewMenu can only be
included within a View class. To create a ViewMenu, you
will need to define an array of viewMenuItems, with
each ViewMenuItem defined within. The sample below
shows an array of viewMenuItems with three
ViewMenuItems defined. There is also a
Button with a label of Open. The open button click
handler will call the open_clickHandler function.
Within this function, the
ViewMenu is opened when the
mx.core.FlexGlobals.topLevelApplication.viewMenuOpen is set to true.
The ViewMenu can be seen in Figure 6-11. There are also click handler functions
on each ViewMenuItem. The
close_ClickHandler is called when the close
ViewMenuItem is clicked. Within the
close_ClickHandler function, setting the
mx.core.FlexGlobals.topLevelApplication.viewMenuOpen to
false closes the ViewMenu:
<?xml version="1.0" encoding="utf-8"?>
<s:View xmlns:fx="http://ns.adobe.com/mxml/2009"
          xmlns:s="library://ns.adobe.com/flex/spark" title="HomeView">

    <fx:Script>
          <![CDATA[
               protected function open_clickHandler(event:MouseEvent):void
               {
                     mx.core.FlexGlobals.topLevelApplication.viewMenuOpen=true;
               }

               protected function newContact_clickHandler(event:MouseEvent):void
               {
                     // TODO Auto-generated method stub

               }

               protected function search_clickHandler(event:MouseEvent):void
               {
                     // TODO Auto-generated method stub

               }

               protected function close_clickHandler(event:MouseEvent):void
               {
                     mx.core.FlexGlobals.topLevelApplication.viewMenuOpen=false;
               }

          ]]>
    </fx:Script>

    <fx:Declarations>
          <!-- Place non-visual elements (e.g., services, value objects) here -->
    </fx:Declarations>
    <s:viewMenuItems>
          <s:ViewMenuItem label="Search" id="search"
                                click="search_clickHandler(event)"/>
          <s:ViewMenuItem label="New Contact" id="newContact"
                                click="newContact_clickHandler(event)"/>
          <s:ViewMenuItem label="Close" id="close"
                                click="close_clickHandler(event)"/>
    </s:viewMenuItems>
    <s:Button label="Open Menu" id="open"
                 horizontalCenter="0" verticalCenter="0"
                 click="open_clickHandler(event)"/>
</s:View>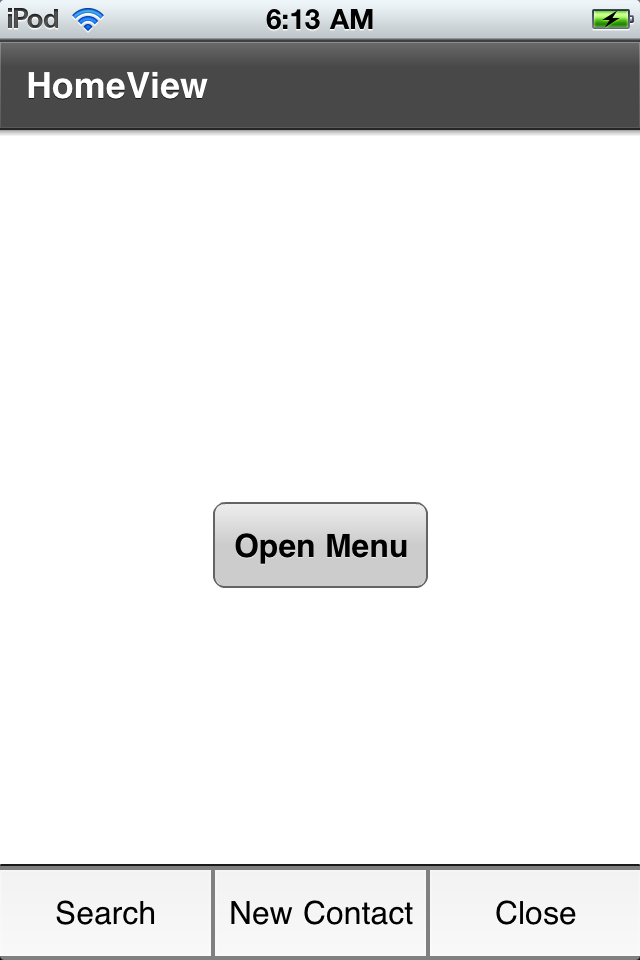
StageWebView
The StageWebView allows for web (HTML and Flash
on supported devices) and video content to be loaded into a Flex
application. StageWebView will utilize the native
browser to load HTML into your application.
Let’s review the code below. First, you will notice there is a
private variable named stageWebView declared of type
flash.media.StageWebView. Within
applicationComplete of the application, an event
handler function is called, which first checks to see if the device
supports StageWebView by reading the static property of
the StageWebView class. If this property returns as
true, a new instance of StageWebView is created, then a
new Rectangle is created, sized to fill the remaining
screen and set to the viewport property of the
stageWebView.
There is a TextInput component with the
id of urlAddress, which holds the
address that will be shown in the StageWebView and a
Button with the label GO.
Clicking on the GO button will call the
button1_clickHandler method. Within the button1_clickHandler method, the
loadURL method is called with the
urlAddress.text property passed in. This triggers the
StageWebView to load the URL.
The results can be seen within Figure 6-12:
<?xml version="1.0" encoding="utf-8"?>
<s:Application xmlns:fx="http://ns.adobe.com/mxml/2009"
                  xmlns:s="library://ns.adobe.com/flex/spark"
                  applicationComplete="application1_applicationCompleteHandler(event)">
    <fx:Script>
          <![CDATA[
               import mx.events.FlexEvent;

               private var stageWebView:StageWebView;
               private var rect:Rectangle;

               protected function application1_applicationCompleteHandler(event:FlexEvent):void
               {
                     if(StageWebView.isSupported==true){
                          stageWebView = new StageWebView();
                          stageWebView.viewPort =
new Rectangle(5,80,stage.width-10,stage.height−90);
                          stageWebView.stage = this.stage;
                     } else {
                          urlAddress.text = "StageWebView not supported";
                     }
               }

               protected function button1_clickHandler(event:MouseEvent):void
               {
                     stageWebView.loadURL(urlAddress.text);
               }

          ]]>
    </fx:Script>
    <fx:Declarations>
          <!-- Place non-visual elements (e.g., services, value objects) here -->
    </fx:Declarations>

    <s:TextInput id="urlAddress" left="5" right="80" top="15"
text="http://www.google.com"/>
    <s:Button right="5" top="5" label="GO" click="button1_clickHandler(event)"/>

</s:Application>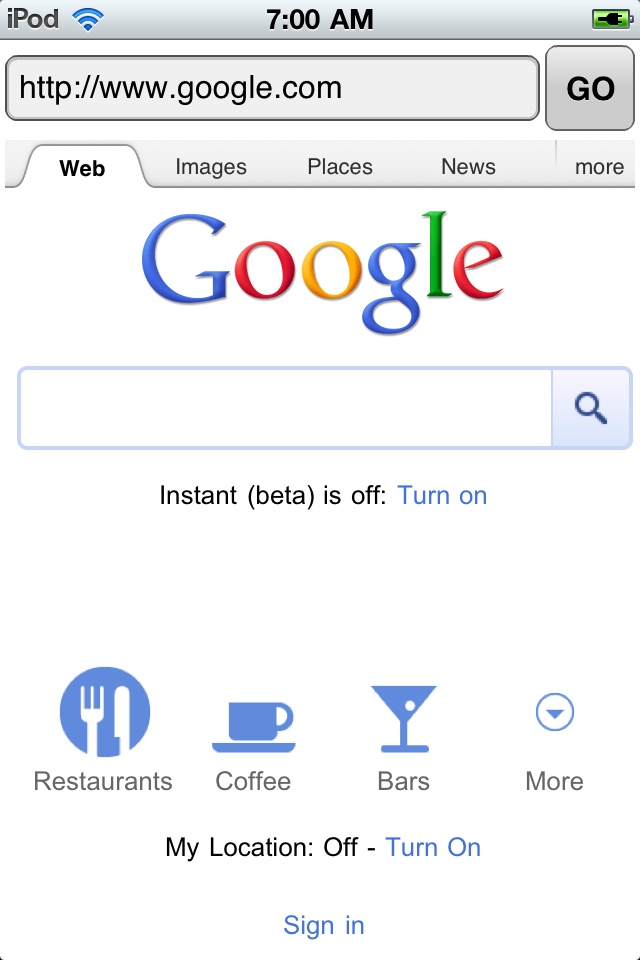
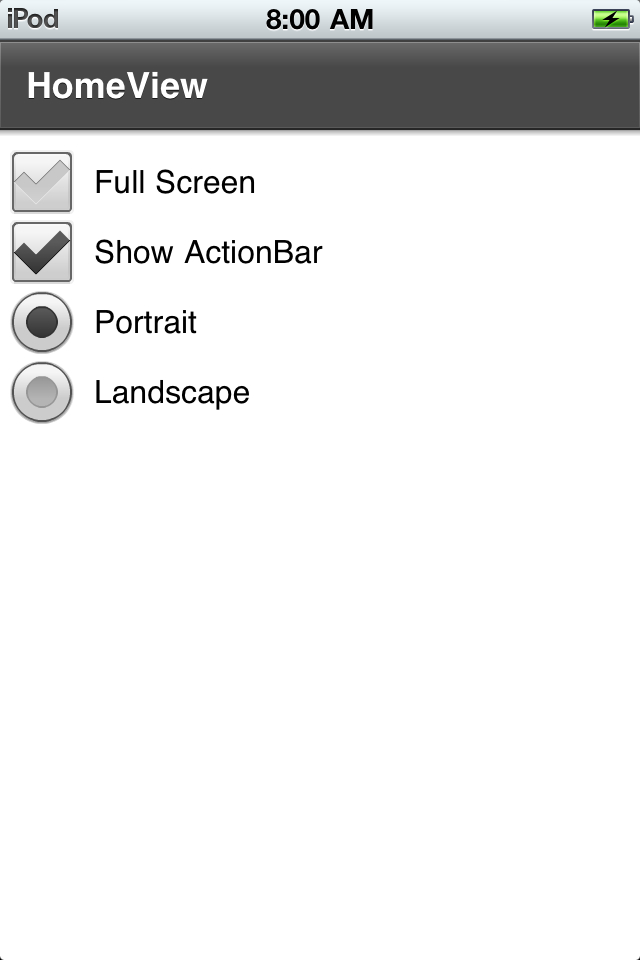
Screen Options
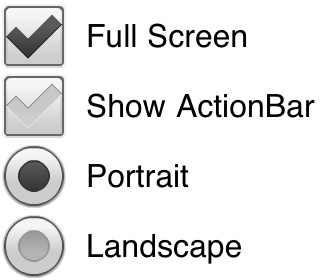
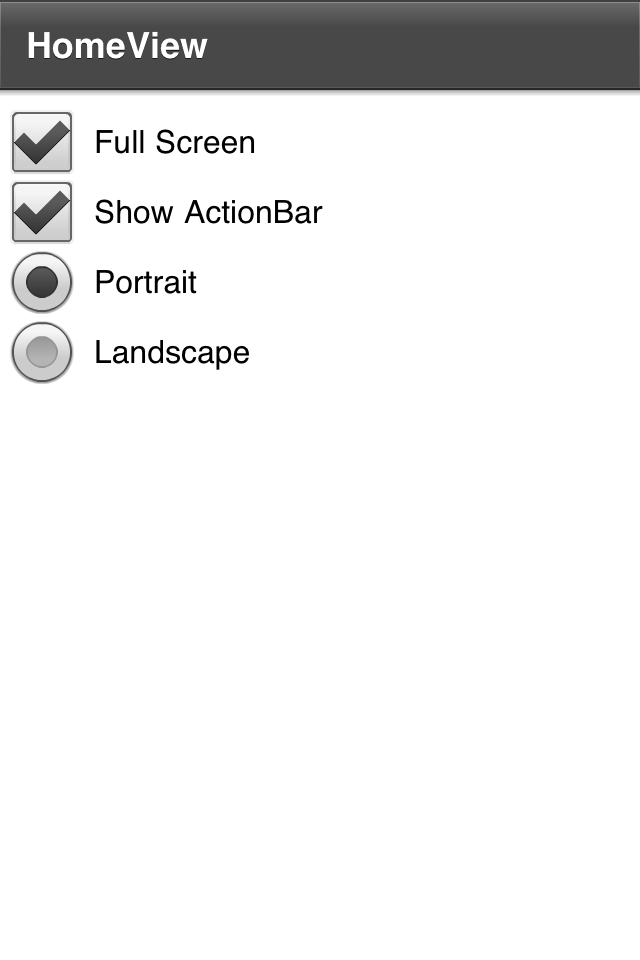
There are several options available to programmatically control several areas of the screen layout. These options include the layout of the application, whether or not to show the action bar in a view-based or tabbed application, and whether or not to show the application in full screen mode. This sample application can be seen in Figure 6-13.
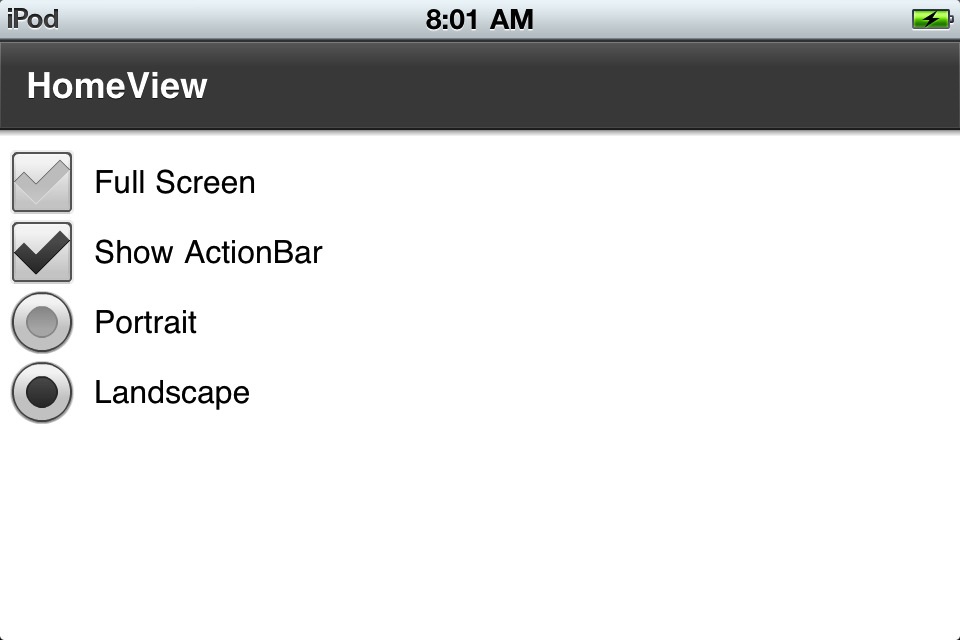
Layout
The options for your application layout are portrait (where the
application shows vertically in the device), or landscape (where the
application appears horizontally). Setting the aspect ratio by calling
the setAspectRatio method on the
stage can change the application’s layout. The
StageAspectRatio class contains two static values
that should be used to set the aspect ratio.
The code below includes a RadioGroup with the
id of orientation. There are two
RadioButton components in this
group with values of portrait and
landscape. When clicking on one of these radio
buttons, the radiobutton1_clickHandler method is
called. Within this method, the
orientation.selectedValue is tested.
If orientation.selectedValue is equal to
portrait, the stage.setAspectRatio
method is called and StageAspectRatio.PORTRAIT
is passed in. If orientation.selectedValue is equal to landscape, the
stage.setAspectRatio method is called and StageAspectRatio.LANDSCAPE is passed in.
The results can be seen in Figure 6-14.
Full Screen
Utilizing the entire screen for your mobile application is an
option that you can set within your application, and there are a few
choices when this change is requested. To put an application in full
screen mode, you will need to set the displayState
property on the stage. There are several static
properties within the StageDisplayState class that
can be used for this.
The code below includes a CheckBox with the
label “Full Screen”. This CheckBox is set to
non-selected by default, as that is the normal state of the application.
When clicking on this CheckBox to check or uncheck
the value, the checkbox1_clickHandler is called.
If the checkbox is selected, the
stage.displayState is set to StageDisplayState.FULL_SCREEN_INTERACTIVE.
If the checkbox is unselected, the stage.displayState
is set to StageDisplayState.NORMAL.
Note that the StageDisplayState also has a static
property of StageDisplayState.FULL_SCREEN. This property
can be used to put the application in full screen mode when the keyboard
is unnecessary. The results can be seen in Figure 6-15.
ActionBar
The ActionBar is the built-in navigation that comes along with the view-based or tabbed application layouts. This bar does consume significant real estate on the screen. Therefore, the option to hide and show this bar programmatically is available to you as the developer.
The code below includes a CheckBox with the
label “Show ActionBar”. This CheckBox is set to
selected by default, as that is the normal state of the
ActionBar. When clicking on this
CheckBox to check or uncheck the value, the
checkbox2_clickHandler is called. The
actionBarVisible of this View is
set to the value of the CheckBox. The results can be
seen in Figure 6-16, which
shows an application in full screen mode, with the
ActionBar hidden:
<?xml version="1.0" encoding="utf-8"?>
<s:View xmlns:fx="http://ns.adobe.com/mxml/2009"
          xmlns:s="library://ns.adobe.com/flex/spark" title="HomeView">

    <fx:Script>
          <![CDATA[
               protected function checkbox1_clickHandler(event:MouseEvent):void
               {
                     if(event.target.selected){
                          stage.displayState = StageDisplayState.FULL_SCREEN_INTERACTIVE;
                     } else {
                          stage.displayState = StageDisplayState.NORMAL;
                     }
               }

               protected function checkbox2_clickHandler(event:MouseEvent):void
               {
                     this.actionBarVisible = event.target.selected;
               }

               protected function radiobutton1_clickHandler(event:MouseEvent):void
               {
                     if(orientation.selectedValue == "portrait"){
                          stage.setAspectRatio(StageAspectRatio.PORTRAIT);
                     } else if(orientation.selectedValue == "landscape"){
                          stage.setAspectRatio(StageAspectRatio.LANDSCAPE);
                     }
               }

          ]]>
    </fx:Script>

    <fx:Declarations>
          <s:RadioButtonGroup id="orientation"/>
    </fx:Declarations>

    <s:VGroup top="20" left="10">
          <s:CheckBox click="checkbox1_clickHandler(event)" label="Full Screen"/>
          <s:CheckBox click="checkbox2_clickHandler(event)" label="Show ActionBar"
                       selected="true"/>
          <s:RadioButton groupName="orientation" value="portrait" label="Portrait"
                             click="radiobutton1_clickHandler(event)" selected="true"/>
          <s:RadioButton groupName="orientation" value="landscape" label="Landscape"
                             click="radiobutton1_clickHandler(event)"/>
    </s:VGroup>


</s:View>