
Chapter 13
Focusing on Flexibility
IN THIS CHAPTER
![]() Uncovering the flexibility benefits of static and dynamic stretching
Uncovering the flexibility benefits of static and dynamic stretching
![]() Getting some pointers on good stretching form and relaxation techniques
Getting some pointers on good stretching form and relaxation techniques
![]() Making sure you know flexibility stretches for all areas of your body
Making sure you know flexibility stretches for all areas of your body
![]() Striking some yoga poses that help make you more flexible
Striking some yoga poses that help make you more flexible
![]() Trying out some basic stretches
Trying out some basic stretches
One cornerstone physical activity that you must, must include in your fitness routine is flexibility training. It doesn’t have to take a lot of your time, but including some stretches or flexibility exercises into your daily life makes a big difference in how well you age with diabetes — and how nimble you stay throughout your lifetime.
 The sad truth is that everyone gets less flexible with each passing year, but now is the time to fight back to combat this loss.
This chapter shows you why flexibility training improves your body’s function, keeping you more limber and less likely to get injured. Basic stretches should flex all the major joints in your body regularly. Though you can do traditional (static) stretching or dynamic flexibility moves, the outcome of either type of activity is better movement. You can try some other activities like yoga, too, if you want to.
Breaking Down What Stretching Does for You
Doing stretching, yoga, or some other flexibility exercise at least several times a week is an important part of being active. Working on your flexibility keeps you doing all the activities you enjoy, along with improving your balance to keep you on your feet.
Stretching regularly can help you
- Move and reach more fully
- Relax stiff, sore, and tired muscles
- Lower your risk of sports injuries
- Prevent falls due to lack of flexibility
- Combat the loss of flexibility from aging, inactivity, and diabetes
Flexibility training is doubly important for anyone with diabetes. Everyone loses flexibility over time due to aging, but elevated blood glucose levels speed up this loss by binding to joint structures (like collagen) and making them more brittle and less flexible.
Figuring out why flexibility matters
Reduced flexibility leads to a smaller range of motion around your joints, which increases your chances of getting joint and muscle injuries. You’re also more likely to develop joint-related problems often associated with diabetes, such as diabetic frozen shoulder, tendinitis, trigger finger, and carpal tunnel syndrome.
Having decreased motion around your joints increases the likelihood of getting injured, falling, and choosing to be inactive due to your fear of falling again. Regular stretching to keep full motion around each of your joints can help prevent all these problems.
People with poorly managed and long-term diabetes are more prone to painful joint issues that can immobilize or limit movement.
Evaluating static versus dynamic stretching
You can choose to do either static (traditional) or dynamic (done during movement) types of stretching. Both increase your flexibility around joints.
You hold static stretches for at least 20 to 30 seconds; don’t bounce to get into the position. Dynamic stretching involves slow, gentle movement to induce the stretch (but still no bouncing). For example, tai chi has many dynamic stretches in its forms, while yoga incorporates more static movements. (I discuss both of these practices and their flexibility benefits later in the chapter.)
Dynamic stretches are like static ones in that they often use the same body position, but they include some extra movement. For example, instead of holding a position to stretch your calves for 15 seconds or longer, a dynamic calf stretch includes walking on your toes forward and backward and then on your heels the same way. This stretch can progress to include a heel-to-toe walk or be done faster.
Studies have compared dynamic stretching to static stretching. Doing dynamic stretching right before running improves speed more than static stretching does. But static stretching increases how far your joints can move (their range of motion) more than dynamic movements can. Static stretching programs appear to increase flexibility in your hamstrings (muscles on the back of your thigh) more than dynamic movements do in most studies. Both dynamic and static stretching have their places in your flexibility routine.
Static stretching is likely better for boosting your mobility, and you can use dynamic stretching to prepare for a sport and improve power. Choose what works best for you. Not every type of stretching is right for everyone.
Considering whether dynamic moves mean fewer injuries
Ever heard of someone pulling a hamstring after forgetting to stretch before playing a softball game? Maybe the lack of stretching wasn’t what caused that to happen. Although stretching used to be recommended to prevent injuries during activities, its ability to lower your chances of getting injured has been a controversial topic of late. The issue may also depend on what type of stretching you do beforehand.
Doing a dynamic warm-up prior to an explosive athletic activity may reduce your risk of injury. Dynamic stretching allows your muscles to tolerate the stresses of a given sport with less strain by preparing your muscles to move in a coordinated way. Or it may reduce your risk by helping you practice moving a certain way that gets rid of awkward and inefficient movements that could get you injured. In any case, there’s little or no evidence that doing static stretching before activities reduces your chances of getting injured.
 Stick with dynamic stretches before an activity if you’re trying to keep from pulling your hamstring or otherwise injury yourself.
Stretching Effectively
Ideally, stretching should be a part of every exercise session. When your muscles are cold, they’re not very pliable and are more prone to injury. You’re less likely to pull or injure a warmed muscle. The best time to stretch is likely at the end of your workout, when your muscles and joints are warm. You can also stretch after a light five-to-ten-minute warm-up or anytime during your workout if you want.
Some people benefit from doing gentle stretches after their initial warm-up and then deeper stretches at the end of the workout. See what works best for you.
Stretch the major muscle groups, including those in your calves, thighs, hips, lower back, shoulders, arms, and neck on both sides of your body. Sport-specific stretches are most beneficial, so focus on the muscles and joints that you have been or will be using during an activity. Make sure to stretch opposing muscle groups equally (like biceps and triceps in the upper arm). Activities that you should consider doing at least three days per week are dynamic or static stretching and balance training (refer to Chapter 12), as well as other activities that benefit flexibility like yoga and tai chi, which I cover later in the chapter.
To stretch safely, find the position where you can feel the stretch but not any pain. Pain indicates you need to decrease the stretch or change position to relieve it. Hold that position for at least 20 to 30 seconds to do static stretching, and repeat each stretch twice. You should never bounce when stretching; just hold your muscle in its lengthened position and relax while taking deep breaths. Remember to breathe throughout all stretching exercises. Head to the earlier section “Evaluating static versus dynamic stretching” for examples of dynamic stretching.
Reviewing Muscles and Basic Stretches
You have so many options to stretch your various muscles that you can’t go wrong when picking some to do. Just make sure to warm up first and then stretch all the major muscle groups in your neck, shoulders, and upper body, along with those in your core and lower body. Do extra stretches for any areas that feel especially tight during any flexibility routine.
Some illustrated stretches are at the end of this chapter, but you can find many online on a variety of websites. Other examples appear in Table 13-1.
TABLE 13-1 Static Stretching Exercises by Body Part
Body Part |
Area Stretched |
Stretching Exercises |
Upper body |
Neck |
Neck to side Neck to front and back |
Shoulder |
Arm across chest Arm overhead (back scratch) Arm behind back |
|
Upper arm |
Doorway Back scratch |
|
Wrists |
Wrist flexion Wrist extension |
|
Body core |
Abdominals |
Side trunk bend Cobra yoga pose Backbend |
Lower back |
Lying knees to chest Spinal twist Cat yoga pose |
|
Lower body |
Hips |
Forward lunge Sideways lunge IT band leg cross (bow) Seated butterfly Seated twist |
Quadriceps |
Standing quad Lying quad Sideways lunge |
|
Hamstrings |
Standing hamstring Modified hurdler Tip-over tuck Bridging with leg to chest |
|
Glutes |
Forward lunge Lying knees to chest |
|
Calves |
Standing calf Standing bent knee calf |
Arms, neck, and shoulders
Your shoulder joint has three main parts to its primary muscle that you need to stretch (the front, middle, and back part of your deltoids). Also, get your pectoralis muscles (pecs) on the front and your trapezius on the back of your upper torso. Flex those areas by moving your arm from the shoulder joint in various directions. For your upper arm, stretch the biceps in the front and the triceps in the back. Your wrist muscles are optional, but you can stretch them by moving your wrist in all four directions. Don’t forget to throw in a stretch for your neck that will limber up your upper back at the same time.
Core muscles
Use side stretches (alternately leaning and stretching to each side) to get some of your core muscles more flexible, including your abdominals (rectus abdominus and obliques). You can also use some yoga poses later in the chapter to stretch your abs (cobra pose) and back (cat pose) muscles.
Legs, hips, and buttocks
Stretch out the front (quadriceps) and back (hamstrings) of your thighs using either standing or lying stretches. Stand upright and bend back at your knee to bring your foot to your buttocks to stretch the front (or do the same lying on your side). You can lie on your back and pull your knees up to your chest to stretch the backs of your thighs, along with your gluteals (glutes, or buttocks muscles). Also, stretch your iliotibial band (ITB), a band of tissue that runs along the outside of your hip, thigh, and knee, as well as other hip muscles (flexors, extensors, adductors, and abductors), by crossing your legs at the knee while standing and arch and lean to the side like a bow. Don’t forget to stretch your calf muscles (gastrocnemius and soleus).
Practicing Some Yoga Poses
Yoga originated in India and stands for “union” in Sanskrit. Its practice is meant to connect the mind, body, and spirit by allowing you to hold physical poses while concentrating on being in the moment through your slowly measured breathing.
Though it’s a lower intensity activity, yoga can help your balance improve as well because it works on the endurance of muscles involved in your body core.
Practicing yoga helps you build strength and flexibility at the same time — and both are very important for everyone. Yoga also makes you more aware of your posture. Most of the standing poses are the foundation of more complex ones. Start with easy ones and work on using good form and aligning your body parts, all while keeping your balance.
Hold each yoga pose through two full breaths when you start, working up to four or five breaths as your strength and balance increase.
Basic and foundational poses
Start with these easy poses to build your foundation.
Mountain pose (Tadasana)
Standing: Essentially, this pose just practices standing up straight and tall:
- Stand as tall as possible, with your feet together and your arms straight down by your sides.
- Make all parts of your feet touch the floor evenly, expand your ribs, straighten your spine, hold your head straight up, and fully extend your hands and fingers down toward the ground.
- Hold this pose for five breaths while inhaling and exhaling through your nose (or your mouth, if using your nose is difficult for you).
Easy pose (Sukhasana)
Sitting: For this pose, sit (eventually comfortably) cross-legged on the floor (use support cushions under the sides of your legs to start out if it’s too uncomfortable):
From a seated position, cross your shins parallel to the floor, bringing each foot beneath the opposite knee.
Each time you do this pose, alternate how your legs are crossed.
- Lengthen your spine, keeping the natural arches in the spine, and sit up straight while pulling your shoulder blades toward each other.
- Place your hands on your lap or knees with palms up or down.
Staff pose (Dandasana)
Sitting: This pose practices sitting on the floor with your legs straight out:
- Sit with your legs together and stretched out in front of you, your hands next to you on the floor.
- Flex your feet, extending out through your heels.
- Pull the tops of your thighs up toward your hips and down to the floor, using your abdominal strength to help you sit straight.
- Draw your shoulders back and down along the spine, bringing the bottom of the shoulder blades toward each other.
- Keep engaging your abdominal muscles to maintain this pose.
As a variation, lift your arms straight up overhead, pointed toward the sky, and hold that position.
Cobra pose (Bhujangasana)
Lying: Done while lying on your stomach, this pose stretches out your abdominal muscles and arches your back in the opposite direction of sitting:
- Lie on your stomach, pointing your toes straight back, with your arms bent at the elbow and hands on the floor lined up with your shoulders.
- Keep your elbows bent and close to your body while you inhale and lift up from your midback to raise your just chest up off the floor.
- Lift your head and push up with your forearms to come up higher, all the way up to a point where it feels good to you.
- Bring your ribs forward, draw your upper arm bones back, and lengthen your neck, allowing you to feel the bend through your entire spine.
Look up, but only if you maintain the length in the back of your neck.
To keep your neck safe, keep the back of your neck long at all times while you’re doing this pose.- Lower your body on an exhalation, rest, and repeat Steps 2 through 5.
Follow this pose with the child’s pose in the following section to stretch your spine the other direction.
Child’s pose (Balasana)
On all fours: This resting pose curls your back opposite from the cobra pose in the preceding section:
- Kneeling on the floor, spread your knees to hip width, keeping your big toes together.
- Exhale and rest your stomach between your thighs, lowering your buttocks toward your heels and lengthening your spine.
Put your arms on the floor alongside your torso, palms up, and release the fronts of your shoulders toward the floor, forehead on the floor.
You can also stretch your arms straight out in front of you if that feels more comfortable.
- Rest in this pose for 30 seconds to a few minutes, breathing deeply.
More-advanced yoga poses
These poses are somewhat more advanced and build on the basic poses in the previous sections.
Cat pose (Majaryasana)
On all fours: This pose practices arching your back like a cat stretching and should be followed by the cow pose in the following section:
- Start on your hands and knees, looking down at the floor, with your fingers spread.
Exhale and round your spine toward the ceiling by pulling in your abdominal muscles and gently contracting your buttocks.
Try to keep your shoulders and knees in position and release your head toward the floor.
- Inhale and come back into the starting position.
Cow pose (Bitilasana)
On all fours: This pose stretches your back opposite to the cat pose:
- Start on your hands and knees in a tabletop position.
- Place your head in a neutral position, gazing toward the floor.
- Inhale, open your chest, and allow your stomach to sink toward the floor.
- Lift your head to look straight forward or look up (whatever is comfortable).
- Hold this pose before you exhale and return to a neutral tabletop position.
Downward-facing dog pose (Adho mukha svanasana)
On all fours: This pose forms an upside-down V out of your full body:
- Start on your hands and knees with your hands slightly forward of your shoulders.
- Spread your fingers and imagine clawing into the ground to create a little suction cup of air in the middle of your palm.
- While exhaling, lift your hips back and up to push yourself back into an upside-down V pose, keeping your knees initially bent.
If you can, straighten your legs while keeping the length in your spine.
Otherwise, skip to Step 5.
- Press your upper arms toward each other, keeping the space across the tops of your shoulders, and hold this position.
Chair pose (Utkatasana)
Standing: This pose is done standing, making a chair out of your lap:
- Standing with your feet together, bend your knees 90 degrees (or as close as you can to that without pain) while keeping your back straight.
- Reach your arms over your head, letting your hips move back a little toward your heels.
- Hold this pose, keeping your focus straight.
Tree pose (Vrksasana)
Standing: This pose makes you practice standing on one leg with the other foot propped against the leg you’re standing on:
Standing with your weight distributed equally on both feet and your hands in a prayer position in front of you, bend your right knee, bringing the sole of your right foot high onto your inner left thigh.
If you have trouble balancing when you first try this pose, bring your foot lower onto your left leg (just not directly on the inside of your knee).
- Keep both of your hips squared toward the front.
- Repeat this move standing on your right foot.
Half lord of the fishes pose (Ardha matsyendrasana)
Sitting: Starting from the staff pose earlier in the chapter, this position gently twists your spine:
- Sit with your legs outstretched in front of you in the staff pose.
- Lift your right knee and place your right foot on the outside of your left leg at knee height.
If you can, bend your left leg and place your left foot on the outside of your right hip.
If that doesn’t work for you, just keep your left leg extended as in Step 1.
- Place your right arm behind you, breathe in, and extend your left arm up to the ceiling.
- Bend and hook your elbow behind the knee as you twist to the right.
- With every breath in, try to lengthen your spine; on exhalation, move deeper into the twist.
- On a final exhalation, come out of the twist by moving back into the staff pose, and then repeat the twist on your other side.
Trying a Whole-Body Approach to Relax
You can try a whole-body approach to increase your flexibility through yoga, meditation, or progressive muscle relaxation exercises. When you get stressed, a common physical reaction is to tense up the muscles in your shoulders, neck, and other areas of your body, which can limit your flexibility in those areas as well.
Exercise is an important tool to manage mental stress. Gentle, slow movement like yoga and stretching can be helpful for some people to feel more relaxed overall, while others prefer to destress with more vigorous activity such as walking, swimming, or other types of aerobic exercise. In either case, relaxing is important to your mental and physical health.
One way that exercise helps with stress is by making you take deeper breaths, which brings more oxygen to your muscles and can help them relax. This kind of deep breathing is also what happens naturally as your body shifts from being awake to sleeping. More blood flow into those areas helps your joints stay more limber as well.
Training your body and mind to destress
Each time you work out, you physically damage your muscles. But you ultimately end up stronger, faster, and better, and your body responds by releasing fewer stress hormones during workouts.
 When you practice using relaxation techniques to control your stress levels, your mind learns to reduce your body’s sympathetic nervous system (fight-or-flight) stimulation and keep your adrenaline and other hormone levels lower. The more consistently you practice relaxation, the more easily you can avoid eliciting a strong stress response the next time life happens. During recovery, your parasympathetic nervous system (the opposing one is the sympathetic nervous system) keeps your heart rate low and digestion high, so it’s no wonder that a warm shower, a big meal, and a long nap after a workout make you feel more relaxed. You’re in an anabolic (building and repairing) state then, and your muscle glycogen is being restored while your muscles are being repaired and strengthened.
Lower stress with deep breathing
The negative aspect of emotional stress is that it can greatly increase your release of the hormone cortisol, which increases insulin resistance and lowers your immunity to common colds and illnesses. Feeling stressed or catching a cold or the flu due to stress greatly impacts your insulin action and metabolic health.
Whenever you start to feel stressed, try this breathing exercise to relax:
- Place one hand on your chest and the other on your abdomen.
- Take full, deep breaths in through your nose and out through your mouth, feeling your stomach push out and your chest rise.
Exhale slowly, feeling your stomach go in and your chest deflate.
Use your abdominal muscles to fully push the air out of your lungs.
- Take a series of these deep breaths to take time out and destress.
Filling your lungs with air also improves the oxygenation of your blood, which is great for your body, brain, and mental state.
Checking out a positive, stress-releasing activity
If you can lie down, try this stress-releasing activity as well. If you don’t have anywhere to lie down, or if you fall asleep easily, do this exercise sitting upright in a chair in a quiet place. Figure out what works best for you, and do it several times a day to see whether your stress levels start to go down:
- Lying down, close your eyes and take a few deep breaths.
- Try to quiet your mind by erasing all thoughts of your day or problems.
- Think about a pleasant place to be — on a beach, resting on the grass on a warm sunny day, or wherever you feel most at peace.
- Relax and visualize all the tension flowing out of your body, replacing it with calmness.
- Feel good about yourself and create positive thoughts about the changes that are taking place in your body.
Your thoughts and beliefs about yourself affect the neural connections that allow you to change your habits, so try to keep your thoughts as positive as possible.
Using visualization to perform better
Sport psychologists recommend relaxation to enhance performance in athletic events. Relaxation techniques can help you control the stress of competition as well as the stress coming from other avenues of your life.
To relax, sit quietly and focus your mind, or even try relaxing while exercising. For example, try punching the air with your fists to release your anger or anxiety and consciously relaxing the tense muscles and joints in your body — all while you’re working out.
Use your imagination to visualize more blood flowing to all the parts of your body that need it. Some studies have shown that people can enhance blood flow to their feet simply by visualizing it, verifying that a strong mind-body connection exists.
Also, take deep and steady breaths and release them slowly, particularly during your warm-up and cool-down periods when you’re not working as hard. Whenever you start to feel winded during a workout, take deeper breaths to bring more oxygen into your lungs and body.
Working on Flexibility with Some Stretching Exercises
You can do many different static stretches to flex your joints. Here are a few simple ones to get you started.
Neck stretch
Your neck is one of the main places you tense up when you’re stressed. Stretch it out as shown in Figure 13-1 to get more movement back.
- Stand with your feet apart and your knees slightly bent (or sit in a chair with your back straight and your feet on the floor).
- Relax your shoulders and bend your head toward your right shoulder.
- Hold it there for 5 seconds and then tilt it to the left for 5 seconds.
- Tip your head forward toward your chest.
- Hold this position for 5 seconds and then tilt your face toward the ceiling for 5 seconds.
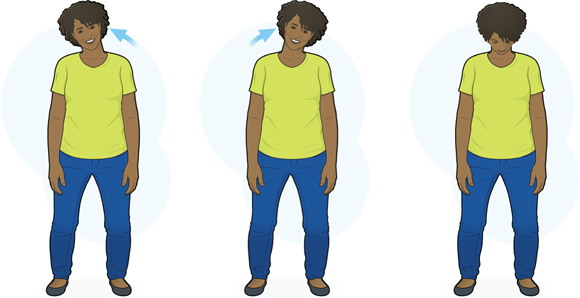
Illustration provided by the American Diabetes Association and David Priess.
FIGURE 13-1: Neck stretch.
Shoulder/upper-back stretch
The upper shoulder is an area that most people lose flexibility in over time. Practice the stretch in Figure 13-2 to keep or get some mobility back in that area.
- Stand with your feet a little apart.
- Slightly bend your knees and tense your stomach muscles.
- Relax your shoulders and pull your right arm across your chest by grabbing onto your elbow with your left hand; hold the stretch for 10 seconds.
- Repeat Step 3 with your left arm.

Illustration provided by the American Diabetes Association and David Priess.
FIGURE 13-2: Shoulder/upper-back stretch.
You can also do this exercise while seated in a chair.
Chest/shoulder stretch
You can do this stretch standing or seated. If standing, bend your knees slightly as shown in Figure 13-3; if seated, sit forward in your chair to fit your arms behind you.
- Tense your stomach and relax your shoulders.
- Try to clasp your hands behind your back, and then bring your shoulders back and push your chest forward.
- Hold the stretch for about 10 seconds.

Illustration provided by the American Diabetes Association and David Priess.
FIGURE 13-3: Chest/shoulder stretch.
Upper-back/back of arm stretch
This stretch (shown in Figure 13-4) is another essential one to keep your shoulders flexible. It’s also a good move if you like to scratch your own back.
- Stand with your feet apart, your knees slightly bent, and your stomach tensed.
- Relax your shoulders and bend your elbows while pulling your right arm straight up by pushing on the back of your right elbow with your left hand.
- Hold the stretch for 10 seconds.
- Repeat Steps 2 and 3 with your left and right arms reversed.

Illustration provided by the American Diabetes Association and David Priess.
FIGURE 13-4: Upper-back/back of arm stretch.
You can also do this exercise while seated in a chair.
Back of upper-leg stretch
Most people get some tightness in the backs of their thighs that can get worse over time. Work on reversing it with the stretch shown in Figure 13-5.
- Stand behind a chair with your legs straight, holding the back of the chair with both hands.
Bend forward from your hips, not from your waist, keeping your back and shoulders straight.
Your upper body will be over the floor.
- Hold this position for 10 seconds, relax, and repeat Step 2.
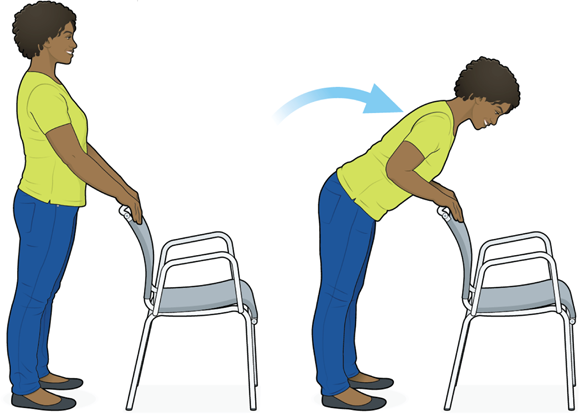
Illustration provided by the American Diabetes Association and David Priess.
FIGURE 13-5: Back of upper-leg stretch.
Calf stretch
Your calves are another area that can get too tight, especially if you ever wear shoes with heels. Work on getting your calves more flexible (Figure 13-6).
- With straight arms, put your hands on the wall in front of you.
- Place your feet shoulder-width apart.
- Move your right foot back from the wall about 12 inches while bending your left knee.
- Holding your back and your right knee straight, bend your elbows slightly; lean in a few inches toward the wall to stretch your right calf.
- Hold the stretch for about 10 seconds and then repeat Steps 3 and 4 with the other leg, again holding for 10 seconds.
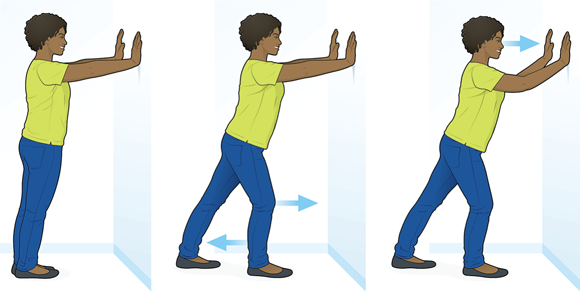
Illustration provided by the American Diabetes Association and David Priess.
FIGURE 13-6: Calf stretch.