
CHAPTER 3
Film Sound Workflows:
Then and Now
There is no right or wrong way to edit dialogues—every scene and every film will demand something different. But the aim will always be the same. The dialogue is, for the most part, where the essence of the story lies, and it will more than likely need a lot of work to ensure the audience clearly understands and comprehends the story.
Jenny Ward, supervising dialogue editor
The Great Gatsby
It's pretty obvious that the technology of filmmaking has advanced a lot since Léon Gaumont's rooster crowed for the camera. Like any other evolutionary process, there have been periods of relative calm, punctuated by moments of unimaginable change. At any time, people have felt it's never been so complicated. Yet the process of making a movie hasn't really changed that much in the past 90 years. Whether you're shooting on film or video or some sort of digital format, you still must shoot the scenes, edit the picture, edit the sound, mix it, do some sort of lab work, and go to the premiere. But periodically there have been sweeping changes in the details of sound postproduction, each time forcing editors to pay attention to zillions of details different from the zillions of details that their predecessors had to pay attention to. There's no way to keep track of all these variables, and the specifics change weekly, so what matters is to understand the process of filmmaking under various circumstances. Things happen in a certain way, in a certain order, under certain constraints. Learn how our assembly line works and you've got it figured out.
The switch from analog magnetic tracks to digital workstations has brought about a big change in the role of dialogue editor. There was no signal processing available at all, and when cutting mag tracks the only way to make a fade on a track was to scrape the emulsion off of the film. Contemplate that. Dialogue editors are now expected to not only cut the tracks, but also to build fades and combine tracks, to do obvious volume graphing and even some signal processing—things which they never had to worry about in the analogue world.
Tom Fleishman, rerecording mixer
Gangs of New York
Film Production Models
In this chapter we'll look briefly at different ways of shooting and posting films—defined either by history, by budget, or by taste. These examples are simplified, but ought to give you an idea of where moviemaking workflows are similar and where they differ. To make sense of things, I've divided modern film history into three periods. Admittedly, these divisions are somewhat arbitrary, but hopefully this model will help to understand the line connecting how we did things with how we do things.
1 Classic film model Shoot film at 24 fps, edit picture and sound on film, mix and release on film. This workflow largely petered out in the midtolate 1990s, although it's still in use.
2 Film/video hybrid model Shoot film or digital at 24 fps (or 23.976 fps), transfer film or other capture media to video or video-based file (video reference and video frame rate). Edit picture and sound, working at “real” 24 fps speed, but within a video “envelope”—PAL or NTSC, depending on where you live or work. Mix the same way, and release on film at 24 fps. This way of working began in the late 1970s and pieces of it are still incorporated into the current filmmaking pipeline.
3 Digital Cinema and other high-definition formats Shoot film or high definition at 24 fps (or 23.976 fps), maintain 24 fps (or 23.976 fps) throughout entire postproduction process (well, sort of), release on film or DCP at 24 fps. This workflow is becoming the norm, and much of the “hybrid” model is integrated into it.
Classic Film Workflow
Even the most modern moviemaking workflows are built upon the classic film model. Details change, numbers go up or down, but squint your eyes and you'll find yourself working the way they did when your grandparents went to the movies. With that in mind, you need to study the classic workflow even though you'll likely never touch a piece of film.
Since the advent of magnetic recording in the late 1950s and industry acceptance of magnetic sound film a short time later, the workflow shown in Figure 3.1 has been the model for making movie sound. Despite the overwhelming acceptance of video and Digital Cinema, there are still films made in this manner or that use big chunks of this model in their production.
The Film Shoot
During the shoot, the camera uses synchronous motors to maintain an exact speed of 24 frames per second (fps).1 On the sound side, the mono Nagra recorder (or stereo Nagra with FM pilot or stereo Nagra with timecode) records a 50 Hz or 60 Hz pilot tone onto the tape along with the audio. When it's time to shoot, you'll hear “Roll sound!” from the assistant director. The sound always starts first because (1) it takes longer for a Nagra than a camera to get up to speed, and (2) tape is much cheaper than film so no one complains about a little bit of it being wasted. Once the Nagra is locked at the proper speed, indicated by a flag on its front panel, the location mixer will say something to the effect of “Sound speeding.” Next comes the camera.
When the set, the actors, the background actors, and the photography department are absolutely ready, the assistant director will call “Roll camera!” In comes the clapper/loader, who has written the appropriate scene and take information on the slate. She stands in a place visible to the camera and audible to the microphone and verbally announces the upcoming shot. When the camera is running and locked, the camera assistant will announce, “Camera speeding.” At this point, the clapper/loader will call “Marker!” to let the world know that the clap is soon to happen (see Figure 3.2). One gentle smack of the clapper, and the deaf film camera and the blind Nagra have what it takes to find their sync in postproduction.
The Film Lab
At the end of a shooting day, or at some other sensible interval, the clapper/loader gathers up the exposed negative, labels it, and sends it to the lab for processing. The lab develops all of the negative, but to reduce costs only the takes selected by the director during the shoot are printed for screening and editing (hence the familiar command: “Cut! Print it!”). These
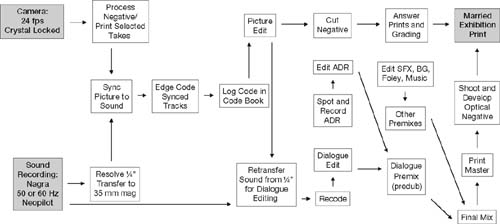

selected takes arrive at the picture cutting room in the form of positive 35 mm workprints, which will soon be organized by scene and slate, or whatever other system the picture editor chooses. But not just yet.
The ¼″ Nagra tapes, or sound rolls, are transferred to 35 mm mag stripe. To ensure that they're played back at precisely the same speed they were recorded at, a resolver attached to the Nagra compares the pilot tone recorded on the tape with the mains frequency (50 or 60 Hz) and slews the tape to the right speed. For the rest of the postproduction process, whenever sound and picture must be interlocked, the mains frequency serves as the common clock.
The Picture Cutting Room
Back in the picture cutting room, the assistant picture editor uses the slate information and claps to synchronize picture with sound. The lab rolls are broken into a more sensible order, usually by scene, and then leaders with start marks are added. Each picture/sound pair of rolls is coded with a unique series number, a several digit edge code stamped at fixed intervals on the workprint. Once printed, the edge code information is entered into the “Code Book,” a vast (usually hand-written) database also home to the scene/shot/take data for the entire film—vital for locating alternate shots, reprinting shots, and keeping things in order. Now the director and editor will sequester themselves in the cutting room for weeks or months, finally emerging with a more or less finished picture.
For quite a while now, the picture team has been handling the mag stripe that contains the production sound, coating it with perspiration, dirt, and Reuben sandwich detritus. That's why it's common to retransfer the takes from the original ¼″?tapes onto fresh mag stripe. These pristine tracks will be the raw material of the dialogue edit. The dialogue team splits the tracks into many units and works on Moviolas or flatbed editors to add tone, replace problem words, or remove noises. The fruits of their labor will be many (perhaps 20 or more tracks per reel) 1000 ft rolls of mag stripe.2
Sound Effects and ADR
Meanwhile, the rest of the sound department has been busy. The ADR supervisor spots where new lines must be recorded and prepares the volumes of paperwork necessary to manage the ADR. These lines are recorded in a studio and then edited by the ADR editor. Sound effects and background editors add texture, excitement, space, and emotion to the film. Foley, the “live” sound effects (for example, footsteps, body motion, cloth rustle, and the sounds of objects like plates, locks, and keys), are recorded and edited. Finally, the music—scored as well as acquired and practical—is edited by the music department. Like the dialogue units, these elements arrive at the mix as 1000 ft rolls of mag.
Negative Cutting
While the film's sound is becoming beautiful, the picture is having its own makeover. Negative cutters use key numbers embedded in the edge of the workprint and negative to conform the original camera negative to the picture edits made by the editor. This glued-together negative is printed to create the first real version of the film, the silent first answer print. The director and director of photography use the first answer print to make decisions about the brightness and color of each shot. This process, called color timing or grading, may require several grading sessions and prints before the film has the desired look.
The Mix
The sound elements are finished and there's a print to project, so the film is ready to mix. Rarely does a mixer string up all of the elements of a film and mix everything at the same time. Instead, the film undergoes a series of premixes (predubs) in which one group of elements is mixed in isolation. Usually the first premix is the dialogue, since production sound usually serves as the foundation on which all other sounds are built. The timbre, noise level, and attitude of the dialogue premix will determine how subtle, loud, wide, or aggressive the rest of the tracks can play. In the premixes, the editor's tracks are playing from the 1000 ft rolls of mag stripe and are recorded to 1000 ft loads of multitrack fullcoat, onto which up to six tracks can be recorded.
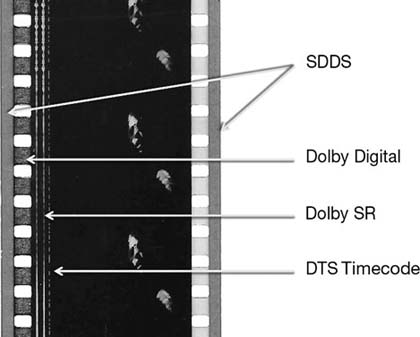
Premixes are about detail, getting the most out of the dialogue or the effects, background, and so on. Here you focus shots to direct the viewer's attention or to enhance the emotion of a scene. The premixes are combined in the final mix to create the best flow, to move the narrative forward, and to create the best “ride” for the audience. During final mix, the playback sources are the multitrack premix recordings. The final mixed sounds are recorded onto multitrack fullcoat stems, keeping the final, balanced, beautified dialogue, effects, and music separate on different fullcoats to more easily create different versions of the final film mix, whether for international, television, or airplane distribution. The stems are then combined to make a print master, whose number of channels depends on the distribution format (Dolby Stereo, Dolby Digital, SDDS, DTS, PCM for DCP). Figure 3.3 shows the standard sound formats on a theatrically distributed film print. The print master goes to a lab where it's converted to an optical negative (except in the case of DTS, where the soundtrack is stored on a CD), which is then joined with the colorcorrected printing negative to form a release print. Premiere, popcorn, fame, and fortune follow.
Take another look at Figure 3.1 before we move on. Remember, making a movie is making a movie, so if you have a good grasp of how it was done before, you can handle how it's done now and in the future.
I do think the role of a dialogue editor is changing—duties such as click removal, crackle reduction, general leveling to fit TV specs, as well as separation and editing of PFX for international mixes are all being added
to the role of dialogue editor. Compressed budgets and production schedules, along with more affordable and accessible technologies, are generally demanding more and more of every member of the sound team.
Karol Urban, CAS, MPSE; rerecording mixer
Twisted, TV series
Single-System Workflow
By now it's clear that most films are shot with two capturing devices: one for picture and another for sound. That this is called “double-system” is pretty obvious. However, there are times when the sound recorder (and sometimes even the sound team) is abandoned. It's clearly better to record with a separate sound recorder—and team—so why single-system? Almost without exception, the answer boils down to money. However, there are some cases when it actually makes sense to shoot this way:
- As recently as the Vietnam War, many war correspondents filmed with special 16 mm film cameras that recorded sound onto the film. Long before reliable video, satellite phones, and portable uplinks, this “everything in one package” roll of film stood a decent chance of getting through the line, being shipped to a lab somewhere, and shown on the news just a few days later.
- Film students first learning cinema language will likely shoot single-system, probably right into the video camera. Perhaps focusing on script, direction, composition, and light is their best introduction to the art form. Get these under their belts, and then they can begin learning the hard stuff: sound.
- A Digital Cinema shoot may record to the camera as a back-up, and a Digital Cinema documentary might send audio straight to camera for logistical reasons.
- ENG (electronic news gathering). As the Kansas Weather News crew rushes to film Aunt Em's house flying off to Oz, there's really no time for a clapperboard. News is almost always shot single-system.
—Or—
- As the Kansas Weather News crew rushes to film Aunt Em's house flying off to Oz, management had just decided on draconian budget cuts. They fired the entire sound department. Double-system is no longer an option.
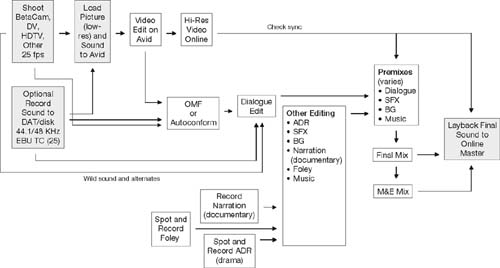
Once you catch on to the classic film workflow, it's nothing to manage a single-system video project. In fact, since sound and image are captured on one medium (usually video), there's only one significant difference from the old way: There's nothing to sync. Workflows are identical in NTSC and PAL; only the frame rates and reference frequency differ. But even that is pretty transparent to you. Figure 3.4 shows a PAL single-system workflow.
Film/Video Hybrid Workflow
Once it became clear that nonlinear editing wasn't a passing fad and that DAWs are here to stay, it was obvious that we'd have to rethink the way we relate to film. When we left the purely sprocket-based production models, we left the nest. The perils in the path from analogue to digital pipelines stem not from the fact that sound and picture in modern editing have been digitized but rather that the picture almost always has to be transferred to some sort of video, which have different timebases from that of film. Countless sample rates, pullups, pulldowns, transfer speeds, and timecode types may lead you to believe that digital audio postproduction is a hopeless maze of variables, any of which are poised to trip you up.
Remember, sound is not the only player in the postproduction game. Once the film is locked, there must be a reliable and predictable way to conform the original negative from the camera to match the editor's masterpiece. This process is called “negative cutting” or “negative matching.” It's got to be right, but can be a source of head-scratching until you get used to it.
Forget the details—for now—and look at this new-fangled film workflow that's wrapped up in a video blanket. You'll find it's not very different from the film model. And remember, it all comes down to two variables:
- How was it shot?
- How and where will postproduction take place?
Moviemaking in this hybrid universe isn't all that different from when picture meant film and sounds were on mag. But the small differences between those worlds can be crippling if ignored. Two steps in the process require great attention.
- First, the film must be transferred to videotape while maintaining an absolute reference between a frame of film and its matching video frame to ensure accurate negative matching.
- Second, you must remember that NTSC video doesn't run at 60 Hz (30 fps) but rather at 59.94 Hz (29.97 fps).
If you keep your wits about you regarding the telecine transfer and pay attention to sample rates, you'll find electronic editing pretty straightforward.
Negative Cutting in the Hybrid World
Conforming negative was straightforward in the days of sprockets. You simply put the 35 mm workprint into a sync block, read the key numbers from the print, and found the corresponding piece of negative. Snip. Simple. Now we edit on workstations that offer countless creative advantages over film, but which make negative matching more complicated. You can't load film negative directly into a workstation; in the hybrid workflow you must first transfer the image to videotape or at least create some sort of a video-like stream and work with that. Since neither PAL nor NTSC video runs at film speed, maintaining a relationship between film frames and video frames seems a bit of a black art.
In the NTSC world, the transfer from film (24 fps) to tape (30 fps) is accomplished by scanning one frame of negative onto two successive fields of video, then scanning the next frame onto three fields of video, and so on (see Figure 3.5). This cycle, called the 2:3:2 pulldown,3 continues for frames A, B, C, and D; on the fifth frame the cycle starts over.4 As long as the transfer

engineer takes care to start this “A-frame” cycle at the right place and then carefully logs all of the appropriate information into a FLEx file, the Avid can keep track of the redundant fields and deliver a reliable negative cut list. During telecine, and for the rest of the postproduction process until the picture is again on film, all picture and sound elements are slowed by 0.1 percent, to the NTSC crystal rate of 59.94 Hz. Throughout postproduction in the video/computer world, sound and picture run at 29.97 fps.
Back on the other side of the ocean, PAL folks don't even try to transfer the 24 fps negative to videotape at its natural speed. Instead, they accelerate it to 25 fps and transfer it directly to tape with no interfield shenanigans.5 The upside of this procedure is that there develops a direct relationship of film frames to video frames (25 film frames = 25 video frames), so it's easy to establish a database that will form the basis of the negative cut list. The downside is that after telecine transfer you're left with a videotape or QuickTime file whose picture runs 4 percent fast, so you can't sync with your audio—yet. There are no quick video sound dailies in PAL.
Once the negative is transferred to tape, the speeded-up picture is loaded into the Avid, FCP, Adobe Premier Pro, or any other NLE. The workstation is then placed in “film mode,” which slows the film to its native 24 fps, keeping track of which fields the workstation doubled to make the speed change. Now the sound—which never changed speed—is loaded into the workstation and synced with the picture. As in the NTSC model, the picture assistant will create a database that contains scene, take, timecode, sound roll number, and so on—derived largely from the metadata created at the shoot. This information will again present itself as a negative cut list for the lab and an edit decision list (EDL) for the sound department (see Chapter 7).
When picture editing is complete, the original camera negative (OCN) must, at last, be conformed to match the offline movie. There are two ways of going about this:
Negative Cutting the Old Way
During the shoot, the film arrives at the lab regularly, and the OCN is safely stored. A database is established so that the lab knows how to find every take. Once the film is edited, negative cutters locate (“pull”) the necessary negative, using timecode from the video EDL, combined with the database from the telecine. They then cut the original negative, either precisely, or by full takes (called “flash to flash”). They assemble these pulls and make a series of test prints. From there come the positives, negatives, and other prints necessary to release the film.
Negative Cutting the New Way
Rather that cutting the negative, shots are transferred to very high-resolution files that, in essence, replace the negative for the rest of the lab process. Conforming the pristine 2K, 4K, or bigger files to match the offline, correcting the color, creating visual FX, and then, at the end of picture lab work, scanning to film or creating a DCP file—this process is called the digital intermediate, or simply DI.
Working in an NTSC Environment
Pullups, pulldowns, impossible-to-remember sample rates, noninteger frame rates—these are the intricacies of NTSC video. Those used to jumping through these hoops take it all for granted. But to those accustomed to working in PAL, undertaking a project in NTSC is intimidating.
Actually, there's only one truth you must respect to avoid the pitfalls of NTSC:
at any given stage in the process, picture and sound must have the same Reference.
Whether sound was recorded at “film speed” or “pulled down” to NTSC video speed, keep the picture and the sound at the same reference at any given step and you'll have no problems.6 You can pull up and pull down as many times as you want; just do the same to sound and picture at each step and your NTSC blues will vanish.
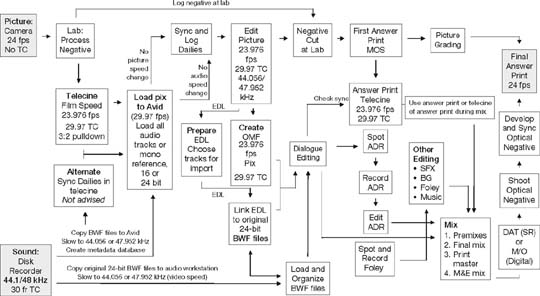
When picture editing is finished, the editor makes an OMF and EDLs for the sound department. The OMF (see Chapter 7) is a postproduction Rosetta Stone that enables the dialogue editor to work directly with the tracks from the Avid. The EDL and the original field recordings are used by the sound team to recreate the picture editor's sound edits—if necessary—by going back to the original recordings. If these contain many channels—isolated tracks for booms and each of several radio mics—the picture assistant or sound assistant will assemble the film using the EDLs to automatically recreate all of the picture editor's sound edits with audio from the original tapes.
From this point on, electronic postproduction resembles the mechanical film model. It's true that during the mix, sounds will play from a DAW, and will likely be recorded to a hard disk recorder rather than to fullcoat, but those differences are cosmetic rather than structural.
Shoot Film (24 fps), Record Sound on Hard Disk Recorder, Edit Picture and Sound in NTSC
Once again: Over the course of production and postproduction, the image and sound will speed up and slow down several times between film and video speed (see Figure 3.6), but as long as they work in tandem, there will be no problems. Really.
A Note about Drop-Frame Timecode
Let's get something straight. “Non-drop-frame timecode” does not mean 30 fps and “drop-frame timecode” does not mean 29.97 fps. The dropness or nondropness of a timecode has to do with how it counts, not how fast it runs. A drop-frame calendar (say, the Gregorian) includes leap years to keep it in sync with the solar year, while a non-drop-frame calendar (the Islamic, for instance, for which the lunar cycle is paramount) has no mechanism to keep it in solar sync. Both calendars run at the same rate—a day is a day, an hour is an hour, a minute is a minute. But one has a built-in “hitch” to force it back into sync with the seasons, while the other doesn't. Christmas always holds a hope of snow, but Ramadan can occur in any season.
Both non-drop-frame and drop-frame timecode count 30 frames per second, 60 seconds per minute, and so forth. The difference is that with 29.97 dropframe timecode an hour of timecode equals an hour of clock time because the counting mechanism has a way of realigning with reality, whereas an hour of 29.97 non-drop-frame timecode is three seconds and 18 frames longer than a clock hour. Still, despite its lack of respect for the clock, non-drop-frame's simplicity makes it the standard in film production.
Normally on the shoot—except that there is no “normally”—the camera, whether film or Digital Cinema, will roll either at 24 fps and sound at 48 kHz, or at 23.976 fps with sound at 47.952 kHz. The rest of the process resembles the mechanical film model, even though the equipment is a bit more modern. Throughout the remainder of this double-system workflow, picture and sound remain locked to video reference, 59.94 Hz. Even the mix, where you're likely watching a projected film image rather than a videotape, will usually occur at 59.94 Hz. If you're editing at 47.952 kHz and want to add some new synchronous material—music, for example—it must be loaded at video, not film, speed. Otherwise, you'll have two conflicting timebases within your edit list—a good formula for losing sync.
Only when the negative is cut or the Digital Cinema files are conformed, the film is printed, and the mix is complete is the film projected at its “natural” speed of 24 fps.

Working in a PAL Environment
The PAL world, with its 25 fps, 50 Hz fixed realities and never a dropped frame, is decidedly less complicated than its North American cousin.7 Of course, filmmaking in an NTSC environment is also a snap once you've caught on. Still, it's very comfortable living in a world in which 25 fps really is 25 fps.
Shoot Film (24 fps) or Tape, Record Sound on Hard Disk Recorder, Edit in PAL
Unlike its NTSC relative, where the picture department has it pretty easy (except for policing the telecine transfer for proper A-framing), double-system PAL is very easy on the sound department but requires a bit of thinking by the picture editor (see Figure 3.7). The fundamental problem is that film runs at 24 fps and PAL video runs at 25. Given this reality, there's no elegant way to maintain proper speed and sync while transferring from film to PAL videotape.
Unlike the highly regular NTSC 2:3:2 pulldown, which is jitter-free to normal humans, the PAL 24–25 telecine transfer adds one highly visible repeated field every 12 frames. Films transferred to PAL at 24 fps display a tell-tale twice-per-second bump in what should be smooth motion, such as camera pans or slow car-bys.
The hard disk records 25 fps timecode, since the project will be edited in a PAL environment. The speed of the sound, which has a reference of 48 kHz, will never change, whereas the picture will make a brief foray from 24 fps (90 feet/minute) to 25 fps (93 feet, 12 frames/minute) and back. The picture that the sound department works with will have a timebase of 24 fps, but negative cutters usually request a 25 fps picture for their purposes. The first answer print is transferred to video or QuickTime at 24 fps, not 25, as picture must stay at its natural speed at this point in the process. As a result, the telecine of the first answer print always displays the revealing bump that comes from repeating a frame each second. The speed is right, but the motion looks goofy.
Digital Cinema
During an amazingly brief period of time, film workflow changed immeas — urably. Not since the Talkies imposed their voice on the way movies are
Audio Workflow Example: Large American Television Drama
1. Record location sound to camera and 744T at 23.976 fps, 24-bit, 48 kHz.
2. After picture edit, use Titan and EDLs to assemble and sync multichannel original audio to match episode editor's cut.
3. Review the tracks:
- From the assembled original sound files, select tracks that will likely be useful in editing and mixing.
- Examine tracks for technical problems (e.g., excessive ambient noise and other unwanted sounds, and mis-delivered words).
- Look for alternate takes to solve these problems; call for ADR for technical problems that can't be fixed this way.
4. Meet with ADR supervisor, executive producer and other relevant producers, the picture editor of that particular episode, composer and music editor. Discuss specific sound concepts for the episode.
5. All editing departments work simultaneously:
- Dialogue editors begin to work with the most recent version. AAF is imported for reference.
- ADR is spotted and recorded. ADR editor is cutting tracks throughout the recording process.
- SFX editors begin with backgrounds and then hard effects. Production FX are incorporated if appropriate.
6. Foley session is cued and prepared two days before Foley recording is scheduled.
7. Ongoing picture changes are conformed using Conformalizer. All departments must take great care that conforms are complete and that any damage caused by the process is corrected.
8. Two-day mix:
- Prior to the mix, SFX, dialogue, Foley and group ADR sessions are predubbed. This leaves more time for creative decisions during the mix.
- Most of the mixing work is done on the first day.
- Episode picture editor evaluates the mix on the morning of the second mix day.
- Changes made as necessary. Executive producer then evaluates the mix.
- Final changes.
9. Episodes mixed to numerous stems: 5.1 surround sound, LTRT, and separate stems that allow the international versions to be made. M&E mixed on a separate mix day.
10. All sessions are redundantly backed up and stored at different locations.
Turnaround time for one episode is ideally seven to ten days. Editors officially get five days for FX, ADR, and dialogue. Foley is cued (one day), walked (two days), and cut/predubbed in one day.
Wilson Dyer MPSE
Sound Supervisor, NCIS-LA
made—scriptwriting and direction, production, postproduction, distribution, and even marketing—have we seen such widespread changes. Digital Cinema has revolutionized the visual side of things: Cinematography, picture editing, color correction, lab work, and projection. But seen from a distance, it hasn't affected us all that much.
Digital Cinema is not a brand, nor is it a format. It's a set of standards and specifications compiled by Digital Cinema Initiatives, a joint venture of many major studios. Its purpose is to ensure a uniform and high level of technical performance, reliability, and quality control through the entire Digital Cinema workflow.8 Digital Cinema files are spectacularly high resolution when compared to traditional video (2048 × 1080 “2K,” 4096 x 2160 “4K,” and even larger).
There are many players on the Digital Cinema (DC) pitch, each with their own peculiarities of dealing with Digital Cinema workflow. But they all work in more or less the same way. From an audio perspective, Digital Cinema workflow is weirdly similar to the original film model, that is, once everyone agrees on the reference rate. Depending on the needs of postproduction and distribution, there are numerous paths a workflow may take.
Before embarking on a Digital Cinema project, it's essential that all the players know how the project will be shot, recorded, edited, conformed, and delivered. Since Digital Cinema Package specifies 24 fps picture with an audio sample rate of 48 kHz, the end of the production path must lead there.
By far the simplest workflow is to shoot at 24 fps, record at 48 kHz, conduct picture and sound postproduction at these rates, then make a DCP at its specified rate of 24 fps/48 kHz. This work model, with its unchanging speeds, most closely resembles the classic model, but for reasons described below, it's more common (at least in NTSC countries) to work with a frame rate of 23.976 and a timebase of 59.94 Hz. At first glance, this changes nothing: It's no problem for a Digital Cinema camera to shoot referenced to 59.94 Hz rather than 60, nor is it magic to record sound at that rate. Plus, you can easily shoot and record at normal speeds and slow both to the video timebase. Either way you end up with a postproduction workflow that never changes speed—until it's time to make the DCP. Why, though, work at a timebase of 59.94 when the much more sensible 60 Hz is the target? There are two basic reasons for this:
- There is a massively expensive, deeply embedded NTSC infrastructure already in place. Why unnecessarily throw it out when you can easily adapt the workflow to your needs?
- Much high-end digital production is bound for television, not cinema. With the pulldown already in place, life is much easier when mastering for non-cinema outlets. Sooner or later a project will need to be downconverted to a non-HD format that runs at video speed—it's easy to do this from a master that's already running at the right speed.
Don't be surprised to encounter 23.976 workflows in non-NTSC countries— it's becoming a common way to work, even in the least likely of places. While there's a lot to be said for standardization, this 23.976 work model can be a headache in PAL countries.
Digital Cinema, as well as high definition, offer more options when shooting and recording for NTSC television. As you saw previously in Wilson Dyer's television workflow, it's common to shoot at 23.976 with an audio sample rate of 48 kHz. This way, the speed goes unchanged throughout the post production process, and is ready-made for downconverting to broadcast standards. Similarly, you can shoot at 24 fps and capture audio at 48,048 Hz. In post, picture and sound alike will be pulled down to video rate. Once again we end up with 23.976 fps/48 kHz. The list of possibilities, if not endless, is pretty long.
When recording or editing for Digital Cinema, take the same precautions as you did when working in the hybrid film/video model. Talk to the supervising sound editor or whoever else is in charge of workflow—everyone must know the speed of sound and picture at every step in the process, and how it got that way. But don't let the glorious name Digital Cinema scare you; there's nothing particularly difficult about editing this way.9
________________
1. Actually, most cameras can run at several fixed speeds, such at 23.976, 24, 25, 29.97, and 30 fps. Many can be adjusted to run at a number of “non-sync” speeds to give the effect of speeding up or slowing down the action. However, you can't record sync sound at such “unreal” speeds.
2. In the 21st century it seems quaint to still speak of film in terms of feet and inches. But film is elegantly gauged for the imperial system. So a minute of film is 90 feet rather than 27.432 meters. Two seconds of life take up three feet of film, not 0.9144 meters. And a foot is 16 frames, while a meter is 52.48 frames.
3. The 2:3:2 pulldown has many names: 3:2 pulldown, 2:3 pulldown, and so on. It's all the same thing.
4. See Norman Hollyn, The Film Editing Room Handbook, Third Edition (Los Angeles: Lone Eagle Press, 1999, pp. 105–14). See also Alan Stewart, “2–3 Pulldown Explained,” (www.zerocut.com/tech/pulldown.html).
5. There is a PAL postproduction method in which film negative is transferred to tape at 24 fps before loading the Avid, to allow for sound dailies. However, the 25 fps technique is more common.
6. There are many ways to face this pull-up/pull-down conundrum, but the method described here is one of the most common.
7. Douglas Murray, “PAL Basics: Film Sound for the Rest of the World” The Motion Picture Editors Guild Magazine (vol. 23, no. 2, March/April 2002).
8. Digital Cinema Initiatives: About DCI, 2012 (www.dcimovies.com).
9. Georgia Hilton MPE, MPSE, CAS. Correspondence, June 2012. (See www.hiltonmm.com.)