
CHAPTER 8
Working with Picture
Picture plays a huge role in cinematic storytelling—almost rivaling sound in importance. But for the magic of movies to do its trick, image and sound must work together—in sync—as the filmmaker imagined and common sense dictates. We must edit with faith that what we see is, indeed, in sync. It's ironic that throughout the filmmaking workflow, sync is more or less assured. Yet when we most need confidence in what we see and hear—during sound postproduction—sync is least certain.
As workstations become smarter and cheaper, syncing sound and picture is, in many cases, more about voodoo than it was in the past. Today sound is always edited on some sort of computer application and picture inevitably arrives as a video file. Specifications change weekly, and just when you think you've got all sorted, out pops a new codec or wrapper that upsets your delicate grasp of how to make things work. Since staying on top of the trends is a losing battle, you're best off learning the basics of how digital picture is recorded, why it is the way it is when it gets to you, and what you can do to make it work—this time and the next. In keeping with my mantra that understanding the past helps guide us through the present, here's a tiny explanation of how we got to where we are. If you're tired of my history lessons, I won't be hurt: skip to the next section, “The Trouble with Digital Picture.”
A Brief History of Editing Sound Locked to Picture
When movies were shot on film, picture was edited on film, and all audio post was done on film, sync was a reality, not something to hope for. Lowbudget, high-budget, any-budget film; getting sound and picture in sync and keeping it there was pretty bulletproof. That's because film has perforations, the little holes on both sides of the frame (see Figure 8.1). Clutched by

sprockets in the camera, editing machine, dubbers, and mix recorders, the “perfs” all but guarantee that once you line up to some sort of sync mark, everybody runs in lockstep (see Figure 8.2). What kept all these machines glued together was biphase. This clever syncing system that predates timecode by decades is built around a 240 Hz pulse stream generated by the tachometers of projectors, dubbers, and the like. Since these pulses occur ten times per film frame, biphase can be used to accurately share information about speed and direction. The whole chain was referenced to the frequency of the local electrical grid—the “mains”—which made sync nearly fool proof. Yet while it's great for keeping a chain of playback and record machines in sync with a projector, biphase contains no address information. A mishap with any of the machines—a break in the film, a ripped perforation, a splice come apart—means that sync is lost. The only recourse is to return to the start mark or to some other reference and re-sync all the elements. In this sense, a classic film chain is akin to the Vitaphone of the 1920s.
With the ascendance of linear videotape editing in the 1970s, video players and recorders, along with multitrack audio recorders, began to replace Steenbecks, KEMs, Moviolas, and dubbers in certain types of film production. Shooting lots of footage on videotape is much cheaper than shooting it on film, so the technology was embraced by documentary film- makers, despite numerous disadvantages in postproduction. Offline editing was rarely accurate, often unreliable, and always tedious. Online video sessions were shockingly expensive and frustrating ordeals. It was not uncommon to use three 1” video players and one such recorder, all synchronized to a video switcher and controlled by a computer terminal. “Complicated” sound editing and mixing required yet more expensive, finicky machines to play on demand. Such complex communication was beyond the capabilities of road-tested biphase, since it carries none of the address information that's at the heart of linear tape editing. Machines had to move about and

synchronize with each other, not simply establish sync once and then roll as a group. This is where timecode came in handy.
SMPTE timecode is a frame numbering system that assigns a specific number to each frame of video in the format of hours, minutes, seconds, and frames. While biphase can tell you how fast you're going and in which direction, timecode lets you find your way home regard-less of where you're coming from.
Linear video editing, whose speed was policed by video reference—black burst—and whose addressing was determined by timecode, offered pretty solid synchronization between sound and image. Synchronization worked, but not without headaches. As machine sophistication grew, so did the possibility of problems. Still, we got through it.
When nonlinear DAWs appeared in the 1980s, a new challenge reared its head: how to synchronize computer-based sound to film or video picture. Videotape had long carried timecode, so in theory it wasn't too difficult to lock a machine that outputs timecode with a DAW that can ingest it. How ever, locking a DAW to a film chain posed more daunting problems. Film chains had to be refitted to lock to a video reference—rather than mains—and engineers the world over had to figure out how to convince workstations to follow the lead of projectors and dubbers. All sorts of solutions were devised. Some early adopters printed timecode on magnetic film that was part of a chain locked to a video reference and fed this code to the TC reader of a DAW. The workstation was set to chase this stream of timecode. Although a shockingly primitive way to use a very expensive work station, this reel of mag stripe with timecode managed to do the trick. Over time, biphase-to-timecode converters were perfected, and synchronizers designed to lock together multitrack recorders and video players were modified to marry film chains and workstations. As long as workstations were chasing something “real,” whether biphase from a film chain or timecode from videotape, it was reasonable to assume that once a system's kinks were worked out, sound and picture would stay in sync. Then came digital picture files.
Combining random access with very low cost and easy copying, digital files are a dream come true for editing or mixing film sound. Click anywhere on an audio workstation's timeline and the picture cues instantly. Load the new online or color-corrected version of a film you've been working on and you'll be editing with the revised picture in seconds. Picture files are easily sent to colleagues or clients, and you can put lots of them on your pocket flash drive. Perfect, right? Well, almost.
The Trouble with Digital Picture
(If you skipped the history section, this is where you rejoin us.)
In theory, a picture file in a computer will flawlessly sync with a DAW session playing from the same computer. Sometimes it does. Other times, picture or sound will be systematically delayed. Or sync may be spot on one time you hit play, and soft the next. Or worst of all, sound and image may weave aimlessly in and out of sync. What's behind this foolishness? Here's an overview of some of the causes.1 The details come later.
- It takes longer to process a video signal than audio, so it's not unusual to hear it and then see it. This is a problem. Given that light travels significantly faster than sound, we're accustomed to sound arriving a bit late. It goes against nature to hear something before we see it.2
- Good old-fashioned CRT monitors were analogue and showed virtually no delay between incoming signal and the picture shown on the screen. Today's video displays use digital video processers to drive the flat panels, and that processing imposes a delay.
- Unless your editing system and everything attached to it are locked to an external clock source, you are much more likely to encounter unpredictable sync drift.
- Each codec compresses and decompresses data in its own manner. This results in different CPU and bandwidth demands from one codec to the next, which in turn affect sync.
- Some codecs prefer one wrapper over another. A mismatch here can result in inconsistent lock-ups.
- There are many hardware considerations (video cards, drives, CPU, memory) that will greatly affect sync. These will be discussed later.
- You could, of course, have a sample rate mismatch (e.g., 48 kHz/47.952 kHz), but this problem is common to all playback systems, so it's not worth getting into here.
Figuring out how to get your client's video in sync with your workstation isn't really rocket science. But—like everything else in dialogue editing—it requires communication. From the photography crew that creates the initial image files to the picture editing facility that delivers them to you, there are plenty of variables, and plenty of possibilities, to get things wrong. But a little planning can put the odds in your favor. In the last chapter we looked at the specification sheet that you provide for the production company well before your job begins. This lists the things you must have in order to get to work. Being sound people, most of our demands have to do with the audio side of things. However, you must also specify the video format that you need in order to make for happy audio postproduction. Of course, when it comes to picture, things often work backward: The client tells you what to expect and you must adapt. Either way, you're OK, as long as you give it enough lead time.
Get Your System Ready for Digital Video
The most common obstacle between you and happy sync is hardware—your hardware. Inadequate RAM, sluggish processor, slow or fragmented drives, too many drives on a bus … the list goes on.3 Heavy editing sessions and streaming video each crave resources. So, what can you do to get things in sync and keep them there?
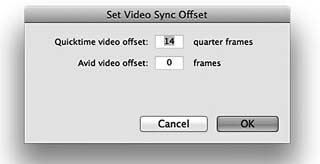
If your picture is out of sync but not drifting, you can usually perform a simple offset to align sight and sound. Pro Tools, for example, has a tool called “Video Sync Offset,” shown in Figure 8.3, that does just that. Many other DAWs have a similar feature. By changing the sync offset in 1/4-frame bumps, you will eventually find the sync you want. This process works, but it can make you crazy. First, you're forced to stare intensely at the screen— first at the sync pop and then at people speaking—and from that divine the sync. Do this for more than a few seconds and you'll swear that anything is in sync, or out, just to end the torture. Second, it's maddening to know that throughout the filmmaking process sync was honored religiously, but now, when it really matters, it's totally subjective. How can you decide which shot, which ADR line, is truly lined up if you can't trust the overall sync of the film?
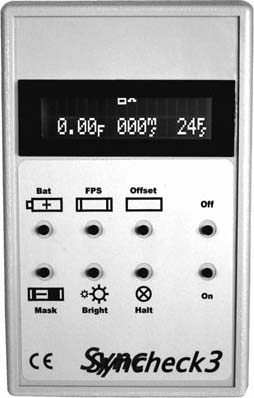
Since you're not the first editor to run into this frustrating problem, there are tools to help you line things up. Syncheck is a device that uses a sequence of flashes and beeps to measure the offset between picture and sound.4 Beep sequences are provided for different codecs, containers, frame rates, and type of scanning, since each variable may impose its own latency. Once you measure the offset, you can apply this value to your workstation, at least for the duration of this project.
If sync is not stable, but instead is dancing back and forth around an offset, there are several things worth looking at. While it's an unbending fact that
you can never have too fast a CPU or too much RAM, there are a few common bottlenecks that are first worth looking into before you replace your computer.
- Don't put your DAW session and audio files on the same drive as the video. Putting the drives on separate I/O paths helps even more. Get faster drives. This is not expensive and it really makes a difference.
- If you normally use an Apple Cinema Display, you can put a small QuickTime window over your DAW session display. This will be in sync. But then who wants to work with one monitor where session and video vie for space? Despite really great sync, you can't take this option seriously.
- A common low-budget option is to use a DV converter that streams picture data through your FireWire port and converts it to composite video, which can be displayed on most TVs or monitors. Unfortunately, this setup is prone to long latency and, worse yet, sync tends to drift unpredictably. As your session gets heavier, picture sync is likely to become less stable. In all fairness, these analogue/digital video converters are not intended to do what we ask of them. So don't insult them; just don't use them.
- Invest in a good video card that is locked to the same reference as your workstation. Processing the video stream on a dedicated card may solve many of your picture sync problems. Then again, it may not. Do your homework before investing.
- For even more zip, take the picture load off your audio computer altogether. Video Satellite,5 Virtual VTR,6 and similar products allow you to stream video from a second computer. Now the CPU is free to take whatever abuse you want to give it without thinking about that hungry video stream. Normally, this second computer needn't be rocket powered, so it's a great way to use the one you threw out to make way for the new, more glamorous workhorse you're now using. The video slave should not, however, be so ancient that it can't handle new video codecs. These solutions are not overwhelmingly expensive, and as a bonus there are often ADR management and recording tools built into the system.
- Finally, if you regularly must deal with several different codecs, stream off of a network, or handle uncompressed HD 4:2:2 files, there are topof- the line options such as Pyxis7 and VCube8 that are commonly used in large facilities. It's unlikely that a budding editor working in mom's basement will opt for such exquisite solutions, but it's good to know they're out there.
Containers and Codecs
Tweaking your computer, drives, and video card may not be enough to distance you from the gates of sync hell. You must also accept the fact that incoming material will arrive in all sorts of flavors, any of which may cause you trouble. It's worth knowing a bit about how a video file is constructed.
A video stream is conceptually layered in a way that enables different types of materials to piggyback on the same package. This allows for much greater flexibility. Not all of these hierarchical layers are physical; some are about norms and conventions:
- A framework is a standard. For instance, Digital Cinema Initiatives9 and SMPTE have defined a framework for digital cinema distribution, security, and playback. This framework is called DCP, Digital Cinema Package. (DCP in film workflows is discussed in Chapter 3.) OMF is another example of a framework.
- A container or wrapper is a file that provides a unified way to structure content and to access it. In other words, it describes how information is stored on a disk. MXF, AVI, and QuickTime are examples of containers.
- Essence. The raw video, audio, and data streams held in a container. In other words, content.
- Metadata are the files that describe the essence.
A codec is a program that encodes a data stream for storage or transmission and then decodes it for editing or playback. Codecs are optimized for different tasks, so it's not surprising that each has its quirks. Some use very high compression to enable mass storage or quick transfer across the Internet. Others provide quality images and frame-accurate playout but little compression. There are codecs that handle only video and those that deal only with sound. Some handle both.10 To find out which codec was used to encode the video you're holding, open the file in your media viewer and then select “Get Info.”
Video files are very big, so it's almost always necessary to compress them— sometimes aggressively. You can compress each frame of a video sequence, but only to a point. There's just so much data you can drop without severely affecting quality.
Choosing a Codec
Video codecs take a video file and make it take up less space (well, that's one of the things they do). However, they do it in different ways. To make sure that your picture is consistently in sync, and will play on your computer, you need to trouble yourself with two parameters: data rate and group of pictures (GOP).
Data rate refers to how much video information is going down your computer's pipeline. Smaller values infer lower quality, since there's less data to describe the picture. So superficially, more is more. But there is a limit to your data rate: your computer. As discussed earlier, CPU and drive speed, amount of memory, quality of video card, and condition of drives together determine the maximum data rate. Exceeding this personal speed limit results in jumpy picture, stalling, or even inability to play a file. If this happens, begin by putting your picture on one drive, your audio and session on another. The good news is that most computers can handle very fast data rates.
Group of pictures describes how frames are defined. Some codecs save significant space by encoding only certain frames, interpolating the intervening ones. This is called interframe compression, as opposed to intraframe compression, where each frame represents a complete, albeit compressed, image. Files using intraframe compression are akin to film, in which a frame is a frame is a frame.
The idea behind interframe compression is that most of the time the bulk of things within a frame don't change quickly. Let's revisit the recording we made a few chapters back: a yak eating an iPhone. Film this event and you realize that the steppes and hills in the background rarely change. Most of the time the grass in the foreground doesn't budge. It's only the crazy yak and the poor iPhone that are moving. Why, then, update the entire image with each frame?
Every so often—a duration definable when encoding the file, or based on bitrate needs—interframe codecs will plant a “real” frame. This key frame, or I-frame, is a fully described picture. Frames between I-frames are inter-polations of one sort or another. The region between and including I-frames is called the group of pictures. A GOP can contain the following picture types:
- I-frame: a complete, fixed image, independent of surrounding pictures.
- P-frame (predictive coded picture): predicted frames, based on previousI- or P-frame information.
- B-frame (bidirectionally predictive coded picture): predicted frame, based on previous I- or P-frame information within a GOP. A B-frame derives a picture by looking “both ways.”
The wider the GOP, the greater the potential compression, since bit-hungry I-frames are less frequent. The H.264/MPEG-4 Part 10 standard (universally referred to as simply “H.264”) is a very popular standard for video codecs. It's good looking (it's used for Blu-ray playback), and since its GOP can be very long, it compresses well. It's a great way to distribute video, since it's easily shared over networks and light enough to quickly send via digital file delivery services.
So what's the problem? Since H.264 and MPEG4 use bidirectional interpolation, frames between I-frames don't really exist. You see them, they scroll more-or-less naturally, but these aren't “real.” It's the picture editors who really pay the price, since it's difficult to edit on interpolated frames. But we, too, are troubled by this and other aggressive compression codecs: YOU will often encounter “gooey” and inconsistent sync. Play your session once and the picture seems perfectly in sync. Play again from the same place, and picture sync may be soft by half a frame or so. This cannot be avoided with such codecs. Solution: do your best to avoid interpolated frame compression altogether. If you must use H.264 or MPEG4, ask the video people to set each frame to be an I-frame, as shown in Figure 8.5. This will work just fine, but you'll lose all file size advantages that make this codec popular. You might as well use an intraframe codec.
So what codecs should you specify to avoid inconsistent sync? There are a number of popular intraframe codec standards, any of which will likely provide you with predictable sync (see Table 8.1.)
Sound editors seek the Holy Grail of codecs and formats, something that we can count on working each time. Sadly, this object of sync salvation is elusive, and most of the variables are out of our control. All you can do is to use and maintain the best host computer and peripherals you can afford,
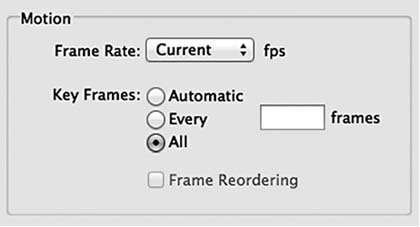
Figure 8.5 Setting an I-frame (key frame) for all frames effectively creates an intraframe stream, even with an interframe codec such as H.264. You're better off using an intraframe codec to begin with.
| Motion JPEG | An old, well-documented codec that uses the JPEG still image compression algorithm. However, JPEG is inefficient, using more bits than newer codecs to deliver equal quality. |
| DV | An SD video format developed by Panasonic. It's an old but stable playback format. |
| DVCPro HD | An HD variant of the DV codec. DVCPro material can be transferred from camera to a NLE via a firewire connection. No transcoding is necessary since audio file format is unchanged throughout postproduction. |
| Apple ProRes | Final Cut Pro native file format. There are several ProRes codecs, offering different video quality and file sizes. Transcoding is likely not necessary. |
| DNxHD | Avid native file format. Specifying this format for projects edited on Avid means that soundfiles will not need transcoding to another format. |
| JPEG2000 | Wavelet-based successor of JPEG. Very flexible for the video department. Required bit rate relatively large (>80 Mbps). |
| Dirac Pro | Open source codec developed by BBC Research. Similar to JPEG2000. Lossless or virtually lossless compression. Handles formats from 720p/50, 1080i25, 1080p/50, to 4K. Requires very high bit rate. |
experiment with different codecs to see which best suit your setup, specify video formats in your spec sheet, and hope that the picture people will give you something you can use.
Bottom Line
Barring a million possible exceptions, if a project was edited on an Avid, it's likely the video will get to you as DNxHD wrapped in a QuickTime or MXF container. Films cut on Final Cut Pro will likely arrive on your doorstep as Apple ProRes in a QuickTime container. If you know that you can play back these codecs, then stick with them. Still, a small test before you begin— just to be sure that there are no problems—could save grief when the pressure is on.
Within reason, avoid interframe codecs such as H.264. They are convenient in every way—size, image quality, scalability—except reliability in terms of sync.
Timecode Burn-Ins
Matching hardware to the wrappers and codecs you use, knowing which codecs to ask for and which ones to shun, and successfully setting your sync offset will help ensure that sound and picture run together. However, at any moment you need to know if they are lined up when the picture is not running. Inserting a timecode burn-in onto your video image will sort that out, but it must be added by the picture people. Normally, you'll have no trouble getting them to burn TC into your picture. But people are people, and for any number of reasons your request may be met with, “Can't do that.” To avoid those awkward moments, here are instructions for inserting a TC burn-in onto a QuickTime image:
Avid Media Composer (see Figure 8.6)
- Create a new video track at the top of the timeline.
- Drag the AVX Timecode Burn-In Generator to that track.
- In the Effect Editor, you will see four overlay display controls. In the Reader menu, select the types of data you want to display. Obviously, timecode will be your first choice.
- Use the Appearance tab to adjust opacity, size, color, background, etc.
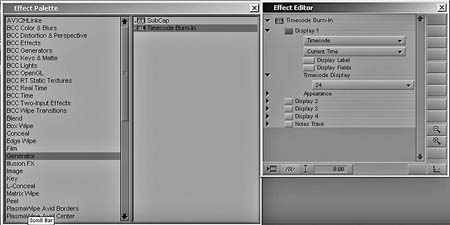
Figure 8.6 Creating a timecode burn-in in Avid Media Composer.

Final Cut Pro (see Figure 8.7)
- Select entire sequence.
- Nest all video tracks (Sequence > Nest items)
- Open Timecode Generator (Effect > Video Filters > Video > Timecode Generator)
- Right click on track. Select Open in Viewer
- Export sequence (File > Export > QuickTime or other)
Don't get lazy and don't try to be liked by the picture department. Get a burn-in.
_______________
1. Richard Fairbanks, “Video to Audio Synchronization within a Pro Tools Workflow” (Pharoah Editorial, Inc., 2005); see www.pharoahaudio.com
2. For more on this, see “Relative Timing of Sound and Vision for Broadcasting,” Recommendation ITU-R BT.1359 (International Telecommunications Union, 1998.) www.itu.int
3. Parts of this section adapted from personal correspondence with Georgia Hilton, MPE, MPSE, CAS, July 2012 (www.hiltonmm.com).
4. Syncheck is a trademark of Pharoah Editorial, Inc. (www.pharoahaudio.com). (See Figure 8.4.)
5. Manufactured by Avid Technology (www.avid.com/US/products/video-satellite).
6. Virtual VTR is manufactured by Gallery (www.gallery.co.uk).
7. Pyxis is a trademark of FairlightAU (http://fairlight.com.au).
8. VCube is a trademark of Merging Technologies (www.merging.com).
9. Digital Cinema Initiatives, LLC (DCI) is a joint venture of Disney, Fox, Paramount, Sony Pictures Entertainment, Universal, and Warner Bros. Studios. Its primary purpose is to develop and document a standardized open architecture for Digital Cinema that ensures a uniform and high level of technical performance, reliability, and quality control (www.dcimovies.com).
10. Some codecs, called “Lossless,” create an exact copy of the original data after compression/decompression. Others, called “Lossy,” sacrifice a predictable amount of data in the process. To compensate for this loss of visual information, codec programmers use psychovisual enhancements, based on the theory of Just Noticeable Difference to remove “imperceptible” visual information. This pre-compression masking process is analogous to psychoacoustic masking used in sound encoding formats such as MP3 and AAC. Almost all of the video codecs found in audio postproduction are lossy.
11. Adi Kouadio, “An Overview of Intraframe Codecs,” EBU Technical, European Broadcast Union (http://tech.can.ch/docs/events/wbuisog09/presentations/ebu_wbuisog09_kouadio_codecs.pdf).