
CHAPTER 19
Preparing for the Mix
By the time you finish your final pass on the dialogue, the tracks are as good as they'll ever be. The next few days in the dialogue premix will bring your tracks to life and tell the story you want to tell. Or they will be a painful realization that this will not be a dialogue job you're proud of. The dialogue premix is where your tracks come out of the closet. There are many factors that can dull the shine of the dialogue: bad location recordings, a troublesome director, sound-unfriendly actors, your own personal issues, and more. But nowhere are you on the line more than in the dialogue premix. A little preparation will put the odds in your favor
The editor should go through all of the recordings and provide only those tracks that are useful. There is no sense taking expensive stage time to audition tracks that are obviously useless. If I find that I am presented with nothing I consider to be useable I will then ask to listen to all of the mics.
Tom Fleishman, rerecording mixer
The Aviator
Talk to the Mixer
Long before you finish your edit, find out what the mixer likes. It won't cost you anything, and it will certainly pay off, even if only in appreciation for your thoughtfulness. Find out if you have too many tracks, or too few. Understand what sort of track order she likes. How should you handle perspective cuts? And what about volume automation? Find out what workstation—and which version—is used in the mix room. And if you're using clip automation, make sure that the playback DAW can handle it. If you're using insert plugins, make sure that the computer in the mix room has the same thing. Bottom line: talk, ask, listen. It will make a difference.
Check the Final Picture
While you're sprucing up the dialogue, the picture is undergoing its own metamorphosis, blossoming from a not-so-bad looking offline to a gorgeous DCP. The process of film finishing has changed greatly in a very short amount of time. Today few films undergo old-fashioned negative cutting; almost every link in the chain is now made of data rather than celluloid. If the original image is shot on film, then the developed negative is scanned to very high-resolution files (“2K,” “4K,” or higher). Images captured with Red, or Arri, of any number of other Digital Cinema cameras are already in the right format, so no scanning is necessary. Next: offline editing, digital conform, visual effects, color correction, done. (The DI process is discussed in more detail in Chapter 3.)
Meanwhile—on a film with a reasonable budget—the picture department is checking that the film is in sync or, more bluntly, whether the digital lab made a mistake. On a very low-budget film, the picture department will be long gone, so you'll inherit this responsibility. Actually, it's not so hard. You just need to synchronize a copy of your session to the final image and watch the movie. If you notice a scene slightly out of sync, make a note, but don't change anything yet. When you finish the screening, go back to the offline session. Check each of the noted shots for any apparent sync differences between the Avid output and the digital answer print. If you find any irregularity of consequence, let the supervising sound editor or production office know about it.
The beautiful final version of the image presents another problem: you can now see very clearly. Throughout the dialogue edit you've been looking at a relatively ugly, dark, compressed image covered with timecode displays and watermarks. Now that you have a high-resolution image, things will appear in the picture that you've never seen before. You can clearly see the lips past that walrus moustache or the footstep on the dark marble floor. Or worse yet, you notice the now impossible-to-ignore child hollering in the background.
Keep track of what you offset: what you moved, how much, and in which direction. This information will tell the other editors what you did and prevent sound effects built on top of production sounds from getting gooey. Also check both ends of any clip you move. You may have displaced the region enough to damage your transitions.
Resyncing Tips
Blindly syncing your session to a new cut will wear you down, and you'll never be totally confident that you're in sync. Sooner or later you'll have to trust your eyes, ears, and gut to fine-tune the sync of a print, but don't start there. Instead, use the countless landmarks a reel provides.
When you get your first video image with the OMF/AAF, and with every new version thereafter, make a log of a few landmarks for each reel. The few minutes this takes will pay off when the time comes to resynchronize to another version. Table 19.1 shows some useful landmarks.
Armed with this information, you can quickly determine if the new version is behaving correctly, and you'll have a number of sync locations for calculating offsets. If this level of list-making is too much, then always—at the very least—record the start mark, head sync pop, first internal cut, and LFOA. Don't start resyncing your session until you've measured the LFOA and calculated the reel length. If the old version and the new version aren't the same length, there's no point in continuing.1 Something is terribly wrong and it's definitely a picture problem. Note the problem, tell the supervising sound editor, and get out of the way. If the film begins in sync but sound
| Benchmark | Description |
| Start mark | Timecode of the leader's picture start mark |
| Sync pop | Timecode or footage of the head leader's sync pop |
| FFOA | Timecode or footage of the first frame of the reel (unless it's a fade from black) |
| 1st cut | First internal picture cut |
| 2nd cut | Second internal picture cut |
| 2nd to last cut | Next to last internal picture cut |
| Last cut | Last internal picture cut |
| LFOA | Timecode or footage of cut from the last frame of action to the tail leader |
| Tail pop | Timecode or footage of the tail leader's pop (if there is one) |
and picture progressively drift apart, then the film is running at the wrong speed. Stop. There's nothing you can do, and if you try to sync to this version, you'll learn a hard lesson that you'll never want to repeat. It may turn out that the producer declares the picture is finished—they can't or won't fix the problem—then your tracks must undergo a painful resyncing. Hopefully, this fiasco will result in a bit more cash for the editors.
Cuts inside a scene are usually more reliable sync references than are the scene boundaries, which is one of the reasons you measured the first two internal cuts. Synchronize within a scene, and the reel will follow suit. It's an easy fix if the beginning of the scene is a bit longer or shorter.
Sync is elusive. The more you analyze a shot, the more you advance and retard a clip, the greater your focus on a shot, the less likely you are to get anywhere. If you're having a tough time nailing the sync, leave the room, do something else, come back later. Bring flowers. Chances are you'll do better with a fresh head. Some shots (and some actors) simply never seem to be in sync. Do the best you can and try not to look at them during the premiere.
Moving From One Platform to Another
Sooner or later you'll work on a film project involving more than one make of audio workstation. Perhaps you'll edit the dialogue on Pro Tools while the SFX team works on Nuendo. Foley is recorded and edited on Fairlight, and the music is dealt with on Logic. This babel of workstation sessions will be merged onto the sound designer's Nuendo for premixes, and finally mixed abroad with a Pyramix. Moving between platforms is no longer exotic—it's rather commonplace—but you can't charge ahead in a cavalier manner and expect everything to work.
Since most workstations can import and export AAF files, it's logical to assume that moving from, say, Pro Tools to Nuendo would be a snap. Yes and no—for there are often problems with such transactions. For example, you may be unable to make an AAF because the session itself contains small containers of its own. These collections of audio and MIDI information— region groups—allow you, among other things, to treat a string of clips as one unit, thus enabling you to fade across the whole thing. They're handy while editing, but try to export it and you may run into all sorts of unforeseen grief. The list of such “features” is long and growing.
OMF, AAF, and other industry standards were meant to make machines work together, minimizing cross-platform silliness. But manufacturers have altered the way the standards work—to their own benefit. Fades, automation, MIDI and plugin settings are among the casualties. To make matters worse, some software companies have steered clear of industry standards, fearing that their proprietary code would be compromised, or that their market position would crumble from the competition. The result: there's currently no guarantee that you can seamlessly move from one platform to another. To sort out this gamesmanship, the Audio Engineering Society long ago formed a work group whose goal was to create a standard protocol that includes an audio format (BWF), a disk format (FAT32), a simple project interchange protocol in a text format (ADL) and, finally, object-oriented interchange.2 This protocol is called AES31. It's stable, well documented, and since it's text-based, a human can look at the list and make sense of what's going on.
What this means for you is that exchanging sessions across platforms stands a decent chance of success if done via AES31. Unlike OMF and AAF, this protocol has not yet undergone too much manipulation by manufacturers (although some workstations use “adapted and improved” versions of AES31). The only catch is that not all DAWs have adopted it, so as with almost everything else in this book, I can offer no Holy Grail: each manufacturer has its own way of writing code, of running DSP through the hardware, and of reading and writing to disk, and any of these can trip up a conversion. So if you want to improve your odds of successfully moving between platforms, you'll need some help.
Using a file translation program such as AATranslator or EDLtranslate, you can now coax sessions from most workstations to become sessions of others.3 AATranslator also allows you to transfer console automation along with session data (see Figure 19.1). File translation applications examine timeline information source project files and then translate this to a master playlist that includes information about tracks, clips, fades, automation, etc. This information is then re-mapped in the structure of the target format, from which it creates a DAW/NLE session. After a bit of practice, you should be able to move session between supported platforms with relative ease. More
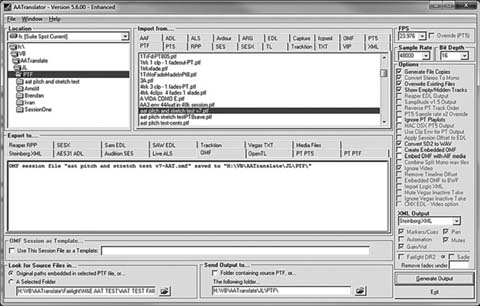
importantly, you will learn what works for you, and what doesn't, so that as you begin that big, complicated project described above (Pro Tools, Nuendo, Fairlight, Logic, Pyramix), you'll be able to plan a sensible workflow.
Session conversion programs are a bit like books about dialogue editing: they're very specialized products and they don't sell by the millions. So when you're shopping for such software, contact the manufacturer and make sure that the tool can, in fact, do what you're asking of it (see Figure 19.2).
There is, of course, a cat-and-mouse relationship between workstation manufacturers and those who make translation programs. No sooner has a translation software mastered moving sessions from one platform to another than one of the DAW manufacturers makes a change—big or small—that upsets the applecart. So you need to regularly update translation software, just as you do with antivirus utilities. Again, consult the manufacturer.
It takes time to figure out how to make reliable transfers from one platform to another; even more time when several platforms are involved. You will

encounter surprises, big and small. Don't wait until the night before the mix to begin the conversions and consolidations. Find other ways to get your thrills.
Finally, if you are heading to a mix room that uses a different platform to yours and you have no means of converting your session, all is not lost. If you're absolutely certain that you won't make any editorial changes while mixing (unheard of!), then the safest, dumbest way to transfer between platforms is to convert each of your tracks to a continuous Broadcast Wave soundfile. This system will get you to the mix, but you're left with no flexibility, which takes most of the fun out of having a workstation in the room. Plus it's astonishingly time consuming to create all these files. If you must go this route, and if you can put your original project in its natural format on a laptop computer, take that with you to the mix. Then you'll have some chance for fixes.
Dealing With the Details
Now it's time to take off your editor's hat and put on the hats of IT technician, office manager, secretary, and shipping clerk. In the days remaining before the mix, you'll have to deal with the following details.
- Confirm that the dialogue sessions are in sync with the newly arrived answer print telecine or, more likely, the DI conform. Visual effects, color correction, and bad luck can change the sync that you so lovingly fought for. Check it again. If you make sync changes, pass along this information to the supervising sound editor or other editors.
- Prepare your sessions. If in the passion of editing you spread your soundfiles across several drives, or across a network, consolidate the session to one drive and omit material that has no business being in the mix room. If you're mixing “in house,” on a system that has access to all of your files, you can probably skip this step. But if you're going mix elsewhere, then organize your sessions, soundfiles, and everything else in the most sensible way possible.
- Make sure that each reel's session is made up of the same tracks, in the same order. Disable and hide any tracks you don't want, such as your work tracks and the original AAF. If a track will not be used throughout a reel, you may choose to make it inactive but keep it visible.
- Make sure the head and tail sync pops are correct. Check them again.
- Remember to include your 1 kHz reference tone.
- List the LFOA of each reel. This will be indispensible when making the pullups.
- If there are some truly unique sounds in the dailies, make a copy of them for yourself. The sound effects editors will undoubtedly have done the same thing. Even though you're a dialogue editor, you never know when the sounds of a 1927 Quadrant motorbike or a 1966 Susita sedan or the background sounds of NASA's Mission Control will come in handy. Clear this with the location mixer, since you will certainly work together in the future.
- If you're mixing out of town, arrange shipping of your material to the facility. Find out how and when the mixing stage must receive it if you're not taking it yourself. Although you no longer have to deliver mix elements in a truck—a gym bag suffices—you have to make sure that everything that must travel does. Nowadays you can send almost anything over the Internet, but why look like a fool on the first day of the mix? Get the shipping right.
- Talk with the studio manager to find out when your setup will take place and if you should be there (probably not).
- Archive your project. Make backup files to take with you, plus one copy for the production office. If the director later decides on a new version of the film, but no one is on speaking terms with the original production company, it's handy to have the sessions.
- If you're never coming back to your cutting room after the mix, box up what's yours and what belongs to the production. Grab the things you care about, since by the time you've finished with the mix, someone else will be in “your” room.
- This may sound a bit pessimistic, but make sure you get paid. Most producers pay their bills, but if you've been having trouble getting money throughout the gig, it's naïve to assume that things will get better once they don't need you.
Packaging Dialogue Elements
Packing up your dialogue elements for the mix is a pretty obvious affair, but a few things are worth remembering.
- Find out what format external drive the mix room prefers (HFS+, FAT32, NTFS, etc.), and then format a drive for your mix elements. A newly formatted drive with nothing else on it is probably healthier, and you reduce confusion on the receiving end. Also, you won't lose the 3,000 photos of your cat.
- Check—one last time—that each session opens.
- Affix a label to the portable drive: the name of the film, “dialogue mix elements,” the date, and contact information for you and the production company.
- Include the video files. Confirm that they are the right picture version— the same version as the final audio sessions, and check that the mix room will have no trouble playing them.
- Pack the drive in an appropriate case; include whatever paperwork makes sense.
- If you are shipping the drive before you join it at the mix room, bring another copy with you. Drives are cheap, time isn't.
Close the Cutting Room and Back Up the Project
The fact that you can carry your tracks on a drive the size of a cigarette pack is a mixed blessing. Not needing a hand truck is undeniable progress, but that precious little drive is attractive to thieves, easy to lose, easier to drop, and much more likely to break than are box after box of mag elements. For these reasons, always have a sensible backup plan.
At the end of the project, copy all material, including the original recordings, to a drive provided by the production (hopefully) and also to your own portable drive. Hang onto all the elements as long as you can. They're good for future reference and will come in handy if you ever decide to teach or to write a book about dialogue editing.4 Big drives are becoming cheaper by the day, so it's sensible to buy a drive, to archive to it, and never think of it again.
As you box up all the materials—drives, paperwork, and any special equipment that belongs to the production—make a log of what's in each box. Tape the log to its box and send copies to the production office. Keep one for yourself. This is a minor hassle, but it can protect you if you need to find something later or if the production office claims you took their mouse pad.
_______________
1. This is a good time to have a timecode/footage calculator. There a several free apps for smartphones.
2. Ron Franklin, File Format Futures, www.mixonline.com/internet/newformats/audio_fileformat_futures (November 2002).
3. See www.aatranslator.com.au, www.ap-sound.de
4. Remember, someone actually owns the rights to all of this material, so in most circumstances you must get permission before using it. Be particularly careful if you choose to use film images that include actors.