
CHAPTER 7
Moving the Film from Picture to Sound
If the audience can't understand the dialogue, then it was pointless to have dialogue in the script.
Ric Viers, sound designer,
author of The Sound Effects Bible
Much of your success as a dialogue editor hinges on your relationship with the picture department, particularly the assistant picture editor. Simply put, you need materials from them that aren't always convenient to come up with. Your understanding, charm, and decency in dealing with the folks in picture can make the difference between an easy start or several days of begging, deal-making, or strong-arming—never knowing if it will get you the elements you need to do your job.
You may encounter some friction with the picture department. Changes will happen. Your multipage memos about items you must receive in order to get the job done will be mislaid and you'll be happy to receive half of what you asked for. You'll discover that the editor forgot to tell you about a new scene yet to be shot, and throughout the gig you'll be peeved with changes you deem “unnecessary” or paperwork “not up to your standards.” Lighten up; the picture guys have at least as many pressures and problems as you do, and they're not out to get you. We're all on the same side.
It's in your interest to quickly identify and overcome any problems with the picture team. Separate structural frictions from personal ones and remember that the film is what counts. However you go about this, get over it and move on with your job. At the same time, don't forget the power carried by the picture editor. In most film cultures, she's the pinnacle of the post -production tower, so don't throw your frustrations in that direction.
The Picture Cutting Room
At the start of preproduction, the supervising sound editor will be in contact with the production office. Depending on the type of film and its budget, as well as his relationship with the director, he may become involved at the script level or may simply show up a few times during the shoot to carry the flag of the sound department. During picture editing, the supervising sound editor will become increasingly involved with the picture department. His crew will provide temporary sound effects for the picture edit and prepare tracks for temp mixes. By the time the picture is locked, the supervising sound editor and a small sound crew will be intimate with the mechanics of the film and the dynamics of the picture department.
As the dialogue editor, you probably won't begin work on the film until a few days before picture lock, unless you're called in to assist with temp mix tracks. But don't wait until picture editing is completed to acquaint yourself with the picture staff and with the film. Your sanity and success will depend in part on having a good relationship with the picture people.
Sometimes on very low-budget films, the picture editor and assistant leave the film as soon as the picture is locked (a strange way for the production to save some money). This means there's no one around to answer questions, find paperwork, or help you read those illegible sound reports. The cutting room has already been rented to another client, so you can no longer easily look into how a problem scene was put together. If you didn't get what you need while the picture department was on the payroll, you're out of luck.
On a film with a decent budget, the job of moving the film from picture to sound rests on the shoulders of the assistant picture editor or assistant sound editor, so you—the dialogue editor—may never need to do any of these transfer chores. However, to be prepared for the job where you have no assistant, read on.
The Dialogue Editor's Relationship with the Picture Department
Your most valuable contact in the picture editing room is the first (and likely the only) assistant editor. This is the person who will (or won't) save your neck. The picture editor is important, of course, but may not be your most useful contact, since she'll be focused on other matters during audio postproduction. When you visit the cutting room, be nice to the picture editor because she can help you get your next job and can provide needed insight into the film, but spend your time with the assistant because that's where all the information is.
Today many small films don't employ a full-time assistant picture editor, but instead use one as needed to ingest materials at the beginning of the project, to periodically maintain the database, and to “get the project out of the Avid” when the maestro finishes. If there is an assistant picture editor, meet with him to clarify what you need. Watch the (still unfinished) film and note sections where you're sure to need alternate takes. Although you'll always need to rifle through the original recordings in search of alternate material, in any cases where the picture assistant can line up alternate takes on the timeline and include them on your OMF/AAF, you'll save immeasurable time and it won't cost him much in the way of added work. Make sure you agree on matters of formats, EDLs, paperwork, and the like. Don't forget to specify a video file format and codec (see Chapter 8, “Working with Picture”), and negotiate about what you need vs. what they can provide.
It's worth paying attention to cutting room etiquette. Be aware of a few traps you can encounter while visiting the cutting room. First, there'll undoubtedly be lines in the film that are noisy, bumpy, off-mic, and so forth, and the picture editor may inquire, “Can you fix this, or do we have to loop it?” Before you answer, take a breath and count to ten. The correct answer is almost always “I can't tell you here and now, but give me the track and I'll do some tests (with the supervising sound editor and the mixer).” Seems pretty obvious, but let's run down the reasons you must go this route:
- More than likely, you can't hear well in the picture cutting room.
- You haven't had a chance to look for alternate takes or “fakes” such as close-up (CU) sound on wide-shot (WS) pictures, so you don't have a clue what your options are.
- You won't be forgiven if you're wrong.
The only reason to rush to an answer, positive or negative, is to look smart and please the editor. Perhaps you have some unresolved parent issues.
The other socially uncomfortable—and relatively uncommon—bind you may find yourself in is at the end of the editing room screening, when the editor or director turns to you to ask what you think of the film. If you're bowled over by the screening, your response will be one of natural enthusiasm. But if you're still scratching your head when the lights come up, you can always hide behind, “I was so involved in listening for dialogue issues that I can't really give you a fair answer right now.” (Of course, no one really talks like this, so come up with your own version.) Armed with such a reply, you don't waste precious screening time trying to think of something clever to say about the film. White lies are the lubricant of a civil society.
What You Need in Order to Get Started
Picture editing is finished—well, almost finished—and you're under enormous pressure to get moving. The film is inevitably behind schedule, and somehow you're expected to make up for lost time. However, if you start too soon you run the risk of having to make too many unnecessary conformations (see Chapter 18)—adjusting your already manicured scenes to a new picture cut—which wastes your time, wrecks your budget, and shatters your mood far too early in the project. At the same time, no one wants to be a jerk or single-handedly delay the production on principle alone. It's a hard call.
Absolute Essentials
So, what must you absolutely have in hand before starting to edit the dialogue on a film? The following paragraphs will tell you. Keep in mind that they contain some terms not yet discussed in this book. If you're unfamiliar with an acronym or expression, check the glossary. To ease the process of ordering the materials you need, prepare several spec sheet templates—using different types of production workflows—from which you can make a detailed set of instructions for the video editing facility. To make sure that you order everything you need—in writing—you may create boilerplate spec sheets for the most common workflows in your market:
- 24 or 23.98 fps Digital Cinema shoot / 24 or 23.98 fps post / DCP or film release.
- 24 fps film shoot / 29.97 fps NTSC post.
- 24 fps film shoot / 25 fps PAL post.
Modify your template as needed for the new project. For the most part, every film will require the same items from the picture department, regardless of the workflow. Your delivery specification sheet will look something like the model in Figure 7.1.
Let's look at each of these critical items:
Locked Picture
You need a locked picture, split into reels. There's locked and then there's 40111 locked. Assume that even the most organized director/editor team will make
John Purcell
motion picture dialogue editor
Materials needed to start dialogue editing (24 fps project):
1. Locked picture, divided into standard reels. (Normally, RL-1 starts at 01:00:00:00; RL-2 at 02:00:00:00, etc.) Alternatively, start mark (12 ft. before FFOA) at 0x:00:00:00.
a. Head and tail Academy or SMPTE leaders. Flash at (FFOA — 3 ft.) or (FFOA — 2 sec)
b. Sync pops match leaders, head and tail. This is valid for all releases, whether film or DCP.
c. N.B. If this film will be a DCP-only release and no reel breaks are planned, please have your DCP encoding lab contact us for coordination.
2. Video
a. Reel breaks are the same as corresponding AAF files.
b. ProRes 422 or DNxHD video files, QuickTime. Contact me concerning specifics.
c. Include editor's reference audio track on QT.
d. We will provide a SyncCheck timing sequence (a series of flashes and beeps.). Kindly insert to this 30-second sound and audio sequence onto your final master, two minutes before FFOA on the first reel only. You may remove this later. Make sure that the SyncCheck timing sequence undergoes the same number of image iterations as does program content (e.g., color correction, on-line, subtitling, etc.).
3. OMF or AAF that matches the locked picture. OMF/AAF will have the same date or version ID as picture file so that picture relates to the corresponding sound.
a. These files must contain all channels from the original recordings, even if the pix editor used only a mono or split guide track.
b. File format is BWF, 48kHz, 24-bit.
c. All region names shall include the original source sound file name (including channel number/microphone information), as reflected in the pix edit and corresponding EDLs.
4. An AAF for each reel that reflects the native audio for each video clip. This audio will not be used in the final dialogue, but it is critical in syncing “fake” shots and it can aid ADR recording.
5. Delivery of materials: Production will provide a USB drive (at least 500 GB) for delivery of all above-mentioned materials to the sound editor. Preferred format FAT-32, This drive will also be used for ongoing shipments between the studio and production office or video facility and for returning the final project to the production. Upon completing the project, this drive will be the sole final archive. It will remain property of the production company.
6. All original recordings, delivered on a hard drive. Normally these will be organized by shooting date as indicated in EDLs. However, if shots have been organized by scene, this will be satisfactory. In any case, there shall be a means of tracing from events in the timeline to original files. Please account for the recordings from all shoot days before delivering them to the studio.
7. Sound reports for original recordings. Please confirm that there are no missing sound reports. PDF or Excel formats preferred.
8. Picture EDLs, 24 fps. CMX 6300, A-format. Include Sc/Tk information, as well as shoot date.
9. Sound EDLs, 24 fps. CMX 6300, A-format. Include sound file name in Comment field; folder name in RLN field.
10. Specifications as to how the film was shot. Format, camera, frame rate, resolution, record machine, etc.
11. List of director's or editor's dialogue notes, if they exist.
12. Picture continuity reports. (Handy to have, just in case, but not essential.)
13. Most up-to-date lined script. (If it exists)
14. List of character names and the actors who play these roles.
Please contact me if there are any questions, even the smallest doubt.
Thank you,
John Purcell
Figure 7.1 A detailed specification sheet won't guarantee that you'll get the material you need to start your job properly, but it clears up many misunderstandings
a few picture changes after declaring the film finished. Conformations are an inevitable part of the game. Yet beginning to cut the dialogue on a film whose direction is unclear or that must still undergo focus group testing is crazy. You may spend more time making changes than editing. Even so, you don't have to wait for the entire film to lock. Often—but by no means always—the interior reels stabilize before the first and last reels. After all, the first reel carries the burden of exposition and character introduction, while the final reel resolves the story and sends filmgoers on their merry way. So when time is of the essence and everyone is on your back, you may be able to start on a “safe” interior reel.
OMF/AAF to Match Final Picture
You'll need a complete OMF/AAF of all edited tracks and any bonus audio material you expect to receive from the picture department. Ideally, the OMF/AAF will include all recorded tracks, not just the reference tracks that the picture editor used. However, there's a good chance you'll have to assemble the many tracks of the field recordings to match the editor's cut (much more on that later in this chapter). Make sure the filename of the OMF/AAF version (the cut number or date) matches that of the picture you'll be using. You don't want to begin working on one version of sound and another of picture.
Audio and Video EDLs
The audio EDLs are important for finding alternate takes. The video EDLs will be useful for conforming changes, for making perspective cuts, and for general housekeeping. And if you're the one to assemble the original recordings you have no choice, for only with this information will it work.
Original Recordings and Associated Sound Reports
You'll receive a drive from the location mixer or production office, holding all of the original recordings (it's likely that the OMFs and EDLs will come to you on the same drive). If your film sound was recorded on DAT or single-system video, you'll likely receive a large box of tapes. However the sound was recorded, you must receive the sound reports; the paperwork— usually not paper at all—that describes each day's recordings (or, in the case of tape recordings, the contents of each tape). You'll use this paperwork to locate alternate takes and wild sound. (See Chapter 10 for more on sound reports and wild sound.)
That's it for the essentials. You absolutely must have them before starting. Missing any at this point spells trouble down the line, and a production that can't provide these key elements is going to bring you heartache. Other elements, although not life or death in importance, are nonetheless worth asking for:
- A list of characters and actors Sooner or later you'll learn the character names and the actors playing those roles, but with this list in hand you can start naming clips and making ADR calls without too many phone calls to the production office.
- A contact list Including the director, picture editor, producer, associate producer, postproduction supervisor, and production office. You never know when you'll need to contact someone.
- List of shooting dates for each scene If your film was recorded on a hard disk recorder, the soundfiles are likely stored in folders identified by the shoot date. A table correlating scene numbers with shooting dates makes it easier to find them. You can create this information using the EDLs or sound reports, but it's a hassle. Try to get the production to do this.
- Lined script The lined script from the shoot is used for locating material and revealing coverage within each scene. It gets its name from the vertical lines drawn over the text, indicating which takes cover each part of the script.
- OMFs/AAFs of the original sync It's not unusual for the picture editor to “fake” a shot: to change the picture or sound so that the two aren't from the same source. There are all sorts of reasons to do this—almost all of them for narrative or acting purposes. They have their reasons, so get over it. Caught up in storytelling, editor and director alike didn't pay attention to the Godzilla sync. You have no choice but to fix it, one way or another. The problem is that you don't have a sync reference, so you're syncing in a vacuum. The original sync will give you a point of reference, and will also give you a clue as to why the shot was replaced.
Splitting Reels
When all films were cut on upright Moviolas or flatbed editors, picture editors and sound editors alike cut on 1000 ft reels. Now most films are picture-edited on one continuous timeline because any decent video workstation will allow for such massive sessions.
However, you can't mix a continuous soundtrack that runs the length of a film, then send it to the lab and not expect to be laughed (or yelled) at. Films are still (mostly) printed in reels of no more than 2050 feet, so that sets the limit of how you mix. And since films are mixed in reels, so too are they edited for sound, which means that before you accept a film from the picture department, it must be broken into reels.1 DCP-delivered films actually can be processed as a continuous timeline with no reel breaks. However, there are some things to consider. If there's even a chance that somewhere down the line a film print will be needed, then deliver in reels. Also, some DCP mastering facilities strongly urge you to split the file into reel-like segments for better performance and security. Convince your producer or supervising sound editor to speak with the DCP mastering facility before they make these choices.
It isn't the dialogue editor's responsibility to decide where to split the reels, but if your picture editor is inexperienced it's in the interest of the sound department to police the reel-splitting process. Here are some rules to observe in order to have sound-friendly reel splits:
- Avoid splitting within a musical cue or in a place likely to have one later. Even if the mixer and sound supervisor manage to pull off this feat (which isn't assured), the music cue will be at the mercy of projectionists and 8111 their ability to properly splice together the reels.
- Don't allow any significant sound within the first second of a new reel. This sound will fall within the changeover and could cause trouble.
- It's usually easier to break a reel between scenes rather than in the middle of a scene, where this transition will be very exposed. If timing demands a reel change within a scene, pick a picture cut with a bit of “air” on either side.
All of these “rules” are subject to veto by an experienced supervising sound editor or mixer, but this is a good place to start.
Protect yourself by refusing (perhaps that's too strong a word) to begin work on a project whose reels aren't yet split. Such a premature start can come back to haunt you in the form of complicated rearranging of scenes (work often not included in your deal with the producer). Plus, a client who insists on beginning dialogue editing on an unsplit film is a client with other dangerous surprises lurking in the wings. Make them split the reels. Properly. Period.
A Brief Detour to Understand How Film Became Digital
(Here's a rather short history of nonlinear editing and the development of the OMF. It's a nice story, but if it doesn't interest you, skip ahead to “Exporting and Importing Sessions using OMF/AAF.”)
When picture and sound were edited on film, elements were completely transportable from one cutting room to another, from a Steenbeck in Paris to a Moviola in Los Angeles. Your plan for sound postproduction didn't depend on the technology used by the picture editor or the sound facility. As long as the rules were followed, everything was interchangeable. Still, there were downsides in cutting film sound on sound film: it was relatively slow-moving; it moved certain problems downstream to the mix room—the most expensive part of audio postproduction; it wasn't easy to make alternate versions; and—most importantly—it employed lots of people.
Like all technological advances, from the cotton gin to the robotic assembly line, digital picture and audio workstations came about partly to reduce labor costs and extract more efficiency from the remaining workers. The initial equipment costs were numbingly high and the trailblazers paid dearly for their new toys. But once the technology was proven and the economies of scale began reducing costs, there was real potential to get more for less. Edit room staff was progressively whittled away until today it's not uncommon to find a small film with no assistants. However, as with all labor-reducing revolutions, this one brought significant benefits. It's now possible to edit with brain-numbing accuracy and produce multiple versions of a scene in a snap. You can work efficiently and quickly, and—with more technological horsepower in your lowly workstation than took man to the moon—you can perform miraculous sound processing feats.
The Birth of Nonlinear Workstations for Film
The first digital audio and video editors were freestanding pieces of hardware with rooms full of processors and storage devices. The CMX 600 that was released in 1971 is considered the first nonlinear video editor, offspring of a partnership between CBS and Memorex, and born years ahead of its time.2 Video was recorded as an analogue FM signal, while audio was recorded as a pulse amplitude signal and stored in the video's horizontal blanking.
The six IBM drives held a whopping 30 minutes of half-resolution black-and-white picture and sound, plus an address language that would later develop into SMPTE timecode. If you wanted to edit onto an audio track, you had to dedicate one precious hard drive to audio. Edit information was stored on one-inch paper punch tape, which was loaded into a CMX 200 online editor for assembly.3 By today's standards the CMX 600 was crude, but the six units manufactured forever changed the way we look at electronic editing.
In 1984 the Montage Picture Processor was introduced. It was a surreal array of 17 or more Super Betamax players shuttling, winding, playing, and coughing out commitment-free scene previews. Preparing a project was a huge task, but the actual editing worked pretty well. The same year, Lukas film announced EditDroid, a laser disk-based random access editor, whose sound cousin was SoundDroid.4 The technology behind EditDroid and SoundDroid was acquired by Avid in 1993, and many of the key developers of SoundDroid went on to form Sonic Solutions, an early leader in noise reduction workstations.
The late 1980s witnessed the births, and often the deaths, of countless nonlinear sound editing systems for the sound-for-picture market. Most were offshoots of music editing tools, while others were spawned from restoration and mastering, coinciding with the introduction of the compact disc. Few were built from the ground up for audio postproduction. All of these workstations were closed systems, so neither code nor file formats were easily exchanged between different manufacturers' products. Still, as long as you kept your job within one studio, life really was getting better.
This utopian vision fell apart when projects had to move from one facility to another. Worse, there was no sane way to take a finished picture cut and begin working immediately on the production sound. Typically, an assembly, often done by hand and ear, was the only way to prepare the picture editor's cut for audio postproduction. This cumbersome and time-consuming chore took much of the fun out of random-access production sound editing.
Creating Sensible Filmmaking Workflows
It wasn't long before a method was devised to automatically conform the original takes to match the picture editor's choices, assuming that the original production sound came with timecode. Auto-assembly was invented. Using an EDL for source name and address information and the RS-232 or RS-422 protocol to control the source machine (initially 1/4" inch tape with timecode, and later PCM 16305 or DAT), manufacturers offered a way, however clumsy, of moving from picture to sound. But the resulting soundfiles were based on proprietary platforms and weren't the least bit interchangeable. You still couldn't mount a picture editor's drive onto a digital audio workstation and start editing. Nor was it possible to do part of a project on one type of machine and then move to another.
It's not that no one was paying attention. Standards setting groups—the Society of Motion Picture and Television Engineers (SMPTE), the Audio Engineering Society (AES), and the European Broadcasting Union (EBU)—were looking for ways to normalize the exchange of this rich and diverse picture and sound data. Since such organizations are notorious for moving slowly, it was industry itself that made the first meaningful foray into file transfer protocol. In 1992 Avid Technology, not yet in the audio business, introduced its Open Media Framework Interchange (OMFI, commonly shortened to OMF), designed specifically to allow Avid files and EDLs to be opened directly on any number of audio workstations.
For a few years in the early 1990s, OMF was promising to be the Esperanto in which all machines would seamlessly communicate, allowing transparent postproduction. Once it became a standard, like SMPTE timecode or any digital audio format, equipment choices would be based solely on desired features and price rather than on embedded architecture, since it would be painless to move between makes and models. Of course, reality eventually reared its head.
Between reluctance on the part of manufacturers to expose their proprietary codes to competitors' eavesdropping, and Apple's unwillingness to release into the public domain the underlying container code, OMF never attained real “standard” status.6 Instead, it continued to be a product of Avid and later Avid/Digidesign. This accidental ownership did nothing to make other manufacturers either comfortable or cooperative beyond what was needed to make their workstations accept an Avid project. The utopia of open exchange would have to wait, although OMF did become the de facto standard for moving files between workstations. Because OMF was complicated and its implementation for each manufacturer required tedious code-writing somersaults, Avid did its best to keep the protocol available to developers. However, within a few years it was clear—given so many changes, bug fixes, improvements, and the culling of initial mistakes—that OMF needed to change, so OMF-2 was released in 1996. OMF-1 and OMF-2 are not compatible formats.
AAF and MXF
Building on the successes of OMF, and learning from its failings, two new file exchange tools were created. One was the Advanced Authoring Format (AAF), created by the AAF Association, a consortium founded by Avid and Microsoft. AAF offers a more rugged file interchange than did either OMF version, and industry implementation is easier. But as you'll read in Chapter 19, while some aspects of this dream of universal interchange were ealized, some fell victim to the same industry bickering that doomed OMF.
Media Exchange Format (MXF) is a media wrapper, like QuickTime. It was developed by manufacturers and several standards organizations to develop a format for the interchange of program material.7 It provides a consistent means of storing sound, video, and metadata, plus it standardizes the way different media are presented to applications. AAF and MXF together allow a far more efficient vehicle than OMF for file exchange.8 More on this in Chapter 8.
Exporting and Importing Sessions using OMF/AAF
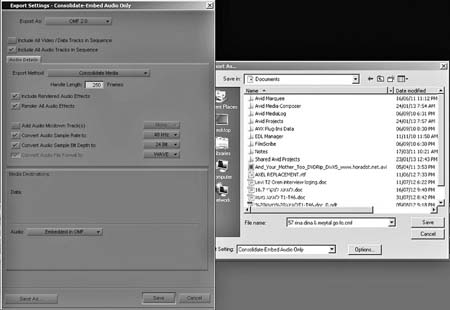
Exporting an OMF from Final Cut Pro or Avid is a pretty run-of-the-mill exercise, and unless you're a Jack-of-all-trades, you likely won't need to make one. Still, it never hurts to know how these things work. Figure 7.2 shows FCP's OMF/AAF Export page, using the Automatic Duck Pro Export FCP tool.9 Creating an OMF from Avid Media Composer, as seen in Figure 7.3,
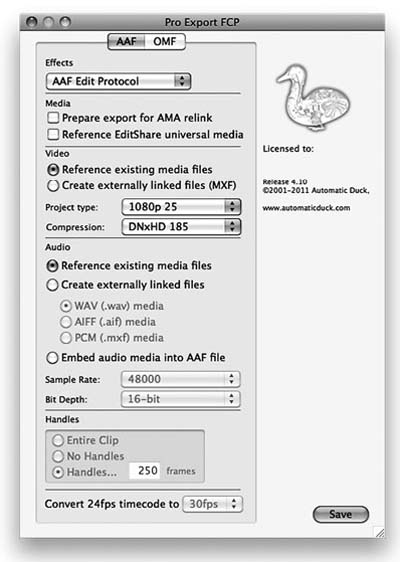
is equally simple. Make sure you set the Handle Length large enough to be useful (see Figure 7.4).
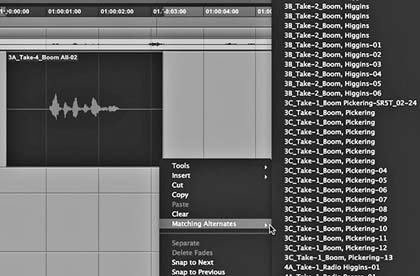
The picture department shouldn't wait until they're making your AAF to decide what to send to the dialogue editor, or how to do it. Choices must be made before the original recordings are loaded into the picture workstation. For example, when moving between Avid and Pro Tools, it's possible to load all tracks into the Avid, sync them, hide them, and make an AAF for dialogue editing—with everything on the timeline. Or, to have alternate channels, in sync, in the clip list. The editor can drop any of these synced clips onto the timeline. Alternatively, the AAF may contain only the field mix; it's up to the sound people to import the other channels. Figure 7.5 shows the Pro Tools Matching Alternate Regions window, which reveals likely associations for a selected clip, based on user-defined criteria. None of these paths are difficult to follow, but the dialogue editor should know what's coming so that she can smother any fires before the film gets burned.
|
Specify to the picture department that all transitions in the OMF/AAF are converted to cuts (“C” in the transition column of the EDL). Also, you don't want any rendered effects (do you really want to inherit the picture editor's rendered reverb or EQ?). You want an OMF as free from cutting room sound shenanigans as you can possibly get. If, once you open the AAF, you discover rendered events for which you don't have the original unprocessed clips, then get on the phone NOW, before the editor and her assistant have moved on to greener pastures. |
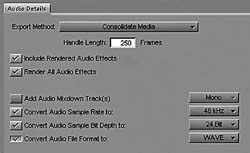
Figure 7.4 |
Opening the OMF/AAF
Opening an OMF/AAF in a DAW is so simple that it warrants no more than a few pointers:
- Double click on the OMF/AAF icon, or import its tracks into your session as you would tracks from any session.10 Follow the dialogue box instructions.
- Select the tracks you require to import from the OMF. On the first import you'll naturally select all tracks. Later, as you receive “adds” and “oh, by the ways” from picture, be more discriminating as to what you choose.
- If your import OMF dialogue box offers to pan L/R, politely decline. If you accept this proposition you will pay later, since you will have to pan all of your tracks to center.
- If you are creating a new session, rather than importing into an existing one, name it sensibly (this will be discussed later in this chapter).
When you open the OMF/AAF on your DAW, make sure that the clips are named as they were in the Avid or FCP timeline. Normally clip names will include scene/shot/take information and perhaps a note from the director.
Expect to see something like this:
32B tk4
or perhaps:
32B tk4 CU Bob eats spinach (although this is truly neurotic labeling)
If you don't see sensible information as your clip names, but rather a serial list number or gibberish, go back to the picture folks and sort out the problem. Without valid scene/shot/take information, your job isn't just a little harder but worlds more difficult. Don't start editing until you get the clip names right, no matter how high the pressure or how strong the urge to get moving. Check for other OMF mistakes and contact the picture department. A tiny amount of coordination with the editor can help avoid lost time or lost tempers.
Now's when you look at the sound reports to see how many tracks are on the original recordings. If you can't make sense of the sound reports, or if there are none, then call the location mixer (best choice), the assistant editor (next best), or the production office (last choice). If it turns out that the OMF contains only the edited mono guide track, without a trace of the original iso tracks, then you don't have the raw material needed to do your job. Don't start editing; it will prove a waste of time. You have no choice but to conform the original recordings to the picture cut—or get someone else to do it. This can be either relatively easy or terribly difficult, depending on how you go about it. The process is called the “assembly” or “conform.” As you'll discover later, “conform” can also mean something entirely different, so I am sticking with “assembly” to describe this process in order to keep confusion to a minimum. We'll get to the assembly in a few pages, but first there's a tool you need to acquaint yourself with. Otherwise, you'll likely get lost in the details.
The Edit Decision List
As a dialogue editor you can't really get away from edit decision lists (EDLs). When you use file-linking programs such as Titan,11 Conformalizer,12 EdiLoad,13 or XLM-Pro14 to replace the picture editor's mono guide track with the original multitrack recordings, you should understand and be able to manipulate EDLs. Even the most basic dialogue editing skills—finding and using alternate takes to lose noises, improve acting, or resurrect wide, off-microphone shots from their watery graves—require that you know your way around an EDL.
Dissecting an EDL
An EDL is a description of each event in an edited sequence (a reel, a trailer, a commercial, etc.). Each line in an EDL describes one clip, whether audio or video. The industry-standard CMX 3600 EDL (see Figure 7.6) isn't the least bit difficult to learn; it's just humorless and terribly monotonous. It's very data frugal, and parts of its information, such as channel mapping, are amusingly cryptic. Fortunately (hopefully) the CMX 3600 won't be around much longer, as the AAF Association is developing a new format. For now, though, you can't escape it.
Even though picture editors regularly use eight or more audio tracks in their timelines, the CMX 3600 format can describe only four at a time. Films edited with more than that require multiple EDLs, each representing a four-track group.
Let's look at one event from this EDL. Learn one line and you've got the whole thing.
000004 12Y05M03 AA C 13:36:40:15 13:36:44:20 04:00:19:06 04:00:23:11
*FROM CLIP NAME: 79 C-02
The top line describes the source of the audio (it could just as easily be video) and its original timecode, plus where it sits in the edited film. The comment line (indicated by an asterisk) provides notes from the picture department. Traditionally, this is the scene and take.
Table 7.1 describes names and describes each field in an EDL event.
The title of the project is on the top line, along with the reel number, the identification of the EDL (in this case, tracks 1 to 4) and whatever else the picture department wants to tell you.
TITLE: NESSIE's REVENGE REEL 4 TR1TO4 24FPS
FCM: NON DROP-FRAME

| Column | Field | Description |
| 1 | 000004 | Event number. A series number that makes it easier to refer to specific edits. |
| 2 | 12Y05M03 | Source. The originating media—the source roll. If sound was captured on a hard disc recorder, this is the date of recording. If sound was recorded on tape, this cell is the tape number. |
| 2 | AA | Record channels. The channels in the session on which the sound was recorded (or edited), not the source channels. When working a DAW, this information is of little interest. |
| 3 | C | Transition type. cut (C), dissolve (D), wipe (W), key (K), etc. |
| 4 | 13:36:40:15 | Source start time. Where on the original field recording, the event begins. |
| 5 | 13:36:44:20 | Source end time. Where on the original field recording the event ends. |
| 6 | 04:00:19:06 | Record start time. Beginning of the event in the edited program. |
| 7 | 04:00:23:11 | Record end time. End of the event in the edited program. |
| *FROM CLIP NAME: 79 C-02 |
Comment field. One or more fields for additional information. In this case, the scene/shot/take information for the event. |
|
Beneath the title, you may see FCM (“frame count mode,” meaning the way the EDL counts the number of frames in a second) followed by NON DROP-FRAME or DROP-FRAME. This flag refers to timecode type of the edited tape or session, that is, timecode count rate of the edit master, not necessarily that of the source material. Normally, on PAL (25 fps) or true film (24 fps) EDLs, you won't see an FCM listing, since there's no need for drop-frame in those timebases. It's very unlikely that this flag will be incorrect, but anything can happen. If you're absolutely sure that the FCM indication is wrong, you can correct it when you clean the EDL (to be discussed soon).
The one or more “comment lines” beneath the event line begin with an asterisk. This is a signal to most EDL management and soundfile assembly programs that the line is not an event, but is instead a comment that can be used to name the clip in your session.
000004 12Y05M03 AA C 13:36:40:15 13:36:44:20 04:00:19:06 04:00:23:11
*FROM CLIP NAME: 79 C-02
In this event, the text line
*FROM CLIP NAME: 79 C-02
identifies the scene, shot and take (scene 79, shot C, take 2).
Now you know the slate information for a clip. What's lacking is where the original file lives. Hard disk recorders include all of the takes from one shooting day in a folder whose name is the date of the recording, which is usually showed in the second column from the left in an EDL:
000004 12Y05M03
This event was recorded on the 3rd of May in 2012, and it's in that folder where we will find the file. When shooting on tape, this column refers to the source media rather than the folder.
For the most part, that's it. There are, however, a few quirks worth looking at. For example, this EDL event describes a 78-frame fade to black.
000030 12Y03M27 AA C 18:56:39:13 18:56:39:13 01:05:02:00 01:05:02:00 000030 BL AA D 078 00:00:00:00 00:00:03:06 01:05:02:00 01:05:05:06
*BLEND_AUDIO_DISSOLVE
*FROM CLIP NAME: 6 A-02
Notice that event 00030 occupies two lines, the first of which has no duration. Now look at the next line. Rather than the usual C, for cut transition, there's a D followed by 078. This double-line event represents a 78-frame dissolve (“crossfade” in audio terms) from material in the folder “12Y03M27” to black (silence in the case of sound). In other words, a fade out.
In truth, by the time you get an EDL it should be stripped of dissolves. Ask the assistant film editor to convert fades to cuts before generating the EDLs. Otherwise, if you happen to have an Avid, you can easily do it yourself with EDL Manager.15 If you don't have a media composer lying about, there are other EDL utilities, such as EdlMax, that offer advanced EDL management tools.16 The other common source symbol in an event is AX, or AUXILLARY, which specifies a video switcher or signal generator. You'll commonly see AX at the head of a reel, signifying PAL or NTSC color bars that coincide with the 1 kHz reference tone. It's unlikely that you'll encounter AX pointing to meaningful dialogue information.
There's something else odd about event 00006: the record channel. Rather than A for audio channel 1, A2 for audio channel 2, or AA for both 1 and 2, the word NONE appears.
000006 12Y05M03 NONE C 13:22:31:21 13:22:33:18 04:00:26:11 04:00:28:08
AUD 3 4
*FROM CLIP NAME: 79 A-14 G
What's the point of an audio recording with no record track enabled? But wait, on the line below you see AUD 3 4, which means that the sound for event 00006 is edited to channels 3 and 4 in the Avid session. Remember, the CMX 3600 EDL is a very old and quirky means of expressing edit decisions. Its ancestors were controllers for VTRs with only two audio channels. In the glory days of linear videotape editing there were many of EDL, any of which could have made for a better way of expressing multichannel edit data. As is often the case with standards, however, the weakest of possibilities became the norm. The AES-31 audio decision list (ADL) sorts out many of these problems, as it's designed to handle real-world data transfer issues and is delightfully sample-accurate.17
Finding the End of a Shot
Ask a film editor to identify the last frame of a shot and you'll be shown the last image connected to the shot in question. The sync block counter will read that shot's ending footage. This is clear, and it reflects the way we relate to physical objects. The last step in France before entering Belgium is on the French side of the border; the last word on a page in a book is, in fact, the last word before you turn to the next page. So, if the last frame of a shot is 231 feet, 12 frames, the next shot will begin at 231 feet, 13 frames. Seems pretty obvious.
But video, being a constantly evolving, ever-scanning illusion, doesn't work this way. By design and necessity, the last frame of a shot in video isn't the last frame we see but rather the beginning of the next frame. Look at this EDL excerpt.
000004 12Y05M03 AA C 13:36:40:15 13:36:44:20 04:00:19:06 04:00:23:11
*FROM CLIP NAME: 79 C-02
000005 12Y05M03 A2 C 13:47:15:03 13:47:18:03 04:00:23:11 04:00:26:11
*FROM CLIP NAME: 79 D-04
Here event 00004 ends at 04:00:23:11. The next, 00005, begins at 04:00:23:11, and not a frame later, as you would expect from the common-sense film model (see Figure 7.7).
Organizing Your EDLs
If you're going to auto-assemble the editor's session from original 24-bit BWF files, you'll almost certainly have to do some preparatory work on the EDL. It's important that the list is clean, containing no illegal situations in which edits end before they start or where column widths aren't standardized. You must also confirm that naming conventions are respected and that notations are consistent.
List Management Software
The easiest way to clean an EDL is with a list management program such as Avid's EDL Manager, EdiLoad,18 or EdlMax. Each works slightly differently, but the goal is the same: to prep an EDL before using an assembly program that matches original recordings to a picture editor's cut. These

Figure 7.7 The out point of a shot is measured differently in video than in film. In film, the last frame physically within a shot is considered the out frame; the next shot begins with the next frame. In video, out is considered to be the frame after the end of the shot, and the next in frame will have the same timecode value.
programs can also be used to modify EDLs, to change the frame rate, to offset timecode, and to merge or split EDLs. Some programs will also perform the assembly as well as conform sound sessions to match picture changes (more on reconforming in Chapter 18). One such example is EdiLoad (see Figure 7.8).
Getting the Right Names Into Your Clips
As mentioned earlier, it's important that your session clip names reflect the scene/shot/take information from the Avid and, ultimately, from the original recordings. You can in fact cut dialogue without this information in the clip names, but you'll expend so much energy figuring out camera angles and digging about for clues to sources that you'll be exhausted before you've even begun.
As we saw previously, shot information is carried below the main edit line in an EDL, either as a comment or as part of a clip names line. If you don't have comments in your EDL, send the list back to the picture department and ask for a version that includes scene/shot/take information. In most auto-assembly programs (and with any decent EDL cleaning software) you can choose to eliminate recurring text that you don't want in your clip names. For example, you don't want all of your clips looking like this:
*FROM CLIP NAME: 79 D-04

It's pretty obvious that you'd prefer to work with just:
79 D-04
All you need to do is tell your auto-assembly program to delete the string *FROM CLIP NAME:{space}{space} and clips will be labeled correctly. Figure 7.9 shows how this can be managed automatically in Titan. If your software can't delete these recurring strings, you can do it manually.
Fixing Comments with a Word Processor
If you don't have an EDL management program, you can—in a pinch—edit these text strings in a word processor or text editor. Locate the text string that precedes the scene/shot/take information (“FROM CLIP NAME:{space} {space}”). One string at a time, perform a global replace to rid the line of its prefix. It's not unusual to find different text preceding the take information (“TO CLIP NAME:{space}{space}”, “CLIP NAME:{space}{space}”, etc.) To rename all of these variations, you must perform separate global replaces (see Figure 7.10).
So *TO CLIP NAME: 24-07 becomes *24-07. Don't delete the asterisk (*) at the beginning of the string because some auto-assembly programs use this to distinguish a comment line from an event line. Lose the * and you may not see your shot information in the clip. Repeat the global replace for each of the text string variations preceding the shot information in the CLIP NAME line.


Figure 7.10 Use a word processor or text editor to globally replace text you don't want in your clip names.
All spacing and alignment in an EDL is done with spaces, not tabs. This goes against all you were taught about word processing, but you must align columns using the spacebar. Be very careful that all columns line up exactly. This is much easier when you use a fixed-space font such as courier.
Save the EDL with a new name, as a text-only file. Auto-assembly programs can't read Word (.docx) files nor NeoOffice (.ods), so save in text format (.txt), or your hard work will go unrecognized. Simple text editors almost always save in text format, so you won't encounter this issue. To keep all these saved EDLs straight (there's still one more set of files to go!), you might want to add another folder to your existing EDL hierarchy:
Nessie's Revenge (film title)/
EDLs (all EDL files)/
EDLs post cleaning (as opposed to raw EDLs or print-ready EDLs)/
Metadata
Metadata is data about data. Look through the directory of a sound effects library and you're dealing with metadata. Pour over the log sheets from a narration recording session and you're using the stuff. Search for an alternate take of dialogue using an EDL and sound reports and you're working with two levels of metadata to locate the sounds you want. Dialogue editors use metadata to keep track of recordings and to organize and find material, based on certain criteria.
Most of the metadata you'll encounter originates at the shoot, when the location mixer enters the date, scene/shot/take, track ID, timecode, and more. The camera also generates metadata, the bulk of which is of no interest to you. This information will follow the files through the postproduction path. Table 7.2 shows some of the metadata that can be recorded with hard disk field recorders.
Your most common brush with metadata will come when the picture editor's cut is handed over to the sound department. Clearly, you want more than unnamed clips of audio to show up on her timeline: proper filenames, channel ID, and timecode are essential. It's metadata from the original recording that makes this happen.
For example, Cantar, in conjunction with its Majax file management system, uses metadata to move projects from field recorder to most NLEs then to most DAWs, all the while preserving the huge amount of information within the files. The location mixer can use Majax to prepare a custom reference mix for the editor. Figure 7.11 shows the Majax main screen. The Cantar uses a filetag naming system, which means that the filename does not reflect scene and take information; soundfiles are named with a rather intimidating code. Clearly, this has its disadvantages when you're editing. However, this human-unfriendly naming scheme is what enables Cantar-originated files to move easily from 24-bit polyfiles to 16-bit mono reference files for editing, back to 24-bit multi-monophonic files for assembly in a DAW or with assembly software such as Titan or Assemblerator.
Each workstation has its own way of dealing with the vagaries of metadata, mismatched bit depths, and multitrack soundfiles. To complicate matters, the choice of hard disk recorder used in production will influence the route you and the assistant picture editor will take to manage the project. This needn't be overwhelming; you just have to discover early in the production, long before you start editing, how the film is being shot and
| Duration | Original time stamp | Sound roll TC |
| File comment | User time stamp | Sound roll TC rate |
| Date modified | TC rate | User bits |
| Date created | Channel names | Tape ID |
| #Channels | Scene | Project |
| Format | Take | Circled |
| Sample rate | Shoot date | Clip names |
| Bit depth | Sound roll |

Figure 7.11 Majax is a utility for managing soundfiles recorded on Cantar multitrack recorders. It enables sound mixers to preview and mix tracks, and to manage metadata. Plus it can quickly extract wild sound recordings.
recorded. Talk with the assistant picture editor as soon as shooting begins; she's after all the one who will be syncing the dailies and organizing the paperwork, and who'll catch the potential pitfalls of the system. At the very least, learn the following:
- What hard disk recorder was used? What's the sample rate and bit depth? What's the file format (hopefully BWF, 24 bit, 48 kHz)?
- What picture workstation was used? Which model and software version? Knowing the version is important, since two different software versions of the same picture workstation may have wildly different capabilities.
- Will the editor cut with all of the recorded audio tracks or use a guide track?
- Who's in charge of all of this?
It's much better to learn of a trap now than to wait until the picture is locked and the weight of the production is on your shoulders. Now you have time to go back to the books to learn what you did wrong and to get the picture department to change some habits.
Performing the Assembly
Once the list is in order, you're ready to assemble the show. Compared with the efforts you've gone through to clean the EDLs and to make sure the metadata is acceptable, the assembly itself is a snap. Some audio workstations can perform an assembly “in the box”—assuming that the sound recordings carry metadata and the material have been handled properly.
Even if the original multitrack sound was not loaded into the NLE before picture editing began, the sound department can link the original soundfiles to the editor's timeline, assuming that all tracks of each cue are the same length and that the metadata makes sense.20 Similarly, most workstations enable you to find appropriate suggested matches for a selected clip, as you saw in Figure 7.5.
More often than not, you will use a freestanding assembly program to match the original recordings to the edit. Although the specifics vary by manu -facturer, the process remains essentially the same.
- Load an EDL into the assembly program, on a computer with access to the soundfiles—either locally or across a network.
- Supply information such as naming scheme for the soundfiles, file type, and timecode format. As expected, you're asked to locate the folders— whose names are usually the date of the shoot—containing the soundfiles and to name the soon-to-be-born DAW session.
- Choose which comment text string the program will use to name the resulting DAW clips.
- Assemble. Having found a candidate folder, the application seeks the appropriate timecode and automatically extracts the event. Any failures, whether due to incorrect folder names, timecode (timestamp) errors, or missing media, will be reported in an error log.
- Once you've conformed one EDL for a reel, repeat the process for all other EDLs for that reel, and then merge the tracks.
Assuming no major hitches, it's very easy. If you do encounter a problem, check the EDL for irregularities and look for inconsistent folder or filenames.
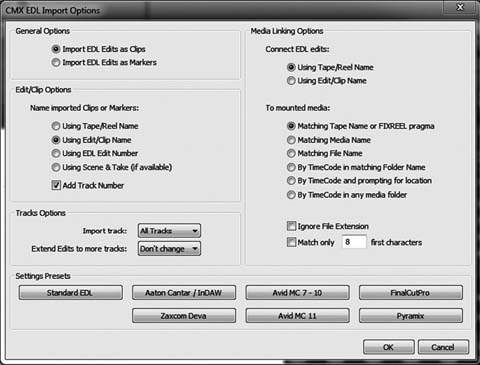
Some workstations allow you to clean an EDL and perform an assembly, all within the DAW. Figure 7.12 shows the Pyramix CMX EDL Import Options page. As would be expected, here you select import options. You can also chose whether to base your assembly on the picture editor' EDL or an OMF/AAF export from the Avid.
Sync issues in the assembled session
When you complete the assembly, you may notice irregular sync problems. Large offsets between the editor's guide track and the conformed tracks may be due to timecode inconsistencies or other technical problems in the field recordings. Smaller sync errors are likely due to the differing sound arrival time for various mics on the set, or due to the fact that picture editors have a resolution of one frame, while on a DAW it's one sample. So even in a perfectly executed assembly, it's common to encounter sync offsets of up to half a frame. Defining and fixing all of these random sync errors will make you crazy, so there are software products that will compare the guide track with the assembly and sync the new tracks accordingly. One such utility is Fix Sync, which is bundled within Titan. Once your session is in sync, the audio side of your project is ready to go.
Filenames
The ease with which you can produce and compare endless variations of a cut is one of the greatest blessings—and curses—of DAWs. By the end of the project you could easily have created hundreds of different versions of a film, each represented by its own session file. There are countless reasons for this, such as:
- The picture editor makes some changes after picture lock, and you have a new version.
- You decide to pursue a new creative path on a scene, so you create a new version.
- You put together a dialogue cut for a temp mix or for a special screening, and a new version exists.
- A couple of times a day you “save as” under a new name so that you have a way to backtrack in case of file corruption and to protect yourself from your mistakes and misjudgments. These files get new names.
Each version is a new session. You have to name these files something, so you might as well give them names that illuminate. With all of this in mind, here's a suggestion for dialogue session filenames
short name Dial Rx ver x, edit x
which translates into what's shown in Table 7.3.
| shortname | Abbreviated film name used by all editors. Probably the name the lab uses on files relating to t h e film. |
| Dial | Indicator that the session is about dialogue and not SFX, BG, etc. |
| R | Reel number. |
| ver | Picture version the session applies to. Could be the date when the video was modified or the picture version name or number. Could also refer to special attributes of the session (director's version, screening version, merged-session version, etc.) |
| edit | Dialogue edit in this picture version. Might be a series number (1, 2, 3, …) or date of the edit. |
Barring other reasons for creating new versions, I'll do a save as twice daily, once at lunch and once at the end of the day. If my starting file for the day was
Jordan Dial R5 ver4 edit 3
My midday save will be
Jordan Dial R5 ver4 edit 4
and my end-of-the-day save will be
Jordan Dial R5 ver4 edit 5
If I come in the next morning only to realize that the double cheeseburger at yesterday' lunch so clouded my judgment as to render the entire afternoon's work unusable, I can always revert to edit 4, not tell anyone of my disaster, and swear off heavy food for the rest of the gig. If I'm going to try a creative path I consider likely to fail, I'll make a new edit (possibly “Jordan Dial R5 ver4 edit 5a”) that differentiates this experimental version from the “straight” work I've done. If edit 5a fails to be brilliant, I can easily revert to edit 5.
Perform a normal save, in which the session file is overwritten, as often as you can remember. You can also use your workstation's auto-save feature to make overwrite saves of your sessions at regular intervals. Setting auto-save to a very quick setting (e.g., one minute) will protect you from crashes, but do little to save you from your own mistakes. Short intervals between saves means that pretty quickly you're overwriting slightly older auto-saves. Auto-save is no replacement for frequent manual saves.
Back Up Your Files
Needless to say, you must have a plan for backing up your soundfiles and sessions. Unlike SFX editing, where your bank of sounds is constantly growing, dialogue doesn't generate a lot of new files after the OMF import and/or auto-assembly, so you can do one big backup at the beginning of the project and most of the work is done. Still, you have to back up daily the handful of new files you inevitably generate: the bounces, consolidations, processed clips, and all files you import into your session. Open your session without them and you'll face embarrassing holes. Also, any destructive process, such as Pro Tool's pencil tool, alters your originals. Such modifications aren't stored with the session, but rather exist as changes in the underlying soundfile, which must be backed up once again. And don't forget to back up your ADR files.
By far the easiest way to back up a session's new soundfiles and keep them up to date is with a back-up utility, of which there are many. Whether you back up to an external drive, a cloud drive, or across a network, back-up programs keep track of changes to your drive since the last back-up session and incrementally copy only what's necessary.
Without special software you can still manage your backups with confidence; it's just a bit more work. After the OMF/AAF is opened and you've created your master sessions, copy the entire project to a large back-up drive. On your work drive, label (color code) all of the files that have been copied.
- As you edit, pay attention to where you put new soundfiles (on Pro Tools, this is controlled in the Disk Allocation window). Fewer target folders mean fewer places to look for them.
- At the end of each work day, open all of the folders to which you've been adding soundfiles. Sort by modification date, and the new, unprotected will come to the top. These new files won't carry a color label since they haven't been copied to the backup drive. Copy them (from every applicable folder) to the backup drive now. Previously copied soundfiles that have undergone destructive changes—such as with Pro Tools' pencil— will sort near the top of the list because they were recently modified, but they'll carry a color label from previous backups, making them a bit harder to find.
- Don't forget to copy your session files.
- Finally, color label the newly copied files to indicate that they've been backed up.
Keep a Backup Off-site
The whole point of backing up your material is to make it safe. Even if you back up daily and your files are scrupulously well organized, you're not covered. Fire, flood, theft—any of these will wipe out your internal drives and likely your backup. Keep a copy backup on a small drive and take it home with you. Or, use a cloud drive service like Gobbler21 that backs up continuously to drives somewhere out there in the ether. However you go about it, backing up systematically costs you little time, weighs nothing, and it gives you one less thing to worry about.
_______________
1. Many sound editors—SFX, BG, Foley, music—edit with “supersessions.” These are sessions whose timeline runs for several hours, the total length reflecting the number of reels in the films. Individual reels still bear their original timecode (1hr, 2hr, etc.), but they are dropped onto this giant timeline, so much of the timeline is empty. Editors who need to cut and paste between reels to save time or to improve continuity often work on supersessions. Most dialogue editors prefer to work on individual reels, but it's really a matter of choice.
2. Jack L. Calaway, personal correspondence, 2006.
3. A good history of the CMX 600 can be found in Bob Turner “A Reflection/Eulogy” SMPTE/New England Newsletter January 1998.
4. For a riveting personal history of electronic picture editing, see Walter Murch In the Blink of an Eye, Second Edition, (Los Angeles: Silman-James Press, 2001, pp. 75–146).
5. Introduced in the early 1980s, Sony PCM-1630 was a digital audio format designed to be recorded to ¾" U-matic videotape.
6. Ron Franklin, “Workstation File-Format Interchange” Mix Magazine (vol. 1, October 2002).
7. “MXF Overview,” Pro-MPEG Forum, 2009; see www.pro-mpeg.org
8. For a more detailed discussion of AAF and MXF, see Brooks Harris, “Advanced Authoring Format and Media Exchange Format” The Editors' Guild Magazine (vol. 24, no. 3, May/June 2003).
9. Automatic Duck Pro Export FCP is a tool that enables export from Final Cut Pro to Avid, Pro Tools, and Quantel platforms. (www.automaticduck.com).
10. If double clicking on the AAF icon doesn't work, it means that the AAF file doesn't know which application to address. Instead, open the file from within your workstation.
11. Titan is a product of Synchro Arts Limited (www.synchroarts.com).
12. Conformalizer is a product of Maggot Software (www.maggot.co.nz).
13. EdiLoad is a product of Sounds In Sync, Pty. (www.soundsinsync.com)
14. XLM-Pro is a product of Gallery Technologies (www.gallery.co.uk).
15. EDL Manager is a utility from Avid that lets you clean and sort EDLs. Once a freetanding program available for free, it is now bundled with Media Composer, Film Composer, or Xpress.
16. EdlMax is a product of Brooks Harris Film & Tape, Inc. (www.edlmax.com).
17. AES-31 is a standard designed to improve interchangeability between digital audio work-stations. Relibilty, file format, new edit list structure, and automation information are all being addressed in AES-31. (www.aes.org/publications/standards/search.cfm?docID=31)
18. See www.soundsinsync.com
19. Digidesign Field Recorder Workflow Guide, version 7.2, 2006. (http://akmedia.digidesign.com/support/docs/Field_Recorder_Workflows_29732.pdf)
20. Digidesign Field Recorder Workflow Guide
21. (See www.gobbler.com)