
CHAPTER 17
Editing Production Sound for Documentaries
If dialogue occasionally assumes a supporting role in dramatic film sound editing—quietly toiling away in the shadow of its sexier sound effects, music, and Foley colleagues—it's at center stage when it comes to documentary films. Documentary is a hopelessly broad genre, including anything from straightforward news docs to wildly stylized films that are largely re-enactments, from concerts to cinéma vérité glimpses into someone's life. Nevertheless, although they cover a wide spectrum, documentaries are for the most part overwhelmingly dialogue driven. Many have soundtracks that consist of little more than production sound, however edited it may be.
Documentary Sound Challenges
Dialogue editing is dialogue editing, so documentaries require the same basic sound editing skills as do dramatic features. You have to organize the tracks to understand the material and create the circumstances for an easy mix. You have to smooth the transitions between shots to create the impression of a living scene that feels real. And you have to remove unwanted noises and anything that calls attention to the filming process.
Still, documentaries present a variety of special challenges for the dialogue editor.
• Often there'll be few or no backgrounds or SFX added to a scene, so the dialogue must carry the entire soundtrack, placing it under much greater scrutiny.
• Rarely are there second takes in a documentary, so finding alternate material to fix overlaps, remove noises, and correct improperly terminated sentences is more difficult.
• Documentary film editors regularly construct voiceover sentences from disconnected sections of an interview, leaving it to you to make them sound like normal language—by repairing cadence, pitch, and energy with very limited resources.
• Depending on the type of documentary, there may be various ethical restrictions on your language manipulations. Overwhelmingly, these concerns fall on the picture editor, but in certain cases you may be required to document the source of the “fakes” you used to make the film sound like a film.
• Documentary structure differs from dramatic structure. Narration and interview/voiceover material and scenes, or B-rolls, are each handled in their own way, so you have to adapt your workspace to let the tracks speak to you and to prevent a confusing mess in the mix.
• Because of the way documentaries are filmed, the clip names in the OMF/AAF session will probably be of less use than what you'll find on dramas. Sound reports—if they exist at all—will likely provide less information than you're used to getting.
• Most documentaries have tighter budgets and schedules than dramatic features, so you have to get used to working more quickly and managing the mix with greater efficiency.
The Documentary Workspace
Since there's no such thing as a “typical” documentary, it's difficult to create a session template to suit all types. But I'll try.
Imagine that you're working on a documentary consisting of interviews, occasional omniscient narration (a.k.a. “Voice of God”), and scenes that illustrate what everyone's talking about. Most of the story is carried by interviews or by voiceovers derived from them. The narration provides additional exposition and background information, and the “scenes” are either freestanding and follow the rules of drama, or are simply illustrative cutaways.
Note that narration is defined here as text spoken by a person who is usually not one of the film's interview subjects. Voiceover, on the other hand, is dialogue derived from interviews but temporarily disconnected from the talking head that uttered it. Usually narration is recorded in a studio, generally close-microphone recorded, and read from a script. But voiceover, whose genesis was an interview, carries with it all the characteristics of location sound.
When you receive the OMF/AAF, it's likely that all of the dialogue elements will be jumbled together, so your first task is to sort out the mess. Just as with dialogue tracks for dramatic films, it's impossible to make sense of what's there before you organize it. So too is it useless to wade through documentary sound elements until you can put each one in its proper place. And just as in dramas, make sure that you received all microphone channels that were recorded during the shoot. Since there's a good chance that there are no sound reports, and since the film editor may not actually know how many tracks were recorded, you may have to talk to the location mixer and find out what you should expect. If you know that there are tracks missing, you'll at least have the choice—assemble the missing tracks or stick with the location mix—based on available time and money.
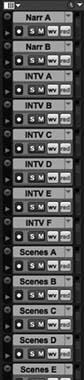
You can organize your documentary tracks as shown in Table 17.1. Of course, since each documentary has its own style, you'll have to adapt your track plan to the needs of the film, filmmaker, and mixer.
Once you've organized your tracks, place memory markers on all scene boundaries. You do this for the same reasons you mark the beginning of
| Track Name | Contents | Description |
| Narr A | Primary narration | If there's only one narration voice, recorded in the same setting, use only one narration track. |
| Narr B-? | Other narration | If there are two or more narrators, or if the single narrator was recorded in more than one (different-sounding) location, assign additional tracks. |
| Intv A-? | Interview/voiceover (or Info A-?) | This is where all interview-based information is placed. |
| Use as many tracks as you need, but usually five or six of these will do. | ||
| Scene A-? | Scene/vérité material | Use these tracks for noninterview material: B-roll action or cutaways to illuminate the voiceover; full scenes of character action; montage constructions. Usually five or six scene tracks are sufficient. |
| Music A-? | Musical performances or other music stripped from the OMF | Use these tracks for production music (e.g., the band is playing or the string quartet is practicing) or score or acquired music that you inherited with the OMF. |
scenes in dramas: to indicate where to cut dialogue and later backgrounds, to ensure that all scene-to-scene transitions are of a desired and predictable length, and to create an easy way to find scenes and perspective cuts.
Track Templates
Many fast-turnaround documentary-style series do not leave it to the dialogue editor to determine track layout. Reality programs, reportage series, and other shows that have a consistent style, a trademark presentation, and lots of stress will have a track layout that begins in picture editing and ends in the mix. You will receive an AAF whose track plan is fixed in stone. It is up to you to make the best of it. And unlike most films and TV series, the realities of these programs encourage you to use the picture editor's volume automation—at least as a starting point. Needless to say, this workflow requires coordination, communication, and respect for those downstream.
Cutting Scenes and Narration
You cut documentary scenes much like you cut dramas. The vérité material (or vérité scenes or B-roll material, or actualities or something else, depending on whom you ask) behaves much like a dramatic scene, so use the same rules of track organization and shot transition. Within a scene, split shots by character, shooting angle, noise problems, or whatever else makes sense. Also split off unusually loud or noisy elements for easier mixing. Documentaries usually have fewer dialogue tracks than dramas, but you never know. Ask the mixer what she wants.
Narration, like ADR, shouldn't carry appreciable room tone, so usually you need not bother filling between regions. You may want to fade the tops and tails of the narration segments to avoid clicks and to smooth what little room tone there is. However, just as with dialogue, never fade during words.
The narrator's breath is a touchy subject. Many editors argue that the narrator's omniscient, God-like point of view requires that mundane human breaths be removed. Certainly vulgar, unsavory, or loud breaths get in the way of the film and misdirect attention to the reader rather than the writer of the narration. These must go, as must page turns and other silly sounds. At the same time, a long string of text without any breathing can leave listeners gasping. It just doesn't sound right. I like to begin such a paragraph with a small, delicate breath and then eliminate all intervening breaths. But it just depends.
If the film is narrated by a known personality who's serving as an activist or endorser, you're likely to keep more breaths. She was hired in part because of her persona, so it makes sense to give her some human presence. If, on the other hand, the narrator is an anonymous voice (a “talent”), you'll probably want to lose more breaths to maintain a respectable distance.
As with ADR or dialogue editing, you needn't use a sound just because it's there. Narration is nothing more than someone reading into a microphone. It's not sacrosanct. If there are flaws—pops, diction and inflection problems, mouth noises, and so on—don't be afraid to dig into alternate takes for solutions. The same goes for problems with delivery. Of course, save the original—in sync—on a nearby track so that you can get things back to normal if the director dislikes your changes.
Talking Heads and Voiceovers
You'll likely spend most of your time working with interview material or voiceovers derived from interview footage. After all, this is how documentaries tell their stories.
Start by organizing the interview regions by shot origin, which normally means splitting first by interviewee and then by location. If in one scene you have talking head and voiceover material from three characters, split the regions onto three tracks. If a character in a scene appears in material originating in more than one filming location or from an additional audio source (such as an audiocassette recording), split this material onto additional tracks. If you need more tracks to solve cadence or shot-matching problems, use them.
In short, follow the rules and logic of dramatic editing and you will likely make the right choices. Normally you don't need to split a character based on on-camera versus off-camera, since you usually want a continuous story between a character's talking head and his voiceover.
With a limited number of characters and interview filming locations, you may be able to place your subjects on dedicated interview tracks for the duration of the film. This allows for very easy mix organization, but works only if you have very few characters and locations. Talk to your mixer before pursuing this approach (see Figures 17.1 and 17.2).

Typical Documentary Problems
Now that your interview tracks are organized, you can begin making sense of the phrases the picture editor put together to tell her story. Aside from familiar chores like balancing room tone and removing noises, you face two common documentary frustrations: (1) cadence problems caused by assembling sentences from different parts of an interview or constructing phrases based on text rather than sound; and (2) incorrect terminations caused by a sentence chopped off before the phrase actually ends, resulting in an unconvincing ending inflection.
Cadence and Voice Matching
It makes sense for documentary filmmakers to transcribe their filmed interviews. By studying the text of an interview, they gain a foothold on mountains of footage. Documentaries are famous for their small budgets, so some filmmakers use transcripts to organize the film's backbone— the stories derived from the interviews—possibly long before the picture editor comes on board. The result can be more efficient editing, even if the transcription separates the picture editor from some of the footage. And in investigative, political, or vox pop documentaries, transcripts can be essential in proving the authenticity of the footage in the event of a libel lawsuit. However, problems arise when interviews are edited in a word processor rather than by an editor working with both the interview and its sounds and images.
When a producer or director (or worse, a committee) constructs dialogue by cutting and pasting words from transcripts, the results are completely content driven. The filmmaker has a story to tell, she has before her all the words spoken by the interviewee, and she soon learns how to make him talk. Even though what's produced may be the sought-after story, when the film editor tries to impose the director's text-based vision on the footage, the resulting sentences may have inflection problems, rhythm irregularities, and misplaced breaths. The time/date recorder on your voicemail might sound more like a known language than do many voiceovers edited this way. A decent documentary film editor will reject the worst of the atrocities and find workarounds for others. But you'll still inherit much impossible but pivotal dialogue.
When a documentary picture editor strings two spoken phrases together into one thought, they often rush the timing across their edit. Their edits are obvious, not because of a technical flaw but because the speech patterns and vocal inflections do not sound natural. Inexperienced dialogue editors may accept those flaws without trying to improve them. Maybe they don't hear the edits or maybe they tell themselves that the picture editor handed them over that way so they must be good enough. My tolerance level for such mistakes is very low, so low that I now insist on editing my own dialog tracks whenever possible.
Richard Fairbanks, rerecording mixer
National Geographic Explorer
What can you do? First of all, find the transcripts so that you can use the same tool that built the mess to sort things out. When you encounter a bumpy string of words that you can't massage with your normal dialogue editing tools, look for solutions within the transcripts. “But how,” you may ask, “will the transcripts help me find a solution to the transition problem when the director, producer, and editor had the same document and only made matters worse?” The answer is that they were looking at content. You're looking at sound.
Listen to a bumpy edit between two regions and identify the sound transition. It might be a long vowel moving to a sharp consonant or perhaps a stop, like a T followed by a vowel. Whatever it is, look through the transcripts to find similar-sounding transitions, although not necessarily the same words. The film editor may have overlooked a good sound transition because she was concerned with meaning, which requires longer word strings, while you care only about transition sounds. Naturally, you'll begin by looking for exactly the same words in combination to get the most realistic results.
Sometimes you have to time-stretch parts of a region to create a better cadence. Remember to save the original region in case your efforts fail or you need a clean starting point for a single region that requires several kinds of time squeezing. Also remember to open up the handles of the original region before changing the speed or duration of the file, since this will give you greater flexibility when you splice the new region into the sentence. You may need to selectively change the pitch of certain clips for the string to make more sense.
As discussed in Chapter 15, all of these processes are unfriendly to sound quality. Whether adjusting length, speed, or pitch, don't reprocess an already processed soundfile. If you need to fine-tune your parameters, you're far better off returning to the original clip and modifying your settings.
When the editor hands you a string of voiceover edits that just don't fit together, don't be shy about replacing words with more sound-appropriate alternates. Keep the original regions in case you or the director are unhappy with the new construction, but be as bold as necessary to recreate believable sentences. Remember, the director and editor created these strings by assembling dismembered words, so you're under no greater obligation to honor the integrity of their unworkable assembly than they were to honor the integrity of the dailies. Just make it work.
Termination
It's common for a documentary filmmaker to chop off a sentence in order to bend its meaning. “It's true: I shot him as he was running toward me with a chainsaw” may be too fact-laden for the filmmaker, so he'll turn his villain's words into an easier to understand “It's true: I shot him.” Period.
The fact that this turns justice on its head isn't your problem, but you're left to fix the mess and turn “I shot him” into a strong, believable declaration. In its current state, the sentence is bound to sound unconvincing because the liaison between “him” and “as” will corrupt the ending of the new phrase. Plus, a statement as direct as “I shot him” deserves a confident ending. You have to find a strong, terminal “him” spoken by this character in the same interview environment. If you do find such a sound, consider yourself lucky and don't ask too many questions.
It's more likely, however, that you'll have to settle for a terminal m sound from a word that rhymes with “him” (slim, grim, dim, gym, etc., and in a pinch, them) and then splice its ending onto your existing “him.” Given enough time and will, you can usually find an adequate ending. Sometimes though, you won't be able to solve the problem by editing. In such desperate circumstances, use pitch shifting, time expansion, and clever addition of room tone to generate the best termination possible. Often, a dynamic “pitch bending” utility is more effective than static pitch shifters that change equally the pitch of an entire clip. Having done all you can, use whatever sound effects or Foley gimmicks are appropriate to mask the edit.
Production Sound Effects
Whether because of ethics or because of the filmmaker's artistic or philosophical concerns, your production soundtrack may end up being the sole sound element in a documentary film. No added sound effects, backgrounds, Foley, or music—just production sound. This puts far greater pressure on your tracks to tell a complete story, maintain a steady and interesting room tone, and flawlessly move from shot to shot with nothing to hide behind.
Thankfully, audiences are far more forgiving of sound bumps in documentaries than they are when watching dramas. Documentaries are, by definition, real—even if not necessarily true—and suspension of disbelief is almost a forgone conclusion. Thus, bumps that would destroy the effective ness of a drama scene are readily overlooked.
But if you're responsible for the entire soundtrack, you'll have more on your hands than just smoothing out the picture editor's cuts. You'll need effects, backgrounds, and perhaps wild voice elements to bring scenes to life. Look through the sound reports, if they exist. If you're lucky, they'll tell you something about the shooting sequence and where room tone, wild recordings, and backgrounds are hiding. If you don't have sound reports, which is often the case with documentary sound recording, go to the last recording for each shooting location, where wild elements are the most likely to be. Or call the location recordist, who can tell you where to look, or not to try.
Don't be afraid to ask the film editor—she's far more familiar with the footage than you'll ever be. And if you're in contact with the production during the picture editing, ask the editor to set aside important wild sounds, room tones, backgrounds, and the like. It's enormously easier for her to drop these treats into an Avid bin as she finds them than for you to blindly wade through the original tapes.
If the location recordist provided some stereo backgrounds, use them. Real, appropriate stereo atmosphere will add a great deal of depth to your production tracks. Be on the lookout for small sounds like footsteps and body motions that can play the role of Foleys. And find doors, cars, and other PFX within the original recordings that you can use to beef up the track and enhance the reality of the scenes.