
Chapter 8
Viewing, Downloading, and Storing Your Pictures
IN THIS CHAPTER
Exploring a few cool playback functions
Figuring out what computer and storage equipment you need
Looking at photo-editing software options
Getting help with moving files from the camera to your computer
When thinking about the benefits of digital photography versus film photography, I rate being able to view my pictures right away, with no time or money spent on film and processing, at the top of the list. Not only do I save a ton of cash, but I know before I put away the camera whether I got the shot I wanted or need to try again.
Although I'm sure that you can figure out the basics of viewing pictures on your camera, you may not be aware of some of the other cool and useful playback features provided on many cameras today. This chapter introduces you to those options. Following that discussion, I discuss hardware and software products designed for storing and editing your photos after you move them off the camera. To wrap up, the chapter offers help with the process of downloading photos to your computer (or another storage device).
Note: Because the way you view, transfer, and store photos on a smartphone or tablet varies so much depending on the device and its operating system, this chapter concentrates on features related to standalone cameras. However, many tips, especially those related to long-term storage of your files, apply no matter what type of camera you use.
Taking Advantage of Playback Tools
On most cameras, pictures appear briefly on the monitor immediately after you take the shot. To take a longer look, you need to shift the camera into playback mode. Usually, you accomplish this by pressing a button labeled with a right-pointing arrowhead — the universal symbol for playback. You can get a look at a generic version of this symbol in Table 8-1.
TABLE 8-1 Playback Symbols
Look for This Symbol |
To Access This Feature |
|
Playback mode |
|
Magnify image |
|
Reduce magnification |
|
Delete image |
|
Protect image |


 If your camera offers touchscreen operation, you also can scroll from one picture to the next using the same technique you use on a smartphone or tablet, swiping your finger across the screen to move from one image to the next.
On most cameras, viewing your photos is just the start of the playback functions you enjoy, however. The next sections describe some of the other features you may have at your disposal.
Getting a close-up look at a photo
Most cameras enable you to magnify an image so that you can inspect the details, as shown in Figure 8-1. If your camera has a touchscreen, you can use the standard touchscreen gesture to zoom the display: Put your thumb and forefinger at the center of the monitor and then swipe them outward, toward the edges of the screen. To reduce magnification, use both fingers to swipe inward from the edges of the screen. (These motions are sometimes known as pinching in and pinching out.)

FIGURE 8-1: Most cameras enable you to magnify an image to inspect the details.
If your camera isn't touchscreen-enabled, you usually activate the zoom-in and zoom-out features by using buttons or other external controls/dials that are labeled with magnifying-glass symbols like the ones shown in Table 8-1. A magnifying glass with a plus sign means zoom in; the minus sign represents the zoom-out function.
Displaying thumbnails and calendars
You also may be able to set the playback display to show thumbnails of multiple images instead of a single photo. In fact, you may be able to choose from several thumbnails views, each of which presents a different number of photos. The left image in Figure 8-2, for example, shows a 9-image view. These displays are helpful when you need to scroll through a lot of pictures to find the ones you want to view. After you locate the first image in the bunch, you can shift back to regular, full-frame view, usually by pressing an OK button or a Set button or by using whatever control you normally use to magnify an image.
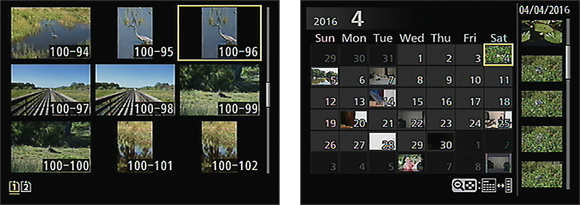
FIGURE 8-2: Also check to see whether you can display multiple images at a time (left) or display a calendar that helps you track down photos from a certain day (right).
Another useful playback option is calendar view. In this display, you can click on a date on a calendar page to easily view all pictures taken on a certain day. The right screen in Figure 8-2 shows an example of this display.
Viewing picture settings (metadata)
When you capture a digital photo, the camera embeds metadata — extra data — into the image file. This metadata contains information about the settings you used when recording the picture, including exposure, focus, and color settings as well as the capture date and time.
Checking picture metadata is a great tool for understanding how different camera settings affect your pictures. If a moving subject appears blurry, for example, take a look at the shutter speed — you then know that you need a faster shutter speed to capture that particular subject. Some cameras even display the focus point that was used when the camera set the focusing distance, which is another great bit of information when you need to figure out why part of an image isn't sharp.
Most photo viewing and editing programs can display the metadata associated with a picture file. But you probably don't have to wait until downloading your pictures, because most cameras can display at least some metadata during picture playback. In fact, you may be able to specify from several metadata display options, each of which offers up a different assortment of picture information.
In Figure 8-1, for example, the upper-left corner of the screen reveals the shutter speed and f-stop used (1/200 second and f/5.6). Other data on that screen indicate the folder and file numbers (100 and 0100) and the frame number and total number of frames in the folder (this image is number 11 out of 33 total frames). Figure 8-3, on the other hand, reduces the size of the image display so that you can see a great deal more capture data along with two histograms. (I explain histograms in the next section.)

FIGURE 8-3: Along with critical picture settings, some playback screens display histograms to help you evaluate exposure and color.
Check your camera manual to find out how to cycle through the various playback displays. Some displays may be disabled by default; you turn on those hidden display modes via a menu screen. (This option is typically found on a Playback menu or Setup menu.)
Displaying histograms
Chapter 5 introduces you to brightness histograms, which are graphs that plot out the brightness values in an image. Some cameras enable you to display a brightness histogram during playback, as shown in Figure 8-3. Checking the histogram is a great tool for making sure that exposure is correct.
 The left side of the histogram represents shadows; the right side, highlights. And a peak in the graph represents a large collection of pixels at that brightness value. So if you see a large mass of pixels at the left end of the graph, the image may be underexposed. A clump at the right end of the graph may indicate an overexposed image.
Some advanced cameras offer a second type of histogram, an RGB histogram, which displays brightness values on a per-channel basis. The red, green, and blue charts in Figure 8-3 comprise an RGB histogram.
To make sense of an RGB histogram, you need to know a little about digital color theory. Chapter 6 provides an introduction, but here's a quick recap: Digital images are known as RGB images because they’re created from red, green, and blue light. When you mix red, green, and blue light, and each component is at maximum brightness, you create white. Zero brightness in all three channels creates black. If you have maximum red and no blue or green, though, you have fully saturated red. If you mix two channels at maximum brightness, you also create full saturation. For example, maximum red and blue produce fully saturated magenta.
Back to the RGB histogram: If the histogram shows that all pixels for one or two channels are slammed to the right end of the histogram — indicating maximum brightness values — you may be losing picture detail because of overly saturated colors. A rose petal that should contain a spectrum of shades of red may be a big blob of full-on red, for example. On the other hand, if all three channels show a heavy pixel population at the right end of the histogram, you may have blown highlights — again, because the maximum levels of red, green, and blue create white. Either way, you may want to adjust the exposure settings and try again.
A savvy RGB histogram reader can also spot color balance issues by looking at the pixel values. But frankly, color balance problems are fairly easy to notice just by looking at the image on the camera monitor, so let's leave that discussion for another lifetime, okay?
For information about manipulating color, see Chapter 6; for exposure-correction tips, refer to Chapter 5.
Displaying highlight alerts (“blinkies”)
When a picture is greatly overexposed, areas that should include a range of light tones may instead be completely white. This problem is known as blown highlights or clipped highlights. Some cameras offer a playback mode in which fully white pixels blink on and off — which is why this view mode is commonly referred to as “the blinkies.”
For example, Figure 8-4 shows an image that contains some blown highlights. I captured the screen at the moment the highlight blinkies blinked “off” — the black areas in the figure indicate the blown highlights. (I labeled a few of them in the figure.) But as this image proves, just because you see the flashing alerts doesn't mean that you should adjust exposure — the decision depends on where the alerts occur and how the rest of the image is exposed. In my candle photo, for example, it's true that there are small white areas in the flames and the glass vase. Yet exposure in the majority of the photo is fine. If I reduced exposure to darken those spots, some areas of the flowers would be underexposed. In other words, sometimes you simply can't avoid a few clipped highlights when the scene includes a broad range of brightness values. When the blinkies cover an important part of your subject, though, you need to adjust exposure settings and reshoot the photo.

FIGURE 8-4: Some cameras offer a display mode that indicates blown highlights with blinking pixels.
Rating, Deleting, and Protecting Files
In addition to being able to inspect your pictures before downloading them, you also may find in-camera tools for performing the following file-management tasks:
-
Rating files: This feature enables you to assign each file a rating — for example, five stars for your favorite photos or movies and one star for those that you're likely to delete. The idea is to help you easily find your best (and worst) work when you're browsing a huge image collection.
On most cameras that offer a rating feature, you can set up a slide show, which displays your photos automatically one by one, and specify that the show should include only images that you tagged with a particular rating. You also may be able to tell the camera to delete all files that have a low rating.
When you do download your pictures to your computer, you also can sort your photos by rating. To take advantage of this option, you may need to use the photo software provided by your manufacturer, but some third-party programs also recognize ratings that you assigned in the camera. (The rating is part of the aforementioned metadata that's buried in each image file.)
How you access this feature, of course, depends on your camera, but it's usually represented by a star symbol. In some playback modes, the star rating you assigned appears with the photo.
-
Protecting photos: Do you see a button or switch marked with a little key symbol like the one in Table 8-1? If so, your camera enables you to protect individual pictures from being erased when you use its Delete option (covered next). No button? Check the Playback menu for a Protect option or, if your camera offers touchscreen operation, a key symbol directly on the screen. However you apply protected status, you usually then see a little key symbol along with the photo, as shown in Figure 8-5. The placement and exact design of the symbol may vary.
Here are two important points about this feature:
-
 Formatting the memory card erases protected photos as well as unprotected ones. Formatting is a process that wipes a memory card absolutely clean of all data, including protected files. Most cameras provide this function because formatting a card ensures that it’s prepared properly for the file-storage system the camera uses. Formatting new cards is a good idea, but be sure that you've emptied the card of all files you want to keep — protected or not — before formatting.
 - Protected photos can't be edited until you unlock them. Locked picture files remain locked even after you download them, which means that you can't edit or delete them on your computer. However, you should be able to unlock the files easily using most photo editing and browsing programs. Look for a menu command named something like Unlock Photo or Remove Protected Status — typically, the File menu holds this command. If nothing else, the software that shipped with your camera should enable you to unlock downloaded photos. You can always put the memory card back in the camera and use the camera's protect feature to remove the protected status, too.
-
-
Deleting files: Got a clunker image that you don't want to keep? No worries; every camera enables you to erase images easily. You usually get more than one way to dump files, in fact.
To erase a single image, first set the camera to Playback mode and display the photo (or movie file). Then look for a button sporting the trash can symbol (shown in Table 8-1) or an onscreen trash can. After you press the button or tap that icon, the camera likely will ask you for confirmation that you really want to erase the photo. Answer in the affirmative, and that picture's zapped into digital oblivion.
Deleting photos one by one can be tedious, though, which is why most cameras also offer a menu command, usually on the Playback menu, that gives you the choice to erase all images on the card or to select specific files to delete. If your camera has a rating feature, you also may have the option to get rid of photos that have a particular rating.

FIGURE 8-5: The key symbol indicates that the file is locked and can't be accidentally erased.
Setting Up Your Digital Darkroom
With the large file sizes created by today's digital cameras, you can fill up a memory card in no time. I explain the basics of moving files off your cards later in this chapter, but first, you need to think about what computer hardware and software you may need to work with your photos after you download them. The next sections offer my advice on such matters, including the best way to preserve your digital image files.
Assessing your computer needs
As with selecting a camera, picking the right computer — and determining whether you even need a computer — depends on what you want to do with your photos and movies after you shoot them.
Basically, your choices boil down to a “real” computer (a desktop or laptop model, with a built-in keyboard, hard drive, and so on) or a tablet such as the Apple iPad or the Samsung Galaxy Tab. To help you decide, the next two sections describe the pros and cons of each.
Tablets
Most tablets come with installed apps (mini software programs) that you can use to view and share pictures. You also can find several third-party apps that enable you to edit your photos. And for the photographer on the go, carrying a tablet is certainly a lighter, less bulky option than carrying a laptop computer (although some laptops don't weigh much more than a tablet these days).
Tablets have several drawbacks, however. First, they don't have enough onboard storage space to serve as a permanent solution for housing your photo files. And even if they did, I wouldn't recommend that option for long-term storage; tablets are just too vulnerable to damage and theft. To be fair, laptop computers present the same problems. In any case, this issue can be easily solved by investing in a separate storage solution; see the section “Preserving your files,” later in this chapter, for some ideas.
Additionally, most tablets don't have the kind of computing power needed to perform serious photo-editing tasks, especially if you're working with large image files. As I write this, some manufacturers are starting to address this issue. Apple's iPad Pro is one example of a tablet that offers greater data-processing power, although it's certainly no match for a well-outfitted laptop or desktop computer. The accuracy of the tablet display is also a concern; image colors, brightness, and sharpness can vary depending on the ambient light in which you view the images and the quality of the display itself. Again, this can also be a problem with laptop monitors, and new tablets being designed for photographers promise better display accuracy. Time will tell if that vow holds true.
Finally, you need to consider the issue of moving pictures from your camera to the tablet. If your camera offers wireless connection, you can use that pathway to transfer photos to the tablet. Some tablets also provide a way to connect a memory card reader or even the camera itself for file downloading. (You may need to buy an adapter to make this solution work.)
My take? I think a tablet works great as a temporary, portable solution for travel and, if you do photography for a living, for carrying along on remote shoots so that clients can review shots on the spot. And of course, it's perfect for transferring photos to your social media pages and for showing your work to family and friends. But if you're someone who wants to do a lot of photo editing, I recommend stepping up to a regular computer, as explained next.
Desktop and laptop computers
If you plan on doing heavy-duty photo editing, especially with large image files, I recommend a desktop, laptop, or well-equipped two-in-one laptop (the kind where you can detach the keyboard and use the monitor as a tablet). As a rule, you'll get more built-in storage as well as more powerful computing components, which enables faster processing of large image and movie files.
Of course, how a desktop or laptop compares with a tablet in these areas depends on the specs of the system you buy. And just how much storage space, processing power, and other system muscle you need depends on what you want to do with your photos. Pro-level photo-editing programs require heavy-duty systems, but a low-end system is fine for running entry-level photo programs. For video editing, you absolutely need a well-equipped system because that task is one of the most demanding assignments for a computer.
I can't be too specific about what computer specs will work best for you because with the pace at which new components are developed, my words would be outdated before they even made it to the printing press. So instead, the following list provides a general overview of components that make the most difference in computer performance. If you decide to invest in a new system, this information will help you narrow down the list of candidates. You can then check the most current computer magazines or online sites for detailed reviews to make your pick.
-
Processor: This is the “brain” of the computer. Ergo ipso facto, the more powerful, the better. However, if you're a value shopper like me, experts suggest that you get the most bang for your buck if you buy a processor one grade under the latest and greatest.
Most computer magazines and sites that review new computer components run performance tests comparing how the processors run Adobe Photoshop, the leading professional imaging software. Suffice it to say, if the processor does well on the Photoshop bench test, it'll serve your digital photography needs. -
Hard drive: The hard drive is the part of the computer that stores your programs, documents, and picture files. If you get a desktop system, you may want to get one that can house two hard drives; that way, you can store your files on one and put programs on the other, which boosts performance.
How much hard drive space you need depends on how many pictures you take and how many other files you keep on your computer. Keep in mind that a computer needs some empty hard drive space to use as temporary data storage space when you're running programs such as a photo editor. If your current hard drive is packed, start doing some house cleaning or consider adding another drive.
If your computer doesn't have room for an additional internal drive, you also have the option of adding an external hard drive. But understand that accessing files stored on an external drive usually takes a bit longer than when you work with files on an internal drive, just because the data needs to make its way through whatever cable (or wireless) connection you use to connect the drive to your computer. So although I do store a backup copy of my image collection on an external drive, I move files that I'm currently editing to my internal drive.
When looking at hard drives, note the drive speed as well as its capacity. Drive speed determines how quickly the system can read and write data to and from the drive. Again, check performance reviews in computer magazines for the latest speed data. -
RAM (random access memory): When you ask your computer to perform any task, it uses RAM to perform the calculations needed to get the job done, so more RAM equals faster performance.
For minor photo editing, web sharing, and general daily tasks such as emailing and word processing, 4GB (gigabytes) of RAM is probably enough. For more intense photo editing or video editing, double that number (at least). However, note that most programs can utilize only so much RAM, so going full tilt on RAM isn't always necessary. To find out the RAM requirements of the programs you like to run, check the software manufacturer's spec sheets.
If you're in the market for a new computer, find out how much RAM you can add — every system has a specific limit in the amount of RAM it can hold, so make sure that you don't buy a system that will leave you hamstrung in the future if your RAM needs increase. - Video (graphics) card: Also called a display adapter, this is the component responsible for making text and images appear on the monitor. Buying video cards involves enough arcane terminology that I don't even dream of covering it here, so here's my best advice: Ask your local teenage video-game enthusiast to help you pick a card. If a card performs well for video gaming, which is the most demanding operation the video card must perform, it's sufficient for photo and imaging work. Of course, computer magazines and gaming magazines also cover these components. (Just don't say I didn't warn you that you'll encounter enough jargon to make your head spin.)
- DVD burner: This component, while not absolutely necessary, provides an option for making backup copies of your files so that in the event of a hard drive failure, you don't lose all your images. Many new computers don't offer a DVD drive, but you can always buy an external burner that you can attach to the computer. Some software also is provided on CD or DVD (DVD burners can read both types of discs), but that delivery method is quickly becoming a thing of the past, with most software vendors making their wares available only for download from the Internet.
-
Operating system (Windows or Mac?): The operating system — OS, in geek terminology — can make a difference, but not in the way you probably expect. It's not which OS you choose, but which version you select. You can run many photography programs on older versions of the Windows or Mac OS, but the newer versions are optimized to work better with digital photos and movies. Some even have built-in tools for editing and sharing your work.
As for the whole Windows-versus-Mac debate: I say, “pfffffffft.” I've used both for years, and both have brought me the same amount of pleasure and the same amount of pain. You do typically get more computing power for less money if you buy a Windows-based PC, and certainly more programs are available for Windows than Mac, but other than that, it's personal preference, in my opinion. After all, when you open most programs, they look and work the same way regardless of whether you're working on a Windows or Mac machine.
Note that there are some other operating systems, including Linux, but that's an arena for computer “enthusiasts” only. I assume that if you're interested in Linux, you're enough of a computer scholar that you don't need me to tell you about its pros and cons.
-
Monitor: If you go with a desktop system, a monitor is another important component of your digital darkroom. It used to be that those big, bulky TV-like monitors (CRT, or cathode-ray tube, monitors, to be specific) produced the best-quality computer displays. Not so today: LCD displays have overtaken the market as the standard, and the images they produce are stunning. Many can serve dual duty as HDTV displays, in fact.
What about laptop monitors? Well, I would never rely on using the built-in monitor to evaluate my images, because the displayed colors, brightness, and sharpness can change when you adjust the monitor angle or even move your head a little. I recommend buying a separate monitor that you can connect to your laptop when you need to work on your images.
If you're in the market for a new monitor, research reviews carefully to make sure that the one you select performs well for this use. You may need to shop online because big-box electronics stores typically carry only monitors meant for gaming and online video streaming — which means that colors are overly saturated and everything appears very bright and sharp. That's fine if you only plan to view your photos on this monitor and you like that look. Just understand that your pictures may look very different when printed or viewed on someone else's monitor.
Whichever monitor you select, you also need make sure that it's color calibrated (set up to display your images accurately). Otherwise, any color or brightness adjustments you make may be off the mark. An uncalibrated monitor is often the cause of print colors not matching onscreen colors, so I cover this topic more in Chapter 9.
Sorting through software solutions
The photo software you use is as critical to your success in the digital darkroom as the hardware. The good news is that if your needs are basic — you just want to view and organize your photos and maybe crop an image or two — you may not need to pay a dime for a good solution. The next sections introduce you to some programs of the free variety as well as a few to consider if you need more features than the free programs provide.
Note: In this chapter, I cover programs designed to be used on a computer rather than a mobile device. See Chapter 10 for a list of my favorite tablet and smartphone apps.
Basic (and free) programs
If you don't plan on doing a lot of retouching or other manipulation of your photos but simply want a tool for downloading and organizing your pictures, one of the following free programs may be a good solution:
- Your camera's own software: Your camera may have shipped with a CD or DVD that contained free software designed by the camera manufacturer. Or you may be able to download the software from the manufacturer's website. In some cases, these programs provide only basic photo viewing and organizing, but some are quite capable. Nikon, for example, offers Nikon Capture NX-D, shown in Figure 8-6, which offers tools for removing red-eye, cropping pictures, adjusting color and exposure, and processing Nikon Raw files.
- Apple iPhoto or Photos: Long-time Mac users are no doubt familiar with iPhoto, the browser built into the Mac operating system until very recently. As part of recent operating system updates, iPhoto was replaced by Photos, shown in Figure 8-7.
- Windows Live Photo Gallery or Photos: Recent versions of Microsoft Windows also offer a free photo downloader and browser. The name varies depending on your version of the Windows operating system; Figure 8-8 offers a look at Windows Live Photo Gallery, which ships with Windows 7. In Windows 10, the program is called Photos and looks more like a smartphone or tablet app.

FIGURE 8-6: Most camera manufacturers offer a free image browser and basic photo editor; here's a look at one of Nikon's programs.

FIGURE 8-7: Apple Photos is a good basic tool for Mac users.

FIGURE 8-8: Windows Live Photo Gallery is free to Windows 7 users.
Advanced (and not free) options
Programs mentioned in the preceding section can handle simple photo editing and organizing tasks, but if you're interested in serious photo retouching or digital-imaging artistry, you need to step up to a full-fledged, photo-editing program. The following list describes the most popular offerings (prices are the manufacturer's suggested retail):
- Adobe Photoshop Elements: Elements has been the best-selling, consumer-level, photo-editing program for some time, and for good reason. With a full complement of retouching tools, onscreen guidance for beginners, and an assortment of templates for creating photo projects such as scrapbooks, Elements offers all the features that most consumers need. But don't think this is a lightweight player — you actually get many high-end editing features as well. The program also includes a photo organizer along with built-in tools to help you print your photos and upload them to photo-sharing sites. (You can find out more at
www.adobe.com. The program sells for $100.) -
Adobe Photoshop and Adobe Lightroom: I mention these two together because Adobe now makes them available as a two-tiered solution specifically geared to photography. In the past, you could buy both programs separately, but Adobe now uses a subscription-based system. Currently, you pay about $10 a month if you subscribe for a year. (This price enables you to install the programs on two computers.) Lightroom is still available as a standalone purchase ($150), but you can get Photoshop only via subscription.
Photoshop offers the industry's most powerful, sophisticated, retouching tools. In fact, you probably won't use even a quarter of the tools in the Photoshop shed unless you're a digital-imaging professional who uses the program on a daily basis — even then, some tools may never see the light of day.
Lightroom, though, is quickly becoming the preferred alternative for photographers who don't need the high-level tools found in Photoshop. Shown in Figure 8-9, it's also geared to processing large numbers of images quickly. For example, with a few mouse clicks, you can make the same color adjustment to an entire series of images from a day's shoot. (Visit
www.adobe.comto find out more about both programs and the subscription program.) - Affinity Photo: This new player in the photography world has gotten rave reviews for offering sophisticated editing tools at a bargain price ($50,
www.serif.com). As I write this, it is available for Mac computers only (Apple named it the 2015 Mac app of the year), but a Windows version is in the testing stage and may even be available by the time you read this book. - Exposure X: This program tries to straddle the line between being simple enough for the novice photo editor but also providing tools that the professional photographer sometimes needs, especially in the arena of portrait photography. It can work as a standalone program or as a plug-in (add-on tool) with Photoshop or Lightroom. (Point your web browser to
www.alienskin.com; the price is about $150.) - ON1 Photo 10: Here's another inexpensive alternative for photographers who need a well-equipped photo editor and organizer. Previously, ON1 editing tools were marketed separately as Photoshop and Lightroom plug-ins, but now you can get all those tools and more in a stand-alone program. The program still operates as a plug-in if you prefer that option, however. Figure 8-10 shows a look at one section of tools designed for quick and easy portrait retouching. (Head to
www.On1.comfor details on this $120 program.)

FIGURE 8-9: Adobe Photoshop Lightroom is a leading choice of studio photographers and others who need to process lots of images.

FIGURE 8-10: Among the features found in On1 Photo 10 are tools specially designed for portrait retouching.
Not sure which tool you need, if any? Good news: You can download free trials of all these programs from the manufacturers’ websites.
Preserving your files
Perhaps the most critical issue for any digital photographer is how to safely store all your files. The following list offers my best advice:
-
Don't rely on a computer hard drive as your only archival storage option. Drives occasionally fail, wiping out all files in the process. This warning applies to both internal and external hard drives, including the small portable drives many photographers carry with them these days.
In addition to possible drive malfunction, laptop users have to think about the possibility of theft. I can't tell you how many stories I hear about people who lost all their baby, wedding, or vacation photos because they kept them on a laptop that was stolen.
At the very least, a dual-drive backup is in order. You might keep one copy of your photos on your computer’s internal drive and another on an external drive. Or you may set up two external drives, if your internal drive is small. That way, if one drive breaks, you still have all your goodies on the other one.
I also make it a habit to unplug my backup external drive when I'm not using it, to lessen the chances of it getting fried by a power fluctuation. (Using surge protectors on all your electronics goes a long way toward protecting them from this type of damage, but it can still happen.) - Don't use camera memory cards or flash drives as backups, either. Both are easily damaged if dropped or otherwise mishandled, and being of diminutive stature, are easily lost. Memory cards do fail, too, and although I've only had it happen a couple of times, I would have been seriously upset had those cards held important images. Also consider that as technology evolves, there's a chance that today's memory cards may not be compatible with tomorrow's card readers.
-
If your computer has a DVD drive, back up important files to DVD. The most stable medium for long-time image storage is an optical disc, by which I mean a CD or DVD. Unlike hard drives, flash drives, and memory cards, DVDs and CDs aren't subject to mechanical or electrical failure (although the drives you need to read the discs aren't safe from those hazards).
Unfortunately, CDs hold only 640MB of data, which makes them impractical for storing the large files that the latest digital cameras produce. DVDs, by contrast, can hold 4.7GB (gigabytes) of data. How many files you can store in that space depends on certain camera settings you use, including resolution and file type (JPEG or Raw). With a high-resolution, Raw, or high-quality JPEG file, you may find yourself burning lots of DVDs. (See Chapter 4 for more information about file types and resolution.) But I still consider DVDs an important component to my file archiving system.
When you shop for blank DVDs, buy high-quality, gold-coated, nonrewriteable (and therefore non-erasable) discs, which have the highest ratings for long storage life. Be aware, though, that the DVDs you create on one computer may not be playable on another, because multiple recording formats and disc types exist: DVD minus, DVD plus, dual-layer DVD, and so on. Keep your eye on the technology horizon and, when you upgrade your computer, be sure it can read your DVDs before you give away your old computer or DVD drive. If not, make copies in a format the new drive can read.
You also need to store your discs properly. If discs get scratched, they may become unreadable, so when you're not using them, keep them in protective cases, away from extreme heat, and store them in a vertical, upright position rather than stacking them one on top of the other. Also avoid putting stick-on, paper labels on them. The adhesive can cause a mess if repeatedly exposed to the heat of the DVD drive.
-
Take advantage of cloud storage (online data storage) for a second level of file security. Even if you do back up your files to DVD, I recommend also storing important files at an online storage site. This practice covers you in the event of fire or another catastrophe that takes out both your computer equipment and your DVDs.
Some cloud storage sites are geared toward photographers, providing not just file storage but also tools for creating slide shows and photo albums, and for sharing your images with others. But if you don't need those features or you want to store documents and other non-image files, cloud services geared toward businesses and other general uses work just as well. Some sites enable you to set up a system of automatic backups, where the computer sends new files to the storage site on a regular basis, with no prompting from you.
How much you'll pay for cloud storage depends on the amount of space you use and what other tools the company provides. To find the right fit, search online or in your favorite photography or computer magazine for recent cloud-storage reviews.
Also keep in mind these pointers:
- If you shoot in the Raw format, make sure that the site accepts them. Many photo-oriented cloud companies won't let you store Raw files. You may need to go with a company that doesn't care what type of file you upload to your digital closet.
- Find out about individual file-size limitations. Most companies care only about how much total storage space you use, but some limit you to a particular size for each individual file.
- Make sure that your original files are preserved. This issue arises mostly on sites that are designed more for photo sharing than storage. When you upload a high-resolution original, such sites often create a lower-resolution copy and toss the high-res version. That's fine for online viewing, but if you need to retrieve your original, you're out of luck.
-
Pay attention to those pesky terms of service. Reading those agreements is a pain, but shady companies sometimes bury unacceptable terms in those long documents. Of primary concern to photographers is that the company agrees that it has no right to publish, distribute, or otherwise use your photos.
Certain sites also require you to buy prints or other photo-related products in order to maintain your storage closet. If you don't routinely buy such products, you may find it cheaper to pay the annual fee at a site that has no purchase requirements.
- Don't rely on cloud storage alone. The problem is that you have no guarantee that the company that's storing your photos won't go out of business, leaving you without any way to get your files back. (One extremely alarming case was the closure of a photography-oriented storage site that gave clients a mere 24-hours’ notice before destroying their files.) In addition, although some companies offer financial restitution if their storage hardware fails, that money can't get your photos back. So anything you store online should be also kept on DVD or a regular hard drive.
- Don't forget to print! One often overlooked archiving option is to print your favorite photos. Presuming that you store them correctly, prints last a long time and aren't subject to hardware failures, electrical disruptions, and the like. Even if you lose every bit of hardware you own, you can have your prints scanned to create new digital originals. Chapter 9 explains the steps to take to give your prints the longest possible life span.
Downloading Your Images
Perhaps the most hated part of digital photography is the inevitable task of transferring files from the camera to some sort of digital storage closet, whether it's a computer hard drive or a cloud storage site. Even if you're a computer pro, this process often involves cryptic menu options, tedious setup routines, and unexpected system hiccups. Profanity, although not encouraged, is an understandable part of the deal.
Because the steps required to complete file transfer vary so much depending on your camera, the computing device you use, and the storage option you choose, I can't provide much detailed assistance in this area. But the next two sections provide some general guidance to get you started.
Looking at connection options
To transfer photos from your camera, the first step is to choose how you want the computer to be able to access your picture files. Depending on your camera, you may be able to use one or all of the following methods:
-
Connect the camera to the computer via USB. USB stands for Universal Serial Bus, which is a technology developed for connecting printers, cameras, and other devices to a computer. A USB port is a slot on the computer where you can plug in a USB cable. Figure 8-11 offers a close-up look at a USB plug and ports, which are typically marked with the symbol labeled in the figure.
To use this method, your camera must have a USB port, and you also need a special USB cable — most cameras require a cable that has a standard USB plug that attaches to your computer's USB port and a smaller plug that goes into the camera. Most camera manufacturers provide USB cables, but if not, you have to buy one from the manufacturer (or from a third-party source that makes the proper cable for your camera).
Before connecting the two devices, be sure to turn off the camera! Otherwise, you risk harming the camera and damaging the files on the memory card. In addition, fully charge your camera battery before beginning the process; if the battery dies during the file transfer, you may lose some picture data. If you opt for this connection method regularly, you may want to invest in a power adapter, if available for your camera, so that you can run the camera on electrical power rather than waste battery juice. -
Use a card reader. A card reader is a device that enables a computer to access data directly from a memory card — no camera or battery power required. You just take the card out of the camera and slip it into the card reader when you want to download photos.
Many computers have built-in card readers; if yours doesn’t, you can buy an external one that plugs into your computer’s USB port. You also can find ways to attach card readers to some tablets. Also, if your printer has a built-in card reader (many do), you may be able to use that card reader to move files to your computer. When I put a memory card in my printer's card reader, for example, I can access the card just as I can any other drive connected to my system. (If your printer is connected to your computer via Wi-Fi, though, the file transfer process can be pretty slow when compared to a reader connected by cable.)
You can buy a card reader that accepts just one type of card or a product like the Lexar model shown in Figure 8-12, which works with the two most common digital-camera card types: SD cards and Compact Flash cards. (Visit
www.lexar.comfor details on this product.) When shopping for a card reader, be sure that it works with the type of card you're using. Also verify that the reader can cope with the capacity of your card (the amount of storage space it offers). Some SD-card readers handle regular SD cards (4GB maximum capacity), for example, but can't cope with the higher-capacity SDHC or SDXC cards. -
Transfer wirelessly. Cellphones and other smart devices can connect to your computer wirelessly, assuming that your computer itself is part of a Wi-Fi network. You also may be able to use Bluetooth, another wireless data-transfer technology, to connect your smart device to your computer.
Many stand-alone cameras also offer Wi-Fi connectivity, sometimes built in and sometimes with an accessory adapter. You usually need to install computer software provided by the camera manufacturer and do some setup work on the camera to enable it to access the wireless network. If your network is password protected, for example, you need to enter the password on a camera menu screen.
Some cameras, tablets, and smartphones offer a wireless feature named NFC (Near Field Communication). When you place two NFC-enabled devices close to each other, they communicate via their own, private connection. You don't need to access a separate Wi-Fi network to transfer files in this case.Whichever wireless route you may choose, remember my earlier note regarding the speed of transferring files through a card reader built into a Wi-Fi printer: The transfer speed depends on the speed of the wireless connection but is almost always much slower than using a wired card reader or even cabling your camera to your computer.
If your camera doesn't offer Wi-Fi connectivity and you'd like that file-transfer option, you can buy Eye-Fi memory cards, which offer built-in wireless transfer technology. (Visit the website
www.eye.fifor more information about these memory cards.) However, these cards are more expensive than standard cards and not all cameras can use them.

FIGURE 8-11: Most card readers and cameras connect to the computer via a USB cable.

Courtesy of Lexar
FIGURE 8-12: Just push the memory card into the matching slot on the card reader.
Completing the download process
What happens after you establish a connection between a camera or card reader and the computer depends on your computer's operating system and the software you installed. Here are some possibilities:
- You see an icon representing your camera or memory card on your computer desktop or in the file-management window. For example, Figure 8-13 shows how a card reader shows up as a drive on the desktop on a Mac computer. In some cases, the camera brand name appears along with or instead of a drive letter. (The drive letter will vary depending on how many other drives are on your system.)
- On a computer running Windows, a Windows message box similar to the one in Figure 8-14 appears. The figure shows the dialog box as it may appear in Windows 7 (the box changes depending on your computer settings). From this window, you can choose from programs that the system believes can handle image file transfers.
-
An installed photo program automatically displays a photo-download wizard. For example, the downloader associated with your camera software (assuming that you installed that program), Adobe Lightroom, iPhoto, or another photo program may leap to the forefront. Usually, the downloader that appears is associated with the software you most recently installed.
If you don't want a program's downloader to launch whenever you insert a memory card or connect your camera, you can turn off that feature. Check the software manual to find out how to disable the auto launch. On the other hand, if you have a favorite downloading program, you can tell your computer to automatically launch that software when you insert a memory card into your card reader or connect your camera to the computer. Sometimes, you can check a box inside the photo software to make it the priority image-file handler; if not, make your wishes known through the computer's own preferences panels or dialog boxes.

FIGURE 8-13: The memory card appears as a regular drive on the computer.

FIGURE 8-14: Windows 7 may display this initial boxful of transfer options.
If you're using photo-download software, you should be able to view all your photos, select the ones you want to transfer, and specify downloading options such as the name of the folder where you want to store the images. Check the program's Help system for how-tos.
But if you prefer, you can just stick with Windows Explorer or the Mac Finder and use the same drag-and-drop technique that you use to copy files from a CD, DVD, or another removable storage device to your computer. Normally, you have to open a folder or two to get to the actual image files: They’re typically housed inside a main folder named DCIM (for digital camera images), as shown in Figure 8-15, and then within a subfolder that uses the camera manufacturer’s name or folder-naming structure. After you open the folder, you may see thumbnails of the images or simply the names of the files, as in the figure.

FIGURE 8-15: On a Mac, you can drag and drop files from a memory card using the Finder.
After opening the folder that contains the images, select the ones you want to transfer and then just drag them to the folder on your hard drive where you want to store them, as shown in Figure 8-15. Although it’s not visible in the figure, you should see a little plus sign next to the cursor when you drag. The plus sign indicates that you’re placing a copy of the picture files on the computer; your originals remain on the card.
A few final downloading tips apply no matter which method you use:
- You don't have to use the same program to edit photos that you use to download them. You can download using your camera's photo browser, for example, and then open and edit the transferred photos in Adobe Photoshop. In some cases, you first need to import or catalog the transferred photos into the program, which simply tells the program to build thumbnails for the picture files.
- Watch out for the erase-after-download option. Many photo downloading tools offer to automatically erase the original images on your card after you transfer them to the computer. Disable that option just in case something goes haywire. It’s not a good idea to erase the images on your card until you’re confident that they’re safely stored on your hard drive.
- Also disable automatic red-eye correction. Many downloaders also attempt to try to remove red-eye during the download process. This option can cause your downloads to take forever as the program tries to locate and fix areas that it thinks may be red-eye. It’s better to do the job yourself after downloading.
- You may be able to copy photos to a backup drive at the same time you copy them to your main storage drive. This feature, found on some photo downloaders, is a great timesaver, for obvious reasons. The initial download may take a bit longer because files are being written to two locations, but you don't have to take the time to select and copy photos to your backup drive later.