
Chapter 7
Getting the Shot: How the Pros Do It
IN THIS CHAPTER
Taking better portraits
Capturing action with and without blur
Shooting memorable landscapes
Getting up close and personal
Discovering a few tricks to photographing challenging subjects
Earlier chapters in this book explain the fundamentals of good photo composition and describe the most common digital camera features, from settings that affect exposure to controls for manipulating focus and color. This chapter takes things a step further, sharing more tips for shooting specific types of pictures: portraits, landscapes, action shots, and close-ups.
 One note before you dig in: Keep in mind that there are no hard-and-fast rules as to the right way to shoot a portrait, a landscape, or whatever. Feel free to wander off on your own, tweaking this exposure setting or adjusting that focus control, to discover your own creative vision. Experimentation is part of the fun of photography, after all — and thanks to your camera monitor and the option to delete images that don't work, it’s an easy, completely free proposition.
Capturing Captivating Portraits
The classic portraiture approach is to keep the subject sharply focused while throwing the background into soft focus, as shown in Figure 7-1. In other words, the picture features a shallow depth of field — only objects very close to the subject are within the zone of sharp focus. This artistic choice emphasizes the subject and helps diminish the impact of any distracting background objects in cases where you can’t control the setting.
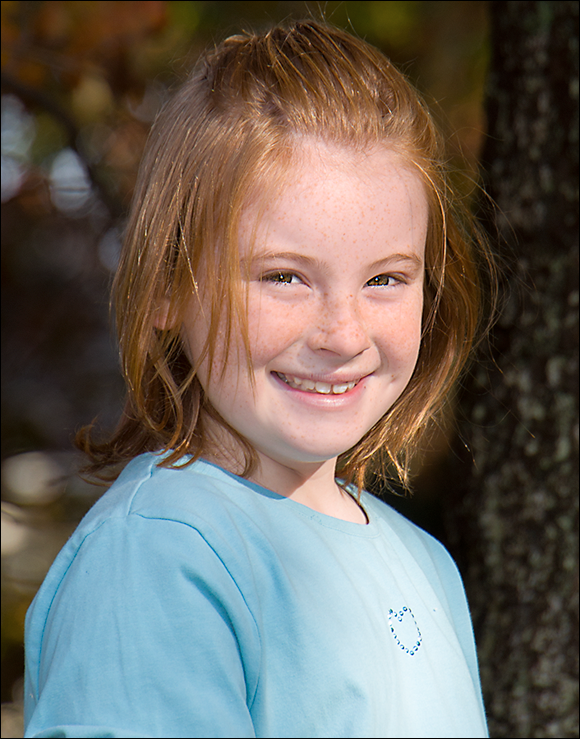
FIGURE 7-1: A blurry background draws attention to the subject and diminishes the impact of any distracting background objects.
Chapters 2 and 6 explain depth-of-field techniques fully, but here’s a quick recap on how to achieve that blurry-background look:
-
Set your camera to Portrait or aperture-priority exposure mode. One way to shorten depth of field is to use a low f-stop setting, which opens the aperture. Portrait mode, found on many cameras, automatically opens the aperture as much as possible. This scene mode also usually warms colors and softens skin.
However, to precisely control depth of field, switch to aperture-priority autoexposure mode, if available. In this mode, you choose the f-stop setting, and the camera selects a shutter speed to properly expose the photo. Of course, if you're comfortable with manual exposure mode, in which you set both aperture and shutter speed, that's an option as well. Either way, the lower the f-stop number, the shallower the depth of field.
-
Zoom in, get closer, or both. Zooming to a longer focal length also reduces depth of field, as does moving physically closer to your subject.
 However, avoid using an extremely long focal length, which can flatten and widen faces. A wide-angle lens also can distort features. (A focal length in the 70-135mm range works best.)
 - Move your subject farther from the background. The greater the distance between the two, the more background blurring you can achieve.
When shooting group portraits, be careful not to go so shallow that the zone of sharp focus doesn't extend to everyone in the group. With extremely short depth of field, the people in the front may be in sharp focus but people even a few inches behind may appear in slightly soft focus.
In addition to considering depth of field, these other tips can improve your people pics:
- Pay attention to the background. Scan the entire frame, looking for intrusive objects that may distract the eye from the subject. If necessary, reposition the subject against a more flattering backdrop. Inside, a softly textured wall works well; outdoors, trees and shrubs can provide nice backdrops as long as they aren’t so ornate or colorful that they diminish the subject (for example, a magnolia tree laden with blooms).
-
For indoor portraits, shoot flash-free if possible. Shooting by available light rather than flash produces softer illumination and avoids the problem of red-eye. During daytime hours, pose your subject near a large window to get results similar to what you see in Figure 7-2. No sun? Try turning on lots of room lights to get the job done.
In dim lighting, you may need to bump up the ISO (light sensitivity) setting so that you can use a shutter speed fast enough to freeze any movement of your subject. (It's not easy to convince a baby or toddler to stay still during a photo shoot.) Also note that in Portrait mode, the camera may not allow you to shoot without flash in dim lighting. If your camera offers a No Flash scene mode (it may be called Museum mode or something similar), try that instead. Again, the camera may in that case increase ISO — and whether it's you or the camera in charge of that setting, remember that a high ISO can translate to noise, which gives your photos a speckled look. - If using a flash for your indoor and nighttime portraits is necessary, try these techniques for best results:
- Turn on as many room lights as possible. The more ambient light, the less flash illumination is required. The additional light also causes the pupils to constrict, reducing the chances of red-eye.
-
Try using red-eye reduction flash mode. Red-eye is caused when light from the flash is reflected by the subject's retinas. In red-eye reduction flash mode, the camera emits a brief preflash light to constrict the subjects' pupils and thus reduce the amount of light that can hit the retina. Just be sure to warn your subject not to stop smiling until after the real flash fires!
One other trick for lessening red-eye when you use a built-in flash is to pose subjects so that they're not looking directly at the camera lens. That way, the flash doesn't strike the eyes directly. You can shoot your subjects in profile or looking upward toward the ceiling, for example — after all, a face-forward pose isn't a requirement of a great portrait.
-
For subjects that can stay perfectly still, try slow-sync flash. This flash mode simply lets you use a shutter speed that's slower than the one normally used for flash pictures. This enables the camera to soak up more ambient light, producing a brighter background and reducing the flash power that’s needed to light the subject.
 If your camera has a Nighttime Portrait mode, choosing that setting automatically enables slow-sync flash. You can also use shutter-priority autoexposure mode or manual exposure mode, if available on your camera, to set the shutter speed yourself.
Figure 7-3 illustrates how slow-sync flash can really improve an indoor portrait. In the left image, shot in Portrait scene mode with normal flash, the camera selected a shutter speed of 1/60 second. At that speed, the camera has little time to soak up any ambient light, so the scene is lit primarily by the flash. That caused two problems: The strong flash created some hot spots (areas of overexposure) on the subject's skin, and the window frame is much more prominent because of the contrast between it and the bushes outside the window. Although I shot this photo during the daytime, the bushes appear dark because the exposure time was brief and they were beyond the reach of the flash.
For the second example, I used shutter-priority autoexposure and set the shutter speed to 1/4 second. This exposure time was long enough to permit the ambient light to brighten the exteriors to the point that the window frame almost blends into the background, and because less flash power was needed to expose the subject, the lighting is much more flattering. In this case, the bright background also helps to set the subject apart because of her dark hair and shirt. If the subject had been a pale blonde, this setup wouldn't have worked as well, of course.
Anytime you use slow-sync flash, don't forget that a slower-than-normal shutter speed means an increased risk of blur due to camera shake. So always use a tripod or otherwise steady the camera, and remind your subjects to stay absolutely still, too, because they will appear blurry if they move during the exposure. I was fortunate to have both a tripod and a cooperative subject for my examples, but I probably wouldn't try slow-sync for portraits of young children or pets. - Soften the flash light by adding a diffuser or bouncing the light off the ceiling. A diffuser is just a translucent screen or covering that you fit over your flash. You can buy diffusers for built-in, pop-up flashes (such as those found on dSLR cameras) and for external flash heads. If you own a flash head that rotates, aim the flash at the ceiling instead of directly at your subject; the light then hits the ceiling and falls back softly on the subject. You also can get nice side-lit portraits by bouncing light off a wall to the left or right of the subject. Just make sure that the surface you use to bounce the flash is white or gray, because the light will take on the color of that surface.
-
Shoot with the camera in a horizontal position. When a camera is held vertically with the flash on, it’s very common to get a strong, unattractive shadow along one side of your subject.
-
Experiment with using flash in outdoor daytime portraits. I know this sounds counterintuitive — why would you need flash during daytime? But think about the direction of the light: It's coming from overhead, which means that there may not be any light directed toward the face.
Consider Figure 7-4 as an example. In this photo, I posed the girls under a shade tree with their backs toward the sun — an option that helps eliminate squinting. In the first image, shot without flash, the subjects are underexposed, for a couple reasons. First, their faces weren't being hit directly by the sunlight. And second, I was using normal exposure metering, where the camera bases exposure on the entire frame, and the very bright background caused the camera to choose an exposure that left the subjects too dark. (Chapter 5 discusses exposure metering.) Notice, too, that in a few areas, sunlight filtering through the leaves of the trees left distracting bright spots on the faces.
Adding flash for the second shot produced a much better result. The flash not only brightened the subjects but also evened out the light and virtually eliminated the overexposed areas on the skin. Additionally, because the camera knew that it would have the advantage of the extra light from the flash, it chose a faster exposure time — 1/125 second as opposed to 1/80 second for the first shot. And with that faster exposure time, the background grass isn't as bright and thus is less distracting.
Chapter 5 talks more about the art of using flash outdoors, but here are just two important points to remember:
- Most cameras don’t let you use flash in Portrait mode if the light is very bright, unfortunately. You may be able to move your subject into a shady enough area that the camera thinks flash is needed, however.
- If your subjects are lit by strong daylight, be careful about overexposing them. When you use built-in flash, most cameras limit you to a shutter speed in the neighborhood of 1/200–1/250 second, and in very bright light, that may be too long of an exposure time. Again, try moving the subjects into the shade for better results.
- Check image colors if your subject is lit by both flash and ambient light. If you set the camera’s white-balance setting to automatic, enabling the flash tells the camera to warm colors to compensate for the cool light of a flash. If your subject is also lit by a secondary light source, such as room lights or daylight, the result may be colors that are slightly warmer or cooler than neutral. In Figures 7-3 and 7-4, for example, colors became warmer. This warming effect typically looks nice in portraits, giving the skin a subtle glow, but if you aren't happy with the result or want even more warming, you may need to try a different white-balance setting or adjust the image color in an image-editing application. See Chapter 6 for help.
- Frame your subject loosely to allow for later cropping to a variety of frame sizes. If you capture a great portrait, chances are you'll want to print and frame it. To give yourself the flexibility of choosing from different frame sizes — 4 x 6, 5 x 7, and so on — remember to leave a little head room, or margin or empty background around the top and sides of the photo. That way, you can crop the picture to different aspect ratios without having to cut off part of the subject's head. See the Chapter 2 for more on this topic.
- Don't say “cheese.” The most boring portraits are those in which the subjects pose in front of the camera and say “cheese“ on the photographer's cue. If you really want to reveal something about your subjects, catch them in the act of enjoying a favorite activity, using the tools of their trade, or interacting with others. Figure 7-5 offers an example. The formal pose is okay, but the second one is more compelling because it reflects a moment of spontaneous fun.
-
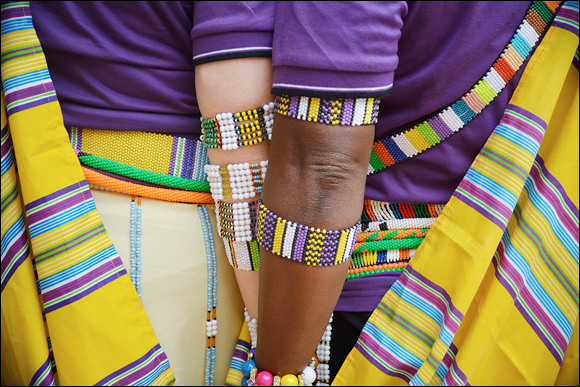
Expand your definition of portrait. A good portrait doesn't always require a face, as illustrated by Figure 7-6. Showing only two interlocked hands, this image tells the story of a bond between friends and offers a look at the colors of their culture at the same time.
Figure 7-7 offers another nontraditional take on a portrait, with the subject appearing in silhouette and facing away from the camera. This one may mean more to me than it does to you because I had a relationship with this particular furball, who could spend hours in front of that screen door, glued to Yard TV (best station ever, if you're a wheaten terrier). But assuming that you're shooting for your own enjoyment (as opposed to taking pictures for someone else), creating an image that will evoke a happy memory years later is the whole point of making a portrait.

Courtesy of Mandy Holmes
FIGURE 7-2: For soft, even lighting, forego flash and instead expose your subject using daylight coming through a nearby window.
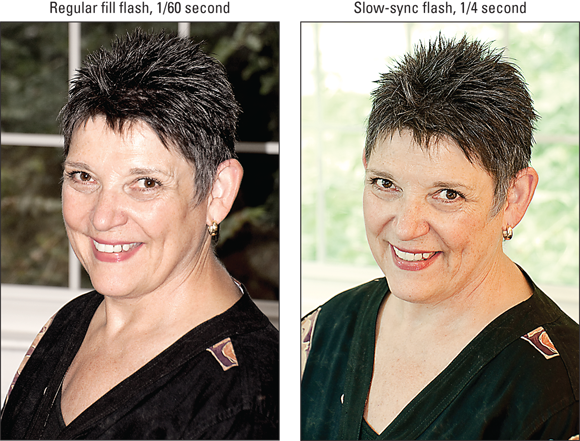
FIGURE 7-3: Slow-sync flash produces softer, more even lighting and brighter backgrounds.

FIGURE 7-4: Using flash in bright daylight helps eliminate shadows caused by strong overhead light.

FIGURE 7-5: Catching a moment of brother-sister play produces a much more engaging portrait than a stiff, formal pose.
Courtesy of Corrie Niehaus
FIGURE 7-6: A good portrait doesn't necessarily require the subjects' faces.
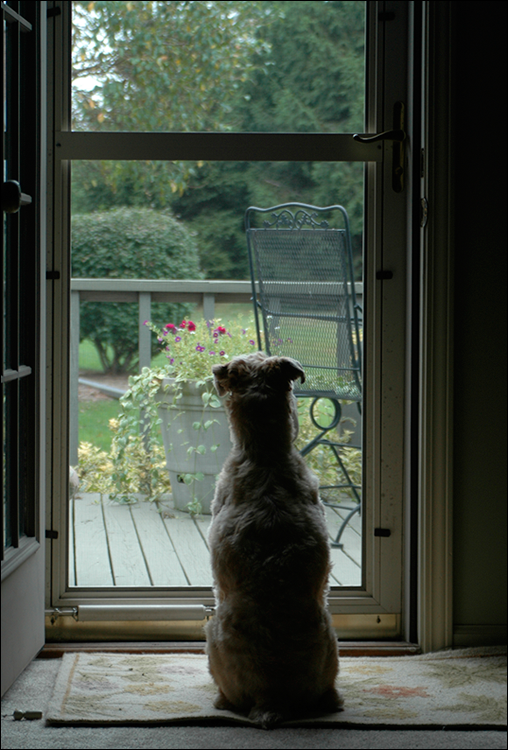
FIGURE 7-7: This photo captured my first furkid doing his job: keeping watch in case something in the yard needed a good barking at.
Shooting Better Action Shots
A fast shutter speed is the key to capturing a blurfree shot of any moving subject, whether it’s a butterfly flitting from flower to flower, a car passing by, or a running baseball player.
The shutter speed you need depends on the speed at which your subject is moving, and finding the right setting requires some experimentation. For example, when shooting the hockey player featured in Figure 7-8, I started with a shutter speed of 1/500 second. After checking the photo in my monitor, I could easily see that 1/500 second didn't come close to freezing the action, so I bumped the shutter speed up to 1/1000 second to capture the image shown on the right. Even at that speed, the end of the hockey stick is slightly soft, but I actually like that effect because it adds a sense of motion to the shot.
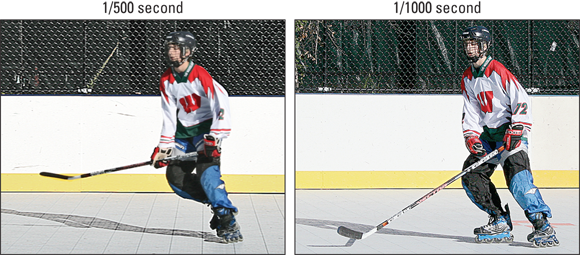
FIGURE 7-8: A shutter speed of 1/500 second wasn't quite enough to stop the motion of this racing hockey player; raising the shutter speed to 1/1000 second did the trick.
As you continue practicing action photography, you'll gain an understanding of what shutter speeds work best for your favorite subjects. But generally speaking, 1/500 second should be fast enough for all but the fastest subjects — my hockey player, cyclists, motorcycles, birds in flight, and so on. And for subjects moving slowly, such as a flower swaying in a gentle breeze or a child walking, you can get away with a much slower shutter speed — even 1/125 second can be enough. Of course, you should take some test shots and inspect the image on the camera monitor closely to make sure that your speed is high enough.
Whatever the speed of your subject, try setting your camera to one of the following exposure modes to capture action:
-
Shutter-priority autoexposure: Usually abbreviated S or Tv (for exposure time value), this mode enables you to specify an exact shutter speed. The camera then chooses the f-stop needed to expose the image properly. Of course, you can always switch to Manual exposure and set both shutter speed and aperture yourself.
Many cameras will tell you if you have set a speed that is too fast to get a good exposure. For example, in some cameras if the aperture value blinks or changes color after you set the shutter speed, the camera can’t select an f-stop that will properly expose the photo at that shutter speed. Other cameras may prevent you from choosing a shutter speed that puts you into the exposure danger zone. - Sports mode: Almost all cameras offer a Sports mode these days, although it may go by some other name (Action, for example). Whatever the name, this mode automatically dials in a fast shutter speed for you. Often, Sports mode also sets the shutter release mode to continuous so that you can fire off a burst of frames as long as you hold down the shutter button.
Here are a few other tips that pros use when capturing action:
- Raise the ISO setting to enable a faster shutter, if needed. In dim lighting, you may not be able to get a good exposure at the chosen shutter speed or in Sports mode without taking this step. Raising the ISO does increase the possibility of noise, but a noisy shot is often better than a blurry one. (Note that some cameras automatically raise the ISO for you in dim lighting as well as when you put the camera into Sports mode.)
-
Forget about flash. Using flash isn’t usually a workable solution for action shots. First, the flash needs time to recycle between shots, so it slows your shot-to-shot time. Second, most built-in flashes have limited ranges — so don’t waste your time if your subject isn’t close by. And third, remember that the maximum shutter speed decreases when you use flash; the top speed is usually in the range of 1/200 to 1/250 second. That may not be fast enough to capture your subject without blur. (Some cameras can use a faster shutter speed when you use an external flash, however.)
If you do decide to use flash, you may have to bail out of Sports mode, though; it probably doesn’t permit you to use a flash.
- Set the camera to burst mode, if available. This mode may be called Continuous or something similar; often, you enable it via an option called Drive mode, Release mode, or Shooting mode. Whatever the name, it enables you to record a continuous series of images with a single press of the shutter button. As long as you keep the button down, the camera captures image after image at a rapid pace — three to five frames per second is common, but some high-end cameras can be faster.
-
In autofocus mode, try continuous-servo mode, if available. Again, the name of the mode varies from camera to camera. When this feature is enabled, the camera initially sets focus when you press the shutter button halfway (or tap to set your focus point on a touchscreen-enabled camera) but adjusts focus as necessary up to the time to take the picture, just in case the subject moves. All you need to do is reframe the shot as needed to keep the subject within the area the camera’s using to calculate focus. I used this feature to follow the feathered friend shown in Figure 7-9.
This frame was one of many I fired off as the bird carried a branch from the side of a pond to a tree several hundred feet away, finally landing and incorporating the branch into a nest. I set focus initially when the bird was first picking up the branch and then just moved my camera as needed to follow the action. The camera tracked the subject movement and adjusted focus as the bird moved closer and then farther away from my lens.
Be aware, though, that not all cameras can adjust focus between the individual frames of a burst. Instead, the focusing distance set for the first shot is used for all frames. With such cameras, capture a short burst, release the shutter button, and set focus again before taking your next series of frames.
- Compose the shot to allow for subject movement across the frame. To make sure that your subject doesn’t move out of the frame before you press the shutter button, compose the image with extra room at the edges. You can always crop the photo later to a tighter composition if you want. Speaking of cropping, remember that if you plan to crop the photo, setting the picture resolution to a high value helps ensure that the cropped photo will have enough pixels to produce a good, larger print.
- A large depth of field gives you a better chance of success when you photograph a subject moving toward you or away from you. The greater the depth of field, the larger the distance over which sharp focus is maintained. If you use an f-stop of, say, f/5.6 and you're shooting with a telephoto lens, the depth of field will be pretty shallow, and you have to snap the photo at the exact moment the subject is within range of focus. Stopping the aperture down a couple of notches (raising the f-stop number) extends the depth of field so that the subject is within the sharp-focus zone for a longer period of time, giving you more shooting opportunities.
-
Get to know the habits of your favorite moving subjects. For example, if you enjoy photographing your daughter's softball team, pay attention to how the various players react after a winning play. After a strikeout, does the pitcher always punch her fist in the air? If you know that detail, you can compose a photo of her well in advance of the pitch, leaving extra room at the top of the frame to accommodate her arm. Photographers who aren't familiar with her routine, on the other hand, wind up with images that don't include that pumped fist, which is important to the moment.
At the very least, spend a few minutes just observing the subjects before you put your eye to the viewfinder, if timing permits. When shooting the scene featured in Figure 7-9, I watched the bird make several trips to and from the nest as it gathered its construction materials so that I had a good idea of the path it would take when I finally started shooting.
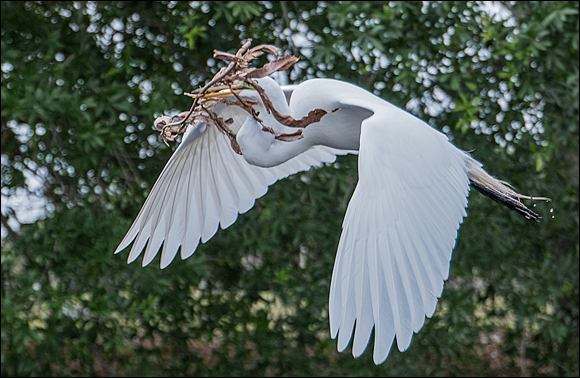
FIGURE 7-9: I used continuous autofocusing, burst-mode shooting, and a shutter speed of 1/1000 to capture this bird transporting a branch to fortify its nest.
Using these techniques should give you a better chance of capturing any fast-moving subject, but action-shooting strategies also are helpful for shooting candid portraits of kids and pets. Even if they aren't currently running, leaping, or otherwise cavorting, snapping a shot before they do move or change positions is often tough. If an interaction or scene catches your eye, set your camera into action mode and then just fire off a series of shots as fast as you can.
Finally, remember that freezing action isn't the only option for moving subjects. Sometimes, going in the other direction and using a shutter speed slow enough to blur the action creates a heightened sense of motion and, in scenes that feature very colorful subjects, cool abstract images as well. A long exposure time is also how photographers create the misty waterfall and car light-trails like the ones featured in the next section (see Figures 7-11 and 7-12).
Taking in the Scenery
Providing specific camera settings for scenic photography is tricky because there’s no single best approach to capturing a beautiful stretch of countryside, a city skyline, or another vast subject. Take depth of field, for example: One person’s idea of a super cityscape might be to keep all buildings in the scene sharply focused, but another photographer might prefer to shoot the same scene so that a foreground building is sharply focused while the others are less so, thus drawing the eye to that first building.
That said, the following tips can help you photograph a landscape the way you see it:
-
Shoot in aperture-priority autoexposure mode, if available, so that you can control depth of field. Again, this mode enables you to adjust the aperture, which is one factor in determining depth of field. (Chapters 2 and 6 explain depth of field fully.) The camera then handles the rest of the exposure equation for you by dialing in the right shutter speed.
For a long depth of field, dial in a high f-stop number; for a shallow depth of field, a low number. The portrait examples earlier in this chapter feature a shallow depth of field; contrast those images with the one in Figure 7-10, taken at f/22. Notice that everything from the foreground statue to the monument in the background is in sharp focus. -
Try Landscape mode if aperture-priority autoexposure isn’t available. This scene mode automatically selects a high f-stop number to produce a large depth of field, so both near and distant objects are sharply focused. Of course, if the light is dim, the camera may be forced to open the aperture, reducing depth of field, to properly expose the image. Note, too, that Landscape mode typically tweaks the image to increase contrast and produce more vivid blues and greens.
If you prefer the landscape to have a shallow depth of field, try Portrait mode instead. That mode automatically selects a lower f-stop setting. Here again, though, color and sharpness may also be manipulated slightly — this time, to produce softer edges and warmer colors. - If the exposure requires a slow shutter speed, use a tripod to avoid blurring. The downside to a high f-stop is that you need a slower shutter speed to produce a good exposure. If the shutter speed drops below what you can comfortably handhold, use a tripod to avoid picture-blurring camera shake. No tripod handy? Look for any solid surface on which you can steady the camera. You can always increase the ISO setting to increase light sensitivity, which in turn allows a faster shutter speed, too, but that option brings with it the chances of increased image noise.
- For dramatic waterfall and fountain shots, consider using a slow shutter to create that “misty” look. The slow shutter blurs the water, giving it a soft, romantic appearance. Figure 7-11 shows this effect. I used a shutter speed of 1/5 second for this shot; the aperture was f/8. Again, use a tripod to ensure that the rest of the scene doesn’t also blur due to camera shake.
-
At sunrise or sunset, base exposure on the sky. The foreground will be dark, but you can usually brighten it in a photo editor, if needed. If you base exposure on the foreground, on the other hand, the sky will become so bright that all the color will be washed out — a problem you usually can’t fix after the fact.
This tip doesn’t apply, of course, if the sunrise or sunset is merely serving as a gorgeous backdrop for a portrait. In that case, you should enable your flash and expose for the subject. -
For cool nighttime pics, experiment with a slow shutter. Assuming that cars or other vehicles are moving through the scene, the result is neon trails of light, as shown in Figure 7-12. The exposure time for this image was ten seconds. Sometimes, if it’s really dark, you may have to bump up the ISO to a point that it produces a lot of digital noise — but otherwise you might not get the shot, even with a very slow shutter speed.
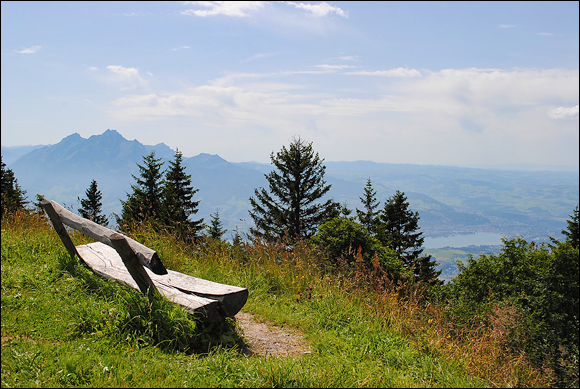
Some cameras require that you use a special shutter setting known as bulb mode to take exposures longer than 30 seconds, which is the standard slow-shutter limit. Typically available only in manual exposure mode, the bulb setting records an image for as long as you hold down the shutter button. - In large landscapes, include a foreground subject to provide a sense of scale. For example, in the image featured in Figure 7-13, the bench serves this purpose. Because viewers are familiar with the approximate size of a typical wooden bench, they can get a better idea of the size of the vast mountain landscape beyond.
- Try panorama mode for capturing extra-wide scenes. Many cameras, including some cellphones, have a tool that enables you to create a panoramic image — a photo that's wider than a normal, single frame. Figure 7-14 offers an example. If your camera doesn't have this feature, you can find software tools that enable you to stitch together multiple frames into a panorama. Or you can “cheat” — just shoot a very-wide-angle shot, and then crop away the top and bottom of the frame to create an image with panorama dimensions.
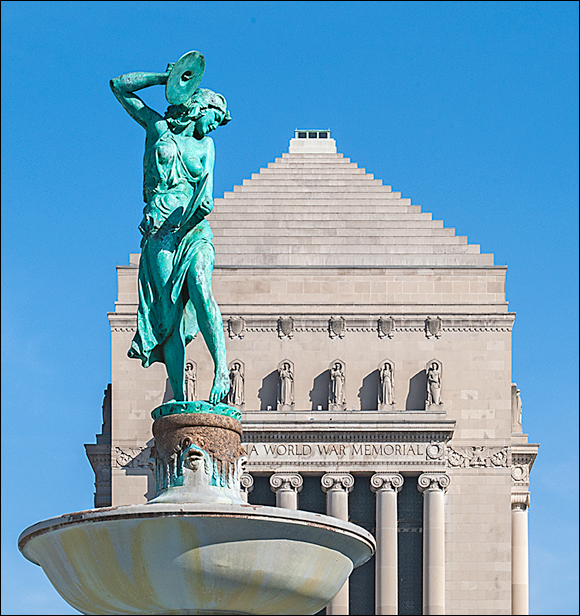
FIGURE 7-10: An f-stop of f/22 helped keep the background building as sharp as the foreground statue in this scene.
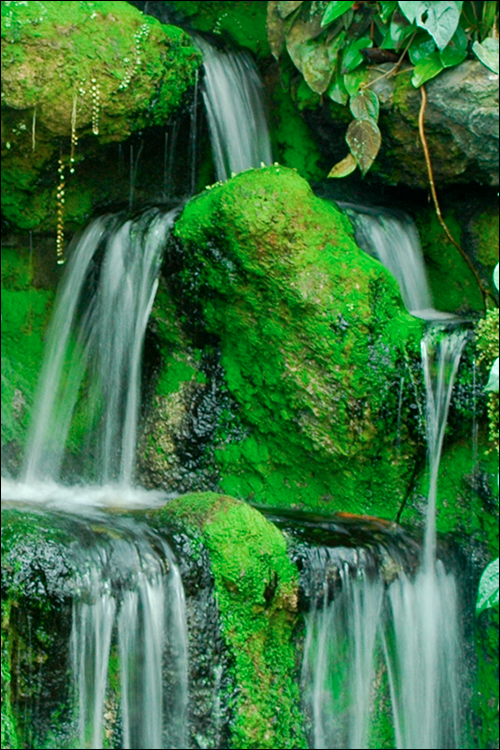
FIGURE 7-11: For misty waterfalls, use a slow shutter speed (and tripod).
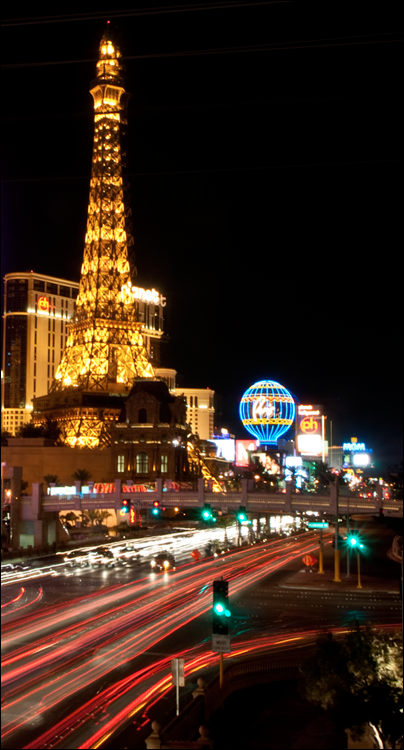
FIGURE 7-12: A slow shutter speed (10 seconds) turns the taillights of passing cars into trails of neon light.
Courtesy of Kristen E. Holmes
FIGURE 7-13: The bench in the foreground helps provide a sense of the vastness of the landscape beyond.

FIGURE 7-14: Many cameras offer a built-in tool that stitches multiple frames into a panoramic image like this one.
Getting Gorgeous Close-ups
Close-up shots can be wonderfully artistic, but they can also be challenging to take. To take good close-ups, try the following settings and techniques:
- Check your camera or lens manual to find out the minimum close-focusing distance. How “up close and personal” varies depending on your equipment. Many cameras and lenses also have a Close-up or Macro focusing mode; you may have to enable this setting to achieve the closest focusing distance.
- Take control over depth of field by setting the camera mode to aperture-priority autoexposure mode. Whether you want shallow, medium, or extreme depth of field depends on the point of your photo. In classic nature photography, for example, the artistic tradition is a very shallow depth of field, as shown in Figure 7-15, and requires an open aperture (low f-stop value). But if you want the viewer to be able to clearly see all details throughout the frame — for example, if you’re shooting a product shot for your company’s sales catalog — you need to go in the other direction, stopping down the aperture as far as possible.
-
If aperture-priority autoexposure isn’t available, try the Close-up scene mode. In this mode, sometimes called Macro mode, the camera automatically opens the aperture to achieve a short depth of field.
Close-up mode means and does different things depending on the camera. In some cases, it simply adjusts the close-focusing distance; in others, it affects aperture as well as some color and contrast characteristics of the image. Check your manual for details. - Remember that zooming in and getting close to your subject also decrease depth of field. Back to that product shot: If you need depth of field beyond what you can achieve with the aperture setting, you may need to back away, zoom out, or both. (You can always crop an image to show only the parts of the subject that you want to feature.)
- When shooting flowers and other nature scenes outdoors, pay attention to shutter speed, too. Even a slight breeze may cause your subject to move, causing blurring at slow shutter speeds.
- Try using fill flash for better outdoor lighting. As with portraits, a tiny bit of flash often improves close-ups when the sun is the primary light source. You may need to use flash exposure compensation, if available, to reduce the flash output slightly, however, because whenever you fire a flash very close to a subject, it may be overpowering. If you can control the flash directly, turn it down; if not, you may need to cover it with something to diffuse its light. (Even taping a napkin over the flash may be sufficient.) And again, remember that most cameras limit the top shutter speed to around 1/200–1/250 second when you use flash — in very bright light, that may be too slow to avoid overexposing the photo. See Chapter 5 for more tips on flash photography.
- When shooting indoors, try not to use flash as the primary light source. Because you’re shooting at close range, the light from the flash may be too harsh, even at a low flash exposure compensation setting. If flash is inevitable, turn on as many room lights as possible to reduce the flash power that’s needed — even a hardware-store shop light can do in a pinch as a lighting source. (Remember that if you have multiple light sources, though, you may need to tweak the white-balance setting.)
-
To get very close to your subject, invest in a macro lens or a set of diopters. A true macro lens, which enables you to get really, really close to your subjects, is an expensive proposition; expect to pay around $200 or more. But if you enjoy capturing the tiny details in life, it’s worth the investment.
For a less expensive way to go, you can spend about $40 for a set of diopters, which are sort of like reading glasses that you screw onto your existing lens. Diopters come in several strengths — +1, +2, +4, and so on — with a higher number indicating a greater magnifying power. I took this approach to capture the extreme close-up in Figure 7-16, attaching a +2 diopter to my lens. The downfall of diopters, sadly, is that they typically produce images that are very soft around the edges, a problem that doesn’t occur with a good macro lens.

FIGURE 7-15: Shallow depth of field helps emphasize the part of the scene that you found most interesting.
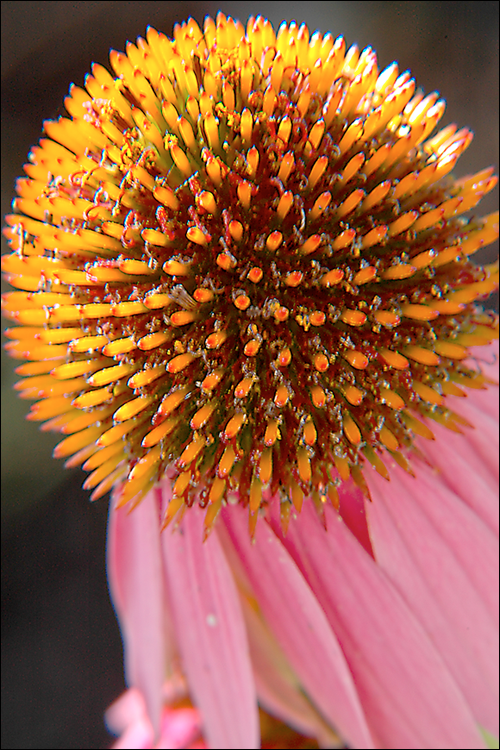
FIGURE 7-16: To extend the lens’s close-focus capability, you can add magnifying diopters.
Coping with Special Situations
A few subjects and shooting situations pose additional challenges not already covered in earlier sections. Here’s a quick list of ideas for tackling a variety of common “tough-shot” photos:
- Shooting through glass: To capture subjects that are behind glass, such as animals at a zoo, you can try a couple of tricks. First, set your camera to manual focusing, if possible — the glass barrier can give the autofocus mechanism fits. Disable the flash to avoid creating any unwanted reflections, too. Then, if you can get close enough, your best odds are to put the lens right up to the glass. (Be careful not to scratch your lens.) If you must stand farther away, try to position your lens at an angle to the glass.
- Shooting out of a car window: Set the camera to shutter-priority autoexposure or manual mode and dial in a fast shutter speed to compensate for the movement of the car. (Sports scene mode also can produce a fast shutter speed.) Also turn on image stabilization, if your camera offers it. Oh, and keep a tight grip on your camera.
-
Shooting fireworks: First off, use a tripod; fireworks require a long exposure, and handholding your camera simply won’t work. If your camera has a zoom lens, zoom out to the shortest focal length. For cameras that offer manual focusing, switch to that mode and set focus at infinity (the farthest focus point possible on your lens). It's tough to use autofocusing with fireworks because there isn't any solid object for the autofocusing system to lock onto.
If available, also use the manual exposure setting. Choose a relatively high f-stop setting — say, f/16 or so — and start a shutter speed of 1 to 3 seconds. From there, it’s simply a matter of experimenting with different shutter speeds. No manual exposure mode? Try shutter-priority autoexposure mode instead. Some point-and-shoot cameras now have a Fireworks scene mode, too, in which case you can let the camera take the reins.
A few other fireworks tips:
- Keep the camera steady. Be especially gentle when you press the shutter button — with a very slow shutter, you can easily create enough camera movement to blur the image. If you purchased an accessory remote control for your camera, this is a good situation in which to use it.
- Reduce noise. If your camera offers a noise-reduction feature, you may want to enable it, too, because a long exposure also increases the chances of noise defects. (Keep the ISO setting low to further dampen noise.)
- Press the shutter button at various intervals. In addition to experimenting with shutter speed, play with the timing of the shutter release, starting some exposures at the moment the fireworks are shot up, some at the moment they burst open, and so on. For the example featured in Figure 7-17, shutter speed was about 5 seconds, and I began the exposure as the rocket was going up — that's what creates the corkscrew of light that rises up through the frame.
-
Shooting reflective surfaces: You can reduce glare from reflective surfaces such as glass and metal by using a polarizing filter. A polarizing filter can also help out when you’re shooting through glass. However, in order for a polarizer to work, you have to position your camera at a certain angle with respect to the sun. Normally, the polarizer works best if you’re positioned so that the sun is at one of your shoulders and the lens is then pointed directly in front of you.
Another option for shooting small reflective objects is to invest in a light cube, which is essentially a box that is made of white, translucent material, with an opening in front. You put the reflective object inside the cube and then position lights around the outside. The cube acts as a light diffuser, reducing reflections. For large objects, you can get a light tent, which looks a little bit like a tepee but works according to the same principle. Among the companies that make this sort of tool are Westcott (
www.fjwestcott.com), Smith-Victor (www.smithvictor.com), and CloudDome (www.clouddome.com). -
Shooting in strong backlighting: When the light behind your subject is very strong, the result is often an underexposed subject. You can try using flash to better expose the subject, assuming that you’re shooting in an exposure mode that permits flash, or you can use exposure compensation, if your camera offers it, to request a brighter exposure of your subject. (Chapter 5 talks more about this feature.)
For another creative choice, you can purposely underexpose the subject to create a silhouette effect, as shown in Figure 7-18. Just disable flash and then experiment with using a negative exposure compensation value, which produces a darker image, until you get a look you like. Of course, if you use manual exposure, just play with the exposure settings to achieve the look you have in mind.
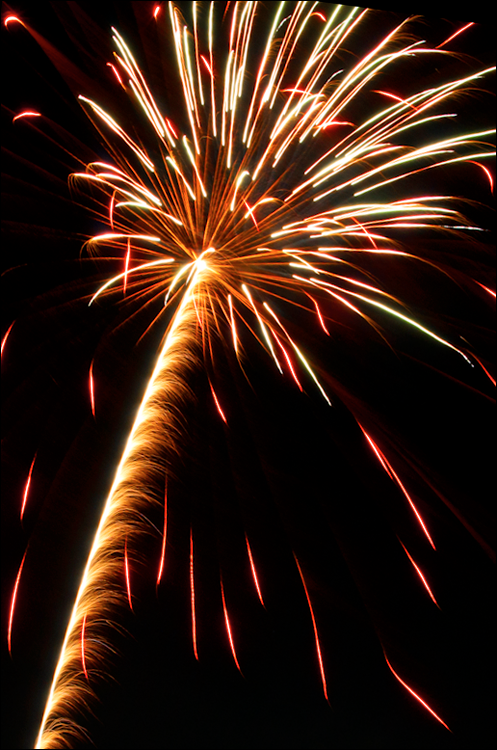
FIGURE 7-17: I used a shutter speed of 5 seconds to capture this fireworks shot.
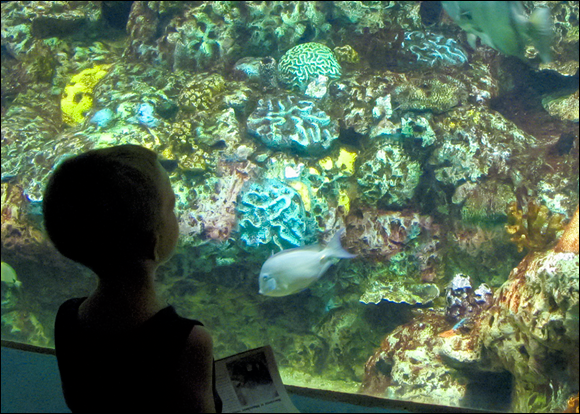
FIGURE 7-18: Experiment with shooting backlit subjects in silhouette.