
How to Obscure Your Sensitive Data
We are living in a digital age. Various online threats exist that may compromise and steal your data, your money, and even your entire identity. Any systems that are connected to the Internet are exposed to a large number of potential cyber-attacks from different outside adversaries who are targeting the systems and open communication channels, either to steal the sensitive information or to disrupt the critical information system. It can be extremely difficult to create a system that is impregnable to outsiders unless you disconnect it from the Internet!
Modern cryptographic systems provide a robust set of techniques to ensure secure transactional sensitive data flows online, thus preventing hackers and cyber-criminals from accessing sensitive contents, even if they succeed in capturing the transmitted encrypted data. The mathematical formulas involved in today’s cryptographic standards are enough to prevent the majority of attackers from decrypting stolen data.
The future of cryptography is brighter than ever before. With more companies becoming increasingly vulnerable to cyber-attacks, it’s crucial that organizations strengthen their line of defense with strong encryption techniques and systems. Passwords, disk encryption, SSL certificates, electronic signatures, security access systems, simple end-user mobile solutions such as the InvizBox, and anything else that incorporates some form of security in the digital world must use some form of robust cryptographic techniques.
Individuals also need to use encryption to secure their personal data. Encryption is considered the last line of defense if an attacker successfully gains access to your confidential data. In other words, encryption will be your last hope to prevent the compromise, use, or disclosure of your sensitive information to the public or to your enemies.
In a world where everything is connected to everything else by the Internet, the demand to keep secrets has never been thus hard. In this chapter, we will give you thoughtful insight about some of the terms and concepts behind basic cryptographic methods. You will also learn how to use different cryptographic tools to encrypt data at rest and possible attacks against full disk encryption. We’ll also cover protecting data in transit as well as steganography techniques (the science of hiding data in plain sight).
The Difference Between Encryption and Cryptography
The majority of computer users think the terms cryptography and encryption are interchangeable. This is not completely correct. Cryptography is the science of “secret writing.” It can be looked at as an ancient art that has taken many forms over the years. It includes steganography, which is the science of hiding a secret message inside another, seemingly legitimate message that acts as the carrier so the hidden, unseen message will not appear during transit.
Encryption is considered a component of cryptography, and it is concerned with concealing secret messages by obscuring them. In other terms, encryption converts plaintext data into another obscured form called ciphertext using a specific cryptographic algorithm. This ciphertext can’t be decrypted to its original state without owning or having access to the associated decryption key.
Encryption helps to ensure the confidentiality of the data stored on servers when at rest or when communicated through public networks such as the Internet.
Theoretically, we have distinguished between cryptography, steganography, and encryption. However, the majority of people still use the term cryptography to refer exclusively to encryption.
Note
We will not delve into the history of cryptography and steganography as that is outside the book’s scope. However, if you want to learn more about these topics, see Data Hiding Techniques in Windows OS: A Practical Approach to Investigation and Defense (Syngress, 2016).
Cryptographic Functions
Cryptography is an essential information security tool. It provides the four most basic services for information security.
Authentication
Authentication works by using a cryptographic system to ensure that a user (or system) is who they say they are. The process works technically by comparing the credentials provided by the remote entity against a list of authorized entities stored in a file system or database.
Authentication precedes authorization. Most people think both terms are interchangeable, but this is not completely correct. For example, when a user requests access to remote resources stored on a server, he or she needs to supply their credentials, for instance, a username and password. If the user credentials match, the system will grant the user access, or authorize, the access to the data or computing resources matching the associated access control tables; otherwise, access will be denied.
Nonrepudiation
The concept of nonrepudiation is important in the e-commerce world. To repudiate means to deny, and this concept is simple: when a user performs an action, he or she cannot later deny it.
As an example, think about when a bank client sends a money transfer from his or her account to another account using an electronic transfer. Later, this client may deny sending any transfer from his or her account and demand the money be returned. Here, there should be a technical mechanism in the bank to confirm that this client has legally authorized the transaction. Nonrepudiation can be technically guaranteed via digital signatures and/or encryption, as you are going to see later in this chapter.
Confidentiality
In simple terms, confidentiality ensures that data is not made available or disclosed to unauthorized parties. This has always been the main purpose of creating cryptographic systems. When the data is confidential, no one should be allowed access to it except the authorized people who possess the decryption key. Confidentiality can be achieved by using a strong encryption algorithm combined with a strong and complex passphrase.
Integrity
Integrity means that data is not viewed or manipulated by an unauthorized, or even an authorized, user during storage or transit. Technically, users can assure data integrity in transit by using hashing, which provides a mechanism to ensure that data has not been tempered with or changed during transmission. While the data is at rest, integrity can be achieved by physically controlling access to server/network device rooms, restricting access to data, and implementing strict authentication procedures in addition to storing sensitive data encrypted on company servers.
Cryptographic Types
There are different classifications of cryptographic algorithms. The most common one is classifying them according to the number of security keys used in the encryption/decryption process.
A cryptographic algorithm works in combination with a key (a number, word, or phrase) to encrypt and decrypt data. This key is composed of a string of bits. The larger the key (contains more bits), the greater the number of patterns that can be created, thus making it harder to break. A cryptographic key is the core part of modern cryptographic operations.
Symmetric Cryptography
Also known as secret key cryptography (SKC) , in this type of encryption, both the sender and the receiver use the same key to encrypt and decrypt the data. The main disadvantage of this scheme is that the entire operation is dependent on the secrecy of the key. If the key is compromised by an unauthorized party, the whole system is breached. Figure 5-1 shows the process of symmetric cryptography.

Figure 5-1. Symmetric key cryptography system
Symmetric encryption algorithms are split into stream ciphers and block ciphers. Stream ciphers encrypt plaintext bits individually, whereas block ciphers encrypt an entire block of plaintext bits at a time as a single unit. The majority of modern block ciphers have a block length of 128 bits (16 bytes).
Some of the popular symmetric encryption algorithms are AES/Rijndael, Blowfish, CAST5, DES, IDEA, RC2, RC4, RC6, Serpent, Triple DES, and Twofish .
Asymmetric Cryptography
Also known as public key cryptography (PKC) , this cryptographic schema uses two different keys for encryption and decryption. The two keys are mathematically linked. However, no one can derive the decryption key (private key) from the encryption key (public key). Figure 5-2 illustrates the use of the two keys between the sender and the receiver.

Figure 5-2. Asymmetric encryption, public key cryptography
In asymmetrical cryptography, the public key can be distributed freely; however, the private key should be kept secret to avoid collapsing the whole system. The public key is used to encrypt the secret message or to verify the digital signature of the sender, while the private key is used to decrypt the scrambled message or to create a digital signature. A message encrypted using this technique can only be decrypted back using the corresponding private key pair.
Some of the popular asymmetric encryption algorithms are the RSA encryption algorithm, Diffie-Hellman, Digital Signature Algorithm, ElGamal, ECDSA, and XTR .
Note
Compared with symmetric cryptography, public-key encryption requires more computation power, which can make it inappropriate for encrypting large amounts of data (according to some studies, asymmetric encryption techniques are almost 1,000 times slower than symmetric techniques).
To counter this issue, some implementations suggest using public-key encryption to send a symmetric key, which can then be used to encrypt a large amount of data. This approach is used by the SSL protocol.
Cryptographic Hash
A cryptographic hash function (also called a digest) converts a digital file (input) and returns a fixed-size value, which is called the hash value (see Figure 5-3). You find the hash of any digital file (or piece of data) by running the data through a hash generator. Every time you hash the same data, you should get the same hash value as a result. This effectively helps you to create a digital fingerprint for any digital file.

Figure 5-3. How a hash function works
To ensure the integrity of a file (or any piece of data), a hash of a file can be sent to accompany the file. The receiver may then compute a hash of the data received and compare it with the hash received. If the two outputs match, then you can assert that a message has not been tampered with.
There are different hash functions, the most popular of which are MD5, SHA-1, and SHA-256. The best secure hash algorithm is the one that has the best speed and is collision resistant. (Collison means producing the same hash from two different inputs. This is rare, especially when using hashing algorithms that create a higher bit hash of 256 bits and more.)
Warning
You should stop using SHA-1. Google just cracked it! The company’s researchers declared that with enough computing power (110 years if using one computer for just one of the phases), a collision can occur. The new revelation renders SHA-1 obsolete. 1
Hash values are used extensively during digital forensics investigations to examine, identify, and authenticate digital evidence. Hashing is also used to store user credentials (password) in management information systems (MISs) so that even the administrator of the MIS does not know a user’s password. Hashing can also speed up the process of searching through a database because searching for hash values is faster than searching for long string names within databases .
Note
Encryption is a two-way operation; it converts input data from cleartext into ciphertext, and vice versa (from cipher to cleartext). Hashing is one-way encryption; it’s never meant to be reversed.
How to Calculate File Hash?
There are many programs to calculate a digital file hash. Febooti Hash & CRC ( www.febooti.com ) is one of them that can integrate natively into Microsoft Windows file properties. After installing the program, right-click any file for which you want to calculate its hash, select Properties, and go to the Hash/CRC tab.
You can also calculate the hash of any file in a modern Windows version without using a third-party tool. To do this, go to the Windows Start menu and select Windows PowerShell. Run the command in Figure 5-4, replacing C:UsersNihadDesktopNihadHassan.txt with the path to the file you want to view the hash of.
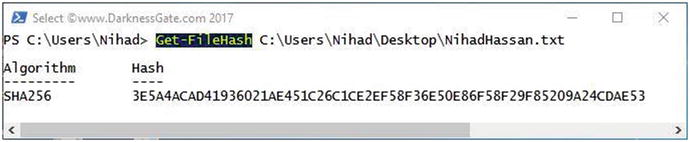
Figure 5-4. Using Windows PowerShell to calculate a digital file’s hash
Key Exchange Algorithms
A key exchange is any method in cryptography that allows a user to safely exchange encryption keys with an unknown party in order to use a cryptographic algorithm. For example, when two parties want to use symmetrical key cryptography to exchange secret data, they need first to share the “secret key.” Public key cryptography can be used to share the secret key securely between authorized communication parties through an untrusted network like the Internet. The following are two of the most common key exchange algorithms currently used:
Diffie-Hellman key agreement algorithm
RSA key exchange process
In general, the Diffie-Hellman key exchange algorithm (used for SSL connection) provides better performance than the RSA key exchange algorithm. Figure 5-5 shows the basic Diffie-Hellman key agreement process.

Figure 5-5. Diffie-Hellman key agreement
Digital Signature
A digital signature is a way to assure that an e-mail or digital file is authentic. Authentic means it is from the correct person who purports to be the authorized party and that the file content has not been tampered with after sending. A digital signature is considered the digital equivalent of a handwritten signature or a rubber stamp. The legal systems in most developed countries consider digital signatures to have the same legal significance as the more traditional forms of signed documents.
A digital signature is based on asymmetric cryptography (public key). For example, to have your e-mail signed, you need first to generate two keys (private and public keys). The signing software (such as an e-mail client like Thunderbird) creates a hash (also called a message digest) of the data that you are going to sign. The private key is used then to encrypt the hash. The result is the digital signature. Finally, the e-mail client appends the digital signature to the e-mail. Now all the data that was hashed has been signed (see Figure 5-6).

Figure 5-6. How a digital signature works
As you saw previously, hashing algorithms produce a fixed-length hash value that is unique for the hashed data (unless a collision occurred, which is practically near impossible to happen, especially when using modern hashing algorithms). Any change in the hashed data (even a single character) will produce a new hashing value. So, when a recipient wants to validate the integrity of the received message, all he or she needs to do is to use the signer’s public key to decrypt the hash. If the decrypted hash matches the value of the hash generated by the recipient’s software for the same data set, this means the message is authentic and has not been tampered with after sending. If the two hashes do not match, this means either the message has been tampered with during transit or the signature was created using a private key that does not correspond to the public key pair used to decrypt it.
Note
A digital signature can be used with any kind of message, whether it is encrypted or not, to authentic sending partners. Today, the majority of modern e-mail clients support the use of digital signatures.
In this chapter, we will show you practically how to send/receive digitally signed e-mails using the Mozilla Thunderbird e-mail client.
The Difference Between Digital Signatures and Electronic Signatures
You should not confuse the terms digital signature and electronic signature (e-signature) even though, again, both names are often used interchangeably. Both digital signatures and e-signature solutions allow you to sign documents and authenticate the signer. However, they differ in the purpose, technical implementation, and legal acceptance. For instance, most electronic signature solutions are easy to use; a user can just click to sign the document or can simply insert an image containing a handwritten signature on the document to sign it.
E-signatures aren’t regulated like digital signatures, and each vendor has its own standards and technical implementation that cannot compare with the strict security standards implemented by the digital signature algorithms currently deployed. However, some more secure e-signature solutions protect the signed document with a cryptographic digital signature, thus making it have the same strict security standards as a digital signature in term of linking the signer’s identity to his or her e-signature .
Cryptographic Systems Trust Models
Cryptographic systems are designed to form the basis of information security. However, despite their importance, you still need trust between communicating parties in order to securely exchange data online. For instance, in SKC, both the sender and the receiver must share the “secret key” in advance in order to encrypt/decrypt the data, but how can they assure safe transmission of this key in an untrusted channel (such as the Internet) if, for example, each one lives in a different country? PKC tries to solve the problem of sharing the secret key securely by introducing two keys for each party. The public key of the receiver is used to encrypt the data and can publish publicly, and the private key pair (of the receiver) is used to decrypt the data and must remain private. Nevertheless, you still have additional problems in PKC. For instance how you can assure that the sender of the encrypted data is actually the authorized party? For example, when Susan receives an encrypted message from Nihad, how she can assure that this message really originated from Nihad? What if a malicious person (Jim) is impersonating Nihad? How will Susan know this?
This section will answer these questions. In a cryptographic schema, there are a number of methods to assure that the person you are communicating with is really the authorized party. The following are the most popular trust models:
The Web of Trust concept is used in Pretty Good Privacy (PGP) and other OpenPGP-compatible systems.
Kerberos is a distributed authentication service designed to provide strong authentication for client-server applications by using secret key cryptography.
A certification authority (CA) is a third-party entity that issues a digital certificate to authenticate a user’s.ownership of a public key.
Note
An open source implementation of OpenPGP is called GNU Privacy Guard (GnuPG); see https://www.gnupg.org .
Web of Trust
The Web of Trust is used in Pretty Good Privacy and other compatible systems to establish a trust relationship between a public key and its owner. It is a decentralized security model in which participants authenticate the identities of other users. The Web of Trust is similar to social networking web sites. A user can add unknown people to his or her list of friends if they already have friends in common. You can see this clearly on Facebook and LinkedIn.
For example, if Susan trusts Nihad, then Susan could also trust the public key of Rita, who does not know if this key has been authenticated by Nihad .
Kerberos
Kerberos is a network authentication protocol developed by MIT. It works through a client-server architecture by using secret key cryptography. Kerberos provides secure authentication between the user and server rather than a host-to-host approach. The main component of a Kerberos schema is a central server (or a trusted third-party server) used for authenticating requests.
In a Kerberos network, each connected host has its own secret key, and one of these hosts is the central Kerberos server, also known as a key distribution center (KDC) . All host secret keys will be stored on the KDC server. (In some networks, not all host keys will be stored in the central KDC; the group of systems that are under the same master KDC is called a realm.) Kerberos provides secure communication by checking each connected host’s secret key with the one stored on it (the host can do the same with the Kerberos server). After a client and server have used Kerberos to assure their identities, they can begin to exchange encrypted data across an unsecured network such as the Internet.
Note
The main disadvantage of Kerberos is that user credentials are stored on a central KDC server. If a malicious hacker gains access to the central server, the entire Kerberos authentication system is at risk of being compromised.
Certificates and Certificate Authorities
Certificate authorities (CAs) issue digital certificates for web sites, online services, IoT devices, and individuals. These certificates contain their identity credential in order to be recognized and trusted online (trusted because CA has already verified the identity of each digital certificate holder). CAs play a critical role in today’s digital age. They build trust relationships between different business partners online, encrypt business transactions, and secure the communications between different parties conducting e-commerce transactions.
A digital certificate is like your passport; you can use it within your country to verify your identity. If you are in the United States and your passport is issued from New York, you can safely use it in Washington. The local authorities in Washington will recognize and trust your personal information because your passport is issued by a government agency they trust (New York authorities). If you moved outside the United States, foreign countries that accept U.S. passports will also verify and trust your details, because they trust in the government papers issued by U.S. authorities. This analogy represents the certificate trust chain where your “certificate” is accepted so as long as it is issued from a recognized trusted party (the CA).
For online transactions, digital certificates are small data files that contain identifying information (certificate issuer, public key, holder name, expiration date, serial number, version, certificate issuer digital signature, and other information according to each CA provider). A certificate enables its holder to bind (or prove ownership) of a public key to him or her (or an organization, web site, or any other entity currently holding this certificate). A digital certificate encrypts the connections between communication parties, ensuring the secure exchange of confidential information online. It also lists what actions its holder can do and what actions the holder cannot.
A popular type of digital certificate is the SSL certificate issued for web sites. SSL binds the ownership details of a web server (and consequently web sites) to their cryptographic keys. These keys are used to establish a secure session between the client’s browser and the web server (web site) hosting the SSL certificate. See Figure 5-7 for a sample digital certificate for LinkedIn.com issued by DigiCert Inc.

Figure 5-7. Sample digital certificate for LinkedIn.com issued by DigiCert Inc
Let’s now return to the role of digital certificate with regard to the trust relationship between a sender and a receiver. For example, when Nihad wants to send an encrypted e-mail to Susan, he needs to get her public key from Susan’s CA issuer. If both Nihad and Susan have their certificates from the same issuer, the process is clear, and the trust relationship is already established. However, if Susan’s certificate is issued from a different CA other than the one that issued Nihad’s certificate, how can Nihad trust Susan’s certificate? When people face such a challenge, they can simply trust the receiver’s public key certificate when it is issued by a global reputable CA company. CA providers like Comodo ( https://ssl.comodo.com ), Digicert ( https://www.digicert.com ), and Symantec ( https://www.symantec.com/ssl-certificates ) are known to be trusted on a global level (and, of course, there are others) .
The most commonly used standard for issuing digital certificates for a public key schema is the X.509 format that is defined in International Telecommunication Union Telecommunication Standardization Sector (ITU-T) Recommendation X.509. The information in an X.509 certificate includes the following: version, serial number, algorithm information, issuer name, expire date, subject name, subject public key, and optional standard extensions. Many SSL certificates follow the X.509 standard format.
Note
In Chapter 2, we covered the validation requirements for issuing a new SSL certificate for web sites and other entities.
Cryptographic Algorithm Selection Criteria
Many types of cryptographic algorithms are already in use. Some are considered more secure than others. Their strength depends on mathematics and the size of the encryption key. To achieve the maximum security possible when using encryption tools to protect your sensitive information, it is advisable to check the following criteria before selecting the algorithm you are going to use:
Do not use proprietary encryption algorithms if you are on a top-secret mission. No one can guarantee they don’t have a backdoor. The RSA encryption company has been accused of receiving $10 million to incorporate a weaker algorithm into an encryption product called BSafe, according to a Reuters report. 2
For security-conscious people, do not trust algorithms developed or sponsored by official government agencies. For example, Advanced Encryption Standard (AES) was developed by the U.S. National Institute of Standards and Technology (NIST). SHA and its family (SHA-224, SHA-256, SHA-384, SHA-512, SHA-512/224, SHA-512/256) were developed by the U.S. National Security Agency (NSA), which makes it unfavorable choice.
Do not use algorithms that have been previously broken or are considered relatively insecure in today’s computing standards. Examples include MD5, SHA-0, SHA-1, and DES.
Open source cryptographic algorithms are considered safer than the closed alternatives; the public can audit them for trustworthiness, and their code can be rigorously tested and reviewed by global security experts and academics alike.
In cryptographic algorithms, the key length, which is the number of bits in a key used by a cryptographic algorithm, is an important parameter to measure the security of the encryption algorithm. Longer keys provide stronger encryption. The preferred key length differs between asymmetrical and symmetrical algorithms . For instance, to achieve the same level of encryption strength, a 1,024-bit RSA key (asymmetrical algorithm) is only considered equivalent to an 80-bit symmetric key. 3
Note
The site at https://www.keylength.com/en/compare gives advice on the minimum key size requirement for your cryptography system.
For security-conscious people, it is advisable to use the Twofish algorithm. It is a symmetric key block cipher with a block size of 128 bits and key sizes up to 256 bits developed by Bruce Schneier and other scientists. Twofish is unpatented, and the source code is uncopyrighted and license-free. According to Schneier, “Currently there is no successful cryptanalysis of Twofish.” 4
Note
As we already said, encrypting a large amount of data using asymmetrical key is not practical, so always exchange the symmetric encryption key using an asymmetrical algorithm and encrypt your data using a symmetrical algorithm like Twofish.
The Whirlpool hash algorithm is a hash function designed by Vincent Rijmen and Paulo S.L.M. Barreto that operates on messages less than 2,256 bits in length and produces a message digest of 512 bits. It has been adopted by the International Organization for Standardization (ISO) and other international bodies. Whirlpool is not patented, and it will not be according to its authors. Anyone can exploit its source code for any purpose freely. 5
The previous selection criteria can be considered somehow rigorous by today’s standards. However, remember that for the majority of Internet users, using encryption algorithms developed by the RSA or NIST is considered more than enough to protect their sensitive data. The strict selection criteria are best suited for government agencies and private-sector companies (such as banks and hospitals) dealing with sensitive, protectively marked, and of course top-secret information and the like. Such entities need to implement extreme security measures to protect their precious data. Closed cryptographic algorithms—unless developed by them (government-use AES)—may not be the best choice to go with.
Create a Cryptographic Key Pair Using Gpg4Win
In this section, you will begin your practical work on using cryptographic systems to secure your sensitive data. As you might guess, the first thing you need to do is to generate your cryptographic key pair (public and private key). There are different programs to create a cryptographic key pair; however, this book is directed to Windows users, so you will use the most popular encryption program that meets all the trustworthiness criteria in terms of security, open source, and reputation; this tool is Gpg4win.
Gpg4win enables users to securely transport e-mails and files with the help of encryption and digital signatures . It supports both relevant cryptography standards, OpenPGP and S/MIME (X.509), and is the official GnuPG distribution for Windows. It is maintained by the developers of GnuPG.
Gpg4win is not a program in itself; rather, it’s a suite of five utilities bundled with a comprehensive manual and a powerful encryption engine. Gpg4Win contains the following:
GnuPG: The core encryption tool
Kleopatra: A certificate manager
GPA: An alternate certificate manager (GNU) for OpenPGP and X.509
GpgOL: A GnuPG extension for Microsoft Outlook to provide e-mail encryption (supports Microsoft Outlook 2003, 2007, 2010, 2013, or 2016—both 32-bit and 64-bit versions)
GpgEX: A plug-in for Windows Explorer to provide file encryption
This section will walk you through the process of generating the keys on Windows. First, go to https://gpg4win.org/download.html and download the latest available version; currently, Gpg4win 2.3.3 is available.
Note
Gpg4win is open source software; you can find its source code at https://git.gnupg.org/cgi-bin/gitweb.cgi?p=gpg4win.git;a=summary .
Second, install Gpg4win like you do with any Windows software; it is advisable to leave the default installation settings as they are.
Third, let’s generate your key pair following these steps:
Launch the Kleopatra program; you should find it in the Windows Start menu in the Gpg4win folder.
Select File menu ➤ New Certificate.
The Certificate Creation Wizard appears; you have two options.
Personal OpenPGP key pair
Personal X.509 key pair and certification request
We have already described both options; select the first option for an OpenPGP key pair (see Figure 5-8).

Figure 5-8. Selecting a personal OpenPGP key pair in the Certificate Creation Wizard
Now you need to enter your personal details. This includes your name, e-mail, and comments. Although the first two fields are required, you can fill out any information inside them. For instance, we will supply a name and an e-mail. Then click the Advanced Settings button at the bottom of this window to further customize the algorithm used to create the key pair (see Figure 5-9).

Figure 5-9. Entering your name, e-mail, and comments for a new key pair
After clicking the Advanced Settings button, the window shown in Figure 5-10 appears. In the Key Material panel, select RSA and 4,096 bits and make sure to select the +RSA box and give it the length of 4,096 bits as well. This offers the highest security measures. Once you’re sure your information matches Figure 5-10, click OK to close the current window.

Figure 5-10. Selecting which algorithm you want to use for creating your key pair
Note
Please note that keeping the default key size of 2,048 bits is recommended unless security is the overriding concern. The longer the key size, the greater the strength of the encryption, but there is a corresponding decline in performance (if you are using an old PC) with a longer key length.
Click the Next button to move to the next wizard window (see Figure 5-11). This window will show you a summary of certificate parameters, so you can review them if you want to change something.

Figure 5-11. Viewing a summary of the certificate (key pair) details before generating it
If everything is OK, click the Create Key button.
Another window will pop up asking you to enter a passphrase. This is used to protect your secret key. Make sure to enter a complex password; refer to Chapter 2 for the best practices when creating and storing your passwords.
Kleopatra will generate your key pair now. It will ask you to make some random actions on your PC like pressing some keys and/or moving your mouse around to help the wizard create a more secure key.
Your key pair is now created. A success window appears that contains your certificate fingerprint in addition to more steps such as creating a backup for your certificate, uploading it to a directory service, and choosing to send the certificate by e-mail (see Figure 5-12). For instance, you will create a backup of your certificate and store it in a USB zip drive. To do this, click Make a Backup Of Your Key Pair and select where to store it. Finally, click the Finish button to close the window.

Figure 5-12. Success message announcing that your key pair was created successfully
After creating your cryptographic key pair, you need to find your public key in order to send it to the people you want to communicate with. Remember, anyone who wants to send you an encrypted message must have your public key first in order to encrypt the message with it. To extract your public key, follow these steps:
Open the Kleopatra program , go to the My Certificates tab, find your certificate (that you already created), and right-click it and select Export Certificates (see Figure 5-13). Select where you want to save this file (it will have an .asc extension).

Figure 5-13. Exporting your public key certificate using the Kleopatra program
To open/view your public key, go to where you saved the file in the previous step. Right-click the file and select Open with ➤ Notepad.
You can advertise your public key as you want, put it as a signature in your e-mail, or publish it to your web site or blog so anyone can find it and send you encrypted messages.
Now how do you import other people’s public key?
In the previous step, we demonstrated how to export your public key from the Kleopatra program in order to send it to other people so they can communicate with you privately. But how can you send encrypted messages to other people? For example, if Nihad wants to send an encrypted e-mail to Susan, he needs to have her public key first. To do this, Nihad can ask her to send him her public key (for example, through an e-mail attachment). When Susan responds and sends her public key to Nihad, he must import it into the Kleopatra program first (or any other compatible/similar program) before he can use it for encryption. You’ll now learn how to import other people’s public keys into Kleopatra.
If the person you are corresponding with sent you his or her public key as an e-mail attachment, follow these steps:
Open Kleopatra, select File ➤ Import Certificates, locate the public key file (it usually has an .asc extension), and open it.
Your newly imported certificate (public key) should appear in Kleopatra on the Other Certificates tab (see Figure 5-14).

Figure 5-14. Imported certificates (public keys) can be found on the Imported Certificates tab
If your correspondent sent you his or her public key as a text in a message, follow these steps to import it into Kleopatra:
Copy everything from ----BEGIN PGP PUBLIC KEY BLOCK---- to ----END PGP PUBLIC KEY BLOCK---- (see Figure 5-15).

Figure 5-15. Sample public key code opened using Notepad
Open the Kleopatra program (if it is not already open), go to the Windows taskbar, right-click the Kleopatra icon, and select Clipboard ➤ Certificate Import (see Figure 5-16).

Figure 5-16. Importing the public key certificate for the Kleopatra program by copying its contents into the clipboard
If everything goes well, a success message should appear, and you will see your newly imported certificate in Kleopatra on the Other Certificates tab, as you saw in Figure 5-14.
What if you already have a digital certificate (cryptographic key pair) and you want to import it into your Kleopatra program?
We showed you how to export your public key, but in some cases you may need to have your private key (if you want to use it in another encryption program). To export your private key from the Kleopatra program, follow these steps:
Open Kleopatra, go to the My Certificates tab, right-click your certificate (or the one you want to export its private key), and select Export Secret Keys.
Select the location where you want to save the private key, make sure to select the “ASCII armor ” option (see Figure 5-17), and then click OK. A success message should appear.

Figure 5-17. Saving a secret key after exporting it
Warning
Do not share your private key with anyone. Make sure to store it in a safe location and keep it confidential.
Now, after you have your private key ready in a separate file, you can import it into any compatible program. For instance, we will assume that you want to move it to another Kleopatra instance on another device. To import your private key, open Kleopatra and select File ➤ Import Certificates. Browse to where your private key is located and open it. A pop-up message should appear to show your certificate import results. Click OK to close the window. If everything is correct, you should find your private key on the My Certificates tab.
In this section, we covered thoroughly how you can use Gpg4win to create a digital certificate and how to import/export your cryptographic key pair. In a later section, you will learn how to use Gpg4win with the Thunderbird e-mail client to encrypt and sign e-mails and other files.
Please note that once your key is created, you can export your cryptographic keys to a variety of encryption tools. Gpg4win is the most important free encryption project for Windows. It is vital to understand this section to understand how you are going to use cryptography later to protect your sensitive data and online communications from interception.
Disk Encryption Using Windows BitLocker
BitLocker Drive Encryption is a data protection feature offered by newer versions of Windows beginning with Vista. It allows you to encrypt your entire disk drive, including the Windows partition and removable USB drives, securely. BitLocker will protect your sensitive data if your computer gets stolen or lost; it also offers a secure way to dispose of your old computer because recovering encrypted data from a disk drive is extremely difficult and costly. In addition to this, BitLocker helps to secure your computer against sophisticated malware that targets the computer firmware level.
Note
We already advised you not to use proprietary encryption solutions, especially from giant companies, because no one can guarantee their safety from security flaws and backdoors. BitLocker is offered freely as part of the Windows installation (some versions), and it offers excellent protection for Windows users with minimal configuration. BitLocker is more than enough for most Windows users and for the majority of private companies that want to protect their data, so it is advisable to use it unless you are in a working with high-level corporate government data assets that are protectively marked; in that case, it is better to use a more robust solution appropriate to the risk.
BitLocker is not available in all Windows versions. Currently, the following Windows editions are supported:
Windows 10 Pro, Enterprise, and Education editions
Window 8 and 8.1 Enterprise and Pro editions
Windows Server 2008 R2, all editions
Windows 7 Enterprise and Ultimate editions
Windows Vista Enterprise and Ultimate editions
Note
Starting from Windows 7 and Windows Server 2008 R2, BitLocker adds a feature to encrypt removable drives. If you are still using an older Windows version such as Vista and XP and you have a removable drive encrypted using BitLocker that you want to read, you can do this through a program called BitLocker To Go Reader ( https://www.microsoft.com/en-us/download/details.aspx?id=24303 ). It provides users with read-only access to BitLocker-protected, FAT-formatted drives.
Warning
Windows XP is not being supported with patches anymore.
BitLocker uses the AES encryption algorithm with a 128-bit key size by default, but you can change the key length to 256 bits for enhanced security.
A longer key size is more secure, but it also means more overhead when performing the encryption/decryption process. This should not be a problem for computers with good hardware. For individuals, it is more than enough to use the default 128-bit key size, but when it comes to companies dealing with sensitive data, it is preferable to increase the key size to 256 bits for maximum protection.
To change the default BitLocker key size to 256-bit AES, follow these steps:
Press Windows Key+R to open the Run dialog.
Enter gpedit.msc in the dialog; then press Enter to access Local Group Policy Editor.
Go to Computer Configuration ➤ Administrative Templates ➤ Windows Components ➤ BitLocker Drive Encryption. In the right pane, double-click “Choose drive encryption method and cipher strength” (Windows 10 [version 1511] and later). In this case, you are using Windows 10; if you are using Windows 7 or 8, select the corresponding setting (see Figure 5-18).

Figure 5-18. Accessing Local Group Policy Editor to change BitLocker settings
In the new window, select Enabled, click the drop-down box (operating system drives, fixed data drives, and removable data drives), and select AES-CBC 256-bit. (Of course you do not need to change the three values; change the encryption method for the drive type you want to encrypt only.) Click OK to save your changes (see Figure 5-19).

Figure 5-19. Changing the BitLocker encryption settings to 256 bits
BitLocker will use 256-bit AES-CBC encryption for any new drive you want to encrypt, but existing drives encrypted with BitLocker will continue to use the default 128-bit ASE encryption.
Note
If you want to change the encryption setting of the existing encrypted volumes from 128 bits to 256 bits, you must decrypt the drive first and then encrypt it again after changing the encryption settings to 256 bits like you already did.
Encrypting Windows/Fixed Data Drives
After you have the necessary information about the BitLocker feature, let’s begin encrypting your first drive. BitLocker differentiates between three types of disks (although the encryption process is transparent to the user): Windows drive, fixed data drive, and removable data drive. To encrypt the Windows drive, your computer must meet the following three prerequisites:
Your OS partition should be formatted using the NTFS file system .
A system partition that is at least 350MB. This partition is necessary to store Windows boot files because Windows cannot recognize an encrypted boot loader at startup. This partition should be formatted as NTFS for computers that use BIOS firmware and with FAT32 for computers that use UEFI-based firmware. You can see this drive and its size by going to Control Panel ➤ Administrative Tools ➤ Computer Management ➤ Storage ➤ Disk Management (see Figure 5-20). The majority of modern laptops that come with Windows preinstalled contain this partition. However, if your current PC does not have one, BitLocker will create one for you automatically by shrinking the current Windows drive (usually the C: drive).

Figure 5-20. Viewing all the computer’s hard drive partitions including the one reserved by Windows
Administrative access.
To begin encrypting Windows disk drive, follow these steps (applicable to all supported editions of Windows 7, 8, 8.1, and 10):
Warning
You should back up your personal data before encrypting the drive to prevent data loss.
Go to Control Panel ➤ BitLocker Drive Encryption, select the drive you want to encrypt, and click Turn on BitLocker on the right side (see Figure 5-21).

Figure 5-21. Turning on BitLocker on the C: drive (Windows partition)
If your computer doesn’t have a TPM chip, you will see the following error message: “This device can’t use a Trusted Platform Module. Your administrator must set the ‘Allow BitLocker without a compatible TPM’ option in the ‘Require additional authentication at startup’ policy for OS volumes.” In other words, BitLocker requires a computer with a Trusted Platform Module (TPM ) . This is a small microchip located on your computer mainboard. The majority of modern Windows devices come equipped with this chip; some motherboards manufacturers allow the addition of this chip separately. The main role of the TPM with regard to BitLocker encryption is to store BitLocker encryption keys. It also offers a mechanism to detect any attempt to change the host OS software or hardware used by attackers to crack your encrypted drive. Once TPM detected any changes, it will make your PC boot in a restricted mode, thus preventing attackers from gaining any information from you that can aid them to crack your encrypted drives (we will cover attacks against BitLocker and full disk encryption later in this chapter). Nevertheless, if your PC does not contain a TPM chip, you can continue to use BitLocker on your Windows device, but you need to change the Group Policy setting on your computer first.
Press Windows Key+R to open the Windows Run dialog.
Type gpedit.msc and then press the Enter key.
Go to Local Computer Policy ➤ Computer Configuration ➤ Administrative Templates ➤ Windows Components ➤ BitLocker Drive Encryption ➤ Operating System Drives.
Double-click the setting named “Require additional authentication at startup” in the right pane. Select Enabled and make sure the option “Allow BitLocker without a compatible TPM (requires a password or a startup key on a USB flash drive)” is selected (see Figure 5-22).

Figure 5-22. Enabling BitLocker without a compatible TPM
Click OK and close the Local Group Policy Editor. Now you can continue setting up your BitLocker on a device without a compatible TPM chip.
Note If you do not know whether your Windows PC has a TPM chip, do the following check (applicable to all Windows versions): press Windows Key+R to launch the Run dialog. Type tpm.msc and press Enter. If your PC has a TPM module, its version and type should appear; otherwise, the following message will show up: “Compatible Trusted Platform Module (TPM) cannot be found on this computer….”
In some devices, the TPM could exist; however, it is disabled in the motherboard settings. To reenable it, restart your PC into its UEFI or BIOS. Search for a setting named TPM or Trusted Platform Module and reenable it if it is already disabled.
After enabling BitLocker to run without a compatible TPM , return to the first step and click Turn on BitLocker next to the operating system drive (see Figure 5-20). Please note that in this experiment you are encrypting the Windows drive; encrypting a fixed data drive is almost identical.
The first window in the wizard appears. Click Next to continue.
The second window states that “You will no longer be able to use Windows Recovery Environment unless it is manually enabled and moved to the system drive.” Click Next to continue.
Now, BitLocker will ask you to “Choose how to unlock your drive at startup.” You have two options: enter a password each time your PC boot or insert a USB flash drive. In this case, select “Enter a password.” Please note that if you select to use a USB drive, you must connect this USB to your computer each time you boot up in order to decrypt your drive.
We select to use a password, so you need to enter it twice in the new wizard window. Make sure to use a strong password according to our tips in Chapter 2. Click Next to continue.
The wizard will ask you “How do you want to back up your recovery key?” You have four choices (see Figure 5-23): save it to your Microsoft account, save it to a USB flash drive, save it to a file, and print the recovery key. In this case, you will store the recovery key to a USB drive. A list of connected USB drives will appear, so select the one that will hold your recovery key (you can also select to print the recovery key; the BitLocker wizard allows you to choose more than one recovery method).
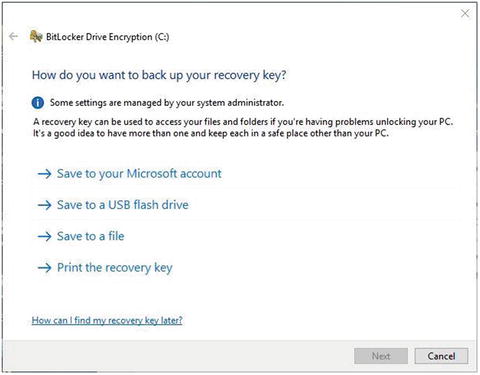
Figure 5-23. Selecting how you want to back up your BitLocker recovery key
Warning Store the BitLocker recovery key in a safe location and make sure not to lose it. If you forget your password or your computer (with a TPM chip) gets damaged and you have to move your hard disk into another computer, the recovery key is your only way to decrypt your data. Otherwise, you will lose all your encrypted data for good.
After saving the recovery key to a USB flash drive, click Next to continue. The next window will ask you to “Choose how much of your drive to encrypt.” You have two options. You can encrypt used disk space only (which is fastest and best for new PCs and drives) or you can encrypt the entire dive (which is slower but better for PCs and drives already in use). Basically, you have been using your computer for some time, your disk drive will certainly contain different data and information other than the one appears (for example, deleted files and fragments of deleted files and folders). In this case, it is essential to enable BitLocker to encrypt the entire drive (including the free space area) to assure that an attacker cannot retrieve the remnants of deleted files from the unencrypted area. On the other hand, if your PC is new, there’s no need to bother and encrypt the entire drive; only encrypt the area that contains data.
After selecting how much drive you want to encrypt, click Next to continue. A new wizard window, which is dedicated to Windows 10 build 1511 or later, appears. It asks you “Which encryption mode to use.” You have two options. The first is “New encryption mode,” which is more suitable for fixed drives on devices with Windows 10 installed. This mode provides additional integrity support, but it is not compatible with older versions of Windows. The second option is “Compatible mode” and works on all previous Windows versions (Windows Vista and 7 and 8). This option should be used if you are encrypting a removable drive that can be used on older Windows versions (see Figure 5-24).

Figure 5-24. Choosing which encryption mode to use (applicable only to Windows 10)
After selecting your encryption mode, click Next to continue. The final wizard window appears and asks you to run a BitLocker system check to ensure that BitLocker can read the recovery and encryption keys correctly. Windows will reboot, and the encryption will begin. It may take some time depending the size of the drive; you can check the encryption progress by checking the BitLocker Drive Encryption icon in the system tray. You can continue your work while the drive is being encrypted.
After finishing the encryption, whenever you boot into Windows, BitLocker will prompt you for a password (or a USB drive if you have already selected that) before unlocking your computer.
Encrypting a fixed data drive is similar. However, Windows will not prompt you for the decryption key upon bootup. Instead, you can double-click the encrypted disk drive after booting to Windows and then enter your password in the prompt to unlock the drive.
If you lost the unlock method you use to access BitLocker drive, you must press the Esc button upon booting to Windows. When BitLocker prompts you to enter the password or insert the USB, then you need to provide the recovery key in order to decrypt your drive.
Encrypting Removable Disk Drives
Using BitLocker to encrypt removable storage such as external HDDs, SD cards, and USB sticks is straightforward. BitLocker offers an effective method to protect your portable storage units that should be used by any Windows user who cares about his or her privacy. Follow these steps to encrypt removable storage devices :
Insert the USB drive you want to encrypt (the same applies to portable HDDs or any supported drive).
Right-click “USB drive” in Windows File Explorer and select Turn on BitLocker. Alternatively, you can go to Control Panel ➤ BitLocker Drive Encryption, and in the “Removable data drives” section (BitLocker To Go) click Turn on BitLocker next to the USB you want to encrypt.
The BitLocker wizard launches and asks you to “Choose how you want to unlock this drive.” You have two choices, a password and a smart card. In this case, you will select the first option, a password. (You can select both options, a password and smart card, for additional security.)
After entering the password used to unlock the drive, click the Next button to move to the next screen. BitLocker will ask you how you want to back up your recovery key in the event that you forget your password (you have three options: upload to a Microsoft account, save to a file, and print on paper). Select your preferred method and click Next.
BitLocker will ask you how much data on your drive you want to encrypt. You can encrypt used space only or encrypt everything. Select your choice and click Next .
The next wizard screen asks you which encryption mode to use. Because you are encrypting a USB stick, leave the encryption mode set to “Compatible mode” and then click Next.
The final wizard asks if you are ready to encrypt the drive. When you are ready, click the Start Encrypting button.
BitLocker will start the encryption process, which can take some time depending on the amount of data you want to encrypt and the size of the USB drive.
When you open Windows File Explorer, you will notice that the encrypted USB drive icon has changed; it now contains a padlock (see Figure 5-25) that indicates this drive is encrypted using BitLocker.

Figure 5-25. A USB drive encrypted using BitLocker
To access the locked drive, double-click it in File Explorer. BitLocker will prompt you to enter the password to unlock the drive. In the same window, you can click “More options” to see additional options such as “Automatically unlock on this PC,” which allows you to unlock the drive on this computer automatically without entering a password each time you insert it. The second option is to enter the recovery key if you forget your password (see Figure 5-26).

Figure 5-26. Accessing advanced options in the USB drive locked using BitLocker
Finally, to manage BitLocker locked drives and removable ones attached to this PC, go to Control Panel ➤ BitLocker Drive Encryption. On the right side of each BitLocker-enabled drive, you will see a list of options, such as backing up your recovery key, changing/removing the password, and turning off BitLocker (see Figure 5-27).
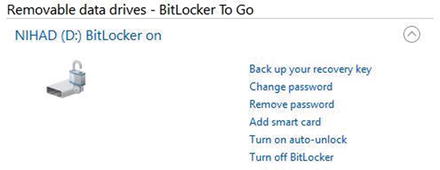
Figure 5-27. Managing options for a BitLocker-enabled drive
Note! Check Your Bitlocker Volume’s Encryption Method
To check whether your existing BitLocker volumes use AES-126 or AES-256, follow these steps :
Launch a command prompt elevated as the administrator (to do this, right-click the Command Prompt icon in the Windows Start menu and select Run as Administrator. In newer Windows versions such as 8 and 10, you can press Windows Key+X and then click Command Prompt (Admin).
Type manage-bde -status at the command prompt and press the Enter key.
A list of all BitLocker-encrypted volumes and nonencrypted ones will appear along with each encryption method (see Figure 5-28).

Figure 5-28. Revealing the encryption type used by BitLocker to encrypt your drives
Best Practices When Using BitLocker
When using BitLocker to encrypt your disk drives, it is essential that you heed the following tips to achieve the maximum security possible when using this feature :
Use a strong and complex password to protect your BitLocker drive following our tips in Chapter 2. Keep your passwords safe in a secure, encrypted password manager.
Keep your BitLocker recovery key in a safe location. It is better to store two copies of each key in two separate physical locations (for example, keep one in a USB flash drive and save the second one on paper in a secure cabinet).
Make sure the name of each recovery key reflects the computer/tablet name or removable drive so you will not be confused when you have many recovery keys stored in one location.
Use multifactor authentication for operating system drives for enhanced security. For example, store TPM and the startup key on a USB flash drive.
If you select USB authentication, do not confuse it with the recovery key. A USB authentication key (also known as startup key) is a file with a .bek extension, while the recovery key is a text file. Make sure to back up the startup key to a safe location .
Before upgrading your OS (for example, from Windows 8 to 10), make sure to suspend BitLocker protection. You can do this by going to the BitLocker Drive Encryption option in the Control Panel and suspending protection for the target drive. Please note that the suspension does not mean that BitLocker decrypts data on the volume; it will make this data unlocked for everyone. However, any new data written to the disk is still encrypted.
Make sure to suspend and resume BitLocker protection after you perform a recovery to your locked drive, as the recovery key will be saved unencrypted on the disk drive, and the drive will remain unprotected until you suspend and resume the BitLocker protection.
Make sure to turn off your Windows PC or put it in hibernation mode when you finish working. BitLocker is active in these states only. BitLocker is not active in Sleep mode.
If you suspect that your BitLocker keys have been stolen, make sure to decrypt the drive and then encrypt it again to avoid leaving any traces related to BitLocker metadata that can help attackers to crack it.
For people storing sensitive data on their machines, it is advisable to encrypt the drive first before moving sensitive files to it. Do this especially for SSDs and USB flash drives.
BitLocker is a great security feature available in most Windows versions. It is easy for novices to use and offers strong protection for your sensitive data. BitLocker adds minimal performance overhead on your machine and is highly recommend, especially on portable Windows computers such as laptops and tablets in addition to removable storage such as USB, SDs, and portal HDDs. Companies using Windows OS for their IT operations are highly encouraged to use BitLocker to protect business data at rest.
Disk Encryption Using Open Source Tools
As we’ve mentioned, open source encryption software is more trustworthy than proprietary (closed) solutions when it comes to protecting highly sensitive or classified information. The main advantage of open source solutions is that they don’t have backdoors (although an audit should be performed before using any program). This does not mean all proprietary solutions have one, but the open source solutions can be reviewed by the public for possible backdoors or for any feature that might facilitate an attack against their cryptographic algorithm. Open source encryption software also has a reputation of being more stable and interoperable with other open source products and protocols and of supporting different hardware (many open source encryption tools support multiple platforms such as Windows, Mac, and Linux). Closed software is usually linked to one vendor, which can impose restrictions on its usage and the other system that can integrate with it. Finally, open source software, especially the popular programs, is used by millions of users and has hundreds of volunteer developers, making open source software more stable, more secure, and less prone to bugs than proprietary systems.
On the other hand, paid solutions usually surpass open source software in being easy to use. They have better user interfaces and offer technical support after the sale. (Most open source products rely on community support or offer paid support service.) Finally, closed software is usually less vulnerable to attacks compared with open ones because no one can view its source code to exploit any weakness.
To end this discussion, open source programs are better than closed counterparts in regard to cryptographic tools. However, you should select your open source encryption tool carefully. Do not consider a product safe just because it is open source. For instance, you need to check the following:
Make sure to select an encryption tool that incorporates open source cryptographic algorithms like Twofish and Whirlpool.
Check what current users of this software say about it. Do a search online for any problems, major bugs, or security flaws related to it.
Check whether experts in the field have made any audit or review of this software and see what their opinion is.
Use mature software. A program with millions of downloads is better than a new one just developed.
It should be updated continuously and under active development; old releases with no continual updates are not a good sign.
The most popular open source encryption program (used for file and disk encryption) is the legendary program TrueCrypt. For years it has been the number-one choice by security professionals around the world. TrueCrypt can be installed on different platforms and supports wide arrays of the best secure cryptographic algorithms.
TrueCrypt development ended suddenly in 2014 through a message on its web site stating the following: “Using TrueCrypt is not secure as it may contain unfixed security issues.” The TrueCrypt developers did not give any further details regarding the announced security flaws and advised Windows users to use the BitLocker Drive Encryption feature instead. The last version of TrueCrypt was the 7.1a version, released in 2012, and it is still used by millions according to some unofficial statistics.
Unconvinced of any security flaws, the Internet community made an independent audit of TrueCrypt ’s source code (version 7.1a). The final summary found that “TrueCrypt has no evidence of backdoors or otherwise intentionally malicious code. However, the code suffers from some vulnerabilities resulted from using some deprecated functions and inconsistent variable types which can be fixed by updating the current code.” 6
Note
You can download the last version of TrueCrypt (7.1a) at https://www.grc.com/misc/truecrypt/truecrypt.htm along other information regarding this program.
The popularity of TrueCrypt and its reputation has encouraged developers to create other forks for this project. The following are the main projects based on this tool:
VeraCrypt ( https://veracrypt.codeplex.com ): This is based on TrueCrypt 7.1a. It adds enhanced security to the algorithms used in encryption and fixes major security bugs found in the TrueCrypt security audit. VeraCrypt cannot open encrypted containers created in TrueCrypt.
CipherShed ( https://www.ciphershed.org ): This is another fork based on TrueCrypt. It maintains backward compatibility with the previous TrueCrypt container format.
In this book, we will opt to use VeraCrypt as it is in active development more than CipherShed, and it already has fixed the main vulnerabilities raised by the TrueCrypt audit project. (The most current audit to the VeraCrypt source code was done in October 2016 and fixed a critical vulnerability related to cryptography. 7 )
Encryption Using VeraCrypt
VeraCrypt offers similar functions as its ancestor TrueCrypt. It can encrypt the Windows partition, fixed drive data partitions, and removable media, and it can create encrypted containers to store sensitive information. VeraCrypt also supports plausible deniability through the following:
It supports hidden volumes and hidden operating system.
Encrypted VeraCrypt devices and volumes look as if they are full of random data; they contain no signature for being a VeraCrypt container.
Note
Plausible deniability can also be achieved by using steganography techniques in which secret data can be concealed within an ordinary file (e.g., concealing a secret text file within an image).
In this section, we will demonstrate how to use this stable software to create an encrypted volume, and later we will demonstrate how to create a hidden volume in addition to encrypting removable USB devices .
Creating an Encrypted Container (Volume)
The following steps detail how to create an encrypted container to store your sensitive data securely.
Download and install VeraCrypt from https://veracrypt.codeplex.com . Make sure to download the latest version.
Launch the program and click the Create Volume button in the main program window.
The Volume Creation Wizard window will appear, allowing you to select which kind of encrypted volume you want to create. You have three options (see Figure 5-29): encrypt a file container, encrypt a nonsystem partition (fixed data drive or flash memory), and encrypt a system partition drive (Windows partition). In this case, select the first option and click Next to continue.

Figure 5-29. VeraCrypt allows you to create three different types of encrypted volumes. This shows only the right side of the wizard window.
The next wizard window asks you whether you want to create a standard or hidden volume. Select Standard VeraCrypt Volume and click Next to continue.
Now, you need to select the volume location and name. Bear in mind that VeraCrypt containers are like ordinary files. You can move them onto a USB drive or to another PC, rename them, and delete them. Do not select an existing file in this step. You need to supply a new file name to avoid overwriting any existing file (see Figure 5-30). After finishing this step successfully, click Next to continue.

Figure 5-30. Storing a volume in the F: drive with the name MyStorage
The next wizard window asks you to select the encryption and hash algorithm for this volume. We already discussed the main criteria for selecting the best secure algorithm. In this case, select Twofish for the encryption and Whirlpool for the hash. Click Next to continue .
Here you need to specify the volume size. In this case, you will choose 500MB. Please note that you cannot increase the volume size after creating it. Click Next to continue.
The next wizard window asks you to enter a password to protect the volume. Select a complex and long password according to our tips in Chapter 2. However, it is strongly recommended that you use at least 20 characters. You can also further secure your volume by using a key file. After typing the password and confirming it, click Next to continue.
In this window, you need to move your mouse within it randomly for some time (at least one minute; a progress bar appears to tell you when it is enough) to increase the cryptographic strength of the encryption keys. Make sure to set the filesystem type to FAT as it is widely supported on different platforms and leave the cluster set to Default. After finishing, click the Format button.
VeraCrypt will begin creating your encrypted container. This may take some time depending on the size of the volume. After it finishes, a success message will pop up saying “The VeraCrypt volume has been successfully created.” Click Exit to close the wizard.
Opening a VeraCrypt-Encrypted Volume
To open an encrypted container, follow these steps:
Launch VeraCrypt and select a drive letter from the list.
Click Select File to select your encrypted container file.
Click the Mount button (Figure 5-31). The password dialog will appear.

Figure 5-31. Opening the VeraCrypt-encrypted container
Enter your volume password in the prompt and click OK.
If the password was correct, the mounted container will appear as a virtual disk drive in Windows File Explorer. You can also access it by double-clicking the drive letter in the main program window.
VeraCrypt will encrypt any file or folder on the fly as it is being written to its volume. In a similar way, whenever you open a file stored in a VeraCrypt container, it will automatically decrypt it to computer RAM without writing anything to the host computer disk.
To close the opened VeraCrypt container and make your stored encrypted files inaccessible again, you can either turn off/restart your computer or select the mounted drive letter in the VeraCrypt main window and then click the Dismount button.
Creating Hidden VeraCrypt Volume
A VeraCrypt hidden volume allows users to protect their sensitive data if they are forced to disclose their VeraCrypt-encrypted volume password. A hidden volume can be created within another VeraCrypt volume (including a standard volume or a partition/device volume) by exploiting the available free space in the outer volume. To create a hidden volume, follow these steps (which are similar to creating a standard volume but with minor differences):
Launch VeraCrypt, click the Create Volume button, select the option “Create an encrypted file container,” and then click Next.
The next window asks you about the volume type. Select “Hidden VeraCrypt volume” and click Next to continue.
The next wizard window asks you which mode creation you want to use. In this case you already have a standard volume, so use the “Direct mode” option and click Next to continue. If you do not have a ready encrypted volume, you should select the “Normal mode” option to create an encrypted volume first and then create the hidden one.
The next window asks you to select your existing encrypted VeraCrypt volume. Select the one you have created in the previous step (this volume will hold the hidden one inside it). Click Next to continue.
Now you need to enter the outer volume password (see Figure 5-32). Click Next to continue .

Figure 5-32. Enter the outer container password. This will hold the hidden volume inside it.
VeraCrypt will scan the outer volume cluster bitmap to determine the maximum possible size of the hidden volume. Click Next to move to the next steps to set the options for the hidden volume.
The next wizard window will ask you to select the encryption and hash algorithm for the hidden volume. Select them as you did previously and click Next to continue. In the next window, you need to set the hidden volume size. VeraCrypt will determine the maximum possible size of the hidden volume. In this case, the maximum size was 495.26MB (see Figure 5-33).

Figure 5-33. Determining the hidden volume size
After typing the hidden volume size, click Next to continue. The next wizard will ask you for a password for the hidden volume. Type one that is different from the outer volume password. Click Next to continue.
Warning Do not use the same password for both the outer volume and the hidden volume. VeraCrypt uses the password to distinguish between both volumes when you want to mount any one of them.
Now you need to select the filesystem format as you did previously (select FAT and leave the cluster size to the default). Move your mouse within the wizard for one minute and click Format. If everything goes well, the hidden volume will be created, and VeraCrypt will launch the window shown in Figure 5-34.

Figure 5-34. VeraCrypt announcing the successful creation of the hidden volume
Finally, click the Exit button to exit the wizard.
Opening the Hidden Volume
Opening a hidden volume is just like opening the standard volume, which you did previously (see the section “Opening a VeraCrypt-Encrypted Volume”). But instead of entering the outer volume password, you need to enter the hidden volume password. VeraCrypt will show the volume type as Hidden after mounting it (see Figure 5-35).
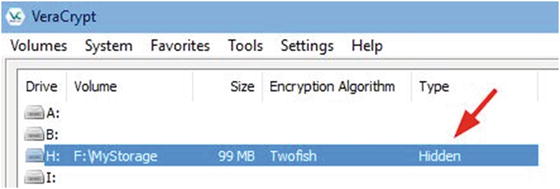
Figure 5-35. VeraCrypt showing the type of volume mounted in its main program window
Protecting Your Data in the Hidden Volume from Accidental Deletion
You may wonder what will happen to the data stored in the hidden volume if you write data to an outer volume that consumes its entire space. The answer is simple. The data in the hidden volume will get damaged. To avoid this, follow these steps:
When you want to mount (open) your outer volume to view its data, after typing your password for the outer volume, click the Mount Options button before clicking OK (see Figure 5-36).

Figure 5-36. Clicking Mount Options before accessing your outer volume
Another window will pop up. Select the option “Protect hidden volume against damage caused by writing to outer volume.” You also need to supply your hidden volume password, as shown in Figure 5-37.

Figure 5-37. Accessing the VeraCrypt container mount options to protect the hidden volume data
Click OK to close the current window; then click OK again in the password dialog to mount your outer volume without damaging the data on the hidden volume stored within it. If there is no error and you have entered both passwords correctly for both volumes, you will see a pop-up message stating that “The hidden volume is now protected against damage until the outer volume is dismounted .”
Please note that this procedure to protect the hidden volume does not mean that VeraCrypt has mounted it. It has only decrypted the portion of the hidden volume that contains its size. When you open your outer volume using the previous steps, both the outer and hidden volumes will open as read-only. Note that VeraCrypt decrypts the volume and displays it as Outer in the program main window. This is because you opened it in a protected mode. If security is an issue, do not mount your volume in this way, as it will give a clue that your outer volume contains within it a hidden one. When you decrypt a VeraCrypt container, it will mount as Normal in ordinary circumstances.
When you have a hidden volume, it is advisable to store some insensitive data in the outer volume and stop adding more data to the outer volume after creating your hidden volume. This will effectively save your important data and prevent accidental damage to the data stored within your hidden volume.
Warning
Using VeraCrypt could be dangerous in some circumstances. When using VeraCrypt to encrypt your data, there is no technical way, as far as we know, to know whether the encrypted container contains a hidden volume within it. For instance, if an honest foreigner traveler is visiting the United States and the U.S. border agency finds a VeraCrypt container on his or her PC, they may ask the traveler to hand over the decryption key (the password/and keyfile) to decrypt the container. This traveler could be in trouble if the encrypted container does not contain a hidden volume within it because the officers (or any adversary) may not believe the traveler that the encrypted container does not have another one hidden within it.
We advise you to use Windows BitLocker if you are not protecting sensitive/high-grade information. However, if you opt to use VeraCrypt and you want to protect yourself from such a scenario, you can simply create a hidden volume within each encrypted container you create. In this way, if an adversary forces you to decrypt your VeraCrypt volume, you can provide the passwords for both encrypted and hidden volumes to prove your innocence from hiding secret data .
Please note that each VeraCrypt container can contain one hidden volume within it.
Encrypting Fixed Data and USB Drive Using VeraCrypt
Encrypting USB drives and other fixed data drives (non-Windows partitions) is similar to creating standard volumes. To encrypt a removable drive, follow these steps (in brief):
Launch the VeraCrypt program. Click Create Volume in the main program window. The Volume Creation Wizard will appear.
Select “Encrypt a non-system partition drive/drive” and then click Next to continue.
In the next wizard window, select “Standard VeraCrypt volume” and then click Next to continue.
The next wizard window will ask you to select the device that you want to encrypt. Click Select Device and select the drive you want to encrypt. All connected devices and partitions on the current computer will appear; make sure to select either the fixed data or the USB drive only (this wizard is not applicable to Windows drives), as shown in Figure 5-38.

Figure 5-38. Selecting the USB drive you want to encrypt
After selecting your device, click Next to move to the next wizard window, which gives you two options (see Figure 5-39). The first is “Create encrypted volume and format it.” Use this option if you want to encrypt a clean USB stick that contains no data (do not use this option if your device/USB holds data because everything will get lost). The second option is “Encrypt partition in place.” Use this option if your current device/USB stick contains data that must be maintained and encrypted.

Figure 5-39. The first option will format the drive and then encrypt the data, while the second option will encrypt the existing data in the drive without formatting it
The next wizard window will ask you to select your encryption algorithm, set a volume password, and set whether you want to store large files (more than 4GB, and set the filesystem type. After setting all these parameters (like you did earlier), click the Format button.
If everything works as expected, VeraCrypt will launch a success message stating that the volume was created successfully. Click the Exit button to close the wizard .
To mount the encrypted device/USB volumes, follow these steps:
Click the Auto-Mount Devices button in the main program window. The password dialog will appear. Type your device/USB password and click OK. VeraCrypt will mount your device to one of the available drive letters (see Figure 5-40).

Figure 5-40. Mounting a device/USB in VeraCrypt
Alternatively, you can mount your device by selecting a drive letter (different from the current device/USB drive letter) and clicking the Select Device button in the main program window; then click the Mount button.
After successfully mounting your device/USB drive, two drives will appear in Windows File Explorer; these are the encrypted drive and the mounted (unlocked) container, which contains its data (see Figure 5-41).

Figure 5-41. Each mounted device/USB will reserve two drive letters, one for the encrypted drive (inaccessible) and the second for the mounted version that contains its data
In this section, we have thoroughly covered using VeraCrypt to create a standard container and a hidden container and to encrypt a fixed data drive and removable storage devices. You can also use VeraCrypt to encrypt the system drive (the Windows partition) in addition to creating a hidden operating system if someone forces you to decrypt the operating system. What we covered in this section is enough for all users with varying IT skills to begin using VeraCrypt for their daily tasks. For experienced users who may want to use it to encrypt the operating system partition or check out all its advanced features, we recommend reading the VeraCrypt documentation at https://veracrypt.codeplex.com/documentation .
Multitask Encryption Tools
Sometimes you may not want to use a dedicated tool for your encryption work. For instance, you don’t need a VeraCrypt container if you want to send a small file to your friend via e-mail or you want to store some files on an unencrypted USB device. There are many programs already used by millions of Windows users that can offer encryption capabilities to safeguard your sensitive data with a few clicks. You can also find many open source security tools that do not need advanced configurations or cryptographic keys in order to encrypt files and folders. This section will introduce some of these tools; they have been selected specifically to meet our tools selection criteria of being open source, reputable, and easy to use.
7-Zip
7-Zip ( www.7-zip.org ) is open source archiver software that works on all Windows versions (beginning from NT). It allows you to compress and encrypt data using the AES-256 encryption algorithm for the 7ZIP format and uses AES-256/ZipCrypto for the ZIP file format. Using it is simple; just right-click the file or folder you want to compress and select Z-Zip ➤ Add to archive.
AES Crypt
AES Crypt ( https://www.aescrypt.com ) is a free, open source program that integrates with the Windows right-click context menu. It uses AES-256 encryption to do its job. To encrypt a file, right-click the file and select AES Encrypt. Then enter the password to lock the file; another file with the same name but with AES extension will appear in the same directory. To decrypt it, right-click the encrypted result and select AES Decrypt. Then enter its password. The encrypted file should appear unencrypted in the same directory with its original extension.
Protect Microsoft Office Files
All Microsoft Office documents beginning with Microsoft Office 2007 can be protected with a password to prevent others from opening or modifying your documents. This feature uses AES-128 by default. To password-protect a Microsoft Word document, follow these steps:
In Microsoft Office 2007, click the Microsoft Office button and select Prepare ➤ Encrypt Document. Type your password and confirm it. Then click OK. Finally, save the changes to your file.
For Microsoft Office 2013 and 2016, open the document you want to protect, select the File menu, go to the Info tab, click the Protect Document button, select Encrypt with Password, enter the password, and click OK. Finally, save changes to your document. In Excel, select File, go to the Info tab, select Protect Workbook, and select Encrypt with Password. In PowerPoint, select File, go to the Info tab, select Protect Presentation, and select Encrypt with Password.
Protect PDF Files
Like the Microsoft Office products, Adobe has a password protection feature for its documents. PDF documents are used widely for both personal and business use. To protect a PDF file with a password, open the file you want to protect, select File ➤ Properties, and go to the Security tab. From the Security Method drop-down menu, select Password Security. Another window will pop up where you should select the option “Require a password to open the document” and type the password in the corresponding field. Click the OK button, and another pop-up window will appear asking you to confirm your password. Type it again and click OK. Then close all open dialogs and save your document (you can save it by closing it and selecting Yes when Adobe asks you whether you want to save your changes to the file ).
Attacking Cryptographic Systems
These types of attacks aim to find the secret key used to decrypt the confidential data in order to gain unauthorized access to it. As computing technology advances daily, you can expect to see more attacks against cryptographic systems. For instance, you should know that using full disk encryption to encrypt your entire disk drive does not ensure 100 percent safety of your data at rest. In the same way, encrypted data transmitted across untrusted networks like the Internet also suffer from many threats. Scrambling your data is a great protective method, but you still need to understand the different types of cryptographic cyber-attacks so you can take some precautionary steps to deter them successfully.
Disk encryption is able to protect you against one type of attack, which is the physical attack. Even though you have your PC encrypted, there are a large number of cyber-threats already traveling the Internet that can strike your machine. For instance, full disk encryption does not protect against an adversary who intercepts your communication online. Unpatched Windows, old software, an older OS (such as Windows XP), and some dangerous services can be exploited remotely to plant malware on your machine. This will effectively steal your decryption keys and make your disk encryption useless.
We already covered how to use BitLocker and VeraCrypt to encrypt entire drives. In Chapter 4, we advised you to use the Tails OS, which boots from a CD/DVD or USB stick to assure complete anonymity when going online in extremely hostile (in terms of censorship) environments. All encryption tools and techniques already covered in this book can suffer from similar attacks. Thus, we are dedicating a separate section for them. The following are the most popular and known attacks against cryptographic techniques.
Harvest-Then-Decrypt Attack
With advances in computing technology, you can expect that currently used algorithms will be broken before reaching their estimated death time. For instance, a quantum computer (still under development) is known to be thousands of times faster than a normal computer. This tremendous speed imposes a serious risk on modern cryptographic algorithms, especially the ones based on public key infrastructure (PKI) such as RSA and Elliptic Curve Cryptography (ECC) . These two algorithms are still used by the Transport Layer Security (TLS) protocol, which is used to secure the majority of online applications such as web browsing, IM, e-mail, VoIP services, and so on. TLS achieves its secure work by encrypting the connection between the client and the server using a symmetrical key. However, it will use asymmetrical algorithms such as RSA to exchange the secret key first, which is generated automatically upon initiating each session. These protocols are still very secure by today’s security standards and nearly impossible to break. However, an attacker could record the encrypted traffic and then wait until the technology advances (for example, until the quantum computer arrives) and then try to decrypt the traffic.
The DROWN Attack
DROWN stands for Decrypting RSA with Obsolete and Weakened eNcryption. This kind of attack affects servers that are still supporting SSLv2. Nearly all modern Internet applications do not use SSLv2. However, if there is a misconfigured server that still has SSLv2 enabled, this may impose a risk as it allows an attacker to decrypt the newer TLS connection between up-to-date clients and the servers by using the same private key used for the secure connection. Disabling SSLv2 is necessary to close such a vulnerability. You can find more information about this attack and the countermeasures at https://drownattack.com .
Man-in-the-Middle (MITM) Attack
This is another form of active attack that targets encrypted traffic flows online, and it is mostly applicable to the public key cryptography schema. In this type, an attacker intercepts the communication but still relays the message between the sender and the receiver as if the communication was not touched. Discovering such attacks is difficult because nothing appears to be unusual for the communicating parties. Here’s an example:
If Nihad wants to communicate privately with Susan, he needs to request her public key first.
An attacker intercepts the communication and sends his public key instead to Susan. In this way, the attacker is able to decrypt anything Nihad sends to Susan.
Capturing one side is not enough; the attacker needs to maintain the connection, so he or she encrypts the data after reading it and resends it to Susan.
The attacker now sends his public key impersonating Nihad so that anything Susan sends is decrypted by the attacker.
Such attacks are difficult to conduct because they involve a real intrusion into the communication channel, but when it does happen, it results in a serious compromise.
Brute-Force Attack
In this type of attack, the attacker already has the encrypted data and knows the encryption algorithm. The attacker needs to know the decryption key or the password/passphrase. The attacker tries all possible combinations to find the correct key. If the key (password/passphrase) is long, cracking it can take a long time. There are many programs to automate such attacks, such as John the Ripper ( www.openwall.com/john/ ) and RainbowCrack ( http://project-rainbowcrack.com ), which is used specifically for cracking password hashes.
A variant of brute-force attack is a dictionary attack, which uses words and phrases from different dictionaries in order to crack the password/key. A dictionary attack is faster than a brute-force attack as the attacker needs to try small combinations of possible words/phrases compared with a regular brute-force attack. However, this attack has its limitations because if the key/password does not exist in the dictionary, the attacker will never find it. Brute-force and dictionary attacks can be deterred by using complex, long passwords that have no specific meaning (follow our tips in Chapter 2 for creating secure passwords).
Bootkit
A bootkit is a kind of malware that installs on the master boot record (MBR) of your operating system. It usually stores its code in the unallocated disk space or host-protected area using its own file system. It runs before the operating system boots, giving it the ability to bypass full disk encryption because the MBR is not encrypted; this allows the OS to boot up and the encryption software to launch its login screen from within the MBR. This will effectively allow it to capture the decryption key/password once entered. A bootkit can get direct access to the Windows kernel, giving it wide abilities to do its dirty work and bypassing all security software already installed on the infected machine.
If you are curious about bootkit development, you can check out www.stoned-vienna.com , which gives information about and the source code of one type of bootkit named Stoned Bootkit. This kind of bootkit attacks all Windows versions from 2000 up to 7. It also has a demo version for Windows 8.
A bootkit is considered a type of rootkit (covered next). However, the main difference between them is that the bootkit launches early during the boot process.
Rootkit
A rootkit is a type of malicious software designed to gain low-level access to the target computer. A rootkit in itself is not malicious; however, if exploited by intruders, it can spy on a legitimate computer owner’s usage and steal his or her decryption keys. Rootkits work stealthily in the background without leaving any traces in the infected machine. They do not have a process name, a registry entry, or an associated Windows service running. A rootkit has the ability to disable security solutions already installed on the infected machine. It can also make modifications to the OS (e.g., install itself as a software driver) to further conceal itself, install a keylogger, and install other malware in addition to maintaining administrative access to the target machine by the attacker.
Detecting a bootkit or a rootkit can be extremely difficult because normal antivirus programs cannot detect all types of them. However, there are many tools that have been designed specifically to detect and remove this kind of threat. You can find some in Table 5-1.
Table 5-1. Anti-bootkit and Anti-rootkit Tools
Name | URL |
|---|---|
RootkitRevealer | |
TDSSKiller | https://support.kaspersky.com/viruses/disinfection/5350#block1 |
GMER | |
Rootkit Detection Framework for UEFI (RDFU) | |
UnHackMe | |
Sophos Anti-Rootkit | https://www.sophos.com/products/free-tools/sophos-anti-rootkit.aspx |
Operating System Leak
Windows can leak sensitive information, even if you are implementing a full disk encryption scheme in your PC. For instance, decrypted files (or parts of them), passwords, encryption keys, cached files, and other secret information can reside in different places in Windows, such as in paging files, hibernation files, memory dumps, and system restore points (created by the Volume Shadow Copy Service). Many single-file encryption tools offer a feature to delete the original file upon encryption and leave the encrypted result only; this is a good security practice. However, the majority of such programs do not wipe the deleted file securely, making it recoverable later.
The previous attacks against encryption techniques are all based on software attacks. However, there are more attacks that require physical access to the target machine to work successfully. The following section covers the most popular one.
Evil Maid Attack
In this scenario, an attacker gains physical access to an unattended target PC that has full disk encryption enabled using programs like VeraCrypt, PGP whole disk encryption, or BitLocker. The attacker (like a maid in a hotel) boots the target PC using a CD/DVD or USB drive, or even through a network, and installs a bootkit (backdoor) into the system and then shuts off the PC.
When the legitimate PC owner returns, he or she powers up the PC as usual and enters the decryption key/password to decrypt the disk. The bootkit will record this information somewhere in the disk drive (e.g., in unallocated space or in a host-protected area); the attacker can return later to recover them and delete any traces left from the attack. Some kinds of bootkits can also send the user decryption key/password via the Internet when a connection is available.
Nearly all disk encryption systems are vulnerable to this attack unless some precautionary measures are followed (covered in a moment) that can make performing this attack extremely hard to achieve.
Note
EvilAbigail ( https://github.com/GDSSecurity/EvilAbigail ) performs an automated Linux evil maid attack.
Cold Boot Attack
In this type of attack, an attacker gains physical access to the target machine immediately after it has been turned off (or the attacker can reboot a running machine using the power button; this called a cold reboot) and then tries to boot using a USB stick or CD/DVD. Using specialized software, the attacker captures an image of the RAM and stores it on the removable device. Finally, the attacker shuts down the PC as if nothing happened. In old desktop computers and some laptop models, an attacker can also remove the RAM module entirely from the target machine and install it on his or her own machine and then boot normally to extract its contents.
The captured image will get analyzed to recognize important artifacts stored within it using a variety of techniques. By using a specialized tool, there is a high probability that an attacker can find and extract the decryption key from the target machine.
This kind of attack is possible because of the volatile nature of RAM. Anything stored in RAM will disappear when it loses power. However, research conducted by Princeton University in 2008 found that information stored within RAM can last for seconds after it loses power. This period can extend into minutes or even hours if RAM is frozen using liquid nitrogen to cool the volatile memory modules to slow down the degradation of the contents.
The majority of encryption systems store their encryption key/password in RAM. This attack also proves its effectiveness against full disk encryption employed by BitLocker .
Direct Memory Access
Direct memory access (DMA ) is a type of physical attack where an attacker gains direct access to the target machine’s RAM by exploiting some types of ports (FireWire, Thunderbolt, PCI Express). This allows direct access to RAM without passing first through the target machine’s CPU. By doing this, an attacker can access/capture the RAM contents directly and then by using specialized software can investigate it thoroughly to extract encryption keys and other sensitive information like passwords, chat messages, and decrypted files. In the same way, an attacker can bypass all the security solutions already deployed by the target OS and install a keylogger or rootkit to monitor everything done on the subject device.
Hardware Keyloggers
Keyloggers come in two forms, software and hardware. We already talked about some types of software bootkits and rootkits that have the ability to record user activities stealthily and send it later through the Internet or Wi-Fi signals to their operator. The same thing applies to hardware keyloggers, which are more sophisticated and have the ability to surpass all the security solutions already installed on the target machine. By installing a hardware keylogger, usually installed between the target computer and its keyboard or simply attached to the DVI, VGA, or HDMI port, an attacker will have the ability to capture everything the user types on the machine in addition to taking screen captures and then send this information through e-mail. Some modern types of hardware keyloggers have built-in Wi-Fi support, enabling them to use their own connection to deliver reports. A hardware keylogger looks similar to cabling used with a PC to connect different external devices, making it less suspicious for nonexperienced users. A hardware keylogger is more dangerous than its software counterpart as it can begin logging user activities once the computer starts. This gives it the ability to record BIOS passwords and full disk encryption passwords.
Hardware Backdoor
As more companies select to manufacture their IT products in Asian countries to reduce costs, you can expect to see more devices equipped with hardware backdoors . Backdoors allow cyber-criminals to gain remote access to target machines/networks without being discovered. Some types can also get embedded within memory modules (volatile memory) and wireless microchips (e.g., radio frequency identification [RFID]). Hardware backdoors are a real threat to IT operations, especially when they are embedded in security devices such as access control systems and network devices. An attacker can modify the hardware device upon manufacturing so he or she can bypass security measures and full disk encryption on the target machine/network. This kind of attack works below the OS level, making it able to bypass all security software solutions currently deployed. Hardware backdoors and firmware attacks that work by modifying the BIOS code to exploit the target machine are usually used by security services and big criminal organizations with adequate resources to monitor users/companies for intelligence. This threat is not only related to exploiting target systems; it can also be used by cyber-criminals to control affected systems remotely and as a botnet to launch further attacks (e.g., DDoS attacks).
Countermeasures Against Cryptography Attacks
Most attacks against cryptographic techniques can be mitigated if the user uses the proper device/OS and takes some precautionary steps. This section gives you some advice.
Mitigate Future Attacks Against Encrypted Data
We already covered the harvest-then-decrypt attack, which works by capturing current encrypted data and then waiting until the technology advances in order to be able to crack it. Countering such attacks is difficult because the majority of encrypted data travels online, and anyone with adequate tools can capture it for later analysis. The most practical advice against such future attacks is to use similar technology to counter for it. Currently, quantum computing is still in the development stage. Quantum cryptography (which depends on physics rather than mathematics to create its cryptosystem) is also gaining more attention to fight against future attack techniques. For instance, it is impossible to crack an encryption key encoded using quantum cryptography. This issue boosts confidence in deploying advanced techniques to exchange top-secret information online.
Another mitigation technique that can be used regardless of future attack and protection techniques is to stop sending any critical data online. Sensitive and high-grade information can be exchanged physically using encrypted storage devices offline, without exposing the contents online.
Mitigate Brute-Force Attack
Such an attack is not practical against the Windows OS sign-in authenticator or BitLocker (with a BitLocker password or recovery key) when the target machine is protected with a strong, complex password and the account lockout is activated (the user needs to wait a certain time after entering an invalid username/password three times). Windows devices with TPM microchips offer more protection against such attacks. To protect a VeraCrypt container and similar full disk encryption tools, it is highly advisable to use at least 20 characters in your password and follow our tips in Chapter 2.
OS Leak
Even if you are using full disk encryption to protect your data, you still need to decrypt this data to access it. Windows stores opened files and fragments of them in different locations on the hard drive. For example, when you want to read a Microsoft Word document stored inside a VeraCrypt-encrypted container, you need to decrypt the container first. Then after opening this document, Windows needs to upload it into the computer RAM to make it available for reading. In the same way, Windows will record opening such a file in different locations (recently opened files, Microsoft Word history files, among other places). In addition, Windows may need to store this file or parts of it in another location without the user’s knowledge. To counter for such risks, you need to configure Windows properly to limit the cases that may leak your sensitive data without your knowledge.
Disable memory dumps: A memory dump file can contain unencrypted data if Windows faces a problem and needs to restart. To disable this feature, go to Control Panel ➤ System, select “Advanced system settings,” go to the Advanced tab, and click the Settings button in the Startup and Recovery section. In the “Write debugging information section,” select “none” from the drop-down menu. Click OK and then OK and you are done.
Disable the Windows hibernation (Hiberfil.sys) feature: This file is located in the same partition where Windows is installed (usually on the C: drive). As you may have guessed, opened files, encryption keys, passwords, key files, and anything that was running or open on a computer when it goes into hibernation mode may go into this file. If an attacker gains physical access or network access to this file, he or she can copy it to extract useful information from it. To disable hibernation mode in Windows, open a command prompt as the administrator, type Powercfg -hibernate off, and press the Enter key .
Disable virtual memory: This feature allows Windows to copy part of the RAM contents into a special file on the hard drive (usually stored on the same drive where Windows is installed under the name Pagefile.sys) to compensate for RAM storage when it becomes full. A user can’t determine which file or files will end in the paging file, so it is better to disable it. To disable the paging file on Windows, go to Control Panel ➤ System, select “Advanced system settings,” and go to the Advanced tab. In the Performance pane, click Settings, and on the Advanced tab, click the Change button in the “Virtual memory” section. From this menu, you can select the drive where you want to disable the paging file by selecting “No paging file” and then clicking Set.
Disable Volume Shadow Copy Service: This service allows Windows to take automatic backup copies of all files and folders and system settings on all system volumes where it is turned on (usually it is turned on by default on the system volume only). This imposes a great risk; for example, a user can delete a file and wipe its location securely, but Windows could save a previous version of this file in one of the system restore points, without the user’s knowledge, to be easily retrieved later. To disable a system restore, go to Control Panel ➤ System, select “Advanced system settings,” and go to the System Protection tab. Select the partition you want to stop generating a restore point for and click the Configure button . In the new window, select “Turn off system protection” (in Windows 10 this option is called “Disable system protection”).
It is good practice to surf the Internet using a limited Windows account to avoid installing any rootkit inadvertently; you should also keep your antivirus solution up-to-date and install a dedicated program to fight against malware. Also, do not forget to set the Windows OS to update itself automatically.
Mitigation Strategies Against Physical Attacks
In this section, we provide you with advice on how to protect against both hardware/physical attacks and bootkits and rootkits. The last two types of attacks are indeed software oriented, but we decided to group them in this section because the majority of such attacks require physical access to the target machine in order to embed successfully. Nevertheless, some types of rootkit can infect machines throughout a network or by installing malware from the Internet inadvertently.
Set a password for your BIOS. This will prevent attackers from booting using a CD/DVD or USB device and will make launching many physical attacks more difficult to conduct.
Use a computer with a TPM module when encrypting disk drives using BitLocker so you can discover any tampering with OS files upon booting. If your computer does not have a TPM microchip, you should protect your drive using both a password and a USB token.
Always use two-factor authentication, even if your computer has a TPM module. For example, use a PIN and a smart card or USB startup key to decrypt your drive. Do the same thing when using the VeraCrypt tool; use a password and a key file stored on a USB flash drive.
Use a computer with Unified Extensible Firmware Interface (UEFI) support. UEFI is a new programmable interface intended to replace the old BIOS program; it defines a software interface between the computer’s OS and the firmware. UEFI can help you to secure your machines against sophisticated malware like bootkits and rootkits by securing the boot process of the OS. For instance, EUFI will check each hardware piece’s firmware digital signature in addition to its bootloader digital signature against a list of signatures available within it. If attackers modify the bootloader or insert malware in the firmware to capture the encryption keys/passwords, EUFI will detect this and prevent Windows from booting. Most modern Windows (8 and 10) devices support EUFI.
Use modern Windows versions and stop using the discontinued editions. For instance, XP and Vista should never be used, as Microsoft no longer supports them. Modern Windows versions like 8 and 10 support many features for preventing bootkit and rootkit attacks.
Secure Boot is enabled by default on all devices that carry the Windows 8 or 10 logo; it checks whether the bootloader has been tampered with before loading it .
The trusted boot feature continues from where Secure Boot ends. It works by verifying the Windows kernel first. If successful, it will pass the check to the Windows kernel, which will in turn check all components used by Windows to start up. If an attacker has modified any startup file, Windows will refuse to load the modified file and will try to repair it by replacing it with another original one to continue the boot process normally.
The Early Launch Antimalware (ELAM) feature allows Windows to start the anti-malware solution before Windows loads all non-Microsoft drives to detect any tampering with third-party component files.
A cold boot attack is practical against computers with old hardware. Modern computing devices have new versions of RAM (DDR3 and DDR4), which store remnants of information for a limited time after losing power. In addition, the RAM in many modern computing devices comes soldered with the mainboard. Thus, you cannot remove it and boot it in another machine. In all cases, it is a good practice to always shut down your computer gracefully and protect your computer BIOS with a password .
To mitigate DMA attacks, you can use Windows InstantGo–certified devices that do not have any DMA ports. Another solution if your PC has such ports is to stop it from using firmware settings or to use Group Policy settings. Starting with Windows 8.1, DMA access by external devices was rejected until the user authorized the connection.
To mitigate hardware backdoor threats, you should buy your computing devices (whether it is a computer, tablet, smartphone, or IoT device) from a trusted and reputable vendor. Always ask and investigate before buying sensitive devices such as access control systems and spy cameras, which are products manufactured in Asian countries.
Securing Data in Transit
Earlier in this chapter we covered how to secure your data while it is at rest. Data at rest is all the data that is stored in computers/laptops, tablets, storage servers, backup tapes, USB drives, and all storage units that hold data without moving it between locations using local or external networks. To cover all security angles, you also need to learn how to secure your data while in transit . This includes securing sensitive data when moving it from one location to another using a local network within an organization or sending it through the Internet (or uploading it to a cloud storage server). It is essential to protect data in both states (at rest and in transit) to cover all cyber-attack possibilities. You will learn about encryption and steganography and about how you can use these technologies to protect your private data in today’s digital age.
In this section, we will demonstrate how to use different tools to assure the security and integrity of your data to protect against eavesdropping on network traffic by unauthorized users.
Cloud Storage Encryption
As the costs of storing data on a remote server online go down (many services offer it for free), more and more people are willing to use cloud storage services to back up and store their sensitive data (such as documents, personal pictures, contact lists, address books, and the like). The majority of smartphone users use cloud services in one way or another to store some type of personal data. Giant cloud providers such as Google Drive, Apple iCloud, and Microsoft OneDrive invest a considerable amount of resources to protect their users’ data. However, no one can guarantee 100 percent protection when your data travels to the Internet. To protect your personal data from unauthorized access while storing it in the cloud, it is advisable to encrypt this data on your local machine before uploading it. This section will introduce some secure and open source tools to perform this easily.
Warning
Don’t rely on the cloud service provider to secure your data. Always encrypt your data before uploading it to the cloud and make sure to have a backup copy stored somewhere else when dealing with sensitive data.
Duplicati
Duplicati ( https://www.duplicati.com ) is a free, open source program for backing up data to the cloud. It works with major cloud storage providers and with other protocols like FTP and SSH. It uses AES-256 or GPG to encrypt your data and incorporates an incremental backup feature to save space and limit the size of uploaded data to the cloud.
Cryptomator
Cryptomator ( https://cryptomator.org ) is free, open source client-side encryption software. It works by creating a virtual hard disk on your PC. Anything you put inside this disk will get encrypted transparently. Cryptomator uses AES-256 to encrypt your data and uses SCRYPT to protect against brute-force attacks. For example, when you want to use Dropbox to store your data in the cloud, create a virtual Cryptomator vault inside your local Dropbox folder. Now anything you put into this vault will get encrypted before uploading it to your Dropbox account in the cloud.
In this section, we covered only two programs that offer native support for cloud storage service. However, bear in mind that you can use the previous encryption tools we already talked about in this chapter to secure your data before uploading it to the cloud. For instance, 7zip, AES Crypt, VeraCrypt containers, and Gpg4win (with the file encryption feature) can be used to secure your data upon uploading it to your cloud account. This will effectively add another layer of protection to your personal information if your cloud account suffers some form of compromise.
Encrypt DNS Traffic
As we mentioned in Chapter 4, using a VPN with DNS leak protection is essential to prevent your ISP from recording your browsing history. However, not all VPN providers offer this kind of protection, and in some technical circumstances a VPN leak can occur despite using a VPN with a DNS leak protection feature. In addition, many modern attacks are launched against poorly configured DNS servers, not to mention the danger of man-in-the-middle attacks that work by hijacking DNS queries traveling between your device and the DNS server to facilitate launching phishing attacks or stealing your sensitive data.
To protect against such threats and to take steps to accommodate privacy online, it is advisable to add another layer of protection between your PC and the DNS server you are using to resolve the IP addresses into their corresponding domain names. This can be achieved by encrypting the DNS requests between your PC and the DNS server using the DNSCrypt protocol . This protocol works by establishing a secure connection between your device and the DNS server (which must support the DNSCrypt protocol) by using cryptographic signatures to verify that responses originate from the intended DNS and haven’t been tampered with during transit. A list of supported DNSCrypt-enabled resolvers is available at https://dnscrypt.org/dnscrypt-resolvers.html .
There is a simple tool to implement this secure protocol to protect your privacy. It is called Simple DNSCrypt and can be found at https://simplednscrypt.org . Configuring it is quite easy and can be found on the same page where the download resides.
Encrypt E-mail Communications
Now, it’s time to learn how to use Mozilla Thunderbird with the GnuPG encryption engine to send and receive signed encrypted messages.
Thunderbird is a free, open source e-mail client developed by Mozilla, the developer of Firefox. You can configure it to work with multiple e-mail accounts from different providers easily. As we already mentioned, it is highly advisable to use open source programs from reputable sources to handle your sensitive communications and data.
In a previous section, we demonstrated how to use Gpg4win to create, import, and export a key pair. The main advantage of Gpg4win is that it gives you the ability to manage your key pair and the public keys of the people you are corresponding with across many encryption programs. For instance, you can use Enigmail, which is an extension for Thunderbird to handle encryption and digital signatures using OpenPGP to create a key pair (public and private key). However, to make things more organized, you can opt to use Gpg4win to create the key pair, as you already did before, and to manage the public key of other users who you are going to correspond with. This allows you to keep everything organized instead of creating and managing key pairs across different programs.
For now, let’s begin setting the stage for your work by downloading and installing the needed programs.
Warning
This section assumes you have followed the steps and have already generated your key pair and installed Gpg4win. If not, please do so in the section “Create a Cryptographic Key Pair Using Gpg4win.”
Download the Enigmail extension from https://www.enigmail.net/index.php/en/home ; it has an .xpi extension.
Download Thunderbird from https://www.mozilla.org/en-US/thunderbird and add the e-mail account you want to use to send/receive encrypted e-mails. Setting up a new e-mail account is easy in Thunderbird because it can recognize your account settings once you enter the correct username and password of this account.
Now, you need to install Enigmail in Thunderbird. Go to the Thunderbird Tools menu, and select Add-ons. The add-ons tab displays; click the Tools button and then select Install Add-on From File (see Figure 5-42).

Figure 5-42. Installing the Enigmail add-on in Thunderbird
Navigate to where you saved the XPI file and select it to complete the installation. You need to restart Thunderbird to start using the Enigmail extension.
To confirm that Enigmail was successfully installed within Thunderbird and is fully integrated with GnuPG (installed as part of the Gpg4win installation), go to Enigmail (this menu item will appear after installing Enigmail). Then click Preferences and go to the Basic tab. In the Basic Settings section, in the Files and Directories pane, you should see the following statement: “GnuPG was found in C:Program FilesGNUGnuPGpubgpg2.exe” (see Figure 5-43). If instead you see the statement “Could not find GnuPG,” then select the “Override with” box, click the Browse button to navigate to where the GnuPG program is installed (gpg2.exe), and select it .
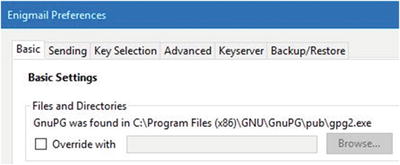
Figure 5-43. Checking whether Enigmail is integrated successfully with GnuPG
Note If the Thunderbird menu is hidden, right-click an empty section of the tab strip and select Menu Bar in the pop-up menu to make it appear. You can also press the F10 key to hide or show the menu bar.
You need to set up Enigmail to begin using it for e-mail encryption. Go to the Enigmail menu and select Setup Wizard. The Enigmail Setup Wizard is displayed. Select the option “I prefer a standard configuration (recommended for beginners)” and then click the Next button.
The next wizard window asks you to create a new key pair or to select yours from the lines listed. In your case, you already created your key pair using Gpg4win, so select “I want to select one of the keys below for signing and encrypting my e-mail.” Select your key and click Next to continue (see Figure 5-44) .

Figure 5-44. Selecting the key you want to use to encrypt and sign e-mails
The Enigmail Setup Wizard ends with a thank-you message. Click Finish to exit the wizard.
Note
The next time, if you want to generate more keys outside Gpg4win (the Kleopatra program) using Enigmail, you can do this by selecting Enigmail ➤ Key Management ➤ Generate ➤ New Key Pair. Select the e-mail account you want to create a key pair for and supply the passphrase to protect your private key. Finally, click the “Generate key” button (see Figure 5-45). You can also customize key size and key type by going to the Advanced tab.

Figure 5-45. Generating a new OpenPGP key pair using Enigmail
The newly created key pair will appear in Gpg4win (Kleopatra) also. Usually each e-mail account should have one key pair associated with it to exchange encrypted e-mails.
Before beginning your work to encrypt/decrypt messages, let’s make sure that everything is settled properly and your e-mail account is configured to use OpenPGP. Select Tools ➤ Account Settings. Select the e-mail account in the left pane. If you have more than one e-mail account, then click OpenPGP Security, and make sure the option “Enable OpenPGP support (Enigmail) for this identity” is selected (see Figure 5-46).

Figure 5-46. Making sure that Enigmail is integrated with the selected e-mail account
In a previous section, we thoroughly covered how to export and import public keys using Kleopatra, but to send and receive encrypted messages, you still need to do a final step, which is validating (trusting) the public key of the person you are going to communicate with. To do this, follow these steps (required for a one-time use only):
Open the Kleopatra program , go to the Other Certificates tab, right-click the certificate you want to validate, and select Certificate Details. Alternatively, you can simply double-click this certificate to open its details window.
Go to the Overview tab and click Trust Certifications Made by This Certificate (see Figure 5-47).

Figure 5-47. Opening the receiver public key certificate details window to trust it
In the new window, select “I believe checks are very accurate” and then click the OK button. A success window should appear .
Now the key needs to be certified to move it to the Trusted Certificates tab. While the certificate details window is still open, click the User-IDs & Certifications tab. Select the certificate you want to validate and then click the Certify button (see Figure 5-48).

Figure 5-48. Certifying the selected certificate using the Kleopatra Certificate details window
A new window appears (called Reconfirmation ). Select the username that you want to certify and then select “I have verified the fingerprint.” Click the Next button to continue (see Figure 5-49).

Figure 5-49. Checking that you have verified the fingerprint of the intended user
Note! How to Verify the Correspondent’s Digital Certificate Fingerprint?
When you create your digital certificate in Gpg4win, it will have a digital fingerprint (40 characters). This is unique all over the world and is used to identify the certificate and its owner. To verify your correspondent’s identity, you can request his or her certificate fingerprint by using the phone, secure instant messaging, or a face-to-face meeting. If the fingerprint supplied by your correspondent matches the certificate you already have, this means you have the right certificate.
You can find a certificate fingerprint by double-clicking the certificate in the Kleopatra program (see Figure 5-50).

Figure 5-50. Viewing the certificate fingerprint in the Kleopatra program
Some people prefer to print their digital certificate fingerprint on their business card to save the trouble of confirming their certificate.
In the next window, select your own OpenPGP certificate, which you will use to authenticate the certificate selected in the previous step. If you have more than one certificate, select the one you want to sign with, select the option “Certify only for myself,” and finally click the Certify button (see Figure 5-51).

Figure 5-51. Selecting your OpenPGP certificate to authenticate your correspondent public key
Now, a pop-up window will appear asking you to enter your passphrase (private key password) to authenticate your selected correspondent certificate. Without supplying the correct passphrase, the process will not complete. Enter it and you are done.
The final window will inform you that the selected user has been certified successfully (see Figure 5-52).
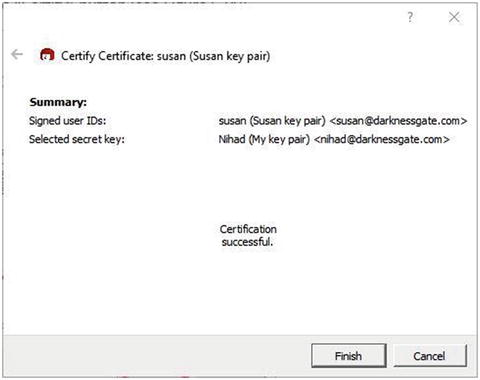
Figure 5-52. The final wizard window informs you that the certification was successful
Check your Kleopatra program. You will see that the selected user certificate has been moved to the Trusted Certificates tab.
The person you are corresponding with (here Susan) must also certify (confirm the fingerprint of) your digital certificate (Nihad) to be able to send you encrypted messages using the same steps. However, keep in mind that if your correspondent does not have your public key imported, they are still able to open and read the encrypted e-mail sent by you.
After validating the trust of the public key of the receiver, you are ready to send him or her your first encrypted message.
Note
Please note you should validate the trust of each user you are going to correspond with. This is required only one time.
Let’s assume that Nihad wants to send an encrypted signed e-mail to Susan. The prerequisites are mainly two conditions.
Nihad must have the public key of Susan.
He should trust verify her digital certificate fingerprint.
Susan must also have the public key of Nihad, and she must also certify his certificate fingerprint (this is required only if Susan wants to send encrypted e-mail to Nihad; however, she will still be able to receive/decrypt his encrypted e-mail safely without adding him to her to the certification manager).
From Thunderbird, click the Write button and select “message” to create a new e-mail message. When you enter the e-mail address of the receiver, his or her e-mail should display in black if you already have his or her public key and it is already certified. Otherwise, the e-mail will display in red. Make sure that the Padlock icon (which indicates the e-mail will get encrypted) and the Pencil icon (if you want to sign this e-mail) should light up after entering the recipient’s e-mail address (see Figure 5-53). Enigmail will automatically encrypt all new e-mails to the people whom you already have public keys for. After finishing writing your message, click the Send button. If you select to sign your e-mail, as we did, you need to enter your private key passphrase in the pop-up window before sending your e-mail.

Figure 5-53. An e-mail that is signed and encrypted. The receiver e-mail displays in black because it is a trusted person.
When Susan receives this e-mail, she needs to enter her passphrase (private key password) to decrypt the e-mail. Enigmail will show a message on the e-mail stating that the message was successfully decrypted and the signature is authenticated (see Figure 5-54).

Figure 5-54. Message decrypted successfully on the receiving end
Warning
Bear in mind that GnuPG only encrypts the content and attachments of your e-mail. The following information will not get encrypted: e-mail subject line, sender’s e-mail address, and recipient’s e-mail address. The default Enigmail settings (PGP/MIME) encrypt all attachment file names unless you change the settings to use inline PGP. This setting can be changed regardless of the default settings for each new e-mail from the Enigmail menu within this e-mail.
It is advisable to practice encrypting all your personal and sensitive work e-mails to teach the people you are corresponding with how to use e-mail encryption (you can send them this guide!). However, if you opt not to encrypt all your e-mails, you should at least sign them all (you can sign unencrypted e-mails as well). In this way, your correspondent will know that your e-mail originated from you and has not been tampered with during transit. Signing e-mail is also a great practice that will encourage others to begin using GnuPG to secure their online communications.
Note
You can direct your Thunderbird e-mails through the Tor network by using an extension for Mozilla Thunderbird called TorBirdy. According to its creators (it belongs to the Tor project), TorBirdy is still in beta release and should not be used to secure communications in extremely hostile environments. You can find information on how to install and use this extension at https://trac.torproject.org/projects/tor/wiki/torbirdy .
So far, we have covered the main steps to send and receive signed, encrypted e-mails using Thunderbird, the Enigmail extension, and the Gpg4win encryption program. For advanced users who want more in-depth coverage about all the security features offered by these tools, they can find more details in the Gpg4win documentation (also called the Gpg4win Compendium) at https://www.gpg4win.org/documentation.html and in the Enigmail documentation at at https://www.enigmail.net/index.php/en/documentation/user-manual .
There is a browser extension available for both Firefox and Google Chrome called Mailvelope that can be used with most web e-mail services. It allows its users to exchange encrypted e-mails using the OpenPGP encryption schema. You can either generate your key pair or import existing one, for example, from Kleopatra using this extension without the need to install any tools except the extension on your browser. The extension is open source, and it is available at https://www.mailvelope.com/en/ . However, we do not recommend encrypting messages within web browsers because this will make them more vulnerable to cyber-attacks that regularly hit browsers.
Encrypt Files/Folders Using Gpg4win
Gpg4win is not only used to encrypt and sign e-mails but also to sign and encrypt individual files and folders. The same steps apply.
You use your private key to encrypt the file.
Then you use your correspondent public key to encrypt the result.
GpgEX, which is a plug-in for Microsoft Explorer, is installed as part of the Gpg4win program and allows you to encrypt/decrypt a file or folder directly by right-clicking it. From the Windows Explorer context menu, select More GpgEX options ➤ Encrypt (or you can select “Sign and encrypt” from the same submenu if you want to send the encrypted data to your correspondent). A new dialog appears with more options (see Figure 5-55).

Figure 5-55. Selecting file/folder encryption settings
In this experiment, you will not sign and encrypt your data to send it to an outside user like you did in the previous section. Instead, you will use Gpg4win to secure your data like you might do using any regular encryption program.
Select Encrypt. You can also activate the option “Remove unencrypted original file when done” to delete the selected file/folder after encrypting it. (However, this practice is not fully secure as an attacker can recover deleted files easily if gaining access to your hard drive. You should make sure to overwrite deleted file/folder area on the hard drive after deletion to avoid recovery, as you did in Chapter 3.) When done, click the Next button. Here you should select to whom you want to encrypt the data. In this case, you are encrypting the data for yourself, so you should select your key pair to encrypt it. Then click the Add button to activate your selection. Finally, click Next and you are done (see Figure 5-56) .

Figure 5-56. Selecting which certificate you want to use to encrypt your data
The final wizard will show the encrypted result. If the encryption was successful, a new file with the same original name but with the tar.gpg extension will appear in the same folder/directory. Click Finish to exit the wizard. To decrypt the file gain, right-click it (the file with the .gpg extension) and select “Decrypt and verify.” A new dialog appears; click Decrypt/Verify. Then enter your private key passphrase to decrypt the file; the decrypted result appears in the same folder/directory.
Secure Webmail Providers
Most Internet users have free e-mail accounts. Yahoo, Gmail, and Microsoft Live offer free e-mail service with excellent features in relation to inbox size and yearly downtime. However, no one can guarantee that such giant companies are not reading your e-mails or simply handling them to a third party. Many new revelations show that the security services in different countries have always requested access, sometimes bulk access, to users’ data for different purposes.
In this section we will give you some free web e-mail providers that offer extended privacy features to their users by using encryption and other features to make surveillance on your e-mail activities more difficult.
ProtonMail
ProtonMail ( https://protonmail.com ) is different from other regular e-mail providers in many ways. For instance, it is based in Switzerland and follows that jurisdiction, which is considered the best in the world in protecting user rights to privacy. ProtonMail uses two passwords to protect your e-mail account. The first one authenticates your account credentials on the server, and the second decrypts your inbox within your web browser or app, meaning that it never goes online to the ProtonMail server. ProtonMail uses open source cryptography based on a secure implementation of AES, RSA, and OpenPGP to build its system and all messages are stored encrypted on the server. In addition, your e-mails are end-to-end encrypted (when both the sender and the receiver use the ProtonMail service). Finally, this service doesn’t record metadata about your connection to its server such as your IP address or any tracking information. For security-concerned people, the main downside of this service is that users’ cryptographic keys are stored within the ProtonMail keyserver. This means ProtonMail can technically find a way to decrypt messages stored on its servers as it is the authority that distributes these keys in the first place.
ProtonMail is still considered the best free, end-to-end secure e-mail service available today. The basic free account has 500MB storage space. If you are not dealing with sensitive or high-grade information, it is highly advisable to use this service because of the enhanced security features offered.
Disposable Temporary E-mail Address
Sometimes you may want to register with a free online service or receive an offer. For example, you download a free e-book and need to supply your e-mail address. You should not use your work or private e-mail address to receive such offers. Reputable web sites do not sell your data to other third parties. However, no one can guarantee anything in today’s digital age where cyber-attacks come from everywhere. Thus, if you want to supply your e-mail address to receive such offers, it is advisable to use a temporary e-mail address .
Hidester ( https://hidester.com//temporary-email/ ) offers free disposable e-mail addresses that last for one day (or it can last forever if you want). You can send and receive e-mails as you do with any other service. The reply will appear on the service web site. Finally, you can delete it when you want and you are done!
Guerrilla Mail ( https://www.guerrillamail.com ) offers a similar service.
Secure IM and Video Calls
Many proprietary services offer free IM, voiceover IP, and videoconference services. Many of these services, like Skype, WhatsApp, Viber, and Google Allo, are popular among Internet users globally. Viber and WhatsApp are now offering end-to-end encryption, allowing user devices to establish a secure channel directly between communicating parties. This will effectively make eavesdropping on your communications almost impossible.
We cannot discuss the security features of each available application in this book. However, we will focus on the security feature that makes one application more secure than the rest. For instance, most VoIP and chatting applications work the same way. They encrypt the messages exchanged between the people involved in the conversation, but they do not encrypt the message metadata.
Message metadata includes all the technical information related to each message sent during a conversation, such as the following: people involved in the conversation and their phone numbers (the entire user phone contact list will be stored on the app server, although this action is optional, but the majority of users allow unrestricted access to their phone address book by the messaging app), message time sent, message length, last time user connect to server, message read status, and anything technically related to each conversation. All this data is stored unencrypted and may be handed to a third party, for example, security service or advertisement company if necessary. Another security concern related to these applications is the backup process; they usually offer a method to back up user data, including private messages, to free cloud storage providers like Google Drive for Android or iCloud for iPhone. The uploaded data is not encrypted and relies only on the cloud storage provider security (which can be breached like with iCloud in 2014). Finally, all proprietary programs are not open source, making them vulnerable to backdoor and other security flaws.
The best secure VoIP/IM application is one that has the following technical characteristics: it should be open source so its code can be audited by independent security experts, it should not offer/show ads or any type of commercial advertisements, the provider and hence the app should not store the decryption key on its server so no one can request the key to decrypt user data, it should not store any metadata about the user connection, and the user contact list should not be stored on the app server and if necessary it should be saved encrypted. It should offer clear options to choose what you want to back up before sending it to the cloud provider.
Many messaging applications offer strong security features; the main disadvantage is the limited user base, which requires its users to convince their correspondents to use it. The following are some popular secure and well-supported messaging apps.
Tor Messenger
Although Tor Messenger ( https://trac.torproject.org/projects/tor/wiki/doc/TorMessenger ) still is in beta version, it is considered one of the most secure IM apps available. It was developed by the creator of the Tor project. Tor Messenger works on different platforms and offers great encryption features by using off-the-record (OTR) messaging automatically. All its traffic is directed through the Tor network by default, making it secure and anonymous at the same time. People who are involved in mission-critical tasks are not encouraged to use it because it still in beta (although this can change to stable anytime).
Cryptocat
Cryptocat ( https://crypto.cat/security.html ) is a free open source program for IM chatting and sharing files. It uses AES-256 and SHA-256 to secure its connection and to encrypt shared files. The main disadvantage of this program is that your buddy list and linked devices are stored unencrypted and can be accessed by the app service provider.
Signal
Signal ( https://whispersystems.org ) is a free open source secure messaging and VoIP app; it is easy to use and offers similar functions as WhatsApp and Viber Apps. This app runs on Android and iPhone devices only. It is recommended by internationally renowned security technologists like Bruce Schneier and privacy advocates like Edward Snowden to have secure online conversations. Signal offers the strongest security measures among all similar apps; it covers all the recommend security criteria for VoIP/IM applications already mentioned.
Ghost Call
Ghost Call ( https://ghostcall.io ) is a free service that offers an end-to-end encrypted calling service; it uses ZRTP media encryption to encrypt the connection, and Linphone, which is a popular open source VoIP program for making audio calls. This service is 100 percent free. Upon signing up (you do not need any personal information and it allows you to register using the Tor Browser), you will receive a virtual phone number (ten-digit number) that can be used to contact other Ghost Call numbers only.
Gruveo
Gruveo ( https://www.gruveo.com ) is a free, anonymous video-calling service. You do not need to supply any personal information to use it; just enter a username and the site will give you a code that you need to give to your correspondents to join the conversation.
Note
It is worth mentioning a free, open source service called SecureDrop ( https://securedrop.org ). It is intended to be used by whistle-blowers around the world as a submission system for sending documents and other leaks to media organizations. This service is managed by Freedom of the Press Foundation, and it offers strict security features for its users.
Another IM program that works only on iOS is ChatSecure ( https://chatsecure.org ). This is an open source program configured to use OTR over XMPP.
Steganography
In the previous sections, we demonstrated how you can protect your information using different encryption techniques. Encrypting data is still the most secure method to protect your confidential files, but what if you are living in a country where encryption is banned by law?
For example, in China, downloading encryption software is considered a crime and can lead to different legal consequences. In addition, VPN services are considered illegal and are barred technically by the Great Firewall of China (this is a kind of framework that regulates Internet usage in China legally and technically). 8 Restrictions on encryption are not limited to China; many countries, even some western democratic countries, consider using encryption to be a suspicious action. For instance, trying to encrypt your data will make you a target of security agencies in many countries, as the encrypted data looks different from normal data when passing through automated monitoring machines deployed by many nations to monitor their citizens’ Internet traffic.
In China, people use steganography techniques to conceal their messages in images, audio files, and video files so that their sensitive conversation will not get intercepted by their government. This is an effective method to counter technical and legal restrictions against using encryption to secure transmitted data.
Steganography is the science of concealing a secret message within an ordinary file, thus maintaining its secrecy during transit. This science is very old; its roots go back to Cypress, which has the first record of using such techniques 2,000 years ago.
In this section, we will teach you how you can use different steganography techniques to conceal your secret message inside an ordinary file. If you are fond of steganography and you want to learn more, we recommend Data Hiding Techniques in Windows OS: A Practical Approach to Investigation and Defense (Syngress, 2016). It covers the sophisticated techniques used to conceal secret data and other malicious code in digital files.
What Is Digital Steganography?
In digital steganography, the carrier used to conceal the secret message within it can be of any type. In reality, nearly any digital file type can be used to conceal data. See Figure 5-57.

Figure 5-57. How digital steganography works
Steganographic techniques have been used since the dawn of history. Ancient civilization used physical mediums like paper, eggs, invisible ink, and even human skin to conceal secret messages. However, with the advance of computers and the Internet, modern techniques were developed to conceal data in digital files without affecting its visual appearance/quality.
In this section, we will cover digital steganography only and describe how you can use it to conceal your secret messages from an outside observer using different digital file types such as text, image, audio, and video files. Digital steganography does not alter the structure of the secret message but hides it in an overt file so that it cannot be seen.
Secret data may also be hidden inside the Windows file system (NTFS file system). Indeed, there are many techniques you might use to exploit the NTFS Windows file system to conceal secret data or an executable malware program. However, to remain within the book’s scope, we will limit our discussion to using steganography to conceal users’ private data only.
Differences Between Steganography and Encryption
Both steganography and cryptography (we mean encryption here) share the same goal of securing transmitted messages. However, they differ in the methods used to achieve this goal. The term cryptography describes all the techniques used to obscure data, whether it is scrambled and hence encrypted or concealed using steganography techniques. However, digital steganography has evolved a lot in recent years as a result of the huge advancement of computing and networking technology. Table 5-2 differentiates between the two techniques.
Table 5-2. Steganography vs. Cryptography Comparison
Context | Steganography | Encryption |
|---|---|---|
Hidden message status | The message does not appear (hidden). | The message appears scrambled. |
Outside party | Communication is hidden from outside parties. | Third parties know that a communication has occurred, but they cannot read the contents. |
Level of development | Still undergoing development. | Matured technology. |
Cipher text status | The structure of the message remains the same. | Encryption modifies the message structure through a cryptographic algorithm. |
Carrier file | Image, audio, video, text, Internet protocols, OS files. | Mostly text files. |
Types of secret files | Image, audio, text, almost all kind of digital files. | Mostly text files. |
Output result | Stego file. | Ciphertext. |
The majority of steganography applications combine both encryption and steganography to achieve their goal of secrecy and security. Obviously, combining both techniques boosts IT/cyber-security and gives strong protection for sensitive data, whether it is at rest or in transit.
Digital Steganography Techniques
To conceal your secret message inside digital files, you need to use one of the following techniques.
Injunction
Here you insert your secret message in a nonreadable location in the overt file, thus concealing it without affecting the look or functionality of the overt file. A good example of this technique is hiding secret data after the end-of-file (EOF) marker. For example, if you have a JPEG file that you want to conceal data inside, you can insert this data after the EOF marker and any image-viewing program (for example, Window Photo Viewer) will read the image source to open it and will stop when reaching the EOF. Anything after the EOF will remain hidden without affecting the overt file quality or appearance.
Substitution
In this technique, you are replacing insignificant bits from the overt file with those bits that belong to the secret message. The most famous practical example to achieve this technique is by substituting the least significant bit (LSB) of the overt file with the bits of the secret message. Substitution is more secure than the insertion technique because it does not increase the overt file size since there is no additional data inserted into the overt file source. Nevertheless, there is still a finite capacity to store hidden messages because this technique is limited to the number of insignificant bits available in the overt file.
Generation
This is the most secure technique to achieve digital steganography. With this type you are producing a new overt file that contains your secret message. A site that demonstrates this technique is at www.spammimic.com . This web site allows you to enter a secret message and conceal it inside a spam message that can be transmitted securely in plain sight to the intended recipient.
Digital Steganography Types
There are different ways to categorize steganography techniques. To keep things simple, we will categorize them according to the type of overt file used to conceal the secret message.
Text Steganography
This is a type of steganography that uses text files to conceal secret data within them. Historically, written letters were the main medium used to conceal secret messages. However, with the advance of computing, digital text files replaced the physical paper messages. This type of steganography is considered impractical in today’s digital world, as it can conceal only small amounts of data compared with other digital file types. Some examples include inserting spaces between words and/or inserting one or two spaces at the end of each line to store hidden bits. Microsoft Word text documents offer many places to conceal data using different formatting features such as the following:
Using the hidden text feature
Making text white on a white background
Reducing the text size to 1 pixel
Hiding data within document attributes (metadata)
Using the RTF File Type to Conceal Secret Data
Rich Text Format (RTF), which is a proprietary document file format developed by Microsoft, can be easily used to conceal data within it. You can create RTF documents by using WordPad or Microsoft Office Word and saving the file in RTF format. To conceal your secret data, right-click the RTF file and select “Open with” from the Windows context menu; then select Notepad to view the raw source file of the RTF file. You will notice that the source code contains tags similar to HTML files that do not appear when viewing it using the regular Microsoft Word processor. Anything enclosed within the tag {} will not display in a regular viewer; in addition, anything written after the closing bracket, }, will get ignored (see Figure 5-58).

Figure 5-58. Concealing a secret message after the EOF within an RTF document
Change of Spelling
A secret message can be concealed within ordinary text by changing the spelling of some words or even the entire overt message’s words. This technique is also effective to fool surveillance software used by governments to monitor inbound and outbound traffic. Surveillance systems and many firewall solutions used by giant enterprises are mainly dependent on finding interesting keywords while scanning the network traffic; by changing the spelling of important words, you can safely avoid being captured by such machines. http://txtn.us is a web site that provides free tools for transforming Unicode text into another string that looks visually similar to the original text; however, it is read differently by automated monitoring machines. See Table 5-3 for illustration.
Table 5-3. Changing Spelling to Fool Surveillance Systems

Note
You can conceal secret messages within Twitter tweets in plain sight. http://holloway.co.nz/steg/ is a web site that offers such a service.
Image Steganography
This is the most commonly used file type to conceal secret data. What makes this type popular is the huge number of images exchanged daily online. People tend to post a large volume of images to social networking web sites or cloud-based photo storage. In addition, exchanging images in e-mails does not raise suspicions about the possibility of the existence of hidden data. Image steganography works by embedding a secret message inside the overt file (hence the image) using a predefined steganographic algorithm; this produces what is known as a stego-image. This stego-image is then sent to the recipient, who will use the same algorithm to extract the hidden message from the overt file.
Concealing Messages After the End-of-File Marker
Experiments show that secret data text files can be embedded within images without leaving any visual effects on overt files. You can achieve this by inserting the text file that contains your hidden data after the end-of-file marker. To demonstrate how to do this trick, prepare a JPEG image and a text file that contains your secret data. Launch a command prompt elevated as the administrator, change to the working directory where the image and text file reside, and type the command shown in Figure 5-59.

Figure 5-59. Concealing a secret text file within a JPEG image
Here you have combined your secret file named secret.txt within image.jpg and output the result, which contains the secret file, as result.jpg. To view the secret message, you can simply open the stego image result.jpg using Windows Notepad to view its source (see Figure 5-60). The secret message will appear after the end of raw code.

Figure 5-60. Using Windows Notepad to view concealed data within a JPEG image after the end-of-file marker
After concealing something using this method, the image quality or appearance will not change. However, you should make sure to avoid inserting a large amount of secret text within the overt image, as its size will increase, which may be suspicious if investigated. Data concealed in this way has some limitations. If you update the image (resize it, change the format, edit it, or crop it), the secret message will get destroyed.
The previous method can conceal text files only. However, if you want to conceal other file types (binary files or Microsoft Office documents, for example), you can do the same steps, but instead of storing your secret data within a text file, use the zip format and then insert your secret like you did in your last experiment.
Concealing Within Image Metadata
This was already covered in Chapter 2 from a different viewpoint. For instance, a large amount of secret information can be concealed within digital image metadata easily and even without using any third-party tools. The following programs can be used to edit image metadata and to insert new metadata without affecting the image’s visual appearance:
Exif Editor ( www.colorpilot.com/exif.html )
Metadata++ ( www.logipole.com )
PhotoME ( www.photome.de )
XnView ( www.xnview.com/en )
Digital Steganography Tools
You can use many steganography programs to conceal secret information within images and other digital file types. The main advantages of such programs, in addition to being easy to use, are that they offer an encryption feature for the concealed data. As you already saw, secret information can be concealed easily in digital files and in plain sight without encryption. However, if an outside observer expects a hidden message in an overt file, he or she can detect and read the hidden message easily. As a result, it is advisable to encrypt your secret message before concealing it in a digital medium, so if an observer were successful in detecting the secret message, he or she could not read it.
We will not demonstrate how to use steganography tools because they are straightforward. Table 5-4 lists the most popular tools.
Table 5-4. Popular Digital Steganography Tools
Program | Supported Overt Files | Support Encryption | URL |
|---|---|---|---|
Crypture | BMP | Yes | |
OpenStego | Different media files | Yes | |
Gifshuffle | GIF | Yes | |
wbStego4open | Bmp, text files, HTML, PDF | Yes | |
Our Secret | Image, audio, and video files | Yes | |
SilentEye | JPEG, BMP, WAVE | Yes | |
Steghide UI | Different media files | Yes | |
Camouflage | Different media files | Yes | |
DeepSound | Audio files | Yes | http://download.cnet.com/DeepSound/3000-2092_4-75758214.html |
Warning
If you are living in or planning to visit a country where encryption is banned by law, do not encrypt your message before concealing it in another digital file because surveillance systems can detect encrypted data.
Audio-Video Steganography
Audio steganography takes advantages of the physical characteristics of the human ear to conceal secret data. Scientists discovered that the human ear can detect noise in the audible frequency range from 20Hz to 20KHz. To conceal a secret message, an audio steganographic algorithm embeds secret data in a low-tone frequency signal; the human ear will not notice this modification because it is not able to detect such a low tone in the presence of a higher frequency. This also called frequency masking. Video files are composed of a series of images and audio files. Video files have a higher capacity to store secret data than other digital files because of their large size; this allows the concealment of a considerable amount of secret data without affecting the quality of the original file (overt file). Most steganographic techniques implemented on digital images and audio files can also work with video files.
The most popular audio steganography tool is MP3stego, which conceals secret data in the most used audio file format, MP3. You can find it at www.petitcolas.net/steganography/mp3stego .
Network Steganography
In this type of steganography, you are concealing your secret message using networking protocols by exploiting their design features. There are two main ways to achieve this.
Masking secret messages as the honest traffic of other protocols
Exploiting empty areas within networking protocol segments to conceal secret message bits
Streaming protocols used to transmit multimedia content are undergoing continual development. The use of such protocols is expected to grow to stay in line with future computing and networking development, opening up more possibilities for places to conceal data.
A good example program to conceal data within networking protocols (TCP/IP header) is called covert_tcp; you can find it at http://firstmonday.org/ojs/index.php/fm/article/view/528/449 .
Summary
In this chapter, we covered how to protect your privacy using cryptography. Cryptography is an old science that deals with all techniques used to assure the security of your communications when communicating in an untrusted environment. There are two main types of cryptography.
Encryption techniques that secure private data by making it scrambled
Steganography techniques that protect data by hiding it in plain sight
As computing technology advances, knowing how to use cryptographic systems in real-world programs becomes an indispensable tool to protect your data.
We began this chapter by discussing a fundamental concept of encryption, the public and private key pair. This knowledge is essential to understand how current encryption techniques work. We demonstrated practically how to use an open source program (Gpg4win) to create your first cryptographic key pair and showed you how you can import/export your keys (and your correspondents’ keys) into the Gpg4win program to facilitate secure communications.
In the second part of this chapter, we demonstrated how to use encryption to secure your data at rest. Data at rest includes all the data stored in computers, servers, tablets, USB flash memory, external HDs, SD cards, and any device that can store digital data for later usage. You experimented using the VeraCrypt program to create encrypted containers and BitLocker to encrypt Windows partitions, and you learned about many other tools to secure individual files, especially when uploading them to the cloud. Full disk encryption is important to protect your data from unauthorized physical access. Also, a detailed discussion of the best selection criteria of cryptographic algorithms was covered in addition to cryptography attacks and countermeasures.
In addition, we covered how to use encryption to secure your communications in transit (when sending e-mails and exchanging confidential files) using Thunderbird and the Enigmail extension; then we talked about alternative free webmail providers, secure IM applications, anonymous calling services, and video-calling services.
We concluded this chapter by talking briefly about steganography, which is an ancient science that deals with concealing data in overt objects (in other words, in digital files) without making any visual modifications to the overt file. This science is important to protect your confidential data in situations where encryption cannot be used.
This was a rich chapter. If you went through it in detail, your digital assets are now much more secure and your ability to defend against cyber-criminals has increased greatly.
Notes
Russell Brandom, “Google just cracked one of the building blocks of web encryption.” The Verge, February 23, 2017. www.theverge.com/2017/2/23/14712118/google-sha1-collision-broken-web-encryption-shattered .
Russell Brandom, “NSA paid $10 million to put its backdoor in RSA encryption, according to Reuters report.” The Verge, December 20, 2013. www.theverge.com/2013/12/20/5231006/nsa-paid-10-million-for-a-back-door-into-rsa-encryption-according-to .
Paul Ducklin, “Anatomy of a change – Google announces it will double its SSL key sizes.” Naked Security. https://nakedsecurity.sophos.com/2013/05/27/anatomy-of-a-change-google-announces-it-will-double-its-ssl-key-sizes/ .
Bruce Schneier, “Twofish.” Schneier on Security. https://www.schneier.com/academic/twofish/ .
Paulo S. L. M. Barreto, “The WHIRLPOOL Hash Function.” www.larc.usp.br/~pbarreto/WhirlpoolPage.html .
Open Crypto Audit Project. https://opencryptoaudit.org/ .
Andreas Junestam, Nicolas Guigo, “Open Crypto Audit Project TrueCrypt.” iSECpartners, February 14, 2014. https://opencryptoaudit.org/reports/iSec_Final_Open_Crypto_Audit_Project_TrueCrypt_Security_Assessment.pdf .
Jean-Baptiste Bédrune, Marion Videau, “Security Assessment of VeraCrypt: fixes and evolutions from TrueCrypt.” Quarkslab’s Blog, October 17, 2016. http://blog.quarkslab.com/security-assessment-of-veracrypt-fixes-and-evolutions-from-truecrypt.html .