
A geometry buffer or G-Buffer is a collection of one or more textures that contain attributes of the current frame necessary to render the final scene at a later stage, usually within screen space. The attributes stored in the G-Buffer might consist of data, such as position, normal vectors, diffuse, and other material properties.
This recipe prepares a G-Buffer that collects the information needed for a classic deferred rendering technique (or deferred shading); however, the approach can be easily extended to cache information for any deferred technique.
We will need a scene with a number of objects and varying materials. We will use the MeshRenderer class and vertex structure from the Adding surface detail with normal mapping recipe in Chapter 6, Adding Surface Detail with Normal and Displacement Mapping. We will assume that the second and third texture slots in both the loaded meshes and the pixel shaders are used for normal maps and specular intensity maps, respectively. The example scene used throughout this chapter is the Sponza Model made available to the public by Crytek at http://www.crytek.com/cryengine/cryengine3/downloads. The FBX version is available with the downloadable source for this chapter and the textures can be retrieved from the previous URL.
The render targets required and the layout of the G-Buffer that we will use in this recipe is shown in the following diagram. We will create three render targets and reconstruct the position data from the depth buffer and screen coordinates. Although we only pack the normals in this recipe, we could also pack everything into a single 128-bit render target.
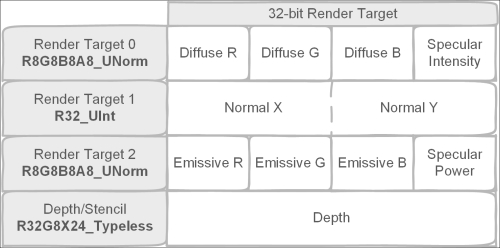
Example G-Buffer render target layout representing a single pixel
We will begin by creating a new class to manage rendering to the G-Buffer:
- Let's create a new C# class,
GBuffer, descending fromCommon.RendererBaseand with the following public and private member fields:// List of render target textures public List<Texture2D> RTs = new List<Texture2D>(); // List of SRVs to the render targets public List<ShaderResourceView> SRVs = new List<ShaderResourceView>(); // List of RTVs to the render targets public List<RenderTargetView> RTVs = new List<RenderTargetView>(); // The Depth/Stencil buffer public Texture2D DS0; public ShaderResourceView DSSRV; public DepthStencilView DSV; // Dimensions int width; int height; // The sample description (e.g. for MSAA) SampleDescription sampleDescription; // The Render target formats to be used SharpDX.DXGI.Format[] RTFormats;
- The only constructor initializes the width, height, and the number and format of render targets:
public GBuffer(int width, int height, SampleDescription sampleDesc, params SharpDX.DXGI.Format[] targetFormats) { System.Diagnostics.Debug.Assert(targetFormats != null && targetFormats.Length > 0 && targetFormats.Length < 9, "Between 1 and 8 render target formats must be provided"); this.width = width; this.height = height; this.sampleDescription = sampleDesc; RTFormats = targetFormats; } - Within the
CreateDeviceDependentResources()method, first clean up any resources and retrieve the device from theDeviceManagerproperty:RemoveAndDispose(ref DSSRV); RemoveAndDispose(ref DSV); RemoveAndDispose(ref DS0); RTs.ForEach(rt => RemoveAndDispose(ref rt)); SRVs.ForEach(srv => RemoveAndDispose(ref srv)); RTVs.ForEach(rtv => RemoveAndDispose(ref rtv)); RTs.Clear(); SRVs.Clear(); RTVs.Clear(); var device = DeviceManager.Direct3DDevice;
- Next, we will prepare the description for the render target textures, and the Render Target Views (RTVs) and Shader Resource Views (SRVs) for these textures:
// Render Target texture description
var texDesc = new Texture2DDescription();
texDesc.BindFlags = BindFlags.ShaderResource | BindFlags.RenderTarget;
texDesc.ArraySize = 1;
texDesc.CpuAccessFlags = CpuAccessFlags.None;
texDesc.Usage = ResourceUsage.Default;
texDesc.Width = width;
texDesc.Height = height;
texDesc.MipLevels = 1;
texDesc.SampleDescription = sampleDescription;

bool isMSAA = sampleDescription.Count > 1;

// Render Target View description
var rtvDesc = new RenderTargetViewDescription();
rtvDesc.Dimension = isMSAA ?
  RenderTargetViewDimension.Texture2DMultisampled :
  RenderTargetViewDimension.Texture2D;
rtvDesc.Texture2D.MipSlice = 0;

// SRV description for render targets
var srvDesc = new ShaderResourceViewDescription();
srvDesc.Format = SharpDX.DXGI.Format.R8G8B8A8_UNorm;
srvDesc.Dimension = isMSAA ? SharpDX.Direct3D.
  ShaderResourceViewDimension.Texture2DMultisampled :
  SharpDX.Direct3D.ShaderResourceViewDimension.Texture2D;
srvDesc.Texture2D.MipLevels = -1; // auto
srvDesc.Texture2D.MostDetailedMip = 0;
- We now need to create the corresponding texture, RTV and SRV, for each of the specified render target formats of the G-Buffer using the description objects we created previously:
// Create Render Target's texture (with SRV and RTV) foreach (var format in RTFormats) { texDesc.Format = format; srvDesc.Format = format; rtvDesc.Format = format; RTs.Add(ToDispose(new Texture2D(device, texDesc))); SRVs.Add(ToDispose(new ShaderResourceView(device, RTs.Last(), srvDesc))); RTVs.Add(ToDispose(new RenderTargetView(device, RTs.Last(), rtvDesc))); } - To complete the
CreateDeviceDependentResourcesmethod, we will create the depth stencil texture and Depth Stencil View (DSV), along with an SRV in order to access the depth buffer from our shaders:// Create Depth/Stencil texDesc.BindFlags = BindFlags.ShaderResource | BindFlags.DepthStencil; // typeless so we can use as shader resource texDesc.Format = SharpDX.DXGI.Format.R32G8X24_Typeless; DS0 = ToDispose(new Texture2D(device, texDesc)); srvDesc.Format = SharpDX.DXGI.Format.R32_Float_X8X24_Typeless; DSSRV = ToDispose(new ShaderResourceView(device, DS0, srvDesc)); // Depth Stencil View var dsvDesc = new DepthStencilViewDescription(); dsvDesc.Flags = DepthStencilViewFlags.None; dsvDesc.Dimension = isMSAA ? DepthStencilViewDimension.Texture2DMultisampled : DepthStencilViewDimension.Texture2D; dsvDesc.Format = SharpDX.DXGI.Format.D32_Float_S8X24_UInt; DSV = ToDispose(new DepthStencilView(device, DS0, dsvDesc));
- Next, we create methods to bind and unbind the render targets to the pipeline and finally to clear the G-Buffer:
// Bind the render targets to the OutputMerger
public void Bind(DeviceContext1 context)
{
    context.OutputMerger.SetTargets(DSV, 0,
      new UnorderedAccessView [0], RTVs.ToArray());
}
// Unbind the render targets
public void Unbind(DeviceContext1 context)
{
    context.OutputMerger.ResetTargets();
}
// Clear the render targets and depth stencil
public void Clear(DeviceContext1 context, Color background)
{
    context.ClearDepthStencilView(DSV,
        DepthStencilClearFlags.Depth |
        DepthStencilClearFlags.Stencil, 1.0f, 0);

    foreach (var rtv in RTVs)
        context.ClearRenderTargetView(rtv, background);
}
This completes our generic
GBufferclass. With this we can easily create new G-Buffer layouts depending on the specific rendering requirements. - Next, we will create the necessary shader code to fill the G-Buffer. First we will update the
PerObjectconstant buffer withinCommon.hlslto include theView,InverseView,Projection, andInverseProjectionmatrices shown as follows:cbuffer PerObject : register(b0) { ... // The view matrix float4x4 View; // The inverse view matrix float4x4 InverseView; // The projection matrix float4x4 Projection; // The inverse of the projection matrix float4x4 InverseProjection; };You may notice that these matrices are not necessarily changing per object, and perhaps should instead be moved to the
PerFrameconstant buffer. However, for simplicity we will continue to keep the affine transform matrices together. - We'll now put the logic for filling the G-Buffer into a new HLSL file named
FillGBuffer.hlsl. Remember to use ANSI encoding as described in Chapter 2, Rendering with Direct3D. - Define the necessary input texture references, include the
Common.hlslHLSL file, and define our pixel shader output structure:Texture2D Texture0 : register(t0); Texture2D NormalMap: register(t1); Texture2D SpecularMap: register(t2); ... SamplerState Sampler : register(s0); #include "Common.hlsl" // From Vertex shader to PSFillGBuffer struct GBufferPixelIn { float4 Position : SV_Position; float4 Diffuse : COLOR; float2 TextureUV: TEXCOORD0; // view-space Normal and tangent float3 ViewNormal : TEXCOORD1; float4 ViewTangent : TANGENT; // .w handedness from CMO }; // Pixel Shader output structure struct GBufferOutput { float4 Target0 : SV_Target0; uint Target1 : SV_Target1; float4 Target2 : SV_Target2; // | -----------32 bits-----------| // | Diffuse (RGB) | SpecInt (A) | RT0 // | Packed Normal--------------->| RT1 // | Emissive (RGB) | SpecPwr (A) | RT2 }; - We will be using view-space for our G-Buffer operations; therefore, we need to provide a new vertex shader that passes the normal and tangent vectors in view-space:
GBufferPixelIn VSFillGBuffer(VertexShaderInput vertex) { GBufferPixelIn result = (GBufferPixelIn)0; result.Position = mul(vertex.Position, WorldViewProjection); ... // Transform normal/tangent into world view-space result.ViewNormal = mul(vertex.Normal, (float3x3)WorldInverseTranspose); result.ViewNormal = mul(result.ViewNormal, (float3x3)View); result.ViewTangent = float4(mul(vertex.Tangent.xyz, (float3x3)WorldInverseTranspose), vertex.Tangent.w); result.ViewTangent.xyz = mul(result.ViewTangent.xyz, (float3x3)View); return result; } - We will use the following functions within our pixel shader to encode and pack our normal vectors into the second render target:
float2 EncodeAzimuthal(in float3 N) { // Lambert azimuthal equal-area projection // with normalized N is equivalent to // Spheremap Transform but slightly faster //http://aras-p.info/texts/CompactNormalStorage.html float f = sqrt(8*N.z+8); return N.xy / f + 0.5; } uint PackNormal(in float3 N) { float2 encN = EncodeAzimuthal(N); // Pack float2 into uint uint result = 0; result = f32tof16(encN.x); result |= f32tof16(encN.y) << 16; return result; } - And finally, create the pixel shader to collect and output the attributes to the G-Buffer render targets:
GBufferOutput PSFillGBuffer(GBufferPixelIn pixel)
{
    // Normalize our vectors as they are not
    // guaranteed to be unit vectors after interpolation
    float3 normal = normalize(pixel.WorldNormal);
...
    float3 diffuse;
    float specIntensity;

... sample normal, texture and specular intensity

    GBufferOutput result = (GBufferOutput)0;
    result.Target0.xyz = diffuse;
    result.Target0.w = specIntensity;
    result.Target1 = PackNormal(normal);
    result.Target2.xyz = MaterialEmissive.rgb;
    // Specular Power normalized to 0-50 range
    result.Target2.w = MaterialSpecularPower / 50;

    // Return result
    return result;
}
- Within
ConstantBuffers.cs, we need to update thePerObjectstructure to include the additional matrices we defined in HLSL:public struct PerObject { ... public Matrix ViewProjection; public Matrix View; public Matrix InverseView; public Matrix Projection; public Matrix InverseProjection; // Transpose the matrices so that they are in column-major // order for HLSL (in memory). internal void Transpose() { ... this.ViewProjection.Transpose(); this.View.Transpose(); this.InverseView.Transpose(); this.Projection.Transpose(); this.InverseProjection.Transpose(); } } - We are now ready to fill the G-Buffer within the
D3DAppclass. Compile the vertex and pixel shaders given previously withinCreateDeviceDependentResourcesand assign each to a new property (for example,fillGBufferVSandfillGBufferPS). - Within the
D3DApp.Runmethod, initialize a newGBufferinstance as shown in the following snippet:GBuffer gbuffer = ToDispose( new GBuffer(this.RenderTargetSize.Width, this.RenderTargetSize.Height, new SampleDescription(1, 0), Format.R8G8B8A8_UNorm, Format.R32_UInt, Format.R8G8B8A8_UNorm)); gbuffer.Initialize(this); - Finally, within the render loop we set the vertex and pixel shader to
fillGBufferVSandfillGBufferPS, prepare and bind the render targets of the G-Buffer, perform any rendering, and then restore the previous render targets:... context.VertexShader.Set(fillGBufferVS); context.PixelShader.Set(fillGBufferPS); gbuffer.Clear(context, new Color(0, 0, 0, 0)); gbuffer.Bind(context); meshes.ForEach((m) => { ... perObject.View = viewMatrix; perObject.InverseView = Matrix.Invert(viewMatrix); perObject.Projection = projectionMatrix; perObject.InverseProjection = Matrix.Invert(projectionMatrix); ... m.Render(); } gbuffer.Unbind(context); // Optionally restore previous render targets context.OutputMerger.SetRenderTargets(this.DepthStencilView, this.RenderTargetView); ... use G-Buffer for screen-space renderingThe following image shows the resulting G-Buffer contents:
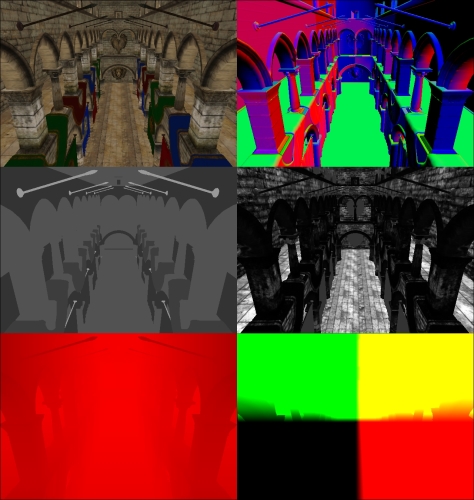
G-Buffer contents from top-left: diffuse/albedo, view-space normals, specular power, specular intensity, depth, and lastly view-space positions reconstructed from depth and screen coordinates (center is 0,0,0 or black).
The GBuffer class is used to initialize a new render target for each DXGI format that is passed to the constructor. These render target textures are created with both the BindFlags.ShaderResource and BindFlags.RenderTarget binding flags specified, allowing them to be used as RTVs for our PSFillGBuffer pixel shader and also as SRVs for retrieving the G-Buffer attributes in our future deferred shaders.
This means that in our textures we can only use DXGI formats that are compatible with both RTVs and SRVs. For example, Direct3D 11.1 compatible hardware can optionally support the SharpDX.DXGI.Format.R32G32B32_Float format for render targets, whereas they must support the SharpDX.DXGI.Format.R32G32B32A32_Float format.
To check the format support at runtime, use the Device.CheckFormatSupport function, as shown in the following example:
FormatSupport fs = device.CheckFormatSupport(
    SharpDX.DXGI.Format.R32G32B32_Float);
if ((fs & FormatSupport.RenderTarget) ==
    FormatSupport.RenderTarget)
{
... format is supported for render targets
}
We also create a depth stencil buffer for the G-Buffer, using a Typeless format of SharpDX.DXGI.Format.R32G8X24_Typeless for the underlying texture, so that it can be used with both a DSV and an SRV. For the SRV, we then use SharpDX.DXGI.Format.R32_Float_X8X24_Typeless making the first 32 bits available within our shader while the remaining 32 bits are unused. The DSV uses a format of SharpDX.DXGI.Format.D32_Float_S8X24_UInt, utilizing the first 32 bits as the depth buffer, the next 8 bits as the stencil and leaving the remaining 24 bits unused. We have added the View, InverseView, Projection, and InverseProjection affine transform matrices to the PerObject structure so we can transform between view-space and world-space, and clip-space and view-space.
When we read the G-Buffer attributes again, we will be reconstructing the position into view-space. Rather than applying a transformation to bring the position to world space for lighting calculations, it is more efficient to leave them in view-space. This is why we have also transformed the normal and tangent vectors into view-space. It doesn't matter in what space the calculations are performed but generally, you want to do lighting in the space that requires the least amount of transformations and/or calculations.
For our PSFillGBuffer pixel shader, we have described the output structure GBufferOutput using the SV_Target output semantic on each property to control which render target is filled, using SV_Target0 for the first render target, SV_Target1 for the second, and so on up to a maximum of eight targets. The pixel shader performs standard operations, such as normal mapping and texture sampling, and then assigns the attributes to the appropriate render target property in the GBufferOutput structure.
In this recipe, we are encoding our normal vector so that we can reconstruct the Z component from the X and Y components, giving a higher precision for the same amount of space in the G-Buffer. There are a number of methods for compacting normal vectors. We have used an approach called Lambert azimuthal equal-area projection (LAEAP) that when used with normalized vectors is equivalent to sphere map transformations except with a slightly lower computing cost (Compact Normal Storage for Small G-Buffers, Pranckevičius, 2009). LAEAP is an azimuthal map projection commonly used in cartography for mapping the surface of a sphere to a flat disc; the projection and its inverse are shown in the following formula. As with other sphere map transformations, the direction of Z is preserved after encoding/decoding.

Formula to project the normalized vector (x,y,z) of a sphere to (X,Y) on a plane and its inverse using Lambert azimuthal equal-area projection.
In addition to encoding our normal, we are then packing the encoded X and Y components into uint. Packing the encoded X and Y of the normal into uint is not required or even optimal, as we could easily use SharpDX.DXGI.Format.R16G16_UNorm for SV_Target1 to store the float2 directly. However, for demonstrative purposes, we have copied the X and Y components into the low and high bits of a SharpDX.DXGI.Format.R32_UInt texture using the f32tof16 intrinsic HLSL function and bit shifting. This is a common method to pack as much information into the smallest G-Buffer possible. Using a similar technique, we could instead use a R32G32B32A32 format render target to pack our entire G-Buffer into a single render target.
You may have noticed that we are not outputting the position into the G-Buffer. In order to store the position with full precision, we would require 96 bits (3 x 32-bit floats), which on some hardware would require the use of a 128-bit texture (or a number of additional render targets). We could reduce the precision of the position; however, this may also introduce visual artifacts. Instead, with modern graphics pipelines, it is possible to read directly from the depth buffer. By using the depth buffer to reconstruct the position, we are able to save on bandwidth, one of the key limiting factors of modern graphics hardware.
We must also consider that because GPUs often handle the depth/stencil differently to other render targets (for example, hierarchical-Z/Hi-Z and compression), it may be worth using a dedicated depth texture in the G-Buffer instead of the depth/stencil, especially if you want to continue using the depth buffer later on. On modern hardware, we could use a single 128-bit render target to store our entire G-Buffer including depth.
It is important to realize that there is no hard and fast rule as to how and what is stored within a G-Buffer (for example, we could also utilize unordered access views), or even how to implement deferred rendering. There are a range of deferred rendering approaches and alternatives, such as light prepass, tiled deferred rendering, light indexed deferred rendering, tile-based forward rendering, Forward+ and so on.
- Refer to the Reading the G-Buffer recipe to read the G-Buffer and reconstruct the position from depth
- Compact Normal Storage for Small G-Buffers at http://aras-p.info/texts/CompactNormalStorage.html
- Inline format conversion reference at http://msdn.microsoft.com/en-us/library/windows/desktop/ff728753(v=vs.85).aspx
- Hardware support for Direct3D 10Level9 Formats at http://msdn.microsoft.com/en-us/library/windows/desktop/ff471324(v=vs.85).aspx
- Hardware support for Direct3D 11.1 Formats at http://msdn.microsoft.com/en-us/library/windows/desktop/hh404483(v=vs.85).aspx
- Interesting links on tiled forward shading techniques at http://aras-p.info/blog/2012/03/27/tiled-forward-shading-links/