
CHAPTER 6
SHOOTING PROJECTS
If you've dipped into this book and want to jump right into the “doing” part, its design is meant to encourage you to do just that. Although one kind of learner likes to read, understand, and be thoroughly prepared before entering practical work, there are others (like myself) who must learn things by doing them. So start production here if you wish, and use the rest of the book to solve problems as you encounter them. That, after all, is how the film industry evolved.
Each project in this book explores different techniques of expression, but you should make each one a vehicle for your own ideas and tastes. I have included discussion of the topics, a list of skills you can expect to learn, and questions after each to help you probe your work's aspects, strengths, and weaknesses.
These projects and their variations represent a fairly complete workout in basic filmmaking. You can use them to explore building a character, a situation, and the audience's involvement through non-verbal, behavioral means. They allow you to build an authorial point of view and the disparate perspectives of the characters themselves. The latter are not basic at all.
HOW BEST TO EXPLORE THE BASICS
Production, the seat of learning in the school of hard knocks, teaches you teamwork and how important it is to be organized. As a director you should make creating a gripping human presence on the screen your No. 1 priority. For this you will need knowledge of actors, the ability to see what is credible and what isn't, and the ability to find solutions to problems actors encounter.
Good screen fiction requires multidimensional characters striving visibly after their own goals in truthful and interesting ways. It looks so easy and natural in the cinema, but it's really difficult to produce.
ASSESSMENT
In the Appendix are assessment sheets, listed by chapter and project. Each project below lists an assessment sheet that you should study carefully because it lists the outcomes your work should aim to demonstrate. Outcomes assessment shows you how well you are succeeding in all the major areas and where your directorial or other skills might need more work.
ON DEVELOPING YOUR ABILITIES
Techniques: The projects that follow will help you develop a broad and representative range of directing and editing skills. Technique should never become an end in and of itself. “Art,” said Thomas Hardy, “is the secret of how to produce by a false thing the effect of a true.” This applies perfectly to the artifice that goes into screen narrative. Good technique is transparent and goes unnoticed by the audience because the film grips the viewer's imagination. Poor technique or virtuosity misapplied is technique that draws attention to itself and confounds the film's purpose.
The first projects explore basic technique and embody modest subject matter, but do not be deceived into thinking they are beneath you.
I have supplied requirements, procedures, and hints, but I leave much of the problem solving—always the most rewarding area of learning—to your ingenuity and resourcefulness. Where a project requires lighting, keep it basic and simple so you avoid getting sidetracked by the delights of cinematography.
Critique sessions: Finished projects are best assessed in a group or class so you get used to working with collaborators and giving and taking critique. If any project has a great number of critical assessments and there are too many to monitor while watching a cut, solve this by having each person in a group watch for a few particular facets. This ensures a discussion of depth from which everyone learns—particularly the maker, whose job it is to listen, take notes about the audience reaction, and say nothing. Never, never explain what the audience should have understood. You are responsible for anything your audience missed.
Further help: For additional information, use the table of contents at the front of the part dealing with the appropriate production phase or the glossary and index at the book's end.
PROJECT 6-1: BASIC TECHNIQUES: GOING AND RETURNING
This project is without dialogue and asks that you establish the character and situation of a woman who looks forward to arriving at a building, but discovers she has lost her keys. During the discovery and returning to her car to look for them, she can go through a range of subtle emotions—irritation, anxiety, relief, perhaps even amusement. While creating this character you give yourself a workout in film grammar basics such as preserving the screen direction of char-acters and action and of matching movement at action-match cuts. (See “Cutting on Action” and “Match Cut Rules” subheadings in Project 6-1A.)
- Maintaining relevant screen direction.
- Panning and tilting to follow action.
- Picture framing and composition to suggest depth.
- Editing: action match cutting.
cutting together different sizes of similar images using action as a bridge. cutting together complementary angles on the same action.
Telling a story through action and behavior, not words. - Ellipsis (compressing real time into a more cinematic shorthand).
- Editing to music.
- Making a long version (first assembly) and a short version (fine cut).
6-1A: PLAN, SHOOT, AND EDIT THE LONG VERSION
Assessment: Use Assessment 6-1A/B (Editing) in Appendix
A car draws up. Mary, its occupant, gets out and approaches a house, looking up at a window in anticipation. She mounts a flight of steps to the front door. There she discovers she does not have her keys. Perplexed, she returns to her car, which she expects to be open. Finding the door locked, she reacts in frustration, thinking her keys are locked in. But looking inside, she sees the ignition is empty. Patting her pockets and looking around in consternation, she spots her keys lying in the gutter. She picks them up, relieved, and returns to the house.
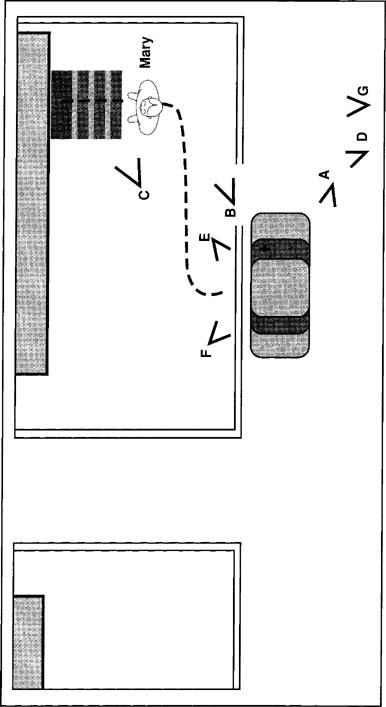
Figure 6-1 is a specimen floor or ground plan. Adapt yours to your location (mine is a one-way street to allow the driver to drop her keys in the nearside gutter). The floor plan shows Mary's walk and the basic camera positions to cover the various parts of the action. No sound is necessary.
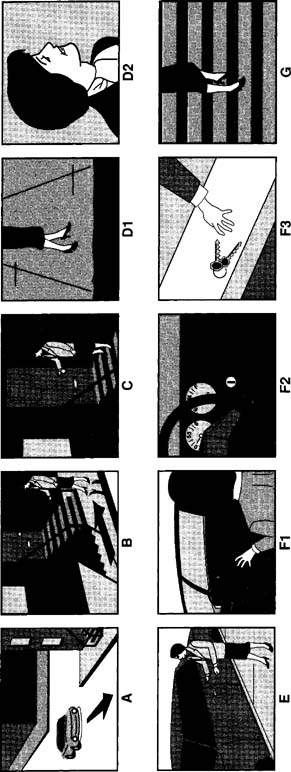
Figure 6-2 is a storyboard of representative frames for each camera position. For your coverage, make your own ground plan and show camera positions and storyboard key frames. Here is a sample shot list related to the ground plan and key frames A through G.
- Establishing shot of locale from camera position A with car arriving as in Frame A.
- Medium shot (MS) panning with Mary left to right (L-R). When she turns the corner in the path she changes her effective screen direction, ending up as in Frame B.
- Medium close shot (MCS) of Mary's feet walking R-L and L-R on sidewalk and up steps as an all purpose cut-in (also called insert) shot, as in Frame D1.
- Big close-up (BCU) panning, telephoto shot of Mary's head as she walks, looking up at window as in D2.
- Feet enter shot descending steps, camera tilts down to follow action, Frame G.
- Overshoulder (OS) shot of empty ignition, F1.
In its simplest edited form, the abbreviated sequence might look something like this:
| Camera Position | Shot Number | Action |
| A | 1 | Car arrives, Mary gets out, slams door, exits bottom right of frame. |
| B | 2a | Mary enters L-R, begins crossing frame. |
| D2 | 3 | CU Mary looks up at window. |
| B | 2b | This is the rest of shot 2a. Mary continues L-R, turns corner of path, walks R-L toward steps and up them. |
| C | 3 | Mary rises into frame from R-L, fumbles for keys, can't find them, looks back at car, turns back out of frame. |
| B | 4 | Mary descending steps across frame L-R, turns corner, crosses frame R-L. |
| E | 5a | Mary arrives from screen R, walking R-L toward car, fails to open door, curses. |
| F1 | 6 | She crosses frame, repositions herself looking R-L to see if key is in ignition, peers inside. |
| F2 | 7 | Her POV of empty ignition. |
| E | 5b | Mary straightens up, pats pockets, sees something out of frame on the ground. |
| F3 | 8a | CU keys lying in gutter from Mary's POV. |
| E | 5c | Mary reacts, stoops down. |
| F3 | 8b | CU of keys, hand enters frame, takes them back up. |
| E | 5d | Mary straightens up looking relieved and exits into camera, making frame go black. End of sequence. |
Notice that shot 2 is intercut with a CU, while the action in shot 5 has been intercut three times. When directing for intercutting like this, don't shoot individual reactions to slot into the script. Instead shoot a large section or even the whole action in the two different sizes of shot, afterward selecting the fragments you require from the continuous take during editing. The more sustained the acting, the more you will get actors in focus, that is, unselfconsciously lost in their characters' realities.
Notice how at the end of shot 5, when Mary returns with the keys, her movement is used to black out the screen by walking right up to the camera lens. To continue the transition in the following shot, have the actor back up against the lens and then on “Action“ walk away from the camera. In the transition the screen goes from action to black, then from black to a new scene. This is one of many transitional devices of which the simplest is the humble cut. Overuse the fancy ones and you run the risk of being tricksy.
- Cut this first, long version together, taking into account cutting from shot 2a to 3.
- Maintain Mary's walking rhythm across cuts and be careful you don't make the poor woman take two steps on the same foot. Rhythm consciousness is needed for editing all walking shots, or anything where rhythms are involved.
- When cutting from 5a to 6, there will probably be an action match. Below are some of the few rules in filmmaking.
Cutting on Action: This is always preferable to cutting at points of stasis. When an attention-commanding action flows across a cut, the eye hardly notices the changes of composition or subject. Action matches work best when the outgoing shot initiates the movement, and the incoming shot takes over and completes most of the action.
Match Cut Rules: For the best action match, follow these steps.
Step 1: Let the outgoing shot run until the start of the action is established.Use no more of the action than is necessary for us to recognize what the action is going to be. This is important because the eye stops being critical whenever we know what is happening next.
Step 2: Complete the majority of the action with the incoming (closer or longer) shot, but be aware that if the action flowing across the cut is at all fast, you must repeat three or four frames of the action at the head of the incoming shot. This overlap is necessary because the eye does not register the first three or four frames of any new image. Though a frame-by-frame analysis shows a slight action repeat, shown at normal speed the action will appear smooth and continuous.
Cutting from 5c to 8b, use the same principle. Let Mary just begin to stoop and then cut to keys with hand entering at top of frame shortly afterwards. If you leave too much footage before the incoming hand appears, you will imply that Mary is 8 feet tall.
Criteria: Run your cut version. Make an exact minutes and seconds count of its length. Now try rating your agreement for each of these criteria on the 1–5 scale outlined in Assessment 6-1A, and B (Editing) in the Appendix. Circling the scores will give you clues to which aspects of your work are strong and which need more work.
6-1B: EDITING A MORE COMPRESSED VERSION
Assessment: Use Assessment 6-1A/B (Editing) in Appendix.
Run your cut and consider which moments in the action are vital and which are link material. Surely a lot of the walking is of secondary importance. If, for instance, Mary turns to look back in the direction of the car, we don't need to see her cover every inch of ground to arrive there. Amend the first cut by making a compressed version. Here's where the unused bridging close-ups come in, signified in this new, abbreviated list with an asterisk:
Discussion: How long is the sequence this time? It should be 30–50% shorter, yet lose nothing of narrative importance. See if you can cut it down further, to perhaps as little as 30–60 seconds overall. Keep running it and you will find shots or parts of shots that can be eliminated. Set the audience up to infer what is not visible, and they will. This way, instead of passively witnessing something that requires no interpretation, the audience actively participates and uses its imagination to fill in points of elision. This is treating your audience as active and intelligent collaborators rather than passive vessels to be filled up with information.
6-1C: SETTING IT TO MUSIC
Assessment: Use Assessment 6-1C Music in the Appendix.
Having discovered how much leeway there is to the length of many of the shots, you can now turn Mary into a musical star. Find a piece of music with a strong beat that enhances the mood of the sequence. Re-edit the materials, placing your cuts and major pieces of action on the beat or on the music's instrumental changes. Be aware that for any cut to appear on the beat, it must occur three or four frames before the actual beat point. This is owing to the perceptual lag inherent when you cut to a new image. The only non-negotiable aspects of your earlier cut are the action match cuts. There will be one way only to make them look right.
Discussion:
- How tightly does the action fit the music?
- Does cutting on the beat become predictable? If so, try cutting on a musical subdivision.
- How much compromise did you have to make with the tight version to adjust the action to fit the music?
- What does the music add to the earlier version's impact?
PROJECT 6-2: CHARACTER STUDY
Skills to develop:
- Revealing a character through action
- Using mobile cinéma vérité handheld coverage
- Blocking camera and actor for mutual accommodation
- Developing counterpoint between words and action
- Imposing a second point of view
6-2A: PLAN, REHEARSE, AND SHOOT LONG TAKE OF CHARACTER-REVEALING ACTION
Assessment: Use Assessment 6-2A (Blocking, Acting, & Camerawork) in the Appendix.
Alan, alone, makes breakfast in his own way. Depending on your actor, this is an opportunity to show someone amusingly smart, dreamy, pressured, ultra-methodical, or slovenly making his breakfast in a particular state of mind and emotion. Develop your ideas in rehearsal:
- First decide what Alan's character is going to be.
- Then decide on his situation.
- Then figure out how to externalize these as action without telegraphing what the audience is meant to notice. Put the accent on credibility as though this was reality being shot by a hidden camera.
Camera coverage should adapt to what the actor improvises, and blocking should evolve from mutual accommodation between camera and actor. You may also find that some actions won't look normal on the screen unless they are slowed down.
You may need to re-block the action, that is, have the actor turn some actions into the camera or have him move away from a close position to a marked point so the whole of the action is visible without the camera having to move or make choices. You may need some lighting. For this semi-documentary approach, try placing light stands in a tight group against the least interesting wall so your camera has maximum freedom to move around without picking up telltale stands and supply wires. Bounce the light off a white ceiling or reflector so you work relatively shadowlessly under soft light.
Have fun with this shoot, and in your coverage incorporate:
- Action of about 4 minutes that is emotionally revealing of Alan's basic character, particular mood, and immediate past and future
- Idiosyncratic interaction with objects (no other people, no phone conversations)
- A single, nonstop, handheld take using wide-angle lens only
- Camera movement (pan, tilt, handheld tracking shot, etc.) to follow or reveal as necessary
- Close and long shots produced by altering subject-to-camera distance as necessary. This may be done by moving the camera in and out, or by blocking Alan to move closer or farther from a static camera.
- Thorough exploitation of the domestic setting
- Lots of rehearsal with camera to make all of the above look smooth and natural
- Safety cutaways, point-of-view shots, and inserts
The difference between an insert, cutaway, and point-of-view shot is that:
- An insert takes detail already inside the main shot and magnifies it usefully.
- A cutaway shows something outside the main shot's framing.
- A point of view shot replicates what a character sees from his or her eyeline.
If they are not to look arbitrary and contrived, cutaways, insert shots, and point-of-view shots need to be motivated by a character's actions or through a consistent logic of storytelling. If, for instance, Alan glances up and out of the frame in wide shot, you can use this glance to motivate cutting to his point of view (and a cutaway shot) of a clock.
Discussion: Try to extract findings from the specifics of your work.
- What in general can make fluid camerawork intrusive or objectionable?
- What is the drawback of long-take coverage?
- What are its advantages?
- What is the difference in feeling when the action takes place across the frame instead of down its depth?
- What are the consequences of framing and camera movement?
- When can the camera look away from Alan and take its own initiative, make its own revelations? (It might, for instance, show that while Alan is searching for eggs, the frying pan is smoking ominously.)
- When is it legitimate for the camera to be caught by surprise or to show it knows what is going to happen next?
- Does the audience feel it is spying on Alan unawares, or is there guidance, a feeling that the camera has its own ideas about him and is deliberately showing particular aspects of him?
- What might determine which storytelling mode to use?
- How much of the take is dramatically interesting and where are the flat spots of dead or link material?
6-2B: ADDING AN INTERIOR MONOLOGUE
Assessment: Use Assessment 6-2BC (Interior Monologue) in the Appendix.
Going further: Now add an interior monologue track as a voice-over (VO) in which we hear Alan's thought process. In planning this, you will need to consider the following:
- Which actions does he do automatically from long habit?
- Which actions require thought?
- On what grounds is each decision made?
- At what points are a character's thoughts in the present?
- At what points do they fly away elsewhere, and why?
- When do we consciously note what we are doing, and why?
Do not forget to shoot monologue “presence track” or atmosphere (also known as buzz track or room tone) to serve as a necessary “sound spacer” should you want to extend pauses in the VO.
When you have completed the assignment, assess or discuss the following:
- Where the interior monologue voice is over-informing the audience
- Where it is under-informing
- Is there redundancy in what you hear because it can be inferred from the action?
- Is VO used skillfully to set up the audience to notice or interpret something that would otherwise be missed? Could it have been?
- Did you show then tell, or tell then show? Which is best?
- Are any losses offset by gains in information, humor, or other aspects?
- Did you use too much or too little VO overall?
6-2C: VOCAL COUNTERPOINT AND POINT OF VIEW
Assessment: Use Assessment 6-2BC (Interior Monologue) in the Appendix.
Going further: Working again with the original piece, now write and record an alternative VO track that this time doesn't complement what you see, but instead contrasts revealingly with it. When action suggests one meaning, and Alan's VO another, the conjunction of the two yields a more complex set of possibilities. The aim here is to develop tensions between picture and sound, a series of deliberate ambiguities or even contradictions that invite the audience to develop its own ideas about the discrepancies. Now you impel the audience to actively develop ideas about Alan's character. Suggested voices are:
- Alan telling his psychiatrist how his compulsions are going away when clearly they aren't.
- Alan rehearsing how to convey his efficiency and foresight in an upcoming and important job interview.
- Alan's mother telling him how to eat well now that he is on his own.
- Alan's wife loyally telling a friend how easy it is to live with him.
- A private eye interpreting Alan's culpability from his innocuous actions.
Unless you are using a character reading from a diary or letter, you will want to avoid the mechanical sound of an actor reading. Even the most professional actors have trouble making a text sound like spontaneous thought. Happily, there is an easy way around this difficulty. Show the actor the ideas and discuss them, then have him or her improvise thoughts, perhaps from headings alone. Do several versions and redirect your actor between takes. Edit them to the action. This reliably produces spontaneity. Do not forget to shoot room tone as a necessary sound spacer should you want to extend pauses in the VO. Also known as buzz track or presence track, room tone is a simple recording of the set at prior recording level, when no action or dialogue is happening. Every sound location has its own relative silence; you can't extend a track with a silence from another place or even microphone position because they will sound different.
Of course there is ample scope for comedy here, but did you create sympathy for your central character or does he come off as a buffoon? The VO has to be carefully developed and rehearsed. Be aware that though the first two options are apparently Alan's view of himself, they should allow the audience to develop an independent sense of Alan that might confirm what a psychiatrist or job interviewer suspected. The remaining three suggestions are perspectives that might better serve to profile the speaker than Alan.
Discussion:
- Using VO were you able to inject interest into periods of bridging action so they were as entertaining as the best action? (It's wise to use VO to raise the dull parts and let eloquent actions speak for themselves.)
- Did you leave interesting sound effects (Alan dropping his shoes) in the clear? (To do this, lay in the VO as a second sound track, which leaves salient portions of the sync or original dialogue track “in the clear.” Raise levels of the sync track in the spaces between blocks of VO so the foregrounded track may either be VO, featured dialogue, or action from the sync track.
PROJECT 6-3: EXPLOITING A LOCATION
Skills to develop:
- Developing a mood
- Shifting the mood from objective to subjective
- Making use of cause and effect
- Capitalizing upon inherent rhythms
- Implying both a point of view and a state of mind
- Suggesting a development
- Using sync sound as effects
- Using music to heighten or interpret the environment
6-3A: DRAMATIZING AN ENVIRONMENT
Assessment: Use Assessment 6-3A (Dramatizing an Environment) from the Appendix.
Select an interesting location, which can be any authentic interior or exterior setting. It might be a harbor, motorcyclists' café, farmyard, teenager's bedroom, stock exchange, fairground, book shop, airport lounge, or anything else that is mainly a physical entity rather than a human event. This assignment has considerable documentary aspects and you will need to spend some hours just observing with a notebook in hand. Afterward, work your observations into a script that incorporates whatever interesting is likely to happen. You can use a POV Observer character of your own deciding so long as he or she looks unquestionably credible. Without using any speaking characters, develop a mood sequence of about 2 minutes that has a structure organic to the location's daily life and that changes and intensifies. In planning your sequence, consider the following:
- What is inherently present that might structure the sequence? (Passengers arriving in an airport, then leaving at the departure gate? Time progression? Increasing complexity in the action? Forward exploratory movement of camera?)
- What cause-and-effect shots can you group together into sub-sequences? (Within a winter forest scene, you establish icicles melting, drops of water falling past a shack's window, drops falling in a pool, rivulet of water flowing through ice, etc.)
- Are there inherent rhythms to be exploited (water dripping, cars passing, a street vendor's repeated cry, dog barking, etc.)?
- Do the sequences move from micro to macro view, or the reverse? (Start with BCU water droplets and develop to view of entire forest; or conversely, start with an aerial view of the city and end on a single, overfilled trash can.)
- Can you create a turning point that marks the onset of a heightened or altered sensibility? (For instance, in a deserted sandy cove, the camera discovers a single, smoking cigarette butt. Thereafter, coverage suggests the uneasiness of wondering if there is a lurking human presence.)
Here fiction merges with documentary; the environment has become a character studied by the Storyteller. We make the same dramaturgical demands, asking that the view of the location grow and change so it draws us into reacting and becoming involved.
The classic three-act structure was developed in theater but can be applied to the contents of a single sequence, a short film, or even a full-length fiction film.
It's important to say that the main character need not be human. In Pare Lorentz's classic ecology documentary The River (1937), the Mississippi River in all its awesome power and changing moods is the central character. Lorentz traces it from a trickle at its start to a roaring torrent that in full flood sweeps away homes and lives.
As always, contrasts and contradictions are the richest stimulant to awareness. In a seaside scene it might be the juxtaposition of frenetic game players with corpulent sun-worshipers that provides the astringent comparisons, or the waves compared with the stillness of the rocks. Every setting, like every character, contains dialectical tensions whose irreconciled and coexisting opposites define the subject's scope and subjective meaning to the observer.
Depending on your storytelling Observer (a child, an old man, a foreigner, a cat, an explorer, someone revisiting his past, etc.), the environment can be interpreted very differently. Through what you show, you can suggest the observing consciousness of a particular person in a particular mood, even though that person is seldom or never seen.
Discussion:
- Was the sequence dependent on the impressions each image and activity suggested or upon the movements and words of a central human subject?
- Did you find inherent rhythms in the material?
- Did you let shot durations be decided by their context?
- Was there a beginning, a middle, and an end to the sequence? (as if you were writing a dramatic scene, but ideally the developments are not imposed but come from the rhythms and activities inherent in the setting)
- The sequence should come from a response to the location and not be an attempt to impose some spurious story or usefulness on it.
6-3B: ADDING MUSIC
Assessment: Re-use Assessment 6-1C (Music).
Going further: Now try adding music to your sequence, choosing it carefully. Don't use any songs; the aim is to work with emotional associations and behavioral narration, not a verbal one. Try different pieces roughly against your scene to determine which works best before downloading onto your hard drive. When you lay the music against the sequence, do the following:
- Be ready to let particular sound effects bleed through the music in appropriate places.
- Decide where and why you want pure music, with no diegetic sound at all. Making these decisions raises important points about when music needs to be “pure” and when its impact and meaning is enhanced by sounds from the “real” world.
- Be ready to adjust shot lengths and cutting points to accommodate the structure of the music you've chosen. Music is never just applied; there should always be mutual responsiveness between visuals, diegetic sound (where used), and music.
Music can do the following:
- Augment what has been created pictorially and act illustratively
- Suggest something hidden that the audience must hunt for. Example: A peaceful harvest scene accompanied by an ominous marching tune, or abandoned houses in a blighted urban area seen against an impassioned Bach chorale
- Suggest what is subjective either to a character in the film or to the Storyteller. Example: that young farm workers go off to die on foreign battlefields, or that poverty and failure are somehow part of God's plan for mankind
Music is easy to begin and a lot less easy to conclude. The start and stop of a camera movement or subject movement can motivate music in- and out-points, as can the ending or beginning of a strong diegetic sound effect. Study feature films for further guidance.
Discussion:
- What rules do you feel govern the legitimacy of using music?
- When is using music illegitimate?
- When is music being used creatively rather than programmatically (that is, as mere illustration)?
- What should music's relationship be to dialogue?
- How should music relate to diegetic sound effects (that is, effects natural to the scene)?
- When should music belong to the world of the characters and when can it come from beyond their world?
- Can music be motivated by the storytelling “voice” of the film?
- Can you mix periods (use modern music on a historic subject, for instance)?
- What determines the texture and instrumentation of a music piece?
PROJECT 6-4: EDITED TWO-CHARACTER DIALOGUE SCENE
Skills to develop:
- Planning and shooting dialogue exchanges
- Camera placement
- Using verbal rhythms and operative words in editing
- Controlling the scene's point of view
6-4A: MULTIPLE COVERAGE
Assessment: Use Assessment 6-4AB in the Appendix.
Overview: This project, though short, covers a lot of ground and will take effort, invention, and organization. It will help if you have read ahead in this book, all the way into the Production phase, in fact (Chapters 26–31). Do not shortchange yourself in the planning stage, for you can learn much from making plans, carrying them out, and then realizing what you'd do differently next time.
- Write a short dialogue scene (approximately 3 minutes) that makes use of an active indoor game. Make one character realize that the other is bluffing and does not know how to play. You must imply why this situation has arisen and what it means to each person.
- Mark the shooting script with your intended pattern of cutting. This frees you during shooting to overlook weak sections that fall in the part of an angle you don't intend to use. Having this information at hand will help you decide immediately whether to call for another take.
- Shoot the whole scene from at least three angles. This style of coverage was once the Hollywood norm. The editor was expected to find a point of view later within the all-purpose coverage. Today shooting a scene this way is considered decision-less coverage that wastes actors' energies, crew time, and filmstock. Such broad coverage here is useful because it allows you leeway to experiment in editing.
- About pacing a scene: Comedy should be paced about a third faster than things would happen in life if it is to look right on the screen. Conversely, serious scenes often must be slowed, particularly at beat points, so that pauses, silences, eyeline shifts, or an exchange of glances can be fully exploited. Experienced directors know where the truly high points are in a scene and how to alter the pacing to their advantage. Beginners often reverse these priorities and strive to ensure that no silence, or silent action, ever threatens to “bore” the audience. Nothing could be further from the truth.
- A word about stretching or compressing time in editing: Having double coverage in the cutting room lets you double a pregnant moment when it isn't pregnant enough. To do this, use all of the moment in the outgoing shot, then cut to the matching, incoming one at the beginning of the moment. That way you can double its screen duration, a key technique for stretching time at strategic points. Conversely, if the moment was held overlong in a shot, you can abbreviate it by cutting tight to the matching angles and using editing as an elision device.
- Actions, reactions, and subtexts: Although editors cannot speed up or slow down the way words in a sentence emerge, they can control the rhythm and balance of action and reaction, which is a huge part of implying a subtext. Surefooted editing can make a vast difference to the degree of thought and feeling the audience attributes to each character, and greatly improve the sense of integration and consistency in the acting.
Steps:
- Cast the actors.
- Decide the location.
- Write a script that implies where the characters come from (their backstory) and where they might be going next.
- Make several copies of the script and mark up one with the beats (more about this useful theatrical term later, but for now, treat a beat as that point at which one of the characters undergoes a major and irreversible realization).
- Rehearse the scene.
- Develop the accompanying action, going beyond what the script calls for.
- Make a floor plan of the location showing characters' moves and intended camera positions (see Figure 5-3 as an example).
- Define what you want the scene to accomplish and whose point of view at any given point the audience is to (a) mainly and (b) partially share and understand.
- Using another copy of the script and colored pens for each camera position, mark up the script with your intended editing plan. Figure 6-3 provides an example.
- Plan to cut between angles at times of major subject movement so cuts will disappear behind compelling action.
- Be sure to shoot a generous action overlap at the intended cutting points or you will have insufficient choice in places to cut. This can spell disaster if the cut is to be an action match.
- Shoot, playing the whole scene through in each major angle, thus allowing yourself to experiment widely during the editing.
- Edit strictly according to your plan.
- Solicit audience critique.
- Re-edit according to what you now feel should be done.
- Solicit new audience critique.
- Write directorial guidelines for your next directing project based on what you learned.
Discussion: Directing and editing a convincing dialogue scene is one of the most challenging tasks a director faces. How did you do?
- How difficult was it to achieve consistent success throughout a take?
- How right was the pacing of the scene?
- Were the significant moments effectively exploited, and if not, why not?
- How did your writing sound in the mouths of your actors?
- Would the acting in this scene pass as documentary shot with a hidden camera?
- What did you learn about directing actors from this experience?
- What did you learn about directing from a text?
6-4B: EDITING FOR AN ALTERNATIVE POINT OF VIEW
Assessment: Use Assessment 6-4AB in the Appendix. See if you did better the second time around.
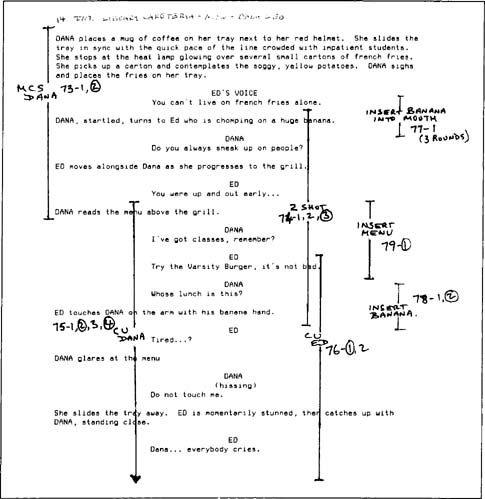
FIGURE 6-3
Marked-up script showing intended cut and generous overlaps to allow action matches and other kinds of alternatives in editing.
Re-edit your scene to make the audience identify with a significantly different point of view, such as the secondary character's or an omniscient Storyteller's point of view.
Discussion: Apply the same criteria as in Project 6-8A, but also propose additional coverage or differences in acting that might make the audience engage better with the new point of view.
PROJECT 6-5: AUTHORSHIP THROUGH IMPROVISATION
Skills to develop:
- Involving actors in script idea development
- Spontaneous and creative interaction between actors and director
- Directing an event for direct cinema coverage, useful where actors must merge, for example, with an uncontrollable public event
- Editing documentary-style coverage
- Script development from taped improvisations
- Stylistic decision making
- Working intuitively and thinking on your feet
6-5A: DEVELOPING A SHORT SCENE
Assessment: Use Assessment 6-5ABC (Improvised Scene) in the Appendix.
Authorial goals: Set up guidelines for a 3 to 4 minute improvised scene between two people that incorporates an emotional transition in one of the characters from cheerful to angry. The goal is not to produce great drama, but to experiment with camera coverage and editing. Should you need guidance in directing an “improv,” read the introductory part of Chapter 21, then follow the instructions for Exercise 21-15: Bridging Emotions. When you have run through your scene several times so it has become reasonably stable and secure, use a handheld camera to cover the complete scene, doing this at least three times to favor three different angles: on character A, on character B, and on both as a two-shot.
The goal is obtaining sufficient coverage to allow freedom in cutting the scene together and to cope with the unavoidable variations inherent in multiple takes of an improvised piece. You will have to rely on your camera operator for the quality of the coverage, so it is best to bring him or her in early to shoot rehearsals.
Camera use: With the advance of Steadicam use, and with high definition (HD) video being used increasingly in feature films, handheld coverage is increasingly common. Stylistically it usually projects a strong feeling of spontaneous human observation, as opposed to the godlike omniscience implied by the tripod's perfect composition and rock steadiness. It also injects an interesting sense of fallibility and subjectivity into the coverage. Sometimes, of course, this is intrusively wrong—for instance, during a sequence of misty mountain landscape shots at daybreak when nobody is supposed to be about. In that case, tripod shots are a must.
In direct cinema documentary, also known as observational camera coverage, the director cannot line up each shot, so creative initiative passes to the camera operator, who must have the mind of a dramatist, not just that of a technician or still photographer. A director quickly finds out whether the operator sees only composition through the viewfinder or whether he or she is finding dramatic meaning and focus within a scene. Some do and some can learn, but many camera operators will remain detached visual designers.
Sound coverage: Here it's catch-as-catch-can (something your sound recordist will find a real challenge). While the camera adapts to the action, the microphone operator must stay out of frame and pick up good sound in a swiftly changing, unpredictable situation. Pay attention to sound balance before you show your work to an audience or discrepancies will make them misread the piece's inherent qualities. One solution is to use a DAT multi-track recorder and put a wire-less microphone on everyone who speaks, recording each on a separate channel.
Editing: Edit together a complete version, keeping to the form and length of the original, and apply Assessment 6-5ABC (Improvised Scene).
Discussion: Exposition
- Was all the expository detail included by the actors so the audience understands the situation? (It is fatally easy in improv to overlook something vital.)
- Was each new piece of expository information concealed artfully enough?
- Did the information come too early or too late in the edited piece?
Camera coverage
- When was mobile, handheld footage stylistically appropriate and when not?
- What conclusions can you draw to help you make guidelines for the future?
- Was the spontaneous coverage adequate or is the operator sometimes caught by surprise?
- What effect do these moments have on the audience?
- How much does the unpredictability of the characters' movements prevent you from more deliberately showing their environment?
- To what degree can you construct an integrated point of view?
- Did you manage to grab enough close detail? By grabbing close-ups, insert shots, and cutaways as you shoot, you will give your editor a variety of material by which to control the substance and rhythms of the scene. An insert shot enlarges significant detail within an existing shot. For example, the watch face a character is consulting. The editor inserts it into the main action. A cutaway shot might convey similar information, but does so by showing something outside the existing shot. For example, if a character looks up out of frame, you would shoot her eyeline view of the clock. This shot is a cutaway because the clock is outside the main action and to show it requires cutting away from the immediate action.
- Does the composition succeed in showing a revealing relationship between people (crestfallen son, for instance, in foreground, angry mother in background)?
- Or between objects (miner grandfather's tombstone in foreground, the coal mine that killed him in background)?
Sound
- How acceptable is the dialogue track?
- How hard was it to cover speakers whose movements are spontaneous?
Point of view
- Whose scene is it?
- Does point of view arise more from the performance than from the camera treatment? (This is extremely hard to pinpoint, but nevertheless, too important to neglect).
- Or between people and some aspect of their environment? (for instance, a forlorn, withdrawn child standing in a playground that looks like a concentration camp)
Improvising
- What did you gain, what did you lose from improvising a scene?
- What did you gain, what did you lose from handheld coverage?
- How credible were the characters?
- How consistently did the dramatic problem between the characters develop and did it resolve?
- How consistent was the density of the piece and how much did you find yourself wanting to edit around plateaus in the pacing or development?
Time your first cut for comparison with the next assignment.
6-5B: EDITING A SHORTER VERSION
Assessment: Use Assessment 6-5ABC (Improvised Scene) in the Appendix again.
Going further: Now edit your initial cut down, trying to make it tighter and more functional by eliminating verbal and behavioral padding. To do this you will have to decide with your editor the dramatic function of much that is said and done on the screen and devise methods of eliminating whatever does not deserve to be there. You are also free to restructure the piece if repositioning exposition or other elements improves the dramatic curve.
Discussion:
- What percentage of the original length did you eliminate?
- In what ways is the new cut more effective?
- How consistent is the pace of dramatic development now?
- What did you feel about the acting?
- What would you do differently?
The strength of improvisation is the spontaneity and realism of the acting and the conviction of the characters. Discuss which of the following weaknesses turned up in your work and whether they could be eliminated:
- The difficulty of achieving a satisfying development. Improv often suffers from irregularly paced dramatic growth, with long plateaus during which both actors and audience feel the pressure for something to happen.
- The temptation for actors, when desperate, to resort to manipulating moments to get the piece moving again.
- The difficulty of reliably hiding exposition inside ongoing events.
You do not want your audience to feel the presence of an editorializing hand during verbal exchanges, feeding such giveaway lines as, “Isn't it rough being out of work for three months, Ted?” and, “The last time we met—you remember— it was at the supermarket. You got mad because I couldn't give you back the money you lent me in September.”
Even if no clumsy authorial hand comes occasionally crashing through the backdrop of your piece, the probability is high that you will be dissatisfied with the dialogue. At times it is skimpy and over-compressed, at other times prolix and flaccid. Though editing can usually remove padding, it may also reveal inadequate joints and structural problems. However, if things go reasonably well, you end up with interestingly developed characters and a story line. Whatever you have by now is the basis for the next stage.
6–5C: FROM IMPROV TO SCRIPT
Assessment: Use Assessment 6–5ABC (Improvised Scene) in the Appendix.
Transcribe the scene from the previous exercise onto paper and rewrite it, aiming to keep the words the actors used, but compress verbiage into pithy lines. Distribute and camouflage any expository information, and wherever possible, transform dialogue into actions that do not require accompanying words. This way characters can show their feelings instead of telling them to each other. Now, using the same cast and location, rehearse and shoot the scene as in Project 6–6.
Discussion: Compare the two versions of the same scene.
- What was lost by turning an improvised performance, shot documentary style, into a scripted and more formally controlled scene?
- What was gained?
- How did your cast handle their lines and action this time?
- What did you learn about authorship and directing through doing this project?
PROJECT 6–6: PARALLEL STORYTELLING
Skills to develop:
- Intercutting two narrative lines
- Counterpointing two moods or activities to imply a storytelling commentary
- Advancing two story lines concurrently so each acts as a cutaway for the other and both are kept to brief essentials
- Showing separate, concurrent events developing toward a moment of convergence
6–6A: SEEING THE SCENES AS SEPARATE ENTITIES
Assessment: Use Assessment 6-6ABCD (Parallel Storytelling), but omit the last section, Parallel Stories.
Either write or improvise two whole scenes with content that will intercut meaningfully and provoke the audience to see a connection. Suggested pairs of subjects:
- man getting ready for a date
- woman in very different mood getting ready for the same date
- burglars getting ready to rob a house
- detectives making preparations to trap them
- man rehearsing how he will ask for a raise
- two managers discussing how they will fire him
Write each as a complete, 3-minute, stand-alone scene. Now cast, shoot, and edit each scene separately and assemble them so that one whole scene follows the other. Do a reasonably tight edit on each sequence and then consider them as follows:
Discussion:
- What difference is there in implication when you run the sequences as AB or BA? (The detectives, for example, may have arrived too late, and the firing may follow the request for a raise, instead of precede it.)
- How long is each sequence?
- What do you gain in dramatic buildup by staying with each unbroken sequence?
6–6B: LONG INTERCUT VERSION
Assessment: Use Assessment 6-6ABCD (Parallel Storytelling) this time with the last section, Parallel Stories.
Going further: Now loosely intercut the two sequences losing nothing of the original material.
Discussion:
- What ironies were you able to create? (Perhaps you counterpoint the fact that the woman preparing for the date has bought a new dress while the man forgets to clean his shoes.)
- What meaningful comparisons do you create? (Both the man asking for a raise and his managers think he is underpaid.)
- What causes and effects does the audience link together? (Both detectives and burglars have radios.)
- Do both sequences appear to be happening at the same time, or is one retrospective in comparison with the other? (For instance, a son from abroad searching for his parents finds that his father is already dead. His father's death is intercut with his mother's account of it, which is softened to spare the son's feelings.)
- Does one sequence foretell the outcome of the other? (In Nicholas Roeg's Don't Look Now (1973) the famous lovemaking scene is intercut with the couple getting dressed afterward.)
6–6C: SHORT VERSION
Assessment: Use Assessment 6–6ABCD (Parallel Storytelling) with the last section, Parallel Stories.
Going further: Now reassess the cut. Because it is no longer necessary to maintain the illusion of continuous time, you can pare away anything the audience can infer and which is thus nonessential. You will probably see new and improved points at which to cut between the parallel stories.
Discussion:
- How much shorter is the new version compared with the old?
- How many of the ideas for your new cut arose from the shooting, blocking, and playing of the scene?
- How many of your intercutting ideas were germinated while writing, and how many came afterward?
- What kind of dramatic capital has been gained and what lost through intercutting?
- Knowing what you know now, how should a writer plan the raw materials for such sequences?
6–6D: DISCONTINUITY AND USING JUMP CUTS
Assessment: Use Assessment 6–6ABCD (Parallel Storytelling), but not the last section, Parallel Stories.
Going further: Now experimentally reassemble each sequence in chronological order, retaining only the pieces you chose for the intercut version as a discontinuity version using jump cuts. A jump cut is any discontinuous edit that signals a significant piece of time has been discarded between the scenes and that we have jumped forward in time. By doing this you are moving from continuity narrative to an episodic narrative using discontinuous time.
Discussion: What are the effects of eliminating the slack material between the high points? Surely this accelerates the story, and by discarding objective time it probably accentuates an authorial attitude toward what moments matter. Flat-footed realism and its linear, continuous time have given way to something more impressionistic and subjective.
If you hate this version of your sequences, it may be because the jump cuts make ugly visual leaps. How true would this be had you written the film with this in mind and designed each jump cut's composition? Here are some options to consider:
Similarity of Frame: You might, for instance, have cut from a bed with two people reading, to the same bed with them asleep, to a morning shot with one still there and the other dressing in the background. Older convention would dictate a long, slow dissolve between the three setups (which should be taken with the camera locked down in the exact same position so each composition is exactly the same), but the same narrative content can be conveyed in a fraction of the time by jump cutting. This makes the jump cut a formal storytelling device of great agility.
Difference of Frame: With a bold difference of composition you can simply jump cut elsewhere in space and possibly in time as well. During a wide shot of people preparing to fire a piece of pottery, you can cut to a close shot of the oven. Somebody opens it, and the pot is already fired. We understand that a block of insignificant time has been eliminated, even though dialogue continues with an unbroken sentence across the cut into the new time plane. The TV commercial has familiarized audiences with cinematic shorthand like this.
Freed from the literalness and “objectivity” of present-tense realism, discontinuity allows a wealth of possibilities for a fleeter and more staccato storytelling style. These developments are very significant if as a writer, director, or editor you want to co-opt the audience's imagination by using a cinematic language of greater flexibility. Jean-Luc Godard was the first director to use this style intensively in Breathless (1959).
CHECKLIST FOR PART 2: SCREENCRAFT
The points and recommendations summarized here are only those most salient. Some are commonly overlooked. To find them or anything else in the text, go to the Table of Contents at the beginning of this part or try the index at the back of the book.
Screen grammar
- Every so often when you have time, make yourself aware of the different aspects of your consciousness and decide what film language would best serve your stream of consciousness.
- What did your consciousness make you do? (Move in, move away, avert your eyes, listen, think, remember …?)
- Pretend you are handling a camera in everyday life and line up shots. Determine their aspects and motivations according to the emotional context of an Observer.
- Practice seeing every shot for its connotations, not just denotation.
- Look for metaphors or symbols in movies and analyze whether they are organic to the situation or imposed.
- Make yourself classify shot juxtaposition by their type, such as illustrative, counterpoint, contradiction, associative, tense-shifting, etc. (See Chapter 4, Figure 4–1 and supporting text for types of cut).
- See how established directors handle the axis, particularly crossing the scene axis. Multiple character scenes with a number of character or camera moves can get very complicated.
- Practice dividing up scenes in everyday life into their possible axes (subject-to-subject, and observer-to-subject). You may want to unobtrusively scan from different vantage points.
- Make yourself aware of what makes a scene discrete. (Is it defined by time, location, mood, other?)
- Screen language implies a particular intelligence, grappling with events in which it also participates.
Seeing with a moviemaker's eye
- Notice when composition on the screen is being adjusted because of changing internal elements.
- See a feature film and count how many types of scene or time transitions it uses.
- Notice when visual rhythm is inherent to the subject matter or when it is being varied for authorial reasons.
- Notice external compositional relationships (the juxtapositional commentary created by two compositions cut, dissolved, or otherwise associated together).
- For practice, make a floor plan of two rooms you live in, showing electrical outlets, windows, and direction of ambient light, furniture placement, and door swing.
- Practice being conscious of the layering in movies' sound tracks.
- Practice being aware of different kinds of light and lighting, in movies and in life, and make a mental note of the emotional associations.
- Notice in different situations how you experience time—what extends it and what truncates it.
- See a movie by a famous director and decide (a) what the Storyteller's identity was and (b) what in the movie communicated it to you.
Shooting fundamentals
- Plan everything and make lists of everything you need to remember.
- Do floor plans showing lighting placements for all your shooting. Name the lights.
- Mark intended camera positions on a floor plan.
- Always check an exterior location for light direction at the time of day when you plan to shoot.
- Check location for unwanted sound intrusions (like being in the flight path of an airport!).
- Be sure to shoot sound presence tracks for every location.
- Don't forget to get written permission for locations if you need them.
- Dialogue scenes are the hardest to shoot and cut well.
- Remember to inhabit your Storyteller's character while you direct. Shoot and see from his or her point of view. This won't be easy to remember.
- Become aware of who is acting and who is being acted upon at any moment and in any situation.
- Remember that characters are alive when they are seeking to do or get.
- Direct to imply the subtext.
- Make storyboards if you are doubtful about how a sequence will cut together. Draw stick figures if this is the best you can do.
- Remember to shoot generous action overlaps between matching shots when you mean to cut them together.
- Decide when long, comprehensive takes are called for and when a more fragmented style suits the situation being filmed.
- Give your major attention to the actors and after initial consultation for each shot, leave directing the camera to the DP.
- Look carefully for what you may have forgotten before striking any camera position or set.
- Keep all the versions you edit.
- View all your rushes again before you lock down a final cut—there is always an unused gem.
- If you want to place a cut on the beat of music, you must make it three frames ahead of the beat if it's to look right.
- In match cutting on movement, overlap (that is, repeat) the first two or three frames of movement to allow the eye to catch up.
- See how far you can go with discontinuity and still keep your audience. Have showings to find out what you can get away with. What permits the audience to fill in the gaps?