In this chapter, you will:
Explore options for saving and accessing your content online
Learn about what you can do with Office Web Apps
Learn about coauthoring across Office 2010 and Office for Mac 2011
Explore the benefits of Office Mobile applications
The phrase collaborating and sharing makes me feel like a trust-related, teambuilding exercise can’t be far behind. But don’t be alarmed. We’re not going to fall backward into the arms of coworkers or sit around a campfire and sing corny songs here. So, enough with the corporate-speak jargon—let’s get down to business.
This chapter is about that big, new world up in the cloud that helps you get things done when and where it’s convenient for you. Today’s technology means that you don’t have to be tied to your office to be productive. You don’t have to route content from one person to the next to work together on a project. You don’t even need your own computer to make changes to your documents.
When you store your Microsoft Office documents online (a.k.a., in the cloud), you can share them more easily, access them from almost anywhere, and work on them from almost any computer with an Internet connection (and maybe even from your phone).
The ability to store and manage documents online has been around for many years. But the change that this technology has recently undergone is surely the biggest one since we all first heard words like SharePoint or web server.
Whoever you are, wherever you work, you now have easy (even free) access to online document management.
You can now edit the documents you store online (many of them, anyway) right in a web browser.
Storing documents online, using either Windows Live SkyDrive or Microsoft SharePoint 2010, now enables new technologies such as the ability to simultaneously edit the document with other people in different locations.
If you’ve not yet ventured into the cloud—even if online or simultaneous editing doesn’t pique your interest—there are many good reasons to explore your online options. From providing an online backup copy of important documents (if you’ve never had a hard drive that failed, you probably will one day, and it might just be your backup drive) to enabling you to more easily share large files (it’s easier to instant-message [IM], text, or email a link than a 20 MB file), online document management is an easy win-win option. What’s more, even free services like the wonderful Windows Live SkyDrive provide advanced document management tools like access control and versioning.
Most of the capabilities discussed in this chapter are available when you save your documents online to either a SkyDrive folder or SharePoint 2010 library. So, what are your options?
Large and midsize businesses can install Microsoft SharePoint 2010 in their organization to create a secure and powerful online Intranet solution that goes way beyond document management.
Businesses of any size can subscribe to Microsoft Office 365 for a Microsoft-managed online solution that goes well beyond SharePoint.
Home and small-business users can get a free SkyDrive account with 25 GB of online storage and many of the same tools that are available to SharePoint users.
If you use Windows Live Hotmail or Windows Live Messenger, you may already be familiar with http://windowslive.com or http://live.com—the collection of Windows Live online services. SkyDrive is the service that lives at http://docs.live.com.
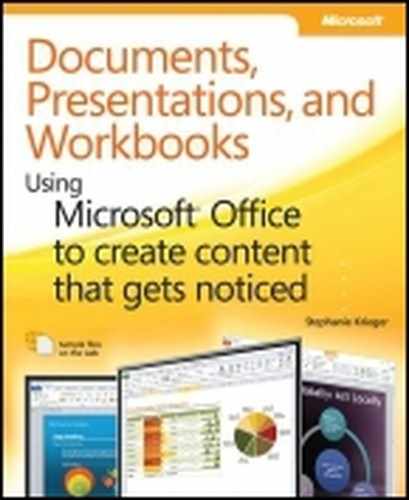
Like Hotmail and Messenger, SkyDrive is free and available to anyone. You can store Microsoft Office documents as well as media files (photos and video) within the 25 GB of storage space that comes with your free account. You can also create Microsoft Office documents directly online from your SkyDrive account, edit your documents online using Microsoft Office Web Apps, or open your documents for editing in the Office 2010 or Office for Mac 2011 programs on your computer directly from SkyDrive (as shown in Figure 2-1 and detailed in the list that follows it).
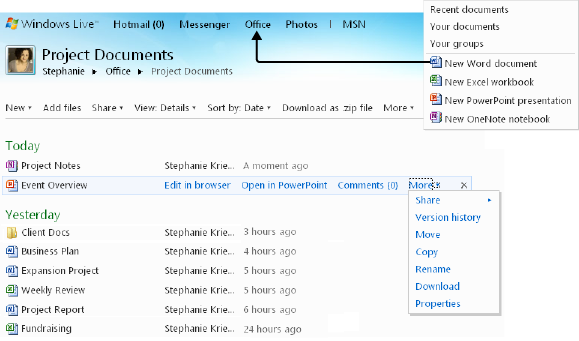
Figure 2-1. A SkyDrive folder, where you can store, view, edit, share, and even create Microsoft Office documents.
Create multiple folders and set unique sharing permissions for each. You can make a folder public, share it with specific individuals, or keep it just to yourself. You can also assign specific permissions (full permission or read-only) to individuals with whom you share.
When other editors make changes to your files, SkyDrive automatically saves a new version so that you can easily manage which edits get made to files that you own.
You can edit documents online using Office Web Apps, including Microsoft Word Web App, Microsoft Excel Web App, Microsoft PowerPoint Web App, and Microsoft OneNote Web App.
Note
Even though Microsoft OneNote is not part of Office for Mac, Mac users can create new OneNote notebooks in SkyDrive and edit them using OneNote Web App. You can also sync them with OneNote Mobile for iPhone, as discussed in the section Introducing OneNote Mobile for iPhone, later in this chapter.
Saving a Word or PowerPoint file to a SkyDrive folder enables you to simultaneously edit that file with others who are using either Office 2010 or Office for Mac 2011. Additionally, you can simultaneously edit Excel workbooks and OneNote notebooks that are saved on SkyDrive with others by using Office Web Apps.
Note
Simultaneous editing for Excel files is available only in Excel Web App. However, you can simultaneously edit OneNote notebooks with others who are using OneNote Web App, OneNote 2010, or Microsoft OneNote Mobile for Windows Phone 7.
Note
See Also Learn more about Office Web Apps and simultaneous editing capabilities across Microsoft Office platforms in the section Exploring Office Web Apps: What Can You Really Do with Them? later in this chapter.
Hotmail integrates pretty nicely with SkyDrive and Office Web Apps as well. If you use Hotmail or receive mail for any account via your Hotmail inbox, you can view or edit Word, PowerPoint, or Excel email attachments online directly from your inbox.
If you edit the attachment online, a copy of the file is automatically saved to SkyDrive and you can reply to the email directly with the changes you’ve made.
You can also save documents, presentations, workbooks, and (for Office 2010 users) notebooks directly from the Office 2010 and Office for Mac 2011 programs to your SkyDrive folders, as shown in Figure 2-2.
For the option to save a file from an Office 2010 program to SkyDrive, click the File tab, click Save & Send, and then click Save To Web.
For the option to save a file from an Office for Mac 2011 program to SkyDrive, on the File menu, point to Share, and then click Save To SkyDrive.
Version control, access management, 25 GB of free storage space, online editing (including the ability to create new documents online), and email integration. Okay, so if SkyDrive is free to anyone, why would anyone pay for SharePoint?
If you’re a consumer or managing documents online for any type of personal use, there probably is no reason at all. Windows Live provides a very good set of free tools that are easy to use and work well together. But for businesses of any size, there might be many reasons to consider SharePoint. Read on to learn more.
Note
All you need to get started on SkyDrive is a free Windows Live ID. If you don’t yet have an ID, when you first go to the Save To SkyDrive options shown in Figure 2-2, you’ll see the option to get one. Or, you can sign up at http://docs.live.com.
Note
See Also To learn more about what you can do on SkyDrive, visit http://windowslive.com/skydrive.
To hear many people tell it, SharePoint is a miracle product, an all-things-to-all-businesses solution that is the place to start for pretty much anything you want to do. Of course, hyperbole (and you might have heard a lot of it on this subject) doesn’t really tell you very much. So, if you’re like many people in organizations where SharePoint is new or soon to be available, you might be wondering what the heck SharePoint actually is and how it can help you.
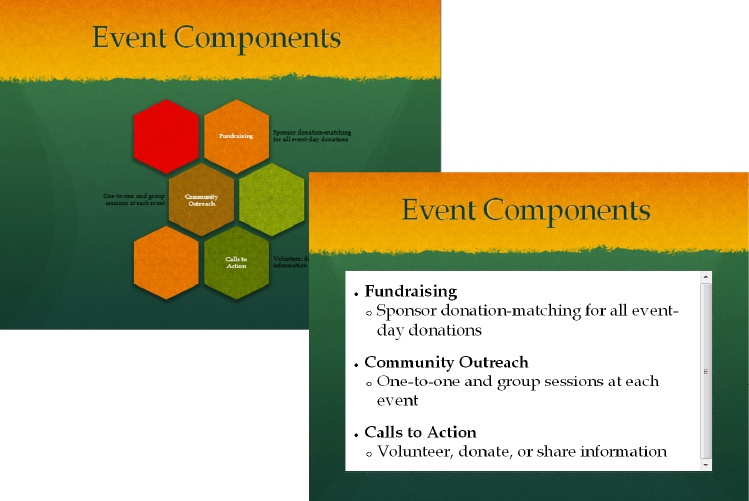
Essentially, SharePoint is a platform for online content management and collaboration. As a user of SharePoint, you can create and customize your own websites for everything from simple online document management to team projects to web databases, blogs, social networking, and then some, as shown in Figure 2-3. For example, as you see in that screenshot, a team site typically includes one or more document libraries along with lists for managing announcements, calendar items, tasks, and discussions.
Setting up a SharePoint site is fast and easy—customization is optional. To access the dialog box shown in Figure 2-3, on the command bar at the top of your SharePoint site, click Site Actions and then click New Site. When you click Create in the dialog box shown here, SharePoint does the rest.
Note
To customize a SharePoint site after you’ve created it, on the Site Actions menu, click Site Settings.

SharePoint administrators can customize the types of sites that are available for their users and create custom site templates. Administrators can also customize features such as whether to allow users to create documents online and the templates to use when documents are created online.
Implementations of SharePoint range from document libraries—where an administrator can manage things like document lifecycle, file size limits, and custom templates—to both internal and external websites where users can share content and interact with colleagues or customers. SharePoint also provides a platform for a wide range of business applications, such as portals with dashboards and scorecards for tracking financials or a database with dynamic online forms.
Because this book is about documents, however, let’s stick with what you as a SharePoint user can do with documents. To begin, you can save your documents, presentations, workbooks, and (for Office 2010 users) notebooks to a SharePoint 2007 or later document library directly from the Microsoft Office programs.
Click the File tab, click Save & Send, and then click Save To SharePoint.
Select a saved SharePoint location and then click Save As. Or, to add a new SharePoint location, click Browse and then click Save As.
After you save a file to a SharePoint location once, that location is automatically saved and becomes available in all Office 2010 programs from which you can save files to SharePoint.
To enter a new SharePoint location, type the URL for the site or library in the Address bar of the Save As dialog box.
When you enter this URL, do not include any details from the URL that fall after the name of the library. For example, if the URL that you see when viewing your document library in a web browser is http://MyTeam/Shared%20Documents/AllForms.aspx, in the Address bar of the Save As dialog box, type http://MyTeam/Shared%20Documents. Alternatively, you can leave off the http: and reverse the direction of the slashes to indicate a file path, as follows: \MyTeamShared%20Documents.
Also note that, if you open a document from a SharePoint library in one of the Office 2010 programs and save changes to it in that same location, the location is automatically added to your saved SharePoint locations.
Tip
Unlike saving to SkyDrive, which Office 2010 sees as saving to a web location, Office 2010 treats SharePoint as a location on your network (which is why it opens the same Save As dialog box for a SharePoint library that you see when saving to a local or network drive). So, after you save to a SharePoint library, that save location will become your default for the active application session until you save a file to another location.
On the File menu, point to Share, and then click Save To SharePoint.
Select a location from the list of recent or saved locations, name the file, and then click Save. Or to add a new location, click the plus sign at the bottom of the dialog box.
After you click the plus sign to enter a new location, type or paste the URL of the SharePoint document library.
Note that you must provide the URL of a document library rather than the URL for a site that contains libraries. For example, if your site is http://MyTeam, providing that URL will return an error. However, if you include the name of a document library within that site, such as http://MyTeam/Shared%20Documents, the library will be added as an available location.
Once you add a location in any available Office 2011 program, it becomes available across Word, PowerPoint, and Excel. Also note that if you open a document from a SharePoint site in one of the Office 2011 programs and save changes to it in that same location, the location is automatically added to your saved SharePoint locations.
What can you do with your documents once you get them on SharePoint? Consider the following:
SharePoint document libraries include tools to create alerts for when documents are added or changed, set up workflows, check out documents for additional access control, and manage version history. You can also set permissions with custom access levels (such as read-only, contribute, or full access) and grant permissions by individual or by group.
When your document libraries are on SharePoint 2010, you can also view and edit documents online using Office Web Apps. And you can utilize the new Office 2010 and Office 2011 coauthoring capabilities discussed in the section Working Together Without Waiting Your Turn, later in this chapter.
Note
See Also For information about the breadth of SharePoint capabilities, including examples of how companies are implementing SharePoint, visit http://sharepoint.microsoft.com and then, in the top menu bar, click Capabilities.
Note
If your organization runs Microsoft Office 2010 Professional Plus Edition, you also have Microsoft SharePoint Workspace 2010, a desktop application through which you can sync your SharePoint libraries for easy offline access to your documents.
Note
See Also To learn about SharePoint Workspace, visit http://office.com/sharepoint-workspace.
There is a lot of good news to tell you about Office Web Apps. But before we begin, it’s important to set expectations. Many people believe that Office Web Apps are a replacement for the Microsoft Office programs on your computer, but that’s incorrect. Office Web Apps are companions to your Microsoft Office programs. They do not replace your desktop applications unless your content creation needs are extremely basic (and considering that you’re reading a book about advanced document creation, that’s not likely the case).
This section will introduce you to both the capabilities and the limitations of Office Web Apps so that you can approach them with the right expectations and reap the many benefits they offer.
Note
It’s also important to point out that Office Web Apps are young applications in their first version, with new features surely still to come. In fact, we’ve already seen some new features added in the months since the original release of Office Web Apps. Any limitations discussed in this section are those that apply at the time this book was written.
I’m not usually much for scenarios of how to use a product. You know what you need from a software program; it’s my job to help you get things done more easily or more effectively. But considering that Office Web Apps are quite new as of this writing, I think it might be useful to provide some different scenarios in which these applications can be particularly handy. You are likely to have your own to add to this list before long. But here are a few examples of how I’ve already seen Office Web Apps used to save time or simplify work:
If you’re traveling or your job takes you out of the office, storing your files (or a copy of them) online gives you easier access. With Office Web Apps, you can view those files and even make quick edits without opening them in the Microsoft Office desktop applications. So you can get things done from whatever computer happens to be handy.
When a company migrates to a new version of Microsoft Office, it can take time to move everyone over. In the past, migrations (especially in large companies) have caused a lot of pain and frustration when users in the same company are working on different versions and trying to share the same files. But if you have to share with users who are still using an earlier version of Microsoft Office, those users can edit your Office 2010 or Office 2011 files online.
On many group projects, particularly with people who don’t work in the same organization, being able to share and edit files online helps simplify tasks and save time. You don’t need to be concerned with what version of Microsoft Office others use, or even whether they have Microsoft Office on their computers. And the files are always accessible to everyone on the team.
When you don’t even have a computer handy and need to take a quick look at a document or find information in it, you can use the mobile version of Office Web Apps to access and view Word, PowerPoint, and Excel documents right from the browser on your smartphone.
Note
See Also For more about the mobile versions of Office Web Apps, see the Going Mobile section later in this chapter.
It’s time to take a look at what you can do with Office Web Apps. Before we start looking at each application, there are a few more key points to cover about getting started and working with Office Web Apps as a whole.
Note
As mentioned earlier in this chapter, when you save a Word document, PowerPoint presentation, Excel workbook, or (for Office 2010 users) OneNote notebook to a SkyDrive folder or SharePoint 2010 library, you can open those files to view or edit them in Office Web Apps.
Note that, if SharePoint 2010 is installed onsite in your organization, the organization also needs to install Office Web Apps in order for them to be available. (The license to install Office Web Apps is included with all volume license editions of Office 2010 and Office for Mac 2011.)
If your organization uses Office 365 or you use SkyDrive, Office Web Apps are automatically available to the documents you save online.
Each Office Web App gives you the option to open a file for viewing or for editing. One especially nice thing about Office Web Apps is that the interface you see is quite consistent across the four applications, so it’s pretty easy to get comfortable as you get started.
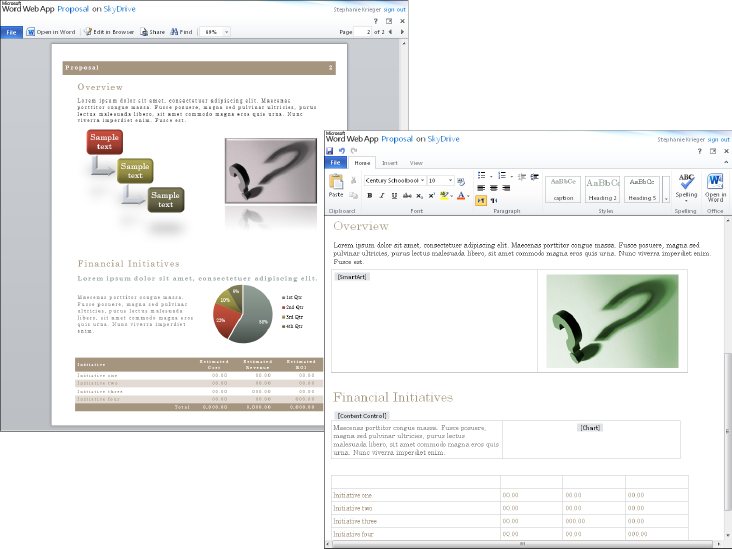
For each Office Web App, in Reading view (view mode), you see a command bar at the top of the screen that includes options similar to those you see in Figure 2-4 for Word Web App. All of the applications include the option to edit in the browser or open the file in the desktop application, and they also include a File tab. But there are a few unique features by program and even by platform.
Of course, the ability to open the file in the applicable desktop application requires that you have a supported version of the desktop application installed on your computer. As of this writing, this feature works on Windows with Office 2003 or later and, on Mac OS, with Office 2011.
The Share button that you see in Figure 2-4 is included on SkyDrive only and takes you to the permissions for the active document.
The File tab includes a few unique options by program. All programs give you the option to download a copy of the file from this location. But Word Web App and PowerPoint Web App include the option to print the file. PowerPoint Web App also gives you access to view your presentation in Outline view from the File tab. And Excel Web App includes the option to download a snapshot of the file that contains just values and formatting.
In addition to unique tools on the command bars, each Office Web App provides a few key features when you’re working in view mode.
Word Web App enables you to change the zoom level, search for document text, and browse pages from the command bar in view mode. When you use the Find command shown in Figure 2-4, you get a pane showing search hits with highlighting throughout the document, similar to the advanced Find experience that is new to both Word 2010 and Word for Mac 2011.
Excel Web App enables you to search for text, refresh data connections, and sort and filter data in tables and PivotTables when working in view mode.
PowerPoint Web App enables you to show your presentation from the command bar in view mode. You can also browse through slides and view slide notes from a pop-up menu that appears at the bottom of the screen in this view.
OneNote Web App gives you the option to view authors for specific pieces of content from the command bar in view mode. You can also right-click page tabs in view mode for the option to view previous page versions.
Note that OneNote Web App opens by default in editing mode. To switch to view mode, on the View tab of the Ribbon, click Reading View.
When you open a file for editing, you see a very familiar face. All Office Web Apps use the Ribbon, with similar organization to what you know from the Microsoft Office programs on your computer.
Notice in Figure 2-5 that you see a File tab, a Home tab, an Insert tab, and a View tab. Additionally, you see contextual tabs when you select certain types of content—such as the Table Tools Layout tab shown in this example—just as you see in the Microsoft Office desktop applications. And you see common tools across all Office Web Apps, such as the Clipboard group on the Home tab, the Undo and Redo commands right above the File tab, and the option to insert a hyperlink (from the Insert tab).
Note that only Word Web App includes the Save button. In the other Office Web Apps, content is automatically saved as you work.
Also note that you can copy and paste text between an Office Web App and the Microsoft Office applications on your desktop, and can copy and paste between Office Web Apps as well (except for Excel Web App, which limits its clipboard content to Excel only).

As mentioned earlier, when Office Web Apps don’t support a feature, they either provide placeholders for that content or prevent you from viewing or editing the file in order to protect your document.
Almost all types of Office 2010 and Office for Mac 2011 documents can be opened for viewing in Office Web Apps. The only feature that will prevent you from opening a file for viewing in any Office Web App is if the document is protected using Information Rights Management (IRM). Other than this, only Excel Web App has a few additional limitations on files it will let you view—including workbooks with embedded files or embedded OLE (Object Linking and Embedding) objects.
There are, however, a handful of features that will prevent you from editing a document online. As you see in Table 2-1, this isn’t a long list. But it does include a few features that are likely to be present in many of your documents, particularly those you share with others—such as Word documents containing track changes and comments.
Of course, you can always open the file in the desktop application to create a copy that doesn’t include the prohibited feature (such as accepting changes and deleting comments in a copy of your Word document) if you need to edit it online. Also notice the R notations under Excel in this table. For those features, Excel Web App prompts you with the option to save a copy directly online that is stripped of any prohibited features.
Note
As mentioned earlier, the capabilities and limitations of Office Web Apps as addressed in this chapter are accurate at the time this book was written. So, for example, if you have a document containing items listed in Table 2-1 and you want to edit that document online, give it a try. Remember, Office Web Apps will either prevent you from opening a document or prevent the content from being visible if the document content cannot be supported. In other words, it doesn’t hurt to give it a try.
Table key:
![]() = File is not accessible. H = Content is hidden. R = A copy of the file can be made with this content removed.
= File is not accessible. H = Content is hidden. R = A copy of the file can be made with this content removed.
Note
See Also To learn about content that appears in placeholders when you’re editing files online, see the following section, Editing Documents in Word Web App. Content for which a placeholder is displayed is not listed in Table 2-1 as hidden.
Table 2-1. Features that prevent viewing or editing of files in Office Web Apps.
Word Web App | Excel Web App | PowerPoint Web App | OneNote Web App | |||||
|---|---|---|---|---|---|---|---|---|
View | Edit | View | Edit | View | Edit | View | Edit | |
IRM protection or encryption | ||||||||
Password to modify | ||||||||
Comments | H | R | ||||||
Tracked changes | ||||||||
SmartArt | H | R | ||||||
Ink | H | R | ||||||
Macros | R | |||||||
Embedded files | ||||||||
Video | ||||||||
Audio | ||||||||
Shapes and text boxes | H | R | ||||||
Digital signatures | R | |||||||
Signature lines | H | S | ||||||
Mark as final | R | |||||||
Read-only recommended | R | |||||||
Document protection | ||||||||
Images in headers and footers | H | R | ||||||
Active X controls or legacy form controls | ||||||||
Embedded OLE objects | ||||||||
Read-only embedded fonts | ||||||||
Tip
If you need to edit a document that isn’t supported for editing in Office Web Apps or you need to edit content that can’t be edited online, it takes just a click (or two, if you count the browser security message that may appear) to open the document in the Microsoft Office program on your desktop. Open In <Program> is available from both the command bar in view mode and the Home tab in edit mode in all Office Web Apps, as you can see in Figures Figure 2-4 and Figure 2-5, shown previously. Note that, because OneNote is not part of Office for Mac 2011, the Open In OneNote command is unavailable when you access OneNote Web App on a Mac.
The first time you open a document for editing in Word Web App, you might get a bit of an unpleasant shock. Where did your headers and footers go? Wait a minute, where did a lot of your formatting go—and your graphics and your page layout?!
Relax. It didn’t go anywhere. If your bullets and numbering look different, your styles don’t appear to have all of their formatting, or you don’t see your table formatting, just save the document and then switch back to view mode (on the View tab of the Ribbon, click Reading View) to see your document in full fidelity, with all of your custom formatting intact, at any time.
Word Web App edit mode shows you a view that is similar to the Draft view you have in Word, but with fewer content types visible, as you see in Figure 2-6. Bottom line—this is largely a text editor that preserves your rich content and formatting, and offers a few very handy additional features.
Following is a summary of what you can do in Word Web App edit mode:
Apply any paragraph or character style that is saved in the document, including your custom styles.
Apply basic font and paragraph formatting.
Note that only a few bullet and numbering formats are available from the Home tab on the Ribbon in Word Web App. However, if your document already contains custom bullet and number formatting—including in styles that are saved in the document—that formatting is retained (even though it is not visible in this mode). You can apply your customized styles while editing in Word Web App and see the results when you view the document in Reading view or in Word on your desktop.
Use spell checking (including the red squiggly underscores for spell checking as you type, with right-click access to corrections) and set proofing language for selected text.
Insert tables and edit basic table structure.
Insert pictures and clip art.
You can search through all available clip art on Office.com directly from the Insert tab of the Ribbon. And you can resize or add Alt Text to any image.
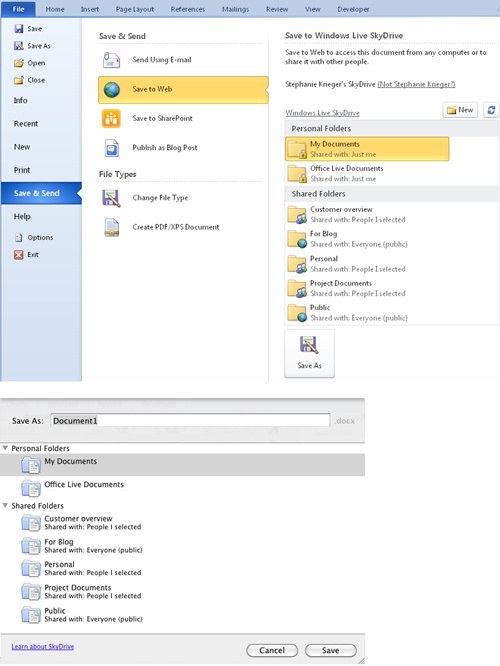
Figure 2-6 also illustrates a couple of key points about what you can and can’t edit:
Placeholders are used for the SmartArt diagram, chart, and a content control. These are the same type of placeholders that you see for any content in the main body of the document that can’t be edited in Word Web App but won’t prevent the file from opening. Other such types of content include floating objects and some formatting marks (such as page breaks).
Placeholders indicate to editors that something is there when the content itself can’t be displayed, and thus help prevent that content from being inadvertently deleted.
Notice that the table at the bottom of the page includes some reverse text (dark shading with white text). The text in those rows isn’t visible in the editor because it is white, and the cell shading does not appear. But the text is still there, and it is still editable.
After looking at the limitations, take stock of what you can do; it might be more than you think. Notice that all of your text (other than text inside content controls or inside a floating object) is visible and editable. Table structure is visible and editable. And pictures that are formatted as In Line With Text are visible as well.
Note
Some picture types or picture formatting may cause an image to appear in a placeholder even if it is formatted with the In Line With Text layout. These include images with alpha channels (such as PNG images that allow surrounding content to wrap to exactly the shape of the image content without any background) and images that are cropped to a shape (such as you get when you apply some Microsoft Office picture styles that crop to ovals). However, notice in Figure 2-6 that images formatted using many of the current picture formatting tools are supported (such as bevel, reflection, and (although you’re seeing it only in black and white) picture recoloring—they just appear in edit mode without their snazzy styles.
Note
See Also For more about working with pictures in Word, see Chapter 10. For more about picture editing tools in Office 2010 and Office 2011, see Chapter 5.
Caution
Many of the built-in templates in both Word 2010 and Word 2011 place much of the template content in content controls. So, if you open a document for editing online and see a bunch of placeholders where you expect to see text, that is likely the reason. In some of these templates, content controls disappear when you edit their content. In others, you have to delete the control. To delete a content control in Word 2010, right-click the control and then click Remove Content Control. To delete a content control in Word 2011 (which might appear as text that becomes shaded when you click in it), delete the placeholder text and then press Delete one additional time before entering your own text.
Note
See Also To learn more about using content controls in both Word 2010 and Word 2011, see Chapter 12.
When you open a presentation for editing in PowerPoint Web App, your slides look much the same as they do in view mode. You can see all of your slide formatting, slide backgrounds, and slide content—including content that can’t be edited.
PowerPoint Web App edit mode looks like a simplified version of the Normal view you know from PowerPoint, including a slides pane where you can browse through thumbnails and a notes pane where you can view or edit slide notes. Here’s a quick list of what you can and can’t do when you get there.
Text, pictures, and SmartArt graphics can be edited in PowerPoint Web App. Charts are visible but cannot be edited, and media (video and audio) does not play.
Picture formatting is limited to just changing picture styles (which you might not use much, since picture formatting typically comes from the slide layout in a PowerPoint presentation and is part of the theme formatting). But SmartArt graphics get one of the richest treatments across Office Web Apps in PowerPoint.
You can insert a new SmartArt graphic on a slide that contains an empty content placeholder. You can edit text, apply SmartArt styles and colors, and change the layout of your graphic. And, of course, because a SmartArt graphic is a graphical representation of a bulleted list, you can add and delete shapes from your diagram just by editing text.
When you double-click to edit an existing SmartArt graphic, the image disappears and you see just a text pane, as shown in Figure 2-7. Edit it just as you do a bulleted list. Then click outside the text area when done to see the changes to your diagram.
You can insert, delete, duplicate, and hide slides. When inserting a new slide, you can select from all layouts included in the active presentation—including any custom layouts.
Apply basic paragraph and font formatting.
As with Word Web App, only default bullet and number formatting is available when you’re editing. However, when you’re using layouts with custom bullet and number formatting, your custom formatting is retained. You see your custom formatting while viewing the slide in either view mode (Reading view) or edit mode. But when you click into a text area to edit it, your bullets appear to be default formatting.
View your slide show.
When viewed online, some animations and most transitions use defaults (such as fade for slide transitions), and dynamic content such as video and audio media does not play. But the view quality for content on slides is excellent.
Not only can you edit your Excel 2010 or Excel for Mac 2011 workbook in Excel Web App, but you can edit it at the same time as other people in other locations.
Simultaneous editing couldn’t be easier to use. Just start editing a workbook in Excel Web App. When someone else starts editing the same copy of the workbook in Excel Web App, simultaneous editing starts automatically.
You don’t see where others are editing during a simultaneous editing session, so it’s a good idea to communicate with other editors to avoid conflicts.
It is easy, however, to see who else is editing the file. A pop-up on the status bar tells you how many people are currently editing and who they are, as you see in Figure 2-8.
Changes sync in near real-time, so as you work you see updates from other editors periodically.
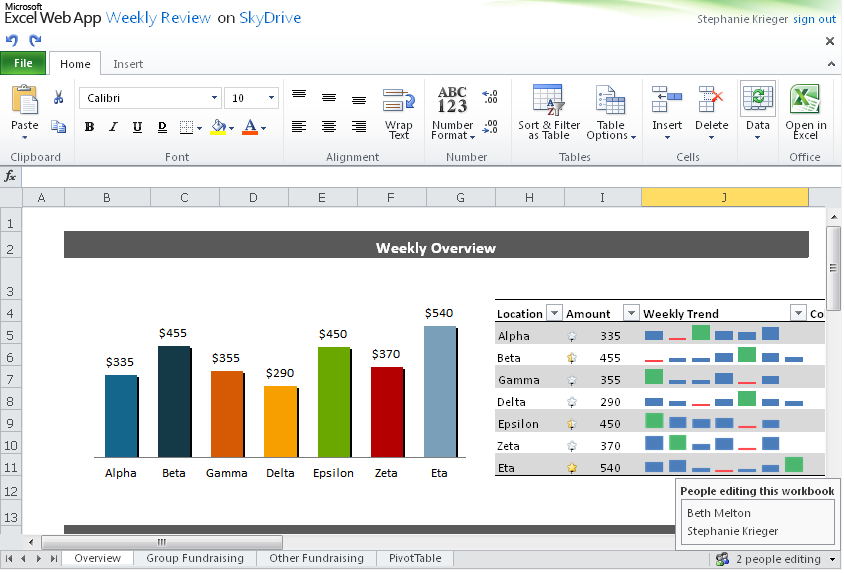
Figure 2-8. See who else is currently editing your workbook on the status bar at the bottom-right of your browser window.
Note
Simultaneous editing is not available, as of this writing, in Word Web App or PowerPoint Web App. But you can simultaneously edit either Word or PowerPoint files using new coauthoring capabilities in the Office 2010 and Office 2011 programs on your desktop, as discussed in the section Working Together Without Waiting Your Turn, later in this chapter. (You can also simultaneously edit OneNote notebooks with others using OneNote Web App, OneNote 2010, or OneNote Mobile for Windows Phone 7.)
Following is a quick overview of what you can and can’t edit in Excel Web App whether you’re editing on your own or with others.
Like the other Office Web Apps, Excel Web App lets you do basic font and paragraph formatting of cell content. But it also gives you some application-specific formatting for cell content, such as number format and cell text wrapping.
As in Excel Web App view mode, in edit mode you can sort and filter content in tables and PivotTables, refresh external data sources, and search for text in the workbook.
Insert and delete cells, rows, and columns.
Insert a new table (which takes on the default table style for the theme in your active workbook) and toggle heading and total rows on or off in a table (the latter is available on the Home tab, under Table Options).
Other Excel table functionality is also available in Excel Web App. For example, type in the row just below a table (or the column immediately to the right of it), and the table automatically expands. If you type a formula in the column to the right of the table, Excel Web App automatically creates a calculated column (that is, a new column containing the same formula in all cells).
Note
See Also To learn about using Excel tables, see Chapter 17, and Chapter 18.
Insert a new chart (from a selection of common chart types, including column, line, pie, bar, area, scatter, doughnut, and radar charts). You can also edit several aspects of a selected chart from the contextual Chart Tools Design tab, including switching row and column data, selecting data, and editing formatting of chart elements like titles, labels, and axes.
Note that, at this time this chapter was written, creating and editing charts in Excel Web App was available only via SkyDrive.
Don’t be fooled by the fact that there is no Function command on the Ribbon. Just start to type a function (that is, type an equal sign followed by the first character of a function name in an otherwise empty cell), and you automatically see an IntelliSense list from which you can select the function you need.
My favorite feature of Excel Web App, however, is that you can even update content that you can’t otherwise edit. That is, dynamic content in your workbook—including sparklines, conditional formatting, PivotTable reports, and charts—updates in Excel Web App in near real-time when you edit the source data for content in that workbook.
Note
If you’re new to OneNote, see the OneNote 2010 product guide for an introduction to the program, including an overview of its key features and where to find them. (Mac users, note that this introduction can be handy for you as well, since the core concepts and many of the features are available in OneNote Web App.)
Note
See Also You can download this product guide (along with a Getting Started guide for OneNote 2010) as part of the free Office 2010 User Resources available from the Microsoft Download Center at http://download.microsoft.com. Search for OneNote 2010 Product Guide or Office 2010 Product Guides to find the Office 2010 User Resources download options.
Although it doesn’t have all the same functionality as OneNote 2010, OneNote Web App looks quite a bit like it. In fact, of all the Office Web Apps, OneNote Web App is the most similar to the desktop application. When editing a notebook in OneNote Web App, you can do the following:
As mentioned earlier, simultaneously edit the same notebook with others who are using OneNote Web App, OneNote 2010, or even OneNote Mobile for Windows Phone 7.
When you open a notebook for editing and someone else opens the same copy of that notebook at the same time, simultaneous editing begins automatically. Changes sync in near real-time, so you see updates from all editors periodically as you work.
Add or delete sections and pages.
You can add sections and pages from the Insert tab of the Ribbon or when you right-click a page or section tab in the navigation pane on the left side of the OneNote Web App window. Use the right-click options to delete sections and pages.
View authors for specific content on your OneNote pages and view previous page versions.
Like OneNote 2010, OneNote Web App automatically saves versions of pages in your notebook when other authors make changes. (The only exception is if history has been disabled for the notebook, which can be done only from OneNote 2010.)
Apply font and paragraph formatting, including available OneNote styles.
Just as in OneNote 2010, OneNote text styles are not customizable.
Insert note tags.
You can insert but not customize tags from OneNote Web App. To customize tags, use OneNote 2010.
Get some of the same functionality for your notebooks that you see in Word Web App for your documents, including spell checking, AutoCorrect, the ability to set a proofing language for selected text, and the ability to insert tables, pictures, and Office.com clip art.
Although OneNote notebooks are not really documents, you might find them incredibly useful for planning your documents and projects, and for delivering some types of content that you might otherwise have included in a traditional document. If you haven’t explored OneNote before and don’t have it available in your desktop applications, check out OneNote Web App. I find OneNote great for brainstorming, storing research notes, and planning. For example, I’ve outlined every presentation I’ve given in the past several years (including every webcast) in a OneNote notebook.
Note
See Also Check out more about OneNote, including using the Linked Notes feature in Office 2010, in Chapter 4.
If you like the idea of simultaneous editing in Excel Web App and OneNote Web App, you’ll love the new coauthoring capabilities that are available for Word and PowerPoint in both Office 2010 and Office for Mac 2011. Yes, that sounded like a sales pitch, but I can’t help it—this new technology is pretty impressive, very cool, and downright fun to use.
Before we begin this topic, the most important thing to know about coauthoring is that it has one requirement in common with Office Web Apps. Coauthoring is available only to Word and PowerPoint documents that are saved to SkyDrive or SharePoint 2010.
Note
Coauthoring is available for most Word 2010 and Word 2011 documents and all PowerPoint 2010 and PowerPoint 2011 presentations. The exception for Word is that Word 2011 Publishing Layout view documents are not supported for coauthoring.
The heart of coauthoring is the ability to simultaneously edit the same Word document or PowerPoint presentation with other people who are using Office 2010 or Office 2011 (and yes, this works across platforms as well). But there is more to coauthoring in these programs than just simultaneous editing.
While simultaneously editing a document or presentation, you can see where other editors are working in the file and you can initiate communication with them (voice, video chat, or—depending upon your software and hardware—IM) directly from Word or PowerPoint.
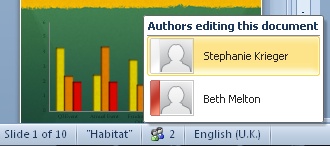
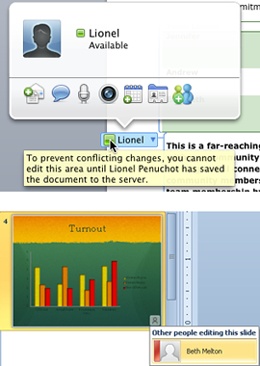
In Figure 2-9, you can see a list of other editors on the status bar (in either Word or PowerPoint). In Word, you also see a ScreenTip where another editor is working, and in PowerPoint, you see an icon on slide thumbnails in the Slides pane when another editor is working on that slide; both applications are shown in Figure 2-10.
Note
Depending on your edition of Office 2010 and your IM software, you might also see other editors listed in Word 2010 and PowerPoint 2010 on the Info tab in Backstage view.
Figure 2-9. See who else is working in your document or presentation on the status bar at the bottom of the screen, as shown here in PowerPoint 2010.
Figure 2-10. Locate where other editors are working in your file. See a ScreenTip in Word (shown in Word 2011, top) and an icon on the slide thumbnail in PowerPoint (shown in PowerPoint 2010, bottom).
During simultaneous editing, point to an editor’s name wherever you see it to access a contact card from which you can start a conversation. These contact cards typically show the availability status of other editors (called presence) by way of an icon, similar to what you see in your IM application (such as green for available and red for busy).
Note that other editors have to be contacts in your default IM application for you to see their presence status and initiate communication with them from Word or PowerPoint while simultaneously editing.
In Word, the paragraph in which each editor is working is blocked to others automatically, as shown in Figure 2-10. You can also block other authors from editing selected parts of the document. Find the Block Authors command on the Review tab.
If you attempt to edit in a paragraph where someone else is working in Word, a ScreenTip will inform you that you must wait until that person is no longer editing in that location.
To see changes from other editors in Word or PowerPoint, save the file. This syncs the file to the server and updates your view with any changes that other editors have saved.
Note that, in Word, new changes by other editors are temporarily highlighted after you save.
The other especially handy element of coauthoring is that you and your colleagues don’t all have to be online to take advantage of it. One of the nicest benefits of this feature is that you no longer get locked out of a document because, for example, a colleague opened it for editing and then left for the evening. If someone goes offline when she has the document opened for editing, you can still continue to edit it. When that person next comes online and saves (that is, syncs her changes), you see the changes she’s made.
To get started using coauthoring in Word or PowerPoint on either platform, just open a document or presentation for editing in the applicable Office 2010 or Office 2011 program, from a SkyDrive folder or a SharePoint 2010 document library. When someone else opens the same copy of the same file for editing in Word or PowerPoint in either Office 2010 or Office 2011, you see a notification pop up on the status bar letting you know that an additional editor has opened the document (and who that person is).
Note
What about when editing conflicts arise? Editing conflicts are very rare in Word, because the program blocks you from editing where another editor is working. In PowerPoint, however, there is no blocking, so multiple editors could be editing the same piece of content.
Many cases of editing conflicts in PowerPoint will just result in the last save “winning” the edit (so it’s not a bad idea to discuss with colleagues who’s editing what). But with some changes (such as if you edit a shape that someone else deletes at the same time) PowerPoint offers you a conflict resolution view, where you can review edits and decide which ones to implement. Conflict resolution appears automatically when available. Of course, you now have Compare tools on the Review tab in both PowerPoint 2010 and PowerPoint 2011, so you can compare versions of a presentation and then review changes at any time (even when you’re not using coauthoring).
As a reader of this book, you’re probably pretty comfortable with technology. So, considering today’s technology, it’s likely that there is a mobile device—be it a Windows Phone, an iPhone, a Blackberry or other smartphone, or maybe an iPad or other slate computer (or even a combination of the above)—that you depend upon and use for many things. Does that include your documents?
If you use Windows Phone 7, you have access to Microsoft Office Mobile, including mobile versions of Word, PowerPoint, Excel, OneNote, Microsoft Outlook, and SharePoint.
As mentioned earlier in this chapter, with just about any mobile device that has a respectable web browser and Internet access, you can access files that you have saved to a SkyDrive folder or SharePoint 2010 site, and view them online using a mobile version of Office Web Apps.
Note
At the time of this writing, iPad users get the mobile version of Office Web Apps. Some types of slate or tablet computers may support the full computer version of Office Web Apps. Also note that SharePoint users might be able to use a virtual private network (VPN) to connect to your sites when outside the company’s wireless network, or you may require external access to those sites to access your SharePoint libraries from the browser on your mobile device. Your company’s SharePoint administrator controls this access.
Microsoft Office Mobile for Windows Phone 7 includes mobile versions of Word, PowerPoint, Excel, OneNote, Outlook, and SharePoint Workspace. If you have a Windows Phone 7, you most likely already have these applications because they come preinstalled.
It’s important to keep in mind that, even more so than the Office Web Apps, the mobile applications are not replacements for your Microsoft Office programs. These are fairly simple tools designed to let you take quick action when you’re away from your computer. The big story is access to your files and the ability to sync your files between the phone and the cloud. Functionality—particularly for the content creation applications—is light. But when you need to access your files or make quick changes, you might be very glad that you have them handy.
How does Office Mobile work with your content in the cloud? And can you access files that aren’t hovering overhead? Here’s a brief overview of how to access your Microsoft Office documents on your Windows phone:
It all starts with SharePoint. The mobile version of SharePoint Workspace enables you to access your SharePoint document libraries. You can open and edit Microsoft Office documents, take the documents offline, or sync them back to SharePoint.
How do you connect to SharePoint sites from your phone if you are outside the company’s wireless network? Depending upon your system security (corporate network access) settings, you might be able to connect through a VPN, just as you might do from your home computer to remotely connect to the corporate network.
Note
If you’re responsible for making these decisions and looking for a way to provide remote, mobile access to SharePoint sites for use with Office Mobile, you might want to look at a secure solution using Microsoft Forefront Unified Access Gateway 2010 (UAG). This tool enables you to provide remote access for your users without compromising your security policies.
From the user’s perspective, I recently worked on a project that used UAG to provide access on Windows Phone 7 to content including OneNote 2010 notebooks and PowerPoint 2010 presentations that were stored in a SharePoint 2010 library. To access my SharePoint library for this project, I provided credentials once and was then able to access and sync my files as needed.
To learn about UAG or download a free trial for your organization, see http://microsoft.com/uag. The trial is a guided evaluation for IT professionals, with significant tools and resources to help you get started.
If you use SkyDrive, you don’t get the same integration with all Office Mobile for Windows Phone 7 applications as you do with SharePoint. But you can still access your SkyDrive files and edit them using Office Mobile. Access your SkyDrive folders using the browser on your mobile device. When you open a document that is saved on SkyDrive, it will open in the applicable Office Mobile application. OneNote notebooks will sync between your Windows Phone 7 and SkyDrive. Note, however, that documents other than OneNote notebooks don’t sync back to SkyDrive with Office Mobile for Windows Phone 7—instead, a copy of the document is created on your phone.
Of course, any Microsoft Office documents that reside on your phone—such as attachments to Outlook Mobile email messages—can be opened and edited in the applicable Office Mobile applications as well.
As you consider how to make use of Office Mobile, keep in mind that you are preparing to edit documents on a very small screen. So, though you can see much of your document content, layout for complex documents might appear compromised (such as content in tables wrapping to long, narrow lines or being visually cut off on the page). If, however, content is not supported for saving in the applicable Office Mobile application, you will get a warning and the option to make a copy of the file for editing on your phone—so you don’t have to be concerned about compromising your original document.
That said, following is a brief summary of key features by program for the document-centric mobile applications:
Word Mobile enables you to do basic font formatting as well as some direct paragraph formatting such as bullets and numbering. You also get a small but useful selection of content management tools, such as find, AutoCorrect, spell check, and undo. It’s also worth noting that you can create and save new documents using Word Mobile.
PowerPoint Mobile enables you to view your slides with quite good fidelity. However, as with PowerPoint Web App view mode, you don’t get playback for media. You do, however, get support for some animations and transitions on your slides—including motion path animations.
You can’t create new presentations on your phone, but you can edit text and notes on slides, hide or move slides, and zoom in on slide content.
Excel Mobile enables you to view rich worksheet content, such as charts, and has a nice selection of basic editing functionality. For example, add or edit values and formatting in cells, add or edit formulas, and sort and filter worksheet content. You can use freeze panes to view multiple parts of a worksheet at once and access more than 100 common Excel functions. You can also create new workbooks.
OneNote Mobile enables you to access your existing notebooks that are stored on SharePoint or SkyDrive, or add new pages to a notebook that resides on your phone. You can view much of the rich content in your OneNote 2010 or OneNote Web App notebooks (such as tables and font formatting) and add text notes, voice clips, and insert pictures. You can also apply a small selection of basic font formatting along with bullets and numbering. few handy content management tools might also be useful, such as AutoCorrect, search, and the ability to open OneNote email attachments in OneNote Mobile.
In addition to program-specific features, Office Mobile for Windows Phone 7 provides some new and improved tools for ease of access and sharing for your Microsoft Office documents, including the ability to add and review comments, navigate Word, PowerPoint, and Excel files in a new Outline pane, and access all of your documents from a centralized Office Mobile hub.
For its first mobile application foray beyond the Windows Phone, Microsoft released OneNote for iPhone. In its first edition, it is a simple application (and free as of this writing). If you’re a fan of OneNote or need an easy way to get notes from your phone to your computer, it’s also a pretty nice tool.
OneNote for iPhone works via SkyDrive and requires a free Windows Live ID. You can save your OneNote 2010 notebooks to SkyDrive or create new notebooks on SkyDrive (particularly handy for Mac users who don’t have OneNote on your desktop), and then access them all from your phone. Much like Office Mobile for Windows Phone 7, if you do fairly complex work with documents, the feature set of what you can do in the applications isn’t really the impressive part. The major benefits of this application (and they’re pretty significant) are access to your files from almost anywhere and the ability to sync information between your computer and your mobile device.
As for the feature set within OneNote for iPhone itself, its first edition (released while this book was being written) is even a bit lighter than OneNote Mobile for Windows Phone 7—primarily in that no font formatting is supported. You can add new pages, add a page title, type text with or without bullets, add active check boxes (such as for your grocery list), and insert photos.
It’s a simple set of features but can work well for many purposes. For example, each time I review a chapter of this book after it’s been through editing, I read the chapter on my iPad and take notes on changes I want to make to it using OneNote for iPhone. The next time I sit down at the computer to make changes, my notes are already there.
Following are just a few tips to help you get started with OneNote for iPhone:
Section tab colors are supported in OneNote for iPhone but can’t be created on the phone or on the web. If you have OneNote 2010, just right-click a section tab for the option to change the section color.
When you exit a page back out to the active notebook section, OneNote for iPhone automatically syncs changes you’ve made to that page back up to SkyDrive. You can also perform a complete sync manually in the application settings. When the keyboard is closed, you see the Settings command at the bottom of the screen. Sync Now is the top command on the settings page.
When the keyboard is closed, you also see two nice and handy timesaving features: quick access to recently accessed pages, and a Quick Note command that creates a new page with just a tap.
Note
Syncing with this app is pretty quick and generally dependable. If you tried the app right after it was first released, you might have run into a glitch with this—I did. But I use the app a lot, and the issues seem to have been corrected by early updates. If you want to check to confirm whether sync was successful at any time, the settings page also lists any sync errors.
If ever there was a poorly named product, it’s the Office Mobile Viewers. There’s nothing wrong with the name on the face of it, but it might lead you to believe that these programs are part of Office Mobile for Windows Phone 7 and require a Windows Phone, when that’s not at all the case.
Office Mobile Viewers are actually another name you might hear for the mobile versions of Office Web Apps—and, unlike Office Mobile, they are accessible from most mobile devices that have a respectable web browser and an Internet connection.
As mentioned earlier in this chapter, you can access the files that you save to SkyDrive or SharePoint 2010 using the browser on a mobile device and view those files with pretty good fidelity.
A wide range of smartphone browsers is supported, including Safari 4 on iPhone (3G or later), Blackberry (4.x and later), and Internet Explorer 7 on Windows Phone 7, as well as others. You can’t edit files in the mobile versions of Office Web Apps, but you can view them and get some handy functionality, such as the ability to search for text in the file.
To access the mobile versions of Office Web Apps, use the browser on your mobile device to navigate to either SkyDrive or your SharePoint 2010 site. For SkyDrive, you’ll see a mobile view of your SkyDrive folders and files by default. For SharePoint, access to your site is controlled by the SharePoint administrator in your organization. When you tap or click to open a file, it opens in the mobile version of the applicable Web App.
Caution
Some browsers may give you additional options. In some cases, those options are great (such as using the touchscreen copy and paste capabilities on your iPhone to copy text from a document), but not always. Some browsers (such as Internet Explorer 7 on Windows Phone 7) give you the usually welcome option to view full versions of websites by default instead of mobile. If you do this with Office Web Apps in a mobile browser, they attempt to give you the full experience. However, this scenario is not supported, and I don’t recommend it. Like any software applications, there are system requirements for Office Web Apps, and mobile browsers don’t meet the requirements for the full Office Web Apps functionality that you get in a computer browser. It’s not the intended Office Web Apps experience, and it’s just not good.