In this chapter, you will:
Explore considerations for sharing documents electronically
Understand the importance of font choices when sharing documents
Learn about potentially private information in your documents
Discover how to easily manage hidden data in your documents
In the age of typewriters, it didn’t much matter how we went about creating documents. All the recipient ever saw was the paper result. Then came along electronic documents, when we started to care more about how documents looked on screen because we were sharing content by email or on portable media such as CDs and flash drives. Today, not only are most documents shared electronically, but more and more documents live in the cloud for constant electronic access and collaboration.
With the powerful tools at our disposal today, we can create far more professional and complex documents than ever before. But when we share documents electronically by any method, we’re actually sharing much more information than just the text, graphics, and formatting we add to the page. And the more hands that are on your electronic documents, the more important (and often more difficult) it becomes to keep those documents well crafted.
In the wise words of Spiderman’s Uncle Ben, “With great power comes great responsibility.” Although building great documents is surely less difficult than battling archvillains, the power to create and share documents the way we do today does carry some important considerations.
In this chapter, we’ll look at the differences to consider when sharing documents electronically—from differences that affect the professionalism of your finished product to those that make it easier to collaborate online with others to those that affect the security of your private information.
Keep two principal areas in mind when creating a document that you will share electronically: the way you construct the document and the document content. The method of document construction is an important consideration because it can affect the message you convey as well as the success of your collaboration with others. Being aware of all content in the document is also important because you might be sharing more than you intend.
Note
See Also For an overview of what you can expect when users of earlier versions (including users of Office 2007 or Office 2008 for Mac) open and edit your Office 2010 or Office 2011 files, see Chapter 1. In that chapter, you can also get more information about the free file format converters for users of earlier versions on both Windows and Mac.
For information about using Office Web Apps, see Chapter 2. And for information about considerations for collaborating online using Office Web Apps, see the section Ensuring Easy Editing Online, later in this chapter.
You may already know that using the simplest method for the task will usually give you better results with less work. But when it comes to sharing documents electronically, the way a document is crafted can also substantially affect the way your document content is perceived.
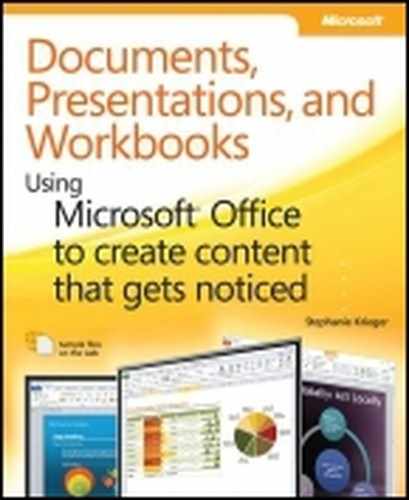
Consider a basic Word document, for example. The pages shown in Figures Figure 3-1 and Figure 3-2 contain the same information and similar layout choices. In fact, the only difference between the two pages is the way they are constructed. Formatting marks, often called nonprinting characters, are visible in both figures. Which document would you prefer to claim as your own?
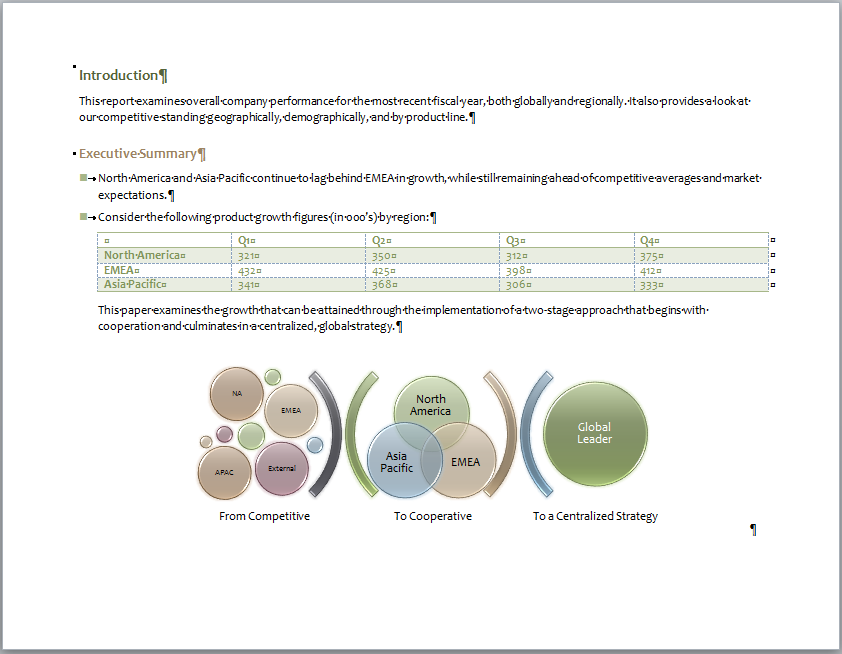
Figure 3-1. Even with formatting marks visible, the content shown here is clean, professional, and readable.
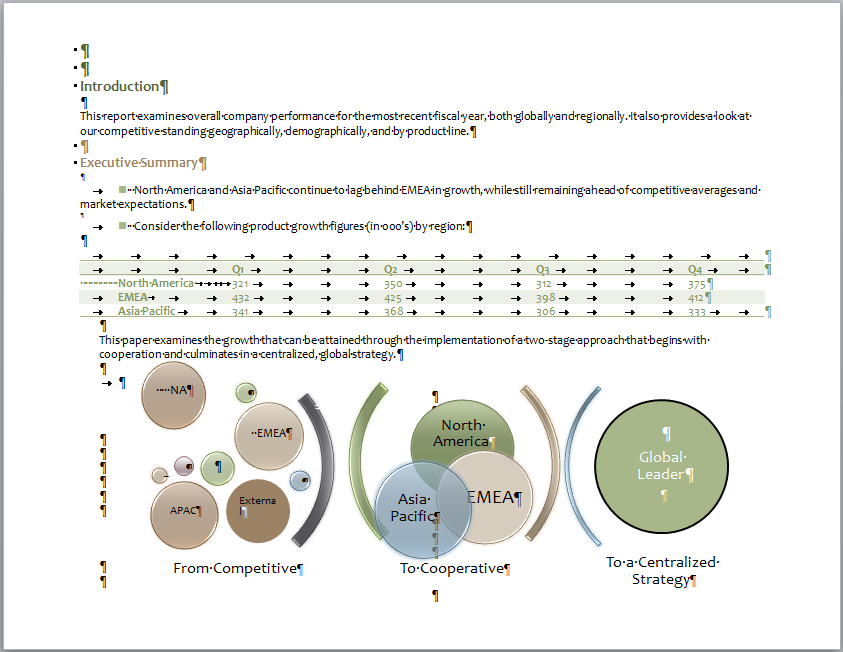
Figure 3-2. This content is the same as that shown in Figure 3-1, but it’s constructed using formatting workarounds.
Because the best features for each task—such as styles, themes, tables, and SmartArt graphics—were used to create the well-crafted page shown in Figure 3-1, it took much less time than the page created with workarounds, shown in Figure 3-2. Even more important, consider the impact of the information conveyed. Clearly, the version shown in Figure 3-1 makes a more professional statement. The construction choices in Figure 3-1 help ensure that the document is easier to edit and that what the recipients see (both on screen and in print) is exactly what the document author intended.
If you’re thinking that the way a Word document looks with formatting marks doesn’t apply to you because you don’t turn on formatting marks in your documents, think again. Just because you don’t turn them on doesn’t mean the recipient or another editor of your document does not. Anyone who opens your Word document might do so with formatting marks visible. Imagine the work that went into both writing and creating the document in Figure 3-2. Isn’t it a shame that the reader has to muddle through the mess of formatting to get to the point?
Note
See Also Learn about the value of using formatting marks in Chapter 6.
But formatting marks are just one element of what makes Figure 3-1 so much more professional-looking than Figure 3-2. Many features across Microsoft Office exist to help you create better content more easily. If you don’t take advantage of the available tools, you do more work for inferior results. For example, notice the difference between the clean, readable table in Figure 3-1 and the collection of tabs, spaces, and other workarounds used to fake a table in Figure 3-2. Also note the difference between the SmartArt layout used to create the diagram in Figure 3-1 and the tremendously time-consuming collection of mismatched shapes used in Figure 3-2 to fashion a poor imitation of that diagram. When you look at these features, you can also easily see that this is not just about Word; think about similar content you might create in PowerPoint or Excel. In fact, the same principles apply to the content you create in any program.
The more you take advantage of the tools Microsoft Office provides for creating well-crafted content, the more professional your documents will look and the easier it will be to keep them looking great regardless of how or with whom you share. Something as simple as paragraph indents that don’t line up perfectly or a sloppy chart that looks “close enough” to what you want can detract from your content and diminish the impact of your important information. Rudimentary workarounds—like an Excel formula that uses 20 plus signs to add up a column of numbers, or a bunch of manually positioned text boxes on a slide to fake a PowerPoint layout—make your content more difficult to edit and less likely to become the final product you really wanted.
When your documents are shared by email, good construction isn’t just about a professional-looking result. It’s also about knowing what recipients will see when they receive your document. For example, when you send a document as a formatted email message, it is typically sent over the Internet in HTML format. Documents created in the Microsoft Office programs are designed to be able to translate well to and from HTML. However, if you’re fudging the layout and using workarounds for formatting, neither Outlook 2010 or Outlook 2011—or any other messaging program you might use—will know how to translate it. For example, when you fake the appearance of bullets or a table, as in Figure 3-2, the translator has no way of knowing that you were trying to approximate bulleted text or a table, so the layout could be distorted when the document reaches the recipient.
You might still send some or even most of your documents by email, but there’s a good chance that you’ve at least started to store and share some content online. If you haven’t yet ventured into the cloud, check out Chapter 2 because you might be missing out on some very useful tools (like the freedom to get away from your desk and still get work done when you need to).
If you are already sharing content “up there,” the most important additional consideration is what applications others will use for accessing and editing your content. For the most part, this isn’t different from any other electronic document sharing—users might open your file in Microsoft Office on either Windows or Mac, and they might use a current or earlier version of the programs as discussed earlier. But when you share documents for editing online using Office Web Apps, there are a few considerations to keep in mind:
As mentioned in Chapter 2, one advantage of Office Web Apps is that you don’t have to worry about opening files for editing online. Unlike some online editors, Office Web Apps won’t let you edit content that the programs can’t properly support. So, don’t fret about what you can’t edit online using Office Web Apps; instead, be happy that you can edit a lot of content online without worrying about what the programs will do to that content. (Of course, because many factors can impact what happens when you share or edit content by any method, please be smart and save a copy of that critical, career-making document first.)
Because Office Web Apps protect your content by not letting you edit content or formatting that they can’t support, the difference you see when viewing versus editing files online can be significant. Files that render beautifully when viewed as a Word document, for example, might look like a collection of placeholders when you open them for editing online. So, the range of content you want to be able to edit online might even help you determine how to construct your file.
When creating files that you or others might want to edit online, be aware of what features will prevent you from collaborating with Office Web Apps so that you can avoid using them in those documents. For example, two of the most common collaboration features—track changes and comments—currently prevent a file from being edited in both Word and Excel Web Apps.
Note
See Also Learn more about the viewing and editing environments in Office Web Apps and find a list of currently unsupported features for Office Web Apps in Chapter 2.
One of the most basic components of formatting documents in any program is also often one of the most problematic: fonts. You can choose beautiful, creative, and interesting fonts, but if they are not standard fonts and do not exist on the recipient’s computer, your document might look entirely different to the recipient. When a font does not exist on a computer, the program in which you open a document (such as Word or Excel) will substitute the closest font available. Often the closest font has differently sized characters from your original font, which can alter alignment of complex layouts, change pagination, or distort graphics.
Fortunately, there are ways to share your files that can help alleviate concerns about fonts, and those are addressed later in this section. But before we get there, it’s important to understand the limitations so that you can make font choices that provide the best results for your particular needs.
A font may exist in the font list that you see in a given program on your computer, but that doesn’t mean that it was installed as part of Microsoft Office or that it will be available to recipients. Most software programs in which you can create content display all available fonts that are installed on your computer—whether they were installed by the active application, the operating system, or another application, or manually installed as a custom font.
Available Office 2010 fonts also vary by edition. In particular, Office 2010 Professional (a retail edition) and Office 2010 Standard and Office 2010 Professional Plus (the volume license editions) include many more fonts than Office 2010 Home and Student and Home and Business editions. This is because the Standard, Professional, and Professional Plus editions include Microsoft Publisher 2010, which provides a large number of fonts.
If you share documents with users of earlier versions of Office for Windows, it might be worth noting that Office 2010 Standard Edition is the first version of Microsoft Office Standard to include Publisher (and thus the fonts that ship with Publisher).
Table 3-1 shows an approximate list of Latin text fonts that are available to most Office 2010 users, regardless of edition. This list is based on a computer running Windows 7 Home Premium and Office 2010 Home and Student edition.
Caution
If you create content in languages other than English, note that the font lists provided here are installed with English language builds of Microsoft Office and Windows. Most of the fonts in the list are available in many other language builds as well, and support several other Latin text languages, but not all. Also note that a few of the fonts in Table 3-1 are designed for specific scripts in other languages, such as Nyala and Raavi, but they are included here because they provide support for English and some other Latin text languages.
To confirm that a font you want to use supports the languages you need, visit http://www.microsoft.com/typography/fonts. The product list is not updated for Office 2010 and Office 2011 as of this writing, but you can search for the font you need under the list labeled Fonts By Family. On the search result page, under the font name, click View Font Information to view language support detail.
Office 2011 includes the same fonts in all of its versions (Home and Student, Home and Business, and the volume license edition). However, fonts do vary by platform. That is, Office 2010 and Office 2011 have many but not all of the same fonts.
Table 3-2 provides an approximate list of Latin text fonts that are available in most Office 2010 editions and in Office 2011. This list includes far fewer fonts than you see in Office 2011 or in some editions of Office 2010. It is provided as a reference to cross-platform fonts that are available to most Office 2010 users.
Table 3-1. Fonts available in Office 2010 Home and Student Edition running on Windows 7
Arial | FreesiaUPC | Plantagenet Cherokee |
Arial Black | Freestyle Script | Pristina |
Arial Narrow | French Script MT | Raavi |
Arial Unicode MS | Gabriola | Segoe Print |
Book Antiqua | Garamond | Segoe Script |
Bookman Old Style | Georgia | Segoe UI |
Bookshelf Symbol 7 | Segoe UI Light | |
Bradley Hand ITC | Juice ITC | Segoe UI Semibold |
Calibri | Kristen ITC | Segoe UI Symbol |
Cambria | Lucida Console | Sylfaen |
Cambria Math | Lucida Handwriting | Symbol |
Candara | Lucida Sans Unicode | Tahoma |
Century | Marlett | Tempus Sans ITC |
Century Gothic | Microsoft Sans Serif | Times New Roman |
Comic Sans MS | Mistral | Trebuchet MS |
Consolas | Monotype Corsiva | Verdana |
Constantia | MS Reference Sans Serif | Webdings |
Corbel | MS Reference Specialty | Wingdings |
Courier New | MT Extra | Wingdings 2 |
Euphemia | Nyala | Wingdings 3 |
Estrangelo Edessa | Palatino Linotype | |
Franklin Gothic Medium |
Note
Estrangelo Edessa is the only font shown in Table 3-1 that is not currently supported in Office Web Apps.
Table 3-2. Fonts available in Office 2011 as well as most Office 2010 editions
Arial | Constantia | MS Reference Sans Serif |
Arial Black | Corbel | MS Reference Specialty |
Arial Narrow | Courier New | MT Extra |
Arial Unicode MS | Franklin Gothic Medium | Palatino Linotype |
Book Antiqua | Gabriola | Papyrus |
Bookman Old Style | Garamond | Plantagenet Cherokee |
Bookshelf Symbol 7 | Georgia | Symbol |
Calibri | Tahoma | |
Cambria | Lucida Console | Times New Roman |
Cambria Math | Lucida Handwriting | Trebuchet MS |
Candara | Lucida Sans Unicode | Verdana |
Century | Marlett | Webdings |
Century Gothic | Microsoft Sans Serif | Wingdings |
Comic Sans MS | Mistral | Wingdings 2 |
Consolas | Monotype Corsiva | Wingdings 3 |
Note
The Microsoft Typography website lists fonts installed by Windows 7. You can also find lists of fonts installed with Office 2007 and Office 2008 on this site. However, as of the date when this book was written, the site is not updated for Office 2010 and Office 2011. Similarly, the Apple knowledge base provides a list of fonts installed with Mac OS X. As of this writing, the most recent available list is for Mac OS X 10.5 (Leopard).
Note
See Also Access the list of fonts installed with Windows 7 at www.microsoft.com/typography/fonts/product.aspx?PID=161. Access the list of fonts installed with Mac OS X 10.5 at http://support.apple.com/kb/HT1642.
So what do you need to know about fonts for sharing files with users of earlier Microsoft Office versions? Some of the fonts in Table 3-2 were introduced in Office 2007 and Office 2008 (such as the default fonts Calibri and Cambria). Gabriola was introduced in Office 2010 and Office 2011.
These recently introduced fonts are included in the Microsoft Office Compatibility Pack, mentioned earlier in this chapter, that is available for users of Office 2000, Office XP, and Office 2003 for Windows. For users of Office for Mac 2004, those fonts introduced in Office 2008 are installed with the File Format Converter for Mac. Additionally, for users of Office 2007, Gabriola is provided in Microsoft Office Updates.
With the free compatibility pack and file format converter tools, users of earlier versions can open and work with documents that use the Office Open XML file formats.
Note
If you are running an earlier version of Microsoft Office and you installed the converters some time ago, it’s a good idea to check the download site and confirm that you have the latest version. For example, if you installed the compatibility pack to Office 2003 well before the release of Office 2010, the converters have since been updated.
Note
See Also To download either of these tools, visit http://microsoft.com/downloads and search for Open XML File Format Converter. You will see both the compatibility pack and the file format converter at the top of the search results. You can also learn more about the Office Open XML Formats in Chapter 1.
If you’re running an edition of Office 2010 that includes Publisher, or you’re running Office for Mac 2011, you know that you have many more fonts than are shown in Tables Table 3-1 and Table 3-2. So how do you take advantage of that font flexibility without risking what recipients see in your documents?
Your first thought might be embedding fonts. But this is not always a complete solution. Font embedding is available only in Word 2010 and PowerPoint 2010. It’s not available in Excel 2010 or in any Office 2011 program.
However, embedding might be useful with another approach: if a font is embeddable and recipients will not need to edit your documents, you might want to send the file as a Portable Document Format (PDF). You can embed fonts in PDF files, giving you a way to share documents, presentations, and workbooks on either platform without font concerns.
Note
See Also For more about font embedding with Word and PowerPoint, as well as how to determine if fonts are embeddable, see this section’s upcoming sidebar, Insider Tip: Font Embedding Options. We’ll discuss creating PDF files from the Microsoft Office programs in more depth later in this chapter.
Instead of embedding fonts, however, remember that there is a way to share your file with recipients who use different editions or different versions of Microsoft Office on either platform, and know that they will see the document just as you do. You might have already guessed where I’m going with this: Office Web Apps.
Office Web Apps support almost all of the fonts that ship with any edition of Office 2010. So when you save your document, presentation, or workbook to Windows Live SkyDrive or a Microsoft SharePoint 2010 site, you and those with whom you share can view and edit the file online, with your fonts intact.
Of course, if you’re the author of an important document, it’s always a good idea to open it for viewing and editing online to make sure the results are what you expect before you share it. For example, you might be using a font that appears in the Microsoft Office programs but was actually installed by a third-party application on your computer and is not supported by Office Web Apps.
Similarly, Office 2011 users can definitely take advantage of enhanced font compatibility when sharing online. But some fonts—such as some installed by Mac OS or third-party applications—might not be supported by Office Web Apps. So, save the file to the cloud and then take a look yourself before sharing it.
Note
See Also Considerations for sharing files online using Office Web Apps are addressed in the section Ensuring Easy Editing Online, earlier in this chapter.
Insider Tip: Font Embedding Options
Font embedding is available in Word 2010 and PowerPoint 2010. It is not available in Excel 2010 or in any Office 2011 programs. So, if those users with whom you share documents only use Microsoft Office for Windows and your documents are in Word or PowerPoint, embedding might be a good solution when a particular document or presentation requires a custom font. But before you think about using embedded fonts regularly, you have several things to consider.
It used to be the case that embedding would affect what recipients saw on screen, but the document might look much different when printed. This is no longer true with current printers. So, if recipients have bought a printer in the last several years, it’s probably safe for you to share documents containing embedded fonts with users of the same programs and not worry about the result on the other end.
But it is also important to consider that font embedding can add substantially to the file size (from hundreds of kilobytes to over a megabyte per font). In addition, the licenses for some fonts might not permit editable embedding (that is, the license restriction renders a document read-only for recipients) or might disallow embedding altogether.
So, between lack of compatibility and increased file size, embedding simply isn’t a complete solution for using a custom font on a regular basis. In fact, many large enterprise companies that use custom fonts for their branded content (such as their marketing collateral) select built-in, highly compatible fonts to use in their regular documents for ease of sharing.
However, if you do need to embed a font for a particular Word or PowerPoint document, always embed all characters rather than just characters used in the document (despite the added file size) if the document may need to be edited on a computer where your custom font is not installed. Find embedding options in the Word Options or PowerPoint Options dialog box, on the Save tab.
As mentioned earlier, whether you use embedding in Word and PowerPoint or in another application (for example, saving a copy of a file as a PDF), it’s important to know whether a font can be embedded. Using Windows 7 or Mac OS, it’s easy to find out. To do this in Windows 7:
In a Windows Explorer window (Windows Key+E), browse to your Fonts folder.
By default, this location is C:WindowsFonts. Or, instead of browsing to a folder location, in the Control Panel, click Appearance And Personalization, and then click Fonts.
On the toolbar at the top of the window, in the Select A View list, click Details, as shown in Figure 3-3.
Right-click the column headings for the option to add more headings, and then click Font Embeddability. In the Font Embeddability column, you see one of the following settings for your font:
Installable The font can be embedded and installed permanently on a recipient’s system.
Editable The font can be embedded but only installed temporarily on the recipient’s system to allow for editing of the document.
Print and Preview The font can be embedded but the document will be read-only on recipient computers where the font is not installed.
Restricted license The font cannot be embedded.
Mac users can get information about embeddability using the built-in Font Book application. Just select a font in Font Book and then press Command+I (or, on the Preview menu, click Show Font Info). You see whether a font is embeddable at the bottom of the list.
Do you know what information your document contains? If you answered yes, are you certain about that? When you share documents electronically, you might be sharing much more than the content you intended to share. Document metadata, and hidden data that you and other document editors can inadvertently add to documents, can result in your private information being shared. Fortunately, these issues are much easier to manage than you might expect.
In a nutshell: there is no reason to fear your documents, and anyone who says otherwise is selling something.
Document metadata (the term most commonly used to refer to underlying data in your documents) became such a hot topic a few years ago that the amount of misinformation about the subject is downright rampant. The truth is that this is an extremely important issue, but one that can be easy to manage. The best way to maintain control of your documents and help ensure that you do not share potentially private information is simply to be aware of the types of hidden content that can exist in your document and the steps you can take to manage them.
Most of the potentially private hidden data in your documents is not actually metadata at all, but content you or other document editors have added to the document at some point. So, what then is metadata?
Metadata, in computer terms, is information that a software program automatically stores in a file to enable some functionality. Virtually all software programs store some type of metadata in their files, the great majority of which is not a privacy risk at all. For example, the version of software used to create a document may be stored in the document as metadata.
The more powerful a software program, the more metadata it is likely to store. Word, Excel, and PowerPoint store metadata such as the date the file was created and the author’s name. Most metadata is not visible in the document window, but can be found through a dialog box. For example, the create date is listed in the Document Properties dialog box.
Defining Hidden Data
Unlike document metadata, hidden data refers to content that you add to a document but might not see in the document window. Examples of hidden data include text in Word that is formatted with the hidden font attribute, unresolved tracked changes in Word or Excel, or comments in Word, PowerPoint, or Excel. Content added to commonly used areas of a document such as headers, footers, and footnotes can also be hidden data, depending on the way you view your documents.
Managing Hidden Data
One of the most common misconceptions about document metadata and hidden data is that the number of potentially private hidden data types is infinite or somehow unmanageable. In fact, the possible types of document metadata or hidden data in your Microsoft Office documents make for a fairly concise list, and you can easily remove most of them yourself. What’s more, just because something is a potential privacy risk to someone doesn’t mean it will be to you. Review the list of possible hidden data types and decide for yourself what content types you want to check for and remove from your documents.
Note
Companion Content Find a Hidden Data Checklist in the Chapter3 sample files folder available online at http://oreilly.com/catalog/9780735651999. The Hidden Data Checklist lists common types of hidden data for both Office 2010 and Office 2011, and was created in an Excel template so that you can easily edit and share it.
The options for removing metadata and other hidden data dramatically improved for users of Microsoft Office for Windows in Office 2007 with the introduction of the Document Inspector tool, and took another step forward for Office 2010 users with the Prepare For Sharing options in Backstage view. Additionally, the Office Open XML Formats make manually accessing and removing hidden data and metadata substantially easier for users of both Office for Windows and Office for Mac.
The Document Inspector searches for a wide range of potentially hidden content types, including both metadata and hidden data, and gives you the option to remove them from your document. See the Document Inspector options for Word in Figure 3-4.
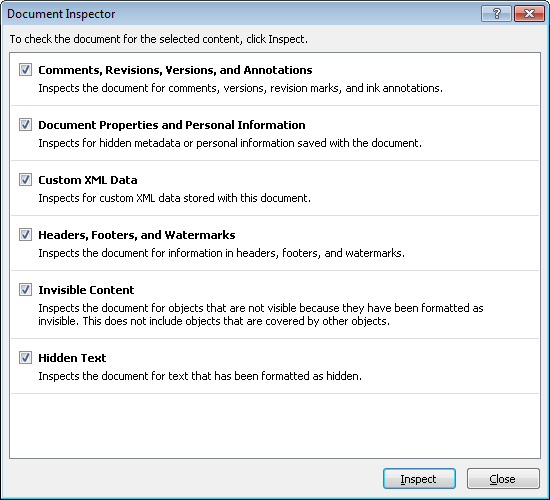
To access the Document Inspector in Word, PowerPoint, or Excel:
Click the File tab to open Backstage view.
On the Info tab, click Check For Issues and then click Inspect Document.
The Document Inspector, like any tool that automatically removes hidden data, can be a bit heavy-handed. That is, it will remove either all or nothing of the content types it finds. So, when you’re using any tool for removing hidden data, the most important thing to remember is that just because something can potentially be private information doesn’t mean it is. Be aware of the content types you want to check for and the circumstances in which you consider content to be private information that you want to remove.
For example, headers and footers are usually intentional content that you want to share. However, if you add content to a header or footer in a Word document and then disable that header or footer (such as adding content to a Different First Page header and then turning off the Different First Page feature), the content you added is still saved with the document unless you remove it. So, while it is unlikely that you would want to delete all header and footer content in your document, you might want to check to ensure that no private information is saved in disabled or otherwise unused headers and footers.
Note
See Also For tips on how to check for disabled or otherwise unused headers or footers, see Table 3-3.
When you use the Document Inspector, in addition to simply being aware of what you choose to remove, you might want to keep in mind some other factors, covered in the following section, before removing content and considering your document ready to share.
Note
If you’re a Microsoft Visual Studio developer or have access to a developer with that skill set, keep in mind that the Document Inspector is extensible. You can add modules to the Document Inspector to search for and manage exactly the content types you want.
Note
See Also Visit the Office Developer Center on MSDN at http://msdn.microsoft.com/office and search for Document Inspector to access developer resources related to customizing this tool.
Checking Out the Prepare For Sharing Options
The new Backstage view in Office 2010 now gives you at-a-glance information about potentially private information in your documents, as you see in the Word 2010 example shown in Figure 3-5.
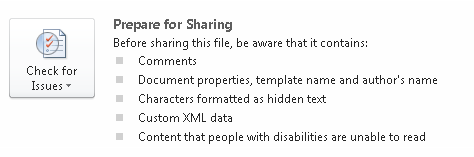
Figure 3-5. To see the Prepare For Sharing options in Word, PowerPoint, or Excel, click the File tab to open Backstage view and then click Info.
So, before you even get to the Document Inspector, you can see at a glance any features that you might want to address. Also notice that this pane doesn’t exclusively list potential privacy issues. The Check For Issues options also include checking for accessibility to people with sensory disabilities and checking for compatibility with earlier versions.
Remember that the way you view a document can make a tremendous difference in what content you see. For example, in Draft view in Word, you don’t see several types of content—including headers, footers, footnotes, and page layout. Similarly, when viewing slides in PowerPoint, if you don’t have the Notes pane open, you don’t see slide notes.
One solution is to change your view so that you do see all elements on a page, slide, or sheet, but Table 3-3 provides some other tips for addressing common types of hidden data with or without the Document Inspector, and whether you use Office 2010 or Office 2011.
Table 3-3. Common types of hidden data
What you need to know | |
|---|---|
In Word, Excel, and PowerPoint | |
Document Properties and Personal Information | In Office 2010, on the Info tab in Backstage view, you can view and access file properties. In Office 2011, on the File menu, click Properties. The information you find here can include properties such as author name and create date. You can remove much of the information directly from the Properties pane (2010) or dialog box (2011).
|
Custom XML Data | The Document Inspector warns you if your Office 2010 document contains custom XML data. Before you remove this, remember that it can include additional functionality that your document requires. It’s a good idea to know what the custom XML data in your document is before removing it. Or, as when removing any hidden data, just make a copy of the document first before removing this content to be sure that you retain a fully functional copy of your file. |
Headers and Footers | As mentioned earlier, header and footer content is most often intentional and meant to be shared. Whether or not the Document Inspector is available to you, that tool is not usually the best option for sanitizing potentially private content in headers and footers. Instead of removing all header and footer content, you can take a few quick steps in either Office 2010 or Office 2011 to ensure that you have no inadvertent content in your document headers and footers:
|
Invisible Content | Invisible Content in the Document Inspector refers to objects that have been hidden using the Selection And Visibility Pane, which is available in Office 2010 but not in Office 2011. To access this pane, select an object and then, on the Drawing Tools Format tab, in the Arrange group, click Selection Pane. Users of both Office 2010 and Office 2011 should, however, keep in mind that other types of invisible content could exist, such as text or objects formatted as white on a white background or otherwise formatted to be obscured. Content that is placed off slide in PowerPoint, or floating objects that are located off the page in Word, might also be hidden from view. |
In Word | |
Hidden Text | For users of Word 2010, it’s important to note that this Document Inspector option searches only for text formatted with the hidden font attribute. It will not find text formatted as white on a white background or otherwise formatted to be obscured. For users of Word 2011 (or users of Word 2010 who prefer to find text formatted with the hidden text attribute), you can expose any hidden text in your document by turning on all formatting marks. You can also use the Find feature to search for text formatted as hidden. |
Note
Companion Content Table 3-3 does not include all types of potentially hidden data, but you can find a more complete Hidden Data Checklist in the Chapter3 sample files folder available online at http://oreilly.com/catalog/9780735651999.
When you need a quick and easy solution to help ensure that your document contains no hidden content that could be a privacy risk, and the recipient of your document will not need to edit it, you might want to save your document to either the Portable Document Format (PDF) or the XML Paper Specification (XPS) format.
The capability to save to PDF or XPS formats is built into Office 2010, and the capability to save as a PDF file is available in Office 2011.
When you take just a few minutes to ensure that you are aware of all the content in your document, there is no reason to be concerned about sharing your document in its original format. However, when you just want a quick solution and the recipient won’t need to edit the file, PDF and XPS file formats can be a nice, simple alternative.
XPS and PDF file formats do not carry over many types of metadata and hidden content, making them a good option for sharing files. However, when you save a copy of your document in one of these formats, file properties information is saved by default. To ensure that you are not sharing private information from file properties in the PDF or XPS formats, you can disable this setting in the Office 2010 programs and, in Office 2011, simply clear the fields as you save to PDF.
Click the File tab to open Backstage view and then click Save & Send.
Click Create PDF/XPS Document and then click Create PDF/XPS.
In the Publish As PDF Or XPS dialog box, select the Save As type (PDF or XPS) and then click Options.
In the Options dialog box, you can exclude document properties from the published copy, specify a page range to publish, and more (options for XPS and PDF differ slightly).
Click OK and then click Publish.
On the File menu, click Print.
In the Print dialog box, click PDF and then click Save As PDF.
In the Save dialog box that opens, you can edit file properties information, including Title, Author, Subject, and Keywords. Then, click Save to create your PDF.
If you’re using Windows 7, you have an additional option for removing personal information that’s stored in file properties before you share a document.
To use the Windows 7 tool, first browse to your file in Windows Explorer (press Windows+E to open a Windows Explorer window).
Right-click your file and then click Properties.
In the Properties dialog box that opens, on the Details tab, click Remove Properties And Personal Information to open the Remove Properties dialog box.
In the Remove Properties dialog box, you can choose to remove any properties saved by the program in which the file was created as well as any information saved with the file by Windows (such as text you add using the Tags feature in Windows 7). You can also choose the option to save the cleaned version of the document as a copy to retain a fully functional version of it for your own use.
Note
Tools for removing hidden data are available in other programs across Office 2010 as well. For example, to remove hidden data from your Visio files, on the File menu in Visio, click Remove Hidden Information. Similarly, OneNote 2010 now saves previous page versions for improved collaboration and provides a recycle bin for content you delete from a notebook. But you can choose to disable these features in a notebook where they may contain information you don’t want to share. To do this, on the Share tab, click Page Versions and then click Disable History For This Notebook.
Note
Companion Content In addition to controlling what you share, you might want to restrict access or editing of your documents. For help working with document protection options—including the powerful Information Rights Management tools for users in companies that use the Office 2010 Professional Plus volume license edition or the Office 2011 volume license edition—see the article “Securing Access to Your Documents—Document Protection Tools and Options,” available in the Bonus Content folder as part of the online companion content for this book, at http://oreilly.com/catalog/9780735651999.