In this chapter, you will:
Discover how to be the the boss of your documents
Learn to capitalize on the logic of documents
Explore how to monitor the health of your document
Learn which six tools enable you to create virtually any Word document
You want documents that remain easy to use and easy to share regardless of their content or editing needs. Should you consider playing the lottery for better odds?
Actually, you might be surprised at just how much document-related stress you can easily avoid, and how solid your documents can be. There is a reason for everything that happens in a Microsoft Word document. You might not always like the reason, but when you take the time to understand it, the pieces can come together nicely and much more simply than you might expect.
The difference between good, healthy documents that can stand up to editing and frustrating documents that continually let you down is the difference between understanding why versus knowing how.
What You Can Really Do with Word
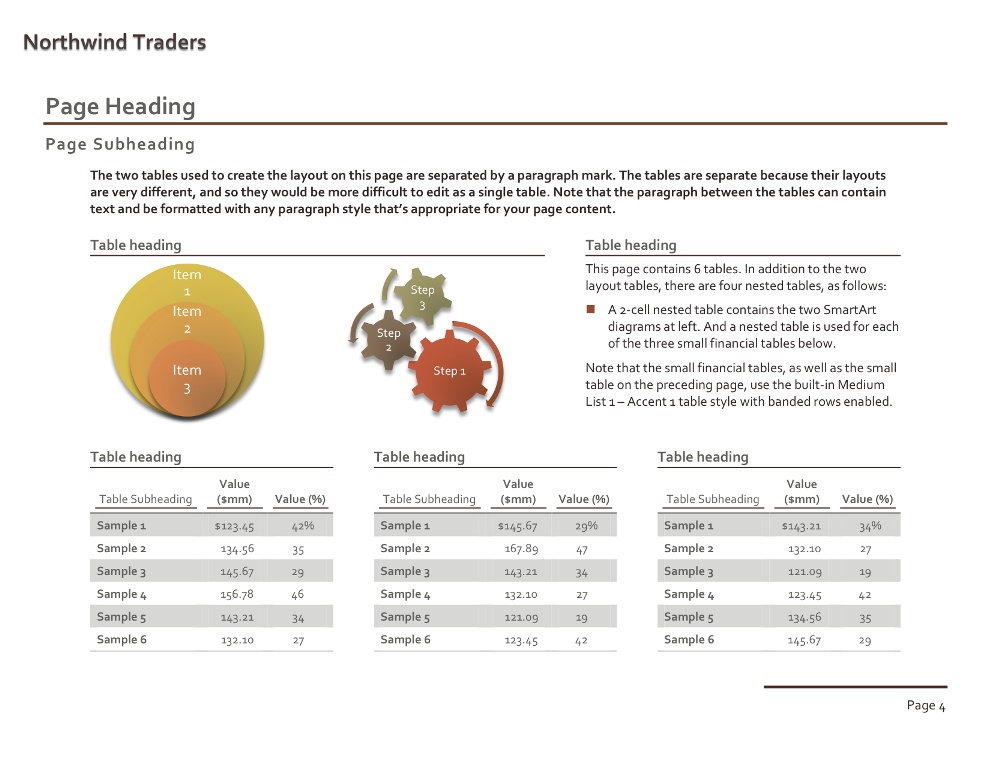
The document shown in Figure 6-1 contains 9 graphics and 13 tables. The file size is just 370 kilobytes. What’s more, it took only two hours to create everything you see on these pages. Sound too good to be true? Check it out for yourself. You can edit this document, share it, do as you like with it. This document will not let you down.
Figure 6-1. This document is an example of what you can really do with Word 2010 and Word for Mac 2011.
Note
Companion Content Find this document, Fearless.docx, as well as an accompanying file containing the source Microsoft Visio 2010 graphic (Fearless.vsd) pictured in the document, in the Chapter6 sample files folder available online at http://oreilly.com/catalog/9780735651999.
When you use the best tools for the task, you can do less work and get better results every time.
As covered in Chapter 1, Word “likes” things to be as simple and organized as possible. That doesn’t mean that you have to sacrifice design or complex layouts. On the contrary, the simpler and more organized your choices, the more complex your document can be without losing stability or complicating your efforts.
The less work you do, the better your documents will be.
The best place to start to understand why things work the way they do in Word is with the three levels of formatting. Word organizes most of the formatting you can apply in your document into three levels—font, paragraph, and section—with font being the simplest of the three and section being the most complex.
Here’s a quick introduction to each of the three levels of formatting, including how they’re stored in your document.
Font formatting is anything you can apply to as little as one character, such as font face (for example, Times New Roman, Arial, Calibri) or font size. Any formatting available from the Font group on a Ribbon tab or the Font dialog box (including the new text effects and OpenType typography support), as well as language setting, text borders, and text shading, is a type of font formatting.
When you apply font formatting in your document, it is stored directly in the character to which you apply it. So, for example, you can select a character and then press Ctrl+Spacebar (in either Word 2010 or Word for Mac 2011) to clear direct font formatting.
Paragraph formatting includes anything you can apply to as little as one paragraph, such as paragraph alignment or indents. Any formatting available from the Paragraph group on a Ribbon tab (such as bullets, numbering, and paragraph borders and shading), or from the Paragraph dialog box, is a type of paragraph formatting.
When you apply paragraph formatting in your document, it is stored in the paragraph mark at the end of the paragraph where it appears.
Section formatting is often thought of as page setup formatting. Most formatting that can be applied from the Page Setup group on the Page Layout tab or from the Page Setup dialog box, as well as text columns, page and footnote number formatting, and information about which header and footer appears on a page, is a type of section formatting.
To change any type of section formatting for just part of the document, you need a section break. That’s because section formatting is stored in the section break at the end of the section. Note that for single-section documents, section formatting is stored in the last paragraph mark in the document.
Note
There are a few settings in the Page Setup dialog box (or the Document dialog box in Word 2011) that are not really section formatting, because you can’t change them for just part of the document. These include the Different Odd & Even Pages header and footer setting on the Layout tab, and the Multiple Pages settings (Mirror Margins in Word 2011) on the Margin tab. Conversely, settings in the Page Setup dialog box that you might not think of as formatting at all (such as the Paper Source setting in Word 2010) are indeed section formatting, stored in a section break when you change the setting for just part of the document.
Note
See Also For more on how section formatting is stored, when section breaks are required, and how to manage section formatting, see Chapter 11.
The Reveal Formatting task pane in Word 2010 is a great tool for troubleshooting document formatting because you can see all of the formatting for a selection at a glance. It can also help clarify the concept of the three levels of formatting and how Word organizes formatting in a document.
As you see in Figure 6-2, the Reveal Formatting task pane clearly demonstrates how formatting is organized along the three levels.
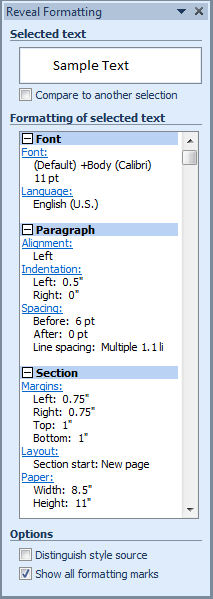
To view formatting for your current selection, press Shift+F1. When using Reveal Formatting, keep the following in mind:
Blue, underlined text in the Reveal Formatting task pane is linked to a dialog box where you can change the referenced type of formatting for your selection.
With the Compare To Another Selection option, you can select any other content in the document to see an instant comparison of formatting for both selections.
If your selection includes a table or paragraphs that contain bullets or numbering, you will see additional categories in the Reveal Formatting task pane. These are not additional levels of formatting. Bullets and numbering are paragraph-level formatting, as explained earlier. Tables are not formatting at all, as discussed in the next section of this chapter. Breaking out these items simply helps you to quickly see formatting for a selection, because bullets, numbering, and tables can each contain quite a bit of unique formatting.
Note
Another way to access the Reveal Formatting task pane will take you there via a simpler tool for checking (or clearing) the font and paragraph formatting for a selection. This tool, called the Style Inspector, is available from the bottom of the Styles pane. On the Home tab, in the Styles group, click the dialog launch icon to open the Styles pane (or press Ctrl+Alt+Shift+S). At the bottom of the pane, click the magnifying glass icon to open the Style Inspector.
This tool shows you font and paragraph formatting at the insertion point, distinguished by style source. The Style Inspector also includes a magnifying glass icon, which opens the Reveal Formatting task pane. Note that the Style Inspector in Word 2010 is very similar to the Word 2011 Reveal Formatting tool discussed next.
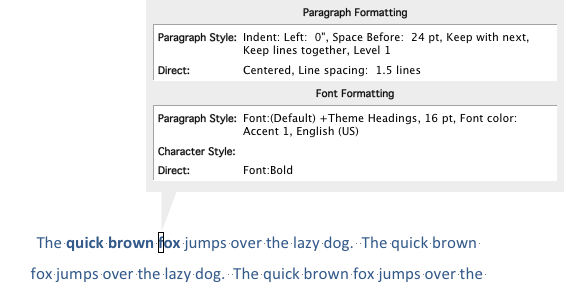
In Word 2011, instead of a Reveal Formatting task pane, you have the Reveal Formatting tool shown in Figure 6-3, available from the View menu. When you turn on this feature and click into text, you see a pop-up window that shows font and paragraph formatting for the selection, distinguished by style source. This tool displays only font- and paragraph-level formatting, but is nonetheless very useful for both troubleshooting and for illustrating at least the first two of the three core formatting levels.
For Mac Users
It’s true that the Reveal Formatting tool in Word 2011 isn’t quite the troubleshooting powerhouse that you get in Word for Windows with the Reveal Formatting task pane. But don’t pout just yet.
Word 2011 has an exclusive new feature (available for documents that you create and edit in Print Layout view) that shows you at a glance where paragraph styles and direct font formatting are applied, with crystal-clear color coding and highlighting directly in your document. This is one of the best new features in Office 2010 and Office for Mac 2011, and it can do wonders for helping you stay on top of the formatting in your Word documents.
![]() Find the options to show style guides and direct formatting guides at the bottom of the Styles pane in Print Layout view. Access the Styles pane of the Toolbox from the View menu or, on the Home tab, in the Styles group, click the button shown here.
Find the options to show style guides and direct formatting guides at the bottom of the Styles pane in Print Layout view. Access the Styles pane of the Toolbox from the View menu or, on the Home tab, in the Styles group, click the button shown here.
Note
See Also Learn about Word 2011 style guides and direct formatting guides in Chapter 8.
A document consists of a range of content types (or objects) and formatting, both of which can be added to the body area of the document or to other areas, such as a header, a footnote, or a comment. These areas are known in Word as stories.
Although the concept of stories in Word most often comes up when you’re using programming (such as VBA) to interact with your document, it’s an important part of the way Word organizes content. Understanding stories can help you stay in control of any document you need to create.
A story is simply a distinct component of the document that can contain its own content and formatting, similar to the concept of layers in a graphics program. In fact, stories are layers in some ways:
Headers and footers (which also comprise watermarks), as well as footnote separators, are story types that sit behind the main document story.
Comments, as well as the text areas within text boxes or shapes, are story types that sit on top or in front of the main document story.
A text box is a type of object (content type) that you can insert into your document. Wait a minute. Didn’t I just tell you that text boxes are stories? Not exactly.
A text box is an object. The text area within that object is a discrete location, separate from the main document, into which you can add text and other content—that is, a story. (Note that there is just one of each story type in a document. So, for example, the text within the collection of all text boxes in a document belongs to the same story.)
So what about tables? If the content area within text boxes is a separate story, is the area within tables a separate story as well? No. Unlike text boxes, tables become a part of the story into which they’re inserted. A table sits in a paragraph mark, just like text. So, Word treats the content you add within a table very much like any other content in the applicable story. For this reason, tables are often the simplest solution for creating complex layouts in Word.
Here are the simplest definitions of stories, objects, and formatting:
Stories The locations in your document where you can add content and formatting.
Objects The content types you add to your document.
Formatting An attribute applied to an object or story.
Even as an experienced Word user, you will benefit from taking the time to understand the distinction among formatting, objects, and stories because it can help you find the simplest solution for whatever you need to do in a document.
The simplest approach to a document task is usually the method that will add the least information to the document and require the least amount of work. For example:
Anything that can be stored in a style (that is, paragraph and font formatting, or table structure formatting in the case of table styles) is the simplest way to apply formatting to text and objects. Styles consolidate several types of formatting into a single container—meaning less work for you to apply and less information for Word to manage.
Note
See Also To learn more about creating styles that simplify documents, see Chapter 8.
In most cases, tables are the simplest solution for organizing complex layouts (other than when you’re using Publishing Layout view in Word 2011), because they don’t require you to add a new layer (as you would with text boxes). They also don’t require you to add extra sets of formatting information to the document, such as the section breaks you need when using text columns to lay out a page.
Note
See Also To learn more about the logic behind using tables as a layout tool and how to make them work for you, see Chapter 9.
Note
Understanding stories, objects, and formatting in your document can help you not only with the documents you create today, but also if you choose to venture into working with your documents programmatically.
Note
See Also Learn more in Chapter 23.
One of the easiest things you can do to stay in control of your documents is to remember what you already knew before you ever sat down at a computer. The two most important skills for simplifying complex document production have nothing to do with software features. They’re skills you’ve been developing and using since childhood: planning and organization.
People often learn software programs by memorizing the set of steps necessary to execute tasks. When it comes to Word, that approach just won’t get you as far as you might want to go. Using Word effectively at an advanced level requires that you take time to think about and understand what’s happening in your document. If that sounds like more of a commitment than you want to make to a software program, consider this: the time you spend planning, organizing, and thinking about your document is a fraction of the time most people spend on the point, click, and tear-your-hair-out method.
Staying in control of your document can be as simple as understanding what’s happening on screen at all times. And that can be much easier to do than you might think. Using tools such as the Reveal Formatting task pane, along with formatting marks (often referred to as nonprinting characters) and the available options for viewing your document, you’ll quickly realize that everything you need to manage your document effectively is right in front of you.
The issue of whether to work with formatting marks (called nonprinting characters in Word 2011) visible in your document is really a non-issue: you simply can’t know what’s going on in your document without them.
They’re annoying, they get in your way, it’s hard to see what the document looks like when they’re visible. Although I don’t always agree with those statements—I’ve used formatting marks for so long that they’ve become like background noise—I know that many of you feel that way. Well, sorry, there’s no easy way around this one. Formatting marks tell you a great deal about how your document is formatted. You’ll never be fully in control of a complex document without them.
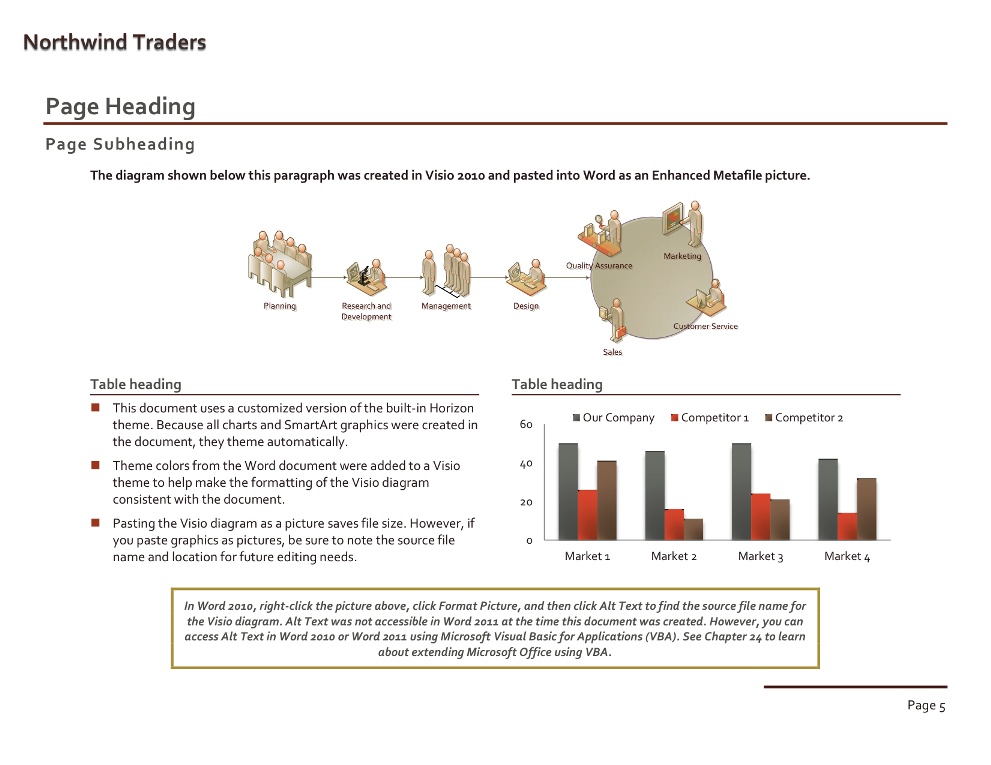
For example, in Figure 6-4, why don’t the right edges of the paragraph borders on the two heading paragraphs line up?
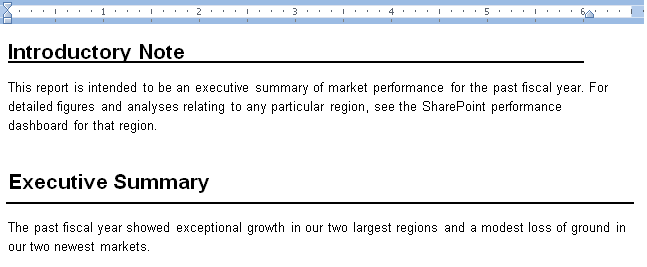
Figure 6-4. Notice that the paragraph border in the top heading is shorter than the width of the paragraph.
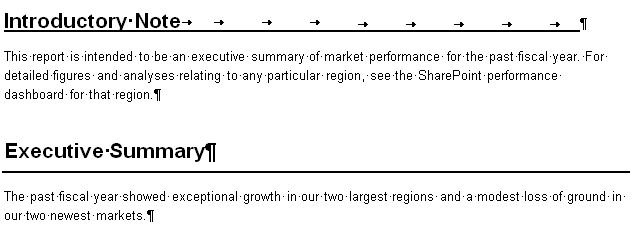
If you’re looking at the ruler in Figure 6-4, assuming that your insertion point is in the first paragraph, you’ll say it’s because there’s a right indent on the first paragraph. But if you move the right indent in this case, it won’t make any difference at all. Why not? With formatting marks visible, you can see the answer immediately. That’s no border, as you can see in Figure 6-5. It’s the old-fashioned, rudimentary workaround of underlining tabs.
Not only can you see the problem immediately when using formatting marks, but you can also correct it quickly without trial and error, because you can pinpoint exactly what content you need to alter.
Take another example. Have you ever copied content from one part of a document, only to have the formatting change when you paste that content? That happened because you pasted the content into a paragraph mark containing a different set of formatting.
As discussed earlier, paragraph marks store formatting. When you press Enter (Return) twice to create a new paragraph, as you would on a typewriter, you’re adding an extra, unnecessary set of formatting to your document.
So, not only is it less precise and, ultimately, more work to press Enter twice after every paragraph than it is to add formatting for space before or after the paragraph to your paragraph styles, but you’re also adding unnecessary information to the document that can get in your way later.
When you view formatting marks, you see spaces, tab characters, object anchors, page breaks, and other marks that tell you how your document is constructed. But you also see the paragraph marks, cell and row markers, and section breaks that store formatting, which means you have more information about the formatting in your document without having to look for it.
Here’s how to toggle formatting marks on or off.
Press the ShowHide ¶ button in the Paragraph group on the Home tab or press Ctrl+Shift+8.
You can also enable Show All Formatting Marks at the bottom of the Reveal Formatting task pane.
On the Standard toolbar, click the paragraph mark icon (¶).
Note
When working in some languages using Office 2011, you might see different icons in this case. For example, if you enable Japanese as an editing language, you might see an icon of opposing blue arrows instead of a paragraph mark, with the ScreenTip Show All Editing Marks.
You can also customize, to some degree, which formatting marks appear on screen in both Word 2010 and Word 2011. To do this:
In Word 2010, click the File tab and then click Options. Or, in Word 2011, on the Word menu, click Preferences.
In Word 2010, on the Display tab of the Word Options dialog box, select the formatting marks you want to view. In Word 2011, find these options on the View tab of the Word Preferences dialog box.
Is it better to work in Print Layout view, Draft view (formerly called Normal view), or Outline view? The best answer to that question is “all of the above.” These three views are the core editing views for working with traditional word processing–style documents. If you work in one view all the time, you might be doing yourself a disservice. Changing views based on the task at hand can save you a lot of time and effort. The following table summarizes the benefits of each of these Word views.
Note
Word 2010 and Word 2011 both include views that are not addressed here. This section covers the views that offer benefits for complex document creation.
Note
What about Full Screen view? Called Full Screen Reading view in Word 2010, this view can be quite handy when you’re reviewing content if you just want a clear reading environment without a lot of tools you don’t need at the moment. But the new Full Screen view in Word 2011 is nothing short of stunning.
In Word 2010, Full Screen is really for review purposes only, although you can enable the option to allow text editing. In Word 2011, you are still likely to use Full Screen view mostly when reviewing documents, but this view provides both write and read modes, where you get a handful of handy quick-access tools for common tasks. For complex document editing, this is not the place to go. But if you ever review documents or do light document text editing, you might want to check out this view—even if it’s just for the jaw-dropping eye candy you get here in Word 2011. And Word 2011 users can customize the environment in Full Screen view as well. If a glossy, piano-black finish isn’t your thing (although if it’s not, you’re probably not a Mac user), choose from a variety of slick backgrounds under the Options button in Full Screen view. And for fun, in read mode, you can also find animated page-turning effects under Options.
You plan, you organize, you stay in control of your document, but something still goes wrong. Perhaps you inherited a document from someone else or added content to a document from another source. What do you do when the document refuses to behave?
Giving your document a time-out probably isn’t an effective way to resolve the issue, but fortunately, there’s usually an easier solution.
Corrupt is, without a doubt, the most frequently misused word in document production. Yes, documents and content can become corrupt. But just because something has gone wrong in your document doesn’t mean it’s corrupt.
The majority of documents labeled as corrupt are not corrupt at all. Formatting errors, or misunderstood formatting, account for most of the issues that make people believe a document is corrupt. Consider the following examples:
An outline numbered list incorrectly numbers paragraphs.
A table falls off the edge of the page and ignores formatting commands to reset its size.
Shaded paragraphs overlap in the printed document.
All of these examples are common formatting errors often mistaken for document corruption. The problem, of course, is that when people assume a document is corrupt, they look for the wrong type of solution. In instances like the formatting error examples provided here, you need to diagnose and fix the individual formatting problem. Extreme troubleshooting solutions are not only unnecessary, but they also won’t get the job done. So, what are the most common solutions for these examples?
When automatic paragraph numbering in an outline doesn’t adjust to accommodate changes in the outline, check to see if the Start At value (also called the Set Numbering value) has been set for some paragraphs. This value forces the paragraph to always show the specified number and not adjust for changes to the outline.
When a table exceeds the width of the page (or any desired width) and won’t respond to commands to adjust it (such as AutoFit To Window), check to see if the table contains more content than can fit within the desired width. For example, you might select the table and then press Ctrl+Shift+< (Command+Shift+< in Word 2011) repeatedly, as needed, to reduce the font size and see if this reduces table size as well.
When shaded paragraphs look fine on screen but overlap in Print Preview or when printed, check the type of shading applied. Using Fill Color to shade paragraphs works fine in just about any scenario. But using pattern fills is another story. Patterns include a background and a foreground—information that some printers (as well as some email clients) don’t know how to handle.
In contrast to these simple solutions, the troubleshooting workarounds and extreme solution attempts I’ve seen for such formatting issues include stripping a 300-page document to plain text and reformatting it from scratch, or converting all tables in the document to text and reformatting them with a variety of workarounds.
Poorly formatted documents can sometimes lead to corruption when content is mismanaged or added to the document from an incompatible source. But the fact remains that corruption is not the same thing as problematic formatting.
Quickly Clean Up Bad Formatting Throughout a Document
The Replace feature in Word is, of course, great for global corrections to text. But it is also a fantastic troubleshooting tool for repairing problem formatting.
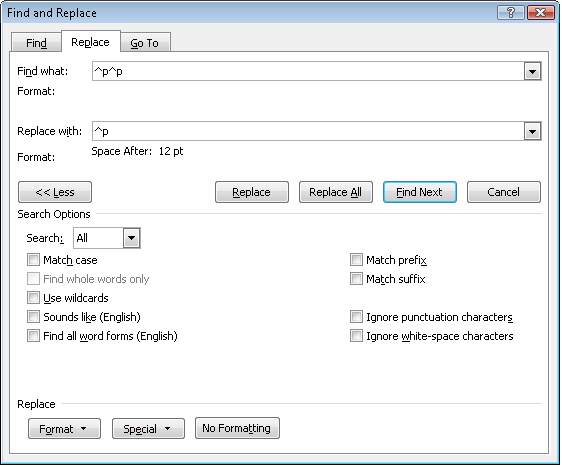
For example, if two paragraph marks are used to create vertical space between each paragraph in your document, you can replace all instances of two consecutive paragraph marks with one paragraph mark that contains formatting for space after the paragraph.
To replace formatting marks as well as some content types (such as fields), select the item from the Special menu within the Replace dialog box. Or, if you know the character code for the item you want, you can type it directly into the Find or Replace box. The Format menu in the Replace dialog box gives you the option to find or replace a wide range of font and paragraph formatting, as well as paragraph, character, or list styles.
The Replace dialog box shown in Figure 6-6 demonstrates searching for two consecutive paragraph marks and replacing them with one paragraph mark that contains formatting for 12 points after the paragraph.
Although the Find experience has changed in both Word 2010 and Word 2011, the Replace dialog box with all of the options discussed here is still available in both programs:
In Word 2010, access the dialog box shown in Figure 6-6 by pressing Ctrl+H or using the drop-down list available from the Search box in the new Navigation Pane.
In Word 2011, on the Edit menu, point to Find, and then click Advanced Find And Replace. Or press Option+Command+G to open the Go To tab of the same dialog box, and then click Replace. Expand the Find And Replace dialog box to see the same options shown in the Word 2010 dialog box shown in Figure 6-6. To access Advanced Find And Replace from the new Search pane, click the gear icon beneath the Search box.
Corruption is when something happens in a document, or an element of a document, that Word doesn’t understand. For example, if a table becomes corrupt, Word might lose the ability to properly manage content in that table. So, pasting content into that table could cause the document to crash.
How do you distinguish between a formatting error and corruption? Crashing or freezing in a specific document is usually a sign of some type of corrupt content. That doesn’t mean that the entire document is corrupt, but it typically indicates that an object (such as a shape or a table) has gone over to the dark side. In contrast, when formatting doesn’t behave—for example, content jumps around on screen, the document doesn’t respond to formatting changes, or the file apparently changes formatting on its own—it is usually a sign of a poorly formatted document.
A logical process of elimination is the best method to determine most formatting or corruption faults. Using Microsoft Visual Basic for Applications (VBA) or the Office Open XML Formats can also be very handy troubleshooting timesavers—and well worth the learning curve for professional document troubleshooters. For example, VBA offers the Immediate Window, where you can quickly run a single line of code to get information about what’s going on in your document. And because an Office Open XML Format document is actually (behind the scenes) a collection of files in a compressed folder, errors are compartmentalized so they might be more easily rectified.
Note
See Also To learn about how VBA can help you save time on document troubleshooting, see the MSDN article “Troubleshooting Word 2007 Documents More Easily Using VBA” (http://msdn.microsoft.com/en-us/library/dd630112.aspx), which also applies to Word 2010 and Word 2011. For tips on general troubleshooting best practices, see the TechNet Magazine article “Troubleshooting 201: Asking the Right Questions” (http://technet.microsoft.com/en-us/magazine/ff955771.aspx). To get started learning the basics of VBA, see Chapter 23. The Office Open XML Formats provide additional options for addressing document problems. To learn about using the file format as a troubleshooting tool, see Chapter 24.
Open And Repair has been available to Word for Windows users since Word 2002 and is now offered in PowerPoint and Excel as well. But this feature improved greatly in Word 2007, and even more so in Word 2010.
Essentially, Open And Repair diagnoses and, in many cases, repairs genuine document corruption. It’s a great place to start, because if it doesn’t find corruption in your document, it’s likely that the problem is a formatting issue and not corruption at all.
Word checks the integrity of documents automatically and will now often recognize and try to fix integrity errors in Office Open XML Format documents as you open or save a file (such as if you try to convert a legacy format document that contains corrupt content to the Office Open XML Formats). When this happens, Word will notify you that it found errors but was able to open or save the file by fixing them. If this occurs, check your content because formatting may have changed during that process.
But even if you don’t see any warnings when opening or saving a file when you’re working with legacy file format documents or with an Office Open XML Format document that you believe to have integrity issues, you can still manually invoke the Open And Repair tool.
When Open And Repair finds corruption in your document, a Show Repairs dialog box typically opens with a list of the corruption types found (such as corrupt tables or styles). In many cases, you can select an error in the list and click Go To to be taken directly to the source of the problem. For those who remember the dreaded error message “A table in this document has become corrupt” before the advent of Open And Repair—when you had to figure out for yourself which table was the troublemaker—you can see how this feature is an enormous timesaver.
To use Open And Repair:
Click the File tab and then click Open (or press Ctrl+O).
In the Open dialog box, browse to and select your file.
Instead of clicking the Open button, click the arrow to the right of the Open button, and then click Open And Repair.
When the document opens, if the Show Repairs dialog box does not appear, Word found no corruption in your document. If the dialog box does appear, take note of the errors and then click Close. To make the repairs permanent, save the document.
Caution
By repairing some types of corruption, such as tables or numbered styles, Word might alter your formatting or even, in rare cases, your document content. For this reason, Office Open XML documents opened with Open And Repair in Word 2010 always open as an unsaved copy of the original. However, for legacy file format documents, Word still opens the original. It’s a good idea to page through the document completely after closing the Show Repairs dialog box but before saving the document (especially if you’re replacing the original) to ensure that no content or formatting has been changed. To be on the safe side, save the file with a new name or rename the original rather than replacing it.
Open And Repair can also be an excellent tool to ensure the integrity of a complex document or template as you create it. It’s a good practice to open a healthy document or template with Open And Repair as you’re working on it to ensure that no problems arise during construction.
People often think that, because Word is so powerful, it would take far too much time to learn everything they need to create complex documents effectively. For all the power of Word, however, the list of what you need to learn to create most documents is much shorter than you probably realize.
If you look through the Word content in a book like this one, you might pass over some things, thinking they’re details you don’t need. Well, specific features are certainly more applicable to some people than others. For example, you might never need to include mathematical equations in your document; someone else might never need an index or a bibliography.
However, some things that might seem like minor details are actually essential components that can make all the difference in the world. When you know the right details, everything comes together. In Word, those details are the six tools you need to create any complex document:
If you’ve seen earlier incarnations of this list from me, you know that themes are a new addition. They were introduced to Microsoft Office in 2007 (and 2008 for Mac), and they should have been on the Office 2007 version of this list. But they’re here now, so better late than never.
Themes are at least as important as any other feature on this list, so please don’t breeze over them just because you’ve been creating documents since long before they existed. Every Office 2010 and Office 2011 document contains a theme regardless of whether you use it. Making use of the theme can simplify many tasks and greatly improve the appearance of the content you create.
Note
See Also Learn about the value of themes across Office 2010 and Office 2011 in Chapter 5. You’ll also learn more about themes as they relate to other key Word document elements in Chapter 7, Chapter 8, and Chapter 10.
Additionally, the last item in the list (dynamic content) has had different names in earlier versions of this list. This tool used to just be about fields, but then in Word 2007, fields were incorporated into the larger Quick Parts functionality (a Word for Windows term, but with lots of cross-platform functionality). Today, dynamic content encompasses a few major features that can save you time in both Word 2010 and Word 2011, such as content that updates automatically given specific conditions (fields), or the capability to instantly swap the look of certain document elements while retaining your content (called building blocks in Word 2010 and document elements in Word 2011). You might not need dynamic content in every document, but don’t dismiss it before you understand what it can do for you.
Note
See Also To explore what dynamic content means today and what it can do for your documents, see Chapter 12.
When you understand how these six features work together most effectively, no document is out of your reach. Using Chapter 5, which introduced document themes, along with the next six chapters of this book, you can get all the tools you need to bring the right details together and create great Word documents.