In this chapter, you will:
Explore the style environment in Word 2010 and Word for Mac 2011
Discover best practices for creating effective sets of styles in your documents
Get tips for working more effectively with paragraph, character, and linked styles
Discover the benefits of document defaults
Simplify your work with lists
Work more easily with table styles
Learn to manage styles more effectively
Sure, you can create documents in Microsoft Word without making use of styles. You can also go grocery shopping without a basket, travel across town without transportation, or do laundry without detergent. But chances are that you wouldn’t work harder than necessary, spend extra time without added benefit, or embark on a task that’s likely to have inferior results if tools are available to improve the experience. That same philosophy is a good one to apply when it comes to creating documents.
Styles exist to save you time, simplify your work, and help keep your formatting more consistent and professional. They’re also integrated into many features, and they’re always in your documents whether you make use of them or not. So, trust me—you don’t want to be the guy with holes in your shoes and a bus pass in your pocket, wearing dirty clothes despite the full detergent box on the washing machine, and balancing boxes on your head while walking past a row of carts in the grocery store. It’s time to talk about tips, tools, and best practices for maximizing the power of styles in your Word documents.
Not much is new for styles in Word 2010 or Word for Mac 2011, but plenty of new tools were introduced in Word 2007 and Word 2008 for Mac that might still be new to you. So, we’ll look at key features like the Quick Styles gallery and Manage Styles tools. We’ll also examine best practices for some longstanding features that are often ignored or misused, such as base styles and the style for the following paragraph. And we’ll dispel a couple of myths while we’re on this subject, including all the reasons not to use Normal style in your documents (in case you are wondering, there are none).
On the Home tab, in the Styles group, you’ll see the Styles gallery (shown in Figure 8-1), which contains paragraph and character Quick Styles. These Quick Styles are just styles like any other, except that they are specified to appear in this gallery. So, ideally, Quick Styles (the contents of the Styles gallery) comprise the set of styles that are designed for use in the active document or template.
Word gives you the option to add any paragraph or character style in your document to the Quick Style list for that document. In addition, you can remove any style from the Quick Style list without deleting it from the document. You can also save the set of Quick Styles in the gallery for reuse in other documents, as addressed in the section Using Quick Style Sets, later in this chapter.
To remove a style from the gallery, right-click and then click Remove From Quick Style Gallery. Doing so does not delete or otherwise affect the style. To add a style to the gallery, select the Add To Quick Style list option when creating or modifying a style through the applicable dialog box. Or, in Word 2010, do one of the following:
When you create a new style on screen, the style is automatically added to the Styles gallery.
Click the drop-down arrow that appears when you hover your mouse pointer on a style name in the Styles pane, and then click Add To Quick Styles Gallery, as shown in Figure 8-2.
Figure 8-2. Add a style to the Styles gallery from the drop-down menu available for each style in the Word 2010 Styles pane.
Note that when a style is already included in the gallery, the option to remove it also appears on the menu shown in Figure 8-2.
Creating Styles on Screen
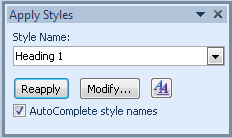
The Apply Styles pane in Word 2010, shown in Figure 8-3, contains the Style Name box (formerly called the Style box) that was available on the Formatting toolbar in versions prior to Word 2007. The familiar shortcut Ctrl+Shift+S opens and activates this pane. Once you’ve opened it, use the X at the top of the pane to close it. This pane can float or dock, and it contains options to reapply the active style, access the Modify Style dialog box, or open the Styles pane.
In Word 2011, the Formatting toolbar is still around and still contains the Style box you probably already know.
As in earlier versions, you can create a style on screen in either Word 2010 or Word 2011 by adding your desired formatting to a paragraph, typing a name for the style in the Style Name box (Style box in Word 2011), and then pressing Enter (Return).
Note, however, that when you do this in Word 2011, the style is not automatically added to the Styles gallery as it is in Word 2010.
In both Word 2010 and Word 2011, it’s also important to note that styles created this way are paragraph styles rather than linked paragraph and character styles.
Note
See Also To learn how to create a linked style on screen in Word 2010, see the following sidebar, Using the Shortcut Menu Style Options in Word 2010. To learn about linked styles for use in both Word 2010 and Word 2011, see the section Understanding Linked Styles, later in this chapter.
Tip
For those who like to use the Style list that now appears in the Apply Styles pane in Word 2010, but don’t want to relinquish the real estate, you can add the Style list on its own to the Quick Access Toolbar or even the Ribbon. To do this, on the Customize Quick Access Toolbar (or Customize Ribbon) tab of the Word Options dialog box, in the Choose Commands From list, select Commands Not In The Ribbon. This option is named Style and appears in the list with an i-beam cursor icon.
Using the Shortcut Menu Style Options in Word 2010
Word 2010 provides an additional option for creating styles on screen, applying styles, or updating styles. When you right-click a paragraph (unless the text is in a table), you see the Styles command. Point to this option for quick access to the Styles gallery and several style-related commands, as shown in Figure 8-4.

When you create a style on screen, using the entry point shown in Figure 8-4 to save the selection as a new Quick Style is nice, because it gives you access to the Create New Style From Formatting dialog box where you customize style attributes you can’t access on screen—such as changing the style for the following paragraph. Additionally, when you create a new style using this entry point, it is a linked style by default.
But be careful when you use this shortcut to access other style options. Accessing the commands beneath the gallery is a bit unwieldy, and it can be easy to accidentally apply an unwanted style. When it’s convenient to use, go for it. But note that every option available here is also available elsewhere. For example, Save Selection As New Quick Style is available from the bottom of the Styles pane and Update <Style> To Match Selection is available from the drop-down list for each style in the Styles pane.
Note
See Also To learn about linked styles, see the section Understanding Linked Styles, later in this chapter.
Open the Styles pane from the Home tab, in the Styles group. In Word 2010, click the dialog launch icon. In Word 2011, click the paragraph icon that appears in that group.
(Word 2010 users can also use the keyboard shortcut Ctrl+Shift+Alt+S to toggle the Styles pane open or closed.)
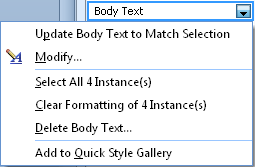
As always, just click a style name in this pane to apply it to the selection. Or, as shown earlier in Figure 8-2, click the arrow that appears beside a style name (when you hover your mouse pointer on the name) to expand a menu of shortcut options.
In Word 2010, these options include updating the style to match the selection, selecting all instances of the style in the document, modifying the style, deleting the style, and adding or removing the style from the Quick Styles gallery.
There are two small bugs to note for the Word 2010 Styles pane as of the date this chapter was written.
If you apply a style through any entry point other than the Styles pane, the selected style will not update in the Styles pane until you change your selection in the document (by starting to type in the paragraph, for example).
When you expand the menu for a style in the Styles pane, the Select All and Remove All options incorrectly indicate that there is no data available. Once you use one of these options during the current editing session in that document, the related data (that is, the number of instances of the style that are applied in the document) becomes visible for all styles in use in the main document story.
Note, however, that styles in use in other document stories (such as the header and footer or footnotes) will indicate that they are not currently in use even when they are.
In Word 2011, this menu includes the option to delete or modify the style, or to update the style to match the current selection.
Though this menu doesn’t include the Select All Instances option in Word 2011, the Select All button on the Styles pane in Word 2011 will select all paragraphs that use the same style as the current selection for your Print Layout view documents.
Caution
As of this writing, in Publishing Layout view, the Select All option in the Styles pane appears to select all text boxes regardless of their formatting. It’s actually not selecting them at all—it’s selecting the paragraph marks on the document layer (the inline text layer that’s not visible in Publishing Layout view). Because the text boxes you use in Publishing Layout view are anchored in those paragraph marks, they appear to be selected when this happens. In other words, this feature isn’t going to help you with your Publishing Layout view documents.
From the Styles pane, you can also click the New Style button (which appears at the bottom of the pane in Word 2010 and the top in Word 2011) to create a new style using the dialog box. And you can customize which styles appear in the pane.
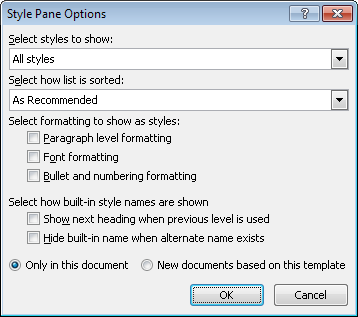
To customize which styles appear in this pane in Word 2010, on the bottom of the pane, click Options. The dialog box that opens lets you specify the list of styles to show, sort order, and additional options as shown in Figure 8-5.
In Word 2011, use the pop-up menu at the bottom of the pane to select which styles to show. This list provides the same options as in Word 2010, including the recommended list (default), styles in use, styles in current document, and all styles.
Unfortunately, the default recommended order is the order recommended by the Word creators—not by you. The recommended styles list and recommended order can be edited in Word 2010 but not in Word 2011. So, you might prefer to select a different option. For example, when creating a template for others to use, if you employ each essential style in sample content within the template, you can then use the In Current Document option to display only styles that are used in the active document.
However, remember that the Styles gallery on the Home tab (at least in Print Layout view documents) might be the easiest access point for the styles in the documents and templates you create for others. So, it may be more important to customize which styles appear in that gallery than in the Styles pane.
Note
For experienced users of either Word 2010 or Word 2011 who are interested in venturing into the XML under the hood of your documents, you can control the recommended styles list and its order (among many other aspects of style management) using some basic Office Open XML.
Note
See Also To learn about the basics of editing and managing your documents under the hood, check out Chapter 24. If you’re already familiar with the basics, you can jump to the section of that chapter titled Edit Styles in styles.xml to learn how to edit styles and manage the recommended style list using Office Open XML.
Note
See Also In Word 2010, the drop-down list for the style includes additional options for managing styles in your document, and the Styles pane includes options such as access to the Style Inspector and the Manage Styles dialog box. In Word 2011, the Style pane includes access to style guides and direct formatting guides. To learn about all of these features, see the section Managing Styles, later in this chapter.
In Word today, the term style sets has two definitions. It refers to Quick Style Sets that you can save from the styles in the Styles gallery, but it also still refers to what it always has—designing styles in your document to work together. Creating a style without giving any thought to how it will be used or how it will interact with other styles is quite likely to do more harm than good. To enable styles to do their job properly, create or customize document styles as a set.
Built-in styles are those that are available to a new Word document by default, before any custom styles have been created. A new, default Word 2010 document contains a whopping 264 styles before you even get started (273 in Word 2011), between those actually stored in the document and those that are added as you use applicable features (such as a header or a footnote).
As you can imagine, the number of built-in styles alone is a good reason to use them when they will work for your needs. After all, why add more styles to a document when you can just edit the existing ones? In the spirit of the “lazy operator” introduced in Chapter 1, you’ll get along best with Word when you don’t add anything to a document that doesn’t need to be there.
Let’s take a closer look at those built-in styles. The total number of built-in styles breaks down as follows:
93 paragraph styles
This category accounts for the different style count in Word 2011. An additional nine paragraph styles are included in Word 2011 for Notebook Layout View documents. The styles are named Note Level 1 through Note Level 9.
24 character styles
4 list styles
143 table styles
In Word 2003, a default Word document had 154 built-in styles available. The additional styles were added as of Word 2007 and Word 2008 for Mac. Of the 110 additional built-in styles added in those versions, 98 are table styles, 6 are character styles, and 6 are paragraph styles.
However, before you start screaming that this is crazy and you don’t want 264 styles in your documents, consider the following:
You—and anyone for whom you create documents—never need to see or interact with any styles other than those you want to use.
The built-in styles that exist in the documents have been designed into the program—their existence does no harm.
A great many built-in styles work with features you just might want to use one day, such as reference tables or captions.
Some built-in styles have unique properties that can save you time, such as the ability to generate a table of contents, cross-references, or a multilevel outline list from the Heading 1–9 styles.
In Word 2010 and Word 2011, only character and paragraph styles appear in the Styles pane and Styles gallery, so you don’t have to concern yourself with the 143 table styles or 4 list styles until you need them. List styles appear only in the Multilevel List gallery, and table styles only in the Table Styles gallery. The only negative there is that you might occasionally miss having the list or table styles you want to use handy in the Styles pane. But if you know the style name, you can still type it in the Apply Styles pane (Style box on the Formatting toolbar in Word 2011) to apply it in your document.
So, should you always use built-in styles rather than create your own? Of course not. There will be times when creating your own styles makes sense. The best practice is to first consider whether you can modify built-in styles for your needs, particularly when it comes to paragraph and character styles.
Because many built-in paragraph styles have additional properties for working with Word features, as discussed earlier, there’s an important added benefit to sticking with them. Common built-in paragraph styles are also named intuitively, such as Body Text, Heading 1–9, Header, Footer, or Footnote Text.
And then there’s the issue of Normal style, which is applied to text by default. If the majority of your document is regular text, why do the extra work of applying a style to every paragraph when it already uses one? Normal style is designed to use document defaults (which are discussed in the sidebar, Working with Document Defaults, later in this chapter), so it’s simple to update and can save you a lot of work when put to its intended use.
The most common reason to create your own styles is because a unique style naming convention is the most logical for users of the document or template you’re creating. However, using style aliases can be a good alternative to adding styles to the document.
Note
See Also For more on this subject, see the upcoming sidebar, Creating Style Aliases.
Word provides more character styles than you probably need, such as the styles with names that are more evocative of perfume marketing than document formatting (Intense Reference or Subtle Reference, for example).
Some character styles that might seem to be named nonintuitively—such as Strong for bold, or Emphasis for italics—take on those less direct names to make them more easily editable. For example, if you wanted to change all instances of bolded text in your document to underlined, the name Strong would still make sense if you changed the formatting contained in that style to be underline instead of bold. If that character style were named Bold, however, and you changed the formatting to underline, that would hardly be logical for other users of your document. Also remember that many character styles, such as Hyperlink, Page Number, and Footnote Reference, are required by Word features.
Note
See Also Learn more about working with character styles in the following section, Benefits of Using Character Styles.
Despite the 143 table styles, I usually create my own custom table styles rather than editing built-in styles. This is because most of the built-in table styles contain more formatting than I would include in a table style, and it’s more work to undo existing formatting in these styles than to create my own, clean table styles.
Note
See Also Learn more about table styles in the section Working with Table Styles, later in this chapter.
There are so few list styles that it often makes sense to create your own. Of course, if an existing list contains much of the formatting you need, there’s certainly more sense in customizing it than in creating your own. The goal of all styles, after all, is to save you work.
Note
See Also Learn more about working with list styles and multilevel lists in the section Mastering Lists, later in this chapter.
Caution
There’s a funky little bug associated with list styles in both Word 2010 and Word 2011 that you might run across when using the Manage Styles dialog box (Style dialog box in Word 2011). In fact, it’s a bug that’s been around for several versions of Word for Windows and has recently returned to Word for Mac.
If the styles Heading 1–9 are used in your document, when you scroll through the style list on the Edit tab of the Manage Styles dialog box (or, in Word 2011, the All Styles list in the Styles dialog box), stay away from the list style named Article/Section unless you mean to use it. If you just scroll over the style, it will automatically be applied to the heading styles in your document—even if you cancel out of the dialog box. If you aren’t aware of this when it happens, it might seem like the evil is at work and even make you wary of the document. But have no fear—it’s a harmless little bug. Just undo the last action (Ctrl+Z in Word 2010 and Command+Z in Word 2011) after you close the dialog box to remove that list formatting from your styles.
As discussed earlier in this chapter, some character styles are necessary because they work with Word features, such as the Footnote Reference or Page Number style. But if you just want to bold occasional words, for example, why use a character style rather than direct formatting?
The fact is that it’s often not necessary to use character styles in these cases, and doing so has no real benefits. Character styles used to offer different functionality from direct character formatting and could be retained more consistently when changes were made to underlying paragraph styles. However, in recent versions of Word, this has become a nonissue, because direct character formatting and character styles have similar retention behavior.
However, using character styles for that occasional bold word can be helpful in some cases, simply because those styles have a name and can be edited. For example, if you bold every instance of a client’s name throughout a long document and later decide that you want those to be underlined instead of bold, it’s much easier to make that change if you used a character style. If you used the Replace feature in that case to search for all bold text and replace with underline, you would also change any bold text that is part of the paragraph style, such as headings. However, if you have a character style for bold that you use in those cases, you can simply edit the style to make that change.
There is more to consider when creating styles than what the formatting will look like when it’s applied in your document. If the styles are not intuitive and easy to use, it doesn’t much matter how they would look in the document. The more you consider ease of use, the more likely styles will be used properly in your documents, so the more likely your documents will look consistent and remain healthy in the long term.
Two of the most important components for keeping styles easy to manage in your documents are also two of the most often overlooked: base styles, and style for the following paragraph.
Working with Document Defaults
Document defaults are an important factor in base styles, as discussed in the section that follows. Understanding document defaults can help you manage base styles much more easily.
In Word 2010, in the Manage Styles dialog box (accessible from the bottom of the Styles pane), you see the Set Defaults tab shown in Figure 8-6. From this tab, you can edit the default font and paragraph formatting settings for the active document or templates.
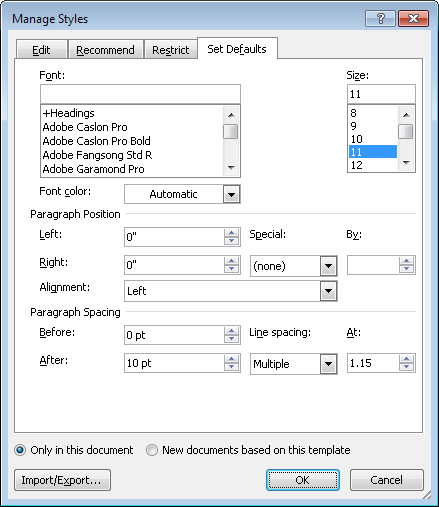
This dialog box is not available in Word 2011. However, in both Word 2010 and Word 2011, you can set font formatting defaults from the bottom of the Font dialog box—which you might recall from earlier versions of Word as well.
The ability to also manage defaults for paragraph formatting was added for Windows users in Office 2007. This additional functionality gives you quick and easy access to manage most of the defaults that are stored in your base styles without having to modify styles directly.
Most styles have another style upon which they are based. A style that uses a base style contains all the formatting settings in the base style (other than those you specify not to include) as well as its own settings. Whenever a base style is changed, any styles based upon it change as well.
The advantage of using a base style is that it saves time when you’re editing document formatting and keeps styles consistent. For this reason, Normal style is usually considered the best base style for most of your styles.
Normal is based on document defaults, not a base style, so it will change only when you edit it explicitly or when you change the default font or paragraph formatting for the document or attached template.
When you have a consistent base style, such as Normal, you simply change it to distribute the change automatically throughout the document styles.
For example, if your body text size is 12 points and you want to make it 10 points, simply make that change in the document defaults and it will update in Normal style. Any style based on Normal style (that doesn’t have font size defined in its style definition) will automatically change to reflect the new font size of its base style (Normal).
Normal is provided to be a base style, which is the only reason it’s better than any other style for this purpose. And, because Normal is based on document defaults, it’s easy to edit.
I’ve never found a reason to create a custom style to act as a base style. But if you prefer to create your own base style, there’s not likely to be any harm in it. However, to avoid unwanted chain reactions when you edit formatting, make sure that your base style does not have a base style of its own.
To create a paragraph style that has no base style:
In the Styles pane, click the New Style command to open the Create Style Based On Formatting dialog box (New Style dialog box in Word 2011).
After you select Paragraph or Linked as the Style Type, you can select the option “(no style)” from the top of the Style Based On list.
Caution
Keep in mind that base styles are designed to help simplify your work when you need to edit formatting. It’s not a good idea to create an entire set of styles without base styles. When you do this, you rob yourself of a key ease-of-use benefit of styles functionality.
For style types other than paragraph and linked styles, base styles are a bit different.
Character styles can use base styles. These styles are typically based on a character style named Default Paragraph Font, which essentially means that any properties not explicitly set in the character style will match the formatting of the underlying paragraph. The alternative to using a base style for character styles is the “(underlying properties)” option at the top of the Style Based On list, which refers to the font properties included in the document defaults. However, this option has the same effect as using Default Paragraph Font, so you gain nothing by taking the time to change this setting.
All table styles have base styles. Table Normal is the default base style for table styles and the best to use, unless you have a specific reason to base one style on another. Similar to Normal paragraph style, Table Normal is based on default table formatting (that is, no borders or shading, cells top aligned, left and right cell margins of 0.08 inches [1.9 millimeters]). All other built-in table styles are based on Table Normal.
All list styles are based on the style named No List. However, unlike other style types, list styles do not give you the option to change the base style. When you create custom list styles, they are automatically based on No List. For the logic behind this, see the section Mastering Lists, later in this chapter.
Note
The default base styles for character, table, and list styles—that is, Default Paragraph Font, Table Normal, and No List, respectively—are the only three built-in styles in Word that can’t be customized.
You may occasionally want to base one style on another. For example, you might want to base a subheading style on the heading style, so that a change to the properties of the heading style (such as font) would be updated automatically in the related subheading style. But tread carefully here, because basing one style on another is the quickest route to the “circular based on list” error, discussed in the following sidebar.
This paragraph style feature is one of my favorites, and it amazes me how often it’s ignored. Style for the following paragraph means the style you get when you press Enter (Return) to start a new paragraph.
By default for most styles, when you press Enter, you get the same style as you used in the preceding paragraph. (Some styles, such as Heading 1–9, are followed by Normal style by default.) However, when you create or edit styles, you can change the Style For Following Paragraph setting as appropriate to simplify workflow.
For example, if every page in your presentation template starts with a Heading 1 paragraph, followed by a Heading 2 paragraph, followed by a Heading 3 paragraph, why not set that up to be automatic?
You can customize this setting when you create a style through the Create New Style From Formatting (New Style) dialog box, or change this setting for any paragraph style through the Modify Style dialog box. To do the latter:
In the Styles pane, click the arrow beside the style you want to change and then click Modify.
In the Modify Style dialog box, select the style you want to follow your style from the list labeled Style For Following Paragraph.
The page heading example given earlier is the most common use for this feature. Another good example appears in the template I’m using to write this book, which was created by Microsoft Press. When I apply the style that’s a placeholder for a numbered figure that will appear in the chapter and then press Enter, I get the figure caption style. That’s a nice timesaver when there are a lot of captioned figures. It’s also a perfect use for this feature because those styles are always used together and always in the same order.
As with any feature, take the time to customize the style for the following paragraph only in examples like these, where it will simplify something for document users. It’s a common mistake to overuse this setting, adding confusion and complication rather than simplifying workflow; the example I see most often is setting each lower level of a multilevel list to follow the previous level. That doesn’t simplify anything—in fact, it can complicate use of the outline-numbered styles—because you won’t always want the lower level style to follow the higher level. Outlines frequently have body text between numbered paragraphs or consecutive paragraphs on the same level.
Essentially, change the style for the following paragraph only where styles will be consistently used in succession.
Have you ever selected just a few words in a paragraph and then applied a paragraph style, only to have the style apply as if it were a character style—in other words, just to the selected text? If so, you were using a linked style.
In Word 2010, you see this additional style type in the Styles pane and as an option when you create styles through the dialog box. Linked styles are just paragraph styles that you can also apply as character styles (that is, apply only the font formatting from the style to just part of a paragraph).
For Windows users, linked styles were first exposed in Word 2007. Before that, you could use built-in linked styles as both paragraph and character styles (such as the styles Heading 1–9), but there was no visual indication in Word of which styles were linked, and you could not create your own linked styles. In Word for Mac, this is still the case with Word 2011.
In the Styles pane, notice that paragraph styles display a paragraph symbol, and character styles display the letter a to represent a character. In Word 2010, linked styles display an icon that includes both the character and paragraph symbol.
Nearly half of all built-in paragraph styles in Word 2010 and Word 2011 are actually linked styles.
Note
One more little style-related tip for Word 2010 VBA users: if you check your document styles by type in VBA, you’ll see 93 paragraph styles as noted earlier. If you check the number of linked styles, it will indicate zero. Word 2010 VBA includes a constant for the linked style type but recognizes those styles as paragraph styles.
Note
See Also As noted earlier, experienced Microsoft Office users who are curious about VBA—such as if you’re interested in making the move from recorded to written macros—can learn all the basics you need to get started in Chapter 23.
When you plan the styles for a document or template, keep in mind the following basic best practices for helping to ensure ease of use:
Use styles, like any other Word feature, only when doing so will simplify your work and the document. The majority of documents and document content do benefit from styles, but creating a mass of styles just to avoid using any direct formatting is overcomplicating their purpose and will likely lead to overburdened documents that are difficult to edit and manage.
Keep the set of styles as simple as possible. For example, don’t create three identical styles with different names just for content in separate parts of the document. Having too many styles confuses users and is just as likely to result in inconsistent formatting as not using styles at all.
Use intuitive style names that will make sense to document users. When creating your own custom styles, use a consistent naming convention.
Consider base styles, style for the following paragraph, and linked styles when developing your style set and check your completed set of styles for proper use of these three features.
Be sure that you use theme-aware colors and fonts in your styles if you want them to be able to update when the document theme (or a theme element) is changed.
Note
See Also Using theme-aware formatting in styles is a critical element in creating effective templates. To learn about working with themes, including how to recognize theme-aware formatting in styles, see Chapter 5.
Include only those paragraph and character styles you want users to access in the Quick Style list.
Note
See Also To learn about using the recommended style features for controlling which styles users see, refer to the Managing Styles section later in this chapter.
Once you have customized the Styles gallery to contain only the styles you want users to access, you can save the styles in that gallery as a Quick Style Set for use in other documents.
A Quick Style Set is a type of template that contains only paragraph and character styles. You can apply one to any document without changing the attached template. A Quick Style Set changes nothing but the makeup of paragraph and character styles in the document.
Word comes with some built-in style sets as well, and you can find both these and your custom style sets in the same location.
To access Quick Style Sets, on the Home tab, in the Styles group, click Change Styles (the Change Quick Style Settings icon in Word 2011).
In Word 2010, point to Style Set to see the list shown in Figure 8-7. In Word 2011, the list of available Quick Style Sets is immediately visible when you click the Change Quick Style Settings icon.
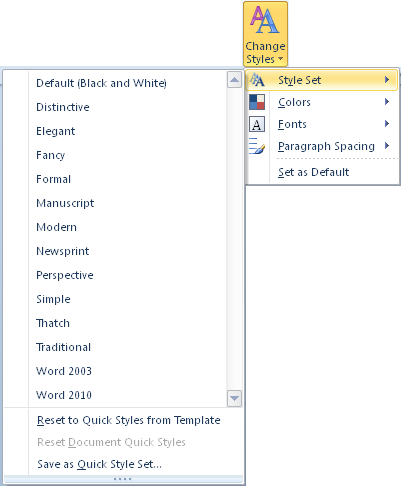
In Word 2010, you can point to style set names to preview them in your document. Of course, you will see previews only if styles with the same names as those contained in the set are applied in the active view of your active document.
In both Word 2010 and Word 2011, you can just click to apply the style set to your document. When you do, styles in your active document with the same names as those in the style set will update to take on the definition from the style set. Additional styles in the set that were not in your active document will also be added.
Note
If you include a style in the Quick Style list (a.k.a., the Styles gallery) and it doesn’t appear in that gallery, it might be set to be hidden until used. If this is the case, as long as it’s included in the Quick Style list (which you can confirm by checking that option in the Modify Style dialog box), it will be included in your style set.
Note
See Also To learn about style settings such as Hidden Until Used, see the section Managing Styles, later in this chapter.
To save the contents of your active Quick Style list as a new Quick Style Set:
In Word 2010, on the Home tab, in the Styles group, click Change Styles and then point to Style Set.
In Word 2011, on the Home tab, in the Styles group, click the Change Quick Style Settings button.
At the bottom of the Style Set gallery, click Save As Quick Style Set.
Name your new style set and then click Save. The new style set name will automatically appear in the Quick Style Set gallery.
At the bottom of the Quick Style Set gallery, note that you also have options to reset the Quick Styles in your document to the defaults for the document or to the settings in the attached template.
Quick Style Sets are a clean and simple option for when you need to provide consistent sets of styles for a group of users, without dictating layout or other template elements. Quick Style Sets can also be great for people who create content for multiple clients.
For example, I often write for different Microsoft websites, many of which have their own style requirements. Instead of saving several document templates when all I need is a set of styles, I have separate Quick Style Sets to apply to blank documents when I’m writing content for different groups.
Note
See Also Because Quick Style Sets are saved as Word templates, you can edit them easily. To learn more about editing and managing Quick Style Set templates and other types of Word 2010 and Word 2011 templates, see Chapter 22.
Do you believe bullets and numbering to be buggy or simply bewitched? Are you amazed (or, perhaps, appalled) at the ability of the lists in your documents to morph, seemingly at will, into unexpected forms? If so, you’ve come to the right place.
Let’s face it—bullets and numbering in Word is not the most intuitive feature to use.
Was that the understatement of the year? Perhaps. But the truth is that bullets and numbering in Word can be easy to use and quite manageable. If you don’t believe this yet, give it a chance. When you use the guidelines and best practices provided here, you just might be convinced.
There are a number of different ways to create and apply lists in Word, which probably isn’t news to you. For our purposes, we’ll whittle it down to two essential types of lists and take it from there: single-level lists and multilevel lists.
A multilevel list is one list that is set up for as many as nine levels of bullets or numbering.
When you’re working in a multilevel list, you can apply the paragraph style associated with a particular level to apply that list level to the paragraph. You can also use the Tab and Shift+Tab keystrokes with your insertion point at the beginning of a numbered or bulleted paragraph to demote and promote the list level, or use the Increase Indent and Decrease Indent buttons on the Home tab, in the Paragraph group.
Note
In Word 2010 (and PowerPoint 2010, by the way), you can also use the keyboard shortcut Alt+Shift+left or right arrow to promote or demote paragraphs. Unlike Tab and Shift+Tab, these shortcuts will change your list level whether or not the active level uses a bullet or number, as long as it is part of the multilevel list.
A collection of single-level lists is not the same thing as a multilevel list. If you set up several styles, for example, to each use bullets or numbering and look like a multilevel list, but there is no single entry point to edit all levels and you can’t use the methods mentioned in the preceding bullet to change list levels, you’re not working in a multilevel list.
If you need more than one or two levels, create a multilevel list to simplify your work and save time. Multilevel lists also provide benefits such as automatically restarting the numbering of a lower level after a new higher-level paragraph. Word 2010 also gives you a nice shortcut (introduced in Word 2007) that enables you to set stepping indents for all nine levels at once.
If you start a list on screen using AutoFormat As You Type settings, it is automatically a multilevel list. Sort of. It’s referred to as a hybrid list. That is, it can have up to nine levels of bullets and numbering with unique indents for each level. But those levels will all be attached to the same style.
Note
AutoFormat As You Type enables you to type combinations such as the number one, a period, and a tab at the start of a paragraph before your text. Then, when you press Enter (Return) for a new paragraph, it converts your typed number to a list and begins to automatically number paragraphs. To use this feature for bullets, type an asterisk or a dash, followed by a tab character, at the start of the first paragraph for your list.
The idea behind this is that you might need a single-level list now but could end up needing additional levels later, so they’re there if you need them. Additionally, the reason for all levels being attached to the same paragraph style is that for lists that are simply the body content of a document, you might want the formatting of all levels to be the same other than the bullet or number and the indents.
When you start a style this way, the List Paragraph style is attached to your list by default. You can then change the formatting of List Paragraph, such as changing paragraph or line spacing settings, to affect all levels of your list.
A single-level list is exactly what it sounds like: one type of automatic numbering or bullets with one related set of indents. You can apply this as direct formatting or include it in a style.
Many built-in styles are designed to work with lists. One purpose of Heading 1–9 styles is to work with multilevel lists. The styles named List Bullet and List Number are good choices for single-level lists. Or, when you need more than one multilevel list in the document, note that there are built-in styles for List Number and List Bullet through level five, as well as built-in styles named List through List 5. Additionally, List Continue through List Continue 5 are designed for paragraph text between bulleted or numbered paragraphs, so that you can have multiple levels of styled text to sit at the correct indent for a given level.
A list style is not another type of list. It is, essentially, packaging for a multilevel list. That is, it’s a multilevel list that’s given a name so that it can be accessed and edited more easily.
List styles can contain all of the same functionality as multilevel lists. The main difference is that a list style is named, so you can save it and share it. A multilevel list that is not part of a list style appears as though it can’t be modified. However, what that actually means might be different than it seems. Check out the following section for more information on this subject.
The things that frustrate list users are often a result of the way Word might make you believe lists work. In software terminology, we’d say that the features are poorly exposed. In the real world, that just means the way you need to access and use these features isn’t intuitive; it can be confusing and misleading. But it doesn’t have to be. So, let’s cut through the confusion and tackle some of the most common list issues.
Rule number one of simplifying list formatting is this: if it can be controlled by the list, it must be controlled by the list.
This rule applies most often with indents and alignment, discussed in the list that follows. But it’s a good point to keep in mind regardless of what you’re doing with the list. Don’t go through paragraph formatting or a paragraph style to control what the list can do. Always use the list-related dialog boxes to apply any available formatting or settings for your list (such as customizing indents or attaching a style to a level of a multilevel list). Follow this one simple rule and even if you don’t read any further, you’ll start to like Word lists a little bit better.
In addition to this essential rule for keeping your lists working correctly, keep the following points in mind:
You can change bullet and text indents in the multilevel list dialog box (and, in Word 2011, the single-level list dialog boxes as well). But you can also change indents in the Paragraph dialog box or on the ruler, right? Nope.
Word doesn’t give you any visual indication that it’s a problem to set indents for bulleted or numbered paragraphs through paragraph formatting, but just don’t do it. Remember, if formatting can be controlled by the list, it has to be controlled by the list or it’s unlikely to stick.
For Windows users, the question of how to set indents for your list levels became especially confusing as of Word 2007, when indent settings moved out of the dialog box options where you customize single-level lists. It seemed logical then that you could just set indents as you do any paragraph formatting. But it’s not so.
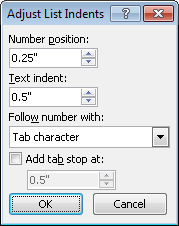
Right-click an automatic bullet or number in Word 2010, and you see the option Adjust List Indents, as shown in Figure 8-8.
Notice that this dialog box has the same options that you used to have in the single-level list dialog boxes for setting indent behavior and number alignment within the list. For single-level lists in Word 2010, right-click is the only built-in way to access this dialog box. You can, however, add it to your Quick Access Toolbar, the Ribbon, or a custom keyboard shortcut.
The important thing to remember here is just to use this dialog box to adjust indents and related settings for your list. Don’t use the ruler or the Paragraph dialog box, or your indents won’t stick under all circumstances.
Note that when you click the Adjust List Indents command when working in a multilevel list or list style, Word opens the Define New Multilevel List dialog box.
Note
See Also Learn more about working with indents and alignment in lists in the two upcoming sidebars Understanding Number Alignment and Text Indent and When I Use Center Paragraph Alignment, Automatic Numbering Is Not Correctly Aligned.
In Word 2011, the dialog boxes for working with all types of lists remain much the same as they have been for several versions (and are consistent with the Bullets And Numbering dialog box that Windows users know from Office 2003). As you see in Figure 8-9, the Bullets And Numbering dialog box includes tabs for single-level numbered and bulleted lists, outline numbered (multilevel) lists, and list styles. On each tab, you have a gallery and a Customize command through which you can configure list settings.
Only the way you get to the features here differs from Word 2010 in terms of all best practices discussed in this chapter. The underlying concepts of how lists work in Word and how to keep them working properly for you are exactly the same.
Do not set the Start At value for any level of your list, unless you have a specific requirement in your document to do so. When you set the Start At value, that number is no longer dynamic, so it will not change to accommodate changes in your list.
I can’t tell you how many times someone has told me that the numbering in the document was corrupted because it didn’t update correctly. Of course there’s no corruption at all. Without fail, this happens either because someone faked numbered paragraphs at some point in the document (by typing in numbers rather than using the automatic list), or used the Start At value setting to specify the number.
The Start At value is designed for cases when you specifically need to start the list somewhere other than at the beginning (such as if a document is split into multiple files and the list extends across those files). But don’t ever use this setting as a workaround because numbering isn’t updating correctly and you don’t know why. Instead, check the paragraphs that are supposedly part of the list to ensure that they all use automatic numbering and are part of the same list.
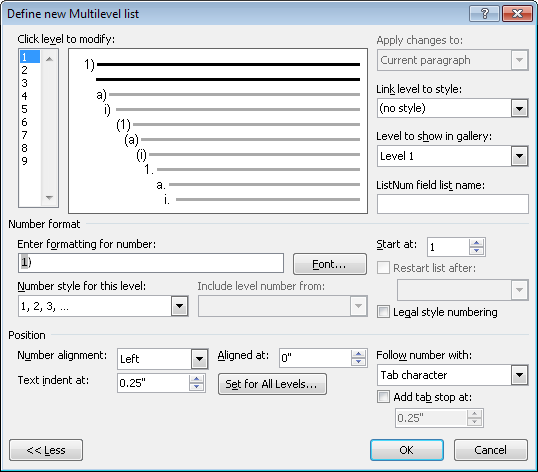
Do not type numbering into the Number Format box in any list-related formatting dialog box. (In the Word 2010 Define New Multilevel List dialog box, this box is called Enter Formatting For Number, as you see in Figure 8-10.)
Figure 8-10. The Define New Multilevel List dialog box, shown in Word 2010. Notice the Enter Formatting For Number box (called Number Format in all other list-related formatting dialog boxes).
When you select a number style from the Number Style list shown in Figure 8-10 (or the similar lists in the single-level list dialog boxes), it is added to the Formatting box as a field, so it will update dynamically. Any text (such as a period) that you type into the Number Format box is static and thus will always be the same for each new paragraph on that level.

Understanding Number Alignment and Text Indent
Alignment in list-related dialog boxes refers to the numbers or bullets themselves and does not affect paragraph alignment. For example, if you change number alignment to Right, then two-digit numbers are right-aligned with single-digit numbers in the list. The alignment of the paragraph is completely unrelated.
(Note that, for single-level lists in Word 2010, the number position and text indent settings are in the Adjust List Indent dialog box, and the number Alignment setting is in the Define New Number—or Bullet—dialog box.)
The Number Position (or Bullet Position) corresponds to the paragraph’s first line indent. The Text Indent/Text Position setting refers to the paragraph’s hanging indent (that is, the left indent for all lines of the paragraph except the first).
Don’t be concerned if you look at the definition for an associated paragraph style for a level in a list—or in the Paragraph dialog box—and see settings instead for left indent plus either hanging indent (most common) or first line indent. This is because first line and hanging indents are, technically, mutually exclusive. When you set both a first line and a hanging indent through an applicable bullets and numbering dialog box, Word views the smaller of those indents as the left indent, because it is the leftmost edge of the paragraph.
For example, Figure 8-11 shows the list indent formatting for a bulleted paragraph with a hanging indent, alongside the related style definition indent settings. Notice that the bullet position is included in the style definition as the left indent, and the text indent is the hanging indent (although in the style, or in the Paragraph dialog box, the measurement of the hanging indent excludes the width of the left indent).

Some issues with lists are not about best practices, but about understanding what Word is trying to do—or trying to tell you. The following list hopefully clarifies some common points of confusion:
You apply a multilevel list (with or without a list style). But when your insertion point is in a paragraph that’s part of the list and you look on the Home tab, the single-level list button is highlighted.
Just ignore this and don’t touch the single-level list options when you’re working in a multilevel list.
To modify the multilevel list if it is not in a list style:
On the Home tab, in the Paragraph group, click the Multilevel List button and then click Define New Multilevel List.
To modify the multilevel list if it is in a list style:
In Word 2010, in the Multilevel List gallery, right-click your list style where it appears in the List Styles section of the gallery and then click Modify. You can also access the Modify Style dialog box from the Edit tab of the Manage Styles dialog box.
In Word 2011, on the Format menu, click Styles. Your list style appears in the style list; just select it and click Modify to open the Modify Style dialog box, as you would for any type of style.
You might have noticed that the preceding instructions tell you to use Define New Multilevel List to modify a multilevel list. But if the command is called Define New, then how is that modifying an existing list? Yes, that’s as confusing as it sounds. But it doesn’t have to be.
The theory is that only a list style can be modified; a multilevel list that’s not part of a list style cannot be. However, the stored list templates in your document tell a different story. One of the main justifications for using list styles is to help minimize the number of list templates in a document. Although there might be good reasons to use list styles (primarily, the ability to share them more easily because they are named), when you have your insertion point in an active list and use the Define New Multilevel List dialog box to edit that list, it updates the existing list in your document and doesn’t add a new list template.
However, if your list uses a list style and you use the Define New Multilevel List command to edit the formatting, it will add a new list template and will not update the list style. So, if you are using a list style, be sure to modify that list style instead when you need changes. (This concept is the same as updating a style rather than applying direct formatting to all instances where you want to change the appearance of that style.)
Note
See Also To learn more about list templates, see the upcoming sidebar Is It True That Too Many List Templates Causes Document Corruption?
If you apply an entry from the Multilevel List gallery in your document, it is applied as a multilevel list, not a list style, unless you selected it from the List Styles category in that gallery. (Note that this category appears only when list styles are in use.)
The reason that this warrants mentioning is that some of the gallery options look like built-in list styles (such as Article/Section). But they’re not. If you want to use the related list style, apply it from a Style dialog box where you see this list style. (Or, in Word 2011, from the List Styles tab of the Bullets And Numbering dialog box.)
You can attach a style to each level of a multilevel list or list style. However, it’s important to understand that the paragraph styles you attach to the list levels are not part of the list style.
Paragraph style names are attached to a list definition, whether that list is in a list style or not. But the definitions of those paragraph styles are stored separately. For this reason, if you copy a list style to another document or template, you must copy the related styles as well if you want the list to retain the same appearance in the new document.
Note
See Also Learn how to share list styles in the section Sharing Lists Between Documents and Templates, later in this chapter.
Can you stop Word from automatically applying the List Paragraph style to your lists?
In Word 2010, you can enable a setting in Word Options to use Normal style for bulleted and numbered lists (that is, the lists that you start using AutoFormat As You Type options). Click the File tab, click Options, and then click Advanced. Find this setting under Editing Options at the top of the Advanced tab.
In Word 2011, you can’t turn off this behavior. However, in both Word 2010 and Word 2011, the style is applied automatically only when you use the AutoFormat As You Type method to start your list. You can also just start a single-level list by customizing either the List Bullet or List Number style; that method works regardless of whether you work on Windows or Mac OS.
Why is there no space between paragraphs in your list?
In Word 2007 and Word 2008 for Mac, Word added a setting to the Paragraph dialog box named Don’t Add Space Between Paragraphs Of The Same Style. This setting was designed for use with bulleted and numbered lists, based on the idea that you might want bulleted or numbered paragraphs to be together and just have space before or after the list.
If that works for you, great. That attribute is on by default in List Paragraph and the List Bullet and List Number styles. If it doesn’t work for you (and it rarely works for me, because no space makes a list very difficult to read), you can just turn off that feature and update the style.
Remember, you can update styles in the document template—including Normal.dotm—which will make your changes the default for new documents based on the template. In Word 2010, the option to apply the changes to new documents based on the template is located in the Manage Styles dialog box. In Word 2011, find the Add To Template command in the New Style and Modify Style dialog boxes.
Why Do Bullets and Numbering Disappear At Will?
Although they may seem to disappear at will, your bullets and numbers disappear because you did something in the document to make that happen. But it wasn’t your mistake. This is a genuine bug. Fortunately, you don’t usually need to recreate this formatting at all. There is a fast and easy fix.
One common way to inadvertently delete your bullets and numbers is to paste (from another document or template) a bulleted or numbered paragraph that uses the same style as an existing bulleted or numbered paragraph in your current document. Instead of the pasted paragraphs taking on the destination formatting for the style, all existing bullets or numbers that use that style in the destination document often disappear, leaving nothing but perhaps a sad tab character at the start of the paragraph.
The most important thing to know when this happens is that your document is not corrupt. This is just a list-related bug, and you can get your bullets back in a jiffy by following these steps:
In Word 2010, in the Manage Styles dialog box, click Import/Export.
In Word 2011, in the Styles dialog box, click Organizer.
The Organizer dialog box opens, as you see in Figure 8-12.
On the Styles tab of that dialog box, notice that your active document is listed on the left and Normal.dotm is on the right. Under Normal.dotm, click Close File. The command changes to become Open File.
Click Open File and then browse to either another document or a template that contains the same bulleted or numbered style as the one that was ruined in your active document. (If more than one bulleted or numbered style was altered, you can copy in multiple styles at once using this method.)
If the file you want to access is a document rather than a template, be sure to change the file style drop-down list selection in the Open dialog box to All Word Documents (it is All Word Templates by default).
Select the file containing the correct version of your style(s) and then click Open. The list of available styles in that document appears on the right side of the dialog box.
On the right side of the dialog box, select the style(s) that you want to replace. You can use the Shift or Control (Command in Word 2011) keys to make multiple selections if needed. Then click the Copy command in the center of the dialog box.
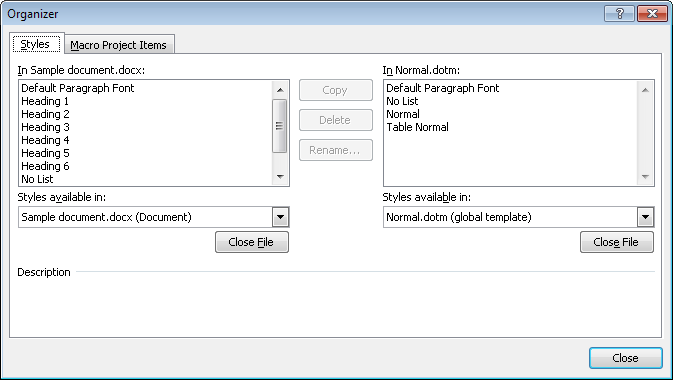
When you click Close, the affected bulleted or numbered styles in your document should be corrected.
If your affected bullets and numbering were not in styles or if you don’t have another document or template from which to get the styles in their correct state, try adding the bullets or numbering back through the applicable single-level list or multilevel list dialog box. Just remember the rule to let the list control what it can and don’t try to do this by modifying the paragraph styles. Update the bullets or numbering in one instance of the style. Then, if Word doesn’t automatically prompt you to add that formatting to your style, update the style to match the selection as addressed earlier in this chapter.
To copy a list style between documents or templates, use the Organizer mentioned earlier in the sidebar Why Do Bullets and Numbering Disappear At Will? and shown in Figure 8-12.
Notice in the Organizer that you can select any document or template for both the left and right sides of the dialog box. So, you can actually copy the styles without having either document open, or when the destination document is open instead of the source document.
When you want the formatting to remain the same in the destination document, the important thing to remember is to copy the list style and all of its associated paragraph styles together.
Once you have copied a list style, it will appear in the Multilevel List gallery whenever the destination document or template is open. As long as you copy all associated paragraph styles along with the list style, the relationship between the list style and its paragraph styles, as well as all list style formatting, will remain intact.
Table styles are available only when your insertion point is in a table. They do not appear in the Styles pane.
When a table is active, see available table styles on the Table Tools Design tab (Tables tab in Word 2011), in the Table Styles group, as you see in Figure 8-13.

Figure 8-13. The Table Styles gallery on the Table Tools Design tab in Word 2010. The same gallery and additional options appear on the Tables tab in Word 2011.
In the Table Styles gallery, you’ll find 99 table styles, including the default style, Table Grid, as well as the 98 theme-aware table styles mentioned earlier.
To create a new table style, just right-click a style in the gallery and then click New Table Style. You can also click the New Style button on the Styles pane and then select Table as the style type. And, in Word 2010, the New Table Style command is also available at the bottom of the Table Styles gallery.
When you add formatting to your style, notice the list labeled Apply Formatting To, as shown in Figure 8-14. Be sure to change this setting as needed to specify formatting for the entire table, a heading row, first column, or other table element.

By default, new tables are formatted with Table Grid style, which is the Table Normal base style introduced earlier, plus a half-point width grid of borders on all cells. Depending on the way you use tables, however, that grid might not be appropriate for most tables.
For example, I use tables frequently for laying out pages, as discussed in Chapter 9. When a table is used for layout, it’s not usually appropriate for the grid to appear. For this reason, I set Table Normal to be the default for all new tables I create.
In another example, when I’m creating branded templates for my clients, they often have a custom table style that coordinates with their branding. To make it easy for users to get this formatting, I set that custom style as the default in the particular template.
A default table style can be set by document (or, in Word 2010, by template), so if you have a table style designed for the tables in your document, you can set that style as the default to save time and help ensure consistent formatting.
To set a table style as the default:
Right-click the style where it appears in the Table Styles gallery and then click Set As Default.
In Word 2010, in the Default Table Style dialog box that opens, specify whether to make the selected style the default for the active document only or for all new documents based on the active template and then click OK.
In Word 2011, the default is automatically set in the active document. If that document is a template, the default also applies to new documents based on that template.
When you are responsible for a document’s formatting, or creating documents and templates for yourself and others to use, managing styles is a big part of your job. In Word 2010, the Manage Styles dialog box (which has already been mentioned many times in this chapter) gives you a range of tools that make this much easier to do.
As shown throughout this chapter, this dialog box combines the Style dialog box functionality of versions prior to Word 2007 (an access point to create, modify, or delete styles, as well as to access the Organizer) with capabilities including the ability to prioritize, restrict, and show or hide styles, as well as to set font and paragraph defaults.
The Edit tab of the Manage Styles dialog box offers the equivalent of the Style dialog box in the previous version of Word.
On the Recommend tab of this dialog box, you can prioritize the order in which styles appear (referred to as the recommended order) and specify whether a style is visible, hidden, or hidden until used.
Note
See Also To learn about how the settings on this tab affect the display in the Styles pane and Styles gallery, see the section Understanding the Style Environment Today, earlier in this chapter.
To prioritize styles, click the Move Up, Move Down, or Make Last buttons, or click Assign Value to prioritize the style by assigning it a numeric value. This last option is a timesaver because styles with the same numeric value are automatically alphabetized in the Styles pane and Styles gallery.
Though the option to Show, Hide, or Hide Until Used can be handy, be careful with these when considering the usability of your document. For example, Hide Until Used is an excellent setting for built-in styles that apply only to certain parts of the document and are applied in those locations by default, such as Header or Footer, because they will remain out of the user’s way until needed. However, don’t use this setting for the styles you create or customize for use in the body of your document. After all, users can’t use a style unless they know it exists.
On the Restrict tab, you can permit or restrict the use of specified styles, as well as block styles from changing formatting if another theme or Quick Style Set is applied in the document. Note that when you set a style to be restricted, a lock icon appears next to the style name on this tab, and Locked will appear as an attribute in the style description where it appears on the Edit tab.
Setting restrictions on this tab will prompt you to enable document protection when you close the Manage Styles dialog box. Note also that locked styles are automatically hidden, regardless of their Show or Hide setting on the Recommend tab.
On the Set Defaults tab, you can set defaults for font, font color, and font size, as well as paragraph indents and spacing.
Note
See Also For more on this subject, see the section Working with Document Defaults, earlier in this chapter.
Notice that for all tabs in the Manage Styles dialog box, you can apply your settings to the active document or to all new documents based on the active template.
![]() In Word 2010, at the bottom of the Styles pane, click the Style Inspector icon (shown at left) to open the Style Inspector dialog box, shown in Figure 8-15.
In Word 2010, at the bottom of the Styles pane, click the Style Inspector icon (shown at left) to open the Style Inspector dialog box, shown in Figure 8-15.
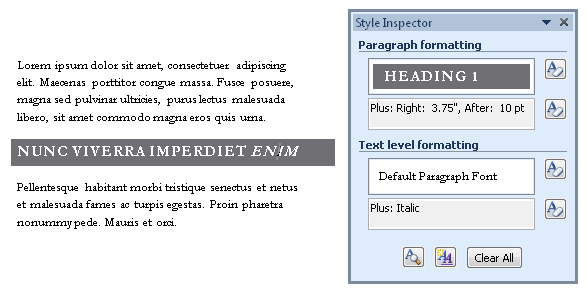
The Style Inspector is a simple but invaluable pane that enables you to distinguish styled from direct formatting in selected text. This tool is great to use when troubleshooting document formatting because you can distinguish what formatting belongs to the style and quickly clear either direct or styled formatting at both the font and paragraph levels.
Note
If you don’t see direct formatting in the Style Inspector pane when your insertion point is in text that you know contains direct formatting, check your settings in Word Options. To do this, click the File tab and then click Options. On the Advanced tab of the Word Options dialog box, under the Editing Options heading at the top of the pane, select Keep Track Of Formatting.
Notice the icon at the bottom of the Style Inspector pane, which is very similar to the Style Inspector icon but actually opens the Reveal Formatting task pane.
Note
See Also To learn about using Reveal Formatting in Word 2010 and Word 2011 to stay in control of document formatting, see Chapter 6.
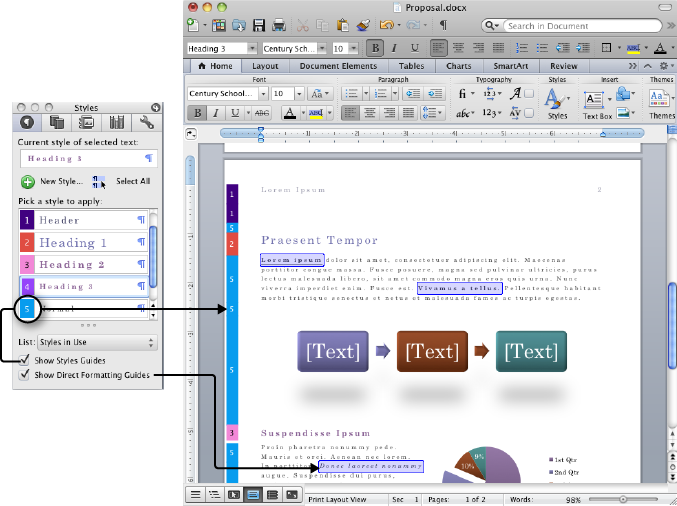
In Word 2011, Mac users get a cool new tool, known as visual styles, that gives you an instant, clear look at the styles and direct formatting in your Print Layout view documents.
To use visual styles, at the bottom of the Word 2011 Styles pane, click Show Style Guides and Show Direct Formatting Guides. Figure 8-16 shows you what happens when you select these options. However, a black-and-white book can’t do the feature justice; the style guides are color-coded for a crystal-clear view of where each style is applied in the document.
Direct formatting guides here are the bubbles (actually blue bubbles) that surround text at certain points in the document. These don’t call out direct paragraph formatting—just direct character formatting (and note that they will pick up some types of international characters as well)—but can still be extremely useful.