
This chapter dives into the technical details of the Dojo framework. We review the files and directories you get when you download Dojo and peak inside to see what treasures lie there. If you’re like me, when reading a technical book, your eyes quickly pass over the prose and focus on the code samples—a new programming paradigm just doesn’t make sense until I see the code. We review some of the basic features of Dojo and describe others at a high level for subsequent explanation in further chapters. When you’re through with this chapter, you’ll know what’s inside the pretty gift box that is Dojo!
Just a reminder: When you’re reading this chapter you might get that “déjà vu all over again” feeling. After all, you’ve already been introduced to some of these same topics in the tutorial in Chapters 1 through 5. For example, you’ve probably already downloaded Dojo for the tutorial. The intent of the chapters in Part III is to dive down deeper than we could in the tutorial. Think of these chapters as flying over the same terrain but at a lower altitude so that more of the details are clearer!
Before we can examine Dojo, we have to go get it. The most direct technique for downloading Dojo is to go to the Dojo web site and look for the download link on the front page. The link provides us the current stable release for Dojo. The front page also contains a link to the download page, which allows you to get older versions or even versions that are newer but might not quite be ready for general release yet. Unless you really need some cutting edge feature in a beta release, your best bet is just to get the current stable release.
The Dojo site is at www.dojotoolkit.org. Here is a current image of the page with the download icon visible on the right of the screen shot. The callout points to the download button.

You will then be directed to the download page, which will show a huge button labeled “Download Now.” Click the download button and follow the instructions to save the file on your computer. The file ends in the extension “.gz,” which means it is an archive file and you need to unzip it. Most unzip utilities that work with “.zip” files will also be able to extract “.gz” files as well.
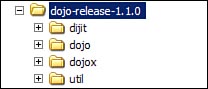
It will create a directory structure where the top-level directory name corresponds to the version number of the product. Inside that directory will be four subdirectories. Here’s an image of the directory structure for version 1.1 of Dojo. Your actual version number may be different, of course.
Although it isn’t necessary yet, you may wish to follow along with this text by browsing through the Dojo files on your own computer. At this point, you may put your Dojo files anywhere and choose your own tools to browse them. As I write this chapter, I’m using Eclipse to view the directories and read the files.
We’ve now downloaded Dojo, but exactly what is it that we’ve gotten? Dojo is just a bunch of files organized in a hierarchy of directories and subdirectories. Wow! That’s helpful. But what kind of files do we have, and what is the scheme used to organize them? Simply put, most of the files contain JavaScript functions, and they are organized by module (a group of related functions). Along with the JavaScript files (over 300 of them) are a handful of files containing such things as license text and other stuff. Let’s drill down level by level into Dojo and explore what we have.
The main directory in my downloaded code is called “dojo_1.0” and consists of four subdirectories. These represent the four major categories of Dojo features. Let’s describe each subdirectory.
Here are all of the functions and constructors in Dojo except for the widgets. Some developers are using Dojo only to get access to the many visually stunning and highly functional GUI widgets that it provides, so they may be surprised that there is an entire hidden underworld in Dojo consisting of many functions to make JavaScript coding easier but that don’t require GUI widgets at all. This directory is where all that under-the-hood plumbing code resides.
Here are the Dojo widgets. Why didn’t the creators of Dojo just combine this with the “dojo” directory? Actually, that is how early versions of Dojo were packaged. But by separating out the widgets from the rest of the Dojo code, it made Dojo more organized. And even more importantly, it makes it easier for developers to use just the parts of Dojo they need.
These are the extended features of Dojo that, for one reason or another, are not considered ready to be included in “dojo” or “dijit” yet. The reasons for exclusion. The functions may not be robust enough. They may not be fully internationalized yet, or maybe they won’t be used by enough developers to justify taking up space in the main “dojo” directory. Then why include them at all? Well, for those developers who do need them, the functionality is very powerful and useful. Over time, functions in “dojox” may migrate into “dojo” or “digit.”
Now let’s drill down into the second level of directories and files, starting with “dojo.” Here’s an image of the directory for my version of Dojo.
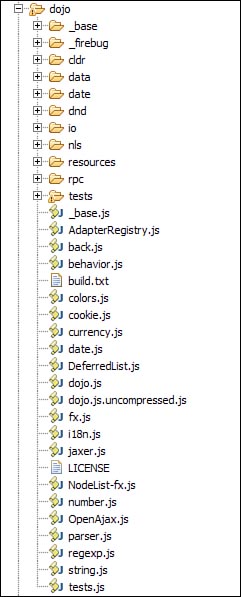
As you can see, this directory is pretty full. At first it may seem like a confusing mix, but we’ll “peel the onion” one layer at a time so that we can really understand what it contains. Let’s view the directory from 20,000 feet: There are various subdirectories and then some JavaScript files along with one text file called “build.txt.”
Let’s start with the most important file first: “dojo.js.” Why is it the most important? Because it is the first file that you include in your web pages to make Dojo functions available to your own JavaScript code. But in another way, this specific file isn’t important at all. And may not even be used when you first start to use Dojo. Confusing? Yes. A bit of an enigma inside a conundrum, as the old saying goes.
Why do I say that this file isn’t important at all? Because every function inside this file really comes from somewhere else. The files in dojo.js are originally contained in separate files found in the “dojo-release-1.0/dojo/_base” subdirectory. Related functions are grouped together in a single file. You can think of these individual files as modules, which is the term Dojo uses. The modules in the “base” directory are ones that the designers of Dojo felt should always be available. So the “dojo.js” file is just used as a convenience to combine all the modules in the “base” directory into a single file that is easy to include in your pages. And that is why the file isn’t really important—because all the functions in “dojo.js” also appear in other files.
And the second puzzle: Why might you not even use this file at all? This seems especially strange given that the file contains the functions that you supposedly always need. The reason you don’t need dojo.js is that there is a companion file called dojo.js.uncompressed.js that contains all the same functions. The difference is that dojo.js contains a compressed version of the JavaScript with all the comments and extra spacing removed, while dojo.js.uncompressed.js contains comments and spacing so that it is easily readable by a developer (and is more useful when using a line-by-line debugger—more on that later). So when you first start using Dojo, you’ll want to use the version that contains comments and white space: “dojo.js.uncompressed.js.”
To write code that uses the Dojo functions, you need to include it in each of your web pages. Following is the code you would use to add Dojo to your page.
     <script type="text/javascript"
             src="dojo-1.0/dojo/dojo.js.uncompressed.js"
             djConfig="isDebug: true, debugAtAllCosts: true"></script>
This code assumes that you have unzipped Dojo to the root of your web application and that the page is running from that location. Although not required, the <script> tag also contains an attribute called djConfig, which turns on some additional debugging messages when something goes wrong. This is a good idea to use when you first start using Dojo. After you publish the page to production, turn off debugging and use the compressed version of the code as shown here:
     <script type="text/javascript"
             src="dojo-1.0/dojo/dojo.js "</script>
Let’s review what we’ve learned so far. The file dojo.js is just a compressed version of the file dojo.js.uncompressed.js, which is itself a file containing functions defined in other Dojo files. These are functions the designers felt would be the most often used features. They even came up with a name to describe this set of functions. They call them Dojo “base.” If you want to see the original home for these functions, look in the “_base” directory under the “dojo” directory.
Dojo is organized into modules that contain groups of related functions. A module consists of a JavaScript file with the functions defined within it. The file also contains some special Dojo functions that register the module with Dojo. Every Dojo module used by a page must be registered when that page runs. So you’ll see the following code repeated many times within the Dojo source code (although the specific module being registered will be different).
     if(!dojo._hasResource["dojo._base.Color"])
     dojo._hasResource["dojo._base.Color"] = true;
     dojo.provide("dojo._base.Color");
The preceding code construct appears at the top of every module file and tells Dojo that a module has been loaded. In this case the loaded module is dojo._base.Color. This would correspond to a JavaScript file called Color.js in the directory _base under the dojo subdirectory. A module may have one or many functions within it. Functions do not require registration individually. Sometimes the module name and the name of the function are the same, but this is not required. The full name of a function is derived from the module name plus the function name. For example, the function fromISOString in the module dojo.date.stamp would be called in your code as shown in the following example:
var date = dojo.date.stamp.fromISOString()
It is probably useful to talk about a few naming conventions at this point. Dojo functions are named with a multi-part convention. The first part of the name is always dojo. This designates that the function is part of Dojo and not a custom function created by you or a function from another class library. The advantage of using a separate name space for Dojo is that it is always clear when reading your code which functions are yours and which functions belong to Dojo. Furthermore, functions you write will not conflict with those from Dojo.
The next part of the name is the module and is preceded by a dot. For example, _base designates that this function is part of the base module. The module name may be followed by another dot and a sub-module name to further group functions. Otherwise the third part will be the function or constructor name. A constructor name would be capitalized. A lowercase name tells us it is a method or non-constructor function. Function names follow the “Camel Case” convention, which is a technique for creating names from multi-word descriptions where the words are concatenated together without spaces or special characters, and the leading letter of each word is lowercase (except for constructors where the first letter would be capitalized). For example, a method that calculates shipping charges might be called calcShipCharge, using the Camel Case naming convention. Sometimes, for frequently used functions, a short-cut name is assigned to the function that omits the module.
Remember, Dojo functions are named with the following conventions:
A final note on names: When a leading underscore character is used in a function name, such as with dojo.parser._nameAnonFunc, the underscore marks the function as being one that a developer using Dojo would not use directly. The function would be used internally within the Dojo code. In essence, the underscore makes the function private.
Now that we’ve introduced dojo.js and talked about the “base” features in it without detailing them, let’s see what kinds of functions are actually included. James Burke provided an excellent summary of the Dojo base functions in the Dojo forum.[1]. And although his description is nearly perfect, I’m going to provide my own summary of it also. As we review the modules included in Dojo “base,” I’ll just provide a summary description. Many of these functions will be reviewed in more detail in later chapters.
The term API is used frequently throughout this book. The term is an acronym for Application Program Interface and usually refers to the set of public functions available for a library and the exact parameters required to call those functions. Obviously, the exact Dojo API is extremely important in using Dojo. For many functions, detail on the API is included, but you should be aware that sometimes the API changes or alternate variations in the API for a particular function are available. An extremely important and useful resource to use for understanding the API and identifying variations and changes is the API documentation available on the Dojo site.[2].
You’ll notice that in the function names for the functions in base that the second part of the name, the module, is missing. This is done as a convenience so that the function names are shorter in your code and yet still long enough to be meaningful.
Let’s start with one of the simplest modules first and then advance to the more complex ones.
This module consists of a number of general functions used in many different contexts. The module name stands for “language” and is similar in purpose to the “java.lang” package that may be familiar to Java programmers. Think of them as foundational functions that can be used by other Dojo functions (and available to you in your custom JavaScript, of course).
Table 11.1. List of dojo.lang Functions
Description | |
|---|---|
| Determines if an object is a String. |
| Determines if an object is an Array. |
| Determines if an object is a Function. |
| Determines if a reference is to an Object. |
| Determines if a reference is to something that behaves like an Array. |
| Determines if a reference is to a Function that does not properly identify itself as a Function. |
| Adds all the properties and methods from one object to another object. |
| Adds all the properties and methods from one object to the prototype of another object. |
| Assigns a specific scope to a function so that the function always executes with that scope. |
| Assigns no scope to a function to force the scope to default to the execution context when the function runs. |
| Makes a copy of an object with all its children. |
| Trims whitespace from the beginning and end of a string. |
This module consists of a single function, dojo.declare, which is used to create constructors used to build new objects. This is an extremely useful function but sometimes difficult to understand if you are new to Object Oriented Programming (OOP). That is why an entire chapter has been devoted to its use. For an in-depth discussion of OOP and the dojo.declare function, see Chapter 12, “Objects and Classes.”
This module consists of functions that associate event handlers with events. Event handlers are simply functions that are called automatically when an event is triggered. The browser itself monitors the actions of the user to detect events. Almost anything the user does with the keyboard or mouse triggers an event that some event handler can be associated with. For instance, when the user places the cursor over a DOM element, an onmouseover event is triggered for that element. An event will only call the event handler if it has been associated with the event—otherwise nothing happens. For more on event handlers see Chapter 14, “Events and Event Handling.”
The following table describes functions in the dojo.connect module. As a convenience to allow shorter function names, it is not necessary to specify the module name.
Table 11.2. List of dojo.connect Functions
Function | Description |
|---|---|
| Creates an association so that a certain function will be called whenever another function is called. |
| Removes the association between two functions. |
| Attaches a listener to a named topic. |
| Removes a listener from a named topic. |
| Invokes all listener methods subscribed to a topic. |
| Ensures that every time some function is called, a message is published on the topic. |
This module consists of a single function, dojo.Deferred, which is used to provide communication between threads. “Threads!?” you might say. “But I thought that browsers don’t support threading.” And you would be right—except for the XMLHttpRequest object, which does run in its own separate thread. This function provides a generic technique for thread notification. And though we don’t quite have one yet, we’re just starting to hear about the beginnings of a threading model within JavaScript. So this function will have some special use now and possibly more use in the future as the threading model evolves. We cover this topic more thoroughly in Chapter 17, “Testing and Debugging.”
This module contains functions for working with JavaScript Object Notation (JSON), a text-based protocol for representing objects. It is quite popular in the JavaScript community as a replacement for XML. Table 11.3 summarizes the JSON functions, but we also cover them in more detail in Chapter 13, “Strings and JSON.”
This module consists of functions that make it easier to work with array objects and other objects that have array-like features. Among other things, the functions provide the capability to easily iterate (loop) through all the elements in an array or iterate just through certain elements.
Table 11.4. List of dojo.array Functions
Function | Description |
|---|---|
| Returns the first position of a value within an array. |
| Returns the last position of a value within an array. |
| Provides an array iterator. Assigns a function to be called for each value in an array. The array value will be passed as an argument to the function. |
| Assigns a function to be called for each value in an array. The array value will be passed as an argument to the function. The function should return a true or false. If all the function calls return true, then |
| Assign a function to be called for each value in an array. The array value will be passed as an argument to the function. The function should return a true or false. If any of the function calls return true, then |
| Applies a function to each element of an array and creates an array with the results. |
| Returns a new array with those items that match a condition implemented by a callback function. |
This module consists of functions that allow a developer to represent colors (used internally by Dojo to perform color transitions).
Table 11.5. List of dojo.Color Functions
Function | Description |
|---|---|
| Constructor for an object representing a single color. Allows a color to be represented as a type rather than as a specific RGB or Hex value. |
| Calculates a new color value between two given color values. |
| Returns a CSS style color value given a color value specified as an RGB color value. |
| Returns a |
| Returns a |
| Returns a |
The way that events are handled differs between browsers. The functions in this module provide a consistent behavior for events and event handlers. Events and event handling are covered in much more detail in Chapter 14.
Table 11.6. List of dojo.event Functions
Function | Description |
|---|---|
| Normalizes properties on the event object including event bubbling methods, keystroke normalization, and x/y positions. |
| Prevents propagation and terminates the default action of the passed event. |
| Object containing decimal values for various special keyboard keys. These are constants that can be used to make JavaScript code more readable (i.e., event code can refer to BACKSPACE rather than the decimal value 8). By convention, JavaScript constants are capitalized. |
This module consists of functions that can manipulate HTML and DOM objects. To understand how these functions work, you need to understand something called the “box model,” which describes the components of a DOM element. For illustrative purposes, Figure 11.4 provides a reproduced a diagram showing the box model from the W3C specification.[3]
Some of the functions in this module allow a developer to access or set “box model” properties for a DOM element.
Table 11.7. List of dojo._base Functions
Function | Description |
|---|---|
| Returns a DOM node given a string representing the |
| Given two DOM nodes, returns true if one node is a descendant of the other. |
| By default, browsers allow a user to select any visible portion of a DOM element. This function can disable that feature or turn it back on for an individual element. |
| Insert a new DOM element relative to an existing one using one of the following controls: before, after, first, or last. First and last refer to placement in reference to siblings of the node to be inserted. |
| The box model describes the components of a DOM node and is documented in the DOM specification. This property specifies which version of the box model is to be used. The default is “content-box.” Some Dojo functions depend on which box model is to be used. The diagram below depicts the standard “content-box” model for DOM nodes. |
| Gets or sets the style property of a DOM node. The style property is specified in DOM accessor format ( |
| In the box model, the four edges around a DOM element’s margin are known as its “margin box.” This function allows you to get or set that value. |
| In the box model, the four edges around the content of a DOM element comprise its “content box.” This function allows to you get or set that value. |
| Returns the coordinates for an object. The coordinates include the “margin box” and the absolute positioning data in the form: |
| For a DOM node, returns true if the node contains the specified class. |
| Adds a class to a DOM node. |
| Removes a class from a DOM node. |
| Adds a class to a DOM node if it is not present and removes the class if it is present. |
This module consists of functions for working with a list of DOM elements. A NodeList is a subclass of Array and extends Array to include a plethora of additional handy functions that perform useful manipulations on DOM elements such as chaining, common iteration operations, animation, and node manipulation. Many of the methods in NodeList are versions of methods from the array and html modules, given that a NodeList is really just an array of DOM elements.
The NodeList functions operate a little differently than most other Dojo functions. Most Dojo functions take the object that they operate upon as an argument. Nodelist functions work on the object they are part of. To use these functions you must first create a new NodeList (or get one back from a function) and then run the functions as methods on that object. For example, if you wanted to perform some function on a DOM element with an id of tree, you would use the following code:
     el = new dojo.NodeList(dojo.byId("tree"));
     el.forEach(function() { // some code; });
Notice how the forEach method is run on el. The el object is not passed as a parameter to forEach. Also the given NodeList only contains a single element even if the DOM element tree has multiple children.
As a convenience, shortcut functions on NodeList provide features that are available on DOM elements directly. By having the functions also appear on a NodeList, your code can be smaller and more readable.
Some of the NodeList functions are rather complex, and the brief description next may seem inadequate. That is why a number of these functions get a more complete treatment later. For example, the animation functions (fadeIn, fadeout and animateProperty) are described in more detail in Chapter 16, “Working with the DOM.”
Table 11.8. List of Functions Available on a NodeList Object
Function | Description |
|---|---|
| A constructor for building a new object of type NodeList that contains a list of DOM elements. The standard constructor takes an element |
| Returns the numeric index of the first occurrence of a DOM element in the |
| Returns the numeric index of the last occurrence of a DOM element in the |
| Assign a function to be called for each element in the |
| Assign a function to be called for each element in the |
| Runs a function on each element of a |
| Applies a function to each element of |
| Returns the coordinates for each element in the |
| Gets or sets the style property of the first element of the |
| Gets or sets the style property of the all the elements in the |
| Adds a class to each DOM node in |
| Removes a specified class from each DOM node in |
| This function does quite a bit of heavy lifting. It takes as a parameter a DOM node or CSS3 selector that is used to find a DOM element in the document. Then it inserts the entire |
| This method attaches event handlers to every node in a |
| Removes nodes from |
| Places all elements in a specified query or |
| Uses a query string to select elements from the |
| The function provides a version of the |
| This function takes either a string of HTML or a DOM element and adds it to each element in the This function does not add additional elements to the |
| This function will perform the fade in animation on all the elements in a This function returns an array of objects of type |
| This function will perform the fade out animation on all the elements in a This function returns an array of objects of type |
| Returns an animation that will transition the properties of node. This function takes an animation property and transitions it from a beginning value to an ending value. There are a number of animation properties such as color and position that will be explained in more detail in Chapter 16. This function returns an array of objects of type |
onmouseover() onclick() onmouseout() onmousemove() onblur() onmousedown() onmouseup() onmousemove() onkeydown() onkeyup() onkeypress() | Each of these methods is available on NodeList. They take an event handler parameter that is assigned to each of the elements in the NodeList. These functions are available on DOM elements directly but also having them on NodeList makes the code shorter and simpler. |
This module essentially consists of a single function, dojo.query. This may seem a little unbalanced, especially compared to all the functions in a module like dojo._base.NodeList. But what you’ll soon see is that this single function is really quite a monster and extremely powerful.
The Document Object Model (DOM) contains the representation of the web page and for most pages contains a large number of individual elements, sometimes in the thousands. Cascading Style Sheets (CSS) introduced a technique for separating the style of an element from the tag itself but introduced a problem: How could a CSS style be easily applied to one or more page elements when so many elements existed? This problem was solved with a pattern matching language called “CSS selectors,” which provided a syntax for identifying HTML elements based on one of their characteristics such as tag type, class, or some attribute value.
Many AJAX techniques also require manipulating elements, so it is very useful to be able to find the few elements you need from the many elements that exist in a typical DOM. The same solution already developed for applying CSS styles can also be used to find DOM elements for AJAX. And that is exactly what dojo.query gives us—a technique for using the CSS selector pattern matching language to find DOM elements. You specify the selector string, and the function will return an array of elements meeting that criterion. The array is returned as a NodeList, which is an object type that we’ve already reviewed and has lots of useful methods.
Following is an example of some code that will search the DOM for all HTML <div> tag elements that have a class of codeSample. The code returns an object of type NodeList containing zero or more elements.
nl = dojo.query("div.codeSample")We’ll explore this function, along with the syntax for CSS selector strings, in Chapter 16.
This module consists of functions for working with the XMLHttpRequest (XHR) object, the heart of AJAX. Descriptions here will be brief because we spend more time on these functions in Chapter 15, “Ajax Remoting.” The XHR object is used to send a request to the server without doing a page refresh. Different types of HTTP requests may be sent, such as GET and POST. This module provides wrappers that will be used to create the various types of requests. By providing these wrapper functions, Dojo allows your code to be simpler and easier to read than if you used the XHR object directly. It is usually necessary to send some data along with the request. This module also contains a number of useful functions for manipulating data and transferring it from one common format to another.
This module consists of a number of functions that can be used to provide basic visual effects on DOM elements. As you can see in Table 11.9, there seems to be a rather limited number of effects, just fadeIn, fadeout and animateProperty. Although it may not at first seem like much, it turns out that one of the functions, animateProperty, is actually extremely powerful because it lets you work with any CSS property.
Table 11.9. List of dojo._base.xhr Functions
Function | Description |
|---|---|
dojo.xhrGet() dojo.xhrPost() dojo.xhrDelete() | These functions provide a wrapper around the underlying XHR request objects. Data is passed into the request using the |
dojo.rawXhrPost() dojo.rawXhrPut() | These functions provide a wrapper around the underlying XHR request objects. They are termed “raw” because the data to be placed in the body of the request is passed directly into the function using the |
dojo.formToObject() dojo.objectToQuery() dojo.formToQuery() dojo.formToJson() dojo.queryToObject() | These are various functions that convert between common data formats. See Chapter 15 for more detail. |
Some of these functions may remind you of similar functions associated with NodeList, and they should considering they are exactly the same! The difference is that these functions work by being passed a DOM element as the first parameter instead of operating against an array of DOM elements as they do in NodeList.
The signature for these methods is deceivingly simple. They all take a single object as their argument. That object, however, can be quite complex. It should always contain a property called node, which is the id of the element on which to perform the animation. Other properties control the animation itself. We explore these further in Chapter 16.
Table 11.10. List of dojo._base.fx Functions
Function | Description |
|---|---|
| This function performs the fade in animation on the element specified as the |
| This function performs the fade out animation on the element specified as the |
| Returns an animation that will transition the properties of the specified DOM node. This function takes an animation property and transitions it from a beginning value to an ending value. There are a number of animation properties such as color and position that will be explained in more detail in Chapter 16. This function returns an object of type |
This ends the discussion of the “base” features. One final note: The technical reason that these are called “base” functions is that the original code for the features (before they are aggregated in dojo.js) is contained in the “_base” directory under “dojo,” hence the name “base.” Let’s consider some additional features next. They’re termed the “core” functions because they are still important and useful, just not part of “base.”
As you can see from the prior discussion, Dojo has lots of features in its “base” modules. But what else is available? The next set of modules gives us additional functionality, but they are considered to be not quite as essential as “base” features—so they are not included in the base Dojo file and must be requested explicitly by your page. You must include these modules in your page by using the dojo.require function and naming the module containing the functions you wish to include.
For example, the following code shows how to use the “core” function dojo.string.pad for padding a string containing the text “52” with four leading zeroes.
   dojo.require("dojo.string");

   empID = dojo.string.pad("52", 4, '0'),
Notice that before you could use dojo.string.pad, you needed to include the functions in the string module by using dojo.require. All the other string functions will be available as well. This is similar to the import statement in Java, with the exception that require causes Dojo to actually include the JavaScript for the string module in your page while import just makes the class available at compile time without actually including it in the byte code.
The way that files and directories are organized for “core” features is a little more complex than for “base” features. The organization of related JavaScript functions into files and subdirectories is termed “packaging,” and a single group of related functions is called a “module.”
Dojo features in the base module are included in the single “dojo.js” (or “dojo.js.uncompressed.js”) files, while “core” features are organized in one of two different ways. A “core” module may consist of a single JavaScript file within the “dojo” directory. Or it may consist of a subdirectory under the “dojo” directory. Why two approaches? The primary purpose is two provide the developer with a fine-grained technique for including features within a single page. For example, the dojo.date module contains functions related to dates. However, you’ll notice that these functions are included in two different JavaScript files (“locale.js” and “stamp.js”) contained in a subdirectory called “date” under the main “dojo” directory. The functions in “locale.js” provide various internationalization processes on date strings. The functions in “stamp.js” allow conversion between various common date types. The Dojo architects are anticipating that developers may often need one or the other of these features sets, but not usually both.
A developer can include the functions for internationalization with the following code:
dojo.require("dojo.date.locale");This would make the functions in “dojo/date/locale.js” available to the page but not the functions defined in “dojo/date/stamp.js.” To include those you would need to provide an additional dojo.require statement in your code.
Note: There is a shortcut that provides a technique for including all the files within a module. You can use the * wildcard. The code that follows would make all the functions defined in both of the date files available to your page:
dojo.require("dojo.date.*");Be careful when using this approach. While it will certainly work, the reason that Dojo organized the functions into two separate files is so that you don’t have to include both of them. By including both in your page, the page may take longer to load and execute. So only include both files if you really need to use the functions in them.
You may notice that there is an additional file containing date functions, “dojo/date.js,” which you may use. It contains functions such as getDaysInMonth(), which returns the number of days in the same month as a specified Date object. To include these functions, use the following code:
dojo.require("dojo.date");Notice that this code does not use the wildcard because it is getting a single specific file “dojo/date.js.”
Another subtlety in using Dojo modules is that some functions require functions defined in other modules. Those modules also need to be included in your page for the code to work properly. The dojo.date.locale functions are examples of this. To work, they also need the following modules to be included:
At this point, you may be breaking out into a cold sweat. How can you possibly be expected to know all the dependencies between various Dojo modules? The good news as that you don’t have to. Dojo modules contain this information. Near the top of the file “dojo/date/locale.js” you can find the following lines of code that cause Dojo to load all the dependent modules:
     dojo.require("dojo.date");
     dojo.require("dojo.cldr.supplemental");
     dojo.require("dojo.regexp");
     dojo.require("dojo.string");
     dojo.require("dojo.i18n");
We’ve now exhausted the various approaches to including date-related Dojo functions in your page. The date module uses all the various approaches to packaging available in Dojo and is a good module to study to understand the techniques. However, most of the modules are simpler. So after you understand how the date module works, the others will be more obvious.
The Dojo packaging system is very powerful and allows us to achieve the best of all possible worlds (at least in the context of loading JavaScript files!).
We can load only the functions we want, keeping our pages small and minimizing the amount of included JavaScript code.
We can use functions with dependencies on other modules without knowing what the dependencies are.
We can keep the number of
requirestatements small by using the wildcard features of module loading.
As a final comment, much thought and effort have gone into the creation of the Dojo packaging system. It addresses the problems of making complex JavaScript code available to a web page. You will face the same problems in organizing the JavaScript code that you write yourself. And the good news is that you can use the Dojo packaging system on your own code!
There are a number of Dojo “core” modules, some of which are so important and useful that they require their own chapters to describe them. So for now, we examine them at a summary level, merely describing their purpose without delineating the functions they contain.
Table 11.11 summarizes the purpose of the primary “core” modules in Dojo. (Note: If you’re checking for completeness, there are a few modules I’ve skipped because you are unlikely to use them such as AdapterRegistry.)
Table 11.11. Dojo Modules
Module name (used in | Description of Module |
|---|---|
| Functions for working with the browser “back” button and maintains a history of URLs. |
| Functions for associating other functions (behaviors) with DOM elements. |
| Functions for reading and writing browser cookies. |
| Functions for working with numbers that represent currency. |
| Functions for accessing persistence data sources. |
| Functions for working with |
| Functions for internationalizing dates. |
| Functions for converting between common types of date formats. |
| Functions for implementing “Drag and Drop” capabilities on DOM elements. |
| Functions for adding visual effects to DOM elements. |
| Functions for performing internationalization. |
| Functions for using |
| Functions to manipulate and format numbers. |
| Functions for reading HTML (or the elements created from HTML) and producing additional objects. |
| Functions for using Regular Expressions. |
| Functions for manipulating string objects. |
This concludes are introductory discussion of the Dojo “base” and “core” features. As you can see, Dojo covers a broad range of functionality. Subsequent chapters allow us to explore these features in more detail and review more examples of actual usage.
The next chapter provides an overview of using Object Oriented Programming (OOP) techniques when working with Dojo. This is important because the Dojo features are exposed to developers as objects. So if you not familiar with OOP, as Bette Davis once famously said, “Get ready for a bumpy ride.” Only kidding, OOP concepts aren’t really that difficult, and after you understand them, you’ll be able to program in a new and useful way.
[1] Following is the link to James Burke’s summary of the base module features in dojo.js, http://dojotoolkit.org/2007/08/22/dissecting-0-9s-dojo-js
[2] Following is the link to the online Dojo API documentation. Be aware that this link may be changed in the future, and you may need to search the site to find it (http://dojotoolkit.org/api)
[3] CSS basic box model, Edited by Bert Bos, August 2007, http://www.w3.org/TR/css3-box/ (Working Draft).