
7. Styling Page Content
In This Chapter
Creating a Style Rule for a Tag
Working with the CSS Properties Pane
Editing Styles with the Property Inspector
You want your website to look inviting, colorful, and organized, right? You need style! With styles, your site doesn’t just look good—you get other benefits as well. Compared to older font-tag-based styling, your site is easier to maintain and update, it downloads faster and uses less bandwidth, and it’s more accessible to every type of browser. In this chapter you’ll get a basic understanding of Cascading Style Sheets, better known as CSS. Then we’ll get into the details of how to use Dreamweaver’s CSS Designer panel to create and apply styles to your pages.
Understanding CSS
Cascading Style Sheets are all about style, looks, and presentation. CSS properties and rules give you an amazing array of control over foregrounds, backgrounds, colors, fonts, positions, alignments, margins, borders, lists, and other aspects of presentation.
Dreamweaver organizes the CSS properties it supports (which is most of them) via a manageable interface: the CSS Designer panel. With this feature, you can control every style aspect of every element on your page. From your document’s body and its paragraphs, lists, tables, and links to styling individual words or even individual letters, it’s all handled with the CSS Designer panel.
Content vs. presentation
Content is king, the saying goes, because users seek content when they come to your site. Content is the actual information in the headings, paragraphs, lists, divs, tables, forms, images, blockquotes, links, and other HTML elements you use on a page. With no styling, content looks something like an outline ![]() .
.
![]() A page with no styles shows content and working links, even though it isn’t beautifully arranged.
A page with no styles shows content and working links, even though it isn’t beautifully arranged.
The unstyled content should be useful and informative, even if it doesn’t look like much. That’s because some of your visitors get only the text content—for instance, those with screen readers, some mobile browsers, or text-only browsers. Some of these also get images, but not all, so make sure your pages are understandable and navigable even without graphics.
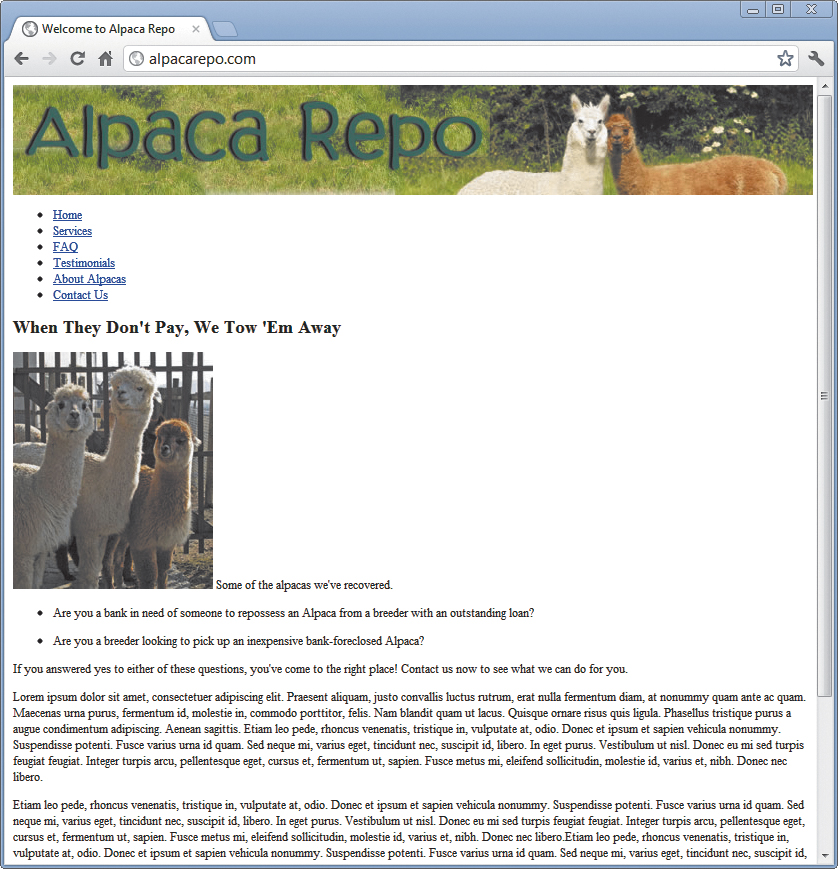
Once you add presentation rules, you have the layout, color scheme, font choice, background, and other “pretties” that make a webpage look good in a standard browser ![]() . The content itself hasn’t changed. What has changed is the way the content is presented on the page. Change the presentation—that is, use different styles—and the same content completely changes its appearance.
. The content itself hasn’t changed. What has changed is the way the content is presented on the page. Change the presentation—that is, use different styles—and the same content completely changes its appearance.

![]() Add styles to the same page to determine rules for layout, background, fonts, margins, and other presentation features.
Add styles to the same page to determine rules for layout, background, fonts, margins, and other presentation features.
The power of CSS derives from the separation of content from presentation. You can make the content look like anything you want simply by changing the way it is styled and presented.
Working with tags
HTML consists of tags, and adding tags to your document turns it into something that a computer knows how to handle. A tag is simply a name inside angle brackets, and every browser has certain names (that is, tags) that it understands.
Now, when you look through this chapter, you might be thinking to yourself at first, “Hey, I bought a WYSIWYG tool so I wouldn’t have to learn about HTML tags!” That’s understandable—but you’ll need to learn at least the basics about HTML tags to take full advantage of CSS.
Some tags are containers; that is, they can contain content, other tags, or both. Other tags are empty elements; for instance, the <img> tag, used for graphical elements, cannot also contain text.
Containers have beginning and ending tags. For instance, each paragraph inside your documents should be inside a <p> tag, where <p> stands for paragraph. To put some text into a paragraph tag, all you (or more often, Dreamweaver) have to do is add a <p> before the text and a </p> after (that forward slash is what tells the browser that it’s at the end of the paragraph). Makes sense so far?
Next, to apply a style to that paragraph, you apply it to that <p> tag. You’re not taking anything out of the paragraph or adding anything to the paragraph. It’s still a paragraph; but with CSS, you have some say about how that paragraph appears. Each style has instructions that define the style and what it does, and these instructions are called rules.
You can learn just enough about HTML tags by looking at the tag selector of your Dreamweaver document. If you find you want to know even more, check out Chapter 17, “Editing Code.”
In the CSS Styles category ![]() , setting the styles to use shorthand is optional. Shorthand omits default values, which saves on bandwidth when downloading style sheets but can be confusing to a novice. To make things easier while you’re learning, deselect all the choices that use shorthand.
, setting the styles to use shorthand is optional. Shorthand omits default values, which saves on bandwidth when downloading style sheets but can be confusing to a novice. To make things easier while you’re learning, deselect all the choices that use shorthand.
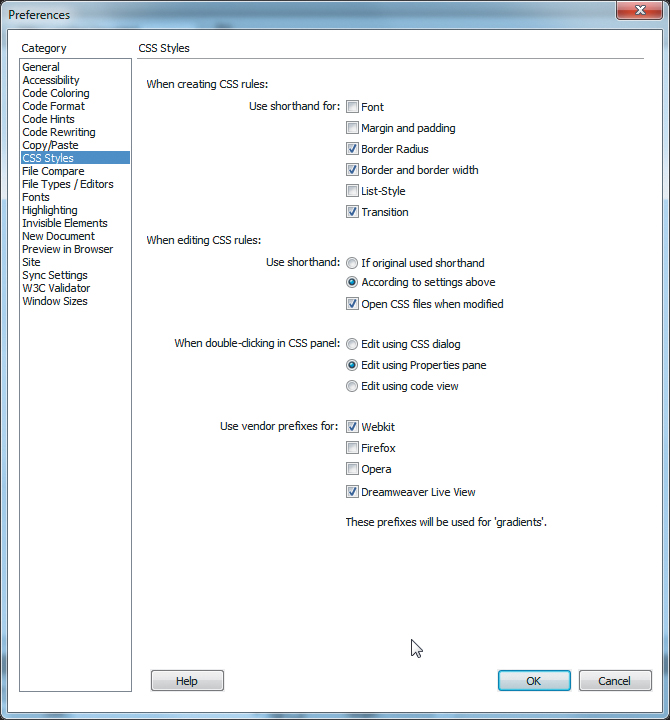
![]() The CSS Styles preferences should be set based on how you like to work.
The CSS Styles preferences should be set based on how you like to work.
Anatomy of the CSS Designer Panel
![]() shows the CSS Designer panel with the Properties pane in Show Only Set Properties mode.
shows the CSS Designer panel with the Properties pane in Show Only Set Properties mode.
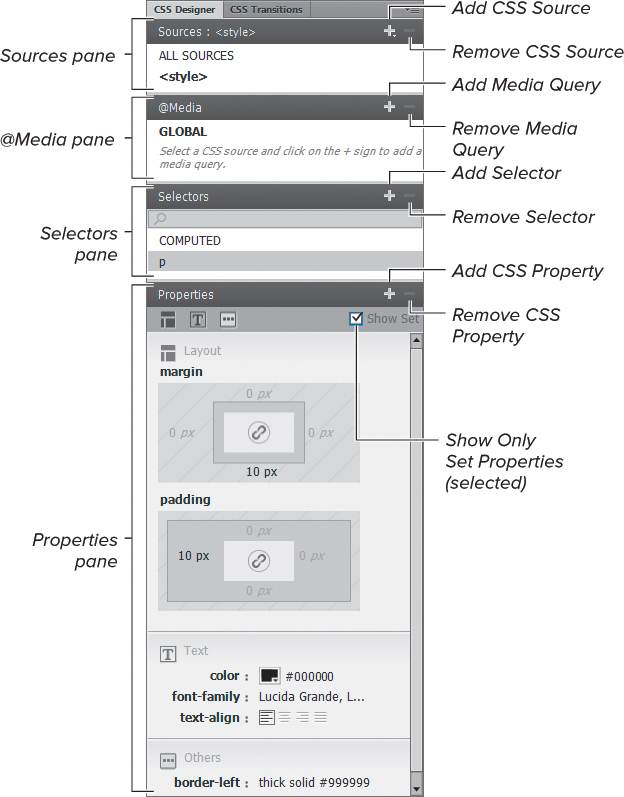
![]() The CSS Designer panel showing only set properties.
The CSS Designer panel showing only set properties.
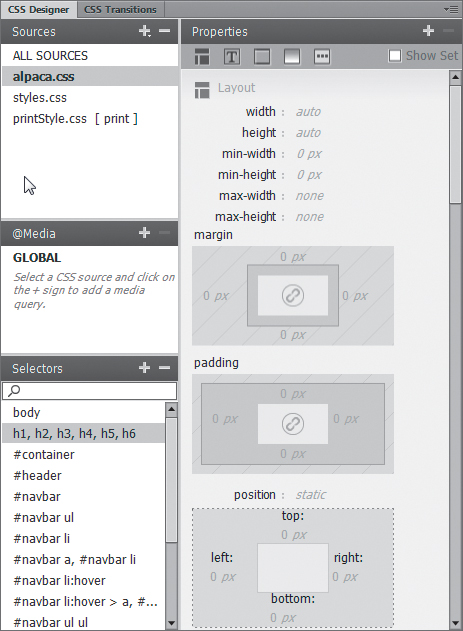
![]() shows the CSS Designer panel with the Sources, @Media, and Selectors panes collapsed. The Properties pane is set to show all properties.
shows the CSS Designer panel with the Sources, @Media, and Selectors panes collapsed. The Properties pane is set to show all properties.

![]() The CSS Designer panel showing all properties, with the Sources, @Media, and Selectors panes collapsed.
The CSS Designer panel showing all properties, with the Sources, @Media, and Selectors panes collapsed.
Creating a Style Rule for a Tag
Everything you do to create new styles, apply styles, and edit styles starts with creating a rule. Style rules begin with a selector. A selector can be a tag, an id, or a class.
To create a style rule for a tag
1. With a page open in Dreamweaver, click the Add CSS Source button (part of the Sources pane) in the CSS Designer panel. Select Define in Page ![]() to add the style to just the document you have open. We’ll cover the other options available here later.
to add the style to just the document you have open. We’ll cover the other options available here later.
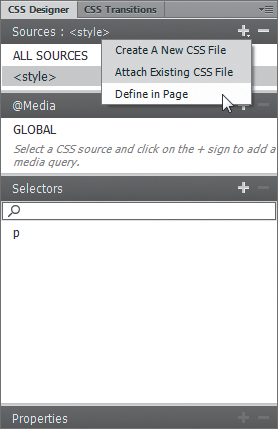
![]() Click the + button in the Sources pane to start creating new styles.
Click the + button in the Sources pane to start creating new styles.
In the Sources pane, a <style> choice appears, showing the style sheet you just created inside the page.
2. On your webpage, select the content you want to edit. In the Sources pane, select the newly created <style> option, and in the @Media pane, select GLOBAL to have your new CSS always apply to the page.
Click the Add Selector button (part of the Selectors pane). Dreamweaver makes its best guess (based on your current selection or cursor placement when you clicked the button) as to what tag you want this style to apply to. That tag automatically appears in the Selector Name field. If that tag isn’t the one you want, start typing, and then select the correct tag from the pop-up menu ![]() .
.
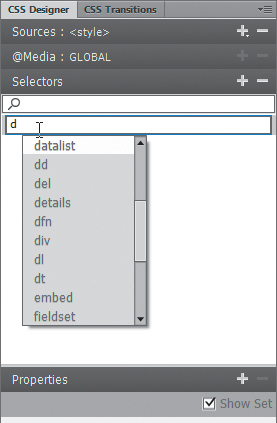
![]() Any tag can be styled—just select the one you want.
Any tag can be styled—just select the one you want.
3. Set the values for the five categories of properties as desired. Which category contains which property is covered in “CSS Categories,” next.
Tip
Not familiar with class and id? What you need to know is covered in the sidebar “Choosing Between Classes and IDs,” later in this chapter.
Tip
This example creates an internal style: one where the style information is included inside the webpage. Internal styles are useful for testing, but in the long run, you’ll want to make all your styles external—that is, move them into their own file. We’ll cover that in Chapter 9, “Managing Styles.”
Choosing Between Divs and Spans
Divs and spans are generic containers. A div, short for division, holds a section of a page that you use and style as a block. Use divs to organize content into meaningful containers. You might structure your page with a div for the masthead, a div for the navigation, a div for the content, and a div for the footer. Positioning divs creates your layout. Blocks of content can then be nested inside other divs. In ![]() , for example, the highlighted div #maincontent is inside another div, which is itself inside the body tag.
, for example, the highlighted div #maincontent is inside another div, which is itself inside the body tag.
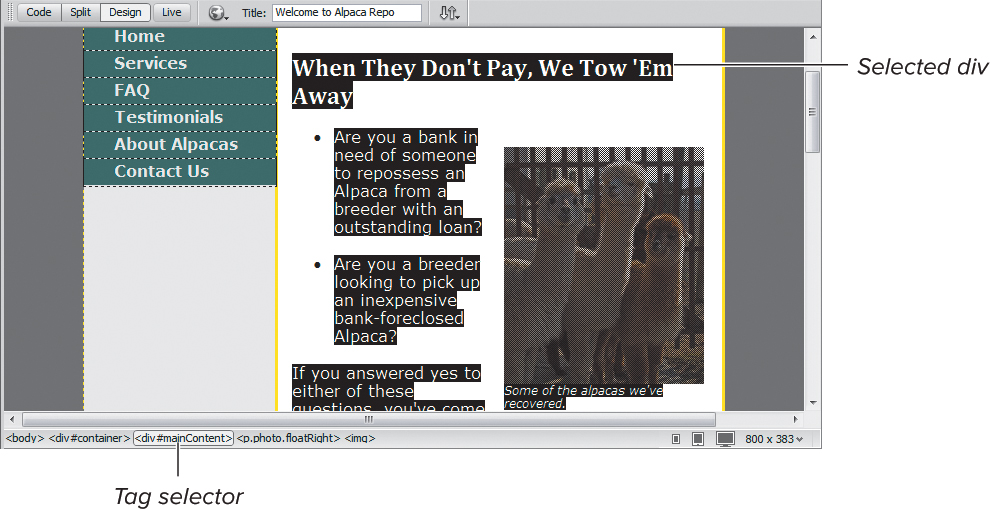
![]() You can nest, position, and style divs individually. The tag selector indicates a named div with a # symbol, such as <div#mainContent>.
You can nest, position, and style divs individually. The tag selector indicates a named div with a # symbol, such as <div#mainContent>.
CSS Categories
In the CSS Designer panel, Dreamweaver breaks down CSS into various categories. Below, you’ll find each of the categories, along with what you can find in that category.
![]() width
width
![]() height
height
![]() min-width
min-width
![]() min-height
min-height
![]() max-width
max-width
![]() max-height
max-height
![]() margin
margin
![]() top
top
![]() right
right
![]() bottom
bottom
![]() left
left
![]() padding
padding
![]() top
top
![]() right
right
![]() bottom
bottom
![]() left
left
![]() position
position
![]() top
top
![]() right
right
![]() bottom
bottom
![]() left
left
![]() float
float
![]() clear
clear
![]() overflow-x
overflow-x
![]() overflow-y
overflow-y
![]() display
display
![]() visibility
visibility
![]() z-index
z-index
![]() opacity
opacity
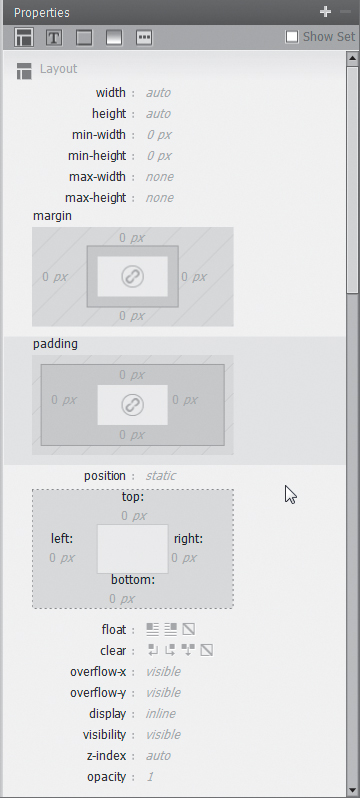
![]() Set rules for width and height in the Layout category. Margin and padding are both transparent, which means that a background shows through either.
Set rules for width and height in the Layout category. Margin and padding are both transparent, which means that a background shows through either.
![]() color
color
![]() font-family
font-family
![]() font-style
font-style
![]() font-variant
font-variant
![]() font-weight
font-weight
![]() font-size
font-size
![]() line-height
line-height
![]() text-align
text-align
![]() text-decoration
text-decoration
![]() text-indent
text-indent
![]() text-shadow
text-shadow
![]() h-shadow
h-shadow
![]() v-shadow
v-shadow
![]() blur
blur
![]() color
color
![]() text-transform
text-transform
![]() letter-spacing
letter-spacing
![]() word-spacing
word-spacing
![]() white-space
white-space
![]() vertical-align
vertical-align

![]() Set rules for spacing and alignment of text in the Text category. Text indent affects the first line only—yes, you can have old-fashioned paragraph indentation with CSS!
Set rules for spacing and alignment of text in the Text category. Text indent affects the first line only—yes, you can have old-fashioned paragraph indentation with CSS!
![]() border-collapse
border-collapse
![]() border-spacing
border-spacing
![]() border-color
border-color
![]() border-top-color
border-top-color
![]() border-right-color
border-right-color
![]() border-bottom-color
border-bottom-color
![]() border-left-color
border-left-color
![]() border-width
border-width
![]() border-top-width
border-top-width
![]() border-right-width
border-right-width
![]() border-bottom-width
border-bottom-width
![]() border-left-width
border-left-width
![]() border-style
border-style
![]() border-top-style
border-top-style
![]() border-right-style
border-right-style
![]() border-bottom-style
border-bottom-style
![]() border-left-style
border-left-style
![]() border-radius
border-radius
![]() 4r
4r
![]() 8r
8r
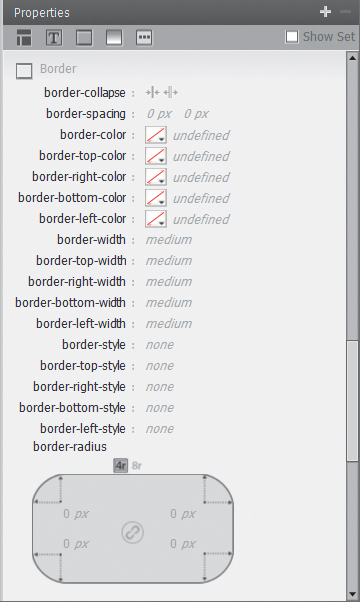
![]() Set rules for borders in the Border category. Rules can apply to all borders or to each individual side.
Set rules for borders in the Border category. Rules can apply to all borders or to each individual side.
![]() background-color
background-color
![]() background-image
background-image
![]() url
url
![]() gradient
gradient
![]() background-position
background-position
![]() background-size
background-size
![]() background-clip
background-clip
![]() background-repeat
background-repeat
![]() background-origin
background-origin
![]() background-attachment
background-attachment
![]() box-shadow
box-shadow
![]() h-shadow
h-shadow
![]() v-shadow
v-shadow
![]() blur
blur
![]() spread
spread
![]() color
color
![]() inset
inset

![]() Always give a page a background color, even if you’re using a background image.
Always give a page a background color, even if you’re using a background image.
![]() list-style-position
list-style-position
![]() list-style-image
list-style-image
![]() list-style-type
list-style-type
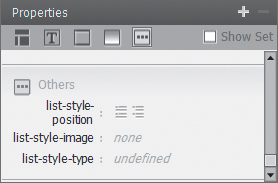
![]() Set rules for list type and position in the Others category. If you want an image instead of a standard bullet, specify it here.
Set rules for list type and position in the Others category. If you want an image instead of a standard bullet, specify it here.
Tip
The style definitions in the CSS Designer panel cover nearly every CSS property available. What’s impressive is that you can apply any of the properties in any of the five categories to virtually any element in your document. Backgrounds, for example, can be applied not just to the body element, but also to the tags div, table, blockquote, span, acronym, quote, form, and many others.
Creating a Custom Class or ID
Redefining the style for a tag gives you considerable control because HTML has a tag for nearly any type of text you need to format. And yet, there are times when you want to create a style rule for something that doesn’t already have a logical tag as a label. You can do that with a class or id. And you get to create a custom name for the style when you create a class or id.
To create a class or ID
1. With a page open in Dreamweaver, select the content you want to edit. In the Sources pane, select the <style> option, and in the @Media pane, select GLOBAL to have your new selector always apply to the page.
Click the Add Selector button (part of the Selectors pane). Dreamweaver makes its best guess (based on your current selection or cursor placement when you clicked the button) as to what tag you want this style to apply to. Don’t choose the default or a new tag name; instead, do the following:
![]() For a class: set the Selector Name option to a name of your own choosing, preceded by a period (.). This is your new class name
For a class: set the Selector Name option to a name of your own choosing, preceded by a period (.). This is your new class name ![]() .
.

![]() A class selector name is preceded by a period when creating a new style.
A class selector name is preceded by a period when creating a new style.
![]() For an id: set the Selector Name option to a name of your own choosing, preceded by a hash or pound symbol (#). This is your new id name.
For an id: set the Selector Name option to a name of your own choosing, preceded by a hash or pound symbol (#). This is your new id name.
2. Set the values for the five categories of properties as desired.
Tip
Pick a class or id name that will serve you over time. A name that describes a purpose rather than a particular property works best. For example, if you wanted to highlight certain vocabulary words in red, you could name a class either .red or .vocab. If you redesign the site later and change the color scheme, the name .red might not make sense any longer, but .vocab would still have meaning.
Tip
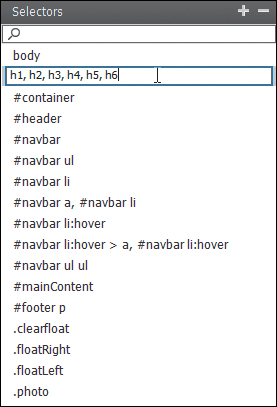
Don’t create a class or id to describe text when there is already a logical tag that does the job. For example, don’t create a class to make text big and bold and use it as a heading. HTML already provides six heading tags (h1, h2, h3, h4, h5, and h6). Simply redefine one of the existing heading tags to suit your purpose. Remember, you want to use HTML to create a logical structure for your content, and you want to use CSS to style the structured content.
Tip
Verify how styles are implemented on your pages by previewing them in a variety of browsers, as well as in Dreamweaver’s Live view. More than one style rule can affect a particular page element. Sometimes the style rules conflict and you get unexpected results.
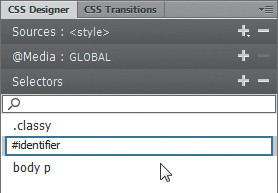
Choosing Between Classes and IDs
In the CSS Designer panel, you see the name of each id and class style rule you add to your style sheet ![]() . In the style sheet, a hash or pound sign (#) precedes an id selector. A period (.) precedes a class selector.
. In the style sheet, a hash or pound sign (#) precedes an id selector. A period (.) precedes a class selector.

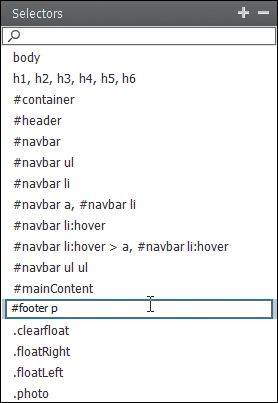
![]() This complete style sheet contains ids (#container, #sidebar), restyled tags (body, h1), classes (.floatRight, .photo), and pseudo-class selectors (tr:first-child).
This complete style sheet contains ids (#container, #sidebar), restyled tags (body, h1), classes (.floatRight, .photo), and pseudo-class selectors (tr:first-child).
Applying Attributes
Most styles take effect immediately in the current document and in any other documents linked to an external style sheet. If you redefine the style for a tag such as h3, then any time you use the h3 tag, the style is applied.
Other styles are different—they’re based on adding a class or id attribute to an element. For instance, after you create a style rule for a class, you must then apply that class to text in the document. The same goes for id.
To apply a class
1. In a document, select the text to which you want to apply the class.
or
Place the cursor anywhere in a paragraph to apply the class to the entire paragraph.
or
Select a tag with the tag selector at the lower left of the document window.
2. Do one of the following:
In the HTML tab of the Property inspector, choose the class you want to apply from the Class pop-up menu ![]() .
.
![]() Use the Class pop-up menu in the Property inspector to apply a class style rule.
Use the Class pop-up menu in the Property inspector to apply a class style rule.
or
In the CSS tab of the Property inspector, choose the class you want to apply from the Targeted Rule pop-up menu ![]() .
.

![]() You can apply classes from either the HTML tab or the CSS tab of the Property inspector.
You can apply classes from either the HTML tab or the CSS tab of the Property inspector.
or
In the document, right-click the selected text, choose CSS Styles, and then choose the class you want to apply.
or
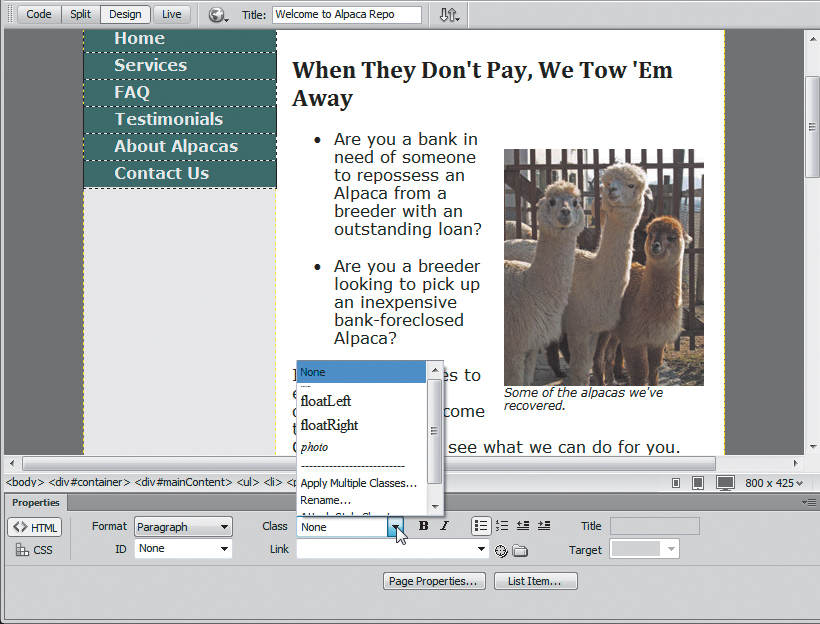
Choose Format > CSS Styles, and in the submenu choose the class you want to apply ![]() .
.
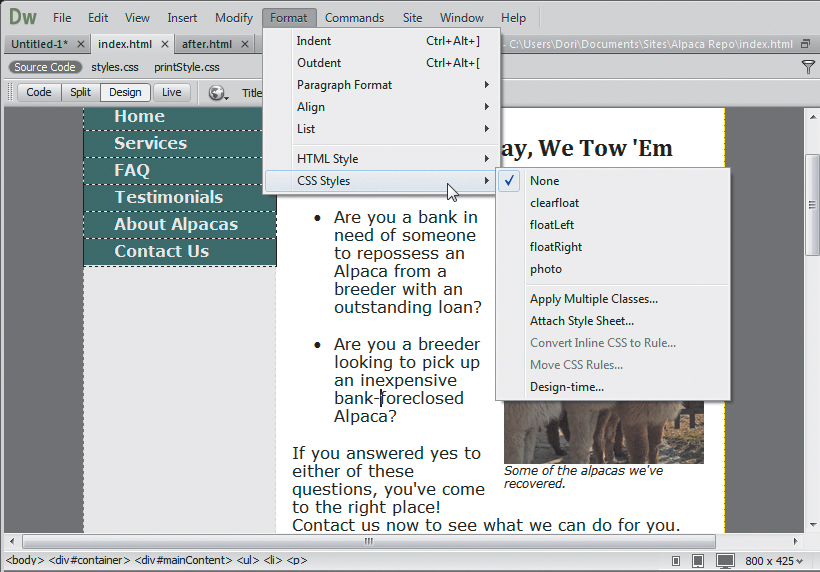
![]() Another way to apply a class style rule is to choose Format > CSS Styles and then choose from the submenu.
Another way to apply a class style rule is to choose Format > CSS Styles and then choose from the submenu.
To remove a class
1. Select the text to which the class was applied. The tag selector in the lower left of the document indicates the presence of a class with a period; for example, <p.vocab> means that the class vocab was applied to the <p> tag ![]() .
.
![]() In the tag selector bar, it’s easy to identify an element that has a class applied to it, because the element has a period in its name—for example, <p.vocab>.
In the tag selector bar, it’s easy to identify an element that has a class applied to it, because the element has a period in its name—for example, <p.vocab>.
2. Do one of the following:
In the HTML tab of the Property inspector, choose None from the Class pop-up menu.
or
In the CSS tab of the Property inspector, choose <Remove Class> from the Targeted Rule pop-up menu.
or
In the document, right-click the selected text, choose CSS Styles, and then choose None.
or
Choose Format > CSS Styles, and in the submenu choose None ![]() .
.
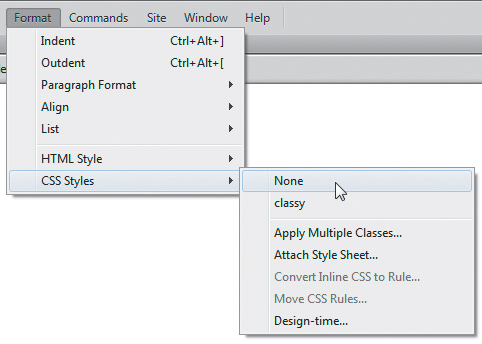
![]() Removing a class is as simple as choosing None from the CSS Styles submenu.
Removing a class is as simple as choosing None from the CSS Styles submenu.
3. The class is no longer applied to the selected text. However, the class is still available in the style sheet.
2. Do one of the following:
Right-click the element in the tag selector, choose Set ID, and then choose an id from the submenu ![]() .
.

![]() Even the tag selector has a context menu, giving you an easy way to add an id.
Even the tag selector has a context menu, giving you an easy way to add an id.
or
Use the HTML tab of the Property inspector to choose an id to apply from the pop-up menu ![]() .
.
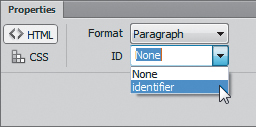
![]() The Property inspector can also be used to add an id.
The Property inspector can also be used to add an id.
or
Use the CSS tab of the Property inspector to choose the id you want to apply from the Targeted Rule pop-up menu ![]() .
.
3. Check the tag selector to verify that the id has been applied by looking for the name of the tag followed by a # followed by the name of the id.
Tip
When you remove a class from the selected element, it’s still available to be applied elsewhere. Removing the class attribute from the tag doesn’t remove the rule from your page.
Tip
Pseudo-class selectors, such as a:link, are also immediately applied to the selected elements in any linked documents. For more information about pseudo-class selectors, see the “Contextual Terminology” sidebar, later in this chapter.
Tip
If you select some text that isn’t inside a container (such as a paragraph or div) and apply a class or id, Dreamweaver wraps a new span tag around that text and applies the new attribute to the span.
Tip
If the pop-up menu in the Property inspector doesn’t show the id you want, it may be because that id is used elsewhere on the page. An id must be unique on the page, so if you want to move it from one place to another, remove it from the first place before attempting to apply it to the second.
To apply multiple classes using the Property inspector
1. In a document, select the text to which you want to apply the class.
or
Place the cursor anywhere in a paragraph to apply the class to the entire paragraph.
or
Select a tag with the tag selector at the lower left of the document window.
2. Do one of the following:
In the HTML tab of the Property inspector, choose Apply Multiple Classes from the Class pop-up menu ![]() .
.
or
In the CSS tab of the Property inspector, choose Apply Multiple Classes from the Targeted Rule pop-up menu ![]() .
.
3. The Multiclass Selection dialog appears ![]() , showing all the available classes. Choose the ones you want to apply and click OK.
, showing all the available classes. Choose the ones you want to apply and click OK.
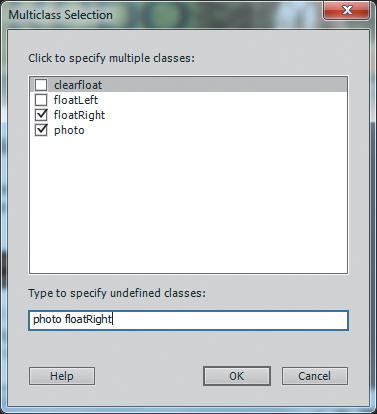
![]() If you want to assign more than one class, do so in the Multiclass Selection dialog.
If you want to assign more than one class, do so in the Multiclass Selection dialog.
Creating Contextual Selectors
Elements in HTML can nest. Inside the body might be a div named content, with a div named newitem nested inside that. Each of these nested elements exists in a parent-child relationship that allows CSS properties to be inherited. The child elements are descendants of the parent elements and inherit properties from them.
You can create extremely selective selectors with descendant elements. Take the lowly list item, or li. If you redefine the default li style, you style every list item anywhere in the body of your page. However, if you have a div named content and list items using li within that, you can create a rule using the selector #content li. Instead of styling every li in the document, it will style only each li that is inside content.
These are called contextual selectors. There’s more about them in the “Contextual Terminology” sidebar below.
To create a contextual style
1. With a page open in Dreamweaver, click the Add Selector button in the CSS Designer panel.
2. For the selector name, one of the contextual selectors may appear in the dialog by default. Select this default ![]() , or type a selector of your own choosing in this field by doing one of the following:
, or type a selector of your own choosing in this field by doing one of the following:

![]() Adding a new selector often generates a contextual selector by default.
Adding a new selector often generates a contextual selector by default.
Type a pound sign (#) and an id to style a named section of the page—usually a div.
or
Type a pound sign (#), the id, and a space before the pseudo-class selector to style only those navigation links in a particular named section of the page ![]() .
.
![]() A selector based on an id must begin with a pound sign (#).
A selector based on an id must begin with a pound sign (#).
or
Type a pound sign (#), the id, a space, and an HTML tag to style an element found only in the named section of the page ![]() .
.
![]() Type in the selector name field to create selectors that fit your document.
Type in the selector name field to create selectors that fit your document.
or
Type a group of selectors, each separated by a comma and a space, to assign the same style properties to every selector in the group with a single rule ![]() .
.
![]() Every tag in this group list of selectors will follow the same style rule.
Every tag in this group list of selectors will follow the same style rule.
3. Fill out the Properties panel as usual.
Working with the CSS Properties Pane
The CSS Designer panel (Window > CSS Designer) shows all the styles affecting a document or a selected style. You can modify, delete, and do other style-related tasks right in the CSS Designer panel. Each style rule consists of one or more declarations, and those declarations are set visually in the CSS Properties pane. If you need an overview of what’s where in the Properties pane, look back at the sidebar “Anatomy of the CSS Designer Panel” or the section “CSS Categories,” earlier in this chapter.
To work in Show Only Set Properties mode
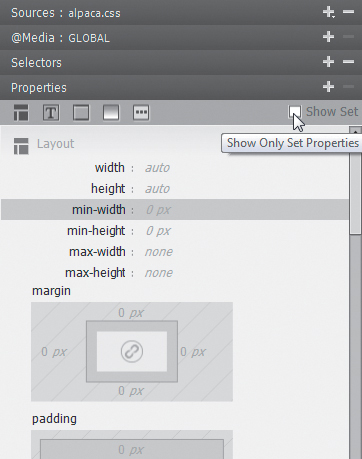
By default, the Properties pane shows you all the possible property options. Select the Show Only Set Properties check box (also shown as the Show Set check box) on the Properties pane ![]() to declutter the pane and show just the properties you’ve specified. Deselect the check box to go back to showing all the properties.
to declutter the pane and show just the properties you’ve specified. Deselect the check box to go back to showing all the properties.
![]() Select the Show Set check box to show only set properties.
Select the Show Set check box to show only set properties.
To work in two-column view
Drag the left edge of the CSS Designer panel to widen it until the Properties pane appears in a second column ![]() . Sometimes it helps to do this so you don’t need to scroll the Properties pane so much. To go back to the single-column view, narrow the panel.
. Sometimes it helps to do this so you don’t need to scroll the Properties pane so much. To go back to the single-column view, narrow the panel.
![]() Widen the CSS Designer panel until you see the two-column view.
Widen the CSS Designer panel until you see the two-column view.
2. If you wish all four sides to share the same values, click the Change All Properties icon in the center of the box ![]() . The icon changes to show that the sides are now all set at once.
. The icon changes to show that the sides are now all set at once.

![]() Click the Change All Properties icon to set all sides to share the same values.
Click the Change All Properties icon to set all sides to share the same values.
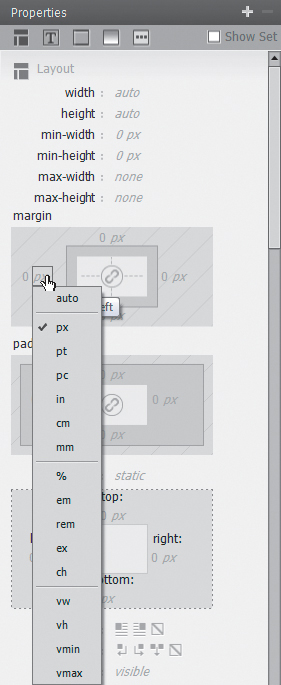
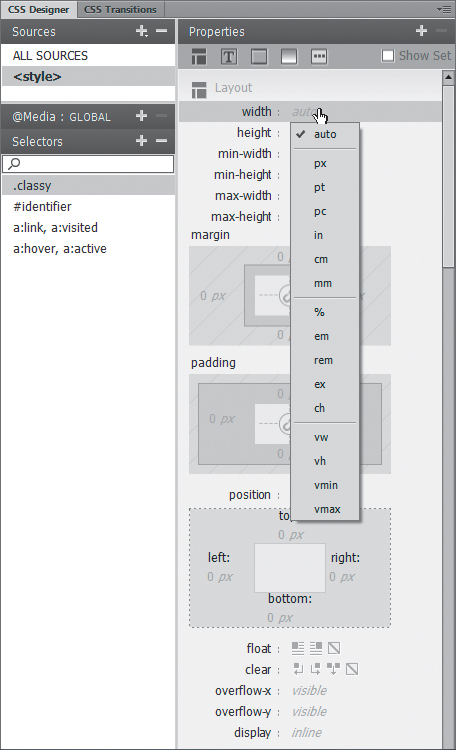
3. Click the px on any of the four sides. A pop-up menu appears, showing all of the various possible unit options ![]() . Select one, and the number field highlights.
. Select one, and the number field highlights.
![]() The box sides can be set using any of these units.
The box sides can be set using any of these units.
4. Hover over the number field, and notice that the cursor changes to ![]() . Click and then move the cursor left (or right) to decrease (or increase) the size of the value.
. Click and then move the cursor left (or right) to decrease (or increase) the size of the value.
or
Click in the number field, and enter the desired value.
5. If you set the sides to all be the same, your box should now show with all the values set. Otherwise, continue around the box, setting each to its desired value ![]() .
.

![]() Each side of your box can have its own width.
Each side of your box can have its own width.
To set border properties
If all your borders have the same values, set the border-color, border-width, and border-style properties.
or
Set the separate border-top, border-right, border-bottom, and border-left properties as desired.
or
Click the Add CSS Property button. In the property name field, type the border property desired and press Tab. In the value field, type the shorthand value for the property ![]() .
.

![]() If you’re used to just typing in your values quickly, this may be your best approach.
If you’re used to just typing in your values quickly, this may be your best approach.
Tip
If you’ve been working with Dreamweaver and CSS for any length of time, the last approach here is the closest to how you used to be able to work. For those who’ve just started, it’s still worth checking out. For instance, it can be much faster to click the + button and type “border-right / tab / 2px solid black” than to set three separate right-hand border properties.
Tip
For margins, padding, and borders, you’ll sometimes see width values set to a sequence of four values. Those values are always in the order Top, Right, Bottom, and Left—think of them as going around the edges of the box in a clockwise direction.
To set other properties
If the particular property you want to set doesn’t happen to be one of the ones included in the Properties pane, don’t give up hope! You can still enter it in manually, so long as you know its name.
Click the Add CSS Property button. In the property name field, type the name of the property you wish to use, and press Tab. In the value field, enter the desired value ![]() .
.
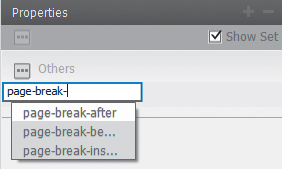
![]() Just because your particular property isn’t included in the Properties pane doesn’t mean that you can’t use it.
Just because your particular property isn’t included in the Properties pane doesn’t mean that you can’t use it.
Tip
Compared to the now-removed CSS Styles panel in previous versions of Dreamweaver, the CSS Designer panel is missing a few rarely used properties. It also isn’t fully up to date with the moving target that is the CSS3 standard. So this last approach can come in handy when you need to manually enter a property for which there isn’t an included visual equivalent.
Formatting Links
One of the most common uses of CSS is to change the way links are displayed in the browser. Want your links to only be underlined when the cursor is over them? Want the background or text color to change when a visitor clicks? Or maybe you just want something other than your visitor’s default colors? That’s all CSS, and Dreamweaver can handle that.
To format links
1. Click the New Selector button on the CSS Designer panel.
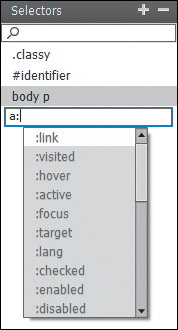
2. If you want to set a style that will apply to all links (whatever their state) or to set the default appearance for links, type a in the selector name field.
or
For the selector name, type any of: a:link, a:visited, a:hover, or a:active ![]() .
.
![]() Which pseudo-class will you change?
Which pseudo-class will you change?
![]() a:link is the default state of the link, seen when none of the other states are in use.
a:link is the default state of the link, seen when none of the other states are in use.
![]() a:visited is how the link will appear after the link has been clicked and the linked page loaded.
a:visited is how the link will appear after the link has been clicked and the linked page loaded.
![]() a:hover is how the link will appear while the visitor’s cursor is over the link.
a:hover is how the link will appear while the visitor’s cursor is over the link.
![]() a:active is how the link will appear while the visitor is clicking that particular link.
a:active is how the link will appear while the visitor is clicking that particular link.
3. You can create the specific rules you want for links directly in the CSS Designer panel ![]() .
.
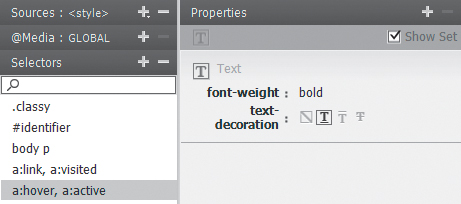
![]() The CSS Designer panel, after various a rules have been defined. Other new properties can be set here, also.
The CSS Designer panel, after various a rules have been defined. Other new properties can be set here, also.
Tip
It is important to set styles for your links; otherwise, they are likely to display underlined and blue (unvisited) or purple (visited)—but you can’t be sure of that. To control the look of your page, set the link styles.
Tip
![]() shows some of the most common rules for CSS-formatted links: bold font weight, and no underline except when the cursor is over the link.
shows some of the most common rules for CSS-formatted links: bold font weight, and no underline except when the cursor is over the link.
Tip
Rules for link pseudo-classes won’t work reliably with the cascade unless you define them in the following order: a:link, a:visited, a:hover, a:active. A way to remember the L-V-H-A order is the memory device LoVeHAte.
Editing Styles with the Property Inspector
If you’re upgrading from a much older version of Dreamweaver, it’s the most natural thing in the world to use the Property inspector to create styles. You can still style text with the Property inspector, but there are a few things to keep in mind.
The old way of using Dreamweaver added dozens, perhaps hundreds, of font tags to a page with the Property inspector. Getting rid of all those bandwidth-eating font tags is a good thing. With modern versions of Dreamweaver, you can apply only two HTML styling tags with the Property inspector: <strong> and <em>. All other style choices create CSS styles, and you’re prompted to create a new CSS rule when you try to style text.
Changing to CSS-based styling required splitting the Property inspector into two tabs: HTML ![]() and CSS
and CSS ![]() . In the HTML tab, you can apply HTML attributes, such as headings, lists, and indenting. You can also apply CSS classes and ids. In the CSS tab, you can create CSS rules, apply font families, change the size and color of fonts, and align text.
. In the HTML tab, you can apply HTML attributes, such as headings, lists, and indenting. You can also apply CSS classes and ids. In the CSS tab, you can create CSS rules, apply font families, change the size and color of fonts, and align text.

![]() The HTML tab of the Property inspector allows you to apply HTML tags.
The HTML tab of the Property inspector allows you to apply HTML tags.

![]() The CSS tab of the Property inspector allows you to apply CSS styles.
The CSS tab of the Property inspector allows you to apply CSS styles.
To create styles with the Property inspector
1. Open a new, blank document or a document with content but with no styles yet applied.
2. Click the Page Properties button on either tab of the Property inspector. The Page Properties dialog appears ![]() .
.
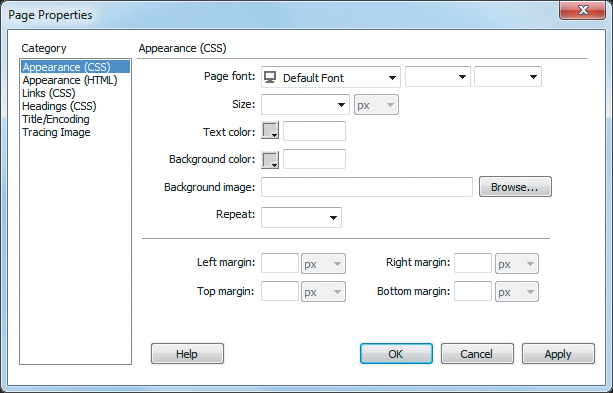
![]() Page properties in the Appearance (CSS) category determine backgrounds, fonts, colors, and margins, using CSS.
Page properties in the Appearance (CSS) category determine backgrounds, fonts, colors, and margins, using CSS.
This dialog applies styles and properties that will affect the entire page, and the styles will be written as an internal style sheet. You can move the styles to an external sheet later, if needed; see “Dragging and Dropping Styles” in Chapter 9.
3. The Page Properties dialog contains six categories. You can set properties as desired:
![]() Appearance (CSS): Set appearance properties for the body, including page font, size, text color, background color, and background image. If you use a background image, you should also set how it repeats. Margins are set individually for top, right, bottom, and left.
Appearance (CSS): Set appearance properties for the body, including page font, size, text color, background color, and background image. If you use a background image, you should also set how it repeats. Margins are set individually for top, right, bottom, and left.
![]() Appearance (HTML): Sets HTML appearance properties for the page, including background image, text colors, link colors, and margins
Appearance (HTML): Sets HTML appearance properties for the page, including background image, text colors, link colors, and margins ![]() . We recommend that you set these with CSS styles instead.
. We recommend that you set these with CSS styles instead.

![]() You can set HTML page properties in the Appearance (HTML) category.
You can set HTML page properties in the Appearance (HTML) category.
![]() Links (CSS): Set the font and size, set colors for unvisited, visited, rollover, and active links, and select underline style from the pop-up menu
Links (CSS): Set the font and size, set colors for unvisited, visited, rollover, and active links, and select underline style from the pop-up menu ![]() .
.

![]() Page properties in the Links (CSS) category set up fonts, colors, and sizes for links.
Page properties in the Links (CSS) category set up fonts, colors, and sizes for links.
![]() Headings (CSS): Set a heading font, and choose a size and color for each heading
Headings (CSS): Set a heading font, and choose a size and color for each heading ![]() .
.

![]() Page properties in the Headings (CSS) category set up fonts, colors, and sizes for headings.
Page properties in the Headings (CSS) category set up fonts, colors, and sizes for headings.
![]() Title/Encoding: Type a page title. Choose a document type from the Document Type (DTD) pop-up menu. Leave the Encoding and Unicode Normalization Form settings alone unless you know what you’re doing and are creating pages in multiple languages
Title/Encoding: Type a page title. Choose a document type from the Document Type (DTD) pop-up menu. Leave the Encoding and Unicode Normalization Form settings alone unless you know what you’re doing and are creating pages in multiple languages ![]() .
.

![]() Page properties in the Title/Encoding category determine title, document type, and language encoding.
Page properties in the Title/Encoding category determine title, document type, and language encoding.
![]() Tracing Image: Browse to locate the tracing image, and set the degree of transparency
Tracing Image: Browse to locate the tracing image, and set the degree of transparency ![]() . We discussed tracing images in Chapter 3, “Building Your First Page.”
. We discussed tracing images in Chapter 3, “Building Your First Page.”
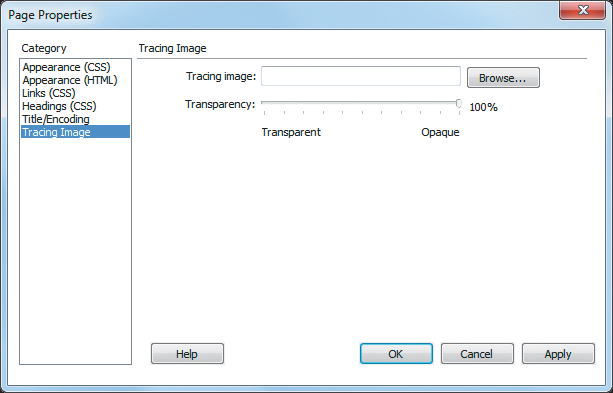
![]() Page properties in the Tracing Image category allow you to set an image that you can trace over when designing your page.
Page properties in the Tracing Image category allow you to set an image that you can trace over when designing your page.
4. Click Apply to see how your changes look, and then click OK to accept your changes.
Tip
The styles and properties you set are stored internally in this document only. You can inspect them in Code view. The document type appears in the first line of code. The language encoding appears in a meta element in the head. The styles are enclosed in a style element in the head. If you set a tracing image, it appears in Design view.
Tip
Names in the Page Properties dialog are not always standard CSS selector or property names. For example, in the Links category, Rollover links correspond to the CSS pseudo-class selector a:hover and Underline style corresponds to the CSS property text-decoration.
To create classes or inline styles with the Property inspector
1. Open a document and select the text or tag to be styled.
On the CSS tab of the Property inspector, <New Inline Style> is automatically selected in the Targeted Rule pop-up menu ![]() .
.
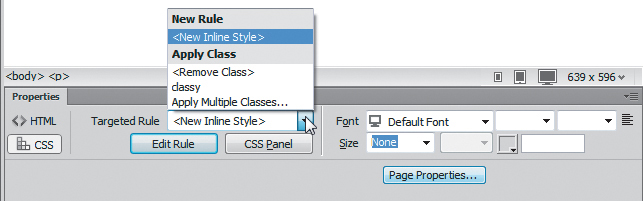
![]() The Targeted Rule menu in the Property inspector lists available classes and ids. Choose one from this menu to apply it.
The Targeted Rule menu in the Property inspector lists available classes and ids. Choose one from this menu to apply it.
If you look in the menu, you’ll see that there are other styles you can apply; the Cascade section lists styles available in external sheet(s), the New Rule section allows you to create a new CSS rule or a new inline style, and the Apply Class section allows you to apply existing classes.
2. Set new values for any or all of the following settings: Font, Size, and Color. For color, use the color picker to choose a color for the selected text.
If you’re creating a new inline style, the style is created in the document and is applied to the selection.
The class is applied with a span tag to inline text. If the selected text is a complete element, such as a paragraph, the class is applied to the element’s tag.
3. (Optional) Instead of applying values in the Property inspector, you can click the CSS Panel button on the CSS tab of the Property inspector ![]() . You can then edit the new rule using the Properties pane of the CSS Designer panel.
. You can then edit the new rule using the Properties pane of the CSS Designer panel.
Modifying a Style
Changing a style is quick and easy. You’re already familiar with the CSS Designer panel, and that’s where you modify styles.
To modify a style with the CSS Designer panel
1. Open a document. In the CSS Designer panel, choose a source in the Sources pane, then a selector in the Selectors pane. Properties for the selected style appear in the Properties pane.
2. Click a value in the Properties pane. An editable field appears ![]() .
.
![]() Edit any property value directly in the Properties pane.
Edit any property value directly in the Properties pane.
3. Change as desired, and press Enter (Return) to complete your changes.
Working with Related Files
The vast majority of webpages you see these days aren’t standalone HTML files. Rather, they are HTML files with links to other, related files, including CSS style sheets, external JavaScript files, server-side include (SSI) files, and sometimes even XML and other HTML files.
In old versions of Dreamweaver, it was sometimes difficult to find and get to these related files when you were working on a page. You would have to check the page’s source code in Code view or fiddle around in the CSS panel to track down the name of the external style sheets.
Dreamweaver’s Related Files bar ![]() is at the top of the document window, giving you quick, one-click access to related files. The Related Files bar appears only when you have linked multiple files to the current document. For example, if you create a standalone HTML file, the Related Files bar won’t appear. But when you attach a CSS style sheet, the bar appears.
is at the top of the document window, giving you quick, one-click access to related files. The Related Files bar appears only when you have linked multiple files to the current document. For example, if you create a standalone HTML file, the Related Files bar won’t appear. But when you attach a CSS style sheet, the bar appears.
![]() The Related Files bar lets you quickly jump to CSS and script files.
The Related Files bar lets you quickly jump to CSS and script files.
The names of the files appear in the Related Files bar. At the left side of the bar, you will always see the Source Code button, so that you can easily display the source code for the current document after you have opened a related file.
2. Click the name of one of the related files in the Related Files bar.
Dreamweaver switches to Split view, with the document in the Design View pane, and the related file in the Code View pane ![]() .
.
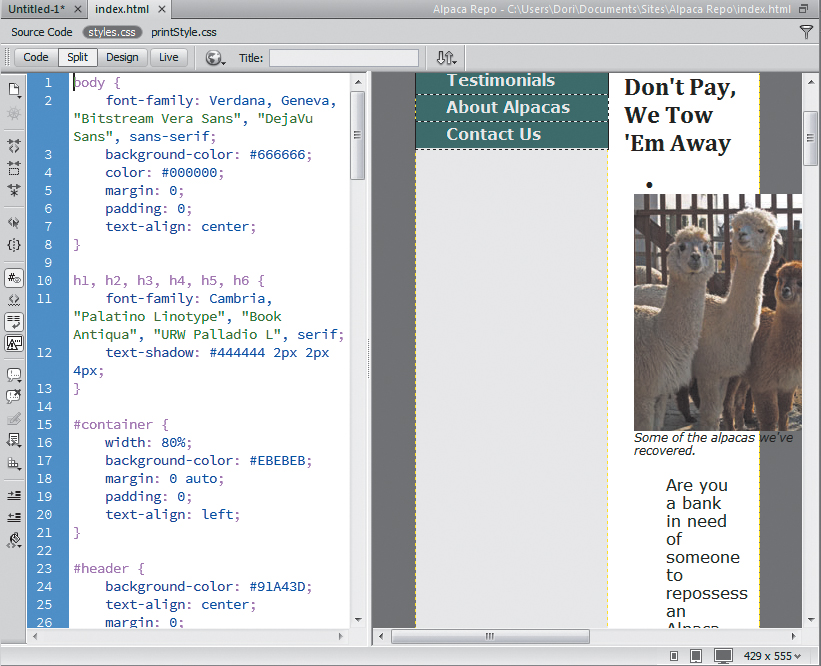
![]() When you click the name of a style sheet in the Related Files bar, you end up in Split view, ready to edit the style sheet.
When you click the name of a style sheet in the Related Files bar, you end up in Split view, ready to edit the style sheet.
3. View or edit code in the Code View pane.
Tip
The Related Files feature is enabled by default, but you can turn it off in the General category of Dreamweaver’s Preferences panel.
Tip
You can also access related files by choosing View > Related Files and then choosing the file you want from the submenu ![]() .
.

![]() You can also see the related files in the View menu.
You can also see the related files in the View menu.
Tip
Dreamweaver will show all linked CSS files in the Related Files bar, even if the CSS files are linked to one another rather than to the current document. In other words, the Related Files bar will show all the style sheets in the cascade. However, it only shows other types of files (such as scripts) when they are directly linked by the current document.
Tip
Related files are especially useful when working with the Code Navigator feature (see the next section, “Using the Code Navigator”) and with Dreamweaver’s Live view.
Using the Code Navigator
One of the challenges of working with modern sites is that sometimes it can be difficult to figure out which of the linked style sheets or script files is actually being applied to a given element on your page. Sure, you can use the Property inspector or the CSS Designer panel to get the name of the style that is applied to the element, but that style could be being modified by another style sheet elsewhere in the cascade. What you need is a tool that shows all of the style sheets and scripts that are affecting your selection and that then allows you to easily make changes to those styles and scripts. That’s what the Code Navigator does.
To use the Code Navigator
1. Point at the element on your page that you want to inspect, then Alt-click (Cmd-Opt-click).
or
Press Ctrl-Alt-N (Cmd-Opt-N).
or
Right-click the selection or a tag in the tag selector, and then choose Code Navigator.
or
Choose View > Code Navigator.
or
Click the Code Navigator indicator that appears near where you last clicked in the document when Dreamweaver has been idle for a few seconds ![]() .
.
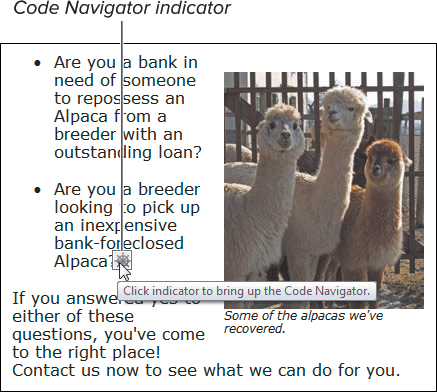
![]() Click the Code Navigator indicator to open the Code Navigator window.
Click the Code Navigator indicator to open the Code Navigator window.
The Code Navigator window appears ![]() showing you the script and CSS files associated with the selection. For CSS styles, indented under the name of each style sheet are the names of the CSS rules that apply to the selection.
showing you the script and CSS files associated with the selection. For CSS styles, indented under the name of each style sheet are the names of the CSS rules that apply to the selection.
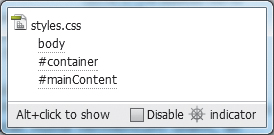
![]() The Code Navigator window shows the different style sheets associated with the element you selected and also shows which particular rules affect the element.
The Code Navigator window shows the different style sheets associated with the element you selected and also shows which particular rules affect the element.
2. To jump directly to a particular rule, click its name in the Code Navigator window.
The Dreamweaver window changes to Split view and places the insertion point in the Code View pane, ready to edit the style rule you chose.
or
To view the properties defined in each of the rules shown in the Code Navigator, hover the cursor over a rule’s name. After a moment, a tool tip appears showing you the properties ![]() .
.
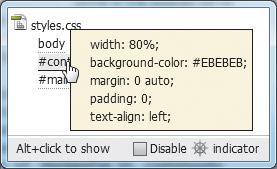
![]() Hovering over a CSS rule reveals the rule’s properties.
Hovering over a CSS rule reveals the rule’s properties.
3. If you ended up in the Code View pane in step 2, edit the style rule. If all you wanted to do was view the rules and properties for the selection, press Esc or click elsewhere in the document to dismiss the Code Navigator window.
Tip
You can also invoke the Code Navigator in Code view by placing the insertion point inside a <script> or <link> tag, or inside a text block that is being styled by CSS, and then clicking the Code Navigator button on the Coding toolbar. See Chapter 17 for more information about working in Code view.
Tip
The Code Navigator is incredibly useful, but the Code Navigator indicator ![]() is actually pretty annoying, because it pops up whenever you pause your work. You can (and probably will) turn off the indicator by selecting the “Disable <Code Navigator symbol> indicator” check box at the bottom of the Code Navigator window. You can always bring up the Code Navigator manually, as discussed in step 1.
is actually pretty annoying, because it pops up whenever you pause your work. You can (and probably will) turn off the indicator by selecting the “Disable <Code Navigator symbol> indicator” check box at the bottom of the Code Navigator window. You can always bring up the Code Navigator manually, as discussed in step 1.