
Chapter Objectives
Discuss the requirements for configuring software on a cluster's compute slices
Describe choices for cluster compute slice operation
Compare network-based system installation tools
Introduce the
pxelinuxboot toolDescribe the installation and use of Red Hat
kickstartfor installationIntroduce some of the concepts necessary for NFS diskless clusters
With infrastructure nodes firmly in place, available storage for saving system configuration information, and active networks, we are ready to begin installing the cluster's compute slices. Because the compute slices (or “worker” nodes) usually far outnumber the other system types in the cluster, we need to be efficient and apply large-scale administration tactics to the effort. This chapter discusses several of the tools and methods for installing several to several hundred compute slices.
If you ever discuss the integration of a cluster with someone who has never worked in a large-scale system environment, there are two possible reactions that frame the spectrum. When you try to describe the task at hand, you may encounter the “that-doesn't-sound-so-hard” reaction. On the other hand, if the person has any system administration experience at all, they may be able to relate their experience to what you are doing. In that case, you will get the “are-you-crazy?” reaction.
As with most things, the truth lies somewhere between the two extremes. Building a cluster is not easy, but neither is it impossible. A lot of people have done it, have done it successfully, and continue to do it year after year. You can too.
If you are already a cluster expert, I don't expect that you will be reading this book. If you are building your first cluster, you may not know how or where to start the process, once you have made some guesses about the infrastructure you might need. As you gain experience, you will know the technologies and methods that work, and you will continue to use and adapt them.
The best thing to realize is that you will discover things of which you were unaware or that don't work as planned as the project progresses. It is best to resign yourself to that, up front, and recognize that you may need to adopt an incremental approach to building the cluster environment. There isn't (yet) an all-in-one software environment that allows the complete construction of a cluster's software environment without some custom system engineering effort.
When I mention an “incremental approach,” I am suggesting that you implement the various software components in “layers,” adding functionality (and complexity) one step at a time. Once the current environment is verified and the configuration is captured, then add another component, verify it, and continue. Eventually, you should run out of components. (Do not take the approach of “stacking cubes of Jello,” which is so tempting. In other words, don't install the software, light it up, and move on with no testing. Following this procedure is somewhat like stacking Jello cubes—you might get a temporarily stable configuration, but the slightest jolt will jiggle the whole stack back to randomness.)
For example, once the expected infrastructure services are in place, move on to getting the system installation process for the rest of the cluster implemented. Once you can install (replicate) systems easily, begin to add and activate the other required functionality to the core configuration. This is the approach I will take in this chapter toward installing the compute slice operating system configuration.
In Chapters 8, 9, and 10, I presented low-level Linux services that enable us to support the compute slices we are preparing to install. The obvious starting point is to enable the infrastructure servers that will be needed to bring up the rest of the cluster's systems. We need to have the basic infrastructure—like shared storage, networking, remote access, authentication, and other “enablers”—in place to continue. Refer back to Infrastructure Implementation Recommendations on page 221 for a recommended installation order.
It is much the same as building a good-size, client–server desktop environment. The same level of detail is necessary, and the same level of complexity (plus a little) is present. As we choose software components and administration practices, we need to have some goals in mind. It also doesn't hurt to have some pretty sound large-scale system administration philosophies in place.
Some possible targets for the overall cluster's final software environment might be
Reliable—. The system behavior must be predictable.
Scalable—. Software systems must scale to support the final number of cluster systems. This includes the infrastructure and administrative tools, as well as the applications that we expect the cluster to run.
Verifiable—. We must be able to confirm that the system is working properly and to pinpoint areas that are affecting the other goals.
Manageable—. We must be able to administer all the components of the environment to meet the other goals for the cluster.
Supportable—. We must choose software components that fit our organization's support requirements.
We are attempting to meet some of these requirements with the installation of replicated infrastructure services and mirrored disk resources. We have to consider the infrastructure and administrative nodes as “support” for the remainder of the cluster, and they are necessarily different in some ways from the compute slices.
But what is it that we are really doing when we choose a software configuration for the compute resources that make up the majority of the cluster? The answer is, we are trying to create a group of systems that behaves as if it is a single system to the users and the applications that utilize it. Let's focus on the word “single” for a while.
Current industry terminology refers to scaling up versus scaling out for expanding a set of compute resources. Scaling up refers to adding CPUs, memory, and capability to a single system to increase its resources and response to its user's needs. Scaling out refers to a multiple-system approach—adding individual systems to a shared resource pool. A cluster of systems expands the available resources that would previously have been limited by a single system's maximum configuration, but still should provide a “single-system view” of those resources, at a potentially lower cost.
If we need to provide a single-system view of a particular set of resources, we might expect that the solution's behavior in terms of performance, availability, and management might need to imitate a single system. Whenever we make choices about implementing portions of our cluster, we need to have this “single-system view” in mind. This is actually one of the most difficult concepts to understand and apply to the type of large-scale system administration efforts required in clusters.
In a perfect world, the operating system and software that we select for a cluster environment would allow us to have
A single installation process
A single boot process
A single, identical set of infrastructure services
A single system administration process
A single view of common storage
A single, consistent set of user accounts
A single set of shared devices
A single unified view of the network
A single application environment
In other words, we need to pursue our cluster with single-minded resolve, engineering the whole solution to appear as if it were a single system from the outside.
Although there is continuing research into an integrated environment like this, and there is a preliminary release of software available, this environment still takes a level of software development expertise to implement that is beyond our capabilities as beginning cluster builders. The environment to which I am referring is the single system image (SSI) for Linux clusters, which may be found at http://openssi.org. For now, the principles involved are exactly what we want to use, but the software is still in a preliminary state.
You should carefully examine the overview information from the OpenSSI Web site. It details some of the developments that are included in the OpenSSI environment—developments that we have to “emulate” with our cluster's software configuration. The beauty of Linux is the ability to create environments like OpenSSI from open-source components, and to make them available to the general community at no cost. I can assure you that I will continue to watch this Web site with high hopes.
Until the OpenSSI environment matures a little more, however, it is just tantalizingly out of our reach. Let's continue on and examine what needs to be present in our compute slices to approximate a unified, single-system environment.
From a practical standpoint, we can view our multiple cluster compute slices as absolute copies of one another—clones. Sharing operating system software structure (a common set of installed packages) across identical hardware configurations allows us also to share administrative processes and be assured that the systems will behave the same. After all, within a set of systems with an identical hardware configuration, the operating system configuration and management process should be identical. If they are not, then we need to correct the situation or create a new category.
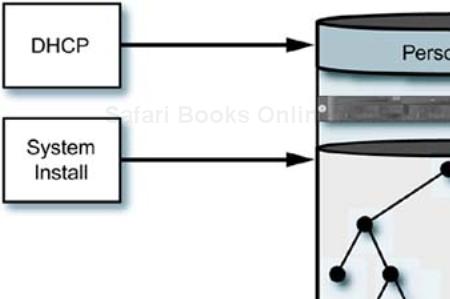
This is not quite true. If you install an operating system on a particular hardware configuration, then copy it to another identical piece of hardware, they may be identical until you need them to boot and be present in a network. At some point, the identical software structure needs to be given a small but unique set of configuration information to differentiate it from all other systems in the network. This is minimal information, such as a host name and IP addresses, but the system is no longer 100% identical to its clone. (I will avoid the annoying trend to assign human traits and behaviors to collections of hardware and software. This is not a matter of software “nature versus nurture.”) This relationship of “personality” to “structure” is shown in Figure 12-1.
One way to think of this situation draws on terminology from the object-oriented programming world. In that view, there are “classes” of objects—in this case, systems—that share a set of base-level characteristics. Objects are created, or “derived,” from base classes possessing the basic characteristics shared by all members of the class, then are extended with any special characteristics required by the application that is using the object. The object is part of a cohesive whole that exists to perform some useful function for its users.
Like the software objects in our analogy, our compute slice systems have a basic software structure and a set of inputs and outputs that we may consider an “interface” to the cluster environment. Understanding the requirements of our system objects, and their interface to the environment, gives us a model for replicating them and creating automated processes for managing them. It also defines the set of services that must be present to support the required inputs and make use of the outputs.
The custom data, or “personality,” of each system is minute when compared with the overall quantity of data in the system's operating system software. After all, how many configuration files would need to be changed, by how much, on a system to make it participate in the network? If you consider the client-side configuration data necessary to use the network and infrastructure services like ksyslogd, NTP, DNS, NIS, and SSH, it is really quite small.
A compute slice should be able to boot, get most of its personality from a central service, like DHCP, and immediately begin participating in the cluster environment. We might have to install some custom scripts manually that automatically adapt the configuration based on the system's host name or IP addresses, but our goal is to make the changes identical on each node. By using single-point administration techniques, we can keep the adjustments to the system's configuration automatic and data driven.
This is a good time to point out that your goal, if at all possible, is to have identical hardware and identical software on all the compute slices and spares in your cluster. If you have different classes of systems all participating in the same cluster environment, the management complexity and the chance of “interesting” failure modes go up. This is one place where a homogeneous solution is a simpler, safer solution.
You may have the luxury of homogeneous hardware in your cluster if you are allowed to build the entire thing at one time. If the cluster is built in phases, or is built from “reclaimed” hardware, having a single set of hardware across the cluster is unrealistic. If you do have a mix of hardware configurations, then you will need to use system management and installation techniques that deal with different classes of systems.
One way to accomplish the “shared” structure for a compute slice is to copy the complete configuration on each node from a “golden” or prototype system. The systems behave as if they were sharing a common set of information, but there are multiple local copies, not a single, central version. As you might recognize, there are version control issues with this approach. All copies of the data must remain synchronized.
Linux supports a number of system installation tools that can address creating identical configurations at the initial system installation. These tools may be package based, like Red Hat's kickstart tool, or they can be file-based, like the more general-purpose SystemImager. There are advantages and disadvantages to both types of tools.
A package-based installation method like kickstart provides a nice, modular way to install software—provided the software is already part of a package. One little-realized flaw is the repeated execution of the package installation and configuration scripts on every system at every installation. This overhead takes time and may create scaling issues. This installation approach is flexible; works well in small, simple clusters; and can be modified to avoid some of the negative issues mentioned.
The “system image” installation methods, like SystemImager, can copy and replicate existing system installations. The approach is extremely flexible, but still can suffer from scaling issues on the installation server. It is possible to copy, store, and replicate any system configuration (including faulty ones) easily once it is initially built on a “golden” system. It is even possible to make changes to a configuration tree and update associated systems without a complete reinstall.
Another approach to shared structure that is used in some clusters truly shares a single system structure between multiple compute slices: a diskless configuration. Linux readily supports a remote root file system, shared via a networked file system such as NFS. The compute slices boot the Linux kernel over the network and then share an NFS file system that contains the system libraries, executables, and configuration information needed by the individual systems.
Advantages to this approach include reliability improvements resulting from no local disks, a single-system image to manage with no local copies, and true single-point administration. Disadvantages include possible scaling issues, lack of “standard” Linux diskless environments (requiring custom work to adapt and implement), and reliance on Linux's NFS server implementation (which is still lacking features).
The trick to keeping compute slice installation manageable is using tools that allow automated installation. There is really no way that we can justify performing a manual installation on multiple compute slices, even if we managed to kick off multiple installations in parallel. There is still the matter of feeding floppies, CD-ROMs, and user input to the installation process.
One issue that we must address is the question: Just what needs to be loaded on a compute slice? The answer to this is: Only the necessary software, and nothing more. The reasons for this are (1) keeping the installation time short, (2) reducing the amount of network traffic required on a per-node basis, (3) reducing the load on the installation servers, and (4) reducing the complexity (and therefore the possible failure modes) on the compute slices.
Each application environment is different, but the software set needs to include the kernel, specialized hardware drivers (HSI, network, and so on), the required system libraries, system commands (shells, ls, grep, awk, and so forth), system monitoring tools, system management tools, application components (libraries, scripts, executables), HSI libraries, and any other specifically identified packages (licensing software, data access, authentication, and so on). It takes a concerted effort to trim the unnecessary software to keep the system “footprint” small, but it is worth it.
Along with automating the installation, we need a facility to allow booting the system and kicking off an unattended installation—running diagnostics—when we specifically need a special system boot (and only if requested). If a compute slice fails, we need to “reimage” it quickly to determine whether it was a hardware failure or a software issue. If the system fails again, it needs to be replaced, repaired, and reimaged.
The less time the installation process takes, the faster the cluster can be upgraded. Many commercial clusters have maximum installation time specified in their contractual requirements. The more flexible the boot environment, the easier it is to use some of the network-based installation and diagnostic tools at our disposal.
Systems that have either BOOTP or DHCP capabilities built into their system start-up ROMs can broadcast a request on a network connection for boot service. (The Linux dhcpd server implements both BOOTP and DHCP boot protocols. Another protocol, PXE, is also frequently available in client boot ROMs.) A DHCP server listening on the local LAN receives the request and returns client information, including the name of a boot file and the client's IP address, to the requestor. Also included in the response packet is the IP address of the DHCP server, and potentially the IP address of another server that actually handles the boot request file transfer.
For an example of the information that is returned to the client by the DHCP server, see Client-side DHCP Information on page 307. This example DHCP client information contains the boot file name pxelinux.0 provided by the DHCP server, which is the pxelinux network bootloader file. The pxelinux bootloader is part of the syslinux package (available at http://syslinux.zytor.com) that is used to create compact Linux bootable floppies, and includes isolinux for creating bootable Linux CD-ROMs. This utility allows us to create a general-purpose network boot menu for selecting different network-based installation mechanisms.
Although you may not need something this general, it can allow selecting between Red Hat's standard installation utility, the Red Hat kickstart service, or SystemImager. The ability to select different boot processes is ideal if you are trying to choose a boot installation method for your cluster. Instead of limiting the boot choice to a single file specified by DHCP, pxelinux enables either a default boot or selection of the method from a menu.
An example of the DHCP server configuration necessary to support booting is shown in the example dhcpd.conf file listed in Configuring the DHCP Server on page 310. The PXE client group in the configuration file contains the necessary configuration information, including the bootloader file. Once the file is specified to the client, the client requests the file from the tftpd server, loads it into the client's memory, and executes it.
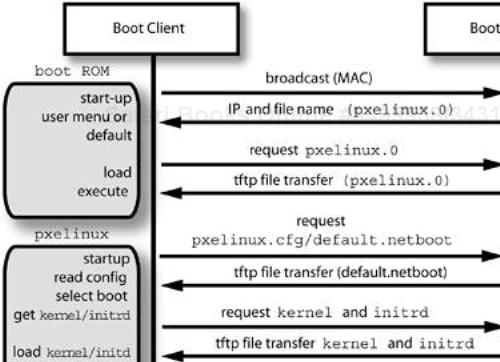
The bootloader then handles the user interaction, allowing selection of a kernel and initrd to use for the remainder of the boot process. The bootloader is responsible for passing the specified parameters to the kernel. Once the kernel and initrd are loaded into memory, the bootloader jumps to the kernel to start system execution and Linux takes it from there. The pxelinux bootloader replaces the disk-based bootloaders like lilo and grub. The DHCP network boot process and its components is shown in Figure 12-2.
First, it is important to understand that TFTP, in general, is a large security hole. It can allow arbitrary, unauthenticated access to any file on your system unless properly configured. You should restrict access to the tfpd daemon on the boot servers to the management LAN only. (You can do this with the /etc/hosts.allow and /etc/hosts.deny files, which control the TCP wrapper behavior. You may also restrict the access via the xinetd configuration file with the only_from configuration option. This allows you to specify a network address or a range of hosts that will be accepted for access.) Another feature that increases the security level is to use the chroot feature of the TFTP server, which limits the daemon's access to the directories below a prespecified point in the file system hierarchy.
The tftpd daemon is started by xinetd, but the service is disabled by default. The configuration file is /etc/xinetd.d/tftp. I usually make two modifications to the configuration file: (1) enable the service and (2) increase the verbosity of output to the syslogd process. The increased message level allows me to track the files and activity being handled by the daemon. The modified configuration file is
# default: off
# description: The tftp server serves files using the trivial
# file transfer protocol.  The tftp protocol is often used to
# boot diskless workstations, download configuration files to
# network-aware printers, and to start the installation
# process for some operating systems.
service tftp
{
        socket_type       = dgram
        protocol          = udp
        wait    = yes
        user    = root
        server            = /usr/sbin/in.tftpd
        server_args       = -v -v -v -s /tftpboot
        disable           = no
        per_source        = 11
        cps     = 100 2
        flags           = IPv4
}
Enabling additional message output from tftpd is important, not only for tracking normal activity, but because the file names that are requested will all be relative to the /tftpboot directory, which is where the daemon is constrained by the -s /tftpboot option in the configuration file. Even understanding that this is the case, it can be difficult to make sure that the files are actually available and that you are specifying the correct path to DHCP.
Don't forget to restart the DHCP daemon after making the changes to the configuration file:
# service dhcpd restart
The best way to ensure that you are accessing the correct files is to test from a potential client using the TFTP client software:
# cd /tmp
# tftp ns2
tftp> get pxelinux.0
Received 10205 bytes in 0.4 seconds
tftp> get pxelinux.cfg/default.netboot
Received 1289 bytes in 0.3 seconds
tftp> quit
Once you are sure that TFTP allows you to access the files properly, you can add DHCP to the mixture and start testing a client boot.
The pxelinux package requires you to place the pxelinux.0 file somewhere that tftpd can find it, and to specify the proper path to it in the dhcpd.conf file. In addition to the boot file, there is a configuration directory, pxelinux.cfg, that pxelinux will access once it is started. This directory contains configuration information that determines the behavior of pxelinux with respect to a particular system or group of systems by linking a system identifier to a configuration file unique to the particular system, or group of systems, being booted.
To differentiate the booting behavior for clients, the pxelinux package searches for links (or files) in the configuration directory that match some portion of the hexidecimal IP address of the requesting system. The link names must be 8.3 compatible (in other words, no more than eight characters in the file and three in the extension), which is why the configuration directory is named pxelinux.cfg, for example. I choose to use soft links, because it is possible to have a single configuration file that the links target, reducing the chance of version mismatches between separate files.
The pxelinux bootloader looks first for the whole network address in hexidecimal. If the link is not found, then it removes one character from the right of the hex address and looks again. This process continues until a match is found or the search fails. As an example, let's take the host address 192.168.0.111. This would convert to hexidecimal C0.A8.00.6F if we preserve the octet-based formatting. The link for this file would be named C0A8006F after removing the dots.
You can see from the searching order that the pxelinux software first looks for C0A8006F, followed by C0A8006, C0A800, C0A80, C0A8, and so on, until it runs out of characters. (You can see this process by watching the verbose output from TFTP in the /var/log/messages file.) This allows you to specify a single link that would match only the network portion of the address. For searching efficiency, I choose to create a link for every system, and use a script named make_links to create them from a list of addresses:
#!/bin/bash -x
SCRIPT="default.netboot"
if [ -n "${1}" ]; then
        SCRIPT="${1}"
fi
for HEXIP in $( sed 's@#.*$@@' < IPS.hex )
do
        ln -s "${SCRIPT}" "${HEXIP}"
done
A partial list of the client's hexidecimal addresses fed to the script is in a file I call IPS.hex:
C0A80067     # 103
C0A8006D     # 109
C0A8006F     # 111
This is, admittedly, a simple-minded approach, with a minimum of error checking. Some industrious person could write a Perl script that does the whole operation and performs the proper amount of error checking without too much trouble.
Now we have DHCP pointing to TFTP, pointing to the pxelinux.0 file, which will try to access /tftpboot/pxelinux.cfg to find the links that we have been discussing. The next step is to create the configuration files that drive the bootloader behavior. The bootloader will drop back to a default file, called default in the configuration directory, if it cannot find a match for a hexidecimal IP address. The contents of my default file simply specifies a boot from the local disk:
default linux
label   linux
        localboot 0
The links in the configuration directory all point to a file called default.netboot (only the link name needs to be 8.3 compatible). This file contains the following:
#  Remember everything is relative to /tftpboot !
#
default local   #  Uninterrupted network boot does this label
serial  0,38400n8       #  Serial port at 38400 Baud
                        # 8 bits no parity 1 stop bit
prompt  0      #  Will stop if Ctrl and Alt is held down or
               # <Caps Lock> or <Scroll Lock> enabled
F1      help.txt        # Will display help if a function
F2      help.txt        # key is pressed at the boot: prompt
F3      help.txt
F4      help.txt
F5      help.txt
F6      help.txt
F7      help.txt
F8      help.txt
F9      help.txt
F0      help.txt

label   linux9.ks
        kernel rh9.0/vmlinuz
        append vga=extended load_ramdisk=1
           initrd=rh9.0/initrd.img
           ks=nfs:192.168.0.110:/kickstart9.0/

label   linux9.in
        kernel rh9.0/vmlinuz
        append vga=extended load_ramdisk=1
           initrd=rh9.0/initrd.img
label   linux.fedora
        kernel fedora/vmlinuz
        append vga=extended load_ramdisk=1
           initrd=fedora/initrd.img
label   linux.si
        kernel si/kernel
        append vga=extended load_ramdisk=1 prompt_ramdisk=0
           initrd=si/initrd.img root=/dev/ram rw
           ramdisk_blocksize=4096
label   linux.pxes
        kernel pxes/vmlinuz
        append ramdisk_size=32768 ro video=vesa vga=0F0F
           initrd=pxes/initrd.img root=/dev/ram rce=1 pd=1
           csn=192.168.0.110

label   local
        localboot 0
When a system makes a DHCP or BOOTP boot request, it gets the pxelinux.0 file, which will continue to a local disk boot unless the Ctrl or Alt key is held down when pxelinux gains control. If the boot is interrupted, a prompt is output, which waits for a selection matching one of the labels in the configuration file. If a link is missing for a particular hexidecimal address, the default behavior is to perform a boot from the local disk.
Pressing F0-F8 will output a nice color menu that lists the options. The menu information, with color attributes (control characters are prefixed with “^”—for example ^L is Ctrl-L) flanking the text, is located in a separate text file called /tftpboot/help.txt:
^L
^O79
  Available options for the boot are:

    linux9.ks    Do a kickstart installation of Red Hat 9.0
    linux9.in    Do a manual Red Hat 9.0 installation
    linux.fedora Do a manual Red Hat Fedora installation
    linux.si     Do a system image installation of Red Hat 9.0
    linux.pxes   Boot PXES thin client
    local        Boot from local disk

  Enter a selection to continue the boot process.
^O09
Because I am continually experimenting with new operating system versions and diskless environments (such as pxes), this facility serves me well. I can easily add a new boot option to the menu, plug in a new directory underneath /tftpboot, populate the kernel and initrd for my boot option, and be up and running in a very short time.
Even if someone stumbles into the network boot option by accident, the normal behavior is to boot from the local disk unless the process is interrupted. This helps prevent accidental installations. I can choose between kickstart, SystemImager, or the standard Red Hat network installation process from the pxelinux menu. The configuration of the TFTP directory and the pxelinux bootloader files is shown in Figure 12-3.
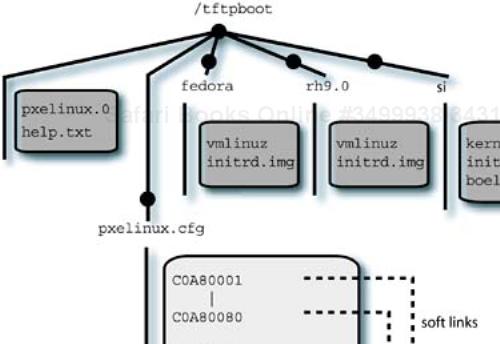
You may notice that none of the RPM packages for either the interactive Red Hat installation or the kickstart installation are present under this directory tree. If you go back to the linux9.ks label in the pxelinux configuration file, you can see that a kernel parameter specifies /kickstart9.0 as the kickstart directory for this installation method. See the following section for details on this installation method and the contents of this directory.
The SystemImager directory, si, contains the special kernel and initrd file for that installation method. Another file, boel_binaries.tar.gz, provides the RAM-based operating system with tools used in the installation. See Using the SystemImager Software on page 351 for coverage of the configuration and operation of SystemImager.
The pxelinux bootloader may be viewed as adding another “layer” to the boot installation process. This extra step provides the ability to interface to other installation methods that might be used in your environment. If you settle on one installation method for your cluster, the intermediate step may be unnecessary. The basic configuration of the DHCP and TFTP server software is similar, no matter whether you choose to use pxelinux or go directly to SystemImager or kickstart.
The Red Hat installation tool, anaconda, provides a cohesive way for the user to use a point-and-click interface (or a VGA text-based one) to step through the Linux installation process. The tool saves the configuration information for a system installation in the /root/anaconda-ks.cfg file. This file may be used to automate the installation process for other systems.
In addition to the kickstart file that is produced by anaconda, it is possible to create a configuration file manually with a text editor or to use the Red Hat tool called redhat-config-kickstart if a graphical interface is desired. The graphical tools, including anaconda, do not expose the full functionality of the kickstart configuration file. An example kickstart file from a system with a RAID 1 system device is
install
cdrom
lang en_US.UTF-8
langsupport --default en_US.UTF-8 en_US.UTF-8
keyboard us
mouse generic3ps/2 --device psaux
xconfig --card "Intel 810" --videoram 16384 --hsync 30-80
      --vsync 56-85 --resolution 1024x768 --depth 24
      --startxonboot  --defaultdesktop gnome
network --device eth0 --bootproto dhcp
rootpw --iscrypted $1$CvYYIEvU$2dTwrsY7nJ9JALZrKmia7.
firewall --disabled
authconfig --enableshadow --enablemd5
timezone America/Los_Angeles
bootloader --location=partition --append hdd=ide-scsi rhgb
clearpart --linux
part raid.8 --size=100 --ondisk=hda --asprimary
part raid.9 --size=103 --ondisk=hdc --asprimary
part raid.12 --size=75701 --ondisk=hdc
part raid.11 --size=75701 --ondisk=hda --asprimary
part raid.15 --size=509 --ondisk=hdc
part raid.14 --size=509 --ondisk=hda
raid /boot --fstype ext3 --level=RAID1 raid.8 raid.9
raid / --fstype ext3 --level=RAID1 raid.11 raid.12
raid swap --fstype swap --level=RAID1 raid.14 raid.15
%packages
@ everything
kernel
grub
%post
Note that the partitioning statements in the file have been uncommented from the automatically generated file. They would normally be set up to preserve the existing partitions on the target disks. This file may be fed to the installation process via a floppy, CD-ROM, or a network access.
If you look at the example kickstart file, you will see several statements that divide the file into sections: a “command” section, followed by %packages, %pre, and %post. The ordering of the sections is important, although certain information may be specified in any order. The %pre and %post sections may be defined in any order, as long as they are at the end of the file, following %packages.
The command section has a large number of options possible, and in the example file we have specified an install, which will reload the system from the specified source: cdrom. (The possible source media are CD-ROM, local disk, NFS, FTP, and HTTP. You may need to provide a network driver diskette to the installation process for your network interface hardware.) All the options, and then some, that are available from the graphical or text interfaces may be specified in the commands and options. We will not cover the details here, see the documentation for the redhat-config-kickstart command, which is in HTML format under /usr/share/doc/redhat-config-kickstart-<version>. The Red Hat Linux documentation also does a good job of introducing the capabilities.
Following the command section, is the %package section, which specifies which software packages are to be loaded from the source media. Lines that begin with “@” signify package groups, and lines without the “@” designate individual package names. Our example file specifies @ everything, which loads all available packages. You do not want to do this for the final configuration of your compute slices. (The installation time is proportional to the number of packages that you load. If you want to keep the kickstart installations short, specify only the packages you need. This may take some trial and error, along with close attention to the packages that are getting loaded [and the dependencies that are automatically selected].)
If you want to see the definitions for the packages on the Red Hat media, they are contained in an extensible mark-up language (XML) file named comps.xml on the CD-ROM media. This file is normally located in the RedHat/base directory relative to the root of the install media. This file is in a format that is “mostly” readable by text editors, if you want to examine it. It drives the list of available languages, packages, and other options in the installation tool.
The %pre section allows you to specify commands to be run immediately after the kickstart file has been interpreted by the installation kernel. It is important to understand the environment in which this script executes, especially the limitations on available commands and resources. The target system hardware being installed has been scanned by the Linux installation kernel, the network is available without name services, and the installation kernel is operating out of RAM disk with the local disks mounted under a special directory (not the root directory.)
The /proc file system will contain useful information about the target hardware that your installation script can use to make decisions and adjustments. You can examine the exact configuration of this environment during an interactive installation by pressing Ctrl-Alt-F2, which will switch to an X-Windows virtual display running a VGA text-mode shell prompt. The entire environment is sitting there to be examined. Type Ctrl-Alt-F7 to get back to the anaconda installation screen.
Fortunately, the environment for the %post script is a little more civilized. This script executes once the installation process is completed and before the system is rebooted. The operations in the script are all relative to the new system's root file system, unless you specify otherwise. If you are using DHCP, then the name resolution will still not be working, but you can use IP addresses, just like in the %pre script environment.
If you specify an NFS source for the installation files, that server directory is mounted under /mnt/source in the installation environment. Your %post script can mount other NFS file systems, and access RPM files, compressed tar balls, prototype configuration files, or any other information you may require. It is entirely possible to install a minimal environment with kickstart, then perform the majority of the system software configuration and loading in the %post script. I have seen some powerful installation processes implemented in exactly this way.
One of the easiest ways to make the installation media available for network installs is to place the files on a server (NFS, FTP, or HTTP) and allow the installation kernel to access the data at the remote location. For NFS, the path to the files must be exported via the /etc/exports file, and NFS clients must be able to access the NFS service without interference from TCP wrappers.
The installation media may be unloaded to a directory structure or provided as International Organization for Standards ISO CD-ROM images to the installation process. (Note that ISO is not an acronym, it is the word iso, which is the Greek word meaning “equal.”) To unload the binary RPM packages to the target local directory /export/RedHat/9.0, issue the following commands for all the CD-ROMs in the install set (usually three or four):
# mount /mnt/cdrom
# cp -var /mnt/cdrom/RedHat /export/RedHat/9.0
# umount /mnt/cdrom
# eject
You may see some warnings about overwriting trans.tbl files, and these can be safely ignored. If you want to make the release notes and image files available, you may also copy the whole top-level directory from the CD-ROM to the target directory. If you use these commands, the target directory for the remaining CD-ROMs becomes /export/RedHat/9.0/RedHat.
In addition to the installation media, which contain the RPM packages used by the install, you need to make the bootable kernel and initrd files available for booting by the client systems. These files are located in the /images/pxeboot directory on the first CD-ROM in the media set for Red Hat and derivative distributions (like Fedora). The files are called vmlinuz and initrd.img, and they need to be placed in the /tftpboot directory hierarchy so they can be found by the client TFTP requests. Figure 12-3 shows the placement of these files, as used by pxelinux.
We now have the ability to boot the kickstart installation kernel via the network and supply it with the installation media via an NFS server. What is left is providing the custom configuration file that drives the installation process. If you go back to the example default.netboot configuration file for pxelinux, you will see the following definitions for the network kickstart installation:
label   linux9.ks
        kernel rh9.0/vmlinuz
        append vga=extended load_ramdisk=1
           initrd=rh9.0/initrd.img
           ks=nfs:192.168.0.110:/kickstart9.0/
This definition passes the proper kernel and initial RAM disk, but also specifies a special para-meter that determines the location to search for the kickstart configuration file by passing the ks= kernel parameter to the installation kernel. In this case, we are specifying an NFS directory that contains the configuration file.
This directory contains soft links with a name of the form <client-IP-address>-kickstart, which point to the kickstart configuration file for the client with the associated IP address. An example link name is 192.168.0.111-kickstart. The target file name in my example directory is RedHat9.0-ks.cfg. As with the pxelinux example, I have a data-driven script that creates the appropriate links.
The kickstart file contains information that points the install kernel to the NFS-mounted RPM packages and some other useful customizations:
text

#Install Red Hat Linux instead of upgrade
install

#Use NFS installation media
nfs --server 192.168.0.151 --dir /export/RedHat/9.0/RedHat

#System bootloader configuration
bootloader --location=mbr

#Clear the Master Boot Record
zerombr yes

#Clear all partitions from the disk
clearpart --all --initlabel

#Disk partitioning information
part /boot --fstype ext3 --size 100 --asprimary
part / --fstype ext3 --size 1 --grow --asprimary
part swap --size 512 --asprimary

#Use DHCP networking
network --bootproto dhcp

#System authorization information
auth  --enablenis --nisdomain cluster.local

#Firewall configuration
firewall --disabled

#XWindows configuration information
#Probe for video card
#Probe for monitor
xconfig  --depth 24 --resolution 1280x1024 --defaultdesktop=KDE --startxonboot

%packages --resolvedeps
@ Everything

%post
/sbin/chkconfig sendmail     off
/sbin/chkconfig ypbind       on
This configuration file loads “everything” on one of my experimental systems. I would explicitly trim the configuration from this point on for compute slice installation.
In general, it may not be a good idea to have the DHCP server and the NFS server be the same machine. In this case, the kickstart kernel can use the DHCP server's information from the next-server <system> option to mount and use the installation media from an alternate system. There are many, many different configuration options possible with kickstart and you should carefully consider all of them before settling on your cluster's configuration.
You may need to be able to install using the Red Hat package-based installation tools to create a “golden” image for a tree-based installation tool like SystemImager. Once the system is configured to your liking, you can capture the configuration with SystemImager and use that image to install the cluster's compute slices. At some point in the process of loading a Red Hat or derivative system, you will need to do the initial installation from the RPM-based media, and you may as well automate that process as much as possible.
The use of an NFS diskless configuration for a cluster's compute slices removes the need for local storage and a local, permanent copy of the operating system. This can do wonders for removing the requirement to install an operating system on every node, and it simplifies keeping all versions synchronized, because there is only one shared copy. A diskless cluster simplifies the compute slice configuration, but complicates the software configuration on the NFS root server.
The good news is that an NFS diskless configuration can eliminate the multiple system administration issues associated with local copies of the operating system on each compute slice. The bad news is that there is not a comprehensive cluster NFS diskless package available. You will have to engineer one from existing knowledge and packages that may not be aimed at clusters. This is not necessarily an impossible task. Linux has the features necessary to implement a diskless environment, but it will take a lot of engineering.
At the very simplest level, an NFS diskless client boots a kernel and an initrd over the network and mounts its system root file system from a remote NFS server. Multiple clients share the same root directory on the NFS server, so care must be taken to ensure that client-specific data is separated from data shared by all clients. Often this is done by keeping volatile files in a RAM disk on the client and mounting the root as read-only. Beyond this simple description, there are many other hidden details. It is best to start with an example environment as a basis.
As a starting point, the kernel for your diskless clients must have the ability to use an NFS root file system enabled. The addition of this ability requires the kernel configuration option to be set and the kernel recompiled to incorporate the functionality. If you are not comfortable with recompiling your kernel, it is best to start with an environment that provides the NFS root ability.
Rather than take the space to run through a complete implementation, let's survey several of the available components for implementing diskless clusters. Many of the available environments are experimental and will require modifications to the kernel or other system components. Unless you are comfortable with undertaking this type of activity, it is best to stick with “sharing by copying”—a local operating system on each compute slice.
There are a number of environments available for implementing Linux diskless thin-client environments. Most are aimed at creating shared X Windows environments, and several of those are based on NFS. One of which is the LTSP. I have considerable experience with version 3.0 of the LTSP software (version 4 has just been released), and I think it makes a good starting point for someone who wants to understand the creation of an NFS diskless environment, even though this is not its primary intent.
The really great thing about LTSP is that it is very well documented compared with similar open-source projects. The documentation explains each step of the boot process, and it makes a great prototype for a diskless cluster. It is a diskless cluster, so it is not a stretch to use it as a starting point for your own diskless cluster. Information about this software is available from http://ltsp.org.
If you take the LTSP initrd file apart, you will see that a file named linuxrc runs in place of the init process. This script is well documented, and does much of the same initialization that we saw in initrd for the SystemImager tool. The major difference is that an NFS directory is mounted and the system's root directory is “pivoted” to it. This directory is exported from the NFS root server, and is passed in the DHCP information:
option root-path "192.168.0.103:/opt/ltsp/i386";
Once the root directory is mounted, the init process from the shared NFS root is run and references /etc/inittab, just like a disk-based system. The /etc/inittab file references /etc/rc.sysinit, which performs the initialization of the client, including building the RAM disk and creating local files in the memory-based file system. Although this initialization process is similar to what happens on a regular system, all the executables, shared libraries, and data files being accessed are on the NFS server.
The behavior of an LTSP client is controlled by a global configuration file under the NFS root—/opt/ltsp/i386/etc/lts.conf—which contains stanzas with client-specific configuration information. The path just mentioned is in relation to the server's root directory. On the client, the behavior is as if the client had done a chroot to the /opt/ltsp/i386 directory. You need to get used to thinking in terms of the perspective from the client and from the server.
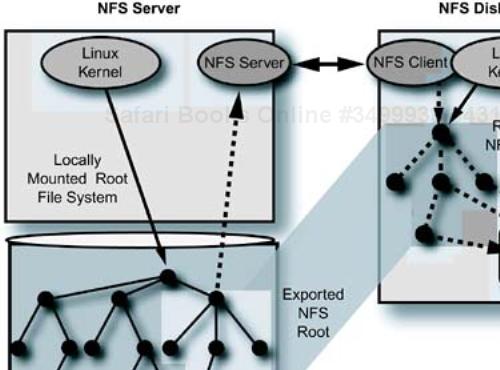
If you take a look in the etc/ directory (this is a relative path), you will see that several of the files there, like resolv.conf, hosts, and syslog.conf are actually links that point to /tmp. The /tmp directory is in the RAM disk on the client. At a higher level in the directory tree, both the var/ and the mnt/ directories are links to /tmp/var and /tmp/mnt respectively. This is a paradigm that you will find repeated over and over with diskless environments. An example of an NFS diskless client and server relationship is shown in Figure 12-4.
Although the LTSP project uses soft links and local RAM disks to give a diskless client local copies of volatile files, the Cluster NFS package implements a different approach. This software package involves modifications to the server's NFS daemons that translate specially formatted file names on the server to the file request generated by the remote client. The file names that are translated have the format <filename>$$<identifier>=<value>$$, where the identifier field is a host name, IP address, UID, GID, or a tag that matches any access from a client system over NFS (as opposed to a local access).
As of this writing, the package is available from http://clusternfs.sourceforge.net and is released with a 3.0 version available. It consists of replacing the server's NFS daemon (NFSD) module, which implement NFS server I/O operations on behalf of the clients. The intent is to allow clients to share an NFS root that is readable and writable, without destructive interference.
Instead of having local copies of volatile files stored in RAM disk, the client systems actually access the file on the NFS server. This keeps all the files for all clients in one place, and allows managing the individual client information in static files. The client “thinks” it is accessing a “well-known” file name like /etc/hosts, but instead is getting a translated version of the file named hosts$$IP=192.168.0,151$$ or another specially tagged file, like hosts$$hostname=ns1.cluster.local$$.
One of the advantages of using the Cluster NFS modifications is that you can share the server's root file system with the client systems, instead of keeping a separate directory hierarchy for export to clients. For example, the LTSP package exports /opt/ltsp/i386 as the client's root directory, which means that you have to maintain copies of the files for diskless clients there.
Replicating the root directory underneath a different directory hierarchy has implications for software installation and maintenance. This is because identifying and copying the proper application libraries, executables, and configuration files can cause issues with versioning. The software first has to be installed on the server's hierarchy, then it must be copied to the diskless root hierarchy.
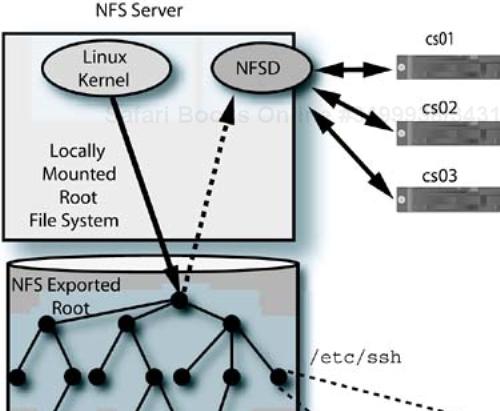
Figure 12-5 shows three cluster diskless clients accessing an NFS server with the Cluster NFS modifications to its NFSD process. Because the NFS request contains the IP address, UID and GID of the user performing the access, and the host name, the NFSD process may look for matching file names that are client specific. Clients share any file that is not tagged with the special file name format. In this example, the client host name is being used to provide a separate copy of /etc/sshd_config file per client, in addition to the server's /etc/ssh/sshd_config file. To provide a file for the local server and one separate file shared by all NFS clients, the system administrator would specify /etc/ssh/sshd_config$$client$$.
Producing the compute slice operating system configuration is an iterative process. To support installation and replication of so many systems, it is absolutely necessary to have an automated tool that allows unattended installation and configuration of the systems. Both tools introduced in this chapter, the Red Hat kickstart and SystemImager, are very capable installation facilities “out of the box.”
Which tool you use will depend on your previous experience, whether you want a package-based installation process, and how frequently you expect to install or reinstall the systems in your cluster. How quickly a complete reinstallation of the cluster must occur is determined by a number of factors, including the type of network used for installations and the scaling ability of the installation server. The degree of scaling that you require from the installation tool may also require you to make choices about using the tools as they are, creating multiple installation servers, or making modifications like we examine in the upcoming prototype multicast installation example.
As I mentioned, the installation of the systems in a cluster is an iterative process, especially as software packages, libraries, and other components are added to the compute slices to support the cluster's applications. The more flexible and scalable the installation facility, the less effort and time required to alter the system configurations via reinstallation or file updates. The maximum flexibility requirements tend to tilt the balance in favor of SystemImager, in my opinion (I know there are kickstart fans out there who will argue with me), mainly because of its ability to synchronize minor changes that do not require a complete reinstallation of the compute slice software.
This, by the way, is an important point. You do not want to reinstall the complete operating system from scratch, just to update a three-character change to a configuration file. There is, however, a threshold beyond which it is better just to reimage the nodes. The installation tools described here do not enforce any system administration process. They enable you to create your own—and you need to think about how to use the tools in your own processes.