
In this chapter, we look at some of the new tools available to the HP-UX administrator to help secure and manage an HP-UX system. These tools range from Secure Shell to encryption technologies allowing us to secure all our applications over an IP network. Many of these tools are new. We briefly look at them in operation and discuss when and if their use may be appropriate. It must be said that we cannot afford detailed discussions on all these tools. I would strongly suggest that you go over the references at the end of the chapter to gain more insight into the technologies behind this new breed of tools, utilities, and infrastructure applications.
A number of the tools and utilities that we look at in this module use encryption to keep private the data they are transmitting. Cryptography has been around since the Roman times; in fact, the first known cryptographic system was known as the Caesar cipher after Julius Caesar who used it to transmit orders to his generals without those orders being understood by his enemies when they captured the messages (and the accompanying messenger). Cryptography comes from the Greek crpyto- meaning hidden or secret and -graphy meaning writing; hence, cryptography is the art of secret writing. In today's world of electronic commerce, high finance, industrial espionage, and terrorism, the art of secret writing has become even more prevalent (see Figure 30-1). At the heart of all cryptographic schemes are two important components: the encryption salgorithm and the keys that lock and unlock the message. If we think of an analogy to describe the use of an encryption algorithm and an encryption key, a good analogy would be an old-fashioned safe. The combination lock is in effect the encryption algorithm; you can study the mechanics of how the mechanism works, but without the combination itself (the encryption key), the treasure held within remains elusive!
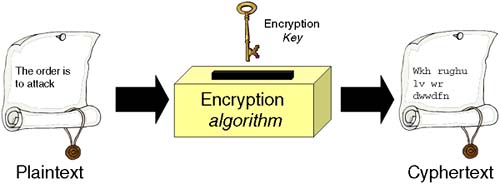
As early as the fifth century BC, the Spartans used cryptographic devices to transmit military orders. Julius Caesar saw their potential early on and used them extensively. The famous Caesar-cipher that bears his name is simple yet effective. The encryption algorithm is a simple substitution algorithm. The encryption key is the clever part; without it, you don't know how letters are substituted. In the Caesar-cipher, it is a simple process of shifting the letters of the alphabet a certain number of places either up or down the alphabet. The example in Figure 30-1 shows a Caesar-cipher where the letters are shifted three places to the right, i.e., A → D, B → E, C → F, and so on. As we can see (and this is still the case), even if we know the encryption algorithm, it is effectively useless without knowing the secret key. The ability to keep the secret key just that (secret) was at the heart of code-breaking in Caesar's time as it was during the Second World War; recovering the code-book for the Enigma machine gave the allies a great insight into the transmissions used by the German military. Even though they had recovered an Enigma machine itself, it was useless without knowing the starting position of the internal rotors, i.e., the secret key(s). These were documented in the much-prized codebook. An excellent book tracking the history and development of cryptography is The Code Book by Simon Singh. It is basically non-technical, but gives great insight into the past, present, and (possibly) future world of secret writing. At the end of this chapter, I mention Singh's book with some other, more technical books covering security and cryptography.
More and more applications are being written with the capability to encrypt and decrypt the information being dealt with. Several standards and products have emerged that have become common use in the world of cryptography. As far as trying to classify them in terms of the cryptographic techniques they employ, they fall into two main categories: private key (or symmetric key; we both use the same secret key) cryptography and public key (or asymmetric key; we use different keys) cryptography.
In an ideal cryptographic world, we would use private, symmetric key cryptography where we both use the same key to lock and unlock each communication. This poses a specific problem: How do we exchange secret keys in such a manner that only the sender and the receiver know what the keys are? A simple solution would be for you and me to meet down at the pub every Friday, have a few beers, agree on the secret key for that week, and then go back to the office (obviously, having a few more beers beforehand). The limitations of this are that the channel of communication is not entirely secure (especially after even more beers) because we may be overheard or spied on in the pub. There is also the problem that if we don't regularly renew our secret keys, a spy could be working in the background trying every possible permutation of our secret key. The spy probably has an idea of the challenge he is facing in trying to guess our secret key because in today's climate of international communications and commerce, government export legislation dictates that the encryption algorithms we use are well known and publicly available. That's okay, because we know that just having the algorithm is not enough to crack an encrypted message; you need the key as well. The other limitation that certain government agencies impose is the size of the key we can use. The larger the key, the more possible permutations it can take and, hence, it's more difficult to break. In our case, the spy in the pub will need longer to guess and try each permutation of the possible keys we could be using. If the key is large enough, this may take hours, days, weeks, or even years. A classic example of this is a challenge posed by industry leaders RSA Data Security. In August 1977, an article in Scientific American by Martin Gardner explained public key cryptography and how RSA works. Gardner then posed a challenge whereby he published a 129-digit number (-10129). This number was the product of two very large prime numbers (factoring large prime numbers is an important part of today's encryption tools). It took 17 years for 600 volunteers working in parallel to find the two factors. Today's encryption technologies use larger keys than Gardner used. It is estimated that even using a powerful PC or workstation, it would take more years than the universe has existed to break the code of current encryption technologies (encryption keys of the order of 10300 are not uncommon). If you think you are up to the challenge, the RSA-160 (160-bit number) was solved in 2003 using a combination of 32 R12000 and 72 Alpha EV67 workstations. The next challenge is to factor a 576-bit (RSA-576) number. If you are feeling up to it, then browse http://www.rsasecurity.com/rsalabs/challenges/factoring/index.html for more details.
Back to meeting down at the pub for a few beers.
We could continue with our regular meetings, have a few beers, and decide on our secret key. One obvious problem is that if I want to communicate with someone else, I will need to arrange another meeting to decide on a secret key for communications with that person. You can see where this scenario is leading. My company has many customers and I want to establish secure communications with all my customers. I will need to establish a secret key for each customer. This is going to take lots of meetings and lots of beer drinking! Then we have to consider that we need to renew our secret keys on a regular basis. While I will accrue vast frequent-flyer points and gain a voluminous knowledge of the world's watering holes, it becomes impractical to maintain secret keys in such a manner (my liver might have something to say about it as well). The problem of key distribution plagued the cryptography world for years. This is where public key or asymmetric key cryptography comes in. The idea here is to have two keys that are different (hence, asymmetric), but both can be used to unlock a message. The beauty of this is in the mathematics involved. Different public key encryption algorithms use different mathematical gymnastics. Many of them are based on modular arithmetic and/or factoring large primes. I won't bore you with the details, but here is a simple example (used in many of the books listed at the end of this chapter) of how a public key system works:
Alice and Bob want to communicate securely.
Alice and Bob decide to use a one-way encryption algorithm that uses large prime numbers.
Alice chooses two large prime numbers that we will call pA and qA.
Alice multiples pA and qA to give NA.
Alice keeps pA and qA private; together they form Alice's private key (Aliceprivate).
Alice publishes NA; this becomes Alice's public key (Alicepublic).
Bob does the same, giving pB, qB (Bobprivate), and NB (Bobpublic).
When Bob wants to send a message to Alice, he uses Alice's public key NA to encrypt his message, knowing that to decrypt the message, Alice will either have to know her private key or be able to factor two very large prime numbers, which as we saw earlier with the RSA challenge is not easy.
To read the message, Alice inputs the encrypted message into the encryption algorithm along with her private key. The result is the decrypted message.
If Eve intercepts the message, she would have to perform a key search of every possible prime number that is a factor of NA. Using sufficiently large prime numbers makes this system effectively impregnable.
An important aspect of this design is how to store and have access to public keys. What we need is a trusted intermediary. This could be an organization on the Internet (Verisign is one such company) that will securely store and distribute our public keys. In order to store a public key with them, you will be required to jump through various legal hoops (using notaries, and so on) to prove that you are who you say you are. This is a good thing, because we don't want Eve to update or delete Alice's key. This service is known either as a Key Distribution Center (KDC) or a Certification Authority (CA); a certificate is a signed document with Alice's name and Alice's public key. The differences between a KDC and a CA are not important at this time. If you are interested, have a look at the Kaufman, Perlman, and Speciner book, page 188, listed at the end of this chapter.
This system affords us confidentiality, which is an extremely important goal of this system. With a slight tweak, we can also get it to provide more: authenticity, authentication, and non-repudiation.
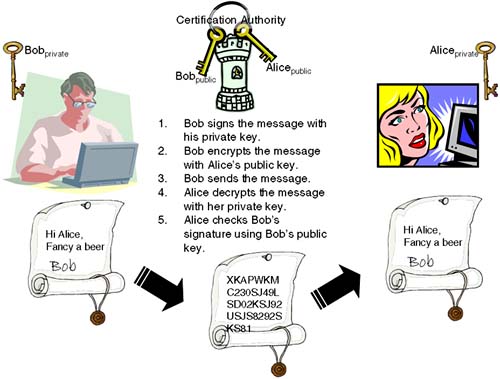
The need for these additional benefits arises from the fact that Eve is a bit of a nasty character. Eve intercepts a message, realizes that it's encrypted, and decides to mess things up by randomly changing some characters before forwarding it to Alice. Because the encrypted message no longer reflects the original message sent by Bob, when Alice decrypts the message, it decrypts to complete garbage. Remarkably, if Eve was either really clever or just plain lucky, she may have changed just the right character turning a £100 invoice into a £1,000,000 invoice. What we need is some mechanism to provide authenticity, i.e., confidence that the message has not been tampered with. This is where a message digest comes in. A message digest uses a hashing algorithm that produces a unique number related to the message. It is the same concept as a checksum or a message integrity check (MIC). There's more exceedingly clever mathematical gymnastics here because a well-designed hashing algorithm ensures that only one message will produce a particular message digest. This means that we can safely publish which message digest hashing algorithm we are going to use, confident that if a message is tampered with, the hashing algorithm will produce a different message digest indicating to Alice that the message has been tampered with. When Bob comes to send a message to Alice, he can first calculate the message digest and then append it to the message before encrypting it and sending everything to Alice. When Alice receives the message and decrypts it using her private key, she can run the message through the hashing algorithm to calculate the message digest. If the result is the same as the message digest appended by Bob, we know the message has not been tampered with: we have achieved authenticity. The last two attributes of our system that we want to achieve are authentication and non-repudiation. Authentication is fairly easy to understand: How do we know the message we received was actually sent by Bob? If you think about it, Eve (the bitter and twisted one in this relationship) could create what looks like a valid invoice from Bob (she receives invoices from Bob as well, so she could use her invoice as a template), calculate a valid message digest, obtain Alice's public key, encrypt the message, and send it to Alice. How does Alice know it actually came from Bob? She doesn't! What we need is for Bob to sign the invoice. We are thinking of a digital signature that will identify the message as coming from Bob. A digital signature works under the same principle as a written signature; it identifies the person who sent the document. Unlike written signatures, digital signatures can't be forged. How can we be so sure? Taking the hashing algorithm we talked about earlier, it produces a unique message digest that uniquely identifies a message. We also saw the benefit of using large prime numbers and the difficulty in factoring them. What if we used a hashing algorithm that used large prime numbers as part of the hashing algorithm? We already have some large prime numbers at our disposal: Bob's public and private key. Making use of similar mathematical gymnastics, the hashing algorithm can produce a unique message digest based on Bob's private key. Bob has effectively signed the invoice. The only difference between a message digest and a digital signature is that a message digest can be produced by anyone (Eve's hatching a plot with that in mind) while only one person can produce a digital signature because it is based on an individual's private key. When Alice decrypts the message, she obtains Bob's public key and uses the hashing algorithm to produce a message digest. If this compares to Bob's signature, she knows that the message has not been tampered with (authenticity) and that it definitely came from Bob (authentication). As a consequence of Bob signing the invoice, we have also achieved non-repudiation. Non-repudiation is the act of not being able to deny that you sent a message. By signing the invoice, Bob cannot deny that he sent it because only his private key could have produced that particular digital signature.
Some systems encrypt the message first and then sign it. Whichever, the idea is the same. Figure 30-2 gives you an idea of what's happening.
You may think that all this clever stuff has emerged only in the recent past with the boom in the Internet and electronic commerce. The history of public key cryptography goes back many years. Many people credit public key cryptography to three colleagues working out of Stanford University: Whitfield Diffie, Martin Hellman, and Ralph Merkle. You may have heard of a crypto-system called Diffie-Hellman, which is a system of establishing secret keys over an insecure medium, i.e., our pub scenario. They were certainly some of the earliest conquerors of the elusive prize of a one-way encryption algorithm that can use two separate but related keys to lock and unlock messages. Three separate individuals working out of MIT—Ronald Rivest, Adi Shamir, and Leonard Adleman—took the ideas of Diffie, Hellman, and Merkle and produced an encryption system known as RSA (named after their initials), which has been credited as one of the best (and most widely used) implementations of public key cryptography. While these accolades adorn our cousins from across the pond, it has come to light that three Britons had cracked public key cryptography some time sooner. In 1969, James Ellis was looking into the problem of key distribution while working for the Government Communications Headquarters (GCHQ). By 1975, James Ellis, Clifford Cocks, and Malcolm Williamson had pretty much cracked public key cryptography. Being Government employees working in a top secret spy center meant that they had to sit in silence because all their work is classified as top secret. In typical British spirit, they took on a stiff-upper-lip attitude and watched while someone else took all the glory for what they did for Queen and Country. Both teams were working completely independently, but because of the secret nature of their work, the British team couldn't discuss their findings with their American colleagues. The American researchers were not limited by any Official Secrets Act and were free to publish and discuss their work openly. Only recently has the British Government declassified some of the team's work, allowing them to talk publicly about their work surrounding public key cryptography.
Current encryption technologies use clever mathematics tricks utilizing large encryption keys. However, there is a downside to using strong, complex algorithms and large encryption keys, and that's speed. Today's applications require that the use of encryption should not adversely impact their usability. We all want something for nothing, but it seldom works out that way. In order to minimize the impact of these additional requirements, we have seen the introduction of advances in processor design that include features specific to encryption. Advances in the speed and intelligence of computer hardware means that we can use cryptographic technologies to secure our day-to-day communications with friends, colleagues, and business partners. We should also remember that less scrupulous individuals and organizations could use the same advances in technology in the pursuit of breaking encryption schemes. Followers of the dark side have an arsenal of technological and mathematical tricks up their sleeves and are constantly looking for new ways to break existing cryptographic schemes. Most people view these rogues as the bad guys. Yes, there are deviants out there who are hell-bent on making our lives as uncomfortable and as miserable as possible. On the upside, their determined efforts ensure that we (the good guys) are working ever harder to stay one step ahead. This necessity to keep advancing the boundaries of cryptographic systems is motivated by something known as the Fundamental Tenet of Cryptography: If lots of smart people have failed to solve a problem, then it probably won't be solved (soon). We could rephrase it to something like this: If none of the good OR the bad guys has broken the code already, then it's probably secure (for the time being). If anyone out there has solved the age-old problem of factoring huge prime numbers, there's a rosy and lucrative future ahead of you. The strength of our cryptographic system can be summarized as follows:
How secret are our secret keys? Are we using a secure communication channel to transmit these secrets, or can someone eavesdrop on our conversations?
Are there any backdoors into our system? Can you insert a magic number that always decrypts a message? If you know which pub we meet at, could you hijack one or both of us?
Is the encryption algorithm strong enough on its own, or can it be reversed? Factoring large (1024-bit) prime numbers is fairly difficult, so the time it takes to reverse the algorithm could be better used at guessing the keys themselves.
Does the spy have any previous knowledge of our transmissions that could be used to assist in the breaking of the code? If the spy can encrypt such a message, the resulting cyphertext may give him insights into the possible keys used to produce such cyphertext (a known plain-text attack).
What is the likelihood of someone guessing our secret key quickly? A key search (using a powerful workstation) of all possible permutations of a 1024-bit key would take more years than the current lifetime of the universe to guess!
Back to our discussions involving Alice and Bob. We established a mechanism using public key cryptography that allowed Alice and Bob to communicate with the confidence that they were doing so in privacy and with the assurance that their messages were being received intact and the confidence of knowing who the sender and receiver are. When we consider the content of Alice and Bob's message, encrypting a large message using public key cryptography is a time-consuming business. Not only is the encryption of large volumes of data time-consuming, but so is the calculation of a digital signature, which is a cornerstone in building confidence in such a system. One solution is to not use asymmetric keys to encrypt and sign large communications. This is not acceptable. The solution goes back to our original requirement leading to you and me meeting down at the pub for a few beers and deciding on a secret key for the forthcoming week. We should remember that in an ideal cryptographic world, we would use private, symmetric keys. The key itself is not a large volume of data. Where we could use public key cryptography is in establishing a private key. Essentially, the content of the message sent between Alice and Bob is not the real message; the content of the message is simply a private key. This is commonly referred to as a session key that can be renewed whenever Alice and Bob feel it is necessary. An example of this is IPSec (more on that later), which uses a variant (it uses public keys as a means of authentication) of the Diffie-Hellman crypto-system to establish a session key, which is subsequently used to encrypt/decrypt IP traffic between two nodes. Some encryption products may talk about providing Perfect Forward Secrecy (PFS), which essentially means that we establish a new secret key for every exchange between Alice and Bob. This is computationally expensive, but it does mean that if a single secret key is discovered, only that one transaction might be compromised.
Finally, if we are going to implement crypto-systems like the ones discussed above, it is important that we have a means of producing good random numbers. When we say good random numbers, we mean that the numbers produced are statistically random and don't follow any discernable pattern. This may seem a little obtuse, but in early implementations of Netscape, some hackers found that the random number generator used in the browser was rather predictable. There is a whole science behind random numbers. Computers are rather predictable devices and need some help (via really clever algorithms) to produce a sequence of numbers that is truly random. Random numbers are commonly used in crypto-systems and form an important part in producing private and public keys that are difficult to guess. If our random number generator is more predictable, hackers can gain an insight as to how our keys were produced, which may give them a fast track into breaking our keys. HP has produced a product called the Strong Random Number Generator. It is free to download from http://software.hp.com → Security and Manageability, but it is only available for HP-UX 11i.
We have looked at the basic ideas surrounding encryption/decryption as well as a little history lesson. Please refer to the books listed at the end of this chapter for more technical and historical detail. We now look at some tools that utilize public, private, or both types of encryption.
Secure Shell is a means of logging in to a remote host providing a secure, encrypted communication channel over what is fundamentally an insecure network technology: TCP/IP. SSH is designed to replace the insecure rlogin and remsh commands. Consequently, we also have secure versions of ftp (sftp) and rcp (scp) that come as part of the SSH product. Based on OpenSSH 3.6p2, HP's Secure Shell offers support for SSH-1 and SSH-2 protocols as well as enhanced security by utilizing HP's Strong Random Number Generator (if installed). The product is free to download from http://software.hp.com → Security and Manageability and is available for HP-UX 11.0 and 11i (version 1, 1.6, and 2.0).
SSH doesn't require a reboot to install it, the Strong Random Number Generator software does.
Once installed, one of the first tasks is to generate your public/private key pairs. This is normally performed on a user-by-user basis, because the resulting keys are stored under the user's home directory, under a subdirectory called .ssh. For this example, I am going to use SSH-2 DSA encryption (the Digital Security Algorithm is at the heart of a U.S. federal-backed standard known as DSS—Digital Security Standard). I am not going to use a passphrase, which is similar to an additional password:
root@hpeos004[.root] ssh-keygen -t dsa
Generating public/private dsa key pair.
Enter file in which to save the key (/.root/.ssh/id_dsa):
Enter passphrase (empty for no passphrase):
Enter same passphrase again:
Your identification has been saved in /.root/.ssh/id_dsa.
Your public key has been saved in /.root/.ssh/id_dsa.pub.
The key fingerprint is:
c0:10:47:2e:5c:ce:3a:97:a9:3e:ec:09:53:c2:b2:40 root@hpeos004
root@hpeos004[.root]
My public key is stored in the file id_dsa.pub:
root@hpeos004[.ssh] ll
total 6
-rw-------   1 root       sys            668 Oct 13 16:36 id_dsa
-rw-r--r--   1 root       sys            603 Oct 13 16:36 id_dsa.pub
-rw-------   1 root       sys           1024 Oct 12 09:22 prng_seed
root@hpeos004[.ssh] cat id_dsa.pub
ssh-dss AAAAB3NzaC1kc3MAAACBAOe+r+XkL/tCKh4aRc+uLx/BJaeKuNnQ+oTBnjeA9P1kzKDG190kbhltPurxLtpfH9VMQXQYXTCywkRcmXQBI4eLYVCHHUv92qaamrjqiCjnwP+gDJYEFsQl4OD/OO6Umoi7aZGJ9mCbW4QCkKQmSmRwooydY6LxstEegh9tSv5NAAAAFQCup39BkFqMWgooRFPaw78DV9JzgwAAAIAZbOkyPr7eLm5umgoS6ZLBv0FDxNGmWiM/ey/niPduGh0InQL+Sgc3xR9PI7IFUGl0v8fl6/9vBl+1f/4kPFAUt4We4KbaGn2JgM/MBs1Ptyyz42OOYIZ/7n5F90PxVmpabNW6qO6ysoZbXkvCQfDq9eiAF0mUCvCs0LxL/80GoAAAAIEAmwmdqSID0PO9JFaey7u5k3XQ3csOPPQSdyBBxjkRMdzaD8j47uE1DFcr/ueG2QDduEXgBOV0KonQA+8I34HAurEvww4a6We9d+IMiLYoslfUDhuOQuoGI9R05RY7iW/e9YhExA//U9auCXl1MGkNblufiTQCM9tsZTvcjEYv+Ms= root@hpeos004
root@hpeos004[.ssh]
I need to create a file called authorized_keys in the .ssh directory of the public keys of all the machines I will communicate with at some time in the future. It's a good idea to do this now in one session, because it means that we don't need to worry about it in the future. If we add any nodes to our network that we will communicate with, we will need to update the authorized_keys file with the public key for that machine. To generate the public key for other machines, I will simply log in to those machines and go through the procedure as listed above.
Unfortunately, for the SSH utilities to work, my home directory must have permissions of 755 (rwxr-xr-x):
root@hpeos004[.ssh] chmod 755 /.root
root@hpeos004[.ssh]
We can now update the authorized_keys in the .ssh directory that contains the public keys of all other nodes on the network. I am simply using a terminal window on each node, and cutting and pasting to update the authorized_keys file. It's a good idea to create one file on one host, which you can then distribute to all nodes on the network. Here's my authorized_keys file for all nodes in my network with the appropriate permissions applied:
root@hpeos004[.ssh] cat authorized_keys
ssh-dss AAAAB3NzaC1kc3MAAACBAOe+r+XkL/tCKh4aRc+uLx/BJaeKuNnQ+oTBnjeA9P1kzKDG190kbhltPurxLtpfH9VMQXQYXTCywkRcmXQBI4eLYVCHHUv92qaamrjqiCjnwP+gDJYEFsQl4OD/
OO6Umoi7aZGJ9mCbW4QCkKQmSmRwooydY6LxstEegh9tSv5NAAAAFQCup39BkFqMWgooRFPaw78DV9JzgwAAAIAZbOkyPr7eLm5umgoS6ZLBv0FDxNGmWiM/ey/niPduGh0InQL+Sgc3xR9PI7IFUGl0v8fl6/9vBl+1f/4kPFAUt4We4KbaGn2JgM/MBs1Ptyyz42OOYIZ/7n5F90PxVmpabNW6qO6ysoZbXkvCQfDq9eiAF0mUCvCs0LxL/80GoAAAAIEAmwmdqSID0PO9JFaey7u5k3XQ3csOPPQSdyBBxjkRMdzaD8j47uE1DFcr/ueG2QDduEXgBOV0KonQA+8I34HAurEvww4a6We9d+IMiLYoslfUDhuOQuoGI9R05RY7iW/e9YhExA//U9auCXl1MGkNblufiTQCM9tsZTvcjEYv+Ms= root@hpeos004
ssh-dss AAAAB3NzaC1kc3MAAACBAK8ckZsgxDF8DKuw31dlLjKTKXqKO0lAXcT8hZvs5t2QbEsEKpLCCLQCcwLIKbE5SVxQLT3RtRIZ4BsJYMpwaEAFMQ4UIzzGvuPpkdO5JrKQ7FPKUEn5PSo6cn5KCAwv1ANSIzQaCyrz55DZg2iy5oJ4xQr0KviIAVN2mSlL64O5AAAAFQDYBg+NP8Bw/qQjkaXguU9jfPFjcQAAAIABmN2TUYKttBSPj0ZiO5wpPCEQzfMh6S2F+Gyo8EjyJdBEzp2SzieZejQVKX8tCn86o1OlQfPINR/XGQEL3RCHbEcO9EGtgnDKjT8qPCwtpf8Ri+pLqeqk7OAzypLPej1NZjC6FZstgDgtnVINVJjlMX53mTd3J+iFEYhODvuGvAAAAIA31JXgkALVtDIu9KQZD4L/wLhmAOGlGVhA3RmStIbCIuFkCwcehMjdCIO43STI73S3rnuh0CtAm4FnguMmuSXJnjJUAQ8xyhUbWpzy0ErnvH6MaPl9AxlGS2kiT9s/dRHHGEdbDeUetb2gID1cjvvT80fRj6P1Ym2QuV0Y02a00g== root@hpeos003
ssh-dss AAAAB3NzaC1kc3MAAACBAMwTvyquqKBRDbTgzmAdcW3kEamr3MXPQrOoI8F5xtdYnhcID9005Qo4vUH8KqMfjKwny+o7syW42OmlX2x9hv4s4oCHcdgIMo0h1PqgXsIG49m4zaz0Zlw/rqbNISL3J2YF5GWUIlNI+XBPBCXCXxZI6r6pxKAbwHSgd2VIfFbNAAAAFQCi+Hjn6XxMhxiBBVhhO16kGZc7DwAAAIBgSp2tA8yPs5fRU3EKgGCAVS4Ib10owVr70XAUBOlmQrKc91wp+a+dJ5eas1XHgAF/tEp3wqnCcpjuzO37LzStaiAsK1WTUANWd5nsUpeLreOWCmH9RzkX+HGk+A95L5U9PJYyxcG3LMto22y4Fz2uGreRmd7hefia6BZzHZ8o9wAAAIA5JbOnQnKlT30ueKkQBeqS7Xoew5149UPB24aUGtReYBA66v0tggHkywJfAk+UjFhEJ++yCKL8oEVJXe9ZDgLc9nGfU/HauD+GoWbR1VvSk7zaRvYHUraDfQPTuQIEYWyqTB7sSkzMl0Ibu/NEXkHAwdattUQJUwjw/BH7/0tg5A== root@hpeos002
ssh-dss AAAAB3NzaC1kc3MAAACBAI7AeX40a196y3MdKqrD/U+1ygoB1AM/twZRIkuGCfjoYETWpj5aDivVBf7Vc2e5xott/wpR4f0drB/bG0qMdyKxcb6jDKZZZUWJJouEH5qBudNR9jtX50OKGEJJVG+r8WYH9DbXRgB2ld/U3QmLoev9wVw+Tj0VyiLVYQqVVE7RAAAAFQDjiDWzzLdNkmLLGd6XkIMdY7e1PQAAAIBWfVIKH2cVowcx5fgxngToJig94ejZ8qWjivNPC+plBV7ySmpUJovjYJUzAMJO+0I88+AZblkdVsTrLrjcfdpgE8zg+XWqKS/ChbKqZUKfxg9IwIY8pKkU9GlbXV1VZDFXSIi0XvBQ+XHTp2tdyso63cOndWuGQbJ1Sk4BH+VmqgAAAIAi2nTy5cX6nKRTDE345JQ/a+y67mE9cwXzVebGOi406ClA1omm31UsnVbDN8eT70qIBZeqcQVT7UgkkFEowlnx0yPQ5V+2tFPoNq2St+UPIkukK5jS/NxL1sA3w3DcGsXyfywexidD1sSj8iiei8l7Hb8BDV2ownLw5a6Gir/VXw== root@hpeos001

root@hpeos004[.ssh]
root@hpeos004[.ssh] chmod 644 authorized_keys
root@hpeos004[.ssh] ll
total 12
-rw-r--r--   1 root       sys           2413 Oct 13 17:19 authorized_keys
-rw-------   1 root       sys            668 Oct 13 16:36 id_dsa
-rw-r--r--   1 root       sys            603 Oct 13 16:36 id_dsa.pub
-rw-------   1 root       sys           1024 Oct 12 09:22 prng_seed
root@hpeos004[.ssh]
After I have ensured that all nodes have the complete authorized_keys file, I can start to establish what is known as the known_hosts file. This will authenticate me on the remote host. Initially, we will be asked for our password, because we haven't been authenticated on that node previously. Once authenticated, we will no longer need to enter our password to log in to the remote machine. In effect, the known_hosts file is acting like the $HOME/.rhosts file.
root@hpeos004[.ssh] ssh hpeos003
The authenticity of host 'hpeos003 (192.168.0.33)' can't be established.
RSA key fingerprint is 15:a7:fe:35:55:01:6c:a1:da:c3:74:50:23:0d:94:62.
Are you sure you want to continue connecting (yes/no)? yes
Warning: Permanently added 'hpeos003,192.168.0.33' (RSA) to the list of known
hosts.
root@hpeos003's password:
Last login: Mon Oct 13 17:00:47 2003 from hpeos004
(c)Copyright 1983-2000 Hewlett-Packard Co.,  All Rights Reserved.
(c)Copyright 1979, 1980, 1983, 1985-1993 The Regents of the Univ. of California
(c)Copyright 1980, 1984, 1986 Novell, Inc.
(c)Copyright 1986-1992 Sun Microsystems, Inc.
(c)Copyright 1985, 1986, 1988 Massachusetts Institute of Technology
(c)Copyright 1989-1993  The Open Software Foundation, Inc.
(c)Copyright 1986 Digital Equipment Corp.
(c)Copyright 1990 Motorola, Inc.
(c)Copyright 1990, 1991, 1992 Cornell University
(c)Copyright 1989-1991 The University of Maryland
(c)Copyright 1988 Carnegie Mellon University
(c)Copyright 1991-2000 Mentat Inc.
(c)Copyright 1996 Morning Star Technologies, Inc.
(c)Copyright 1996 Progressive Systems, Inc.
(c)Copyright 1991-2000 Isogon Corporation, All Rights Reserved.


                           RESTRICTED RIGHTS LEGEND
Use, duplication, or disclosure by the U.S. Government is subject to
restrictions as set forth in sub-paragraph (c)(1)(ii) of the Rights in
Technical Data and Computer Software clause in DFARS 252.227-7013.

                           Hewlett-Packard Company
                           3000 Hanover Street
                           Palo Alto, CA 94304 U.S.A.

Rights for non-DOD U.S. Government Departments and Agencies are as set
forth in FAR 52.227-19(c)(1,2).

Value of TERM has been set to "dtterm".
WARNING:  YOU ARE SUPERUSER !!

root@hpeos003[.root]
At this stage, you might want to authenticate all other machines to get that task out of the way. As you can see from my system, I have taken the time to authenticate all nodes on my network:
root@hpeos004[.ssh] cat known_hosts
hpeos003,192.168.0.33 ssh-rsa AAAAB3NzaC1yc2EAAAABIwAAAIEA1aCVYoAt24zGbQMBSrlug5sfsg0tcVS8M2Me3Ies4chPW/4n/IDrhry8CBs8nGz8quRzW9WEYIZR+aJ0MxY5/
3j6tDpkoq8aqGk7obb5NFkxiw+ktjgV3k2ovV83mLNE+cCYT90EFiIAIvZmIAN/+Yy3KwHBizdsG8HwULplGSE=
hpeos001,192.168.0.67 ssh-rsa AAAAB3NzaC1yc2EAAAABIwAAAIEAm99WPPb265PJ/Ag4tMHZzV2RMCd+UAs5Lk96ekQH0s7RkDqpm4806yrt8f68ydYAgVts3cCiBD3dRjVSmRTOgrBPn2gEEIwjcTJ36MusnV4wRkD0iAclPx6slD3Ss7j1E0XRe7F8XcR4FHxtpar4JaWgqVgS3yLBikRR3ZN9be8=
hpeos002,192.168.0.34 ssh-rsa AAAAB3NzaC1yc2EAAAABIwAAAIEAw2K2lMpLeSFxshgZ3oaAyGr2jy+YMiszkk2xTXBWJNAm2qeyU9Yq33QL7dtWDgjQwE9AYisecXZ8NnvrTIlFY24IDdxGwxafXKhWbHpM4GPiX8Y50q90O0vPbHn1WvbAdYvbv9+S3/WMP4KGU+JUY/CuE6xRuhvJjM5roCbFjnE=
root@hpeos004[.ssh]
I can now use ssh as I would have used rlogin and remsh:
root@hpeos004[.ssh] ssh hpeos001 "netstat -i"
Name      Mtu  Network         Address         Ipkts   Ierrs Opkts   Oerrs Coll
lan0      1500 192.168.0.64    hpeos001        2012    0     1754    0     0
lo0       4136 127.0.0.0       localhost       1829    0     1829    0     0
root@hpeos004[.ssh]
The utilities scp and sftp work as you would expect rcp and ftp to work, except that we are not asked for usernames and passwords because we have already been authenticated:
root@hpeos004[.ssh] sftp hpeos002
Connecting to hpeos002...
sftp> dir
.
..
.ICEauthority
.TTauthority
.Xauthority
.dt
.dtprofile
.profile
.q4_history
.sh_history
.ssh
.sw
sftp> quit
root@hpeos004[.ssh] scp hpeos003:/etc/hosts /tmp
hosts                                         100% 2922   779.6KB/s   00:00
root@hpeos004[.ssh] ll /tmp/hosts
-r--r--r--   1 root       sys           2922 Oct 13 17:45 /tmp/hosts
root@hpeos004[.ssh]
If you look at the .ssh directory on one of the other nodes, you will notice that we don't have a known_hosts file on those machines.
root@hpeos003[.root] ll .ssh
total 10
-rw-r--r--   1 root       sys           2413 Oct 13 17:25 authorized_keys
-rw-------   1 root       sys            668 Oct 13 17:01 id_dsa
-rw-r--r--   1 root       sys            603 Oct 13 17:01 id_dsa.pub
root@hpeos003[.root]
In order to be able to use ssh/scp/sftp without supplying passwords all the time from any machine to any other machine, we will have to go through the steps above to authenticate each node from every other node. When you have many machines on your network, you might want to do those steps only for the machines you use regularly.
Personally, I think users should be encouraged to use this system ASAP. It doesn't take long to set up, and it means that we are no longer sending unencrypted passwords over our networks. In time, we could even remove the telnet, ftp, login, and shell services from /etc/inetd.conf to ensure that no one used them. I think a period of education and familiarization would be appropriate before disabling the old services.
Host Intrusion Detection System (HIDS) was formerly known as Intrusion Detection System/9000 (IDS/9000) and/or HP Praesidium Intrusion Detection System/9000. The older IDS/9000 comes standard with HP-UX 11i Operating Environments but is not installed by default. Prior to HP-UX 11i, HIDS and IDS/9000 were separate purchasable items. The current release of HIDS (2.2) has no additional operational features over IDS/9000 but has updated some features as well as provided some bug fixes. In fact, when you download and install HIDS, you will see that the software products and filesets are still called IDS. Forgive me if I sometimes refer to HIDS as IDS.
The idea behind HIDS is to provide host-level intrusion detection whereby we detect the illegal and/or improper use of computer resources, and that's all! We must realize that this is basically the limit of what HIDS can do. On its own, HIDS will not make your system any more or less secure; if your system has gaping holes in security, those holes will still be there after you install and configure HIDS. It is important that we perform the minimum security requirements mentioned in Chapter 29 and seriously consider running penetration tests on all our systems. Once we have achieved what we would regard as a reasonable level of security, HIDS will inform us of any untoward activity.
A feature I like about HIDS is that it was designed with a distributed network of machines in mind. In such a configuration, it would be tedious to log in to each machine and monitor individual alert logs. HIDS gets around this by configuring a central node as the HIDS Server. This could be a central management station used by IT/Security staff. On the machines we are monitoring, the HIDS Clients send alerts to the HIDS Server that are displayed and managed via a reasonably intuitive GUI interface.
A fundamental benefit behind using HIDS is the notion that HP has spent a considerable time working out the main avenues of attack that an unauthorized user would use to interfere or gain unauthorized privileges on an HP-UX system. These are affectionately known as Detection Templates. The current list of Detection Templates includes:
Modification of files and directories
Changes to logfiles
Creation of set UID files
Creation of world writeable files
Repeated failed logins
Repeated failed
suattemptsRace condition attacks
Buffer overflow attacks
Modification of another user's files
Monitor for the start of interactive sessions
Monitor logins and logouts
Within each template, we can customize which files and directories we want to monitor. Initially, we may use the templates as is. In my experience, this produces lots of alerts. Customizing the templates to your own use, i.e., to include particular application files and directories can take some considerable time. Once configured, HIDS will continuously monitor and report alerts back to the HIDS Server. When we look at the templates listed above, we will probably want to utilize a number of these templates. When we group templates together, this is known as a Surveillance Group. Allied with a Surveillance Group will be a Surveillance Schedule. As the name suggests, a Surveillance Schedule tells HIDS when to activate the monitoring of resources listed in the Surveillance Group. We can then download a Surveillance Schedule to an HIDS Client. Once activated, the HIDS Client will be continuously monitored within the parameters of the Surveillance Schedule. The alerts produced are sent back to the HIDS Server using secure communications; the HIDS Server creates private/public keys that are used by the clients to encrypt their alert reports. It's a good idea to ensure that an intruder can't see the transmission of alerts over the network. To summarize, these activities are involved:
Install HIDS on the HIDS Server and all HIDS Clients.
Create the private/public keys on the HIDS Server.
Import the public keys on each HIDS Client.
Start the HIDS Agent Software.
Create a Surveillance Schedule that will reference at least one Surveillance Group.
Create a Surveillance Group containing the relevant Detection Templates.
HP provides some preconfigured Surveillance Groups that you can use.
You may want to customize which files and directories the Detection Templates monitor.
Select the hosts (HIDS Client) to be monitored.
Download and activate a Surveillance Schedule to the relevant HIDS Clients.
Monitor alerts on the HIDS Server.
Create Response Programs on the HIDS Clients to react to alerts locally (optional).
Let's go through these tasks one by one.
As mentioned previously, HIDS was formerly known as IDS/9000, which came standard with HP-UX 11i (on the Core OS CD/DVD). If you don't have IDS/9000, HIDS is available free of charge from http://software.hp.com - Security and Manageability. We need to install HIDS as well as Java 1.3.1.01 or greater onto the HIDS Server. (B9789AA is free but not installed with HP-UX 11i, or it can be downloaded free from http://www.hp.com/products1/unix/java/.) There is a kernel-auditing component (nothing to do with system/Trusted System auditing) to HIDS; hence, it requires a reboot to install it. On the HIDS Client, we only need to install the HIDS software; Java is not required:
root@hpeos004[.root] swlist -l fileset -s /software/11i-PA/HIDS -a is_reboot –a
revision
# Initializing...
# Contacting target "hpeos004"...
#
# Target:  hpeos004:/software/11i-PA/HIDS
#

# IDS                                   B.02.02.16
  IDS.IDS-ADM-RUN                       B.02.02.16     false
  IDS.IDS-ADM-SHLIB                     B.02.02.16     false
  IDS.IDS-AGT-KRN                       B.02.02.16     true
  IDS.IDS-AGT-RUN                       B.02.02.16     false
  IDS.IDS-AGT-SHLIB                     B.02.02.16     false
  IDS.IDS-ENG-A-MAN                     B.02.02.16     false
# Java2-RTE13_base                      1.3.1.02.01
  Java2-RTE13_base.JAVA2-JRE-BASE       1.3.1.02.01    false
# Java2-RTE13_doc                       1.3.1.02.01
  Java2-RTE13_doc.JAVA2-JRE-DOC         1.3.1.02.01    false
# Java2-RTE13_perf                      1.3.1.02.01
  Java2-RTE13_perf.JAVA2-JRE            1.3.1.02.01    false
root@hpeos004[.root]
We must configure HIDS from an ids account that should have been created as part of the installation process:
root@hpeos004[.root] grep ids /etc/passwd /etc/group
/etc/passwd:ids:*:112:104:HP-UX Host IDS Administrator:/home/ids:/sbin/sh
/etc/group:ids::104:
root@hpeos004[.root]
Before we create the public/private keys, we should consider whether our HIDS Server and/or IDS Clients are multi-homed. If our HIDS Servers and/or Clients are multi-homed machines, we specify which IP address is to be used to identify the HIDS Server. This may need to be achieved on both the HIDS Server and HIDS Client.
You need to decide which interface is going to listen to requests from HIDS Clients. Your HIDS Server cannot listen to IDS Clients on separate physical networks. In the HIDS GUI (/opt/ids/bin/idsgui), we need to configure which IP address (and, hence, the interface we will use) the IDS Server will listen for HIDS Clients:
root@hpeos004[.root] netstat -in
Name    Mtu  Network         Address         Ipkts   Ierrs Opkts   Oerrs Coll
lan1    1500 192.168.0.64    192.168.0.66    11335   0     11656   0     1030
lan0    1500 192.168.0.32    192.168.0.35    1589    0     1605    0     2
lo0     4136 127.0.0.0       127.0.0.1       1793    0     1793    0     0
root@hpeos004[.root]
As you can see, this machine is multi-homed. Being my HIDS Sever, I will need to update my idsgui script:
$ id
uid=112(ids) gid=104(ids)
$
$ hostname
hpeos004
$
$ ll /opt/ids/bin/idsgui
-r-x------   1 ids        ids       7479 May  7 23:02 /opt/ids/bin/idsgui
$
$ chmod u+w /opt/ids/bin/idsgui
$
$ vi /opt/ids/bin/idsgui
#!/usr/bin/sh

#########################################################################

#####################
# GUI CONFIGURATION #
#####################

# Host name or IP address (in dot notation) of interface to listen for
# connections. If not set, the default value is the local host name.
INTERFACE=192.168.0.35
...
$ chmod u=rx /opt/ids/bin/idsgui
$
I need to ensure that all my HIDS Clients are using this address:
$ id
uid=105(ids) gid=104(ids)
$ hostname
hpeos002
$
$ ll /etc/opt/ids/ids.cf
-rw-------   1 ids        ids          17232 Feb  8  2003 /etc/opt/ids/ids.cf
$ vi /etc/opt/ids/ids.cf
...
[RemoteSA]
REMOTEHOST             IDS_importCert.will.replace.this
...
$
As you can see from the comments in the ids.cf file, the import of the public keys should update the REMOTEHOST variable; we will check this after we have imported the public keys.
An HIDS Client will receive commands (a Surveillance Schedule) from the HIDS Server. We need to tell the HIDS Client on which interface those commands will be received. This address should match the IP address that the HIDS Server uses to resolve the hostname for this machine.
root@hpeos003[.root] netstat -in
Name      Mtu  Network         Address         Ipkts   Ierrs Opkts   Oerrs Coll
lan1      1500 192.168.0.64    192.168.0.65    661     0     501     0     0
lan0      1500 192.168.0.32    192.168.0.33    2222    0     1944    0     4
lo0       4136 127.0.0.0       127.0.0.1       1658    0     1658    0     0
root@hpeos003[.root]
As you can see, we have two interfaces on this machine. We will configure the ids.cf file to ensure that we listen on the appropriate interface:
$ id
uid=107(ids) gid=105(ids)
$
$ hostname
hpeos003
$
$ ll /etc/opt/ids/ids.cf
-rw-------   1 ids        ids      17232 Feb  8  2003 /etc/opt/ids/ids.cf
$
$
$ vi /etc/opt/ids/ids.cf
...
#
# This parameter is only needed if you are running HP-UX Host IDS on a
# multi-homed system. It should be set to the name of the network
# address that the HP-UX Host IDS GUI will communicate to this agent
# on. It can be either a hostname which resolves to a unique
# IP address, or an IP address in dotted-decimal notation.
# If this parameter is omitted, idsagent will not start execution
# on a multi-homed system.
#
IDS_LISTEN_IFACE                192.168.0.65
...
$
Now we can continue to create the public/private keys. At this time, it would be useful if we know all the HIDS Clients that are going to participate in this configuration. If we add more nodes later, we will need to repeat this step including the new nodes as appropriate. The import of the public keys needs to be accomplished only on the new nodes. We will use the /opt/ids/bin/IDS_genAdminKeys command to create the public/private keys. We run this command as the ids user on the IDS Server:
$ id
uid=112(ids) gid=104(ids)
$ hostname
hpeos004
$ /opt/ids/bin/IDS_genAdminKeys

==> Be sure to run this script on the IDS Administration host.

Generating a certificate request for IDS Root CA...
Generating a self-signed certificate for IDS Root CA...
Generating a certificate for the HP-UX Host IDS System Manager...
Generating cert signing request for HP-UX Host IDS System Manager...
Signing the HP-UX Host IDS System Manager certificate request...
Importing IDS Root CA certificate...
Importing the HP-UX Host IDS System Manager certificate...

************************************************************
* Successfully created certificates for IDS Root CA and for
* the HP-UX Host IDS System Manager.
* Certificate public keys are valid for 700 days and are
* 1024 bits in size.
*
* Now you need to create keys for each of the hosts on which
* the Agent software is installed by running the script
* 'IDS_genAgentCerts'.
************************************************************
$
We can now create certificates for each of the HIDS Clients using the IDS_genAgentCerts as mentioned above:
$ /opt/ids/bin/IDS_genAgentCerts

==> Be sure to run this script on the IDS Administration host.

Generate keys for which host? hpeos001
Generating key pair and certificate request for IDS Agent
on hpeos001....
Signing certificate for IDS Agent on hpeos001...
Certificate package for IDS Agent on hpeos001 is
/var/opt/ids/tmp/hpeos001.tar.Z

Next hostname (^D to quit)? hpeos002
Generating key pair and certificate request for IDS Agent
on hpeos002....
Signing certificate for IDS Agent on hpeos002...
Certificate package for IDS Agent on hpeos002 is
/var/opt/ids/tmp/hpeos002.tar.Z

Next hostname (^D to quit)? hpeos003
Generating key pair and certificate request for IDS Agent
on hpeos003....
Signing certificate for IDS Agent on hpeos003...
Certificate package for IDS Agent on hpeos003 is
/var/opt/ids/tmp/hpeos003.tar.Z

Next hostname (^D to quit)?
************************************************************
* Successfully created agent certificates for the following
* hosts:
*       hpeos001
*       hpeos002
*       hpeos003
*
* Certificate public keys are valid for 700 days and are
* 1024 bits in size.
*
* They are stored in /var/opt/ids/tmp as hostname.tar.Z
*
* You should now transfer the bundles via a secure channel
* to the IDS agent machines.
*
* On each agent you will need to run the IDS_importAgentKeys
* script to finish the installation.
************************************************************
$
As you can see from the output above, I now have a filename of the form <hostname>.tar.Z that I need to securely transport to each host and then import the keys on that host.
We have our public keys stored in the file /var/opt/ids/tmp/<hostname>.tar.Z. We need to find a secure means of transporting these files to the relevant hosts. Do not use rcp or ftp! I am going to use ssh, which I set up in the previous section. If you don't have a secure network connection, you may want to copy the files to removable media, e.g., DDS or DLT. If you use removable media, ensure that the media is either destroyed or completely erased afterward.
root@hpeos004[tmp] pwd
/var/opt/ids/tmp
root@hpeos004[tmp]
root@hpeos004[tmp] for x in 1 2 3
> do
> ssh hpeos00$x mkdir $PWD
> ssh hpeos00$x chmod 755 $PWD
> ssh hpeos00$x chown ids:ids $PWD
> scp -p hpeos00$x.tar.Z hpeos00$x:$PWD
> ssh hpeos00$x chown ids:ids $PWD/hpeos00$x.tar.Z
> done
hpeos001.tar.Z                                100% 3844     7.1MB/s   00:00
hpeos002.tar.Z                                100% 3872     8.9MB/s   00:00
hpeos003.tar.Z                                100% 3841     7.9MB/s   00:00
root@hpeos004[tmp]
Now I can import the public keys on each of the HIDS Clients:
$ id
uid=107(ids) gid=105(ids)
$ hostname
hpeos003
$ cd /var/opt/ids/tmp
$ ll
total 8
-rw-------   1 ids        ids           3841 Oct 15 12:05 hpeos003.tar.Z
$
$ /opt/ids/bin/IDS_importAgentKeys hpeos003.tar.Z hpeos004

Extracting key pair and certificates...
Modifying the configuration file /etc/opt/ids/ids.cf to use
hpeos004 as the IDS Administration host...

************************************************************
* Keys for IDS Agent were imported successfully.
*
* You can now run the idsagent process on this machine and
* control it from the HP-UX Host IDS System Manager.
************************************************************

$
$ grep REMOTEHOST /etc/opt/ids/ids.cf
REMOTEHOST             hpeos004
$
As you can see, with the IDS_importAgentKeys command I specify the filename containing the keys and the hostname/IP address of the HIDS Server. You can see from above that this process has updated my ids.cf. I have purposely used the hostname, as we will see when I attempt to start the IDS Agent software.
In the previous step, I used a hostname for my HIDS Server even though I know it is a multi-homed machine. I know this will cause a problem when I try to start the HIDS Agent software. Here's the output from my first attempt at starting the HIDS Agent software:
root@hpeos003[.root] /sbin/init.d/idsagent start
(c)Copyright 1983-2000 Hewlett-Packard Co.,  All Rights Reserved.
(c)Copyright 1979, 1980, 1983, 1985-1993 The Regents of the Univ. of California
(c)Copyright 1980, 1984, 1986 Novell, Inc.
(c)Copyright 1986-1992 Sun Microsystems, Inc.
(c)Copyright 1985, 1986, 1988 Massachusetts Institute of Technology
(c)Copyright 1989-1993  The Open Software Foundation, Inc.
(c)Copyright 1986 Digital Equipment Corp.
(c)Copyright 1990 Motorola, Inc.
(c)Copyright 1990, 1991, 1992 Cornell University
(c)Copyright 1989-1991 The University of Maryland
(c)Copyright 1988 Carnegie Mellon University
(c)Copyright 1991-2000 Mentat Inc.
(c)Copyright 1996 Morning Star Technologies, Inc.
(c)Copyright 1996 Progressive Systems, Inc.
(c)Copyright 1991-2000 Isogon Corporation, All Rights Reserved.


                           RESTRICTED RIGHTS LEGEND
Use, duplication, or disclosure by the U.S. Government is subject to
restrictions as set forth in sub-paragraph (c)(1)(ii) of the Rights in
Technical Data and Computer Software clause in DFARS 252.227-7013.

                           Hewlett-Packard Company
                           3000 Hanover Street
                           Palo Alto, CA 94304 U.S.A.

Rights for non-DOD U.S. Government Departments and Agencies are as set
forth in FAR 52.227-19(c)(1,2).
idsagent daemon started
root@hpeos003[.root] Wed Oct 15 14:08:13 2003: libcomm: pid=4282 thread_id=1:
comm_init: connect_host (hpeos004) resolves to more than one IP address. Do not
know which one to use.
idsagent: idsagent initialization failed. See /var/opt/ids/error.log for
details. Exiting

root@hpeos003[.root]
The isdagent startup script performs an su – ids. As you can see from the highlighted (bold, underlined italics) output, the HIDS Agent has found multiple IP addresses for the HIDS Server identified by hostname hpeos004. We need to ensure that we update the ids.cf file with the IP address that the IDS Server used in the idsgui script.
root@hpeos003[.root] vi /etc/opt/ids/ids.cf
...
REMOTEHOST             192.168.0.35
...
root@hpeos003[.root]
Now we can start the HIDS Agent software:
root@hpeos003[.root] /sbin/init.d/idsagent start
(c)Copyright 1983-2000 Hewlett-Packard Co.,  All Rights Reserved.
(c)Copyright 1979, 1980, 1983, 1985-1993 The Regents of the Univ. of California
(c)Copyright 1980, 1984, 1986 Novell, Inc.
(c)Copyright 1986-1992 Sun Microsystems, Inc.
(c)Copyright 1985, 1986, 1988 Massachusetts Institute of Technology
(c)Copyright 1989-1993  The Open Software Foundation, Inc.
(c)Copyright 1986 Digital Equipment Corp.
(c)Copyright 1990 Motorola, Inc.
(c)Copyright 1990, 1991, 1992 Cornell University
(c)Copyright 1989-1991 The University of Maryland
(c)Copyright 1988 Carnegie Mellon University
(c)Copyright 1991-2000 Mentat Inc.
(c)Copyright 1996 Morning Star Technologies, Inc.
(c)Copyright 1996 Progressive Systems, Inc.
(c)Copyright 1991-2000 Isogon Corporation, All Rights Reserved.


                           RESTRICTED RIGHTS LEGEND
Use, duplication, or disclosure by the U.S. Government is subject to
restrictions as set forth in sub-paragraph (c)(1)(ii) of the Rights in
Technical Data and Computer Software clause in DFARS 252.227-7013.

                           Hewlett-Packard Company
                           3000 Hanover Street
                           Palo Alto, CA 94304 U.S.A.

Rights for non-DOD U.S. Government Departments and Agencies are as set
forth in FAR 52.227-19(c)(1,2).
idsagent daemon started
root@hpeos003[.root]
This looks better.
This is accomplished on the HIDS Server via the /opt/ids/bin/idsgui interface. We run the GUI as the ids user ensuring that our DISPLAY variable has been set accordingly. When you first run the GUI, you may be asked to accept a license agreement. It's probably a good idea to Accept.
It is going to be difficult to give you screenshots for all the screens I navigate. I will try to give you bullet points of the steps I perform. and include all the steps for creating a Surveillance Schedule and a Surveillance Group in the next step in the process. I wanted to separate the tasks in this checklist just to ensure that we understand the relationship between the various ideas in the HIDS software.
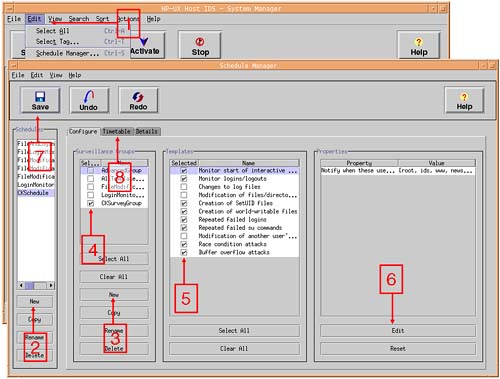
We are going to create a new Surveillance Schedule (CKSchedule) that contains only one Surveillance Group (a new group called CKSurveyGroup), which contains a collection of customized Detection Templates. Here is a screenshot and accompanying bullet points for creating a Surveillance Schedule containing a single Surveillance Group (see Figure 30-3).
From the main screen in the
idsgui, selectEdit Schedule Manager.Under the
Schedule Managerwindow, clickNewto create a new schedule. I called my scheduleCKSchedule. You could use an existing schedule if you prefer. Once created, ensure that you highlight your newSurveillance Schedule.Choose
Newunder theSurveillance Groupwindow to create a newSurveillance Group. I decided to create a newSurveillance GroupcalledCKSurveyGroup.Ensure that your
Surveillance Groupis the only one selected.Select the
Detection Templatethat you want to include in yourSurveillance Group.If you wish, you can
Editthe properties of individual elements of eachDetection Templateyou choose.When you are finished,
Saveyour changes.We are now ready to define a
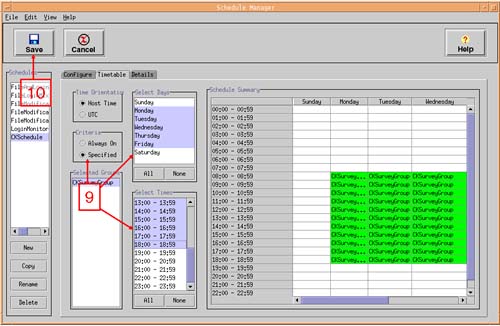
Timetableof which days and times theSurveillance Schedulewill run (see Figure 30-4).When you first go into the
Timetabletab, the default is to run theSurveillance Scheduleall time; theCriteriabutton on the left side will haveAlways onselected. I think this is a good idea, because you don't know when an intruder is going strike. In the figure above, I have selected to monitor mySurveillance Groupat particular times. NOTE: This is for demonstration purposes only. If you exclude certain times, e.g., outside of normal business hours, you run the risk of not monitoring your system(s) at the times when intruders normally operate, i.e., outside of normal business hours.When you have specified you
Timetable, youSaveyour changes. You can now close theSchedule Managerby clickingFile Close. This will take you back to the mainidsguiscreen.
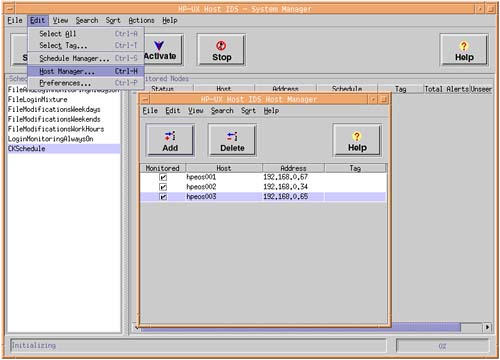
We should now be back at the idsgui main screen, and should be able to see our new Surveillance Schedule in the Schedules window on the left side of the screen. Before we can download the Surveillance Schedule to a group of machines, we need to select the IDS Clients we want to monitor. We do this via the Host Manager; click Edit Host Manager. We should get a list of nodes for which we created public keys. If a particular host isn't listed, we can add the host by using the Add button. Ensure that the Agent is running on any missing nodes (see Figure 30-5).
On returning to the idsgui main System Manager screen, all HIDS Clients should now be in an Available state. NOTE: One issue I have experienced is that if you are not running NTP between your machines, the Certificates created on your HIDS Server have a Valid From as well as an Expiry date. If one of your HIDS Clients is slightly behind with respect to system time, it may fail to negotiate a SSL Handshake because there are no valid Certificates available. You can check the status of Certificates with the /opt/ids/bin/IDS_check[Admin|Agent]Cert commands. You can also check errors in /var/opt/ids/error.log.
We are now ready to download and activate our new Surveillance Schedule to our selected hosts.
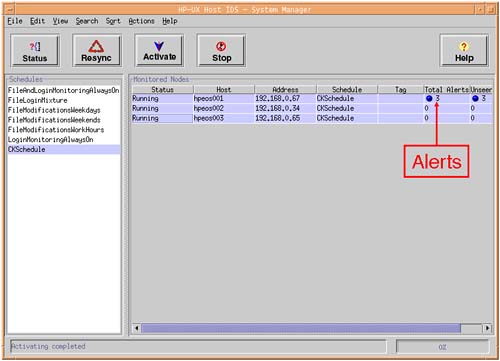
We simply highlight the Surveillance Schedule, highlight all the nodes to which we want to download the Surveillance Schedule (use Shift + click to highlight multiple nodes) and then press the Activate button. The status will go from Available to Downloading to Running. You may start to see alerts being highlighted soon after activation (see Figure 30-6).
Individual nodes maintain their alerts in the file /var/opt/ids/alert.log. They are transmitted back to the HIDS Sever where they are held in the directory /var/opt/ids/gui/logs:
root@hpeos004[logs] pwd
/var/opt/ids/gui/logs
root@hpeos004[logs]
root@hpeos004[logs] ll
total 52
-rw-------   1 ids        ids          18049 Oct 15 17:41 Trace.log
-rw-------   1 ids        ids           2848 Oct 15 17:41 hpeos001_alert.log
-rw-------   1 ids        ids            626 Oct 15 17:26 hpeos001_error.log
-rw-------   1 ids        ids            626 Oct 15 17:26 hpeos002_error.log
-rw-------   1 ids        ids            155 Oct 15 17:39 hpeos003_alert.log
-rw-------   1 ids        ids           1252 Oct 15 17:25 hpeos003_error.log
root@hpeos004[logs]
We can view the alerts and errors just by double-clicking an individual host in the idsgui main System Manager screen (see Figure 30-7).
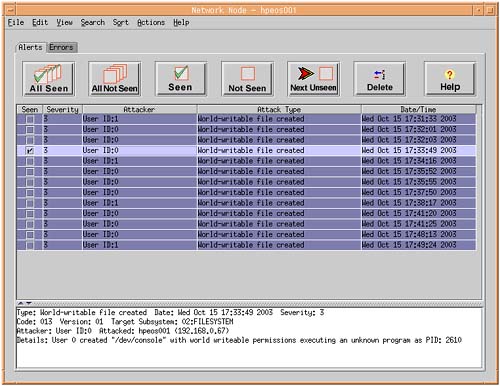
Highlighting individual alerts (errors can be found under the Errors tab near the top of the screen) will display the content of the alert in the panel at the bottom of the screen. This will also mark that alert as seen. You can delete seen alerts simply by clicking the Delete button.
A response program is a shell script or a program that resides in the /opt/ids/response directory. You may find some examples in there as well as programs allowing you to integrate HIDS with OpenView Vantage Point Operations:
root@hpeos001[response] # pwd
/opt/ids/response
root@hpeos001[response] # ll
total 34
-r-x------   1 ids        ids         16384 Jul 16 15:56 ids_alertResponse
-r-x------   1 ids        ids           573 Aug 24  2001 send_alert_to_vpo.sh
dr-x------   2 ids        ids            96 Sep 16 15:52 vpo
root@hpeos001[response] #
Whenever an alert occurs, the response program is executed with a number of command line arguments (as shown in Table 30-1).
Table 30-1. Arguments Passed to Response Programs
Argument | Data Type | Name | Description |
|---|---|---|---|
| String | Program | Name of the executable. |
| Integer | Code | Code assigned to the detection template. Three digits with leading zeros, as in 005 and 027. |
| Integer | Version | Version of the detection template. |
| Integer | Severity | A number from Critical (1): Can provide root access to an attacker. Severe (2): Can compromise the operation of the system, overwrite or delete files, attempt to gain privileged access, and so on. Alert (3): Information about actions that might be used to attack the system. |
| String | UTC Time | The UTC date, formatted as YYYYMMDDhhmmss, where YYYY is the year, MM is the month ( |
| String | Attacker | The “initiator” of the action, if known. |
| String | Target ID | A two-digit code followed by a label, indicating the general computer subsystem affected by this action. For example, |
| String | Attack Type | A brief summary of the alert. |
| String | Details | Detailed information on the alert. |
You can get more details on these command line arguments in the HIDS documentation. The script/program will run using the same UID/GID of the idsagent program (the ids user/group). The script/program must exist on each individual client machine if you want it to run. Because the script/program is going to run as the ids user, it is unlikely that you will be able to perform any system-configuration changes as described in the HIDS documentation unless you create SUID-to-root scripts/programs (with the inherent security concerns with SUID-to-root scripts/programs). Standard output and standard error are both redirected to /var/opt/ids/error.log. Here's a simple example:
root@hpeos001[response] # ll
total 36
-r-x------   1 ids        ids         16384 Jul 16 15:56 ids_alertResponse
-r-x------   1 ids        ids           203 Oct 15 18:35 myprog.sh
-r-x------   1 ids        ids           573 Aug 24  2001 send_alert_to_vpo.sh
dr-x------   2 ids        ids            96 Sep 16 15:52 vpo
root@hpeos001[response] # cat myprog.sh
#!/sbin/sh

echo "my response program"

id

echo "Arg 1 = " $1
echo "Arg 2 = " $2
echo "Arg 3 = " $3
echo "Arg 4 = " $4
echo "Arg 5 = " $5
echo "Arg 6 = " $6
echo "Arg 7 = " $7
echo "Arg 8 = " $8
root@hpeos001[response] #
Here's some output created by it:
root@hpeos001[ids] # pwd
/var/opt/ids
root@hpeos001[ids] # more error.log
...
my response program
uid=105(ids) gid=104(ids)
Arg 1 =  013
Arg 2 =  01
Arg 3 =  3
Arg 4 =  20031015173820
Arg 5 =  User ID:1
Arg 6 =  02:FILESYSTEM
Arg 7 =  World-writable file created
Arg 8 =  User 1 created "/var/X11/Xserver/logs/X0.log" with world writeable permissions
executing /usr/bin/X11/X(1,35228,"40000007") with arguments ["/usr/bin/X11/X", ":0", "-auth", "/var/dt/hpeosAAAa02610"] as PID:8744

root@hpeos001[response] #
HIDS can be an extremely useful tool for monitoring a large collection of machines for unauthorized access and suspicious tampering of critical resource. HIDS will put additional pressure on resources on the monitored and monitoring systems. As with any kind of auditing, you need to decide whether the additional workload that HIDS will impose on individual servers is acceptable. There is no simple answer to this except to finely tune your Detection Templates to your own specific needs.
IPSec allows us to configure a secure communication channel between multiple machines. This secure communication channel operates at Layer 3 (the IP layer) of the ISO seven-layer model. As such, it can provide a secure communication channel for all of the common network services, e.g., SMTP, ftp, telnet, and DNS, without those individual services securing their own communications.
As we have mentioned previously, in an ideal cryptographic world we would use secret keys between individuals (or nodes, in this case). We have seen the problem of distributing secret keys (who said more beer?). IPSec uses the Diffie-Hellman crypto-system because it's means of establishing secret keys between two individuals over what is effectively an insecure communication medium, i.e., an IP network. The mathematics involved in Diffie-Hellman is deceptively simple and beautifully elegant. For once, I will take a slight detour via some maths just to give you an idea of what is happening here.
The strange thing about Diffie-Hellman is that it neither encrypts data nor signs it. To some, it would seem a strange choice of crypto-system due to these failings. Diffie-Hellman is simply a means whereby individuals can agree on a shared, secret key even though their communications are performed in a public place—on an IP network (or the pub). Here's an idea of how it works.
Some of this stuff gets into modular math. We don't get into heavy-math here, but just as a recap for you folks who haven't been in math class for a bit, modular math is used in most public key encryption schemes because it can be used as a mechanism of converting one digit into a different digit simply, efficiently, and with no chance of reversing the result without knowing a secret key. Modular arithmetic can be simply (-ish) described as taking the result of the addition and dividing it by some integer n. We discard the integer result of the division but keep the remainder. Using n = 10, we can say that
3 + 9 = 12 (mod 10) = 1 remainder 2 = 2
In this way, we can see that if we use 9 as a constant and add it to a digit mod 10, we can convert it into another digit = 2 in this instance. To decrypt, we use the additive inverse of 9 (mod 10). The additive inverse is the number you add to x to get 0. In normal arithmetic the additive inverse of 9 would be –9. In mod 10 arithmetic, the additive inverse of 9 is 1: 9+1=10 (mod 10) = 0. To encrypt, we add 9 (mod 10), and to decrypt, we add 1 (mod 10). Let's take our example above:
2 + 1 = 3 (mod 10) = 0 remainder 3 = 3
In this example, we have decrypted the number 2 back to its original value = 3. The same ideas work for modular multiplication and modular exponentiation. Some of the trickier parts of this include finding the multiplicative and exponetiative inverse of large numbers. There are clever math tricks like Euclid's Algorithm to help here. We won't go into all that here; I hope you can see that what we have is a means of encrypting and decrypting digits using some fancy math footwork. Let's jump way ahead and look at the basics of Diffie-Hellman.
Alice and Bob select two values: a prime (p) which is about 512 bits1 in size and a generator (g) which has a specific relationship to p; for every number n between 1 and (p-1) inclusive, there is some power of g (g^m) that equals n mod p, but that isn't really important in understanding the basics. Both p and g are made public. Both Alice and Bob choose a large (atleast 512 bits in size) number at random (hence, the need for a Strong Random Number Generator). This we will call Alice and Bob's secret. We then get into the fancy math footwork:
Alice's secret we will call: Alicesecret
Alice computes:

Bob's secret we will call: Bobsecret
Bob computes:

Bob and Alice swap the T values:
Alice computes:
Bob computes:
The crazy bit about all this is that they both come up with the same answer! Here's how:
No one else can compute ![]() in a reasonable amount of time even though they now have
in a reasonable amount of time even though they now have ![]() and
and ![]() . If they could work out Alicesecret from
. If they could work out Alicesecret from ![]() , then they will have broken the Fundamental Tenet of Cryptography and we would (i) have a genius in our midst and (ii) be in a whole lot of cryptographic trouble.
, then they will have broken the Fundamental Tenet of Cryptography and we would (i) have a genius in our midst and (ii) be in a whole lot of cryptographic trouble.
As it stands, your head is probably quite sore and you want to lie down for a bit. Let's just mention a failing of Diffie-Hellman: It offers no means of authentication. How do Bob and Alice know that they are talking to the right person? All they are doing is swapping numbers and from there deciding on a secret key. What happens if we reintroduce (the bitter and twisted) Eve into this scenario? Alice has no means of proving that she is talking to Bob and, likewise, Bob has no means of proving that he is talking to Alice. Figure 30-8 shows what is known as a man-in-the-middle or a bucket-brigade attack.

Bob can be talking to Eve who is decrypting the messages, thank you very much, and then re-encrypting them with the shared key used for talking to Alice and forwarding the message to Alice. A similar process can be envisaged for the return messages, with Eve eavesdropping on all communications between Bob and Alice. This is why Diffie-Hellman is commonly used in conjunction with some form of authentication scheme to verify the sender and the recipients. IPSec can use either public keys or preshared keys to authenticate the sender and the recipient: This is known as Primary Authentication. In this way, Primary Authentication can offer privacy, authentication, authenticity, and non-repudiation in distributing a shared, secret key. The secret key can then be used to encrypt and authenticate the actual data packets being transmitted between the individual nodes.
The current version of IPSec (A.01.07) supports the use of VeriSign PKI (public key infrastructure) or Baltimore UniCert certificates for Primary Authentication. A third alternative is the use of a preshared key where both nodes need to know a secret key in order to perform Primary Authentication. This is useful when you want to demonstrate and test the capabilities of IPSec when you are waiting for the legal process involving notaries, and so on, to verify your Certificates with the Certification Authorities.
Version A.01.07 has discontinued the support of Entrust Security Certificates for Primary Authentication.
IPSec comes free with HP-UX 11i but is not installed by default. It is available to download free from http://software.hp.com - Security and Manageability. The current version (A.01.07) is supported only on HP-UX 11.11; if you want IPSec for HP-UX 11.0 or 11.04, you should download version A.01.05. We look at setting up an IPSec between two nodes in order to encrypt a single service; we encrypt telnet packets between two nodes. This requires us to do the following:
Install IPSec.
Configure the IPSec policies including the encrypting and authentication of IP packets.
Configure the ISAKMP Main Mode policies.
Import/Request certificates or configure preshared keys.
Set up boot-time configuration.
Start the IPSec daemons.
Test a connection to a remote machine to ensure that Main Mode and Quick Mode SAs are established.
We go through these steps in turn.
This is not a laborious process; it's simply a swinstall that requires a reboot. Ensure that you have the product installed on all nodes wishing to use IPSec:
One problem I did encounter was that on HP-UX 11i with version A.01.07, the swinstall failed when I didn't have the 11.11 ARPA Transport patch PHNE_28895 (or later) installed. This patch is not part of the downloaded software bundle. I had to download this patch and its dependencies first before installing IPSec.
Setting up IPSec is performed via a GUI interface. Before we can interact with the GUI, we must set up a password to secure the IPSec configuration. This is required in case someone compromises the security of the root user on this system. Without the password, anyone attempting to view IPSec information will not be able to determine how our security associations have been configured.
The IPSec password is unique to an individual host and needs to be a minimum of 15 characters long. It is established using the ipsec_admin –np command.
root@hpeos004[.root] ipsec_admin -np
IPSEC_ADMIN: Establishing IPSec password, enter IPSec password: *******************
IPSEC_ADMIN: Re-enter IPSec password to verify: *******************
IPSEC_ADMIN: ALERT-IPSec password successfully established.
root@hpeos004[.root]
If you were to lose or forget this password or if you believe your IPSec configuration had been compromised, you would have to do the following:
We can now configure the IPSec policies. IPSec policies use the secure communication channels (Security Associations) established by the IKE (Internet Key Exchange) daemon: On HP-UX, this is known as the ikmpd daemon (ikmpdv6 if you have IPv6 installed). This daemon deals with establishing Main Mode Security Associations. There are two other daemons: The secpolicyd deals with establishing Quick Mode Security Associations and has IPSec and ISAKMP policy information. It will receive a query about a 5-tuple (local IP address, remote IP address, local port number, remote port number, and protocol number) and find the best-fit IPSec policy. It will note whether an IPSec policy has been used to establish an IPSec SA, and record the Security Parameters Index (a SPI number is used to identify IPSec SAs) for outbound IPSec SAs. Note that the IPSec policies can contain IP address masks and wildcards. Therefore, a single IPSec policy can match multiple 5-tuples and result in multiple IPSec SAs. The secauditd receives audit messages from the other modules and logs them in an audit file. The two other major components of IPSec are the Kernel Policy Engine, which caches recent policy decisions, and SAs for specific 5-tuples. It will also record SPIs for outbound IPSec SAs. Finally, there is the Kernel Security Association Engine, which keeps a database of IPSec SAs, indexed by the Security Parameter Index (SPI) and IP addresses. This database contains the IPSec SA parameters, including the cryptography keys. Note that unlike IPSec policies, the cache entries do not contain masks or wildcards.
A Security Association (SA) is a secure communication channel and its parameters such as encryption method, keys, and lifetime of keys. As such, a single telnet session will have at least two SAs: an inbound and an outbound SA.
Main Mode is where the ikmpd daemon established the ISAKMP (Internet Security Association and Key Management Protocol) SAs. This includes authentication and encryption algorithms and key lifetimes. Next, the two nodes will exchange information used in the Diffie-Hellman algorithm. Finally, both nodes authenticate each other using the chosen Primary Authentication means (either public keys or preshared keys).
Quick Mode relates to specific IPSec policies that include Filters and Transforms. Quick Mode SAs utilize the secure communication channel set up by earlier ISAKMP (Main Mode) SAs. By default, 100 Quick Mode SAs can utilize a single ISAKMP SA. A concept known as Perfect Forward Secrecy (PFS) allows the ikmpd daemon to create a new ISAKMP SA for every IPSec SA. This is computationally expensive, but it does mean that if a single key is compromised, only that one SA may be compromised. (We discuss ISAKMP Main Mode Security Associations later.)
An important part of the IPSec policy is the Filters we will use. Filters can include local/remote IP addresses, local/remote subnet masks, protocols, and even local and remote port numbers. This allows us to encrypt and/or authenticate individual services, e.g., telnet.
A second part of the IPSec policy is the Transform we will use to encrypt and/or authenticate individual packets.
To authenticate an IP packet, we include an additional field in the header of the packet. This header is known as an Authentication Header. The IP Authentication Header (AH) provides integrity and authentication but no privacy: The IP data is not encrypted.
The AH contains an authentication value based on a symmetric key hash algorithm. All the fields in the IP datagram that are not mutable (do not change in transit) are used to calculate the authentication value; this includes the IP Header as well as other headers and the user data. IP Fields or options that need to change in transit, such as hop count and time to live, are assigned a zero value for the calculation of the authentication value.
The AH header also includes a sequence number as protection against replay attacks. HP's IPSec checks the sequence number on received packets to prevent replay attacks.
Included in the AH header is a Security Parameter Index (SPI) value as well as the message digest. The SPI is a key into an in-kernel Security Association table that tells IPSec which algorithm was used to authenticate the packet. IPSec support two U.S. government standards for AH: HMAC-SHA1 (Hashed Message Authentication Code with Secure Hash Algorithm) and HMAC-MD5 (HMAC with Message Digest-5). Both will use the secret key established by both nodes during the Main Mode negotiations.
An example AH transform would be of the form: AH-MD5.
While the Authentication Header provides integrity authenticity, it does not provide privacy. To provide privacy, we must encrypt the packet as well. This is where the IPSec ESP (Encapsulated Security Payload) header comes in. This will add an additional field to the packet. Included in the ESP header is a Security Parameter Index (SPI), similar to the SPI value in an AH header, that will determine the algorithm used for encryption. The IP Encapsulating Security Payload takes the IP payload, such as a TCP packet, encrypts it using a symmetric key, and encapsulates it with header information so that the receiving IPSec entity can decrypt it. The ESP header also includes a sequence number as protection against replay attacks. All senders are required to properly set the sequence number, but receivers are not required to check it. HP's IPSec checks the sequence number on received packets to prevent replay attacks.

IPSEC/9000 supports the 56-bit Data Encryption Standard Cipher Block Chaining Mode (DES-CBC) and Triple-DES CBC (3DES-CBC) encryption algorithms as well as the 128-bit Advanced Encryption Standard (AES-128). AES-128 provides encryption strength comparable to Triple-DES with the system performance comparable to DES.
An example ESP transform would be of the form: ESP-AES128.
To provide authentication and privacy, we can include an ESP authentication field at the end of the IP packet. With authenticated ESP algorithms, an authentication algorithm uses a second, shared secret key to compute an Integrity Check Value (ICV) that authenticates the ESP header and IP data. The ICV is appended to the end of the packet and can be generated using either HMAC-MD5 or HMAC-SHA1.

Alternately, we can nest an ESP transform within an AH. For example, you can nest a DES-CBC ESP transform within an HMAC-MD5 AH transform. IPSec will use DES-CBC to build an ESP with the IP data encrypted. IPSec will then nest this within an AH transform, using HMAC-MD5 to authenticate the ESP and the entire IP packet, including the immutable fields of the original IP header. This differs from an authenticated ESP transform using DES-CBC and HMAC-MD5. The authenticated ESP transform authenticates only the ESP header and IP data, and does not authenticate the original IP header.
An example of an Authenticated ESP transform would be of the form: ESP-DES-HMAC-MD5.

An example Nested AH & ESP transform would be of the form: AH-SHA1&ESP-AES128.
Tunneling Mode is where we will include the original IP header in the AH and/or ESP algorithm. This is more relevant to ESP headers that will be encrypted. We generally use ESP in tunneling mode when IPSec is being used on a gateway machine. The additional, outer IP header will contain the IP address of the gateways, while the inner, encrypted IP header will contain the ultimate source and destination addresses.

Because IPSec will encrypt Layer-4 port numbers, it should not be protected behind a corporate firewall. The firewall may not allow packets through because it is may be filtering on Layer-4 port numbers, which are now encrypted.
Whichever type of transform we choose to use, we need to ensure that we use the same transform on both nodes involved.
The GUI supplied with the IPSec software is the mechanism we use to set up IPSec and ISAKMP policies. The command is ipsec_mgr. We are asked for the IPSec password before it launches the GUI:
root@hpeos004[.root] ipsec_mgr
IPSEC_MGR: Please enter the IPSec password: *******************
Once started, we are presented with the main IPSec Policy window. From here, we can create an IPSec policy. Figure 30-9 shows the steps I went through to create a single IPSec policy.
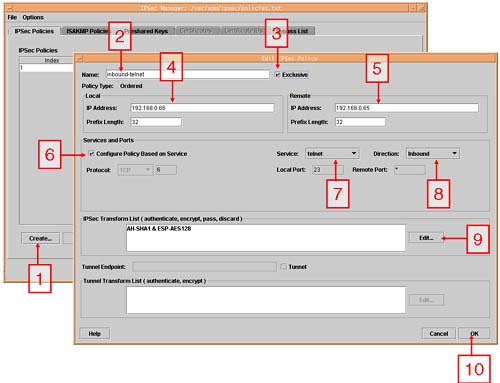
These bullet points relate to the steps I have taken:
Click Create to create a new IPSec policy. This opens the Edit IPSec Policy window.
Give the policy a name. I called my policy
InboundTelnet; the reason becomes obvious.I chose to use Exclusive SAs. This flag allows you to configure SAs to be Shared (Host-based keying) or Exclusive (Session-based keying). If you check the Exclusive Flag, you are selecting Session-based keying. If not, the default (an unchecked box) is host-based keying. Host-based keying allows multiple connections (or sessions) between two systems to share the same two SAs created by IPSec. With session-based keying, a unique pair of SAs is used per connection or session, thus incurring a large overhead. It also, however, allows for a more secure or private connection.
I specify the local IP address (if required) to filter for.
I specify the remote IP address (if required) to filter for.
I decided to filter on specific TCP ports, so I clicked the check box for Configure Policy Based on Service.
I chose the specific port based on port name.
I chose the direction, i.e., inbound. Remember that an SA is a single secure communication channel; hence, TCP connections will require two policies, one inbound and one outbound.
I chose my Transform List by clicking the Edit button. This opens the Transform List window with combinations of AH and ESP. Here, I can choose which authentication and encryption algorithms I will use. My choice determines whether I use an AH, ESP, Authenticated ESP, or Nested ESP. I have chosen a Nested ESP. This was achieved by selecting the appropriate AH (
AH-SHA1, in my case), keeping thectrlkey depressed and then selecting the appropriate ESP (ESP-AES128, in my case) and then clicking Add in the Transform List window. This resulted in the transformAH-SHA1&ESP-AES128.I finished my IPSec policy by clicking OK.
I need to repeat these steps to create an OutboundTelnet policy (obviously, the Direction field in Step 7 will be outbound in this case). I can choose a different Transform if I like; I decided to keep them the same, for simplicity.
NOTE: I need to ensure that I mirror this configuration on my remote host as well, especially the Transforms used for encryption/authentication.
If we want to stick with the default ISAKMP Main Mode policies, we need do nothing here. If, for instance, we want to establish Perfect Forward Secrecy, we need to create at least one ISAKMP policy. Figure 30-10 shows me setting up an ISAKMP policy for PFS (which really needs Exclusive SAs in your IPSec policies to be configured as I did above):
Click Create to open the Create ISAKMP Policy window.
Give the Policy a name; I called mine PFS for obvious reasons. Because I want this policy to apply to all ISAKMP Sas, I am leaving the Remote IP Address as an asterisk (*).
For Perfect Forward Secrecy, you need to set Max Quick Mode to equal 1.
Click OK to save these settings.
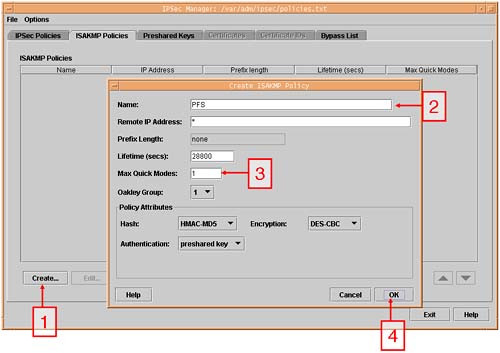
PFS is computationally expensive because for every Quick Mode SA, a new ISAKMP SA is created. This should be undertaken only after careful thought. If you are seeking to establish PFS, then ensure that you configure a similar ISAKMP policy on all remote machines involved.
Under Options on the menu bar, there is an option with a check box for Certificate Authority Settings. When checked, this activates the Certificates and Certificate IDs tabs in the main IPSec window. From there, you can request and/or import VeriSign and Baltimore certificates. I am going to choose to set up preshared keys. This is a secret key known to both nodes. The longer the preshared key, the more secure it is (see Figure 30-11). This is used to establish Primary Authentication when setting up the ISAKMP SAs. Ideally, I would use a public key, but time precludes such a setup; preshared keys are sufficient for testing and demonstration purposes.
Click Create to open the Create ISAKMP Preshared Key window.
Enter the IP address of the remote machine involved. You need to set up a preshared key for each machine with which you are communicating.
You can use a file as input; supposed you had a file containing a long key from another application, e.g.,
ssh-keygen, which produces a readable key file. I have decided to type in the key. I had to click on the input panel and then type the key by hand. Be sure that you type it correctly because you need to input exactly the same key on the remote machine.Click OK to save your changes.
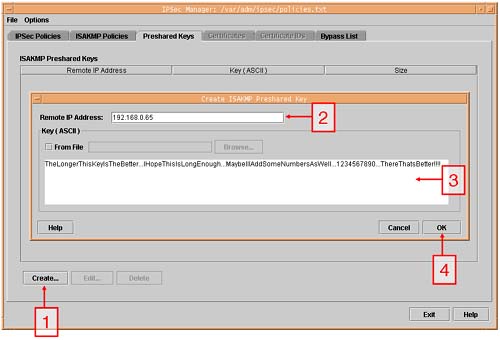
I now need to mirror this configuration on my remote machine. NOTE: If using public key certificates, we should set up a cron job to periodically retrieve the Certificate Revocation List (CRL) from the appropriate servers. Two scripts come supplied with IPSec to retrieve the CRL from Baltimore (baltimoreCRL.cron) and VeriSign (crl.cron). The scripts can be found in /var/adm/ipsec_gui/cron:
root@hpeos004[cron] pwd
/var/adm/ipsec_gui/cron
root@hpeos004[cron] ll
total 2086
-r-x------   1 bin        bin            309 Feb  6  2003 baltimoreCRL.cron
-r-x------   1 bin        bin            375 Feb  6  2003 crl.cron
-r-x------   1 bin        bin        1065192 Aug  7 18:54 crl_cron
root@hpeos004[cron]
It is worthwhile to contact the relevant organization to establish how often they update the CRL in order for you to set up an appropriate cron job. It is not uncommon to run these jobs a number of times during the day. The scripts use the information configured in the ipsec_mgr program to contact the appropriate server and retrieve the CRL. The CRL is added to the certs.txt file.
We need to ensure that IPSec is started at boot-time. This creates a file called /var/adm/ipsec/.admin_info, which is an encrypted version of the IPSec administration password that we created using the ipsec_admin –np command. This is needed in order for IPSec to start up at boot-time without asking for the IPSec administration password. This is accomplished by accessing the Boot-up Options window as seen in Figure 30-12.
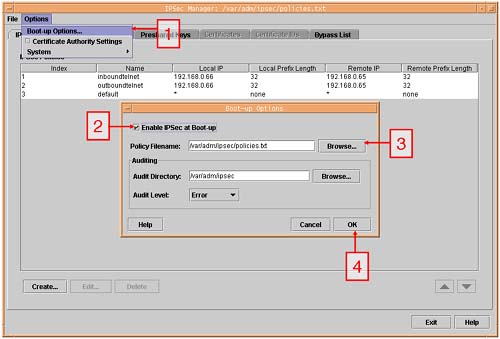
We are now ready to start the IPSec daemons.
We can see the status of the daemons using the ipsec_admin –status command:
root@hpeos004[.root] ipsec_admin -status

----------------- IPSec Status Report -----------------
Time:  Fri Oct 17 09:35:19 2003

        secauditd program: Not running
        secpolicyd program: Not running
        ikmpdv6 program: Not running
        IPSec kernel: Down
        IPSec Audit level: Unknown
        IPSec Audit file: Unknown
        Max Audit file size: 0 KBytes
        IPSec Policy file: Unknown
        Level 4 tracing: None
-------------- End of IPSec Status Report -------------
root@hpeos004[.root]
To start the daemons, we use the same command but with the –start option:
root@hpeos004[.root] ipsec_admin -start
IPSEC_ADMIN: Starting up the secauditd program.
IPSEC_ADMIN: ALERT-Starting up IPSec/9000.
IPSEC_ADMIN: Starting up the ikmpdv6 program.
IPSEC_ADMIN: The ikmpdv6 program successfully started up.
IPSEC_ADMIN: Starting up the secpolicyd program.
IPSEC_ADMIN: Starting up the IPSec kernel.
IPSEC_ADMIN: IPSec kernel successfully started up.
IPSEC_ADMIN: Security Association Data Base successfully flushed.
IPSEC_ADMIN: IKE MM SAs successfully flushed.
root@hpeos004[.root] ipsec_admin -status

----------------- IPSec Status Report -----------------
Time:  Fri Oct 17 09:37:24 2003

        secauditd program: Running and responding
        secpolicyd program: Running and responding
        ikmpdv6 program: Running and responding
        IPSec kernel: Up
        IPSec Audit level: Error
        IPSec Audit file: /var/adm/ipsec/auditFri-Oct-17-09-37-18-2003.log
        Max Audit file size: 100 KBytes
        IPSec Policy file: /var/adm/ipsec/policies.txt
        Level 4 tracing: None
-------------- End of IPSec Status Report -------------
root@hpeos004[.root]
The first time we try and perform a telnet between our two nodes in this configuration, the telnet will initially appear to hang while both machines establish the required Security Associations. Once established, the telnet session will behave as normal. In a separate session, I will monitor the Main Mode Security Associations that have been established (ipsec_report –mad). I could also monitor the Quick Mode Security Associations (ipsec_report –sad), although because I have established PFS, I may have to look at all active records (ipsec_report –ipsec active) to see all currently active SAs.
The following commands were issued while a telnet session was active between node hpeos004 and hpeos003. First, the Main Mode SAs:
root@hpeos004[.root] ipsec_report -mad

------------------------ ISAKMP SA --------------------------
Sequence number: 1
Role: Initiator
Local IP Address: 192.168.0.66
Remote IP Address: 192.168.0.65
Oakley Group: 1    Authentication Method: Preshared Keys
Authentication Algorithm: HMAC-MD5    Encryption Algorithm: DES-CBC
Quick Modes Processed: 0    Lifetime (seconds): 28800
root@hpeos004[.root]
Now all active SAs:
root@hpeos004[.root] ipsec_report -ipsec active

--------------------- Active IPSec Policy Rule -----------------------
Rule Name: inboundtelnet      ID: 1
Cookie: 2    State: SPI(s) Not Established
Src IP Addr: 192.168.0.66   Prefix: 32  Src Port number: 23
Dst IP Addr: 192.168.0.65   Prefix: 32  Dst Port number: *
Network Protocol: TCP    Direction: outbound
Action: Secure
Shared SA: Yes
Number of SA(s) Needed: 2
Number of SA(s) Created: 0
Kernel Requests Queued: 0
-- SA Number 1 --
   SA Type: ESP
   Encryption Algorithm: AES128-CBC
   Authentication Algorithm: None
   SPI (hex): Not Established
   SPI updated: Unknown
-- SA Number 2 --
   SA Type: AH
   Authentication Algorithm: HMAC-SHA1
   SPI (hex): Not Established
   SPI updated: Unknown

--------------------- Active IPSec Policy Rule -----------------------
Rule Name: outboundtelnet      ID: 2
Cookie: 3    State: SPI(s) Not Established
Src IP Addr: 192.168.0.66   Prefix: 32  Src Port number: *
Dst IP Addr: 192.168.0.65   Prefix: 32  Dst Port number: 23
Network Protocol: TCP    Direction: outbound
Action: Secure
Shared SA: Yes
Number of SA(s) Needed: 2
Number of SA(s) Created: 0
Kernel Requests Queued: 0
-- SA Number 1 --
   SA Type: ESP
   Encryption Algorithm: AES128-CBC
   Authentication Algorithm: None
   SPI (hex): Not Established
   SPI updated: Unknown
-- SA Number 2 --
   SA Type: AH
   Authentication Algorithm: HMAC-SHA1
   SPI (hex): Not Established
   SPI updated: Unknown

--------------------- Active IPSec Policy Rule -----------------------
Rule Name: inboundtelnet      ID: 1
Src IP Addr: 192.168.0.65   Prefix: 32  Src Port number: *
Dst IP Addr: 192.168.0.66   Prefix: 32  Dst Port number: 23
Network Protocol: TCP    Direction: inbound
Action: Secure
Shared SA: Yes
Number of SA(s) Needed: 2
-- SA Number 1 --
   SA Type: ESP
   Encryption Algorithm: AES128-CBC
   Authentication Algorithm: None
-- SA Number 2 --
   SA Type: AH
   Authentication Algorithm: HMAC-SHA1

--------------------- Active IPSec Policy Rule -----------------------
Rule Name: outboundtelnet      ID: 2
Src IP Addr: 192.168.0.65   Prefix: 32  Src Port number: 23
Dst IP Addr: 192.168.0.66   Prefix: 32  Dst Port number: *
Network Protocol: TCP    Direction: inbound
Action: Secure
Shared SA: Yes
Number of SA(s) Needed: 2
-- SA Number 1 --
   SA Type: ESP
   Encryption Algorithm: AES128-CBC
   Authentication Algorithm: None
-- SA Number 2 --
   SA Type: AH
   Authentication Algorithm: HMAC-SHA1

--------------------- Active IPSec Policy Rule -----------------------
Rule Name: default      ID: 3
Cookie: 1    State: Ready
Action: Pass
Shared SA: No
Number of SA(s) Needed: 1
Number of SA(s) Created: 0
-- SA Number 1 --
   SA Type: AH
   Authentication Algorithm: HMAC-SHA1
   SPI (hex): Not Established
   SPI updated: Unknown
root@hpeos004[.root]
At the same time, I was running a nettl trace on the telnet session to see if I could capture root passwords. Just to remind us of the commands I used, I will demonstrate the trace with IPSec turned off. Here, I start the trace on the IP layer using an output file /tmp/noIPsec.TRC000:
root@hpeos004[.root] nettl -e NS_LS_IP -f /tmp/noIPsec -tn pduout pduin
I then run the telnet session between nodes hpeos004 and hpeos003. Once I log in, I can stop the trace:
root@hpeos004[.root] nettl -tf -e all
I will use a formatting file just to filter for the source and destination IP addresses I am interested in:
root@hpeos004[.root] cat .netfmt.conf
filter ip_saddr 192.168.0.66
filter ip_daddr 192.168.0.65


root@hpeos004[.root]
The next part of deciphering a network trace is knowing what you are looking for. In my case, I happen to know the format of the packets I am looking for. The packets I am looking for contain the clear-text passwords transmitted over the network. Consequently, I can use a netfmt command piped directly into a suitable grep command, looking for the packets of interest:
root@hpeos004[.root] netfmt -c .netfmt.conf -f /tmp/noIPsec.TRC000 | grep '^
*32:.*[a-z0-9][a-z0-9] -- -- -- -- -- -- --  P.*' | more

---------------------- SUBSYSTEM FILTERS IN EFFECT -----------------


        ---------------- LAYER  1 -----------------

        ---------------- LAYER  2 -----------------

        ---------------- LAYER  3 -----------------
        filter ip_saddr          hpeos004
        filter ip_daddr          hpeos003

        ---------------- LAYER  4 -----------------

        ---------------- LAYER  5 -----------------
---------------------- END SUBSYSTEM FILTERS -----------------------

  32: 50 18 80 00 2b 2e 00 00 72 -- -- -- -- -- -- --  P...+...r.......
  32: 50 18 80 00 2e 2c 00 00 6f -- -- -- -- -- -- --  P....,..o.......
  32: 50 18 80 00 2e 2a 00 00 6f -- -- -- -- -- -- --  P....*..o.......
  32: 50 18 80 00 29 28 00 00 74 -- -- -- -- -- -- --  P...)(..t.......
  32: 50 18 80 00 35 18 00 00 68 -- -- -- -- -- -- --  P...5...h.......
  32: 50 18 80 00 38 17 00 00 65 -- -- -- -- -- -- --  P...8...e.......
  32: 50 18 80 00 31 16 00 00 6c -- -- -- -- -- -- --  P...1...l.......
  32: 50 18 80 00 31 15 00 00 6c -- -- -- -- -- -- --  P...1...l.......
  32: 50 18 80 00 2e 14 00 00 6f -- -- -- -- -- -- --  P.......o.......
  32: 50 18 80 00 6c 13 00 00 31 -- -- -- -- -- -- --  P...l...1.......
  32: 50 18 80 00 6b 12 00 00 32 -- -- -- -- -- -- --  P...k...2.......
  32: 50 18 80 00 6a 11 00 00 33 -- -- -- -- -- -- --  P...j...3.......
  32: 50 18 80 00 31 69 00 00 65 -- -- -- -- -- -- --  P...1i..e.......
  32: 50 18 80 00 1e 67 00 00 78 -- -- -- -- -- -- --  P....g..x.......
  32: 50 18 80 00 2d 65 00 00 69 -- -- -- -- -- -- --  P...-e..i.......
  32: 50 18 80 00 22 63 00 00 74 -- -- -- -- -- -- --  P..."c..t.......
root@hpeos004[.root]
I hope that you can see that the root password for node hpeos003 is hello123.
I performed the same trace, but with IPSec turned on. The trace file was called /tmp/IPsecON.TRC000. I won't go through all the commands I used, because they were exactly the same as those used above. The part I am interested in is the content of the trace. Here's the result:
root@hpeos004[.root] netfmt -c .netfmt.conf -f /tmp/IPsecON.TRC000 | grep '^
*32:.*[a-z0-9][a-z0-9] -- -- -- -- -- -- --  P.*' | more


---------------------- SUBSYSTEM FILTERS IN EFFECT -----------------


        ---------------- LAYER  1 -----------------

        ---------------- LAYER  2 -----------------

        ---------------- LAYER  3 -----------------
        filter ip_saddr          hpeos004
        filter ip_daddr          hpeos003

        ---------------- LAYER  4 -----------------

        ---------------- LAYER  5 -----------------

---------------------- END SUBSYSTEM FILTERS -----------------------

root@hpeos004[.root]
As you can see, the grep command has produced no output. At least I can see that something is different. This is where looking for individual packets becomes exceedingly difficult; the entire TCP data is now encrypted and bears no resemblance to what it used to look like. I even went so far as to look for packets containing the character I knew would be there:
root@hpeos004[.root] netfmt -c .netfmt.conf -f /tmp/IPsecON.TRC000 | grep
'^....:.*  P.*[roothello123].*' | more

---------------------- SUBSYSTEM FILTERS IN EFFECT -----------------


        ---------------- LAYER  1 -----------------

        ---------------- LAYER  2 -----------------

        ---------------- LAYER  3 -----------------
        filter ip_saddr          hpeos004
        filter ip_daddr          hpeos003

        ---------------- LAYER  4 -----------------

        ---------------- LAYER  5 -----------------

---------------------- END SUBSYSTEM FILTERS -----------------------

  32: 50 10 80 00 ee 68 00 00 -- -- -- -- -- -- -- --  P....h..........
  32: 50 18 80 00 9c 31 00 00 46 15 00 05 03 80 00 49  P....1..F......I
  32: 50 10 80 00 e7 68 00 00 -- -- -- -- -- -- -- --  P....h..........
  32: 50 18 80 00 95 65 00 00 46 15 00 05 03 80 00 49  P....e..F......I
  32: 50 18 80 00 c6 a2 00 00 12 02 00 06 02 00 00 31  P..............1
 240: 20 20 20 50 61 6c 6f 20 41 6c 74 6f 2c 20 43 41     Palo Alto, CA
  32: 50 18 80 00 91 b2 00 00 72 6f 6f 74 40 68 70 65  P.......root@hpe
  32: 50 18 80 00 e8 68 00 00 4c 05 00 06 03 00 00 49  P....h..L......I
1248: 50 73 65 63 4f 4e 2e 54 52 43 30 30 30 6f 6c 69  PsecON.TRC000oli
  32: 50 18 80 00 1c 82 00 00 20 31 20 72 6f 6f 74 20  P....... 1 root
  32: 50 18 80 00 b1 0a 00 00 12 02 00 06 02 00 00 31  P..............1
  32: 50 10 80 00 92 31 00 00 -- -- -- -- -- -- -- --  P....1..........
  32: 50 18 80 00 03 33 00 00 20 39 30 30 30 2f 38 30  P....3.. 9000/80
  32: 50 18 80 00 31 20 00 00 42 00 00 07 03 80 00 49  P...1 ..B......I
  32: 50 18 80 00 72 ee 00 00 46 00 00 05 03 80 00 49  P...r...F......I
  32: 50 18 80 00 72 3a 00 00 46 00 00 05 03 80 00 49  P...r:..F......I
  32: 50 10 80 00 d0 68 00 00 -- -- -- -- -- -- -- --  P....h..........
  32: 50 18 80 00 33 87 00 00 3e 01 00 07 02 c0 00 48  P...3...>......H
  32: 50 18 80 00 32 c3 00 00 3e 01 00 07 02 c0 00 48  P...2...>......H
 720: 20 20 20 50 61 6c 6f 20 41 6c 74 6f 2c 20 43 41     Palo Alto, CA
  32: 50 18 80 00 72 b8 00 00 46 01 00 07 02 c0 00 48  P...r...F......H
  32: 50 18 80 00 72 91 00 00 46 01 00 05 02 c0 00 48  P...r...F......H
  32: 50 10 80 00 bd 68 00 00 -- -- -- -- -- -- -- --  P....h..........
  32: 50 18 80 00 6c e9 00 00 46 01 00 05 02 c0 00 48  P...l...F......H
  32: 50 18 80 00 a6 c1 00 00 2d 72 77 2d 2d 2d 2d 2d  P.......-rw-----
  32: 50 18 80 00 65 7a 00 00 46 00 00 05 03 80 00 49  P...ez..F......I
  32: 50 10 80 00 b4 68 00 00 -- -- -- -- -- -- -- --  P....h..........
  32: 50 18 80 00 62 31 00 00 46 15 00 05 03 80 00 49  P...b1..F......I
root@hpeos004[.root]
I tried as best I could but was unable to discern any pattern to the content of the packets.
Discarding or requiring ICMP messages (Internet Control Message Protocol messages, protocol value 1) to be encrypted or authenticated may cause connectivity problems. Normal network operation may require IP to exchange ICMP messages between end-to-end hosts and between an end host and an IP gateway (including router devices). IP may need to exchange ICMP packets with gateway nodes even though no user (end-to-end) services are being used to the gateways.
Be careful when configuring the default IPSec policy or IPSec policies that affect entire subnets because you may inadvertently cause ICMP messages to be discarded. You may also inadvertently require ICMP messages being transmitted or received from a non-IPSec gateway or router to be authenticated or encrypted, which will also cause ICMP packets to be discarded.
IP uses ICMP messages to transmit error and control information, such as in the following situations:
IP may periodically send ICMP Echo messages to gateways to determine whether the gateway is up (Gateway Probes). If no response is received, the gateway is marked Dead in the IP routing table.
This feature is controlled by the IP kernel parameter
ip_ire_gw_probe. By default, this feature is enabled on all HP-UX systems.IP may use ICMP Echo messages with the Don't Fragment flag and ICMP Destination Unreachable messages with the Fragmentation Needed flag to set the Path Maximum Transmission Unit (Path MTU). This feature is controlled by the IP kernel parameter
ip_pmtu_strategy. By default, HP-UX will attempt to send an ICMP Echo Don't Fragment message when initially establishing a route to a non-local destination, but no Echo Reply is required. However, you should ensure that the local system does not discard Fragmentation Needed packets that may be sent in response.IP may send ICMP Redirect messages to redirect traffic to a different gateway. The transmission of ICMP Redirect messages is controlled by the IP kernel parameter
ip_send_redirects. By default, this feature is enabled on all HP-UX systems.IP may send ICMP Source Quench messages to request the source system to decrease its transmission rate. The transmission of ICMP Source Quench messages is controlled by the IP kernel parameter
ip_send_source_quench. By default, this feature is enabled on all HP-UX systems.
Refer to the ndd manual page or recall our discussions on ndd in Chapter 15, “Basic IP Configuration” for information on checking or changing all these parameters' values.
IPSec can provide privacy, authentication, authenticity, and effectively non-repudiation for packets transmitted at the IP level. This can be customized for relationships between individual hosts and customized for individual network services. While being computationally expensive (like any other encryption technology), IPSec can ensure that secure communication is possible even when using insecure applications such as telnet. While we have shown that even our telnet packets are now secure, I would still try to ensure that users stopped using these insecure applications in favor of applications such as ssh.
HP-UX IPFilter is a stateful system firewall that filters IP packets to control packet flow in or out of a machine. It works as a security defense by decreasing the number of exposure points on a machine.
HP-UX IPFilter is based on ipfilter v3.5 alpha 5 from the Open Source community. At the heart of the configuration is a set of rules to control whether packets are allowed into or out of a machine. Its key benefits can be summarized as follows:
Protects an individual host on an intranet against internal attacks.
Protects an individual host on an intranet against external attacks that have breached perimeter defenses.
Provides an alternative to the restricted configuration of Internet Services.
Protects a bastion host on the perimeter or in the DMZ.
IPFilter is available for HP-UX 11.0 and 11i (version 1, 1.6, and 2.0) as a free download from http://software.hp.com - Security and Manageability. We look at a basic configuration to limit access to particular services.
HP-UX Bastille is a security hardening/lockdown tool that can be used to enhance the security of the HP-UX operating system. It provides customized lockdown on a system-by-system basis by encoding functionality similar to the Bastion Host white paper, which is available at http://www.hp.com/products1/unix/operating/infolibrary/whitepapers/building_a_bastion_host.pdf and which is included in Appendix E. (Read this document; it is exceptionally good!) It also provides other hardening/lockdown checklists.
Bastille was originally developed by the Open Source community for use on Linux systems. Here are some of its key features:
Configures daemons and system settings to be more secure.
Turns off unneeded services such as
pwgrd.Helps create
chrootjails that partially limit the vulnerability of common Internet services such as Web servers and DNS.User interface designed to educate users.
Configures Security Patch Check to run automatically.
Configures an IPFilter-based firewall.
Includes a “revert” feature that returns the security configuration to the state before Bastille was run.
Like IPFilter, HP-UX Bastille is available for free download from http://software.hp.com - Security and Manageability. As you can see, Bastille has a built-in feature to include an IPFilter firewall. You do not need to use both of these utilities together; however, if you are looking at hardening a particular server, then it makes sense to consider both free products.
Let's start by having a quick look at IPFilter.
Installing the software requires a reboot even though the software introduces a DLKM into the system:
root@hpeos004[.root] swlist -l fileset -a is_reboot -d @ /software/11i-PA/IPFilter
# Initializing...
# Contacting target "hpeos004"...
#
# Target:  hpeos004:/software/11i-PA/IPFilter
#

# IPF-HP
  IPF-HP.IPF-DEMO       false
  IPF-HP.IPF-MAN        false
  IPF-HP.IPF-MIN        false
  IPF-HP.IPF-MIN        false
  IPF-HP.IPF2-DLKM      true
  IPF-HP.IPF2-DLKM      true
# PFIL-HP
  PFIL-HP.PFIL-MIN      false
  PFIL-HP.PFIL2-DLKM    true
  PFIL-HP.PFIL2-DLKM    true
root@hpeos004[.root]
Once installed, we need to check that the DLKM modules (pfil and ipf) are LOADED.
root@hpeos004[.root] kmadmin -s
Name            ID      Status          Type
=====================================================
krm             1       UNLOADED        WSIO
rng             2       LOADED          WSIO
pfil            3       LOADED          STREAMS
ipf             4       LOADED          WSIO
root@hpeos004[.root]
We now need to establish a set of rules for blocking or passing packets to and from this particular host.
The default rules file for IPFilter is /etc/opt/ipf/ipf.conf. By default, it is empty:
root@hpeos004[.root] ll /etc/opt/ipf/ipf.conf
-rw-r--r--   1 root       sys              0 Oct 17 12:38 /etc/opt/ipf/ipf.conf
root@hpeos004[.root]
IPFilter is started automatically (see /etc/rc.config.d/ipfconf and /sbin/init.d/ipfboot), which means that we have no rules to apply, i.e., we are blocking no LAN cards, IP addresses, protocols, or port numbers.
root@hpeos004[.root] ipf -V
ipf: HP IP Filter: v3.5alpha5 (A.03.05.08) (368)
Kernel: HP IP Filter: v3.5alpha5 (A.03.05.08)
Running: yes
Log Flags: 0 = none set
Default: pass all, Logging: available
Active list: 1
root@hpeos004[.root]
One way to approach IPFilter is using a concept known as least privilege. This dictates that we block everything and then allow only specific entities access to the services they need. This could result in a very simple rules file of the following form:
root@hpeos004[ipf] pwd
/etc/opt/ipf
root@hpeos004[ipf] cat ipf.conf
block in all
block out all
root@hpeos004[ipf]
To load this as the active ruleset, we use the ipf command:
root@hpeos004[ipf] ipf -Fa -f $PWD/ipf.conf
root@hpeos004[ipf]
root@hpeos004[ipf] ipfstat -io
block out from any to any
block in from any to any
root@hpeos004[ipf]
root@hpeos004[ipf] ping hpeos002 64 3
PING hpeos002: 64 byte packets

----hpeos002 PING Statistics----
3 packets transmitted, 0 packets received, 100% packet loss
root@hpeos004[ipf]
Be very careful of this configuration, because this effect is immediate. No one will be able to communicate with any network service into or out of this machine. Be careful of the order of entries in the rules file. The last rule is the one that applies. Look at this simple example:
root@hpeos004[ipf] vi ipf.conf
block in proto icmp from any to any
pass in proto icmp from any to any
root@hpeos004[ipf]
root@hpeos004[ipf] ipf -Fa -f $PWD/ipf.conf
root@hpeos004[ipf] ipfstat -io
empty list for ipfilter(out)
block in proto icmp from any to any
pass in proto icmp from any to any
root@hpeos004[ipf]
Can we ping a distant machine? Yes, because the pass rule is the last rule processed and is matches the packets in question. One way to get around this is to apply the quick rule optimizer:
root@hpeos004[ipf] vi ipf.conf
block in quick proto icmp from any to any
pass in proto icmp from any to any
root@hpeos004[ipf]
root@hpeos004[ipf] ipf -Fa -f $PWD/ipf.conf
root@hpeos004[ipf] ipfstat -io
empty list for ipfilter(out)
block in quick proto icmp from any to any
pass in proto icmp from any to any
root@hpeos004[ipf]
The effect is that if we match a rule utilizing the quick keyword, no further ruleset matches are performed for that packet.
root@hpeos004[ipf] ping hpeos003 64 3
PING hpeos003: 64 byte packets

----hpeos003 PING Statistics----
3 packets transmitted, 0 packets received, 100% packet loss
root@hpeos004[ipf]
Another important mechanism for improving the efficiency of IPFilter is to configure a rule that establishes an entry in the IPFilter kernel state table. If a packet matches an entry in the state table, it passes through the firewall without being checked against rulesets. This enhances the performance of the IPFilter system. IPFilter checks both inbound and outbound packets against the state table. If either an inbound or an outbound packet matches a session in the state table, it is not checked against the ruleset. In this configuration, I am applying a quick rule that will allow access to port 22 (used by Secure Shell). Once the initial SSH packets are received, a state table entry will be set up. The remainder of the SSH session continues without any further packets within the session being checked against the IPFilter ruleset.
root@hpeos004[ipf] vi ipf.conf
pass in quick proto tcp from any to 192.168.0.66/32 port = 22 keep state
pass out quick proto tcp from any to any keep state
block in log quick all
block out log quick all
root@hpeos004[ipf]
root@hpeos004[ipf] ipf -Fa -f $PWD/ipf.conf
root@hpeos004[ipf] ipfstat -io
pass out quick proto tcp from any to any keep state
block out log quick from any to any
pass in quick proto tcp from any to 192.168.0.66/32 port = 22 keep state
block in log quick from any to any
root@hpeos004[ipf]
First, notice that I have including logging of any attempts to access my server, which are blocked. This produces lots of output (the ipmon daemon sends its output to syslog). It gives me an idea of who is trying to contact me and what services and protocols they are using. I would suggest turning on full blocked logging like this only if you are sure that's what you want to achieve.
The configuration above is blocking anything other than ssh access into this machine, and no one can use network services to leave this machine. I can now attempt a ssh session from another node:
root@hpeos003[.root] ssh 192.168.0.66
Last   successful login for root: Fri Oct 17 14:18:58 GMT0BST 2003 on console
Last unsuccessful login for root: Fri Oct 17 14:22:53 GMT0BST 2003
Last login: Fri Oct 17 14:18:58 2003 from hpeos003
(c)Copyright 1983-2000 Hewlett-Packard Co.,  All Rights Reserved.
(c)Copyright 1979, 1980, 1983, 1985-1993 The Regents of the Univ. of California
(c)Copyright 1980, 1984, 1986 Novell, Inc.
(c)Copyright 1986-1992 Sun Microsystems, Inc.
(c)Copyright 1985, 1986, 1988 Massachusetts Institute of Technology
(c)Copyright 1989-1993  The Open Software Foundation, Inc.
(c)Copyright 1986 Digital Equipment Corp.
(c)Copyright 1990 Motorola, Inc.
(c)Copyright 1990, 1991, 1992 Cornell University
(c)Copyright 1989-1991 The University of Maryland
(c)Copyright 1988 Carnegie Mellon University
(c)Copyright 1991-2000 Mentat Inc.
(c)Copyright 1996 Morning Star Technologies, Inc.
(c)Copyright 1996 Progressive Systems, Inc.
(c)Copyright 1991-2000 Isogon Corporation, All Rights Reserved.


                           RESTRICTED RIGHTS LEGEND
Use, duplication, or disclosure by the U.S. Government is subject to
restrictions as set forth in sub-paragraph (c)(1)(ii) of the Rights in
Technical Data and Computer Software clause in DFARS 252.227-7013.

                           Hewlett-Packard Company
                           3000 Hanover Street
                           Palo Alto, CA 94304 U.S.A.

Rights for non-DOD U.S. Government Departments and Agencies are as set
forth in FAR 52.227-19(c)(1,2).

Value of TERM has been set to "dtterm".
WARNING:  YOU ARE SUPERUSER !!

Erase set to Delete
Kill is Ctrl-U
root@hpeos004[.root]
Notice that I have specified an IP address on the ssh command line. The node hpeos004 is a multi-homed machine, so I may need to add additional entries if I want to allow access via other interfaces/IP addresses. I can now view the state table on node hpeos004:
root@hpeos004[ipf] ipfstat -sl
192.168.0.65 -> 192.168.0.66 ttl 101338 pass 0x500a pr 6 state 4/4
pkts 89 bytes 19856 49496 -> 22 2d8cc5c8:2b96789e 32768:32768
cmsk 0000 smsk 0000 isc 0000000000000000 s0 2d8cbaa0/2b9663fe
sbuf[0] [����������������] sbuf[1] [����������
������]
pass in quick keep state IPv4
pkt_flags & 2(b2) = b, pkt_options & ffffffff = 0
pkt_security & ffff = 0, pkt_auth & ffff = 0
interfaces: in lan1[0000000041fe3400] out -[0000000000000000]
root@hpeos004[ipf]
If I had configured IP multiplexing on that interface and wanted to allow access to use ssh regardless of the IP address, I could have used a configuration that specifies the LAN card and not the IP Address:
root@hpeos004[ipf] cat ipf.conf
pass in quick on lan1 proto tcp from any to any port = 22 keep state
pass out quick proto tcp from any to any keep state
block in log quick all
block out log quick all
root@hpeos004[ipf]
There is an excellent white paper that is used extensively in the documentation for IPFilter and can be found at http://www.obfuscation.org/ipf or at a mirror site such as http://www.darkart.com/mirrors/www.obfuscation.org/ipf/ipf-howto.txt. (I found this site to be down quite a bit.)
You can set up a vast number of different configurations with IPFilter. We can't go into all of them here. However, here are some points worth considering:
Don't block all ICMP packet types. Some ICMP packet types are useful in routing algorithms. However, do you really want other servers to be able to
pingyou (ICMP packet type 0 = echo reply)?IPFilter sits at a lower level in the networking stack than IPSec. You will have to allow the pass in and out of UDP port 500 that is used by IPSec. If using the IPFilter Network Address Translation (NAT) feature, you have to allow UDP in and out on port 4500.
Be careful which ports you block if you are running in a Serviceguard cluster. Serviceguard uses the following ports:
hacl-qs 1238/tcp # High Availability (HA) Quorum Server
clvm-cfg 1476/tcp # HA LVM configuration
hacl-hb 5300/tcp # High Availability (HA) Cluster heartbeat
hacl-hb 5300/udp # High Availability (HA) Cluster heartbeat
hacl-gs 5301/tcp # HA Cluster General Services
hacl-cfg 5302/tcp # HA Cluster TCP configuration
hacl-cfg 5302/udp # HA Cluster UDP configuration
hacl-probe 5303/tcp # HA Cluster TCP probe
hacl-probe 5303/udp # HA Cluster UDP probe
hacl-local 5304/tcp # HA Cluster commands
hacl-test 5305/tcp # HA Cluster test
hacl-dlm 5408/tcp # HA Cluster distributed lock manager
This list of HA services is not exhaustive. In addition, Serviceguard also uses dynamic ports (typically in the 49152–65535 range) for some cluster services. If you have adjusted the dynamic port range using kernel tunable parameters, alter your rules accordingly. This list does not include all HA applications (such as Continentalclusters). New HA applications might be developed that use port numbers different from those listed above. You need to add new rules as appropriate to ensure that all HA applications run properly.
There are several examples of
ipf.conffiles listed in/opt/ipf/examples. Use these as a starting point for your configuration.Consider using the
mkfilterscommand (you need to install Perl if you want to use it), which can build a very basic firewall configuration (see/opt/ipf/examples/firewallfor more details).
HP-UX Bastille requires Perl 5.6.1E or higher. (The most recent version of Perl for HP-UX can be found at http://www.software.hp.com/cgi-bin/swdepot_parser.cgi/cgi/displayProductInfo.pl?productNumber=PERL.) Neither Bastille nor Perl requires a reboot to install. Once installed, you can run bastille either interactively (bastille, bastille –x or bastille –c) or non-interactively (bastille –b, InteractiveBastille).
One aspect of Bastille is the file /etc/opt/sec_mgmt/bastille/ipf.customrules, which can form the basis if an IPFilter ruleset for hardening a system. When you run Bastille, it checks whether your DISPLAY environment variable has been set up. If so, you can interact with Bastille in that way. Figure 30-13 is the screen you will see.
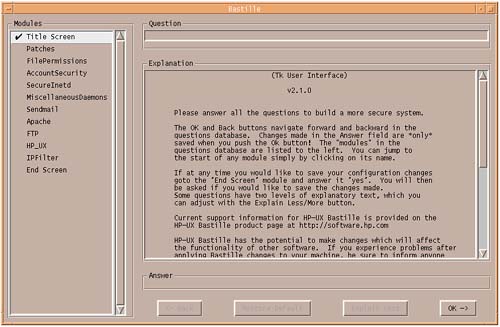
The questions deal with the following issues:
Patches
Set up
cronto runsecurity_patch_checkregularly.You are asked the time of day to set up an appropriate
cronjob.
File Permissions
Set the sticky-bit on world-writeable directories.
Account Security
Set the default
umask.The default chosen by Bastille is 077.
Password protect single-user mode.
Bastille converts your system to a Trusted System in order to achieve this.
Enable auditing of
admin,login, andmoddacevents.Bastille converts your system to a Trusted System in order to achieve this.
Password aging
Maximum number of days a password is valid (default=182, rounded to weeks for non-Trusted Systems).
Minimum number of days between password changes (default=7 rounded to weeks for non-Trusted Systems).
Warning period before a password is changed (default=28 days).
This requires the system to be converted to a Trusted System.
Disallow
rootlogins from any networktty.
SecureInetd
Disable
telnetdservice.Disable
ftp/ftpdservices.Disable
login,shell, andexecservices.Disable
tftpservice.Disable
ntalkservice.Disable
identservice.Disable
daytime,discard,chargen, andechoservices.Disable
timeservice (not NTP).Disable
kshellandkloginservices.Disable
dtspcd,cmsd, andttdbserverservices.Disable
recservservice.Disable
printservice.Create Authorized Use Only message to be displayed at login time: the file
/etc/issue. You can also add an authorized user comment in this message as well.
Miscellaneous Daemons
Sendmail
Disable
sendmailfrom running in daemon mode.Run
sendmailevery 15 minutes to manage the mail queue.Disable the
VRFYandEXPNsendmail commands.
Apache
Run Apache Web server in a
chrootjail.
FTP
Disable system account login via the
WU-FTPDdaemon.
HP-UX
Disable programs executing programs directly from their stack (buffer-overflow problems).
Disable
swagentdfrom allowing read access from remote machines.Set up recommended
nddparameters:ip_forward_directed_broadcasts 1 => 0 ip_forward_src_routed 1 => 0 ip_forwarding 2 => 0 ip_ire_gw_probe 1 => 0 ip_pmtu_strategy 2 => 1 ip_send_redirects 1 => 0 ip_send_source_quench 1 => 0 tcp_conn_request_max 20 => 4096 tcp_syn_rcvd_max500 => 1000
Create a
TODOlist to help run a port scan.Provide more information about other HP tools for protection.
Are you willing to mail your
configfile andTODOlist to HP?
IPFilter
Should Bastille set up a basic
ipf.conffile for basic firewall protection?
Once you have answered the questions in each section of the interface, it will create a configuration file /etc/opt/sec_mgmt/bastille/config:
root@hpeos004[bastille] pwd
/etc/opt/sec_mgmt/bastille
root@hpeos004[bastille] ll
total 440
-rw-------   1 root       sys              0 Oct 17 16:48 .nodisclaimer
-r--r--r--   1 bin        bin         214920 May 21 23:09 Questions.txt
-rw-------   1 root       sys           4674 Oct 17 17:02 config
-r--r--r--   1 bin        bin            814 May 21 23:09 ipf.customrules
-r--r--r--   1 bin        bin            967 May 21 23:09 jail.bind.hpux
-r--r--r--   1 bin        bin            804 May 21 23:09 jail.bind9.hpux
-r--r--r--   1 bin        bin           1625 May 21 23:09 jail.generic.hpux
root@hpeos004[bastille]
root@hpeos004[bastille] more config
# Q:  Enter the maximum number of days between password changes:
AccountSecurity.PASSWORD_MAXDAYS="182"
# Q:  Enter the minimum number of days between password changes.
AccountSecurity.PASSWORD_MINDAYS="7"
# Q:  Enter the number of days a user will be warned that their password will expire.
AccountSecurity.PASSWORD_WARNDAYS="28"
# Q:  Should Bastille disallow root logins from network tty's? [N]
AccountSecurity.create_securetty="N"
# Q:  Do you want to setup password policies?
AccountSecurity.passwordpolicies="Y"
# Q:  Would you like to password protect single-user mode?
AccountSecurity.single_user_password="Y"
# Q:  Do you want basic system security auditing enabled?
AccountSecurity.system_auditing="Y"
# Q:  What umask would you like to set for users on the system? [077]
AccountSecurity.umask="077"
# Q:  Do you want to set the default umask? [Y]
AccountSecurity.umaskyn="Y"
# Q:  Would you like to chroot your Apache Server? [N]
Apache.chrootapache="Y"
# Q:  Would you like to disallow ftpd system account logins?
FTP.ftpusers="Y"
config (21%)
Running bastille –b performs all necessary modifications based on your responses to the questions asked in the interface.
root@hpeos004[bastille] bastille -b
NOTE:    Entering Critical Code Execution.
         Bastille has disabled keyboard interrupts.


NOTE:    Bastille is scanning the system configuration...

Bastille is now locking down your system in accordance with your
answers in the "config" file. Please be patient as some modules
may take a number of minutes, depending on the speed of your machine.

Executing File Permissions Specific Configuration
Executing Account Security Specific Configuration
Executing Inetd Specific Configuration
Executing Daemon Specific Configuration
Executing Sendmail Specific Configuration
Executing Apache Specific Configuration
Executing FTP Specific Configuration
Executing HP-UX's Security Patch Check Configuration
Executing IPFilter Configuration
Executing HP-UX Specific Configuration
WARNING: An attempt to get the network host entry for "hpeos113"
         failed. This may result in denial of access to users and
         agents at this host. Check the spelling of this name, then
         your "/etc/hosts" file, or your "/etc/resolv.conf" file and
         DNS resolver configuration. The nslookup program may be
         helpful in isolating this problem.

Please check
/var/opt/sec_mgmt/bastille/TODO.txt
for further instructions on how to secure your system.

root@hpeos004[bastille]
You should now review the TODO.txt file mentioned above. One important aspect of this is that your system may require a reboot, i.e., if you changed the executable_stack kernel parameter. You should also check the action-log and error-log files:
root@hpeos004[bastille] ll /var/opt/sec_mgmt/bastille/log
total 530
-rw-------   1 root       sys         261255 Oct 17 17:43 action-log
-rw-------   1 root       sys             98 Oct 17 16:54 error-log
root@hpeos004[bastille]
Please be careful when locking down your system. It is designed to make your system impregnable. This means that you may find it difficult to log in as well.
IPFilter and HP-UX Bastille are two new(ish) tools for HP-UX that can go some way to locking down your system. IPFilter in particular should be studied closely. The simple configurations seen here will not suffice in all but a limited, few configurations. The simple configuration supplied by HP-UX Bastille can also be considered only a starting point. The products are not the only solution that HP-UX offers for system and network security. Appendix E contains a copy of the document Building a Bastion Host Using HP-UX 11. This offers some additional excellent ideas for locking down a server. Another good starting point is the web site http://www.hp.com/security.
DMZ: Short for a De-Militarized Zone. It comes from the military term that relates to a buffer zone between two enemies. A DMZ in our context is usually a small network that sits between our trusted (and valuable) corporate network and an untrusted network such as the Internet. The DMZ contains machines acting as proxy servers for resources such as Web, SMTP, FTP, and DNS servers. These servers will be hardened against individual attacks, i.e., bastion hosts. A DMZ offers the administrator a chance to place a choke on traffic going to and coming from connected networks. This choke can be controlled to allow or deny access. The DMZ and associated chokes also provide the opportunity for the administrator to record and log all allowed and denied access attempts.
Firewall: The firewall comes from the construction industry where it is used to describe a physical wall between two areas that is fire-resistant. In a similar way, we can think of a firewall as keeping the fire that is external attackers from gaining access to our networks and servers. Firewalls can be considered conceptually the same as a DMZ.
Bastion host: According to the Oxford Dictionary, a bastion is “a projecting part of a fortification.” In our context, a bastion host is a machine that has been locked down to provide only the absolute minimum service required. A bastion host needs to be monitored for external attacks. We looked at using HP-UX Bastille as a first step in setting up a bastion host. Appendix E contains the PDF file Building a Bastion Host Using HP-UX 11. See this for more details.
Proxy server: A machine located between a client machine and its intended target. For example, a Web proxy would (normally) reside in the DMZ and offer Web browsing services to all clients within the corporate network. Individual clients would be blocked from browsing directly on the Internet but must go via the proxy server. The Web proxy will forward requests to the relevant Internet server and return responses to the client. Only the proxy server has direct access to the Internet.
Kerberos: A secret key based authentication system originally designed and developed at MIT. When a user logs in to the network, he is given a unique key or ticket, which identifies him and the access permissions he has been granted. This ticket can be used to access additional network services that are designed to understand and decipher the ticket. An important concept in Kerberos is a secure server known as the Key Distribution Center (KDC), which is responsible for distributing keys. On HP-UX, we can also use Kerberos as a means of securing basic Internet Services; see man inetsvc_sec for more details. NOTE: Kerberos in Greek mythology is a three-headed dog that guards the gated of the underworld, Haedes. (Why would it be guarding the entrance? Is it a cool place to be? And if so, why don't we all want to go there?) A dog with three heads is going to be efficient, I would think.
VPN: A Virtual Private Network whereby two machines, e.g., a remote user and an in-house server (located in the DMZ), can use the Internet (or some other large network) to transport information securely. Privacy, authentication, and authenticity are ensured by using secure protocols/software, e.g., IPSec.
PGP: Stands for Pretty Good Privacy and was written by Phil Zimmerman. Although it is most commonly thought of in conjunction with email, it is a system that can perform encryption and integrity protection for files. It uses public key encryption systems such as RSA and IDEA. Due to licensing issues and royalty payments for the use of certain crypto-systems, PGP has had a checkered ownership; see http://www.pgpi.org.
VirtualVault: A separate software installation version of HP-UX currently known as 11.04. Many of the features of this implementation of HP-UX 11.04 make up the requirements for a B1-level (Orange Book classification; VVOS includes Mandatory Access Control labels) operating system. Allied with the VirtualVault operating system are various applications components such as Netscape Enterprise Server, Trusted Gateway Agent, Trusted Gateway Proxy, Java Servlet Proxy, and Web QoS. A VirtualVault server need not have a root account.
PAM: The Pluggable Authentication Module. This allows other authentication mechanisms to authenticate users at login time. PAM can support any number of authentication modules including DCE, Kerberos, NTLM, and Radius pluggable authentication modules. At its heart is the /etc/pam.conf configuration file. We saw extensive use of PAM in Chapter 20: Common Internet Filesystems (CIFS/9000).
DCE: The Distributed Computing Environment. DCE is an industry-standard, vendor-neutral set of distributed computing technologies. It provides security services to protect and control access to data, name services that make it easy to find distributed resources, and a highly scalable model for organizing widely scattered users, services, and data. DCE runs on all major computing platforms and is designed to support distributed applications in heterogeneous hardware and software environments. DCE services include Remote Procedure Calls, Security Service, Directory Service, Time Service, Threads Service, and Distributed File Service.
RADIUS: Stands for Remote Authentication Dial-In User Service. It is an authentication and auditing system used by many ISPs. Commonly, you have to supply a username and password to the RADIUS server before gaining access. HP's implementation of RADIUS is known as HP AAA Server (AAA standing for authentication, authorization, and accounting).
SSL: Secure Sockets Layer was developed as a non-proprietary protocol. SSL provides data encryption, client and server authentication, and data integrity for TCP/IP connections. SSL utilizes asymmetric, public key cryptography with X.509 version 3 certificates. Web servers (such as Apache) with SSL enabled can include certificates to authenticate transactions between servers and clients. For more details, see http://wp.netscape.com/eng/ssl3/, http://www.openssl.org, http://www.modssl.org, and http://www.sslreview.com.
tcpwrapper: Originally, tcpwrapper was available only as a third-party freeware addition to HP-UX. HP now offers this software as a free download from http://software.hp.com − Security and Manageability. The idea behind tcpwrapper is to provide a mechanism of controlling and verifying services spawned by inetd. Instead of running the actual service program, inetd will run tpcd, which performs additional security checks before spawning the intended service program. Some people say the inetd has sufficient security on HP-UX with the use of /var/adm/inetd.sec. tcpwrapper does supply additional functionality over and above inetd.sec. Have a look for yourself.
X.509 v3 certificates: X.509 is a popular standard for certificates. An X.509v3 certificate includes the following:
Version, serial number, and identity information
Algorithm-related information
Signature of Certification Authority issuing authority
Subjects public key
An X.509v3 certificate instills confidence in the user that the certificate has been signed by a CA-trusted third party or Certificating Authority. On a user's Web browser, the user will see a closed padlock signifying that the certificate is an X.509v3 certificate. See http://www.ietf.org/html.charters/pkix-charter.html for more details.