In this chapter, we’ll get a feel for the structure of a simple wxWidgets program, using a tiny sample. We’ll look at where and how a wxWidgets application starts and ends, how to show the main window, and how to react to commands from the user. Following the wxWidgets philosophy of keeping things nice and simple, that’s all we’re going to cover in this chapter. You may also want to refer to Appendix A, “Installing wxWidgets.”
Figure 2-1 shows what our sample looks like under Windows.
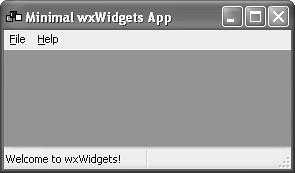
The minimal wxWidgets application shows a main window (a wxFrame) with a menu bar and status bar. The menus allow you to show an “about box” or quit the program. Not exactly a killer app, but it’s enough to show some of the basic principles of wxWidgets—and to reassure you that you can start simple and work your way up to a complete application as your confidence and expertise grow.
Every wxWidgets application defines an application class deriving from wxApp. There is only one instance of it, and this instance represents the running application. At the very least, your class should define an OnInit function that will be called when wxWidgets is ready to start running your code (equivalent to main or WinMain when writing a C or Win32 application).
Here is the smallest application class declaration you can sensibly write:
// Declare the application class
class MyApp : public wxApp
{
public:
// Called on application startup
virtual bool OnInit();
};
The implementation of OnInit usually creates at least one window, interprets any command-line arguments, sets up data for the application, and performs any other initialization tasks required for the application. If the function returns true, wxWidgets starts the event loop that processes user input and runs event handlers as necessary. If the function returns false, wxWidgets will clean up its internal structures, and the application will terminate.
A simple implementation of OnInit might look like this:
bool MyApp::OnInit()
{
// Create the main application window
MyFrame *frame = new MyFrame(wxT("Minimal wxWidgets App"));
// Show it
frame->Show(true);
// Start the event loop
return true;
}
This creates an instance of our new class MyFrame (we’ll define this class shortly), shows it, and returns true to start the event loop. Unlike child windows, top-level windows such as frames and dialogs need to be shown explicitly after creation.
The frame title is passed to the constructor wrapped in the wxT() macro. You’ll see this used a lot in wxWidgets samples and in the library code itself—it converts string and character literals to the appropriate type to allow the application to be compiled in Unicode mode. This macro is also known by the alias _T(). There is no run-time performance penalty for using it. (You’ll also see the underscore macro _() used to enclose strings, which tells wxWidgets to translate the string. See Chapter 16, “Writing International Applications,” for more details.)
Where is the code that creates the instance of MyApp? wxWidgets does this internally, but you still need to tell wxWidgets what kind of object to create. So you need to add a macro in your implementation file:
// Give wxWidgets the means to create a MyApp object
IMPLEMENT_APP(MyApp)
Without specifying the class, wxWidgets would not know how to create a new application object. This macro also inserts code that checks that the application and library were compiled using the same build configuration, allowing wxWidgets to report accidental mismatches that might later cause a hard-to-debug run-time failure.
When wxWidgets creates a MyApp object, it assigns the result to the global variable wxTheApp. You can use this in your application, but it would be more convenient if you didn’t have to cast the wxApp pointer to MyApp. By inserting this macro after your application class declaration:
// Implements MyApp& wxGetApp()
DECLARE_APP(MyApp)
you can then call the function wxGetApp, which returns a reference to the MyApp object.
Let’s look at the frame class MyFrame. A frame is a top-level window that contains other windows, and usually has a title bar and menu bar. Here’s our simple frame class declaration that we will put after the declaration of MyApp:
// Declare our main frame class
class MyFrame : public wxFrame
{
public:
// Constructor
MyFrame(const wxString& title);
// Event handlers
void OnQuit(wxCommandEvent& event);
void OnAbout(wxCommandEvent& event);
private:
// This class handles events
DECLARE_EVENT_TABLE()
};
Our frame class has a constructor, two event handlers to link menu commands to C++ code, and a macro to tell wxWidgets that this class handles events.
As you may have noticed, the event handler functions in MyFrame are not virtual and should not be virtual. How, then, are they called? The answer lies in the event table, as follows.
// Event table for MyFrame
BEGIN_EVENT_TABLE(MyFrame, wxFrame)
EVT_MENU(wxID_ABOUT, MyFrame::OnAbout)
EVT_MENU(wxID_EXIT, MyFrame::OnQuit)
END_EVENT_TABLE()
An event table, placed in a class’s implementation file, tells wxWidgets how events coming from the user or from other sources are routed to member functions.
With the event table shown previously, mouse clicks on menu items with the identifiers wxID_EXIT and wxID_ABOUT are routed to the functions MyFrame::OnQuit and MyFrame::OnAbout, respectively. EVT_MENU is just one of many event table macros you can use to tell wxWidgets what kind of event should be routed to what function. The identifiers used here are predefined by wxWidgets, but you will often define your own identifiers, using enums, consts, or preprocessor defines.
This kind of event table is a static way of routing events, and cannot be changed at runtime. In the next chapter, we’ll describe how to set up dynamic event handlers.
While we’re dealing with event tables, let’s see the two functions we’re using as event handlers.
void MyFrame::OnAbout(wxCommandEvent& event)
{
wxString msg;
msg.Printf(wxT("Hello and welcome to %s"),
wxVERSION_STRING);
wxMessageBox(msg, wxT("About Minimal"),
wxOK | wxICON_INFORMATION, this);
}
void MyFrame::OnQuit(wxCommandEvent& event)
{
// Destroy the frame
Close();
}
MyFrame::OnAbout shows a message box when the user clicks on the About menu item. wxMessageBox takes a message, a caption, a combination of styles, and a parent window.
MyFrame::OnQuit is called when the user clicks on the Quit menu item, thanks to the event table. It calls Close to destroy the frame, triggering the shutdown of the application, because there are no other frames. In fact, Close doesn’t directly destroy the frame—it generates a wxEVT_CLOSE_WINDOW event, and the default handler for this event destroys the frame using wxWindow::Destroy.
There’s another way the frame can be closed and the application shut down—the user can click on the close button on the frame, or select Close from the system (or window manager) menu. How does OnQuit get called in this case? Well, it doesn’t—instead, wxWidgets sends a wxEVT_CLOSE_WINDOW event to the frame via Close (as used in OnQuit). wxWidgets handles this event by default and destroys the window. Your application can override this behavior and provide its own event handler—for example, if you want to ask the user for confirmation before closing. For more details, please see Chapter 4, “Window Basics.”
This sample doesn’t need it, but most applications should provide an OnExit function in its application class to clean up data structures before quitting. Note that this function is only called if OnInit returns true.
Finally, we have the frame constructor, which implements the frame icon, a menu bar, and a status bar.
#include "mondrian.xpm"
MyFrame::MyFrame(const wxString& title)
: wxFrame(NULL, wxID_ANY, title)
{
// Set the frame icon
SetIcon(wxIcon(mondrian_xpm));
// Create a menu bar
wxMenu *fileMenu = new wxMenu;
// The "About" item should be in the help menu
wxMenu *helpMenu = new wxMenu;
helpMenu->Append(wxID_ABOUT, wxT("&About... F1"),
wxT("Show about dialog"));
fileMenu->Append(wxID_EXIT, wxT("E&xit Alt-X"),
wxT("Quit this program"));
// Now append the freshly created menu to the menu bar...
wxMenuBar *menuBar = new wxMenuBar();
menuBar->Append(fileMenu, wxT("&File"));
menuBar->Append(helpMenu, wxT("&Help"));
// ... and attach this menu bar to the frame
SetMenuBar(menuBar);
// Create a status bar just for fun
CreateStatusBar(2);
SetStatusText(wxT("Welcome to wxWidgets!"));
}
This constructor calls the base constructor with the parent window (none, hence NULL), window identifier, and title. The identifier argument is wxID_ANY, which tells wxWidgets to generate an identifier itself. The base constructor creates the actual window associated with the C++ instance—another way to achieve this is to call the default constructor of the base class, and then explicitly call wxFrame::Create from within the MyFrame constructor.
Small bitmaps and icons can be implemented using the XPM format on all platforms. XPM files have valid C++ syntax and so can be included as shown previously; the SetIcon line creates an icon on the stack using the C++ variable mondrian_xpm defined in mondrian.xpm, and associates it with the frame.
The menu bar is created next. Menu items are added using the identifier (such as the standard identifier wxID_ABOUT), the label to be displayed, and a help string to be shown on the status bar. Within each label, a mnemonic letter is marked by a preceding ampersand, and an accelerator is preceded by the tab character ( ). A mnemonic is the letter a user presses to highlight a particular item when the menu is displayed. An accelerator is a key combination (such as Alt+X) that can be used to perform that action without showing the menu at all.
The last thing that the constructor does is to create a status bar with two fields at the bottom of the frame and set the first field to the string “Welcome to wxWidgets!”
It’s worth putting together the bits so you can see what the whole program looks like. Normally, you’d have a separate header file and implementation file, but for such a simple program, we can put it all in the same file.
Listing 2-1 The Complete Example
// Name: minimal.cpp
// Purpose: Minimal wxWidgets sample
// Author: Julian Smart
#include "wx/wx.h"
// Declare the application class
class MyApp : public wxApp
{
public:
// Called on application startup
virtual bool OnInit();
};
// Declare our main frame class
class MyFrame : public wxFrame
{
public:
// Constructor
MyFrame(const wxString& title);
// Event handlers
void OnQuit(wxCommandEvent& event);
void OnAbout(wxCommandEvent& event);
private:
// This class handles events
DECLARE_EVENT_TABLE()
};
// Implements MyApp& GetApp()
DECLARE_APP(MyApp)
// Give wxWidgets the means to create a MyApp object
IMPLEMENT_APP(MyApp)
// Initialize the application
bool MyApp::OnInit()
{
// Create the main application window
MyFrame *frame = new MyFrame(wxT("Minimal wxWidgets App"));
// Show it
frame->Show(true);
// Start the event loop
return true;
}
// Event table for MyFrame
BEGIN_EVENT_TABLE(MyFrame, wxFrame)
EVT_MENU(wxID_ABOUT, MyFrame::OnAbout)
EVT_MENU(wxID_EXIT, MyFrame::OnQuit)
END_EVENT_TABLE()
void MyFrame::OnAbout(wxCommandEvent& event)
{
wxString msg;
msg.Printf(wxT("Hello and welcome to %s"),
wxVERSION_STRING);
wxMessageBox(msg, wxT("About Minimal"),
wxOK | wxICON_INFORMATION, this);
}
void MyFrame::OnQuit(wxCommandEvent& event)
{
// Destroy the frame
Close();
}
#include "mondrian.xpm"
MyFrame::MyFrame(const wxString& title)
: wxFrame(NULL, wxID_ANY, title)
{
// Set the frame icon
SetIcon(wxIcon(mondrian_xpm));
// Create a menu bar
wxMenu *fileMenu = new wxMenu;
// The "About" item should be in the help menu
wxMenu *helpMenu = new wxMenu;
helpMenu->Append(wxID_ABOUT, wxT("&About... F1"),
wxT("Show about dialog"));
fileMenu->Append(wxID_EXIT, wxT("E&xit Alt-X"),
wxT("Quit this program"));
// Now append the freshly created menu to the menu bar...
wxMenuBar *menuBar = new wxMenuBar();
menuBar->Append(fileMenu, wxT("&File"));
menuBar->Append(helpMenu, wxT("&Help"));
// ... and attach this menu bar to the frame
SetMenuBar(menuBar);
// Create a status bar just for fun
CreateStatusBar(2);
SetStatusText(wxT("Welcome to wxWidgets!"));
}
The sample can be found on the accompanying CD-ROM in examples/chap02, which you should copy to a folder on your hard drive for compiling. Because it’s not possible to provide makefiles that work “out of the box” with every reader’s software environment, we provide a DialogBlocks project file with configurations for most platforms and compilers. See Appendix C, “Creating Applications with DialogBlocks,” for help with configuring DialogBlocks for your compiler. We also cover compiling wxWidgets applications in detail in Appendix B, “Building Your Own wxWidgets Applications.”
Install wxWidgets and DialogBlocks from the accompanying CD-ROM. On Windows, you should install one or more of the compilers provided on the CD-ROM if you do not already own a suitable compiler. After setting your wxWidgets and compiler paths in the DialogBlocks Paths settings page, open the file examples/chap02/minimal.pjd. Select a suitable configuration for your compiler and platform such as MinGW Debug or VC++ Debug (Windows), GCC Debug GTK+ (Linux), or GCC Debug Mac (Mac OS X), and press the green Build and Run Project button. You may be prompted to build wxWidgets if you have not already built it for the selected configuration.
You can also find a similar sample in samples/minimal in your wxWidgets distribution. If you do not wish to use DialogBlocks, you can simply compile this sample instead. See Appendix A, “Installing wxWidgets,” for instructions on how to build wxWidgets samples.
This is how the application starts running:
1. Depending on platform, the main, WinMain, or equivalent function runs (supplied by wxWidgets, not the application). wxWidgets initializes its internal data structures and creates an instance of MyApp.
2. wxWidgets calls MyApp::OnInit, which creates an instance of MyFrame.
3. The MyFrame constructor creates the window via the wxFrame constructor and adds an icon, menu bar, and status bar.
4. MyApp::OnInit shows the frame and returns true.
5. wxWidgets starts the event loop, waiting for events and dispatching them to the appropriate handlers.
As noted here, the application terminates when the frame is closed, when the user either selects the Quit menu item or closes the frame via standard buttons or menus (these will differ from one platform to the next).
This chapter gave you an idea of how a really simple wxWidgets application works. We’ve touched on the wxFrame class, event handling, application initialization, and creating a menu bar and status bar. However complicated your own code gets, the basic principles of starting the application will remain the same, as we’ve shown in this small example. In the next chapter, we’ll take a closer look at events and how your application handles them.