Chapter 8 Using Standard Dialogs
This chapter describes the set of standard dialogs that wxWidgets provides for displaying information or getting data from users with just a few lines of code. Becoming familiar with the available standard dialogs is going to save you a lot of coding time, and it will help give your applications a professional feel. Where possible, wxWidgets uses the native dialogs implemented by each windowing system, but some, such as wxTextEntryDialog, are implemented in wxWidgets itself, and these are referred to as “generic” dialogs. In this chapter, we will show pictures of dialogs on more than one platform where there are significant visual differences.
We will divide the dialogs into the categories Informative Dialogs, File and Directory Dialogs, Choice and Selection Dialogs, and Entry Dialogs.
In this section, we’ll look at dialogs that present information: wxMessageDialog, wxProgressDialog, wxBusyInfo, and wxShowTip.
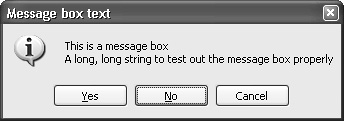
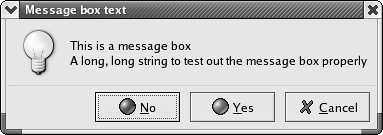
This dialog shows a message plus buttons that can be chosen from OK, Cancel, Yes, and No. An optional icon can be shown, such as an exclamation mark or question mark. The message text can contain newlines (“
”).
The return value of wxMessageDialog::ShowModal indicates which button the user pressed.
Figure 8-1 shows how the dialog looks under Windows, Figure 8-2 shows it under GTK+, and Figure 8-3 is the same dialog on Mac OS X.

To create this dialog, pass a parent window, message, and optional caption, style, and position. Then call ShowModal to display the window, and test the returned value.
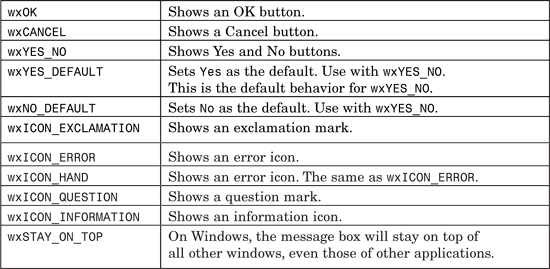
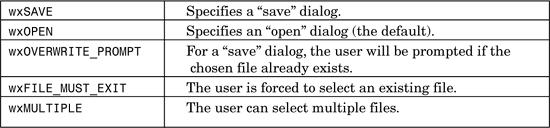
The style is a bit-list of the values shown in Table 8-1.
Here’s an example of using wxMessageDialog:
#include "wx/msgdlg.h"
wxMessageDialog dialog( NULL, wxT("Message box caption"),
wxT("Message box text"),
wxNO_DEFAULT¦wxYES_NO¦wxCANCEL¦wxICON_INFORMATION);
switch ( dialog.ShowModal( ) )
{
case wxID_YES:
wxLogStatus(wxT("You pressed "Yes""));
break;
case wxID_NO:
wxLogStatus(wxT("You pressed "No""));
break;
case wxID_CANCEL:
wxLogStatus(wxT("You pressed "Cancel""));
break;
default:
wxLogError(wxT("Unexpected wxMessageDialog return code!"));
}
You can also use the convenience function wxMessageBox, which takes a message string, caption string, style, and parent window. For example:
if (wxYES == wxMessageBox(wxT("Message box text"),
wxT("Message box caption"),
wxNO_DEFAULT¦wxYES_NO¦wxCANCEL¦wxICON_INFORMATION,
parent))
{
return true;
}
Be aware that wxMessageBox returns values that are different from those returned by wxMessageDialog::ShowModal. wxMessageBox returns wxOK, wxCANCEL, wxYES, and wxNO, whereas wxMessageDialog::ShowModal returns wxID_OK, wxID_CANCEL, wxID_YES, and wxID_NO.
wxProgressDialog shows a short message and a progress bar representing how long the user has to wait. It can display a Cancel button to abort the task in progress, and it can also display elapsed time, estimated total time, and remaining time. This dialog is implemented by wxWidgets on all platforms. Figure 8-4 shows wxProgressDialog under Windows.
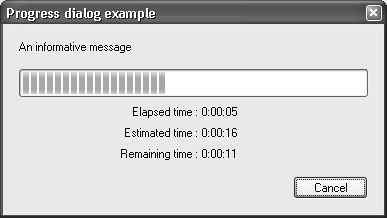
You can create the dialog object on the stack or dynamically. Pass the following parameters: a caption string, a message string to be displayed above the progress bar, the maximum value for the progress bar, a parent window, and a style.
The style is a bit-list of the values listed in Table 8-2.

After dialog creation, the program flow continues, but the parent window is disabled for input. If wxPD_APP_MODAL is specified, then all other windows in the application are disabled as well. The application should call Update with a value (between zero and the maximum specified in the constructor) and, optionally, a new message to display in the dialog. If specified, the elapsed, estimated, and remaining times are all calculated automatically by the dialog.
If wxPD_AUTO_HIDE is specified, the progress dialog will be hidden (but not destroyed) as soon as the maximum value has been passed to Update. The application should destroy the dialog. You can call Resume if you need to resume an aborted progress dialog.
Here’s an example of using the progress dialog:
#include "wx/progdlg.h"
void MyFrame::ShowProgress( )
{
static const int max = 10;
wxProgressDialog dialog(wxT("Progress dialog example"),
wxT("An informative message"),
max, // range
this, // parent
wxPD_CAN_ABORT ¦
wxPD_APP_MODAL ¦
wxPD_ELAPSED_TIME ¦
wxPD_ESTIMATED_TIME ¦
wxPD_REMAINING_TIME);
bool cont = true;
for ( int i = 0; i <= max; i++ )
{
wxSleep(1);
if ( i == max )
cont = dialog.Update(i, wxT("That’s all, folks!"));
else if ( i == max / 2 )
cont = dialog.Update(i, wxT("Only a half left (very![]() long message)!"));
long message)!"));
else
cont = dialog.Update(i);
if ( !cont )
{
if ( wxMessageBox(wxT("Do you really want to cancel?"),
wxT("Progress dialog question"),
wxYES_NO ¦ wxICON_QUESTION) == wxYES )
break;
dialog.Resume( );
}
}
if ( !cont )
wxLogStatus(wxT("Progress dialog aborted!"));
else
wxLogStatus(wxT("Countdown from %d finished"), max);
}
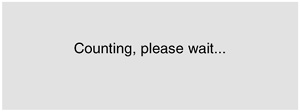
wxBusyInfo isn’t actually a dialog—it’s derived from wxObject—but it behaves in a similar way. It shows a window displaying a message for as long as the object exists, and it is useful for asking the user to wait while the application is working on something. On Windows, it looks like the window in Figure 8-5.
Create a wxBusyInfo object on the stack or dynamically, passing a message and a window parent.
Here’s an example of using wxBusyInfo, first using wxWindowDisabler to disable all windows currently open in the application.
#include "wx/busyinfo.h"
wxWindowDisabler disableAll;
wxBusyInfo info(wxT("Counting, please wait..."), parent);
for (int i = 0; i < 1000; i++)
{
DoCalculation( );
}
Many applications show a tip on startup to give you extra insights into using the application. Tips can be a good way to learn an application in small, easily digested doses, especially for users who find it tedious to read documentation.
The startup tip dialog under Windows is shown in Figure 8-6.
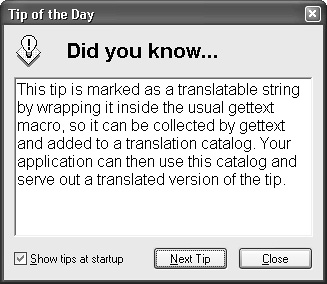
Unlike most of the standard dialogs, startup tips are shown by calling a function: wxShowTip. Pass a parent window, a pointer to a wxTipProvider object, and optionally a boolean value specifying whether to show the Show Tips at Startup check box. The return value is the value of this check box.
You must derive a new class from wxTipProvider and override the GetTip function to return a wxString containing the tip. Fortunately, wxWidgets provides an implementation already: wxCreateFileTipProvider, which takes the name of a file of tips (one per line) and an index into the tips.
The application is responsible for deleting the wxTipProvider object when it is no longer needed.
Here’s a function that shows a startup tip using the standard tip provider:
#include "wx/tipdlg.h"
void MyFrame::ShowTip( )
{
static size_t s_index = (size_t)-1;
if ( s_index == (size_t)-1 )
{
// randomize...
srand(time(NULL));
// ...and pick a new tip
s_index = rand( ) % 5;
}
// pass a tips file and tip index
wxTipProvider *tipProvider =
wxCreateFileTipProvider(wxT("tips.txt"), s_index);
m_showAtStartup = wxShowTip(this, tipProvider, true);
delete tipProvider;
}
There are two dialogs you can use to get file and directory information from the user: wxFileDialog and wxDirDialog.
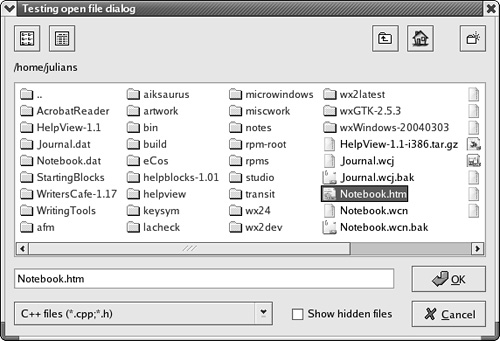
wxFileDialog can handle the selection of one file or several files, and it has variants for opening and saving files.
Figure 8-7 shows the file dialog under Windows.
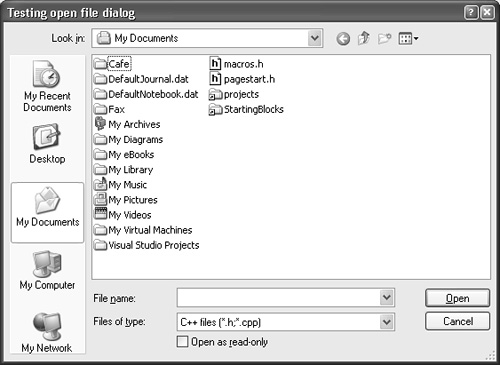
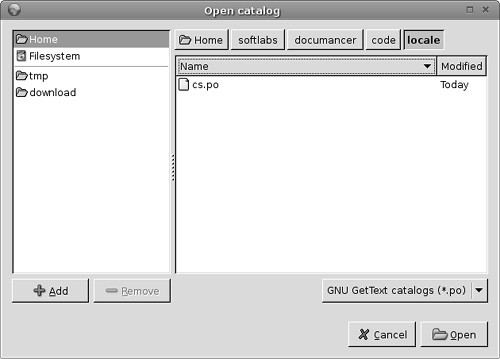
Figure 8-8 and Figure 8-9 show the file dialog under Linux using GTK+ versions 1 and 2, respectively.
The file dialog appearance under Mac OS X is shown in Figure 8-10.

To create a wxFileDialog, pass a parent window, a message to display in the dialog caption, a default directory, a default file name, a wildcard, the dialog style, and a position (ignored on some platforms). Call ShowModal and test for a wxID_OK return value, which is returned if the user confirms a selection.
Directory and file name are distinct elements of a full path name. If the directory is empty, the current directory will be used. If the file name is empty, no default file name will be supplied.
The wildcard determines what files are displayed in the file selector. The wildcard may be a specification for multiple types of file with a description for each, such as
"BMP files (*.bmp)¦*.bmp¦GIF files (*.gif)¦*.gif"
Typing a file name containing wildcards (“*”, “?”) in the file name text item and clicking on OK will result in only those files matching the pattern being displayed.
The wxFileDialog functions are as follows.
GetDirectory returns the default directory or the directory component of the selected file for a single-selection file dialog. Use SetDirectory to specify the default directory.
GetFilename returns the default file name (without the directory) or the selected file name for a single-selection file dialog. Use SetFilename to set the default file name.
GetFilenames returns a wxArrayString of the file names of all selections in a multiple-selection dialog. Generally, these file names do not include the directory, but under Windows, if any shortcuts are selected, the file names do include directories. This is because the application cannot determine the full path of each referenced file by appending the file name to the selected directory. Use GetPaths if you want to get an array of the selections including their directories.
GetFilterIndex returns a zero-based index of the default or selected filter. Filters are usually displayed in a drop-down list under the list of files. Use SetFilterIndex to set the default index to be displayed when the dialog is shown.
GetMessage returns the dialog caption. Use SetMessage to set the caption.
GetPath returns the full path (directory and file name) of the file selected by the user or the default path. Use SetPath to set the default path. For a multiple-selection dialog, use GetPaths to get a wxArrayString of all selections including their directories.
GetWildcard returns the wildcard specification, and SetWildcard sets it.
Here’s an example of using wxFileDialog to open a single BMP or GIF file:
#include "wx/filedlg.h"
wxString caption = wxT("Choose a file");
wxString wildcard =
wxT("BMP files (*.bmp)¦*.bmp¦GIF files (*.gif)¦*.gif");
wxString defaultDir = wxT("c:\temp"));
wxString defaultFilename = wxEmptyString;
wxFileDialog dialog(parent, caption, defaultDir, defaultFilename,
wildcard, wxOPEN);
if (dialog.ShowModal( ) == wxID_OK)
{
wxString path = dialog.GetPath( );
int filterIndex = dialog.GetFilterIndex( );
}
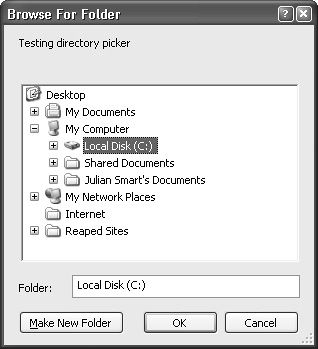
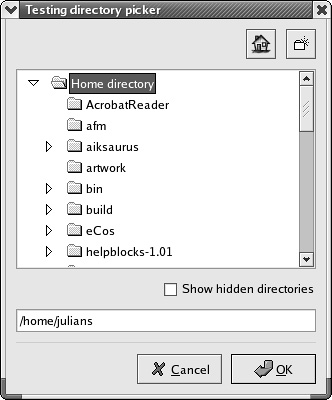
wxDirDialog allows the user to choose a local or network directory (folder). Optionally, it can allow the user to create a new directory if the wxDD_NEW_DIR_BUTTON style is passed to the constructor.
Figure 8-11 shows wxDirDialog under Windows, where Windows supplies the dialog. The generic version of wxDirDialog is used for GTK+ on Linux, as Figure 8-12 shows.
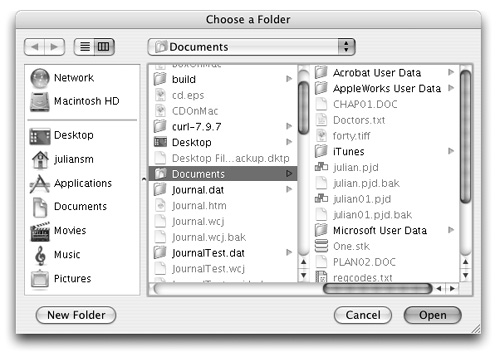
wxDirDialog on Mac OS X (Figure 8-13) looks very much like the file dialog.
To create the directory dialog, pass a parent window, a message to show on the dialog, a default directory, a window style, a position, and a size (these last two may be ignored, depending on implementation). Call ShowModal and test for a wxID_OK return value, which indicates that the user confirmed a directory selection.
The functions for this dialog are described in the following.
SetPath and GetPath are accessors for the default or user-selected directory.
SetMessage sets the message that appears on the dialog, and GetMessage returns the current value.
Using wxDirDialog is easy, as this example shows:
#include "wx/dirdlg.h"
wxString defaultPath = wxT("/");
wxDirDialog dialog(parent,
wxT("Testing directory picker"),
defaultPath, wxDD_NEW_DIR_BUTTON);
if (dialog.ShowModal( ) == wxID_OK)
{
wxString path = dialog.GetPath( );
wxMessageBox(path);
}
In this section, we look at dialogs for getting choices and selections from the user: wxColourDialog, wxFontDialog, wxSingleChoiceDialog, and wxMultiChoiceDialog.
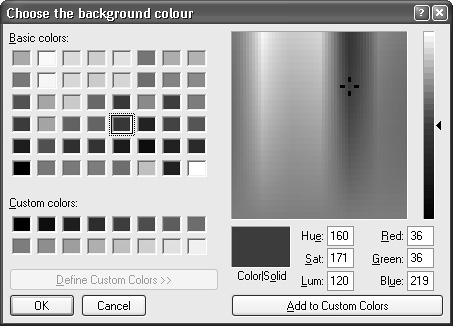
This dialog allows the user to pick from a standard set or a full range of colors.
Under Windows, the native color selector dialog is used. This dialog contains three main regions: at the top left, a palette of 48 commonly used colors is shown. Below this, there is a palette of 16 custom colors, which can be set by the application. Additionally, the user may add to the custom color palette by expanding the dialog box and choosing a precise color from the color selector panel on the right. Figure 8-14 shows the color selector under Windows in full selection mode.
The generic color dialog, shown in Figure 8-15 under GTK+ 1 and X11, shows palettes of 48 standard and 16 custom colors, with the area on the right containing three sliders for the user to select a color from red, green, and blue components. This color may be added to the custom color palette, and it will replace either the currently selected custom color or the first one in the palette if none is selected. The RGB color sliders are not optional in the generic color selector. The generic color selector is also available under Windows and other platforms; use the name wxGenericColourDialog.
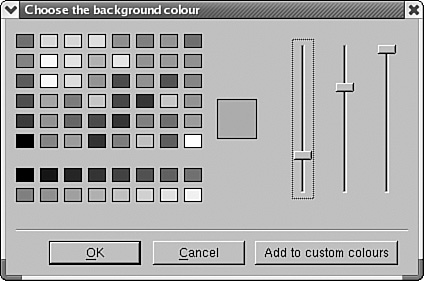
Figure 8-16 shows the native color dialog under GTK+.
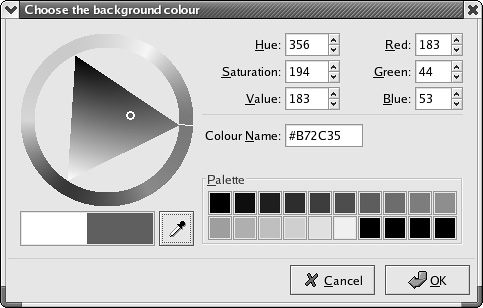
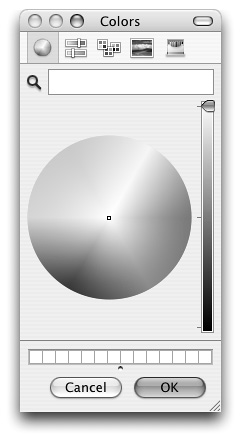
Figure 8-17 shows Mac OS X’s color dialog, which offers yet another way of getting a color from the user.
To use this dialog, create a wxColourDialog object (dynamically allocated or on the stack) and pass it a parent window and a pointer to a wxColourData object. The information in wxColourData will be copied to the dialog to set some defaults. Call ShowModal to enter the modal loop, and when control is returned to your code, you can retrieve the user-modified data by calling GetColourData.
wxColourData has the following functions.
SetChooseFull specifies that the color dialog should show the full selection of colors; otherwise only a subset will be shown. This currently works only under Windows. GetChooseFull retrieves the value of this boolean.
SetColour sets the default color to show in the color selector, and GetColour retrieves the color that the user has chosen.
SetCustomColour takes a zero-based index (maximum 15) and a wxColour object and sets one of the 16 custom colors. Use GetCustomColour to retrieve the custom colors, which may have changed if the user has added to the custom colors from within the color selector.
Here is an example of using wxColourDialog. The code sets various parameters of a wxColourData object, including a gray scale for the custom colors. If the user did not cancel the dialog, the application retrieves the selected color and uses it to set the background of a window.
#include "wx/colordlg.h"
wxColourData data;
data.SetChooseFull(true);
for (int i = 0; i < 16; i++)
{
wxColour color(i*16, i*16, i*16);
data.SetCustomColour(i, color);
}
wxColourDialog dialog(this, &data);
if (dialog.ShowModal( ) == wxID_OK)
{
wxColourData retData = dialog.GetColourData( );
wxColour col = retData.GetColour( );
myWindow->SetBackgroundColour(col);
myWindow->Refresh( );
}
wxFontDialog allows the user to provide font and, on some platforms, font color selections.
Under Windows, the native font selector standard dialog is used. This presents a dialog box with controls for font name, point size, style, weight, underlining, strikeout, and text foreground color. A sample of the font is shown on a white area of the dialog box. Note that in the translation from full Windows fonts to wxWidgets font conventions, strikeout is ignored, and a font family (such as Swiss or Modern) is deduced from the actual font name (such as Arial or Courier). Under GTK+, the GTK+ standard font selector is used, which does not allow color selection.
Figure 8-18 shows how the font dialog looks under Windows.

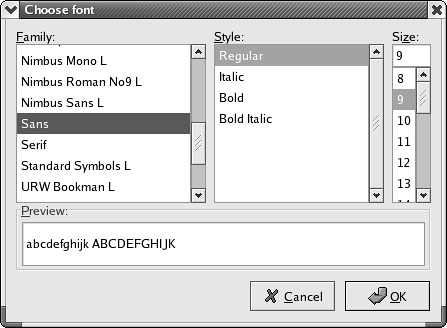
Figure 8-19 shows the native font dialog under GTK+.
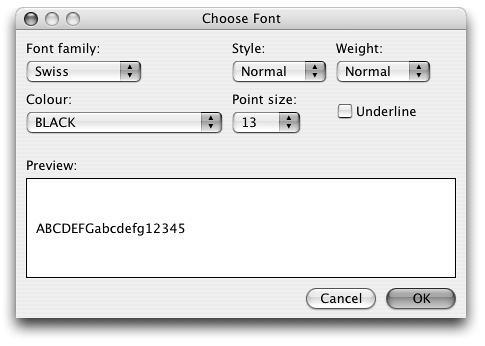
Under platforms other than Windows and GTK+, the font selector is simpler: see Figure 8-20 for a view of the generic dialog on Mac OS X. Controls for font family, point size, style, weight, underlining, and text foreground color are provided, and a sample is shown upon a white background. The generic font selector is available on all platforms; use the name wxGenericFontDialog.
To use wxFontDialog, create an object dynamically or on the stack and pass a parent window and a wxFontData object. Call ShowModal and test for a wxID_OK return value. Then retrieve the wxFontData from the dialog and call GetChosenFont and GetChosenColour as required.
wxFontData has the following functions.
EnableEffects enables controls for manipulating color and underline properties under Windows or on the generic dialog (no effect on GTK+). GetEnableEffects returns the current boolean value of this setting. Note that even if effects are disabled, the font color will be preserved.
SetAllowSymbols allows the selection of symbol fonts (Windows only), and GetAllowSymbols returns the current boolean value of this setting.
SetColour sets the default font color, and GetColour retrieves the font color selected by the user.
SetInitialFont sets the default font that will be selected when the dialog is first opened. GetChosenFont retrieves the wxFont selected by the user.
SetShowHelp can be called to indicate that the help button should be displayed (under Windows only). Use GetShowHelp to return the value of this setting.
Call SetRange with the minimum and maximum point size that the user can select; the default (0, 0) indicates that any point size can be selected. This has an effect on Windows only.
In this fragment, the application uses the returned font and color for drawing text on a window.
#include "wx/fontdlg.h"
wxFontData data;
data.SetInitialFont(m_font);
data.SetColour(m_textColor);
wxFontDialog dialog(this, &data);
if (dialog.ShowModal( ) == wxID_OK)
{
wxFontData retData = dialog.GetFontData( );
m_font = retData.GetChosenFont( );
m_textColor = retData.GetColour( );
// Update the window to reflect the new font and color
myWindow->Refresh( );
}
wxSingleChoiceDialog presents the user with a list of strings and allows the user to select one. It looks like the dialog in Figure 8-21.
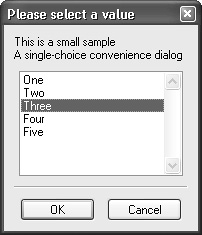
Pass to the dialog constructor the parent window, a message to show on the dialog, the dialog caption, and a wxArrayString for the strings to appear in the list. You can also pass an array size and a C array of strings (wxChar**) instead of passing a wxArrayString.
You can use SetSelection to set the default selection before showing the dialog; after the dialog has been dismissed, query the user’s choice with GetSelection (to return the index) or GetStringSelection (to return the string).
You also can pass an array of char* client data to the dialog’s constructor; when the dialog is dismissed, GetSelectionClientData will return the char* client data corresponding to the user selection.
Here’s some code to show how wxSingleChoiceDialog is used.
#include "wx/choicdlg.h"
const wxArrayString choices;
choices.Add(wxT("One"));
choices.Add(wxT("Two"));
choices.Add(wxT("Three"));
choices.Add(wxT("Four"));
choices.Add(wxT("Five"));
wxSingleChoiceDialog dialog(this,
wxT("This is a small sample
A single-choice
![]() convenience dialog"),
convenience dialog"),
wxT("Please select a value"),
choices);
dialog.SetSelection(2);
if (dialog.ShowModal( ) == wxID_OK)
wxMessageBox(dialog.GetStringSelection( ), wxT("Got string"));
wxMultiChoiceDialog is similar to wxSingleChoiceDialog, presenting the user with a list of strings, but it allows the user to select zero or more. This dialog is illustrated in Figure 8-22.
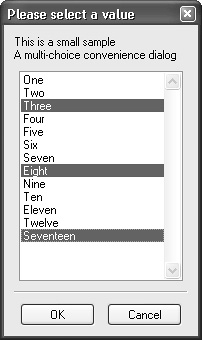
Pass to the dialog constructor the parent window, a message to show on the dialog, the dialog caption, and a wxArrayString array of strings. As with wxSingleChoiceDialog, you may pass an array size and wxChar** array instead of the wxArrayString argument. Unlike wxSingleChoiceDialog, no client data may be passed to the constructor.
To set the default selections, call SetSelections passing a wxArrayInt where each element specifies an index in the passed array of strings. Query the user’s choice with GetSelections to return a wxArrayInt of indices specifying the user’s selections.
Here’s how you use a wxMultiChoiceDialog.
#include "wx/choicdlg.h"
const wxArrayString choices;
choices.Add(wxT("One"));
choices.Add(wxT("Two"));
choices.Add(wxT("Three"));
choices.Add(wxT("Four"));
choices.Add(wxT("Five"));
wxMultiChoiceDialog dialog(this,
wxT("A multi-choice
![]() convenience dialog"),
convenience dialog"),
wxT("Please select several values"),
choices);
if (dialog.ShowModal( ) == wxID_OK)
{
wxArrayInt selections = dialog.GetSelections( );
wxString msg;
msg.Printf(wxT("You selected %u items:
"),
selections.GetCount( ));
for ( size_t n = 0; n < selections.GetCount( ); n++ )
{
msg += wxString::Format(wxT(" %d: %d (%s)
"),
n, selections[n],
choices[selections[n]].c_str( ));
}
wxMessageBox(msg, wxT("Got selections"));
}
These dialogs ask you to type in information. They include wxNumberEntryDialog, wxTextEntryDialog, wxPasswordEntryDialog, and wxFindReplaceDialog.
wxNumberEntryDialog prompts the user for an integer within a given range. The dialog shows a spin control so that the number can be entered directly or by clicking on the up and down arrows. This dialog is implemented by wxWidgets, so it has the same functionality on all platforms.
Create a wxNumberEntryDialog passing a parent window, message text, prompt text (that will precede the spin control), caption, default value, minimum value, maximum value, and position. Then call ShowDialog and, if wxID_OK is returned, retrieve the number using GetValue.
Figure 8-23 shows what the dialog looks like under Windows.
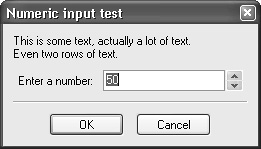
Figure 8-23 was created using the following code:
#include "wx/numdlg.h"
wxNumberEntryDialog dialog(parent,
wxT("This is some text, actually a lot of text
Even two rows of![]() text"),
text"),
wxT("Enter a number:"), wxT("Numeric input test"), 50, 0, 100);
if (dialog.ShowModal( ) == wxID_OK)
{
long value = dialog.GetValue( );
}
wxTextEntryDialog and wxPasswordEntryDialog present the user with a single-line text control and a message. They function identically except that the letters typed into a wxPasswordEntryDialog are masked so that they cannot be read. Figure 8-24 shows a wxTextEntryDialog under Windows.
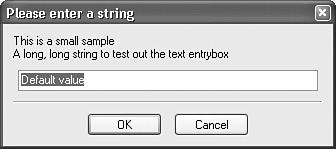
Pass a parent window, message, caption, default value, and style to the constructor. The style can be a bit-list of wxOK, wxCANCEL, and wxCENTRE (or wxCENTER), and you can also pass wxTextCtrl styles such as wxTE_CENTRE (or wxTE_CENTER).
You can set the default string separately with SetValue, and GetValue returns the text entered by the user.
Figure 8-24 was created using this code:
#include "wx/textdlg.h"
wxTextEntryDialog dialog(this,
wxT("This is a small sample
")
wxT("A long, long string to test out the
![]() text entrybox"),
text entrybox"),
wxT("Please enter a string"),
wxT("Default value"),
wxOK ¦ wxCANCEL);
if (dialog.ShowModal( ) == wxID_OK)
wxMessageBox(dialog.GetValue( ), wxT("Got string"));
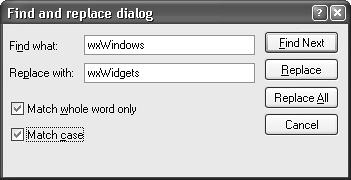
wxFindReplaceDialog is a modeless dialog that allows the user to search for some text and replace it with something else, if desired. The actual searching must be done in a derived class or a parent window, responding to events generated by the dialog’s buttons. Unlike most standard dialogs, this one must have a parent window. This dialog cannot be used modally; it is always, by design and implementation, modeless.
The Windows Find and Replace dialog is shown in Figure 8-25.
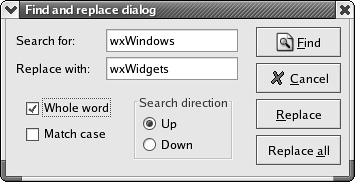
On other platforms, such as GTK+ and Mac OS X, wxWidgets uses the generic version of the dialog, as shown in Figure 8-26.
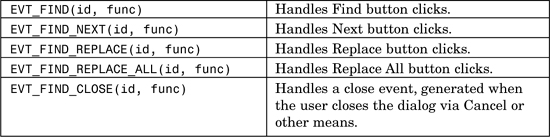
wxFindReplaceDialog sends command events when the user clicks on controls in the dialog. Event handlers take a wxFindDialogEvent argument, and the event table macros take the dialog identifier and handler function, as listed in Table 8-4.
wxFindDialogEvent has the following functions.
GetFlags returns flags for the current selections on the dialog. The value is a bit-list of wxFR_DOWN, wxFR_WHOLEWORD, and wxFR_MATCHCASE.
GetFindString returns the string the user entered as the text to find.
GetReplaceString returns the string the user entered as the text to use as the replacement.
GetDialog returns a pointer to the wxFindReplaceDialog that generated the event.
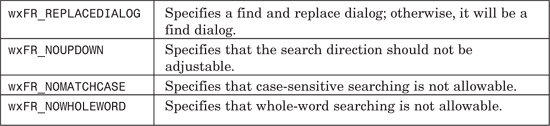
To create a wxFindReplaceDialog, pass a window parent, a pointer to a wxFindReplaceData object, a dialog caption, and a style, which is a bit-list of values shown in Table 8-5.
wxFindReplaceData holds the data for wxFindReplaceDialog. It is used to initialize the dialog with the default values and will keep the last values from the dialog when it is closed. It is also updated each time a wxFindDialogEvent is generated, so instead of using the wxFindDialogEvent methods, you can also directly query this object. Use the dialog’s GetData function to return a pointer to the data you passed to the dialog constructor.
These are the functions for setting and accessing data in wxFindReplaceData. Note that the setters may only be called before showing the dialog, and calling them has no effect later.
GetFindString and SetFindString are accessors for the search string, provided by the application or entered by the user.
GetFlags and SetFlags are accessors for the flags specifying the state of the find dialog (refer to Table 8-5).
GetReplaceString and SetReplaceString are accessors for the replace string, provided by the application or entered by the user.
The following shows an example fragment of wxFindReplaceDialog usage, employing hypothetical DoFind and DoReplace functions to do the actual search and replace for the application. These functions would maintain application-dependent variables in the dialog class, storing the last position that was searched, so that each time the functions are called, the next match can be found. The functions will also change the document view and highlight the match.
#include "wx/fdrepdlg.h"
BEGIN_EVENT_TABLE(MyFrame, wxFrame)
EVT_MENU(ID_REPLACE, MyFrame::ShowReplaceDialog)
EVT_FIND(wxID_ANY, MyFrame::OnFind)
EVT_FIND_NEXT(wxID_ANY, MyFrame::OnFind)
EVT_FIND_REPLACE(wxID_ANY, MyFrame::OnReplace)
EVT_FIND_REPLACE_ALL(wxID_ANY, MyFrame::OnReplaceAll)
EVT_FIND_CLOSE(wxID_ANY, MyFrame::OnFindClose)
END_EVENT_TABLE( )
void MyFrame::ShowReplaceDialog( wxCommandEvent& event )
{
if ( m_dlgReplace )
{
delete m_dlgReplace;
m_dlgReplace = NULL;
}
else
{
m_dlgReplace = new wxFindReplaceDialog
(
this,
&m_findData,
wxT("Find and replace dialog"),
wxFR_REPLACEDIALOG
);
m_dlgReplace->Show(true);
}
}
void MyFrame::OnFind(wxFindDialogEvent& event)
{
if (!DoFind(event.GetFindString( ), event.GetFlags( )))
{
wxMessageBox(wxT("No more matches."));
}
}
void MyFrame::OnReplace(wxFindDialogEvent& event)
{
if (!DoReplace(event.GetFindString( ), event.GetReplaceString( ),
event.GetFlags( ), REPLACE_THIS))
{
wxMessageBox(wxT("No more matches."));
}
}
void MyFrame::OnReplaceAll(wxFindDialogEvent& event)
{
if (DoReplace(event.GetFindString( ), event.GetReplaceString( ),
event.GetFlags( ), REPLACE_ALL))
{
wxMessageBox(wxT("Replacements made."));
}
else
{
wxMessageBox(wxT("No replacements made."));
}
}
void MyFrame::OnFindClose(wxFindDialogEvent& event)
{
m_dlgReplace->Destroy( );
m_dlgReplace = NULL;
}
You use wxPageSetupDialog and wxPrintDialog in applications that print documents. If you use the printing framework (including wxPrintout, wxPrinter, and other classes), you won’t need to invoke these dialogs explicitly in your code. For more on printing, refer to Chapter 5, “Drawing and Printing.”
wxPageSetupDialog contains controls for paper size such as A4 and letter, orientation (landscape or portrait), and controls for setting left, top, right, and bottom margin sizes in millimeters. The user can also set printer-specific options by invoking a further dialog from this one.
Figure 8-27 shows the wxPageSetupDialog dialog under Windows.
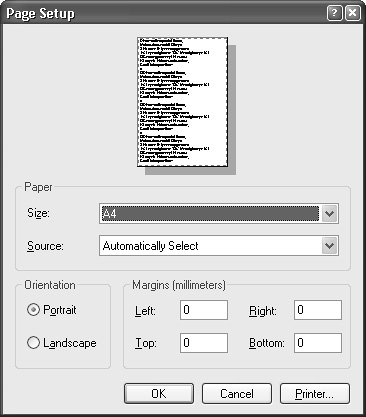
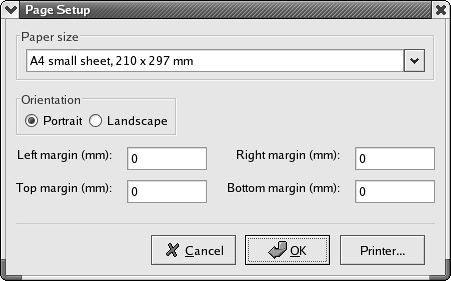
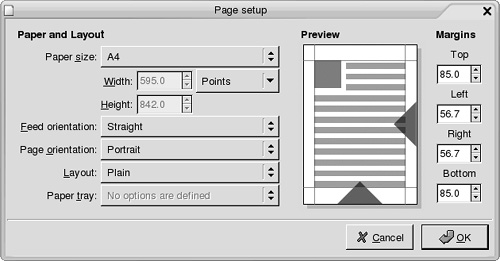
Figure 8-28 shows wxPageSetupDialog using the generic implementation under GTK+. If the GNOME printing libraries are installed, wxWidgets will instead use a native GNOME page setup dialog, as shown in Figure 8-29.
The Mac OS X version of wxPageSetupDialog is shown in Figure 8-30.

To use this dialog, pass to the constructor a parent window and a pointer to a wxPageSetupDialogData object, which contains settings to pass to and retrieve from the dialog. You can create the dialog on the stack or dynamically. The page setup data will be copied to the dialog’s own data; use GetPageSetupData to return a reference to the dialog’s data.
wxPageSetupDialogData has the following functions.
Ok returns true if the print data associated with the object is valid. This can return false on Windows if the current printer is not set, for example. On all other platforms, it returns true.
SetMarginTopLeft takes a wxPoint object and sets the left and top margins in millimeters. Call GetMarginTopLeft to retrieve this value.
SetMarginBottomRight takes a wxPoint object and sets the bottom and right margins in millimeters. Call GetMarginBottomRight to retrieve this value.
SetPaperId sets the paper identifier to select the current paper size, instead of using SetPaperSize. See the documentation for this function for the symbols that are available. GetPaperId retrieves the paper identifier.
SetPaperSize takes a wxSize object and sets the paper size in millimeters. Use GetPaperSize to retrieve the current paper size.
EnableMargins enables or disables the margin controls (Windows only). Call GetEnableMargins to test the value of this setting.
EnableOrientation enables or disables the orientation control (Windows only). Call GetEnableOrientation to test the value of this setting.
EnablePaper enables or disables the paper size control (Windows only). Call GetEnablePaper to test the value of this setting.
EnablePrinter enables or disables the Printer button, which invokes a print setup dialog. Call GetEnablePrinter to test the value of this setting.
Here’s an example of using wxPageSetupDialog:
#include "wx/printdlg.h"
void MyFrame::OnPageSetup(wxCommandEvent& event)
{
wxPageSetupDialog pageSetupDialog(this, & m_pageSetupData);
if (pageSetupDialog.ShowModal( ) == wxID_OK)
m_pageSetupData = pageSetupDialog.GetPageSetupData( );
}
This class represents the print and print setup standard dialogs. You may obtain a wxPrinterDC device context from a successfully dismissed print dialog.
Figure 8-31 shows wxPrintDialog under Windows.
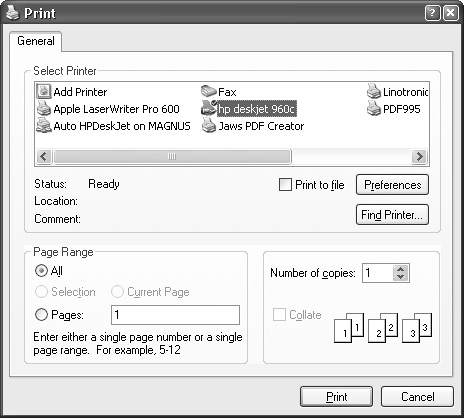
Figure 8-32 shows wxPrintDialog under GTK+ without the GNOME printing libraries, and Figure 8-33 shows the dialog shown when the GNOME printing libraries are installed.
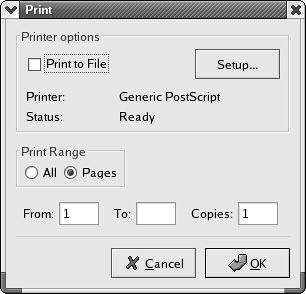
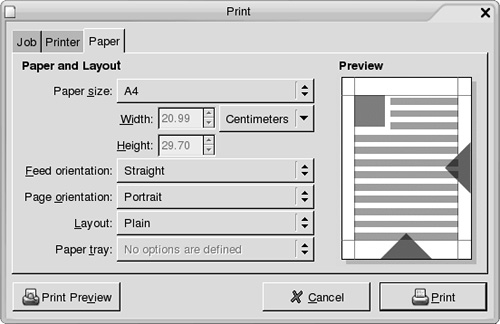
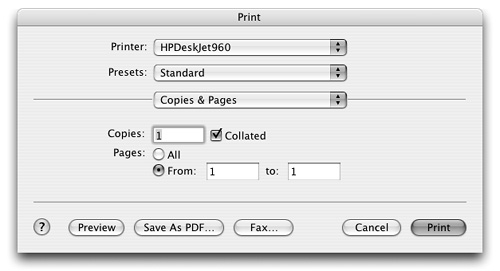
Figure 8-34 shows wxPrintDialog under Mac OS X. As you can see from the buttons along the bottom, Mac OS X gives you the added advantage of saving your document as a PDF file, and you can use the Mac OS X previewer as an alternative to the application’s preview window.
To use wxPrintDialog, create it on the stack or dynamically and pass the parent window and a pointer to a wxPrintDialogData object, whose contents will be copied to internal data in the dialog object. Call wxPrintDialogData:: SetSetupDialog with true before passing the data to the dialog if you want to show the print setup dialog instead of the print dialog. Following Microsoft’s conventions, the print setup dialog has been replaced by the wxPageSetupDialog, but for compatibility, some applications may still need to use the setup dialog.
When the dialog returns successfully, you can retrieve the wxPrintDialogData using the GetPrintDialogData function.
Call GetPrintDC on the dialog to get a printer device context based on the settings the user has chosen. If the function returns a non-null pointer, the application is then responsible for deleting the device context.
Ok returns true if the print data associated with the dialog is valid. This can return false on Windows if the current printer is not set, for example. On all other platforms, it returns true.
These are the functions you can use with wxPrintDialogData.
EnableHelp enables or disables the Help button. Use GetEnableHelp to return the value of this setting.
EnablePageNumbers enables or disables the page number controls, and GetEnablePageNumbers returns the value of this setting.
EnablePrintToFile enables or disables the Print to File check box. Use GetEnablePrintToFile to return the value of this setting.
EnableSelection enables or disables the Selection radio button that lets the user specify that the current selection should be printed. Use GetEnableSelection to return the value of this setting.
SetCollate sets the Collate check box to be true or false. Use GetCollate to return the value of this setting.
SetFromPage and SetToPage set the page range to print. Use GetFromPage and GetToPage to return this range.
SetMinPage and SetMaxPage set the minimum and maximum page numbers that can be printed. Use GetMinPage and GetMaxPage to return these values.
SetNoCopies sets the default number of copies that will be printed. Use GetNoCopies to return the value of this setting.
SetPrintToFile sets the Print to File check box to true or false. Use GetPrintToFile to return the value of this setting.
SetSelection sets the Selection radio button. Use GetSelection to return the value of this setting.
SetSetupDialog determines whether the print setup dialog is shown (true) or the normal print dialog is shown (false). Use GetSetupDialog to return the value of this setting.
SetPrintData sets the internal wxPrintData object. GetPrintData returns a reference to the internal wxPrintData object.
The following example shows wxPrintDialog being used to return a suitable printer device context:
#include "wx/printdlg.h"
void MyFrame::OnPrint(wxCommandEvent& event)
{
wxPrintDialogData dialogData;
dialogData.SetFromPage(0);
dialogData.SetToPage(10);
wxPrintDialog printDialog(this, & m_dialogData);
if (printDialog.ShowModal( ) == wxID_OK)
{
// After calling GetPrintDC( ), the application
// owns the DC
wxDC* dc = printDialog.GetPrintDC( );
// Draw on the device context
...
// Destroy it
delete dc;
}
}
However, usually you can avoid invoking the print dialog directly. Instead, use the higher-level printing framework (refer to Chapter 5). The print dialog will be shown as a side effect of calling wxPrinter::Print.
In this chapter, you have learned about the standard dialogs that you can use to present information and retrieve user choices with very little code. For further examples of using standard dialogs, see samples/dialogs in your wxWidgets distribution. Next, we’ll show you how to write your own dialogs.