Chapter 9 Writing Custom Dialogs
Sooner or later, you will have to create your own dialogs, whether simple ones with only a few buttons and some text or highly complex dialogs with notebook controls, multiple panels, custom controls, context-sensitive help, and so on. In this chapter, we cover the principles of creating custom dialogs and transferring data between C++ variables and the controls. We also describe the wxWidgets resource system, which enables you to load dialogs and other user interface elements from XML files.
When you start writing your own specialized dialogs, the fun really starts. Here are the steps you’ll typically need to take:
1. Derive a new class from wxDialog.
2. Decide where the data is stored and how the application accesses user choices.
3. Write code to create and lay out the controls.
4. Add code that transfers data between C++ variables and the controls.
5. Add functions and their event table entries to handle events from controls.
6. Add user interface (UI) update handlers to set controls to the correct state.
7. Add help, in particular tooltips, context-sensitive help (not implemented on Mac OS X), and a way of showing an explanation of the dialog in your application’s user manual.
8. Invoke the dialog from a suitable place in your application code.
Let’s illustrate these steps with a concrete example.
As we saw in the previous chapter, dialogs come in two flavors: modal and modeless. We’ll illustrate custom dialog creation with a modal dialog because it’s the more common kind and has fewer complications. The application will invoke the dialog with ShowModal and then query the dialog for user selections. Until ShowModal returns, all user interactions with the application will be contained within the little world of your custom dialog (and any further modal dialogs that your dialog may invoke).
Many of the steps involved in creating a custom dialog can be accomplished very easily by using a dialog editor, such as wxDesigner or DialogBlocks. The amount of coding left to do depends on the complexity of your dialog. Here, we will assume handcrafting of all the code in order to demonstrate the principles, but it’s highly recommended that you use a tool to help you because it will save you many hours of repetitive work.
We’ll illustrate the steps involved in creating a custom dialog with a simple example where the user is required to enter his or her name, age, sex, and whether the user wants to vote. This dialog is called PersonalRecordDialog, as shown in Figure 9-1.

The Reset button restores all controls to their default values. The OK button dismisses the dialog and returns wxID_OK from ShowModal. The Cancel button returns wxID_CANCEL and does not update the dialog’s variables from the values shown in the controls. The Help button invokes a few lines of text describing the dialog (although in a real application, this button should invoke a nicely formatted help file).
A good user interface should not allow the user to enter data that has no meaning in the current context. In this example, the user should not be able to use the Vote control if Age is less than the voting age (18 in the U.S. or U.K.). So, we will ensure that when the age entered is less than 18, the Vote check box is disabled.
Here’s the declaration for our PersonalRecordDialog. We provide run-time type information by using DECLARE_CLASS, and we add an event table with DECLARE_EVENT_TABLE.
/*!
* PersonalRecordDialog class declaration
*/
class PersonalRecordDialog: public wxDialog
{
DECLARE_CLASS( PersonalRecordDialog )
DECLARE_EVENT_TABLE( )
public:
// Constructors
PersonalRecordDialog( );
PersonalRecordDialog( wxWindow* parent,
wxWindowID id = wxID_ANY,
const wxString& caption = wxT("Personal Record"),
const wxPoint& pos = wxDefaultPosition,
const wxSize& size = wxDefaultSize,
long style = wxCAPTION¦wxRESIZE_BORDER¦wxSYSTEM_MENU );
// Initialize our variables
void Init( );
// Creation
bool Create( wxWindow* parent,
wxWindowID id = wxID_ANY,
const wxString& caption = wxT("Personal Record"),
const wxPoint& pos = wxDefaultPosition,
const wxSize& size = wxDefaultSize,
long style = wxCAPTION¦wxRESIZE_BORDER¦wxSYSTEM_MENU );
// Creates the controls and sizers
void CreateControls( );
};
Note that we follow wxWidgets convention by allowing both one-step and two-step construction—we provide a default constructor and Create function as well as a more verbose constructor.
We have four pieces of data to store: name (string), age (integer), sex (boolean), and voting preference (boolean). To make it easier to use a wxChoice control with the data, we’re going to use an integer to store the boolean value for sex, but the class interface can present it as boolean: true for female and false for male. Let’s add these data members and accessors to the PersonalRecordDialog class:
// Data members
wxString m_name;
int m_age;
int m_sex;
bool m_vote;
// Name accessors
void SetName(const wxString& name) { m_name = name; }
wxString GetName( ) const { return m_name; }
// Age accessors
void SetAge(int age) { m_age = age; }
int GetAge( ) const { return m_age; }
// Sex accessors (male = false, female = true)
void SetSex(bool sex) { sex ? m_sex = 1 : m_sex = 0; }
bool GetSex( ) const { return m_sex == 1; }
// Does the person vote?
void SetVote(bool vote) { m_vote = vote; }
bool GetVote( ) const { return m_vote; }
Now let’s add a CreateControls function to be called from Create. CreateControls adds wxStaticText controls, wxButton controls, a wxSpinCtrl, a wxTextCtrl, a wxChoice, and a wxCheckBox. Refer to Figure 9-1 earlier in the chapter to see the resulting dialog.
We’re using sizer-based layout for this dialog, which is why it looks a bit more involved than you might expect for a small number of controls. (We described sizers in Chapter 7, “Window Layout Using Sizers”—briefly, they enable you to create dialogs that look good on any platform and that easily adapt to translation and resizing.) You can use a different method if you want, such as loading the dialog from a wxWidgets resource file (XRC file).
The basic principle of sizer-based layout is to put controls into nested boxes (sizers), which can distribute space among the controls or stretch just enough to contain its controls. The sizers aren’t windows—they form a separate hierarchy, and the controls remain children of their parent, regardless of the complexity of the hierarchy of sizers. You might like to refresh your memory by looking at the schematic view of a sizer layout that we showed in Figure 7-2 in Chapter 7.
In CreateControls, we’re using a vertical box sizer (boxSizer) nested in another vertical box sizer (topSizer) to give a decent amount of space around the dialog’s controls. A horizontal box sizer is used for the wxSpinCtrl, wxChoice, and wxCheckBox, and a second horizontal box sizer (okCancelSizer) is used for the Reset, OK, Cancel, and Help buttons.
/*!
* Control creation for PersonalRecordDialog
*/
void PersonalRecordDialog::CreateControls( )
{
// A top-level sizer
wxBoxSizer* topSizer = new wxBoxSizer(wxVERTICAL);
this->SetSizer(topSizer);
// A second box sizer to give more space around the controls
wxBoxSizer* boxSizer = new wxBoxSizer(wxVERTICAL);
topSizer->Add(boxSizer, 0, wxALIGN_CENTER_HORIZONTAL¦wxALL, 5);
// A friendly message
wxStaticText* descr = new wxStaticText( this, wxID_STATIC,
wxT("Please enter your name, age and sex, and specify whether you wish to
vote in a general election."), wxDefaultPosition, wxDefaultSize, 0 );
boxSizer->Add(descr, 0, wxALIGN_LEFT¦wxALL, 5);
// Spacer
boxSizer->Add(5, 5, 0, wxALIGN_CENTER_HORIZONTAL¦wxALL, 5);
// Label for the name text control
wxStaticText* nameLabel = new wxStaticText ( this, wxID_STATIC,
wxT("&Name:"), wxDefaultPosition, wxDefaultSize, 0 );
boxSizer->Add(nameLabel, 0, wxALIGN_LEFT¦wxALL, 5);
// A text control for the user’s name
wxTextCtrl* nameCtrl = new wxTextCtrl ( this, ID_NAME, wxT("Emma"), wxDefaultPosition, wxDefaultSize, 0 );
boxSizer->Add(nameCtrl, 0, wxGROW¦wxALL, 5);
// A horizontal box sizer to contain age, sex and vote
wxBoxSizer* ageSexVoteBox = new wxBoxSizer(wxHORIZONTAL);
boxSizer->Add(ageSexVoteBox, 0, wxGROW¦wxALL, 5);
// Label for the age control
wxStaticText* ageLabel = new wxStaticText ( this, wxID_STATIC,
wxT("&Age:"), wxDefaultPosition, wxDefaultSize, 0 );
ageSexVoteBox->Add(ageLabel, 0, wxALIGN_CENTER_VERTICAL¦wxALL, 5);
// A spin control for the user’s age
wxSpinCtrl* ageSpin = new wxSpinCtrl ( this, ID_AGE,
wxEmptyString, wxDefaultPosition, wxSize(60, -1),
wxSP_ARROW_KEYS, 0, 120, 25 );
ageSexVoteBox->Add(ageSpin, 0, wxALIGN_CENTER_VERTICAL¦wxALL, 5);
// Label for the sex control
wxStaticText* sexLabel = new wxStaticText ( this, wxID_STATIC,
wxT("&Sex:"), wxDefaultPosition, wxDefaultSize, 0 );
ageSexVoteBox->Add(sexLabel, 0, wxALIGN_CENTER_VERTICAL¦wxALL, 5);
// Create the sex choice control
wxString sexStrings[ ] = {
wxT("Male"),
wxT("Female")
};
wxChoice* sexChoice = new wxChoice ( this, ID_SEX,
wxDefaultPosition, wxSize(80, -1), WXSIZEOF(sexStrings),
sexStrings, 0 );
sexChoice->SetStringSelection(wxT("Female"));
ageSexVoteBox->Add(sexChoice, 0, wxALIGN_CENTER_VERTICAL¦wxALL, 5);
// Add a spacer that stretches to push the Vote control
// to the right
ageSexVoteBox->Add(5, 5, 1, wxALIGN_CENTER_VERTICAL¦wxALL, 5);
wxCheckBox* voteCheckBox = new wxCheckBox( this, ID_VOTE,
wxT("&Vote"), wxDefaultPosition, wxDefaultSize, 0 );
voteCheckBox ->SetValue(true);
ageSexVoteBox->Add(voteCheckBox, 0,
wxALIGN_CENTER_VERTICAL¦wxALL, 5);
// A dividing line before the OK and Cancel buttons
wxStaticLine* line = new wxStaticLine ( this, wxID_STATIC,
wxDefaultPosition, wxDefaultSize, wxLI_HORIZONTAL );
boxSizer->Add(line, 0, wxGROW¦wxALL, 5);
// A horizontal box sizer to contain Reset, OK, Cancel and Help
wxBoxSizer* okCancelBox = new wxBoxSizer(wxHORIZONTAL);
boxSizer->Add(okCancelBox, 0, wxALIGN_CENTER_HORIZONTAL¦wxALL, 5);
// The Reset button
wxButton* reset = new wxButton( this, ID_RESET, wxT("&Reset"),
wxDefaultPosition, wxDefaultSize, 0 );
okCancelBox->Add(reset, 0, wxALIGN_CENTER_VERTICAL¦wxALL, 5);
// The OK button
wxButton* ok = new wxButton ( this, wxID_OK, wxT("&OK"),
wxDefaultPosition, wxDefaultSize, 0 );
okCancelBox->Add(ok, 0, wxALIGN_CENTER_VERTICAL¦wxALL, 5);
// The Cancel button
wxButton* cancel = new wxButton ( this, wxID_CANCEL,
wxT("&Cancel"), wxDefaultPosition, wxDefaultSize, 0 );
okCancelBox->Add(cancel, 0, wxALIGN_CENTER_VERTICAL¦wxALL, 5);
// The Help button
wxButton* help = new wxButton( this, wxID_HELP, wxT("&Help"),
wxDefaultPosition, wxDefaultSize, 0 );
okCancelBox->Add(help, 0, wxALIGN_CENTER_VERTICAL¦wxALL, 5);
}
Now we have the bare controls of the dialog, but the controls and the dialog’s data are not connected. How do we make that connection?
When a dialog is first shown, wxWidgets calls InitDialog, which in turn sends a wxEVT_INIT_DIALOG event. The default handler for this event calls TransferDataToWindow on the dialog. To transfer data from the controls back to the variables, you can call TransferDataFromWindow when the user confirms his or her input. Again, wxWidgets does this for you by defining a default handler for wxID_OK command events, which calls TransferDataFromWindow before calling EndModal to dismiss the dialog.
So, you can override TransferDataToWindow and TransferDataFromWindow to transfer your data. For our dialog, the code might look like this:
/*!
* Transfer data to the window
*/
bool PersonalRecordDialog::TransferDataToWindow( )
{
wxTextCtrl* nameCtrl = (wxTextCtrl*) FindWindow(ID_NAME);
wxSpinCtrl* ageCtrl = (wxSpinCtrl*) FindWindow(ID_AGE);
wxChoice* sexCtrl = (wxChoice*) FindWindow(ID_SEX);
wxCheckBox* voteCtrl = (wxCheckBox*) FindWindow(ID_VOTE);
nameCtrl->SetValue(m_name);
ageCtrl->SetValue(m_age);
sexCtrl->SetSelection(m_sex);
voteCtrl->SetValue(m_vote);
return true;
}
/*!
* Transfer data from the window
*/
bool PersonalRecordDialog::TransferDataFromWindow( )
{
wxTextCtrl* nameCtrl = (wxTextCtrl*) FindWindow(ID_NAME);
wxSpinCtrl* ageCtrl = (wxSpinCtrl*) FindWindow(ID_AGE);
wxChoice* sexCtrl = (wxChoice*) FindWindow(ID_SEX);
wxCheckBox* voteCtrl = (wxCheckBox*) FindWindow(ID_VOTE);
m_name = nameCtrl->GetValue( );
m_age = ageCtrl->GetValue( );
m_sex = sexCtrl->GetSelection( );
m_vote = voteCtrl->GetValue( );
return true;
}
However, there’s an easier way of transferring data. wxWidgets supports validators, which are objects that link data variables and their corresponding controls. Although not always applicable, the use of validators where possible will save you a lot of time and can make it unnecessary to write TransferData ToWindow and TransferDataFromWindow functions. In our PersonalRecordDialog example, we can use the following code instead of the previous two functions:
FindWindow(ID_NAME)->SetValidator(
wxTextValidator(wxFILTER_ALPHA, & m_name));
FindWindow(ID_AGE)->SetValidator(
wxGenericValidator(& m_age));
FindWindow(ID_SEX)->SetValidator(
wxGenericValidator(& m_sex);
FindWindow(ID_VOTE)->SetValidator(
wxGenericValidator(& m_vote);
These few lines of code at the end of CreateControls replace the two overridden functions. As a bonus, the user will be prevented from accidentally entering numbers in the Name field.
Validators can perform two jobs—as well as data transfer, they can validate the data and show error messages if the data doesn’t conform to a particular specification. In this example, no actual validation of the input is done, other than for the name. wxGenericValidator is a relatively simple class, only doing data transfer. However, it works with the basic control classes. The other validator provided as standard, wxTextValidator, has more sophisticated behavior and can even intercept keystrokes to veto invalid characters. In the example, we just use the standard style wxFILTER_ALPHA, but we could also specify which characters should or should not be regarded as valid by using the validator’s SetIncludes and SetExcludes functions.
We need to dig a bit deeper into how wxWidgets handles validators in order to understand what’s going on here. As we’ve seen, the default OnOK handler calls TransferDataToWindow, but before it does so, it calls Validate, vetoing the calls to TransferDataToWindow and EndModal if validation fails. This is the default implementation of OnOK:
void wxDialog::OnOK(wxCommandEvent& event)
{
if ( Validate( ) && TransferDataFromWindow( ) )
{
if ( IsModal( ) )
EndModal(wxID_OK); // If modal
else
{
SetReturnCode(wxID_OK);
this->Show(false); // If modeless
}
}
}
The default implementation of Validate iterates through all the children of the dialog (and their descendants, if you specified the extra window style wxWS_EX_VALIDATE_RECURSIVELY), calling Validate for each control’s wxValidator object. If any of these calls fails, then validation for the dialog fails, and the dialog is not dismissed. The validator is expected to show a suitable error message from within its Validate function if it fails the validation.
Similarly, TransferDataToWindow and TransferDataFromWindow will be called automatically for the validators of a dialog’s controls. A validator must do data transfer, but validation is optional.
A validator is an event handler, and the event processing mechanism will route events to the validator, if present, before passing the events on to the control. This enables validators to intercept user input—for example, to veto characters that are not permitted in a control. Such vetoing should normally be accompanied by a beep to inform the user that the key was pressed but not accepted.
Because the two provided validator classes may not be sufficient for your needs, especially if you write your own custom controls, you can derive new validator classes from wxValidator. This class should have a copy constructor and a Clone function that returns a copy of the validator object, as well as implementations for data transfer and validation. A validator will typically store a pointer to a C++ variable, and the constructor may take flags to specify modes of use. You can look at the files include/wx/valtext.h and src/common/valtext.cpp in wxWidgets to see how a validator can be implemented; see also “Writing Your Own Controls” in Chapter 12, “Advanced Window Classes.”
In this example, wxWidgets’ default processing for OK and Cancel are sufficient without any extra coding on our part, as long as we use the standard wxID_OK and wxID_CANCEL identifiers for the controls. However, for non-trivial dialogs, you probably will have to intercept and handle events from controls. In our example, we have a Reset button, which can be clicked at any time to reset the dialog back to its default values. We add an OnResetClick event handler and a suitable entry in our event table. Implementing OnResetClick turns out to be very easy; first we reset the data variables by calling the Init function we added to centralize data member initialization. Then we call TransferDataToWindow to display that data.
BEGIN_EVENT_TABLE( PersonalRecordDialog, wxDialog )
...
EVT_BUTTON( ID_RESET, PersonalRecordDialog::OnResetClick)
...
END_EVENT_TABLE( )
void PersonalRecordDialog::OnResetClick( wxCommandEvent& event )
{
Init( );
TransferDataToWindow( );
}
One of the challenges faced by the application developer is making sure that the user can’t click on controls and menus that are not currently applicable. A sure sign of sloppy programming is the appearance of messages that say, “This option is not currently available.” If an option isn’t available, then it should not look available, and clicking on the control or menu should do nothing. As time-consuming as it can be, the programmer should update the elements of the interface to reflect the context at every instant.
In our example, we must disable the Vote check box when the user’s age is less than 18 because in that case, the decision is not available to the user. Your first thought might be to add an event handler for the Age spin control and enable or disable the Vote check box according to the spin control’s value. Although this may be fine for simple user interfaces, imagine what happens when many factors are influencing the availability of controls. Even worse, there are some cases where the approach doesn’t work at all because you cannot be notified when the change occurs. An example of this situation is when you need to enable a Paste button or menu item when data becomes available on the clipboard. This event is outside your power to intercept because the data may become available from another program.
To solve these problems, wxWidgets provides an event class called wxUpdateUIEvent that it sends to all windows in idle time—that is, when the event loop has finished processing all other input. You can add EVT_UPDATE_UI event table entries to your dialog, one for each control whose state you need to maintain. Each UI update event handler evaluates the current state of the world and calls functions in the event object (not the control) to enable, disable, check, or uncheck the control. This technique puts the logic for updating each control in one place, calling the event handler even when no real event has been handled in the application. You can breathe a sigh of relief because you don’t have to remember to update the user interface after any change that might happen to be relevant!
Here’s our UI update handler for the Vote control. Note that we can’t use the m_age variable because transfer from the controls to the variables doesn’t happen until the user clicks OK.
BEGIN_EVENT_TABLE( PersonalRecordDialog, wxDialog )
...
EVT_UPDATE_UI( ID_VOTE, PersonalRecordDialog::OnVoteUpdate )
...
END_EVENT_TABLE( )
void PersonalRecordDialog::OnVoteUpdate( wxUpdateUIEvent& event )
{
wxSpinCtrl* ageCtrl = (wxSpinCtrl*) FindWindow(ID_AGE);
if (ageCtrl->GetValue( ) < 18)
{
event.Enable(false);
event.Check(false);
}
else
event.Enable(true);
}
Don’t worry unduly about efficiency considerations; plenty of spare cycles are available for processing these handlers. However, if you have a very complex application and run into performance problems, see the wxUpdateUIEvent documentation for the functions SetMode and SetUpdateInterval that can be used to decrease the time wxWidgets spends processing these events.
There are at least three kinds of help you can provide for your dialog:
![]() Tooltips
Tooltips
![]() Context-sensitive help
Context-sensitive help
![]() Online help
Online help
You can probably think of further techniques not explicitly supported by wxWidgets. We already have some descriptive text on the dialog described here. For a more complex dialog, you could create a wxHtmlWindow instead of a wxStaticText and load an HTML file containing further details. Alternatively, a small help button could be placed next to each control to show a description when clicked.
The three main types of help supported by wxWidgets are described in the following sections.
Tooltips are little windows that pop up when the pointer is hovering over a control, containing a short description of the control’s purpose. You call SetToolTip to set the tooltip text for a control. Because this can get annoying for experienced users, you should provide an application setting to switch this off (that is, SetToolTip will not be called when dialogs are created and displayed).
Context-sensitive help provides a short pop-up description similar to a tooltip. The user must first click on a special button and then on a control to get the help or press F1 to get help for the focused control (on Windows). On Windows, you can specify the extra window style wxDIALOG_EX_CONTEXTHELP to create the little question mark button on the dialog title. On other platforms, you can create a wxContextHelpButton on the dialog (usually next to the OK and Cancel buttons). In your application initialization, you should call
#include "wx/cshelp.h"
wxHelpProvider::Set(new wxSimpleHelpProvider);
This tells wxWidgets how to provide the strings for context-sensitive help. You call SetHelpText to set the help text for a control. Here’s a function to add context-sensitive help and tooltips to our dialog:
// Sets the help text for the dialog controls
void PersonalRecordDialog::SetDialogHelp( )
{
wxString nameHelp = wxT("Enter your full name.");
wxString ageHelp = wxT("Specify your age.");
wxString sexHelp = wxT("Specify your gender, male or female.");
wxString voteHelp = wxT("Check this if you wish to vote.");
FindWindow(ID_NAME)->SetHelpText(nameHelp);
FindWindow(ID_NAME)->SetToolTip(nameHelp);
FindWindow(ID_AGE)->SetHelpText(ageHelp);
FindWindow(ID_AGE)->SetToolTip(ageHelp);
FindWindow(ID_SEX)->SetHelpText(sexHelp);
FindWindow(ID_SEX)->SetToolTip(sexHelp);
FindWindow(ID_VOTE)->SetHelpText(voteHelp);
FindWindow(ID_VOTE)->SetToolTip(voteHelp);
}
If you want to invoke context-sensitive help yourself, as opposed to letting the dialog or wxContextHelpButton handle it, you can simply put this in an event handler:
wxContextHelp contextHelp(window);
This will put wxWidgets in a loop that detects a left-click on a control, after which it will send a wxEVT_HELP event to the control to initiate popping up a help window.
You don’t have to limit yourself to the way wxWidgets implements the storage and display of help text, though. You can create your own class derived from wxHelpProvider, overriding GetHelp, SetHelp, AddHelp, RemoveHelp, and ShowHelp.
Most applications come with a help file that provides detailed instructions for use. wxWidgets provides the means to control several kinds of help windows through different derivations of the wxHelpControllerBase class. See Chapter 20, “Perfecting Your Application,” for more information about providing online help.
For the purposes of this example, we’ll just use a wxMessageBox to display some help when the user clicks on the Help button.
BEGIN_EVENT_TABLE( PersonalRecordDialog, wxDialog )
...
EVT_BUTTON( wxID_HELP, PersonalRecordDialog::OnHelpClick )
...
END_EVENT_TABLE( )
void PersonalRecordDialog::OnHelpClick( wxCommandEvent& event )
{
// Normally we would wish to display proper online help.
/*
wxGetApp( ).GetHelpController( ).DisplaySection(wxT("Personal record dialog"));
*/
// For this example, we’re just using a message box.
wxString helpText =
wxT("Please enter your full name, age and gender.
")
wxT("Also indicate your willingness to vote in general elections.
")
wxT("No non-alphabetical characters are allowed in the name field.
")
wxT("Try to be honest about your age.");
wxMessageBox(helpText,
wxT("Personal Record Dialog Help"),
wxOK¦wxICON_INFORMATION, this);
}
The complete implementation of the dialog is listed in Appendix J, “Code Listings,” and can also be found in examples/chap09 on the CD-ROM.
Now that we have the dialog completely coded, we can invoke it:
PersonalRecordDialog dialog(NULL, ID_PERSONAL_RECORD,
wxT("Personal Record"));
dialog.SetName(wxEmptyString);
dialog.SetAge(30);
dialog.SetSex(0);
dialog.SetVote(true);
if (dialog.ShowModal( ) == wxID_OK)
{
wxString name = dialog.GetName( );
int age = dialog.GetAge( );
bool sex = dialog.GetSex( );
bool vote = dialog.GetVote( );
}
wxWidgets can be used on mobile and other embedded devices, using GTK+, X11, and Windows CE ports (and others in the future). The most obvious limitation associated with many of these devices is the size of the display, which for a smartphone may be as little as 176×220 pixels.
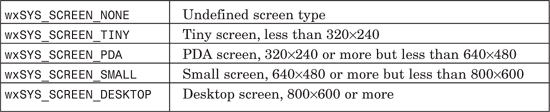
Many dialogs will need an alternative dialog layout for small displays; some controls may be omitted altogether, especially as the functionality of the application may be reduced compared with a desktop application. You can detect the size of the device with wxSystemSettings::GetScreenType, for example:
#include "wx/settings.h"
bool isPda = (wxSystemSettings::GetScreenType( ) <= wxSYS_SCREEN_PDA);
GetScreenType returns one of the values listed in Table 9-1. Because the types increase in value as the screen size increases, you can use integer comparison operators to deal with classes of devices with screens below a certain size, as in the example we’ve just seen.
If you need more detail about the display size, there are three ways to get it:
1. Use wxSystemSettings::GetMetric, passing wxSYS_SCREEN_X or wxSYS_SCREEN_Y.
2. Call wxGetDisplaySize, which returns a wxSize object.
3. Create a wxDisplay object and call GetGeometry, which returns a wxRect containing the bounding rectangle of the display.
When you know you may have a stunted display to run on, what can you do with this information? Here are some strategies you can use:
1. Replace the whole layout by loading a different XRC file or executing different control creation code. If the controls don’t change type, you may not need to change the event handling code at all.
2. Reduce the number of controls and space.
3. Change the type of some controls to take less space (for example, from wxListBox to wxComboBox). This will need some modification of the associated event handler.
4. Change the orientation of one or several sizers. Some small devices have a lot more space in one direction than in another.
Occasionally you will need to use API enhancements for particular platforms. Microsoft Smartphone has two special buttons that you can assign labels, such as “OK” and “Cancel”. On this platform, instead of creating two wxButton objects, you should call wxDialog::SetLeftMenu and wxDialog::SetRightMenu with an identifier, label, and optional submenu to show. Because these functions only exist on the Smartphone port, you need to conditionally compile your code. For example:
#ifdef __SMARTPHONE__
SetLeftMenu(wxID_OK, wxT("OK"));
SetRightMenu(wxID_OK, wxT("Cancel"));
#else
wxBoxSizer* buttonSizer = new wxBoxSizer(wxHORIZONTAL);
GetTopSizer( )->Add(buttonSizer, 0, wxALL¦wxGROW, 0);
buttonSizer->Add(new wxButton(this, wxID_OK), 0, wxALL, 5);
buttonSizer->Add(new wxButton(this, wxID_CANCEL), 0, wxALL, 5);
#endif
Here are a few tips to help you create professional-looking dialogs.
Provide mnemonics in static text labels and other labeled controls by inserting ampersands in front of characters. On some platforms (notably Windows and GTK+), this will help the user navigate between controls.
Always provide a means for the user to cancel the dialog, preferably with the option of using the Escape key. If a dialog has a button with the identifier wxID_CANCEL, its handler will automatically be called when the user presses the Escape key. So, if you have a Close button, consider giving it the wxID_CANCEL identifier.
Provide a default button (often OK)—for example, by calling wxButton:: SetDefault. The command for this button will be invoked when the user presses the Enter key.
To simplify the example, the data variables that PersonalRecordDialog uses are stored in the class itself. However, a better design would be to provide a data class separate from the dialog class, with a copy constructor and assignment operator, so that you can pass a copy of the data to the dialog and retrieve the modified data from the dialog only if the user confirms any changes. This is the approach adopted for some of the standard dialogs. As an exercise, you can rewrite the PersonalRecordDialog using a PersonalRecordData class. The dialog constructor will take a PersonalRecordData reference, and there will be a GetData function so that the calling application can retrieve the data.
In general, always consider how you can separate out the UI functionality from non-UI functionality. The result will usually be code that is more compact and easier to understand and debug. Don’t be afraid to introduce new classes to make the design more elegant, and make use of copy constructors and assignment operators so that objects can easily be copied and assigned without the application having to repeat lots of low-level code.
Unless you provide an Apply button that commits your changes to the underlying data, canceling the dialog should leave the application data in the same state as it was before the dialog was opened. The use of a separate data class makes this easier to achieve because the dialog isn’t editing “live” data but rather a copy.
If your dialog looks claustrophobic or somehow odd, it may be due to a lack of space. Try adding a bigger border around the edge of the dialog by using an additional sizer (as in our PersonalRecordDialog example) and adding space between groups of controls. Use wxStaticBoxSizer and wxStaticLine to logically group or separate controls. Use wxGridSizer and wxFlexGridSizer to align controls and their labels so that they don’t appear as a random jumble. In sizer-based layouts, use expanding spacers to align a group of controls. For example, often OK, Cancel, and Help buttons are in a right-aligned group, which can be achieved by placing a spacer and the buttons in a horizontal wxBoxSizer and setting the spacer to expand horizontally (give it a positive stretch factor).
If possible and appropriate, make your dialog resizable. Traditionally, Windows dialog boxes haven’t often been resizable, but there is no reason why this should be the case, and fiddling with tiny controls on a large display can be a frustrating experience for the user. wxWidgets makes it easy to create resizable dialogs with sizers, and you should be using sizers anyway to allow for font and control size differences and changes in language. Choose carefully which elements should grow; for example, there may be a multi-line text control that is a good candidate for growing and giving the user more elbow room. Again, you can put expanding spacers to good use to preserve alignment in a resized dialog. Note that we’re not resizing controls in the sense of zooming in and out, making text bigger or smaller—we’re simply giving more or less space for items in the control. See Chapter 7 for more about sizers.
If you find that your dialog is becoming too large, split it up into a number of panels and use a wxNotebook, wxListbook, or wxChoicebook to enable selection of one page at a time. Using lots of independent dialogs is annoying to the user and clutters up your menus, whereas browsing through pages is perfectly acceptable. Scrolling panels should be avoided unless there’s a very good reason to use them. The ability to scroll controls is not supported on all platforms, and use of scrolling can be a sign that the user interface has not been adequately planned. If you have many properties to edit, consider using a property editor based on wxGrid or a third-party class (see wxPropertyGrid, which is mentioned in Appendix E, “Third-Party Tools for wxWidgets”).
Be consistent with label capitalization. Don’t be tempted to use custom colors or fonts in your dialog; this can be distracting and can look out of place in the context of the current theme and other dialogs in the application. For best results across platforms, leave control fonts and colors to wxWidgets. Instead, consider providing some impact through judicious use of wxStaticBitmap controls.
Finally, consider whether you should be creating an independent dialog box at all—a modeless solution, such as a tab in the main application window, might be better. Most of the principles of dialog design and implementation apply to modeless dialogs and panels, but there are added challenges of layout (the window has less control of its size) and synchronization (the window may no longer have exclusive use of the data it is showing).
You can load specifications of dialogs, frames, menu bars, toolbars, and so on from XML files with extension xrc instead of creating these elements explicitly in C++ code. This enables better separation of code and user interface, such as enabling an application’s dialog design to be changed at runtime. XRC files can be exported by a range of UI design tools, including wxDesigner, DialogBlocks, XRCed, and wxGlade.
To use XRC files in your application, you need to include wx/xrc/xmlres.h in your application code.
If you will be converting your XRC files to binary XRS files, as we will describe shortly, install the zip file system handler by placing an AddHandler call in your OnInit function:
#include "wx/filesys.h"
#include "wx/fs_zip.h"
wxFileSystem::AddHandler(new wxZipFSHandler);
Initialize the XRC system by adding this to your OnInit:
wxXmlResource::Get( )->InitAllHandlers( );
Load the XRC file with code like this:
wxXmlResource::Get( )->Load(wxT("resources.xrc"));
This makes wxWidgets aware of the resources in the file; to create a real UI element, we need another call. For example, the following fragment creates a dialog whose resource name is dialog1:
MyDialog dlg;
wxXmlResource::Get( )->LoadDialog(& dlg, parent, wxT("dialog1"));
dlg.ShowModal( );
The following code shows how to load menu bars, menus, toolbars, bitmaps, icons, and panels.
MyFrame::MyFrame(const wxString& title): wxFrame(NULL, -1, title)
{
SetMenuBar(wxXmlResource::Get( )->LoadMenuBar(wxT("mainmenu")));
SetToolBar(wxXmlResource::Get( )->LoadToolBar(this,
wxT("toolbar")));
wxMenu* menu = wxXmlResource::Get( )->LoadMenu(wxT("popupmenu"));
wxIcon icon = wxXmlResource::Get( )->LoadIcon(wxT("appicon"));
SetIcon(icon);
wxBitmap bitmap = wxXmlResource::Get( )->LoadBitmap(wxT("bmp1"));
// Finish creating panelA after making an instance of it
MyPanel* panelA = new MyPanel;
panelA = wxXmlResource::Get( )->LoadPanel(panelA, this,
wxT("panelA"));
// A second method: get XRC to both create and load panelB
wxPanel* panelB = wxXmlResource::Get( )->LoadPanel(this,
wxT("panelB"));
}
wxWidgets maintains a single wxXmlResource object that you can use, but alternatively, you can create a wxXmlResource object, load resources, and then destroy it. You can also use wxXmlResource::Set to set the current global resource object, destroying the old one.
To define event tables for windows loaded from a resource file, you can’t use integer identifiers because resources have string names. Instead, use the XRCID macro, which takes a resource name and returns an integer identifier associated with the name. XRCID is an alias for the function wxXmlResource:: GetXRCID. Here’s an example of XRCID usage:
BEGIN_EVENT_TABLE(MyFrame, wxFrame)
EVT_MENU(XRCID("menu_quit"), MyFrame::OnQuit)
EVT_MENU(XRCID("menu_about"), MyFrame::OnAbout)
END_EVENT_TABLE( )
It can be convenient to combine a number of resource files into one binary file (extension xrs). To compile XRC files into a zip file that the resource system can load, use the utility wxrc located in the utils/wxrc directory in your wxWidgets distribution:
wxrc resource1.xrc resource2.xrc -o resource.xrs
Use wxXmlResource::Load to load a binary resource file in just the same way as with a plain XML file.
You can also compile your XRC files into C++ code that may be embedded in your application, thereby eliminating a separate resource file. Here’s the wxrc command to do this:
wxrc resource1.xrc resource2.xrc –c -o resource.cpp
Compile this C++ file as normal and link it with your application. The file includes a function InitXmlResource, which you have to call, for example:
extern void InitXmlResource( ); // defined in generated file
wxXmlResource::Get( )->InitAllHandlers( );
InitXmlResource( );
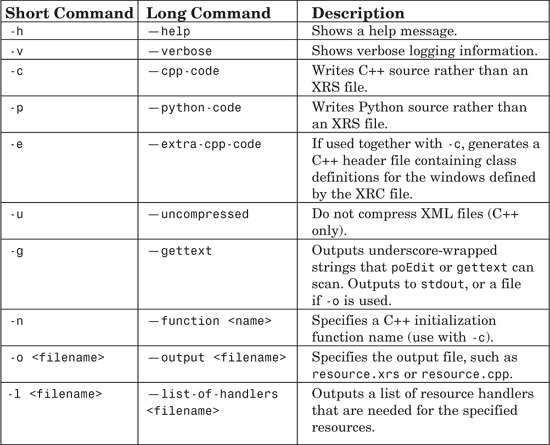
Table 9-2 lists the command-line options and arguments that wxrc accepts.
If the wxXmlResource object has been created with the wxXRC_USE_LOCALE flag (the default behavior), all displayable strings will be subject to translation, as detailed in Chapter 16, “Writing International Applications.” However, poEdit cannot scan XRC files for strings to translate as it can for C++ code, so you can create a file of such strings using wxrc with the -g option. For example:
wxrc -g resources.xrc -o resource_strings.cpp
Then you can run poEdit to scan the strings in this and other files.
There isn’t space to describe the XRC format in detail, but here is an example showing a simple dialog with sizers:
<?xml version="1.0"?>
<resource version="2.3.0.1">
<object class="wxDialog" name="simpledlg">
<title>A simple dialog</title>
<object class="wxBoxSizer">
<orient>wxVERTICAL</orient>
<object class="sizeritem">
<object class="wxTextCtrl">
<size>200,200d</size>
<style>wxTE_MULTILINE¦wxSUNKEN_BORDER</style>
<value>Hello, this is an ordinary multiline
textctrl....</value>
</object>
<option>1</option>
<flag>wxEXPAND¦wxALL</flag>
<border>10</border>
</object>
<object class="sizeritem">
<object class="wxBoxSizer">
<object class="sizeritem">
<object class="wxButton" name="wxID_OK">
<label>Ok</label>
<default>1</default>
</object>
</object>
<object class="sizeritem">
<object class="wxButton" name="wxID_CANCEL">
<label>Cancel</label>
</object>
<border>10</border>
<flag>wxLEFT</flag>
</object>
</object>
<flag>wxLEFT¦wxRIGHT¦wxBOTTOM¦wxALIGN_RIGHT</flag>
<border>10</border>
</object>
</object>
</object>
</resource>
A detailed specification of the XRC format can be found in the technical note docs/tech/tn0014.txt in your wxWidgets distribution. If you use an editor to create your user interfaces, you won’t need to know about XRC’s format.
You may be wondering how a text XRC file can be used to specify binary bitmaps and icons. These resources may be specified as URLs, and wxWidgets’ virtual file system will extract them from sources such as a zip file. For example:
<object class="wxBitmapButton" name="wxID_OK">
<bitmap>resources.bin#zip:okimage.png</bitmap>
</object>
See Chapter 10, “Programming with Images,” and Chapter 14, “Files and Streams,” for more information on using virtual file systems to load resources such as images.
The XRC system uses a resource handler to recognize the XML specification of each type of resource. If you write your own custom control, you may want to write a resource handler so that applications can use the custom control with XRC.
As an illustration, the declaration for wxButton’s handler looks like this:
#include "wx/xrc/xmlres.h"
class wxButtonXmlHandler : public wxXmlResourceHandler
{
DECLARE_DYNAMIC_CLASS(wxButtonXmlHandler)
public:
wxButtonXmlHandler( );
virtual wxObject *DoCreateResource( );
virtual bool CanHandle(wxXmlNode *node);
};
The handler implementation is quite simple. In the handler’s constructor, the XRC_ADD_STYLE macro is used to make the handler aware of specific button styles, and AddWindowStyles is called to add common window styles. In DoCreateResource, the button object is created in two steps, using XRC_MAKE_INSTANCE and then Create, extracting parameters such as the label, position, and size. Finally, CanHandle tests whether this handler can handle the node in question. It’s permissible for a single handler class to handle more than one kind of resource.
IMPLEMENT_DYNAMIC_CLASS(wxButtonXmlHandler, wxXmlResourceHandler)
wxButtonXmlHandler::wxButtonXmlHandler( )
: wxXmlResourceHandler( )
{
XRC_ADD_STYLE(wxBU_LEFT);
XRC_ADD_STYLE(wxBU_RIGHT);
XRC_ADD_STYLE(wxBU_TOP);
XRC_ADD_STYLE(wxBU_BOTTOM);
XRC_ADD_STYLE(wxBU_EXACTFIT);
AddWindowStyles( );
}
wxObject *wxButtonXmlHandler::DoCreateResource( )
{
XRC_MAKE_INSTANCE(button, wxButton)
button->Create(m_parentAsWindow,
GetID( ),
GetText(wxT("label")),
GetPosition( ), GetSize( ),
GetStyle( ),
wxDefaultValidator,
GetName( ));
if (GetBool(wxT("default"), 0))
button->SetDefault( );
SetupWindow(button);
return button;
}
bool wxButtonXmlHandler::CanHandle(wxXmlNode *node)
{
return IsOfClass(node, wxT("wxButton"));
}
To use a handler, an application needs to include the header and register the handler, as follows:
#include "wx/xrc/xh_bttn.h"
wxXmlResource::AddHandler(new wxBitmapXmlHandler);
An XRC file can specify a foreign, or “unknown” control, by specifying class="unknown" in the object definition. This can stand in for a control that is actually created in the C++ code, after the parent is loaded from XRC. When XRC loads the unknown object, a placeholder window is created. Then the application calls AttachUnknownControl to superimpose the real window onto the placeholder window, with the correct position and size. For example:
wxDialog dlg;
// Load the dialog
wxXmlResource::Get( )->LoadDialog(&dlg, this, wxT("mydialog"));
// Make an instance of our new custom class.
MyCtrl* myCtrl = new MyCtrl(&dlg, wxID_ANY);
// Attach it to the dialog
wxXmlResource::Get( )->AttachUnknownControl(wxT("custctrl"), myCtrl);
// Show the dialog
dlg.ShowModal( );
The custom control definition can look like this:
<object class="unknown" name="custctrl">
<size>100,100</size>
</object>
Using this technique, you can lay out interfaces in tools that don’t know about your custom controls, and you also avoid the need to write a resource handler.
In this chapter, you have learned the fundamentals of custom dialog design and implementation, including a quick look at sizers, the use of validators, and the advantages of using UI update events. For examples of creating custom dialogs, see samples/dialogs in your wxWidgets distribution. Also see samples/validate for use of the generic and text validator classes. Next, we’ll look at how to handle images.